Transcripts
1. Welcome to the Class: Welcome to the class, create and sell
watercolor wall art as a downloadable file. In this class, we will draw an artwork in watercolor
together, digitize it, and then prepare it as a digital download to sell
it on your own website, on Ts or anywhere else
if we have met yet. Hi, my name is Una. I'm an artist, a graphic
designer, and a teacher. And I love to create
digital products from my artwork to build
a sustainable business. In this class, we
will first draw our artwork together
with watercolor. We will digitize it, optimize
it for various formats, and then package it for sale. We will also create
previews together. In the end of this class, you have a complete blueprint
for selling your artwork on your own website and on
C as a downloadable file. Join me in this class.
2. Material: Let's start with the
material we need for this workshop that is
of course first of all, is your paper, I'm
using watercolor paper. I'm using it in 300
gram/square meter. You can see it is a
pretty thick one. I personally really like it. It's also great because it
can take a lot of water. It's up to you if you want
to have something else, maybe 200, that's fine, but don't go under it. You will be annoyed when your art is ready because water color needs
a lot of water actually. What else do we need
is an eyedropper to because before we start, we need to reactivate
all our colors, which means I'm going to go over all the colors
with some water. We can quickly do that. I just go over it and
activate all my colors here. You never know what you need. It's good to have
them all activated. You see how much water I put on there because it
really needs it. Otherwise, I have
very dry colors here. Besides that, I have my
color palette, of course. And I have three
brushes I'm using here, brush number ten, number
eight, and number six. These are watercolor brushes. Make sure you use
watercolor brushes because that's not unimportant. They can take on more water. Make sure when you
purchase some brushes, they are watercolor brushes, then your best friend
will be your towel. Believe me, that's
really necessary. Have a towel next to you. You can just use it to
clean up your brush here. Okay. Of course, then I need all the colors or
my colors here. You can have just 12 colors
which is fine as well. It doesn't really matter
because we can always mix it. Then you need a pencil because you will be drawing
your leaves here. We need to get rid
of the stroke of the graphite later on why
I have a rubber here. But I also have this rubber
because with that one, I can make it really light. I go over it and take off
as much graphite as I can. This is a nice one, you might get that as well. Showing you here Faber case. You might want to have
something like that. Yeah. As a pencil, I just have whatever pencil
I had here flowing around. But you might want
an H three pencil. H two pencil. The point is, it needs to be a hard
one because you don't want to that much
graphite on your paper. The more you have, the more
you need to wrap it off. Because you don't want the edges to have a
pencil around it. Maybe for this project, it's not such a big deal
because we want to go over it with a pencil, with a pen. Actually, later on I'm
going to show you that pen because later on we want to use this migrant fine liner
and go around our leaves. But of course, that's
not always the case, you might want to take care
of rubbing things off. That's not so unimportant. Yeah, now we can get
started actually. And we start by mixing our colors and then we move
on sketching our leaves.
3. Mixing Colors: For our project. We need some blue tones
and some brown tones. I want to make that
up a little bit. A red brown, more or less. That's what I have in mind. And what's my plan for that? I'm going to add some colors to my palette and see
how that goes. I will have a really sienna
brown, something like that. You will see that in a second. I'm just going over the colors. As I said, it takes a
lot of water to activate them and we need to
see how that looks. Yeah, I like that color. Going to add a bit more. I will also add a
few more tones. I want to have a brighter one
and a darker one basically. I want that because
I want to mix. Yeah, do really nice washy tone here to have all the tones into each other flowing
into each other. Here's a dak brown. Now let's use that one usually. That is just the imagination
you have as an artist. But most probably it turns
out completely different. You never know. But
that's not a big deal. We do, we will take
whatever works. Let's see. Okay, here are some brown
tone and a color here. Then I'm using a
little bit of blue. You see it's a very strong one. Okay, let's see, Maybe we
will use something else, you never know actually. We will start with
these four tones and then we might add
some yellow or a, or some more blue or a
different blue tone. But that's the base actually,
we start with that.
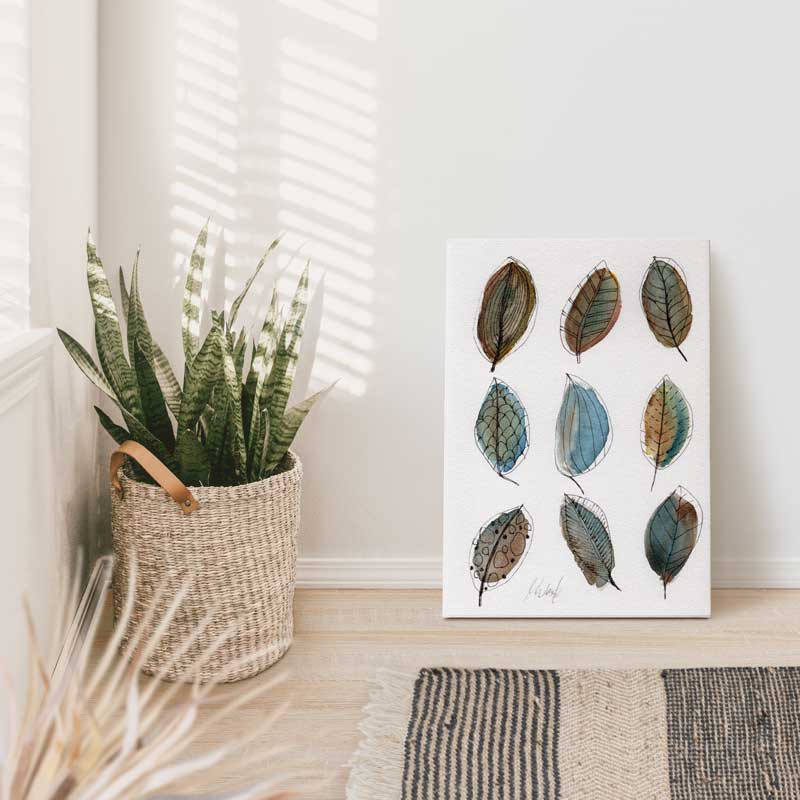
4. Sketching your Leaves: Now let's start by
sketching our leaves. And for that, I just
go very lightly here. I don't make it a big deal just drawing some leaves,
three in a row. Actually, I have
nine leaves later. You can hardly see
it. I know that. But as I said, I'm using a very
hard brush because I want to be able later
on to wrap it off. Let's draw some leaves and then we can start filling
them with color. You can draw them in
different directions, of course, just as I did. Or smaller ones and bigger ones, maybe I'm going to make
those a bit larger. Let's use this one. You see, you can get rid of it, and later on when we get
it into the computer, we definitely can get rid of it. Okay, These are my nine leaves. That's the size of
my artwork as well, so it's not very big, but I can scan it with
a very high resolution. So later on we can
sell it bigger. So make sure you have nothing from your rubber
left on the paper.
5. Colouring the Leaves: For this drawing, I'm using
the wet on wet technique. I get my towel and
the brushes here. I guess I will use the eighth, the ten, maybe, maybe
a better eight here. Then I start with
the first leaf. I will use the clean water
and make it a little bit wet. You see it turns out to
be a little bit yellow. It's not a big deal, but if you don't want that, make sure you get clean water. Again, what I don't do, I don't go over the edges, so I'm not going
into this graphiti. Actually, I can rub
that off later. If I do, I will have a hard
time to get rid of that. As I said, it's not such a
big deal for this project, but actually I don't want that. That's why I just
leave it like that. Now I go in with the color, I can control that a bit
by adding more water, maybe a little bit
more color, different. Really just let it flow in. So we have different
structures here. It will look nice later on. You see, even if
you are a beginner, can draw a leave and you can definitely fill it with color. You can always have
it drying a bit. I'm now picking some
brighter color here. I have that flowing in
directly from my plan box. If you into the
pencil drawing here, it's not in the
end of the world, then we will just include
it in our drawing. But you can take care of it. You can be careful
if it happens. Don't worry too much. I'm adding a little
bit of black to my blue because I don't
want it to be that strong. I need to be really
careful with that one. If you feel it's just
too much, it might help. Then you use your towel
and carefully go into it and take off a little
bit of the color. You see I go now
with my blue into the brown leaf. It
might look good. Be creative at this point. You can basically mix your
colors here on your paper. As you see, we can always go over it again. We just need a foundation
for our line art. I even go in with my brush
and take on some color. You see how well it works. Why I do that? Because I feel this looks
good. I like that. It's why I take a
bit of the colors to make it fit more to the rest. I guess I do the same
on the other ones. Here you see you can always go in change
or make it a bit darker. Don't worry too much. If
it's not perfect with your first brush stroke,
that's totally normal. Okay, I'm using now
another yellow here, which is not that bright. No worries. When your
colors get dry here, you can always reactivate them with a little bit of water. The beauty of water
color, by the way. Okay, what do I see now? I see that I like the
blue and darker brown. And now I have the problem
with these leaves. Don't have these darker brown. I guess I will go in with a
bit more color there and see if I get closer
to the other toe. Let's get it right for a bit and then we see how it looks
and we might go in again.
6. Cleaning your Artwork from Graphite: Okay. I waited maybe
for ten or 15 minutes. It is not everything
completely dry yet. But for what I want to show you, I can just do it here
on these leaves. And you see I'm now
having this rubber. And I go over it and try to get rid of as much
graphite as I can. I just show you here on
one leaf. Get rid of that. Go around it. Once you
feel you have it all, then you use the other
one and go around here, Get rid of as much as you can. It doesn't matter
if there still is a little bit left
because when we scan it, we can clean it on the computer. But the best thing is to
get rid of most of it. Don't make the mistake and
smear over it just yet. Because there might be something which is still where we
can't see right now, but you never know. I'm careful with
that and usually try to keep it like this. See, sometimes it comes a
little bit of my paper. That's what I'm doing
now to all nine leaves. You don't have to
watch me doing that. You get what I mean here. If you are still
not happy with it, you can always go in again. That's what I've done
here to these leaves and I just tried to take out
a little bit of the yellow, which I didn't like anymore. I like mostly the
blue and dark brown. That's what I wanted to have present here
for these leaves. You know how that works? Get rid of all of the graphite on your paper
and then we move on.
7. Adding Line Art to your Artwork: Okay, now we will add
some fun line art. It's an abstract painting. I'm just going in here and
adding some veins here. We can do that in
different ways. Let's maybe start with this one. I won't go around it exactly because I just want to show
that it is somehow a leaf. But I don't want to be exact. I just go around like this. Yeah. Then I have my
vein here in the middle. Then I can play a little bit. I just do it like
that for this leaf. I just show you some patterns. Maybe you come up with
something different. Maybe we get the center
a little bit stronger. I have a fine liner
here now in five, but you might want to
have something bigger. Just go ahead and
fill your leaves. You see, I don't want to
have it that regularly. I just go over it and
draw how it turns out. So it's always different. So I bet you can't do it the same like I am doing.
And that's good. It's a good thing because we don't want to have
the same thing. We want to have
different leaves. Actually just move on just to come up with
different ideas here and see how your
leaves turn out. And now we can do a
pretty regular one, and now we have the
last three left. You see, I'm leaving that
out for the last one. My purpose, just in case
it's still not dry. Don't ask me why, but for this leaf I've been
thinking of an onion. So that's why it gets now all the veins in
the same direction. Okay. I think I'm done so far. Maybe there's one or other edge, I go over again, but basically I like what I see, so I leave it now as it is.
8. Adding your Signature: I believe that you should always add your signature under
each artwork you do. You never know for what is good. You don't want it
to be that present but also not seeable. Actually, you could do it with a pencil because we
are scanning it, then we might go better with that or we don't like the signature so we
can wrap it off again. But whatever you decide for, make sure it's somewhere here in the corner or
somewhere there. Make sure you have your
signature on your work. I'm just going to put it here because I might want
to move it later on. That's the beauty of scanning
and digitizing your artwork because then you can always just cut it out and
move it somewhere else. Okay, that's it. You see, I don't have it to present, but it's definitely there. Maybe you also want
to add the date. You could do that here or maybe just a year of your drawing. You go, go ahead, do as you like it, but don't forget to
add your signature.
9. Scanning, Cleaning and Saving your Artwork: Now we want to scan our artwork. I just do it because
I want to be able to print it much larger
than it is already. Right now we have
an A four paper, so not that large. But if I scan it in
a higher resolution, we can easily have it printed
in a higher resolution. Let's go to the printer
and scanner menu. Use might look similar. It always is a
little bit different for each printer scanner, both. In this case, mine
is the absent. Et 77, 50. It's an three printer scanner. Yours might be different. Don't get this onto you. It's just a dialogue. And somehow you can
scan most probably. You can already also started
on your computer then. It looks something like that. When I now click
on open scanner, the great thing is it
starts scanning right away. You see waiting, and it
gives me an overview scan. Now once I have it, I can say which area I
want to have scanned. You see years of artwork
we have just drawn. And here I can set
my resolution. That's an important part. So you see, I can even
do it much higher, up to 9,600 DPE. But I gather them, my computer will
not do it anymore. I have 1,200 DPI, that is a very high resolution. Usually you have 300, that is, dots per inch. You have no 1,200 dots per inch. I believe that's a
pretty high resolution if you don't want
to have a just in a four but also in three
or two, maybe a one. I don't know, we would
have to check it. This could be easily done by setting the
higher resolution. Right now, the size of
my paper actually is about 6.7 by 9.4 So
I can set that here. Now I have this area
here and I can place it. I have everything
I need in my scan. You see I have All right. Resolution here now. You could also set
auto selection, but I prefer to have it
scanned the same size I have. We will turn it later,
don't worry about that. You can also turn it
around on your printer. Doesn't matter right now. Correct image or Unsharp
mask or whatever, we don't do anything here. Once you see something
the same like here, you just click scan and make sure of course you
have color and not black and white or text
selected, then just skin. This is my result and you see already that it has
a very high resolution. You can even see the
texture of the paper here. I really like how it turned out. I also like that my signature is really,
yeah, just light. I'm not that strong. Like if I had done it
with my Micfinedlinern, it would have been very strong. It's very lightly here. That's why I think that's a perfect way to
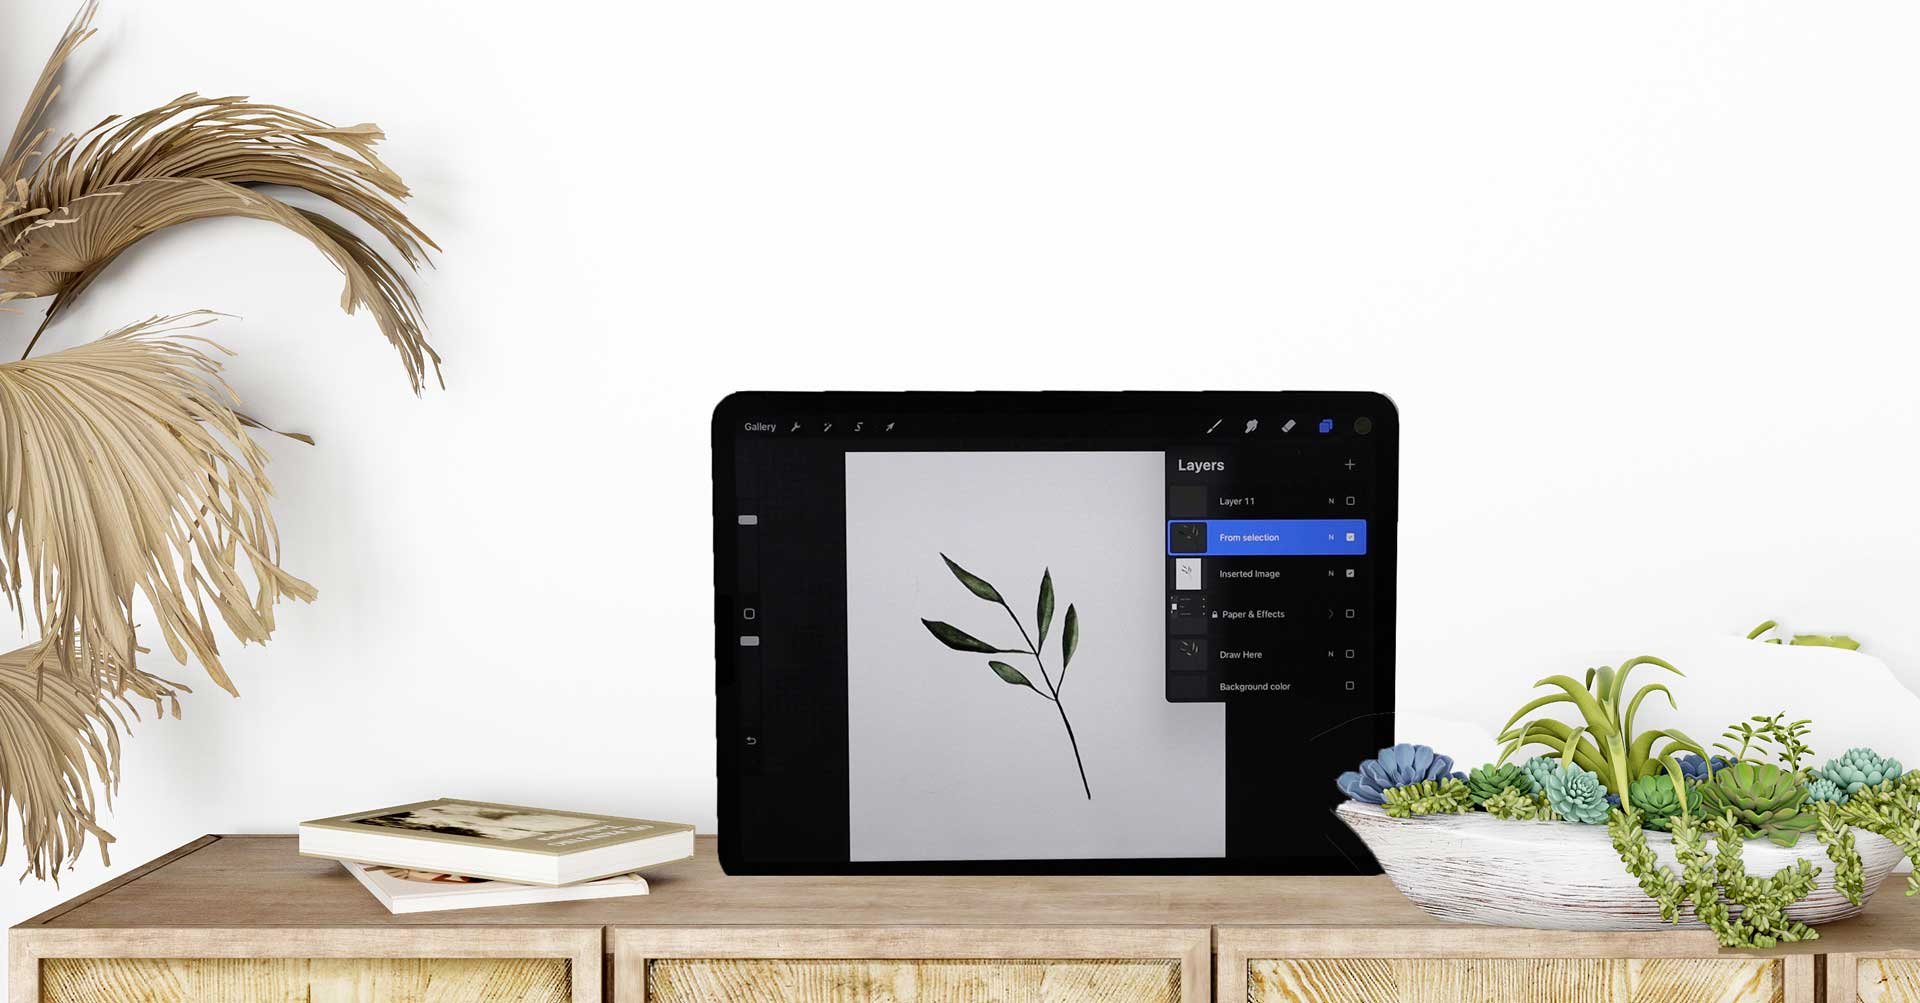
scan your artwork. Once you have done that, you can easily open
it in Photoshop, then we can do some
color corrections if you are not happy yet. Beside that, you can also save it in different
sizes. Let's do that. It just takes a second
until it is loaded. Now you can see here file. If I press now command and plus, you see what a high
resolution it has actually and how nicely you can
zoom into the artwork. Yeah, depending on maybe you
want to get rid of that. I'm quickly showing you
how to do that for that we are using here the healing
brush, spot healing brush. Maybe you don't see it. If so, that's because there is a little triangle on
the bottom right. And then you have to
choose healing brush tool, spot healing brush
tool, whatever. Then you just go
over it before you, of course, need to
define a source. Just click here next
to it and that's it. Let's zoom out with comma minus and see if there is anything else
I need to get rid of. Maybe, well, I don't
think there is anything. Maybe here, something
very lightly. Press out, pick the color here and then I go over
it and it's gone. That's a moment where you can fix any issue you
have on your paper, but in case you
are happy with it, you can now set the ratio
with a command zero. You have to screen here back to 100% You have your
document fit to screen. You see it just 17% here. You can imagine what large
size it actually is. Now we need to save it in different sizes to give
that to our customers. If I go to file and then I can export as export
export as I can set. Now the resolution or the
height and width here is where might be an option
you can sell in this size. And then people can just scale
it down if they want to, but just in case you want to
have it in different sizes, give your customers
in different sizes, it's a good idea because not
anyone is computer savvy. That's the moment where
they will Thank you. If you have changed
the sizes of the file, what you don't
have right now are these ratio papers which
are all these canvases. This is material you have in the class and you actually
should download it and to offer your customer
the best choices you can create with all these
backgrounds here your artwork. Just drag and drop one of
these into your Photoshop. Then you just drag by pressing Shift your artwork
onto this paper. You see that not much happened. What happened is that it
is not really positioned and that it doesn't fit 100% You see here is
a little bit missing. Now you have two options. You can decrease it a little. Then what happens
is that you have something here on the left and on the right
when I double click, now we need to double check. Actually, if one
can see something, if you look really behind, you can actually
see a little bit. Actually it's so small that I don't worry
too much about that. I can offer my customer
that with full heart. I just export that and make
sure now you export it, not for web click export. Then you choose JPG format. Once again, in this case, we want of course, to have high quality. Here is the artwork you see. There is nothing left. You can increase the
quality to seven. I will leave it now as it is because otherwise the
files get really large. Adding that into a new folder, actually, this is now
the abstract artwork. I just call it artwork
for now because I need to save all the files there.
That's the first one. Now I keep going
and do that again. I delete that file from it
and close that one here. Then I use the second template
here from my folder here. And now the two by
three ratio and drag that into Photoshop and
do the whole process. Again, I also do that
for the other one. I won't bother you to
show for each of them, but basically that's
how you see here. It's larger, you just need
to scale it down a little bit and then position
it on the canas. Nothing can be seen. You can actually play around
a little with just using here several options and see if something
fits your needs. But basically, I think even if you don't do
anything, it's okay. You won't see it.
Or maybe dissolve. No, that's on the bottom. You could even
increase the canvas. There are different options
to do that, but personally, I prefer just to leave it as
it is because you can hardly see it if you can always increase it a little bit because it's such
a high resolution. For example, for this one, if you want to
increase it a little, just get rid of the key here, this lock and then just
pull it a little bit. One can hardly see that
something has changed. Of course, if you
are very picky, you might be not
happy with that, but it always depends what you want and what you
want for your customer. In this case, you gave
him different ratios, which I really like. And that's why I make a little bit of a
compromise at this point. I just click Save
Export as before, and then wait a little bit. And then again we just leave it in artwork and
export the rest as well. You see that's how it works. So you have several ratios for your customer and
can sell those files.
10. Your Artwork in different Ratios: Let me show you another option in case you are really piggy, which is totally fine if you want to do it right
just in quotation marks. Let me just show you
what else you can do. I still have my artwork
open and now I have the 11 by 14 ratio water
color texture open again, Shift key, and I drag it over. Then command minus and have it a bit smaller so you
can see that it doesn't fit. Actually, Make sure you have this locked and
now we decrease it. It's the same problem as before. Have a thing here
and double click, hardly can see it. But in case you really zoom in and you are really
picky, you might think, okay, you can see
it a little bit, but we can get rid of it
because we have Photoshop. Let me quickly show
you how make sure you are on the top layer
with your artwork. And then you go to
the selection tool and you select this edge. Actually, let me zoom in. You have the little edge
here, selected here. You can hardly see
it, but a little bit. Now I set the Fs to five. Maybe just press Return, then I click delete. Now I do the same thing. I just take that over here to the other side where you
can also see a little bit. And do that again.
Fes still to five. And do that again. Now it's gun, you can't
see anything anymore. It's a little bit like
it's scratched now. Yeah, I really like that. Here on the bottom, there's maybe also a little bit. Let's get rid of that as well. It was too much. Okay. So that's how you can easily get rid of
that in case you want that, you can always decrease it a bit and then you have your
different ratios.
11. Using Mockups and creating Previews in the right Size: If you want to
sell your artwork, you most probably
need a mock up, something which presents your artwork where
you put it in. You don't have to hang
it on your wall and take a picture and then get the
picture and have that added. For example, to add or
wherever you list your item, you can basically just
get some mock ups. What I did here is mock ups from all about mock up he
or she is selling on C. This is pretty inexpensive and
they are really beautiful. Let me show you what I got. I got PSD files and this is
what I want to show you now. Here's one of them. Here's
how they are set up. You can see in the layers pet, there are just two
items here, Two layers. One is the background and one
is here, the smart layer. Nothing happens when I
turn that on and off, but I can't double
click on that, then just pull my artwork in. I press the shift key and
then drag and drop it over. You see how large that is? I really need to
make that smaller. I can just do that with
press command minus, then I press Command. You see how big that is? Let me just scale it down
to maybe 20% something. You see now it's even too small. I'm going to make
it fit now and pull it on my background here, and you see it fits perfectly. Once I'm done, I just double click or just click
here on the arrow. Then the trick is just to
close it easy. I click Save. Now the magic has happened. The artwork is here inside and you see how
beautiful that looks. That's how easy you
can get your images. If you're listed in
your store or wherever. You can easily do that. Let's do that again. Another
more gap also from that set. I double click here. Again, I drag and drop my
image over shift key command. Once I increase it, command minus then command, then I put it now to maybe 30% Now that fits nearly perfectly. Let's increase it a
little bit again. I click the error and then
close the smart object. It's now I have two
beautiful images. And I can close that as well. I can use my images for
presenting my artwork. The best thing now is
to the right size. I go here to the crop tool. I say one to one, for example. If you elicit on C, one to one is the way to go. You see you don't
have to crop a lot, it's just a little bit here. You decide where
you want to crop. It doesn't matter
to me right now. I just double click here. You have to do compromise and see what you want to keep
on your image and whatnot. You can crop it like that, maybe something like that. But then you don't
have a clock anymore or you go here and
you have the clock. Just a little bit of everything. I think that's what I go with. And crop that as well. That's how it works.
And now you have two beautiful images
of your artwork. And you can start selling
once you have exported them, let's quickly do that
file and then export. And then say save for Web, because we need it,
of course, for web. Now you see it's
still pretty large. You don't want that webshop
for Etsy's about 2000. If you are doing that
on your own shop, you might to have it just in 1,000 which is pretty
fine. Same thing here. If you choose
medium, that's okay. Then you still have 291 for C, that's okay for your own
shop, that's too large. I go 2000, and then I have
86 kilobytes, which is fine. Then you can save it
on your computer, save the other one as well, and upload those files
to C or any other shop.
12. Preparing your File for Download: Once you have your folder ready with your abstract
watercolor leaves, you should zip the file with the files you
are selling inside. Then also keep in your folder
your original artwork. Then of course the
previews we have created in both sizes. I have them in 800 from my
website and in 2004 Es. Then also I have
here the ratios. I can easily use them for
the next file I create. I just move this folder from
one folder to the next. I always have that handy. But this is a file
we are going to sell and this is what we want to
deliver to our customer. We can't because it has
101 megabyte in this case, since C just allows you to send 25 or 20 megabytes per upload to your customers
and you have five of them. It doesn't really work out beside that each file
has to be 20 megabytes. One had 19, but the
next one had 21. It doesn't work, but there is an easy workaround for that. And I'm going to show you that. First of all, we have
to create a document. You see here, I have
created one with my logo just for your friend. Thank you so much
for your purchase. Please click the link
to the download. I don't have a link yet to
download your products. The easiest, most
secure way for you to download large
files from my server, and here is also an e
mail to contact me. Now we need to create this link. If you send people once they
have purchased your product, this documents a PDF file. We are going to make
a PDF out of that. They will be able to click on the link and then just
start the download. Now we have to
create such a link, and we can do that by
signing up for Dropbox. I have the Dropbox now here in my task list
under Favorites. You can have that to, you. Just need to sign up for
Dropbox and download it. Let's quickly go to the browser. You see downloaded Dropbox app and installed on my computer. But make sure you choose the basic plan because that is free and you
have 2 gigabytes. You see even if your
product has 100 megabytes, there's plenty of
space for now for you. You can start with that, yeah, have this free plan first. And then you can
upload the files here, right over the
browser. You see here. Just click upload,
or you can create a folder first and then upload. Or you can do that
here over your finder or whatever you have on your
computer. I just do it here. I just create a new folder
now and name it just like the one I have on my desktop because I always want to
have these SKU numbers. I know what's inside, I don't have the name
because it gets pretty long. Otherwise, click Create. Now you have the folder. I can just add my zip file from my computer
here to the Dropbox. I can also do that
from my desktop. As you can see here, the folder
has been created as well. I could actually also go here, just open a new tab and
go into the folder, and then just drag and
drop the Sip file here. The same thing happens, it says move, of course. Okay, Now I have it moved. I prefer to have it on
my computer as well. I just come and see
and put it here. Again, it's uploading. You can see that it's uploading. You can see that here
it takes a second. Here they are sending me
notifications for that. But once once I have
my file here uploaded, let me reload that, I can create a
link to that file. Here you go. Now I need to click Share and get
the link Copy link. That does a trick. When I have this link here,
it's a pretty long one. I can add it to my
document which I created. Let's see here. Please click on the link to download
and I'm going to make this a link
I just market do. Right click and then say a
link at link to web page. Then I just paste my link here. Just click open link and
you see it's working. That is where my
customer is sent and can download my
artwork from here. Yeah, that's the easiest way. Then you just go ahead now, you have a link here
and just go ahead and export that as a PDF. Just say export PDF. Then you put it on your computer and upload that file to C. I always keep that
here on my desktop. In the folder, I have it all together.
I just click on that. I have the exact name here, and have that in
my folder as well. Now I have everything together which is
around this product. Beside ratio, which I move
from one folder to the next, I keep that secure and can
use it for the next work. Again, I will also just just say download
and keep this file. You see I already have
to keep that file. I can just modify the link for the next product and then send
it to the people as well. Yeah, I hope that helped because I believe that
the best and easiest way for you to send these
large files to your customers.
13. Your Project: Now let's talk about your
project for this class. By now, you might
have already folded along and have drawn
your watercolor leaves. You might have already
done your preview and you have your product
ready for upload. I just want you to show
off what you have drawn. Maybe take a picture, make a screen chart or whatever, and upload that to the gallery so we can
see your project.
 Monja Wessel, Graphic Designer and Teacher