Transcripts
1. Welcome: There's something so creatively fulfilling about starting
with nothing but an idea, creating an original
illustration, and bringing it to
life with animation. But it's not always easy to get an idea out of your head
and onto the screen. It takes practice,
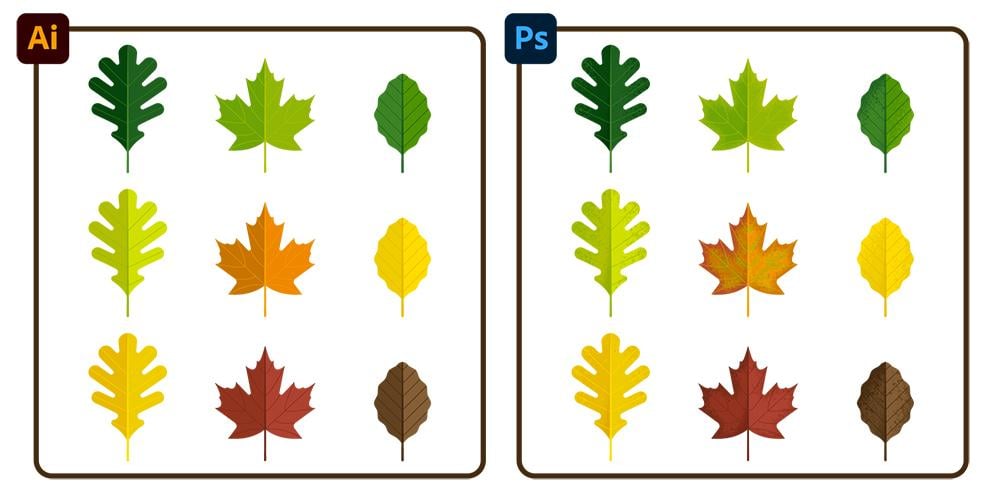
a lot of practice. That's where this edition of Create then Animate comes in. Taking inspiration from real
life, the changing seasons, I'll guide you through
the workflow of illustrating a set of leaves
in Adobe Illustrator, adding colorful
textures and Photoshop, and animating them
falling in After Effects. Along the way, you'll
learn tricks for creating professional
looking illustrations, time saving tips for
working more efficiently, and will break into the
three D tools and After Effects to add a whole other dimension
to your animations. In the end, you'll have an
animation that you can put in your portfolio or post on social media to
showcase your skills. I'm Megan Frias, and as a
self taught motion designer, I know that I made the
biggest strides in my creative and technical
skills when I was having fun creating
projects that I enjoyed. I hope that this class can
be that for you without the frustrations of not knowing what to create or
how to go about it. Having made a career of writing, illustrating and animating
educational animations, mostly on health and
environmental topics, I know that putting in
the practice can pay off. This class is designed for
those that already have a basic familiarity with Adobe Illustrator
and After Effects. The first class in the
Create then Animate series is perfect for
complete beginners. And you can also check out
my complete class curriculum for more guidance if you're
just getting started. So if you're ready to have
some festive fall fun, practicing Adobe
Illustrator, Photoshop, and After Effects, then
let's get started.
2. Class Project: And the project for this class is to illustrate a set of leaves in
Adobe Illustrator, add colorful textures in Photoshop and animate them
following in After Effects. You can make your
leaves look like mine or make them unique. I'll show you two ways to
animate leaves falling. You can use either or both
in your class project. And if you just want to practice one aspect of this workflow,
whether that's Illustrator, Photoshop or After Effects, I've provided my files so you can get
started at any point. If you have any
questions along the way, feel free to post them
in the discussions tab. The first thing I'd
recommend doing is creating a folder to store all your
files for the class project. You can see here that I have
folders for After Effects, Illustrator and Photoshop, and
they're all empty for now. I've also gathered
some inspiration. These are all photos that
I took a few falls ago, but if you don't have
your own photos, you can always just go
to Google Images or your favorite stock
photo site to find photos of leafs that
you can use as reference. Like this oak leaf that I
grabbed from Google Images. Once you've gathered
some leaf photos that you can use as inspiration, let's make our Illustrator file. In Illustrator, I'm going
to create a new file. For this size, I'm
going to work with 38 40 by 38 40 pixels, and I'm doing square because
I know that I want to do a grid of three
leaves by three leaves. Also, make sure that your
color mode is set to RGB because that's going to be important in After Effects. I'm also using 300 PPI, which is going to be
important for getting the highest quality
in Photoshop. So once you have
that, hit Create. Your Illustrator
workspace might look slightly different than
mine, and that's okay. But if you want it to
look more like mine, a good starting
place is to go to Window Workspace and then
choose Essentials Classic. I've customized my workspace, so if I ever use a panel
that you don't see, you can always go and
find it on your end underneath Window and then
find the panels down here. One panel that's going
to be important to have at the end when we're
cleaning things up and making sure
that it's ready for the next steps is
the Layers panel. Next, let's grab some leave
photos to use as reference. I'm just going to
drag and drop a few of my photos
into Illustrator. And then let's just drag
them to arrange them. I'm just going to
put them off of the artboard for now and
use them as reference. And then once I like
what I've created, I'll move that
into the artboard. But however you want to
work is totally fine. Keep in mind that you can always drag in more photos later. So let's just start with this. I'm also going to use this
layer as the reference layer and just lock it so that I don't accidentally move around
these photos as I'm working. Then I'll go down here to
this little plus button to add a new layer that
I can use to work in. Now that that's all set
up in the next videos, we'll start illustrating
our leaves.
3. Illustrate Elm Leaf: Down down. For the first leap, I'm going to do something
that's generally this shape. I use a lot of
keyboard shortcuts, but you'll always be
able to see those on my screen if I
don't call them out, and to the zucchiht that you can download to help you learn
all the keyboard shortcuts. So to zoom in, I'm going
to hit Command and plus, and then I'm just going to
use my mouse to scroll over. And for this shape,
it's basically like an oval but
with pointy ends. So to create that, I'm going
to use the Ellipse tool. So I'm just going to
hit L on the keyboard, which is the Ellipse tool. You can also find it here, and then I'm just going
to drag out an ellipse. It doesn't have to be exact, and then I'll move
it into place. Let's get rid of the fill. So I'm going to click
over here and hit none. And then just kind
of resize this. Now to make these
two ends pointy, I'm going to switch over to
the direct selection tool, which is this icon. And what this
allows you to do is select individual points on
a path and move them around. So it allows you to customize
the exact shape of paths. So for this point up here, what I want to do is get rid of these handles so that
it's a pointy corner. A quick way to do that
is just to go up here and hit this button to
convert to a corner. And I'll do the same
thing on the bottom. It's totally up to you how closely you follow
your reference image. For this leaf, I want
to experiment with doing a wavy line for the edge, even though this leaf
does have a wavy line, I'm going to exaggerate that. I think I'm also going to make the lines for the leaf
veins a little bit further apart and maybe even adjust the overall shape
of this to make it a little bit not as tall. With all that, I don't really need the reference
photo anymore, so I'm just going
to zoom out and then just drag this
into my artboard, so it's a little bit easier to see to center your artboard
and zoom in on it, you can do Command and zero. I'm just going to resize
this a little bit. Maybe something like
that looks good. I'm just going to bring
the stroke weight up a little bit just to
make it easier to see. I'm going to switch over to
the direct selection tool, select my shape
and then click and drag over these two
points to select them. And then I'm just going
to drag them up to give the leaf a slightly
different look. So maybe something like that. Now let's add the wavy edge. I'm going to select
the shape and go up to effect and then distort and
transform and then zig zag. Make sure that preview is turned on so you can see
what you're doing. The first thing I'm going
to do is hit smooth, and then I'm just
going to adjust these settings to get
something that I like. I think that looks pretty good, but I don't like how it's
treating the top and bottom, the corners of the
leaf, so I'm going to go in and adjust that manually. So from here, I'll
just hit Okay. If you want to go back
and adjust the zigzag, you can go to the
appearance panel and then click zig zag to
get this window back. Right now the zig zag is applied as an effect
on the shape, so we can't manually adjust
the curve of the zig zag. In order to do that,
I'm going to go up to object expand appearance. And now you can see this
is no longer an effect. This is just the way
that the shape is. So if I switch to the
direct selection tool, all of those zig zags are created with points on the path. From here, I'm going to go
in and let's just zoom in. And I want to make this
point more pointy. So maybe something like that. I'm going to adjust this even more so that it
really looks smooth. When you're working with
symmetrical strapes like this, it can be hard to do the same
exact thing on both sides. So what I'm going to do is
cut this shape in half and then I'll duplicate the half
once I like how it looks. So to cut the shape in half, I'm going to go to
the scissors tool, which you'll find underneath the eraser or the
keyboard shortcut is C. And then I'll just click this point and click
the top point. And then this half
that's selected, I'm going to delete, so
I'll just hit Delete. You might need to do it twice. And now we just
have the one half. So now I can really work
on smoothing this out. And then up at the top, I'm
going to make this come over more so it can come to
a nice rounded peak. Since this is just
one half of the leaf, I need to make sure
that the top point and the bottom point line up. I'm going to first
select the bottom point and then the top point
and then I'm going to use the align tools to
align them to the right. The reason why I selected the bottom one
first is because I want the bottom one to move
over to line up at the top. In that case, the
selection order matters. Since the bottom point moved, it doesn't look quite
right down there, so I'm going to go in and
adjust this a little bit more. Once you're happy with how
this half of the leaf looks, you can duplicate it to
create the other half. I'm going to select the leaf and then just hold
down Option or Alt and then drag and I
can also hold down Shift to make sure that I'm
only dragging horizontally. That will create a duplicate.
Then to flip this over, I'm going to use
the reflect tool, which the keyboard shortcut
is O. It's this tool here. And then I'm going
to click and drag horizontally and hold down Shift to make sure that I don't accidentally move vertically. Then I can just
move it into place. And you'll notice that
I'm getting all of these pink guides as
I'm moving things, and that's because I have
Smart Guides turned on. If you go underneath, view
Smart Guides is right here. Make sure that's checked if you want those helpful guides. To create the stem, I'm going to draw a line with the Pen tool. If I hover over right here where I want
to start the line, you can see that little slash
icon next to the Pen Tool, and that means that I'm
going to be adding on to this existing path, which
I don't want to do. I want the stem to
be a separate shape. So I'm just going to move
down a little bit to make sure I don't
see that slash line. I see the little star
to mean a new path, and then I'll click to
create a point, go down, and then hold down
Shift to make sure that this is going to be a
perfectly vertical line, and then click to
create another point. And then I'll hit Return
to end this path. I'm going to switch over to
the direct selection tool and then just grab this point and move it where I want it. Next, let's create the
vein lines for the leaf. To do this, I'm just
going to go off of the leaf and use
the pen tool again. I'm just going to create
some 45 degree angled lines. I'm going to click to create
a point and then hold down shift and that snaps it
to 45 degree increments. I'll just create a line that's going to be a
bit longer than I need. Then I'm just going to position this into
place on the leaf. I'm going to hold option while dragging this line
to duplicate it. And then a trick to repeat the last thing that you
did is that you can hit Command D. So that'll just duplicate the
line a bunch of times. And actually, let's
delete that last one. Now I need to trim these lines. So I'm going to switch to
the direct selection tool. And if I grab one
of these points, I can hold down Shift
to make sure that I'm maintaining a
45 degree angle as I'm dragging
and then just drag this until it intersects
with the leaf line. And I'll repeat that for
all the other lines. Now let's duplicate the
lines for the other side. So I'm just going
to click and drag to select all of these lines, make sure that the outer
leaf shape is not selected, and then I'm going
to hold down option or A and drag to
create a duplicate, and I'm also holding Shift to maintain the vertical
positioning. And now I need to
flip these over. So I'm going to use
O, the reflect tool, click and drag again
to flip them over and then back to
the selection tool and move them into place. So now I have the basic
skeleton for the first leaf. We'll work on coloring the
leaves in a later video. Before we move on, remember to save your Illustrator file. To stay organized, I would recommend saving it
in a master folder for all of your files
for this project and then within that an
Illustrator folder.
4. Illustrate Oak Leaf: Down down. For leaves with more complex
shapes like this oak leaf, you could try to
use the pen tool to trace the shape of this leaf, but I'm going to show you
a different technique that I like to use that creates perfectly rounded
corners to give your illustration a
more geometric look. So to do that, I am going
to use the Pen tool, but I'm only going to be
creating straight lines, which also makes this
technique a little bit easier, especially if you're a
beginner with the Pen tool. So I'm going to switch over to the pentil which is
P on the keyboard, and then I'm just going to start at the bottom of this leaf, and I'm going to trace
the left side because I like how this side
looks slightly better. So I'm going to start at the bottom and then just
draw straight lines, but I'm going to
extend the line, past any curves so that I can round the corners
and make it curve. So if that doesn't
quite make sense, as I do this, it'll
probably make more sense. I'm also going to bring
down the stroke weight just because this
is a little big for the size of this
reference photo. So I'm going past the curves, but trying to line up with the line in between the
curves as much as possible, and it's okay if it's not exact because we can always
go back and change it. So for this part,
I'm just kind of squaring off this rounded
piece of the leaf. And then same thing
on the indent here, I'm kind of squaring
off that curve. And I'll repeat that for
the rest of the leaf. For the last point, I'm
getting this guide that tells me that it's lined up
with a point at the bottom, and this way I'm
making a perfect half. But if yours doesn't
quite line up, you can always line
them up later, kind of like I showed you in the last leaf illustration example. So I'm going to click to
create that point and then hit Return
to end this line. And then I'm just going
to go through with the direct selection tool and adjust these lines so that they more line
up with the leaf. So right here, there's a gap, so I'm just going to
pull this corner in a little bit so that it lines up better with
the actual leaf reference. The next step is to use
the round corners widget. So making sure you're still
on the direct selection tool, if you select any of the points, you should get this
little circle icon. And if you click
and drag that icon, you can round that point. So I'm just going
to go through and do this for all of
the different points. You can select multiple
points at once to get both of the rounded
icons at the same time, which is handy in cases like
this where I want both of these corners to be the
same amount of roundness. For these points, I'm just
rounding completely to make a really nice rounded point
and same for these indents. I'm rounding as
much as it'll let me to create this
nice rounded shape. At the bottom of this leaf, I want this line to
be curved inward. First, I'm going to take this corner and undo
the round corner, and then to curve this line, I'm actually going to use
the anchor point tool. That's going to be Shift
C on the keyboard. So once you have this tool, you can grab anywhere on the line I like to
grab from the center, and you can just pull in either direction
to curve the line. And then I'm going
to switch back to the direct selection tool, and now I'll re
round this corner. One thing to be careful
of is if you use the direct selection tool and you're changing these paths, the round corners option might go away if you
change it too much. So if I wanted to undo this, but I had adjusted
this line somehow, then now that round corner widget doesn't
come up anymore. That's just something
to be aware of. But if I undo that,
you can see that I can click back onto this point and the round corner widget
that's closest to that point will pop up so that I could unround
this if I wanted to. Or round it less or whatever. The next step is to duplicate
this half of the leaf. I'm going to select it with the selection tool to
get the whole thing, and then I'm going to hold down option while dragging
and also shift, and then I'm going to flip it
over with the reflect tool, also holding shift, and then
I'll move it into place. Obviously, this leaf isn't following the reference exactly, but I like how it's
perfectly symmetrical, those things are totally
up to you as the artist. Now let's move this
over onto the artboard. I'll select both halves of the leaf and just
drag this over. This top point, I don't really like how it
comes to a point. I want it to be more rounded, kind of like how the
reference is kind of round. In order to make
this point rounded, I need to join the two
halves of the leaf. So I'm going to switch over to the direct selection tool and then just click and drag to
select both of those points. To join them, you can
go up to object path, and then join, or the
keyboard shortcut is Command or Control J. Now it's going to
combine the two points, but there's still multiple points really close
to each other. You can drag them apart to
check that there's multiple. So there's not a
round corner widget that I can use to
round the corners yet. To fix this, I'm going
to make sure that I have both of those
points selected, and then I need to average
them so that they're in the same exact place so
that I can then merge them. So the keyboard shortcut to average is going to be
option command, and J. And then I'm going to do both vertically and horizontally. And now there should be
two points right here, but in the exact same place. So now if I select
both of these points, I can go to the
Pathfinder panel and hit the Unite button. So
now there's only one. If I click out and then
select this again, now there's a round
corner widget, and so I can drag that
to round this corner. Let's create the stem
with the Pen tool. And then also some veins. I'm going to use the Pen
tool again and then just go from these pointy parts
in towards the stem. Then I'll select all of these
lines and then option and drag them to duplicate
and then flip them over with the reflect
tool and move them into place.
5. Illustrate Maple Leaf: Down. For the maple leaf, I'll show you a couple of different techniques
that you can use. Before I get started, I'm
going to double click on layer two here in
the layer panel and then change the label
color to something that's going to
stand out a little bit better on this red leaf. So maybe let's go with yellow. The first technique
I'll show you is just using the pen tool. The pen tool can be a
little bit challenging. There's kind of a
learning curve to it, but let me just show you
how I would go about using the pen tool to
kind of trace this leaf. First, click to create
a point and then click again to create another point and keep holding
your mouse down, and then you can drag out handles to create a curved line. Then for this part, I want
it to curve the other way. So you can see right
now if I click, it will curve the
wrong direction. In order to fix that, I'm just going to click
again on this point, and that's going to
remove the curve. Now I could go in and create
another point and curve it in any direction I want
based on which way I drag. I'm just going to create a point like this and then here I'll click and drag again
to create a curve. And then here I'll click
and drag to create a curve. Then I'm going to click
this point again so that the outgoing handle
won't be there and then this line
will be straight, but I can click and
drag to curve inward. I'll do the same thing again. Then to finish, I'll hit Return. From here, you can
always switch over to the direct selection tool and
adjust any of the curves. You can also move the
points around too. And you can nudge them with your arrow keys if that helps. Using the pen tool creates a little bit more
of an organic feel. It's not quite as
perfect and geometric as the other techniques that I showed you in previous leaves. I brought in another
leaf here and I'm going to show you a different
technique on this leaf. This time, I'm going to
use the pen tool still, but I'm going to draw straight lines and then curve them later. I'm going to start
down here again, and I think I'm just going
to ignore this piece, just to simplify a little bit. I'll click over here to
create a straight line. Then for these two indents like this one here
and this one here, I'm going to use the
round corners tool to create a perfectly
rounded corner. That way, the style will fit together across all
through my leaves. I'm just going to go inward past that corner so that I can use the round corners tool later
to round the corner here. And then I'll click over here. And then I'm just
going to connect these two points and then I'll take this straight line
later and curve it. Then the same thing
here, here and here. And then for this indent, I'm going to use the
round corners tool. So I'll go further
in and then here, I'm just going to
connect these points and curve this straight line later and same thing for this. Then hit Return. Before I go and fix this up and make it look the
way that I want to, I want to show you one other thing that
you might find useful. With the path selected,
you can go up to object, repeat, and then mirror. This is going to create
a copy on the other side so that when I adjust this side, the exact same thing
happens on this side. I can help you see how your
full leaf is going to look. Now let's adjust these lines. First, I'm going to use
the anchor point tool to create some curves
on the straight lines. The keyboard shortcut for
that tool is Shift C, or you can also find it
underneath the pen tool. So from here, I'm
just going to drag these straight lines
to create a curve. You can see how that already updates it on the other side, and then I'm going
to leave these two straight and then pull
this one into a curve. And then this one. And then I'll use the round
corners tool on this, so I'll leave that
and then curve these. I'm going to switch over to
the direct selection tool and then curve these corners. There's an important
reason that I use the round corners tool after curving the lines with
the convert vertex tool. That's because doing
it in this order preserves the editability
of the corners. Because I did it in this order, I still have the ability to change my mind on
these rounded corners. But if I were to now use the convert vertex
tool and curve a line that's close to one of the corners and then go back and try to
curve this corner, you can see that it's
broken the corner so that round corners widget
is no longer an option. It doesn't show up when I
select near the corner. So I could still adjust
this corner with these handles by
dragging the handles, but the round corner widget is no longer an option
in this corner. It still is over
here because that wasn't close enough
to break this corner. So that's why I like to
do it in the order of convert vertex tool to
curve any straight lines, and then round corners
widget to round any corners. When you're using
the mirror repeat, you'll see this gray
bar at the top, and you can exit the mirror
repeat by clicking on this gray bar or
just double clicking anywhere outside of your shape. And then if you want
to go back into the mirror repeat to
edit both sides again, you can select your shape,
and you'll see that this is a mirror repeat because of
this dash line in the middle. And then just double
click on the path to get back into
the mirror repeat, where you can now go and edit, and it should update both sides. Let's bring this
leaf into the Rbard. I'm actually going
to duplicate it just to save a copy because I think I'm going to need
to edit this to make it look like it fits the
style of the other leaves. I'm going to do a little
bit of cleanup here to make sure that all the leaves
are about the same size. I'll give them all the
same stroke weight. Both of these leaves have
more of a geometric style. These have perfectly
rounded corners for each of these little pieces and
perfectly zigzagged lines. And the maple leaf doesn't
quite fit in with that style. So I'm going to go in and work
on this to try to make it match this style by making it look a little bit more uniform. Like making these pieces more symmetrical like this
compared to this. So to do that, I first going to double click into
the maple leaf, and then I'm going to
unround those corners just so that I don't
break the corners and I can go back and
adjust those later. And then I'm just going to use the direct selection
tool to click and drag these points and
adjust the handles. Okay. You can also click and drag over multiple points at once to move them all
at the same time. Also, with multiple
points selected, you can switch to other tools
like the rotation tools. So I'm gonna hit R
on the keyboard, and then I can just rotate these a little bit to get
the look that I'm going for. The last thing I'm
going to do is round these corners with the
round corners Widget. The last step is to add
the stem and the veins. I'm going to exit
mirror mode to add the stem and then I'm going to go back into
the mirror mode so that I can add the veins to
both sides at once. Once that's done, you can
click out of Isolation mode. So here are the
three leaves so far.
6. Color Leaves: In this video, I'll
show you how to find color inspiration and
then color your leaves. But first, let's do a
little bit of prep work. I'm going to resize these
leaves a little bit. Then I'm just going to
select them all and make sure they all have
the same stroke weight. I also want to make
the stems wider at the bottom and
narrower at the top, and let's make them
have round caps. I'll select all the stems and then just choose round
cap in the stroke panel. Then let's go into
this oak leaf. And then I'm going to use
the Stroke Width tool, which is right here, or the keyword horca is Shift W. Then I'm going to hover over this anchor point
at the bottom of the stem and then click and
drag to expand the width. Then just repeat the process
on the other leaves. I'm going to give each half of the leaf a slightly
different color. So for the oak leaf, this
whole thing is one shape, so I need to cut it into
two different halves. So to do that, I'm just
going to zoom in and then go over to the scissors tool
or see on the keyboard, and then cut at this
point down here, and then make a cut up here. There's no point, but I'll just make it cut right in the middle. And then now I have
this half selected. I I just double click on this, it'll make sure that
I'm only able to select this half the leaf
and then I'm going to go to the Pen tool and then
hover over this point and you should see this little slash icon next to the Pen tool, which means that
you're adding to this point or connecting
to this point. So I'm going to
click and then go down here and you should
see the little circle, which means that you're
completing a path. Now this half is
one complete shape, and I'm going to do
the same thing on the other side. Just click this. I'll double click into it just to make sure that I
don't accidentally connect the stem or something and then I'll
go to the pen tool, click and then click to Connect. For the maple leaf, we used a mirror repeat so that the
two sides were identical. In order to color them with
slightly different colors, I need to release
that mirror repeat. If you select the leaf and
then go into the layers panel, you can see that it has
this mirror repeat. So what I'm going to do is
go up to Object Expand. And then object and fill
is good and hit Okay. Now it's turn that mirror
repeat into a group. I'm going to ungroup it by
doing the keyboard shortcut, which is Shift Command G. Now there's two
different mirror repeats, so I'm going to
ungroup those again. And now it's two different
clipping groups. So I'm going to right
click on one of the clipping groups and
choose release clipping mask. So now I have this half of
the leaf that I can select, and then also this half of
the leaf that I can select. These aren't close shapes which might not actually end
up being a problem, but just to keep
things nice and clean, I'm going to double click into this and then close this shape. If you look carefully
in your layers panel, there's also going to be
this invisible rectangle, which was used in
the clipping mask. I don't need this anymore because it's
not doing anything, and it's also just invisible, so I'm just going to delete
it to clean things up. Then moving on to the last leaf, these are two
different open shapes, so I'm just going to double click onto the shape
just to make sure that I can only select that shape and then just close it up just
to keep things clean. Now that each leaf is set up, let's duplicate them to
create nine total leaves. To make it easier to align
things with the align tools, I'm going to just
select each leaf individually and group it
with the keyboard shortcut Command or Control
G. If you want to, you can make sure that all
of these are aligned by using the bottom align or
however you want to align them. Then with all three of
these leaves selected, I'm going to hit Command
G to just group this row. Then I'll hold down Option
or Alt and drag out a copy and then you can do Command or Control D to do that same thing again. These are not fitting
on the artboard, so I'm just going to
select everything and resize them a little bit. Then you can use the align tools to make the layout of
the leaves look good. Last, I'm going to make sure
that the rows are ungrouped. And then I'm going
to also ungroup all the leaves just to make it a little bit easier to color. So now each piece is
its own separate thing. Now let's color the leaves. If you want to use the
same exact colors as me, I've provided a link
below this video where you can access
my color library. Once you click the
link, you should be able to pretty easily add this library of colors to your creative cold libraries,
just like I have it here. Or you're more than welcome to come up with your
own color palette. If you need some inspiration, color.adobe.com is a
really helpful tool. There's a few different
ways you can use it. If you go to the Create tab, you can use the color wheel and the color harmony rules to
create a custom color palette. Just make sure
you're on RGB mode. From here, you can
adjust the sliders. Once you like the palette, you can go over to
Save to and click the Plus button to create a new library, and
then just hit Save. Back in Illustrator, if you
go to the library's panel, you should be able to see
your new library here. You can also use a photo
to create a color palette. So if you go to extract theme, you can dragon drop a photo, and it will grab the
colors from the photo. You can also move
these little dots around to find different
colors within the photo. And then again, go over here
to save to your library. Another option is to go to the Explore tab and you
can type in something like Autumn and then you'll
find a bunch of different options
that would work really well for this project. All you need to do to
save a color pale is hover over the image and
then click ADT Library. You can also build
a color palette or add to one from Illustrator. I'm just going to create some squares that I
can use to color, and then you can color them
here or you can go over two swatches or you could use
colors from your library. Then if you wanted colors
that are similar to that, you could go over to
the color guide and then select that color and then it'll give you different
shades and tints, or you can change
the color rules to get different options here. If you want to add a
color to your library, select it and then go down to the plus button and
choose fill color. In case you're
wondering why I'm using libraries to store my
colors instead of swatches. It's because in Photoshop, the libraries will
automatically be available, so I can just start
using these colors for texturing without having
to do any extra steps. Once you have your
color palette ready, let's start coloring the leaves. I'm going to select this
half of the oak leaf, and then I'm just going to
switch the fill and stroke so that it actually has a
fill and has no stroke, and then I'll go over to my
library and select a color. Then for the other side,
I'm just going to do the same thing but
select a lighter green. So I'm going to color these with one half slightly
darker than the other, but feel free to do
this however you want. Also make sure to
color the line. So I'm going to
select this half and then unselect the actual leaf. You can hit X to switch
which is on top, whether it's fill or stroke, and then go in and
choose a stroke color. Now go through and color
all of your leaves. Feel free to change up the color palette if you don't
like how it's turning out and really play around with this until you get
something that you like.
7. Save for Photoshop: Yeah. Last step in Illustrator is to separate
each piece of the leaf into its own layer so
that we can access each piece and texture
it in Photoshop. You'll need to have
the layers panel open, so if you don't
see this already, go under window to
find this panel. First, I'm just going
to click and drag over each individual leaf and then
hit Command G to group it. That way, it'll be a
little bit cleaner when we're working with this
giant stack of layers. This layer one has all
of the reference photos, but I don't need this anymore, so I'm just going to hit the trash can to delete this layer. There's also a couple
other things that I was working on that
I decided not to use, so I'll just delete
those two as well. Then it looks like
this little piece of the maple leaf didn't get
to be part of the group, so I'm just going to drag it into the group that
it should be in. Now I have a group
for each leaf, but I want all these leaves
to be on their own layers. That way, Photoshop will recognize them as
separate layers. To separate these
groups into layers, I'm going to select
where it says layer two, go to this three line menu and then choose release
layers to sequins. Notice that it renamed all
those groups to layer three, four, five, six,
seven, and so on. I'm going to take
all these layers, select them, and then just
drag them out of layer two. Now they're no longer
nested in layer two. Layer two is now empty,
so I can just delete it. If I were to stop
here, Photoshop would import each of these leaves
as just one layer each. It's not going to have each half of the leaf as separate layers, but I need to access each half of the leaf and the
lines of the la separately so that I can do the texturing in the way
that I want it to look. So if we click on
one of the leaves, let's take this oak leaf. It's going to be grouped,
so I'm going to ungroup it. I need to create
nested layers or sub layers for everything
that I want to be separate. So I'm going to select
where it says Layer ten. This is the parent layer, and then I'm going to go down to the bottom and click this
new sub layer button. Notice how this has
a name of layer 12. Now I can take the lines on the left side and just drag them into layer 12 so that now this represents all
the lines on the left, and I'll just name
the lines left. Then let's do the
same thing to create a new sub layer for all
the lines on the right. This is the stem, but I need to make sure it has
its own sub layer. So again, select
the parent layer, new sub layer, and then drag
the stem into this layer, and then I can rename this stem. And then same thing for
these two halfs of the leaf. They can't just be named path. They have to be an actual layer, a sub layer within
this parent layer. So I'll create a sub layer and another sub layer and drag the two halves of the
leaf in and name them. And then let's name
the parent layer. You can triple check
that you've done this correctly and that
Photoshop is going to recognize each of these as its own layer within a group
that's called oak leaf green if it has these little toggles so that you can toggle down and see each of the items
within this subgroup. So as long as yours
looks like this, it should work when
imported into Photoshop. This is really important.
Otherwise, you might not be able to
access some of the layers. So if you're trying to texture just this
half of the leaf, it might flow over into this
half if it's all one group, or it might go on
top of the lines. So just make sure it looks just like this and that you
followed my steps exactly. And then once you do that, all you need to do is repeat
for all of the other leaves. I know it's tedious,
but after all of that, your layer stack
should look like this, and this will make it so we can work with it in Photoshop. From here, I'm going to
save the Illustrator file. But in order to import
this into Photoshop, I need to save it as a Photoshop
file from Illustrator. In order to do that,
I'm going to go to File Export and then Export As. Then I'm going to go into
my Photoshop folder. And then choose the format as Photoshop PSD and
then hit Export. Make sure the color
mode is set to RGB. Then for the resolution, I'm
going to keep it at 300 PPI. That way I get the highest
quality in Photoshop. It's also important that
you have right layers checked and maximum editability. From here, I'll hit Okay. Here's the PSD file
that I exported and I can just double click
to open it in Photoshop. If you separated out all
the layers correctly, you should have a folder for each leaf and then
within each folder, you should have separate
layers for the lines, the stem, and the
halves of the leaf.
8. Texture in Photoshop: Now it's time for what I think is one of the
funneest parts, which is texturing the
leaves in Photoshop. The first thing I'm
going to do is switch this transparent background to a white background just out
of personal preference. If you want to do that,
too, you can go to the Properties panel and then go to Phil and change it to white. To create the textures,
I'm going to use brushes. I'm just going to
create a new layer just to scribble on to show you some of the brushes
I'm going to use. If you go over to
the brushes here, then up to this button, you
can change your brushes. I'm going to be using
a bunch of brushes in this Kyle Webster
splatter brushes pack that you can download for free. So let me show you
how to do that. If you go to this gear icon, you can go down to
get more brushes, and then it will open
up this webpage, and you can scroll down. The ones that I'm using
are in this splatter pack. So I'm going to hit Download. Once that's
downloaded, basically, all you have to do is
double click on this file. There's also instructions at the bottom of this page
if you need more help. One of the brushes that
I'm going to use a lot is this WC splatter spread. Here's what it looks like. You can increase or
decrease the size of the brush with the bracket
keys on your keyboard. This brush, notice that
when I overlap strokes, so I do multiple strokes
on top of each other, the colors start to
get darker and that's because the blending
mode is set to multiply. You can change it to normal here if you don't
like that look. Now when I use the
brush and then I do multiple brush strokes
on top of each other, the colors never change. If you want to save the brush
with any changes like this that you've made so
you don't have to do that every time
you use the brush, what you need to do is go
into the brush, find it here, and then hit the plus button, and then you can
give it a new name. You can check this box if you always want the brush
to start out in the same size that
you're currently at and same thing with color. And then just hit Okay.
I already did that step. So this brush is
the one that I've saved with that
normal blending mode. I've also moved it up
into my favorites folder, which is a totally optional step if you want to do that, too. To change the color
of your brush, all you have to do is select a different color in
the library's panel. Let's delete this layer and
start texturing the leaves. I'm going to go into the
group for the first oak leaf, and then above this
leaf left layer, I'm going to click the plus
button to add another layer. Let's just zoom in on this leaf. I'm going to use this
lighter green color on the left half of the leaf. First, I'm going to
decrease the brush size. Maybe something like
this. But obviously, I don't want the texture
to be outside of the leaf. So to do that, you can go over
to this layer where you're adding the texture and then
hold down Option or A, and you should see this
little icon for your mouse. And then if you
click, it will make it into a clipping mask so that this layer is only
visible where this layer is. So now I can go in
and add more texture. And this is all about what
you think looks best, so just kind of have
fun with it and feel free to use different
brushes than what I use. But one thing that I would
suggest is that if you use different brushes
or different sizes of brush, even, like, if I were to go in and do a version of this
that's much bigger, I would recommend
adding another layer, making that clipping
mask so you can have multiple clipping masks
for the same layer, and then do that on a
separate clipping mask. Because if you tri
side that you don't like one of the textures
that you've added, it's a little bit easier to go back and edit
what you've done. Like, I could just
delete this layer. And then start again. But if I combined the small texture with the
big texture on one layer, then I'd have to delete the
whole thing to start over. This just makes it a little
bit more easy to edit, if you have multiple layers and have each different kind of
texture on its own layer. I'm going to create
another layer, make it a clipping mask, and then go in and
change the brush. So let's change it to these
splatter brush is dots one. This is also in the
splatter brush pack. And then I clicked
out and I actually made some dots over here,
so I'm going to undo that. And then let's make
the brush bigger. Just add some
random little dots. And let's go and
add one more layer, make it a clipping mask,
and then I'm going to go over and grab this
grain shader four. With this brush, I'm going
to add a little bit of a darker shadow on
the left side of the stem to kind of make
it look like the leaf is a little bit more three D. So I'm going to use the
dark green color, but that's the same color
as this half of the leaf. So I'm going to change this
entire layers blending mode right here to multiply. And then I'll use this brush
to create that shadow. I'm going to make
it a little bit darker down at the bottom. Something like that, but
I think that's too dark. So I'm going to take
this entire layer and change the opacity to 30%. I'm happy with how the left side of the leaf looks so far, so now let's add the
textures for the right half. So I'll just add some
layers and then option, click to make that
clipping mask, and then I'm going to use
the dark green color, but I'm going to
switch the brush to this flatter brush and then draw some
texture over here. Let's create another layer
and grab a different brush. That's a little too small. So I'm gonna make
the brush bigger. I think I'm gonna leave
the green leaf like this. Now it's time to
repeat the process on all of your other leaves. Have fun with this
and feel free to experiment with different
brushes and colors. For the maple leaves, I decided to go
around the edges with the WC splatter spread brush and the grain
chador for brush. I realized that in my photos
of real maple leaves, they kind of start turning
color from the outsides, and the veins of the leaves
are the last to change. So on the orange maple leaf, I added some green
underneath the veins and some yellow in between to give it an even
more colorful look. Here's the result.
One last thing that I want to fix
is that if I zoom in on the maple leaves
and on these leaves, right here, you can see that the lines are going
off the leaf. So if I go in, let's
find this elm leaf, I'm going to take
the lines and make them clipped to their
half of the leaf. I'm just going to
make this panel bigger so you can see
more of the layers, and I'm going to bring
the right lines down here on top of the
right half of the leaf. And then option click to
make it a clipping mask, and now you can see
that it's clipped off that little corner
that was sticking out, and I'll do the same
thing on the left. So now just go through and do that on all the other leaves.
9. Export from Ps & Import into Ae: Down down down. Let's export these leaves so we can animate them
in after effects. You can import entire
Photoshop files into after effects and have access to all of the different layers. Any group will be imported
as a precomposition. But actually, for this project, we're going to go with a
different method because I found that it's a lot easier
for what we're trying to do. So instead of importing the
PSD file into after effects, I'll show you how to export each leaf individually
as a PNG file, and then we'll import
those into after effects. But first, we need to
change the resolution from 300 PPI to 72 because after
effects only works with 72, so giving it something like 300 is going to slow
down for no reason. Like to save a copy of
the Photoshot file at 300 PPI just in case I want to go back
and edit something, I still have the
full resolution. I'm going to hit Command
Shift S to save as, and then I'll just name this
for A E and then hit Save. Then go up to Image, Image size, and then change
the resolution to 72. Now to export all the
leaves as PNG files, I'm going to select them
in the layers panel, right click and then
choose quick export as PNG and then navigate to
where you want to save these. I'm going to create
a new folder called PNGs and then just hit Open. The nice thing about this
method is that it saves each file as a PNG with a
transparent background, and it automatically crops the dimensions of the file
to the size of the leaf. Now let's open up after effects. Let's create a new project, and then I'm just going
to grow and grab my PNGs. And then just drop them
into after effects. I'm going to select
the green oak leaf and then just drag
it onto this button here to create a new composition
with this PNG inside. Now, you can see that this is just an image file and we don't have access
to all of our layers. Usually, when you
want access to all of the different layers that
you had in Photoshop, it's going to be best
to import the PSD file, not an image file like a PNG. But for this specific project, it's going to be
easier to use the PNG. Before we get too far, let's save the After
effects project file. Navigate to where you want
to save it and give it a name and then just hit Save.
10. Set Up Leaf for Animation: Down down down. In this video, I'll show you how to prep
your leaves for animation so they're actual three D
shapes that are falling. The first step that
I already did was to take a leaf and drag it onto this new button to create a new composition
with the PNG inside. The next step is going
to be to mask out the leaf so that we
just have one half. With the leaf selected,
I'm going to use the keyboard shortcut
to create a new mask. That's going to be
Command or Control, Shift If we toggle this
open, here's the mask. And then if you clicked
off of the mask and then back on to this
top level mask, you should be able to select the individual points
and adjust them. I'm going to crop this
so you can only see the left side of the leaf,
not including the stem. Now that that's done, I'm
going to rename this. I know this might seem
a little tedious, and we had all the layers already in Illustrator
and Photoshop, but trust me, there's a reason this is going
to save you time. So just stick with
me for a second. I'm going to close
this up and then duplicate it with
Commander Control D. Let's name this right and then
go in and adjust the mask. So if you click on
the top level mask, you should be able to adjust the individual
points on the mask. So I'll just drag this over
the kind of flip this around. And then make sure that
the stem is cropped out. Now let's recreate the
stem with the Pen tool. So I'm going to click to
create a point up here, and then holding
Shift to make sure that I get a perfectly
straight line. I'll click down here to
create another point. If you need to change
the color of the stroke, click here and you
can either use the eyedropper to sample a
color or type in the hex code. I want to make sure
that this is centered. So first, I need to make sure the anchor point is
centered within the line. To do that, I'm
going to go up to the Pan Behind tool and then double click while holding
Command or Control. That centers the anchor point. And now let's center this line in the center of
the comp with the align tool. Let's rename this stem. And then in the
properties panel, you can give it round caps. If you need to go back
in and adjust the line, you can go into the contents, shape one, and then Path one. And if you select path one, you should be able to select the individual points
on the path to adjust. Next, I'm going to
go into the stroke and then underneath taper, I'm going to set
the start length to 100% and then bring the start width up a little bit so it's not so
narrow at the top. So maybe something
like that. And I need to adjust this so
it's a little bit higher. Let's close this up
and then go up to layer new null object. A null is basically
an invisible layer that you can use to
control other layers. I'm just going to
rename this controller. Then let's make
all of our layers three D by checking
this box here. When you're working with
any kind of three D layers, there are different
renders that you can use, and basically this
just means that it changes some of the properties
and options that you have. So to make sure that you're
using the same render, you should see this
dropdown here. Yours might be set
to three D classic, but we want it to be
set to Advanced three D. And just in case you
don't see this dropdown, you can also go to
composition settings and then go to three D
render and change it here. So just make sure you're using Advanced three D
and then hit Okay. Next, I'm going to select all the layers
except for the null and then take this pick whip and drag it onto the null layer. What this does is parents all of these layers to the null. So now if I were to take this
null and move it around, you can see that all
the layers follow. We're not going to use
this to move the layers. We're actually going to use
it to rotate the layers. So if I were to rotate
this in the Y space, you can see that the
leaf is now three D. But when I rotate this, you can see that the
stem looks flat, but a stem has a little bit
more dimensionality to it. It's not as flat as the actual
leaf itself in real life. So let's make it look like that. I'm going to undo that.
And then on the stem, I'm going to hit R to bring
up the rotation properties. Then on the Y rotation, I'm going to grab this
pick whip and drag it up to the Y rotation
on the controller. These numbers should turn red, which means that it's being
controlled by an expression. An expression is
just a little bit of JavaScript code that tells
the property to do something. In this case, it's
telling the property to copy the Y rotation
of the controller. But we don't want it to copy the Y rotation of the
controller exactly. We want it to do the
opposite of that. So what I'm going
to do is click into this expression and
then just arrow over so that my cursor is
at the beginning of the expression and
just add a minus sign. So now, whatever the wire
rotation is for the controller, the Y rotation of the stem
is going to be the opposite, so in the negative direction. So now it looks like the stem has some three
dimensionality to it, but in reality, it's
just not rotating. I'm going to undo just to
set things back to zero. Next, I'm going to
go into each half of the leaf and then underneath
geometry options, I'm going to set the
curvature to negative 50%. This is going to give
it kind of a curve. So when I rotate it
in three D space, it's not just perfectly flat. There's a little bit
of a curve to it. I'm also going to
increase the segments to ten just so that it looks
a little bit more smooth. And then I'll do the same
thing on the other half. Underneath material options, I'm going to turn
off cast shadows, except shadows and lights. You don't necessarily
have to do this if you like the look
of these on better. If you look at a
leaf in real life, usually the backside is a little bit less bright in color. So let's make our
leaf look like that so that when it rotates
in three day space, it looks a little
bit more realistic. To set that up, I'm
going to duplicate the right and left
half of the leaves. So just select them and
hit Commander Control D, and then bring these
duplicates to the bottom. You can rename them if you want. Then I'm going to
go to effects and presets and look for saturation. And then this hue
saturation here, I'm going to drag onto one
of the halves of the leaf, and then I'm just going
to adjust these sliders. But I'm not going
to be able to see this because it's on the bottom, so I'm just going
to solo this layer so I can see just this layer. I'm going to bring
the saturation down and the lightness up. Then I'm going to
take this effect. So selecting at the top, where it says Hue saturation and hit Commander Control
C to copy the effect, and then I'll paste it onto
the other half of the leaf. And then I'm going
to unsolo those. Again, I can't see the back of the leaf because the top
of the leaf is in front. And if I rotate this, we still can't see the
back of the leaf. So what I need to
do is go in here and hit P on the keyboard to bring up the
position property, and I'm going to change
the Z position to 0.1. So now you can see
the back of the leaf. And then I'll just rotate
this back to zero. Setting these back
leaves to 0.1 in the Z space makes
them just barely behind these top layers so that now when I rotate the
null in three D space, you can see the
back of the leaf. In order to animate this leaf and reuse it multiple times, this is going to be
a pre composition inside of another composition. If that doesn't make any sense
to you, let me show you. I'm going to go over
to the project panel and then create a
new composition. Let's name this. I'm just
going to make it 1920 by 1080. And I'll change the
background color to white and the duration
is fine at 10 seconds. I'm also going to
use a frame rate of 30 frames per second, but if you want to use something
else, that's okay too. And then hit Ok. To
animate my oak leaf, I'll drag that into
this composition, and now I can
animate the position of this leaf and the rotation. But right now I only
have this one rotation. I can't rotate it
in three D space. Let's set that up back
in the oak leaf comp. To do that, right click
in an empty space in the timeline and choose open
and essential graphics. This is going to open up this
Essential Graphics panel, and this allows you to take
properties here from inside of this comp and expose them so that when the comp
is in a different comp, you'll see those
properties listed here. So I'm going to select
the controller and hit R to bring up the
rotation properties, and then I'm going to
drag in this X rotation and the Y rotation. Now if I switch back to my
falling leaves composition, there's this new
essential properties toggle and I can open that up and then I can rotate this so that it rotates
in three D space, this direction, and
also this direction. But you'll notice
that as I'm rotating, it's getting cut
off a little bit, so I'm going to go back in to the main oak leaf
comp and just hit Command or Control K to bring up the
composition settings. Let's just lock
this aspect ratio and just drag this so that
it's a little bit bigger. If you want to, you can
make this a nice number. Just make sure that
you have enough extra space on the sides. Now when we rotate this, it shouldn't be getting cut off.
11. Quickly Set Up Other Leaves: Now that this oak leaf is ready, we need to do this setup
with all the other leaves, and this is where
importing the leaves as PNG files is going to
save you a bunch of time. So I'm going to go
over to the oak leaf composition in
the project panel, duplicate it, and
then rename it. And then I'm going
to open up and then select all four of these
halves of the leaf, and then I'm going to take
the lime green PNG file, hold down Option or Alt, and then drag it onto
these leaf halves. And now the majority
of the work to set up this lime green oak
leaf is already done. The only thing that you
really need to do is click on the stem and then change
the stroke color up here. You can just eyedropper the correct color
from the leaf itself. Then if I go back into the falling leaves composition
and drag in the new leaf, Everything is already set up, so if I go into
essential properties, I can already rotate
this in three D space. You can just repeat this process to set up the yellow oak leaf. You can also use the
already set up oak leaf as a starting point for setting up the maple leaf and elm
leaf. Let me do that. I'm going to duplicate
this again, rename it. Let's open that up, and we can actually close
essential graphics. And then I'm going to
select these four halfs of the leaf and then drag
in the maple leaf, holding down Option or Alt. Since this leaf is a
totally different shape, there's going to be a couple more things
that we need to adjust. First, I'm going to go
into composition settings, which is Command or Control K, and then adjust the width. Et's also adjust the stem. So if you toggle down, open
up contents, shape one, and then click on where
it says path one, you should be able to select
the individual points on the path and then drag
them to move them. If you want to, you can
drag in a maple leaf, the PNG version to
use as a reference. So for this stem, it's
a little bit long, so now I can just adjust that. I'll just delete that reference. Next, I need to go
into the max and just adjust so that there's
no gap right here. And I need to now adjust
the SEM a little bit more. And also adjust the stem color. I adjusted the mask for
the top half of the leaf, but not for the bottom
half of the leaf. So what I'm going to
do is just open up the top halfs and then
open up the corresponding back half and just take this mask path on the
back and parent it to the top. That way, it's going to
be the exact same path. So you can see how that updated to where I just made
that adjustment. And actually, it looks
like this path that I have on the top is going to be cutting
off part of the leaf, so I need to bring this
down a little bit. But now that the back
half of the leaf is parented to the top half, I don't need to worry about
adjusting this one at all. It's always gonna update
when this one gets updated. So let's do the same
thing on the other side. I'm going to make a few more
adjustments so that there's a little bit more variation
within my leaves. If I rotate this leaf
in the Y direction, you can kind of see
how it looks like it's curving out from the stem
and then kind of going back. But I looked at some maple
leaves in real life, and a lot of times,
it looks like they kind of start to curve
in on themselves. So let's try to make the
leaf look like that. I'm going to turn off
the back halfs of the leaf for now just so that
they don't get in the way. And then let's go
into the right side, open up geometry options, and then change this
curvature from negative 50 to a positive number so that it curves in
the other direction. And then I'll do the same
thing on the other side. I can make this look
even more curvy by also going into transform and
adjusting the Y rotation. And then on the other side, this is going to need to be in the negative direction
to curve in. Another optional thing
that you can do is add a little bit of animation
to the leaf itself. So not actually animating
it falling yet, but just animating
the leaf waving in the wind just a little bit so that when we do
animate it falling, it looks even more realistic. So to do that, I'm
just going to go up to the Y rotation property
and then from here, hold down Option or Alt and then click this
stopwatch here. And we're going to write a
really simple expression that gives it a random
wiggle animation. So I'm going to write wiggle and then if it guesses what you
mean, you can hit Enter. And then inside of
those parentheses, the expression wants to know
the frequency that we want this rotation value to
wiggle and how much. So I'm going to do
0.5, so 0.5 seconds, and then a comma, and then
let's do ten degrees. So it's going to
go plus or minus ten degrees from this value
that I set here at 15. And then just click away to get out of the
expression writing. So here's what that looks like. You can just copy and
paste the expression onto the Y rotation
of the left leaf. So option her out,
click this stopwatch, and then hit Command B to paste. We can also add a wiggle
expression to the curvature. So I'm going to option her
out, click the stopwatch. I could just paste
that expression again, and maybe let's try increasing
the amount that it curves. So let's do 25, and then I'll copy this and paste
it on the left side. So here's what this
is looking like. Feel free to adjust this
so it looks good to you, and I'm just going
to rotate this back. Next, we need to update the
back halfs of the leaf. I'm actually going to delete these two back halves and then select the
two front halves. Go up to Edit and then
copy with property links. And then hit Command V to paste, Let's move that behind
and then parent it to the controller, and
that should center it. So what that did was it
duplicated this leaf, but all of the
properties of this leaf, including the mask and the rotation property that
we added the expression to, they're all parented to this
left leaf, the top one. That's why you see all of these red numbers because all of these properties are
parented to the left leaf. Now I'm going to go into
one of my other leaves that's already set up and
grab one of the back leaves, go to the effect
controls panel and then grab this hue
saturation effect, copy it, and then go
back to my maple leaf. Select the back halfs of
the leaf and paste that on. So remember, this was
the effect that makes the back half not as vibrant as the front half of the leaf. There's one more
thing to set up, and that's to
adjust the position of the back half of the leaf so that when the leaf is rotated,
it can actually be seen. So I'm going to hit
P on the keyboard to bring up the
position property. And then I need to type in 0.1, but there's an
expression on this, so it doesn't really
let me type in a different value because it's already parented
to this leaf, so it's just kind
of overriding it. So I'm going to option her out, click on the Stopwatch to get
rid of those expressions. And then now you can see that my 0.1 is actually
working. It's there. And so, if we rotate this, you can see that the back half
of the leaf is a lighter, less saturated color, which is exactly the effect
we're going for. Now you should have everything
you need to know to duplicate this maple leaf to create the other
maple leaves, just like we did
with the oak leaves. And you should even be able
to set up the elm leaves.
12. Animate Leaves Falling: Let's animate our
leaves falling. I've organized my project
panel a little bit, so feel free to do that, too with the new folder
button down here. And then I've created a new
comp called Falling Leaves, and it's 1920 by 1920, and I'm using a frame rate
of 30 frames per second. You don't necessarily
have to use the same settings as me if you have a reason
to do otherwise. The first step is going
to be to drag in a leaf. I'm going to start off
by resizing this by 50%. And then let's animate
the position property. I want the leaf to
start off screen. So I'll set a key frame, and
then let's go forward like 3 seconds and drag the position all the way down so it's offscreen at the bottom. And then I don't want it to
just fall straight down. So let's add a few
more keyframes to just make it zig zag. And right now, these are
very jagged zig zag, so I'm going to go
up to the pen tool, click and hold, and then grab
the convert Vertex tool. And then if you click
on the keyframes, it'll add those handles if
you didn't already have them. So you can adjust these handles to adjust the motion path. So right now, this does
not look very realistic. So there's a few things
we need to change. First, let's rotate the leaf so that it's falling
with the stem up. So I'm just going to
rotate this 180 degrees. And then it's not really
following the motion path. So I could animate the
rotation with keyframes, or an easier way to do this, in this case is going to be
to right click on the layer, go to transform, and
then auto orient. And then choose orient along path that might change the
direction of the leaf. So let's change it to what we
want, something like that. And now you can see
that the leaf is going to follow that motion path.
So that looks a lot better. But this still doesn't look very realistic because the keyframes are linear and that's not how a leaf would
move in real life. I add in the middle
two keyframes just to make points
on the motion path, so the leave goes side to side. But I don't want
these keyframes to affect the overall
speed of the leaf. They're just there to tell
the leaf to go side to side, to hold that position. So what I'm going
to do is select these two keyframes
in the middle. And if you had more
keyframes in the middle, select all of the
keyframes that are not the first and last
keyframe and then right click on it and
go to Rove Across time. That's going to convert the keyframes to
these little dots. And basically, it
means that when you adjust the easing on the
first and last keyframe, these rove across time
keyframes in the middle are not going to affect the
speed of the animation. If you want more details
on the speed graph and adjusting motion curves and ovcroft time and all
of this type of stuff, then check on my class
smooth moves because I go way more into
detail into all of this. And this is a key
skill for being able to create realistic
motion and after effects. So definitely recommend if you want to learn after effects, if you're serious about it, that class is an important one. With that said, let's
look at how to adjust the graph with this
particular animation. So I'm going to select the
first and last keyframes and just add EZ Es to them. That adds the handles that you can adjust in the graph editor. So you can either right click, go to Keyframe Assistant, and then EZ Es or use the keyboard shortcut,
which is F nine. So now with the keyframe
still selected, I'm going to go into
the graph editor, and you can see this
is the speed graph. So it's starting off slow.
The speed is increasing. It's going to be fastest
in the middle and then slowing down
towards the end. But that's not how a leaf
would move in real life. So let's adjust this. Also note, if you're not seeing
the speed graph, if you're seeing a graph
that looks more like this, then you need to just
go to this button here. This is the value graph,
and if you go here, you can switch to
the speed graph. And you can also see
these little points right here are the
RovcrossT keyframes. So I want my leaf to start
out with zero speed, we're pretending it was attached to a tree and then
started falling. So as it starts falling, it's going to accelerate towards the ground because gravity
is pulling it down. But as the speed increases, the air resistance
also increases. So the speed graph should
start to level off. And then my leaf is going
to go completely off the screen so you never
actually see it hit the ground. But if it were to
hit the ground, the speed would go
to zero suddenly. So to create the type of
graph that starts out with an acceleration
and then levels off, I'm going to grab this
keyframe and drag it up, and I'm holding shift
just to make sure I don't actually move the timing
of this keyframe. So I'm going to move that up
and then let's even drag out these handles so that
the acceleration at the beginning is fast and
then it starts to level off. So maybe something like that. And you can see when I drag
the handles that the rove across time key frames
just follow that graph. So let's see what
this looks like. That looks a lot better
than it did before. Technically, as the orientation
of the leaves changes, the speed would change
slightly because the air resistance or drag
on the leaf changes. You're welcome to further adjust the graph editor to
add these details, but I tried this,
and I don't really think it made a
noticeable difference, especially when there were
multiple leaves falling. So I'd say, Let's save ourselves some time and not
worry about it. Next, I'm going to click out of the graph editor and
let's rotate the leaf. So I'm going to open up
the essential properties and let's animate
the Y rotation. So maybe at the start, I'll set a keyframe for
the Y rotation to be zero. And then let's just have it kind of rotating
the whole way down. So maybe I'll set this to one. Let's just add Easy Ease to
smooth out this animation. You could also animate
the X rotation. And if you do that, it
actually looks like this leaf is getting cut off, and if you have
the same problem, you can just double click into the composition and then hit Command or
Control K to get to composition settings and just increase the width or height
or both of your composition. I'm going to actually just
set this back to zero. Another option is that
you could animate the rotation here, so that'll rotate it this way. I want to have a bunch
of different leaves falling with a lot of variety. So I'm just going to
leave this leaf as is, and then for other leaves, I'll rotate them with this
rotation and the X rotation. So I'm just going
to close this up. One thing that I like
to do to save time is just to duplicate
this existing comp with Commander control
D and then drag in a different leaf holding
option onto the selected comp, and now it'll replace
it with that comp. And now let's go into
the position property. And if I select the entire
position like this, so all the keyframes
are selected, I can just drag this position over And then I could go in to each individual point and adjust this so that
there's more variation. I could also go in and
animate the rotation. So I'll set a keyframe, let's rotate this
like 180 degrees. That looks pretty good.
Then let's just add EZ Es to these to kind of
smooth out that animation. I could also stagger this layer so that it's not lined
up with the oak leaf. Let's bring in another leaf. I'm just going to duplicate
the oak leaf again. Either leaf is
fine to duplicate, and then I'll drag in
the green alm leaf. Let's go to the position,
move this over. Let's adjust the
position keyframes. Et's also animate
the X rotation. And at Easy Ease. And I can even throw in a
rotation on this rotation here. And let's stagger these layers so that they don't all come
down at the same time. So my approach to
creating a bunch of different leaves is to just
keep duplicating the comps, dragging in different leaves on top of them to switch
out the leaves, and then adjusting the
position and rotation key frames kind of
randomly to create a bunch of different
random variations and just kind of play around with this to see what looks good. Once you have enough different
variations of leaves falling with different positions
and rotation keyframes, you can start to reuse
the same exact leaves just at different
times in the timeline, and no one will really notice. Once you get more leaves
in your timeline, it'll probably
take after effects a longer amount of time to
preview your animation back. So you can lower the resolution to make it go a little
bit faster here. Another thing you can
do to add variation to your leaves is to
change up the scale, and I'll show you a trick so that you don't
have to go into each leaf individually and
change the scale number. So instead of doing that, I'm
going to use an expression. So I'm just going to
option or click on the Stopwatch for the scale property of one of the leaves. It doesn't matter which one, and then I'm going to
write an expression. So the expression is
going to be random. And then in parentheses,
you can define a range. So since the scale
is already 50%, I want it to be maybe
between 40% and 60%. Now, if I click out of this,
I'm going to get an error, and that's because the scale
is two different values, X and Y, but I only gave
it one random number. So to fix this, what
we need to do is go back into the expression
and add a variable. So S equals, and then that's going to be the random number and then put a semicolon at the
end of the line and then define in brackets
the two scale properties. So X and Y are both going to
be S, and then click out. So now this has chosen a random
number in my range of 52, but I'll just so this leaf
and show you what this does. Scale changes at every frame, which is also not what we want. So in order to fix this,
we need to freeze it. There's a couple of different
ways you can go about this, but I'm going to
use seed random. So I'm going to add seed random. And then in parentheses,
it wants a number. So this is the seed number. So you can really
just pick anything. So I'll just put one. And then the second
thing that needs to go in the parentheses
is true or false. True means that it's
just going to choose one random number, which
is exactly what we want. We don't want it to
change on every frame. And then technically, you should have a semicolon
at the end of this line. And now if I click out, it's
chosen one random number, and when I play it, it just keeps that same random
number the whole time. So we can copy this expression onto all of the other layers. To do that, right click, go to Copy Expression
only and then select all of the other layers and hit Command or
Control V to paste. You can see already how that's given each leaf a
different scale.
13. Animate Leaf Drifting: Another way to animate leaves is to make them look
like they're drifting. So let me show you how to
do that on this oak leaf. I've already added it to a
new comb and scaled it 50%. Let's animate the
position property. So I'm gonna have it
start off screen. And then every, like, 1 second, 20 frames, I'm gonna have it
zig zag across. And then it'll end off screen. Obviously, this motion path is not going to be what we want. So let's go in and add handles
so we can curve the path. So go up to the pen
tool and then click and hold and grab the
convert vertex tool. And then you can
click these points, the keyframes to add handles. And then just drag
the handles to create a more
realistic motion path. This handle I need to bring
down, but if I do that, it's locked to the other handle, and it messes up this
part of the path. So to break these handles, hold down option or Alt
and then drag the handle. And then it will
unlock the two handles so you can drag
them how you want. Now, let's rotate the leaf. So up here, I'll have it start kind of in line
with the motion path, and I'll set a key frame. And then let's see all the
keyframe so I'll hit you, and then I'll go to where
changes position here, and I'll just make
sure that this is kind of lined up better, and then I'll do the same thing for all the other keyframes. Let's make sure it starts
all the way off screen. Obviously, we need to adjust the keyframes because
this doesn't look right. So I'm going to select all
the keyframes and add Es Es, and then go into
the graph editor, and let's just select
all the keyframes. And then I'm going
to drag the handles to make this graph a
little bit more extreme. So let's see what this looks
like. That looks decent. I'll click out of
the graph editor. Now let's rotate this
in three D space. I'm going to close this
and open it to find the essential properties and let's keyframe the Y rotation. So at the start, maybe I'll just move this
so I can see it. We'll start the leaf,
maybe something like this, and I'll set a keyframe. Let's actually move that to
the start of the timeline. Then once it gets here, maybe let's rotate it so it's
flattening out like this. Maybe when it travels
from here to here, I'll make it do a full loop. Or maybe let's do
almost a full loop. So something like
that, and then maybe it'll do another loop
for this segment. Then let's have it
rotate all the way back like this. I'll move that. I just put it there
so I can see it. Then let's ease these
keyframes to smooth out that animation. Let's see
what this looks like. I think this is
looking pretty good, but the motion is
a little bit too extreme between the
fast and slow parts. So I'm going to select all
of the keyframes and just hit EZ Es again to
kind of reset them, and then I'll go into
the graph editor and re select the keyframe
so I can see those handles, and then I'll just drag
the handles to make the EZ Es graph a little
bit more extreme than EZs but not quite as extreme
of a peak as I had before. So let's try that out. I think that looks
better. I'm going to take this point and bring
it down a little bit. And feel free to fine tune this as much as you
feel like you need to. I've already animated this one, so the first time around, it definitely took me longer. One more thing
that we can add is a bend so that the leaf looks a little bit
more realistic. So I'm going to go
over to effects and presets and look for CC bend it, and then just drag
that onto the leaf. If that cuts off your
leaf, that's okay. What we need to do is adjust
the start and end values, which are these
little controllers on the leaf so that
nothing gets cut off. So usually, if you extend them, to the edge of the layer or a little bit beyond,
that works well. So then if I adjust
this bend amount, you can see how that
affects the leaf. And if you go too
far, obviously, it'll get cut off, but we don't really
need to go that far. So maybe at this
point, I'll have it bend something like this. And let's set a keyframe here. So I'll set the keyframe here, and then if you hit
U on the keyboard, it'll just bring up all the
properties with keyframes. And then let's move forward, and maybe around here, it needs to bend the
other direction. So something like that. And then at this point, let's
just bend it back to zero. And let's add Ess
to these keyframes. So that's how it animate
a leaf drifting. Feel free to apply this
to the other leaves, too.
14. What's Next: Down. When you're ready to
render out your animation, either make sure that
it's open in the timeline or select it or select
multiple in the project panel, then go up to composition,
add to Render Q. The default settings
export an MP four file, which is usually good
for most things. If you want to change the
type of file it exports, then click this Blue text, and you can change
the settings here. Then click the blue text next to Output two to choose
where you're going to be saving this file, and
then just hit Render. If you want to render
your animation as a gift file
instead of a video, check out this
tutorial, linked below. If you want to learn how
to make your falling leaves animation loop semlessly, check on my class
looping animated scenes. If you got something
out of this class, I'd really appreciate
if you left a review. Thank you. To keep learning, click on my name
next to this video to check out the other
classes that I'm teaching. And make sure you're
following me on Skillshare, Instagram and
YouTube and sign up for my email newsletter to hear when I have a
new class for you. Thanks so much for being here. Until next time.
Happy Animating.
 Megan Friesth, Motion Designer