Transcripts
1. Welcome: Rigging a character should connect your illustration
in ways that makes animating more
efficient, easy and intuitive. But too complex of
rigging systems can take time away from animation and make
character animation infeasible for projects
on a tight deadline. On the other hand, not
creating a rig can lead to headaches and leave
your animation lacking the sweet spot. A flexible, efficient system that actually makes
animating easier. Welcome to limber
character Rigging, to secondary animation
and after effects. In this class, you'll learn how to efficiently rig a character created for a specific action and bring it to life
with animation. We'll even add
secondary animation for a more realistic look. I'm Megan Phrase and
I'm an explanator, which is just to
say that I write illustrate and
educational animations mostly on health and
environment related topics. I use character
animation in my work as a powerful
storytelling tool to help viewers picture
themselves in the character shoes and relate the message
to their own life. In this class, I'll
show you my go to tool for efficient custom
character rigs. Limber. Limber is an
after effects add on that allows you
to quickly create flexible shape based limbs. It has all the necessary
features like the ability to create custom limbs
using your own artwork. Auto rotate hands,
and seamlessly switch between
animating in IK and FK. Plus, it's compact, not overly complicated,
and easy to learn. I may sound like I'm a
salesperson for Limber, but I'm actually
just a huge fan. You'll be able to follow
along with a good portion of the class with just the free
trial version of Limber. And by doing so you can decide if it's a tool that
you want to invest in. This class is for
two D animators who are comfortable
in after effects and ideally have a
basic familiarity with character rigging
and animation. You can find a specific
list of things to know. Below this video,
you can check out my other classes to get more comfortable
in after effects. If you're ready to learn
how to efficiently rig a character and bring it
to life with animation, then let's get started.
2. Class Project: The project for this class is to rig and animate the illustration provided or use your own illustration or one from another illustrator. You can consider going to the class the first time, following along step-by-step with me, and creating exactly what I'm creating. Then you could go back through the class and try to apply the skills you've learned to your own project. If you're using your own illustration, your character does not necessarily need to be by game. Just make sure that you can apply the principles and skills from this class to your own rig and animation. If you have any questions along the way, feel free to post them in the discussions tab below this video.
3. Install Limber: [MUSIC] In this class we're
going to be using a character rigging and animation
tool called Limber, that you can purchase
from aescripts.com. There's also a free version of Limber called Limber Light. While I'll be using
the paid version of Limber throughout the class, you can use Limber Light to
follow along with the class, so you can try out character
rigging and animation with Limber before deciding if you want to purchase
the paid version. If you use Limber
Light for this class, the way that you create the legs and arms will be much simpler. You won't be able
to use the leg and arm artwork from Illustrator, so it won't look exactly
like my example. With Limber Light, you can only create simple limbs
called bones, but these can be styled
like you would style any shape layer that's
a path with a stroke. Once you download Limber Light or the full version of limber, you'll see a ReadMe PDF in the folder
alongside the plug-in. This file will explain
how to install Limber. Once you've installed Limber, if you had After Effects open, you'll need to close
it and reopen it. Also, if you go up to the After Effects menu
and then "Settings", then down to scripting
and expressions, make sure that, "Allows
Scripts to Write Files and Access
Network" is checked on. You can find Limber
under "Window" and then it should be down in
this bottom section, and you can dock this
panel wherever you like. Also in this ReadMe PDF, there's a link to the
Limber user guide, where you can learn more
about the differences between the free and
paid versions of Limber, as well as advanced
topics and features of Limber that we won't be
going into in this class. If you have the full
version of Limber, you'll also get this handy limb library with
different styles of limbs that you can
use as starting points in your own animations.
4. Limber 101: [MUSIC] Let's take a look at
what Limber does and how it compares to other character
rigging and animation tools. This video is going
to be a little bit different from the
rest of the class. It's not a step-by-step
how-to video. I just want to explain why
Limber is my go-to tool for efficient and flexible
custom character rigs. This is not going to be
an exhaustive list of features or a complete
comparison between tools. Just a high-level overview. Let's start with how
a limb is set up. With member, you can either
create a limb directly from the tool or you can
use your own artwork, which is what we'll be
doing later in this class. Once you create a
limb with Limber, you have options when you select the wrist or ankle in your
effects controls panel. You can adjust things like
the shape of the limb. The upper length, the lower
length, the start size, the middle size, the end size, and you can even make the end
square instead of rounded. You can also scale the limb, and because this is just
made of shape layers, it's a vector-based limb, and so it's infinitely scalable
without being pixelated. You can also quickly
and easily adjust the colors of different
segments of the limb, and you can adjust how much
of the limb is that color. This isn't easy way to make
sleeves and things like that. You can also around
these segments to make it look like the
limb is in 3D space. You can even animate the
amount of rounding to make it look like it's moving
in and out of 3D space. This is a pretty
cool feature that RubberHose and Duik don't have. It's also easy to address which direction your
limb is bending, and it's easy to animate between these directions
if you need to, because it's based
on a percentage. With RubberHose, you can create a limb right from
the tool as well. You can use your own
artwork from Illustrator or Photoshop by using the rubber
rig feature or rubber pin, which utilizes puppet pins. To be honest, when
I use RubberHose, I mostly use the
RubberHose option, but I now prefer Limber over this for reasons
that we'll get into. There are options for
styling a RubberHose limb, like adjusting the length
or the bend amount. You can also animate
the bend direction very similar to how you can
animate it in Limber, but it's a bit more time-consuming
and limited compared to Limber when it comes to customizing things like sleeves, pants, socks, shadows,
and that thing. With Duik, you'll
need your own artwork from either Illustrator
or Photoshop. These guide layers in blue that I've created are not required, but I think that they help
to help line everything up. I find that setting
up a Duik Rig takes the longest out of the
three different tools, but you can set up a
whole character body rig, which includes the
spine and neck, whereas Limber and RubberHose
are really just for limbs. With Duik, you'll need
to carefully connect your artwork to controllers
that it creates. Once you align everything up and parent the artwork
to the controllers, Duik creates more controllers
that you use for animation. In the end, there's
a lot of layers. Duik is a powerful tool, but it can be intimidating to learn because there
are so many buttons. Another bonus of Limber is that it comes with
this Limb library, which is just an After
Effects project file. In this project file, there are a bunch of
different kinds of limbs that you can
use in your projects. It's really easy to copy the style from one of
these limbs by using the Copy button and
then just paste it onto a limb that you've already created with the Paste button. Limber gives you the option
to have anything that you attach to the start
or end of your limb, like a hand or a foot
auto-rotate as the limb moves. You can even adjust how
much it auto-rotates. RubberHose gives you
these options too, but in the form of a checkbox so you can adjust the amount. Unfortunately, it's
not so easy in Duik. Limber and RubberHose limbs can be stretchy and
the controllers will change colors when stretch to indicate that the
limb was stretched. Also with Limber, you can turn off the ability for your limb to
stretch if you want to, but you can't with RubberHose. Duik has an auto
stretch option which if unchecked will prevent you
from stretching the limb. If auto stretches on and
you stretch the limb, it might all fall apart. This part gets a
bit more technical, but it's not totally necessary to understand for the
rest of the class. I just want to explain
because it's one of the main reasons why
I like using Limber. With all three of these arms, you can animate the
position of the hand and the rest of the arm
will move accordingly. This is called inverse
kinematics or IK. The other way to animate a limb is forward kinematics or FK. With FK you rotate the shoulder then the
elbow, then the wrist, it's called forward kinematics because of rotation at
the joint closest to the body affects the rest
of the limb and so on down the chain moving
forward away from the body. Inverse kinematics happens in the reverse order and you just use the wrist automatically
controls the rest of the arm. It's not super important
to understand FK and IK for this class because
we'll only be using IK, but this gets to a major
selling point of Limber. There are times when
animating using IK is best, for example when a character
is grabbing something, and then other times IK
doesn't work very well. For example, if a character is reaching up
towards their head, the elbow might flip out and move in a direction
that you don't want to. There's no elbow control, at least in any 2D character
tools that I know of. In this case, you'd
want to use FK because you can control
each segment of the arm. FK is also good for
animating swinging limbs. Limber really shines here because you can switch
between animating an IK and FK and back and
forth really seamlessly. You can animate the
switch between the two and use these
handy buttons to translate the orientation
of your arm and FK to IK and vice versa. Unfortunately,
RubberHose doesn't have an option to animate and FK. Duik because both FK and IK, but it's a checkmark so either on or off to switch
between the two. If you need to animate
between the two, it's much more difficult, especially because there's
no button to translate the orientation
of a limb between FK and IK, or vice versa. That has to be done manually. That's why I like
using Limber to rig and animate the
limbs of my characters. In the rest of this class, I'll be showing you how I
use Limber and other tools in order to rig and animate
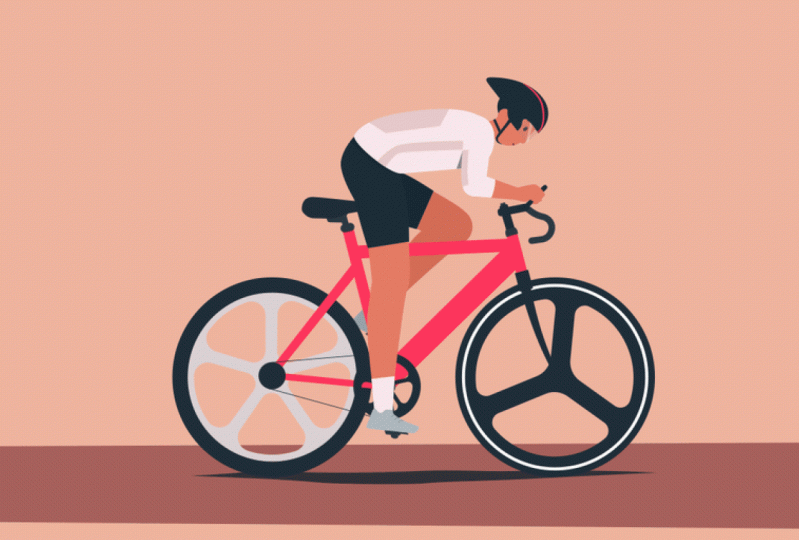
this character biking.
5. Prepare Illustration: If you're working as a professional motion designer, it's common to be given an illustration and your job is just to animate it. For this class, I'm going to be providing you with this illustration so that we can focus on the rigging and animation side of things. Now if you want to create your own illustration, you are more than welcome to and you can even go through this class a couple of times, and first do it with this illustration that I'm giving you, and then do it with your own or just jump right in with your own if you are up for a challenge. When you're working with artwork from someone else, they might not know exactly what you need for animation, so they might not have separated out all the artwork into different layers. It's obviously a good idea to communicate with your illustrator to make sure that you're on the same page, but you'll still probably have to go into the Illustrator file and make a few changes to be sure that the file is ready for animation. Let's talk about some of those things that you might have to go in and do right now. First of all, you're going to want to make sure that your Illustrator file is pretty decent in size, so that when you need to zoom in and work on small details, that you can actually see those details without them getting really pixelated in After Effects. Even though this is vector-based artwork, when you zoom into it in the composition window in After Effects, it will still get pixelated when you're zoomed in at like 800 or 1,600 percent. It helps to work with the bigger art board or composition, and then you can always shrink that down. This art board is actually 4K, so 3,840 pixels by 2,160 pixels. In this Illustrator file, all of the layers that are currently visible when you first open the file is what you would probably get from your illustrator, but maybe even a little bit more than you get from your illustrator because I did separate everything that needs to be in its own layer into its own layer and I named it. But you'll see that this leg, this front leg is all combined in one shape and this back leg is all one shape. These are not going to be animatable, so we're going to need to go in and recreate the legs. We can actually just recreate one leg and then duplicate that in After Effects to get the other leg, so we're just going to focus on the front leg. Lucky for you, I already knew what exactly you're going to need and I was going to need that myself to animate this, so I thought it would just be mean to not give you those layers. I actually did provide you with those layers and they're just going to be these hidden layers here. For the front leg, I'm just going to hide this one that's currently visible in the biking position. That would be the one that you probably get from your illustrator and then I'm going to show all of these other ones which are the re-created leg that we're going to be using for animation. This is the thing that you are probably going to need to recreate on your own, so these layers, you'd probably need to recreate on your own if you are getting this from another illustrator that didn't know exactly what you would need in order to animate it. Let me walk you through what I've given you so you can recreate this on your own if you needed to. First of all, we have this circle for the hip. You can see that this hip is a perfect circle and I've even made it a nice round number, which is always nice but not necessary. Then I've also created what Limber calls a wedge group, which is just a rectangle which is a little bit smaller at one end than the other. It fits perfectly between the hip and this other circle, which is the knee and these are all on their own layers, and then the calf group is a little bit different. The calf group is going to have some additional art within it. It has this little calf on the pant, a little accent line, a shadow, and it also includes this actual leg. This whole thing is the calf group. We're actually going to be able to incorporate that into our leg rig, which I'll be showing you later. Then I also have the shoe on a separate layer. In order to create a Limber limb, the most important things that you need are the hip, knee, and ankle, which is this little circle right here. It's hidden by the shoe, but this circle right here. Hip, knee, and ankle for a leg, and then obviously shoulder, elbow, and wrist for an arm. What Limber is going to do is just connect these three circles in order to make the leg. Whatever size you make these circles is going to determine the size of the thigh and then the calf. But if you have any artwork like we do for the calf, you can incorporate that into the Limber rig. You'll actually see in a little while that you don't really need this thigh group because there's nothing special about it, it's just a solid color, so Limber would make this for you when it connects the hip and the knee. But I just created the thigh group because otherwise the leg would look weird until we rig it. Again, the three things that you need to create a Limber limb with your own artwork are the three joints, so hip, knee, and ankle for a leg, and if you want to include any artwork, you can include those for the calf and the thigh, or same thing for the arm but just for the upper arm and forearm. Then you can also include things to attach to the limb like a shoe or a hand. When I create a limb to rig with Limber, I like to put all of the artwork layers in a straight line like this because I find it easier to line everything up and make sure that it [inaudible] perfect. That's why I've created this straight leg right here. Then once it's rigged up with Limber, then I can easily just bend it and move it into place on the pedal. But you can use Limber to rig a limb that's already bent, so if you want to do that instead, that works as well. You just, again, need to have the three joint layers as circles. Let's also look at the arm. This visible layer that has everything altogether is probably what you would get from your illustrator. What you would need to do is recreate it to have these layers, so the shoulder, the sleeve, the elbow, and the wrist, and then I also have the hand on a separate layer. Again, I've given you the layers that you need, but you'd probably need to recreate this if you're working on a different project. You might be wondering why I don't actually have an arm here, I just have the three joint circles and then the sleeve. That's because when I use these three joint circles in order to create a Limber limb, Limber is going to connect these circles and make a shape for the arm. I actually don't need to create those shapes. Also, the sleeve is just going to be added on top of that arm, so I'm just going to have the sleeve just like this, and I actually know because I created this version of the arm, that this is the correct shape and size for the sleeve and this little shadow on the arm. I was able to just delete those arm layers because Limber is going to create that for me. Also in this file, I've given you two different pony tails and two different ears for the dog's ears. This pony tail is what the illustrator, which happens to be me in this case, wants the hair to look like, but we want to animate that hair and we want to animate it waving, so we're actually going to start with something that's a little bit less wavy. Because of the effect that we're going to use to animate the hair, we're actually going to want to use a bigger version of that hair so that it's easier to work with, and you'll see why when we get to that lesson. But I've given you this weird-looking hair layer that was going to work better for animating the hair and you'll see why in that lesson again. You have that there and then same thing for the dog's ear. This fun, wavy dog ear is what the illustrator wants the dog's ear to look like, but to animate that same thing as the pony tail, we're going to be using this ear that's a little bit less wavy. Since the dog has two ears, we'll just be duplicating the first ear that we've animated to create the second one. You only need this one ear here. That's why there's those two weird layers in there.
6. Get Set Up: I want to use an extension called Overlord to transfer my artwork from Illustrator into After Effects. In this class, I'm going to be using an Overlord so that you can see a more true version of my workflow. But I trust that you're comfortable enough with Illustrator and After Effects, and you know how to import artwork into After Effects in the traditional way. While you'll see me using Overlord in this class, you do not need to have Overlord in order to follow along. You'll be able to do everything that I do, using the traditional method of importing your file into After Effects. If you want to learn more about Overlord, you can check out my class, the Top 5 Plugins for Efficiency in After Effects. If you're importing the Illustrator file into After Effects the traditional way, just make sure that you have import as Composition Retain Layer Sizes selected. If you don't see this option, click the "Options" button and then hit "Open". That way you'll have all of those layers that I separated out for you in your After Effects composition. At some points, which I will warn you about, you're going to need to convert your Illustrator layers into shape layers. You'll just right-click, go to Create, Create Shapes from the Vector Layer. Once you do that, you can either delete the Illustrator layer or just shy it to get it out of the way. Now let me show you how I import my Illustrator artwork using Overlord, which is this little tool right here. First, I'm going to create a new composition, and I'm just going to call this biking, and I'm going to make sure it's the right dimensions. I'm going to use a frame rate of 30 and just hit, "Okay". Then I'm just going to click this little button right here, which is just a shortcut between Illustrator and After Effects, which comes in really handy. Then in Illustrator, I'm just going to select all of the artwork that has to do with the bike. I'm just going to select from the crank arm all the way up to the front pedal. I'm selecting the actual artwork, not just highlighting the layer. You can see that the artwork is selected with this little box indicator here. Just note that all of the layers that have multiple shapes within the layer like the wheel, these are contained within a group. That way it'll import correctly using Overlord when I import them all at once. This is my Overlord tool in Illustrator, which is pretty similar to an After Effects, but I have these options for center anchor points, split shapes to layers, and detect parametric shapes all selected, and then all I need to do to move this artwork into After Effects is to hit this push button right here. That's going to separate all of the layers out, just like I had them in Illustrator. Because I imported these layers using Overlord, they are already shape layers, which is really nice because I won't have to do that thing where you right-click, Create, Create Shapes from Vector Layer, like you would if you are using the Illustrator file. If you want to just focus on these layers like I'm doing, but you're using the traditional method, you can just hide the layers that you don't need, and you can also shy them. You just select them, hit the shy, and then hit the shy guy here to hide the layers that you don't need. That's just helpful from a workflow point of view, but not totally necessary.
7. Build the Bike: Now let's set up the bike and animate it pedaling, because the peddling of the bike is actually going to drive the animation of the legs. You'll see what I mean by that in a little while, the opposite of real life. The first thing we need to do is move the anchor point on these crank arms. To get to the pan behind tool to move the anchor point, I'm just going to use the keyboard shortcut of Y, and just move this up and zoom in a lot. This is where it helps that I made the file nice and big. Things aren't too pixelated, so I can still tell what I'm doing. I'm just going to hold down Command, and that will help snap this right into the center of the chain ring. Now I'm going to do the same thing on the back crank arm. Grab the pan behind, hold down Command, snap it into place. The chain ring seems to not have it's anchor point in the center, so you can either do that same thing with the Pan Behind Tool and hold down Command, or if you have a plugin like motion, you can just use the shortcut to center the anchor point like that. Next we're going to do the pedals. We want to have the pedals follow the motion of the crank arm. So I'm just going to parent the front pedal to the front crank arm and the back pedal to the back crank arm. Then the crank arm is actually going to be parented to the chain ring. Both of those crank arms parented to the chain ring. Now let's animate the chain ring rotating. I'm just going to hit "R" to bring up the rotation property. Set a key frame right at zero for the rotation to be zero. I'm going to be animating one revolution in 32 frames. I'm just going to zoom in on the timeline and go to 32 frames or 1 second, 2 frames. You can see the number of frames right here. I'm just going to set a key frame for the rotation to be at one whole revolution at 32 frames. I can even trim my work area to 32 frames just like that. If I play this back, you can see that the pedals and the crank arms are rotating, but the pedals are also just rotating, just glued onto those crank arms and that's not how a bike would work. Your feet really wouldn't be able to stay on the pedals like that. What we need to do is counter rotate these pedals. To do that we're going to use an expression. First I'm just going to bring up the rotation property, and then I'm going to option click on the stopwatch to open up this field where I can put in an expression. If you've never used expressions, that's okay. Basically an expression is just a little piece of code that tells After Effects how to animate this property or how to modify it to do what you wanted it to do. I can delete what it has in there right now and just paste in an expression that I have copied. I save a bunch of expressions in a notes app on my computer so that I can just easily reference them. You can find this expression to copy and paste below the video. I'm just going to paste that in there. Click out, click back in so you can see the full expression, and you don't need to understand exactly what all this means. I'm not even taking credit for writing this expression. I got it from somebody else. But just understand the gist of what this does. Basically, this expression is just going to counter the rotation of any of the parents of this layer. If I play this back, you'll see that that pedal is always staying level. It's going to be counter rotated so that it maintains that level position. Whatever the parent rotation is, this expression is going to counter the rotation for the pedal. I'm going to paste the same expression onto the back pedal as well. Remember "Option" click and then just paste that in there. Now both pedals will just stay level the whole time, more like a real bike would. The last thing that I need to do here is animate the wheels of the bike. I could just parent the rotation of these wheels to the rotation of the chain ring because they could be going the same speed. But if the bike had gears or something, the pedals could be going at a different speed than the wheels, so I could also just animate the rotation by setting key frames. For now, I'm just going to have them do one revolution which is the same as the chain ring. But I could always change this if I wanted to. Right now we have our bike peddling itself, and in the next video we'll add the character.
8. Create Limber Leg: [MUSIC] Now let's
import the leg layers and make it into a limber leg. But first, I'm just going to do a few housekeeping things. So I'm just going to
color code all of the layers that have
to do with the bike. I'm just going to click on this little colored box
and change it to yellow. Just because the bike is yellow. Then I can color-code
other groups of layer so it's easier to
see what I'm working with. Now let's import the leg. I'm going to import those
recreated shapes that I made. So starting with the ankle all the way up through the shoe. Just make sure that
all of those are selected and that the layers
are going to be split into their own layers and then just push them over
into after effects. If you imported your artwork without overload in
the traditional way, then you're going to
want to go in and find the layers that
you need by unshowing them and making them visible. Then this is when
you're going to want to convert the layers
into shape layers. So from the hip until the ankle, all the leg layers except
you can skip the shoe, you're going to want to
right-click go to Create, create Shapes from Vector Layer. You can delete the original illustrator layers if you like. Now sometimes when you do this, the artwork doesn't get converted into a
shape layer properly. So if you click on this
Calf Outline layer that's the shape layer, you can see shape selection on the outside
of our whole composition, which doesn't make any sense for this calf which is
just right here. So let's toggle down into the calf layer and see
what's gone wrong. If you just start to toggle
down each of these groups, which are just the
different shapes that make up the calf layer. I'll just solo this so
we can focus on it. So in Group 4, you'll see this Group
1 within the group, and then the merge
paths right here. So sometimes when you import and then convert
to shape layer like this, after effects will
create these masks where you don't
actually want them. So that's what's happened here. But it's easy to fix by just
deleting the merge path and we're also going to
need to delete the Group 1. So now that border
on the outside is gone and the calf
still looks right. The only thing that is off is that this
shadow is really dark. So that's this Group 4, I'm just going to go
into Transform Group 4 and bring down the opacity. So that looks just like we
had in Illustrator now. We can just close up this
layer and we're good to go. So no matter which way you
imported your artwork, we should all be in
the same place now. The first thing I'm going to
want to do in order to rig this leg is just select
the hip, knee, and ankle. So just those three
circle joint layers. Then I'm going to
go up into limber, which I have docked right here. I'm going to make
sure first of all, that the type of limb
I'm creating is correct. So I want to make a leg and I want to make
a tapered limb, not a bone, so make
sure taper is selected. Then to use my custom artwork
that I have selected here, I'm going to hit this rig
and pause button right here. That's going to
bring up this little dialogue where
it's going to show what I have selected for each of the layers that make up the leg. So this looks right
and I also want to include for my lower art
layer, the calf layer. So I'll just select that there. I don't need to choose the thigh because like I mentioned in the character
illustration video, there's nothing special
about this thigh. It's just a solid
color shape and limber will make this connection between the hip and the knee. So I don't need to use my thigh artwork at all because limber is just
going to do that for me. So I'm just going to leave
the upper art layer, which is for the thigh as none, and then I'll hit "Okay", and this is going to let me decide what I want
to call the limb. I'm just going to call it front because it's going to be the front leg and hit "Okay". Then limber will do its magic and now I have this rigged leg. With the ankle selected, I could just take this, move it around and you can
see that it moves like a leg. Now, you'll also see that
that thigh group has not been hidden like the other layers that I use to make
that limber limb. So I can just hide that. Actually I could
just delete all of these original layers
that I use to make this limb because now
I've made the limb and they're all incorporated
into this leg group. So I'll just delete those. If you look closely
at the ankle, we have a tapered ankle whereas in my original
illustrator artwork, it was just a straight
ankle like that. The reason why this happened is because limber
is just going to connect the knee and the
ankle in a perfect taper. But we actually
don't want to see the bottom of that taper. So I can fix that by going
into the front leg group. The front leg is what contains all the artwork and
then the hip is just a controller and then the ankle is
just a controller. So if I go into the actual
front leg that contains all of the shape layers that
make up that leg and I toggle down into
Contents and then Limb, then under Lower Group, I'm going to toggle that
down and Distal Lower is going to be this wedge group that I want to get rid of. If I just hide that, you can see that that
tapered ankle has gone away and it's just
keeping the ankle that I had in my
original artwork. So all I did to
fix that was just hide the distal lower group. Then I can just
close this backup. Now we have our leg all set up and in the next video
we can animate it. [MUSIC] Here's how to create the leg if you're
using Limber Lite. First, you want to make
sure that you grabbed the shoe layer either from the Illustrator file that
you've already imported into After Effects or
by using overlord. Then next you want to just go up to Limber Lite and
hit "New Bone", and you can name this. Now we just need to style this limb a little
bit to make it work. So this is going to be the hip, this front start, and then the ankle will
be the front end. I'm just going to move
this start controller up to about where
the hip will be and the end controller down to
around where the shoe is. Right now I notice how these
controllers turned red. That means that I've
stretched the limb. So what I need to do is go in the Effect Controls panel
and underneath the Shape, I need to make the
upper and lower length longer so that this is
not a stretch limb. Those little
controllers will turn into a green or teal once
I get to that length. Let's try, since I've done this, I know it's about 450 for each of these
to make this not so stretched and we could
even maybe go 445. Something like that
looks pretty good. Then let's go into the front
limb and toggle that down, go under the limb
and then underneath the stroke and then these
stroke options probably look familiar to shape
layers that you've used before so we can go
in and change the color. Then we can also adjust
the stroke weight. So I'm just going to
make that 200 because an illustrator of the hip
circle was 200 pixels, and then I'm just
going to go underneath taper and let's make
the end length. Let's bring that up so
it makes it tapered. Let's do 90 and then we'll make the end
width a little bit wider. Something like that
looks pretty decent. And you might need to just
finesse this a little bit to make it look a
little bit better. But overall, this is how you would create the
limb with Limber Lite.
9. Animate Legs: Before we animate this leg, let's just move the shoe above the ankle. I'm just going to color code the front leg blue, just so that all of my leg layers are the same color. Normally what I would do is go into this shoe layer and move the anchor point to the center of the ankle. Where this red controller is hidden behind the shoe. I would try to line it up and then hold down Command to snap it into place. Then I would parent the shoe to the front ankle, and that way, when I move the ankle, the shoe is attached. But biking is a little bit unique. Instead of parenting the shoe to the ankle, I'm going to actually do it the other way around. I'm going to parent the ankle to the shoe, and then I'm going to parent the shoe to the front pedal. Then I'm just going to take the shoe and move it into place on the pedal, and that will move the ankle as well since it's parented. Something like that looks pretty good. Now you can see that the leg is in biking position. Now since the shoe is parented to the pedal, and the pedal is parented to the crank arm, and the crank arm is parented to the chain ring, which is animated, this whole thing is already going to be animated. But it doesn't look very natural because the foot is always level, and at some points it makes an angle that would probably break a real person's ankle. We need to go in and animate the pedal rotation. On the front pedal, I'm just going to bring up the rotation property. Remember we've set an expression on the rotation of the pedal to counter the rotation coming from the chain ring. When you have an expression set, you can't actually animate this value. It's always just going to go back to what it was. What we need to do is add something very simple to this expression. If you just toggle down next rotation, we're just going to click into the expression and then add plus value, and then click out. Now because we've added this plus value, the expression will still work, but it will also allow us to animate this property to make the ankle look a little bit more natural. I'm just going to close up this rotation expression and then go over to zero and set a keyframe because this position looks good, and then I'm just going to scroll through my timeline. I think about there that's starting to look unnatural. I'm just going to adjust this until it looks more natural, and then keep going. Looks weird right there, so let's bring that down. Let's just copy this first keyframe onto our last keyframe so that it'll make a perfect loop. Let's play this back to see if it looks any better. I think that looks a whole lot more natural. We can just duplicate the front leg in order to create the back leg. I'm just going to select the front leg layer, that's my limber leg, and then I'm going to go up to limber and hit the duplicate button. Let's just name this back and hit Okay. That just made the back leg in the same exact position as the front leg, so that's why you're not seeing it here. We're also going to need a shoe for the back leg, so let's just duplicate this front shoe, bring it above the back ankle and name it shoe back. I'm just going to go to the beginning of my timeline to make this a little bit less messy. I'm going to take all of these back leg layers, color them dark green, and then bring them all the way to the bottom of my layer stack. Now we need to do some re-parenting to the back leg. The back shoe is going to be parented to the back pedal, and then the back ankle is going to be parented to the back shoe. Now I can move the back shoe onto the back pedal. Something like that looks pretty good. If I play this back now, remember how the back pedal is just going to be leveled the whole time and it's going to look a little bit unnatural. We need to add the rotation of the pedal to the back pedal. What we can do is just go into the back pedal, into the expression, and then add plus value and click out of that. Now we can animate this rotation value. We could actually just copy the rotation keyframes from the front pedal onto the back pedal, but the front and back pedals are always one half of a cycle apart. We can just copy these rotation keyframes from the front pedal and then paste them halfway through our cycle. That's going to be at 16 frames. Paste those on the back pedal, and now this keyframe that's outside of the range of our cycle is going to just be deleted. Then to make a perfect loop, we just need to copy this last keyframe onto the first frame. Now if we play this back, the back leg and the front leg are now animating in a natural-looking pedaling motion. One other thing that we can do is we can recolor the back leg, just like how we had it in our illustration. How the back leg is a little bit darker than the front leg, so that there's a bit of separation when they cross over each other. An easy way to do that is just to go over to the Effects and Presets panel and search for brightness. We're going to take the brightness and contrast effect that's under color correction, and just drag that onto our back leg. Make sure you're dragging onto the back leg, that's the limber leg and not either of the controllers. Then up in your effects controls panel, you can just bring the brightness down to a negative number to darken up the leg. You could do the same thing to the shoe just to make that consistent. You could actually just copy this effect and then paste it onto the back shoe to make that back shoe a little bit darker as well. This is what we have so far.
10. Create Limber Arm: [MUSIC] Now let's add the
arm to these biking legs. If you use the
traditional method, you can just find
the layers that you need in your
Illustrator file. Otherwise, if you use overlord, then let's grab the
layers that we need. I'm going to grab
the wrist, elbow, sleeve, shoulder, and the hand. Then I'm going to make sure that my layers are going
to be split into their own layers and then just hit "Push" to after effects. We're going to also need the handlebars layer so
let's grab that as well. We can move that next to the other bike layers and just color yellow to stay organized. If you imported your artwork
in the traditional way, now is the time to convert those vector illustrator
layers into shape layers. Then on the sleeve you're going to have to
get rid of those pesky merge path layers
if you have any. Still delete, delete,
and I fixed it, but also the shadow
is a little bit dark, so figure out which one's the shadow and
lower the opacity. Now let's make a limber arm
out of these arm layers. Let's grab the shoulder, the elbow, and the
wrist. The three joints. Then I'm going to
go over to limber. First, make sure that I'm
making the right limb. I'm going to change that arm. I want it to be a tapered arm
and then I'm going to hit the "Rig & Pose"
button just like I did for creating the leg. I want to make sure that
this is all correct, so that looks good. Then for the upper art layer, I'm going to select the sleeve and I don't have any art from
my lower art layer. I can just leave
that blank and hit "Okay" and we can name
it front arm that works. We're actually only going
to have one arm because the arms are in
the same position so you wouldn't
see the back arm. We're just going to do the
one arm and hit "Okay". Now we have this limber arm
and you could move the wrist around and it would function
like you'd expect an arm to. Normally, I would parent
the hand to the wrist, but again, biking it is unique. Instead, I'm actually
going to parent the hand to the handlebar and then
the wrist to the hand. That way, the arm is holding
on to the handlebars. Then once I get
the torso in here, I'll parent the
shoulder to the torso. We can just delete
the original layers that we used to create this limber arm and let's also color-code the arm
just to stay organized.
11. Animate Torso: Now let's add the rest of our body. If you imported using the traditional method, you know what to do. Otherwise, let's grab our layers with overload. I'm going to select the neck all the way through the top earring, and then just push those into After Effects. Let's color code all of these layers, so let's just make them green, and they need to go behind the front arm. Now what we need to do is just make sure that the anchor point is in the correct position for all of these layers. The neck looks pretty perfect right where it is. The torso, let's move that down. So using y on the keyboard to get to the pan behind tool, and then I'll just drag that about right there near the hip. The arm shadow is going to be fine. We'll deal with that a little bit later. The head, let's move that to where the head connects to the neck. The hair we don't need to change or the ear. The earring top, we just want to make the anchor point where that goes into the ear. You could use the pan behind tool or if you have a tool like motion, you can just use a shortcut to make it move to the top. Then for the other part of the earring, let's just move that up to where it connects with this top part of the earring. From here, let's parent all of our layers together to connect them. The neck is going to be parented to the torso. The arm shadow will be parented to the torso. The head will be parented to the neck. The ponytail will be parented to the hair. The hair will be parented to the head. The ear will be parented to the head. The earring will be parented to the top earring and the earring top will be parented to the ear. I know that was a lot really fast. You can just pause the video and make sure that all of your parents look like this. We also want to parent the shoulder to the torso. Now what we need to do is animate the torso. Just rotating slightly because if she's peddling and moving her legs, it's going to be nearly impossible for her torso to stay perfectly still. To make this animation look a little bit more realistic, we're going to add some secondary animation on the body. It just rotates a little bit as if she's exerting some effort to pedal. On zero frame zero seconds, I'm just going to bring up the rotation property on the torso and set a keyframe. Then I'm going to go a quarter of the way through my one cycle, which is 32 frames. Quarter of the way would be eight frames, and I'm just going to rotate her to lean forward. That's going to be about two degrees, something like that. I've chose to do this one cycle in 32 frames so that I can easily split it into four sections. She's just going to rotate just slightly back and forth, two times throughout one cycle of pedaling. Now what I need to do is just repeat these keyframes again. I could just copy and paste the keyframes and have multiple sets of keyframes on my timeline, or if I wanted to make this a little bit more flexible so that if I change my mind about how much she's rotating, I won't have to change on every keyframe, I can just change it on the one key. To do that, I'm going to use an expression. If you want to go more in-depth into looping and using expressions to create loops, then check on my class Looping Animated Scenes in After Effects. To set this expression, we're just going to option click on the rotation stopwatch. Then I'm just going to type in a super simple expression which is going to be loop, and then capital O on out, and then after effects is probably going to guess what you mean, so you can just press Enter. Then within those two parentheses, you're going to want to use the quotes, and then you want to do ping pong. Make sure that your expression looks just like this. What this expression does, it just repeats these keyframes by going back and forth between the two keyframes. That's why it's called ping-pong, like a back-and-forth ping-pong match. If we play this back, you'll see how her body is going to go forward and backward as she is pedaling. Now let's just select the keyframes and add some easing to make this motion a little bit smoother. You could do F9 or right-click and easy ease, or if you have a plugin like motion, you could use the sliders or a preset. Now this is going to look a little bit more smooth, I think that looks good. Her neck and head are pretty stiff. Because in a real human, your head likes to always be level so you're not getting seasick by your own biking. The head would do a pretty good job of staying level by counter-rotating what the body is doing. Let's incorporate that now. First let's add some keyframes to the neck, which is going to help the head counter rotate the motion of the torso. At zero frames I'm just going to set a rotation keyframe for zero, and then at eight frames, I'll set a rotation keyframe for negative 1. It's halfway counter-rotating the positive 2 degree rotation on the torso. Then on the head, I'm going to set some rotation keyframes. So zero zero seconds and then at eight frames, let's bring this to negative 1. The head and the neck are tag teaming to counter rotate the torso. I need to add the same loop expression to the keyframes on the head and neck. One way to do this instead of typing it in twice, is to select the torso's rotation, go up to Edit and then Copy Expression Only, and then select the rotation on the head and neck. Then just hit Command V to paste, and these numbers change to red. I can tell that there's an expression added onto it. I also need to apply the same easing to these keyframes. Let's play this back and see how it looks. This looks pretty good, but I think we could make it even better and a little bit more fluid. What we can do is offset these keyframes so that not everything is happening at once. The torso is going to be the one that's driving this motion. Then it's going to happen in a chain reaction, so the torso would move first, then the neck, and then the head. Let's offset the keyframes accordingly. But we're actually going to be doing this in reverse because we have a loop out expression, and the keyframes are going to be repeated from this point on forward in time. What we need to do is offset the rotation keyframes from the torso backward in time. I'm going to offset the torso keyframes, two frames, and then I'm going to offset the neck keyframes, one frame. Now we have the torso is going to move first, then the neck, and then the head. Let's take a look at what this looks like. This looks a lot more smooth and also realistic to somebody peddling on a bicycle. You could experiment with how much the torso, neck, and head are rotated and how much the keyframes are offset to make her look like she's biking either more peacefully, more commonly, or like she's exerting a really huge effort to go really fast and like sprint somewhere. One other thing that I want to do here is make the arms bend a little bit less, because that looks like a little too much of a bend in the arm. What I want to do is just animate the shoulder position moving back. At zero frames, zero seconds, I'm just going to set a position keyframe. Then at eight frames I'm going to move the position of the shoulder back and up just a little bit to train not her arm a little. Because a real human has a shoulder joint which is not really incorporated in this rig. Sometimes you have to move the shoulder position to fake that there's a joint here. I think something like that looks pretty good. It's just a subtle movement, so nothing huge, but I think that will make it look a little bit more natural, so her arm isn't bending quite as much. I'm going to need to use the same loop expression on these keyframes, and I think I still have it copied. I just pasted that there. Now I'm going to add easing to those keyframes. I also want these keyframes to be lined up with the torso. I'm just going to select them, move them back two frames. Let's take a look at that. I think this looks a little bit better when her arm is not bending quite so much.
12. Animate Hair: Now let's animate the hair waving in the wind as she's biking. We're actually going to use a different shape layer for the hair that doesn't have this wave, because then we can use the wave warp effect to apply a wave to the hair and to animate it. In the illustration file that I provided you, I've included this hair layer that's for animation. This one is less wavy and it's also obviously bigger because that's going to make it easier to work with, with the wave warp effect. We need to go into warp effect and create a new composition to put this hair into. This composition can be 1920 by 1080, that should be big enough. Then if you're using overload, you can just push that shape into your composition, or if you imported your Illustrator file using the traditional method, then you can just go into this biking layers folder and you can grab the layer that you need. It's going to be the ponytail for animation. Now I could apply the wave warp effect directly onto this hair layer, or another way to do it would be to go to layer, new, adjustment layer. If you've never used adjustment layers before, basically, they are just an invisible layer that you can apply effects to, and it will apply those effects to any layer that's below it in your timeline. I'm just going to apply the wave warp effect to this adjustment layer. You can see that that's already applying the wave effect to this hair layer beneath it. Now I can go into the settings for the wave warp and adjust the settings to get the effect that I'm looking for. I'm going to increase this quite a bit. Let's try 600, and let's increase the wave height to 70. Something like that looks pretty good. But we need to make sure that this part of the hair is always still because that's where it's going to be attaching to her head, so we don't want it to be moving. What we can do is go under pinning and choose right edge. This is the reason why this hair layer needs to be in its own composition, because if it were just within this composition and I were to try to pin the edge, it wouldn't work because the edge is way over here. That's why I've put the ponytail on its own layer so that we can pin it to the edge and it will actually be pinned. Now when I play this back, that looks a lot better. But the other thing that I need to change is the wave direction because right now it looks like the wind is coming from the wrong direction. She was biking to the right, so we want the wind to be going in the negative 90 direction instead. Let's see what that looks like, that looks a lot better. Another thing that we can do is slightly angle the direction down because her hair has some weight to it, and so if we angle it down, it will simulate that weight. This effect is a really perfect wave and it looks a bit computer-generated. One thing that we can do if we don't want it to be so perfect is to add another wave warp effect. I'll just drag the wave warp effect again onto this adjustment layer. Now I can adjust this second wave warp settings to be similar to the first wave warp, but slightly different. I'll keep the wave height the same, and then let's make the wave width instead of 600 let's try 500. Then let's just make the direction negative 90. Make sure that we have pin to right edge. Let's see what that looks like. I think that looks pretty good. It looks a little bit less computer-generated and a little bit more organic. Now what we need to do is go back into our biking composition, and just drag in that composition, and we can scale it and move it into place. Now we're also going to hide the original ponytail air. I could even delete it because we won't need that anymore. I'm going to adjust the anchor point to be right at the ponytail holder. I'm going to rotate this down just a little bit so that it rests on her shirt. Something like that looks pretty good. We also need to make sure that we pin this ponytail to the hair. That looks pretty good, but if you look closely, it's not actually looping perfectly. This first frame should be the exact same as this last frame, and it's just a little bit off. What we need to do is go into that same composition with the ponytail. We need to adjust the wave warp speeds to make sure that the speed makes it so that it loops perfectly in 32 frames. I can actually just set my work area so that I can preview that here. Right now the speed is set to one, and that means that in one second, the wave cycle is going to do one full revolution. Frame 0 and Frame 30 or one second are exactly the same. You can see that just by clicking between the two. In order to make this loop over 32 frames, I need to figure out what the speed would be for that. I need to take these additional two frames and divide it by 30 frames. So 2 divided by 30 is going to be 0.06. I know that I need a slower speed than one because it's going to be doing one cycle over a longer amount of time. I'm going to do one minus 0.06, which is going to be 0.94, and that's going to be the perfect speed to make this loop. I'll also put in 0.94 for the second wave warp speed. Now you'll see that frame 32 and frame 0 are the exact same, which is going to make a perfect loop. If I play this back in the whole composition, you can see that the hair is now looping perfectly.
13. Animate Shirt: To add secondary animation of the shirt blowing in the wind, we're not going to be able to use the Wave Warp effect because we need it to be pinned to her whole upper body. We just want this portion down here of the shirt to be blowing, and so Wave Warp isn't going to work. Another effect that we can use is the Ripple effect. If you just search for Ripple, you're going to want to find the one that is under distort. So it's this one right here. You can just drag that effect onto the torso layer. Here's an example of what the Ripple effect looks like. So basically, it's just adding a ripple, like a ripple on a pond, and it creates waves out from a center point. So to make this effect work on the torso, we just want to go into the effects controls, and then if you select the Ripple control, you'll see this little center point that you can move into place. So I'm going to move it right behind her, right about here. Right now, there's no effect because the radius is set to zero. So I'm just going to bring this up to 18. You can see there's already starting to be some waves, but that's obviously not quite the look I'm going for. So what I'm going to do is just adjust the wave width and wave height. So let's make the wave width a bit bigger and the wave height a little bigger as well. Maybe something like that. The reason that this effect works so well on the shirt is because the ripple is going to be most intense right where the center point is, and then it's going to get less intense as it moves away from the center point. That's how the short can be not very affected when it's a up by shoulders, but we can make it more wavy down here where it's loose and blowing in the wind. I might even adjust this just a little bit. That looks pretty good, but again, this is not going to be looping because the wave speed is set to one, and just like with the hair, we're looping this over 32 frames, not 30 frames or 1 second, so we need to adjust the wave speed. The same wave speed is going to work for the ripple effect as it did for the wave warp on the hair. I remember that that was 0.94. Now this ripple effect should be looping perfectly. Another thing that we can do with this shirt is we can animate the path of the shirt when she brings her front leg up. Right here, it looks weird that her shirt was not affected by her leg because her shirt would probably be pushed up when her leg comes up like this. We can just animate the path of the torso to make that look more accurate. So I'm just going to toggle down into the path of the torso, and then let's just scrub through our timeline and let's say about six frames. That's where her shirt is going to start being affected by the position of her leg. So we'll just set a key frame at six frames, and then let's just move forward and look for the frame where her leg reaches the highest position. It looks like that's going to be about 17 frames. At this point, I'm just going to move the anchor points of the path to animate it to look a little bit more accurate at this point. I think that looks pretty good. Now let's just find where her leg is about in this position. So maybe about there, and we'll just copy and paste this first key frame back into place. Let just add some easing on these key frames. So I'm just using F9, and let's just scrub through and make sure that this looks right. We might need to go into our Graph Editor and just adjust the graph where the shirt looks a little bit off. It looks like maybe it's coming up too quickly, so if I just drag this handle to the right, hope it come up a little bit more slowly. That looks like that fixed that. Then it maybe comes down a little bit too quickly, so if I just drag this handle to the right in this one, that looks like it fixed that. So now we have our shirt animating according to her leg position, and also blowing in the wind.
14. Animate Shadows: In this video, we're going to get into some nitty-gritty details of animating this shadow coming from the arm onto the torso. Right now, the shadow doesn't move even if the arm moves a little bit and should be casting a different shape of shadow, and also, there's some gaps at some places along the timeline, so let's fix all of that. First, we need to just take the arm shadow and make sure that the anchor point is in the upper left. We want this to be affected by the arm moving, so what we can actually do is parent the rotation of this arm shadow to the rotation of the upper arm. I'm going to go into the limber arm group and just toggle down into contents and then limb. Then under upper group, I'm going to go under transform upper group and this rotation property has an expression set on it that's created by limber. I'm actually going to take the rotation of the arm shadow and I'm going to parent it to this rotation of the upper arm. That made the shadow flip out and so what we need to do is, go into the arm shadow's rotation by just toggling down. You'll see that when I parented that rotation using the pick whip, it created this expression. Basically, this is just saying that this rotation should always be the same as this rotation on the upper group of the limb but that doesn't look right, so what we need to do is at the end of this expression, we can just add a handy little line of code that's just plus value and then just click out of that. Now, because we add a plus value, we're going to have the ability to adjust the value and that value will just be added onto whatever the rotation of the upper arm group is. We can adjust this until the shadow comes into place, so something like that looks good. Now, if I scroll through the timeline, you can see the shadow is going to be affected when the arm bends and moves in a left direction, the shadow is also affected. It's really, really subtle, but it makes everything way more accurate. Now, we just need to make a mask for this shadow so that it always is maintained within the shirt layer. To do that, we're just going to take the torso and hit "Command D" to duplicate it, and then let's bring this torso up above the arm shadow layer. On the arm shadow, I'm going to make this a mask, so I need to go to toggle switches/modes in order to see my Track Matte option and under Track Matte, on the arm shadow, I'm going to choose "Alpha Matte Torso 2." Now, you can see that wherever that torso layer is is where the arm shadow is going to show up and nowhere else. I can just name this torso mask, and then just to be safe, in case we want to change anything about the torso in the future, we'd also have to change it on this torso mask. We could just save ourselves some headache by instead just going into the torso mask, hitting "U" to see all of the key frames, and then we can just unclick the stopwatch to get rid of all of those keyframes. I'm going to get this error here because there was an expression set on the rotation keyframe and I just deleted the keyframe, so now the expression doesn't know what to do with itself. If we just click on that and delete it, that'll fix that error. Now, what we need to do is just parent the torso mask to the torso. Now, any changes that we make to the torso will also be applied to the torso mask, except for if there are path changes. Because when you parent something with this main parent pick whip, it doesn't transfer the parenting of the path. What we need to do is just toggle down into the path of the torso and parent the path of the torso mask with this pick whip next to path, so just parent that to the path of the torso. Now, if we made any changes to this path, it would also be changed in this torso mask path. Technically, you should pair all of the properties from the ripple effect on the torso mask to the ripple effects properties on the torso, in case you want to change any of those two in the future but I'm just going to skip that step just to speed things up here. That's just an extra step to make sure that any changes are not going to be a headache in the future because this torso mask is, in a way rigged to this torso. One last thing that we need to do on this arm shadow is just extend it a little bit because at some places like right here, the shadow is not long enough to cover the whole shirt. What we need to do is go into the path, and then just make sure that it's always going to be enough to cover the whole shirt. We can also add a shadow on the pants that's coming off of the shirt. In order to do that, we're just going to need to duplicate that torso again, and since we already duplicated and then parented up the torso mask with the torso, if we just duplicate the torso mask, it'll make it easier so we don't have to re-parent everything to the torso. I'm just going to duplicate this torso mask and then bring it down underneath the torso and rename it. Now, let's move this shirt shadow layer down so that it's over the pants. I also need to turn the visibility back on so that we can actually see it and I'm also going to make it darker. Let's just go into the fill color and choose a dark version of this pinkish-purplish and that looks fine. Then I'm going to change the opacity to make it look more like a shadow, so something like that looks good. Now, we need to make a mask for this shirt shadow so that it only shows up on the leg, but the leg is a limber leg. An easier way to do this than to duplicate the leg would be to use Set Matte. With the shirt shadow selected, if you go up to effect channel and then Set Matte, it'll bring up this set matte effect, and then from the Take Matte from layer, you want to choose the limber front leg. This one right here. You can see that that's just another way to make a mask. Now, the shirt shadow looks a little bit off, so what I'm going to do is just rotate it a bit so that it looks a little bit better. I'll just position it where it looks good, so something like that.
15. Animate Earrings: Now let's add some secondary animation on the earring to have it swing back and forth as she's biking. I'm going to start this animation at eight frames because I know that she's leaning forward and backward every eight frames, and so this way, if I animate between eight frames and 16 frames, I have room to offset the keyframes both forward and backward in time. I'm just going to set keyframes on both of the earring layers. At this point, she's leaned the most, she leans forward. I'm going to want to animate the earring swinging towards the bike. Maybe negative five for the top and then negative 10 for the bottom. These earrings are like two pieces that are connected, but they can rotate freely. Then I'm going to move over to 16 frames, and this is where she's most upright. So I want to animate the earring in the opposite direction. We'll just do five and 10. All right, so I want the bottom part of the earring to lag a little bit behind the top of the earring, like a chain reaction. The top of the earring would move and then the bottom of the earring would lag a little bit behind. What I'm going to do is just take these bottom part of the earring keyframes and just drag them one frame forward in time. That way, it's really subtle, but it'll just lag one frame behind the top of the earring. Then in a similar way, I also want to offset the keyframes on the earring to be one frame behind the rotation on the head. You can see that the head is rotating right on eight frames, so I want these keyframes to be offset by one frame. If I drag these keyframes all the way back and just have them offset one frame, just like this, then that's going to lag just one frame behind, and then of course, it's not going to loop because I haven't added that loop expression. I need to option click on the stopwatch, add my loop expression. Just like that, I can copy this and then paste it into here, and so now let's play this animation through. The earring is lagging just a little bit behind the head, which makes it look a bit more fluid. We also need to add some easing to these earring rotation keyframes to make this look even more smooth. I just use the same preset as I did on the torso and body, so let's take a look at that.
16. Animate Dog: Last but certainly not least, let's add in the dog. If you're using Overlord to import your layers, then go ahead and transfer all of the dog layers, but we can skip the ears for now, and make sure you also include the basket connections in the basket. If you use the traditional method of importing your layers, then I trust that you know how to find the layers that you need. Then I'm just going to take all of these layers. Let's color-code them. How about peach? Bring them down right on top of the bike layers. I'm also going to go in and transfer my background layer in just so that it's easier to see the white dog. I'll bring that to the bottom and lock it up. All right, so let's pair all the layers of the dog together. The body of the dog is going to be parented to the basket. The paw can be parented to the body. The head can be parented to the body. The tongue can be parented to the head. The face should be parented to the head. I know that was quick, so if you need to, just pause the video to make sure that your layers are parented just like mine. The basket connections are what's going to connect the basket to the bike. But we want the basket to be bouncing a little bit to just give it a little bit of secondary animation and make it look natural and so we need this basket connection to bend just a little bit. In order to do that without making it look weird, we're going to use a special little tool called Create Nulls From Paths. Now, this looks like it's a plug-in but it's actually included in After Effects. So if you go to Window, it's going to be down where a lot of scripts are so it just create nulls from paths. It's not something that you need to purchase or download. It should already be included. We're going to work with the basket connection top first. If you imported your artwork using the traditional method, then you're going to need to convert the basket connection top and basket connection bottom into shape layers now. Both of these basket connections are actually just strokes, so just a path, and they have three different anchor points. I've added this middle one because I want the bend to just happen right here. So that's where the bend will happen. Just like that. What we need to do is toggle down the path and select the bottom layer path and then go over to your Create Nulls From Paths' little panel and click the first button which is "Points Follow Nulls." What this does is creates these different nulls one for each of the points that you had on your line and so each of these points, because we did Points Follow Nulls, each of these nulls is going to control one of the points. So now, if I were to move this null, it's going to change the path of that line, which is pretty cool because now I can take this null and parent it to the basket. I can take this basket connection and parent it to the bike frame and then I can make my basket bounce up and down. So I'll just set a position keyframe here for the basket to be at this position and then I'm going to go over to eight frames and just bring the basket down a little bit. Now, this basket connection is nicely bent because this null is connected to the basket and the points of this line are connected to the nulls, which then bend the path just as we want it to. So this Create Nulls From Paths tool is super handy for things like this and that's only covering one of the buttons. If you wanted to do Nulls Follow Points for some reason, like maybe you have an animated path and you want to connect something to one of the points of the path, you could do Nulls Follow Points and then trace paths is also useful for connecting things to something moving along a path. What we need to do now to make the bottom basket connection bend a little bit is just the same thing as we did with the top connection so I'm going to toggle down into the path. Make sure you select the bottom layer path, the one that has a stopwatch next to it, and just hit "Points Follow Nulls." It looks like this. Null is the one that I need to attach the basket but I need to make sure that I parent this at the right time. So at zero frames, that's when it's going to be straight. Now, I can just pick whip this to the basket and now both of those basket connections will nicely bend to give that basket a little bounce. I'm not planning on moving the bike at all. I'm just going to have her biking in place and move the scenery behind her. But if I was planning to move the bike, then I would want to make sure that I parent the other nulls to the bike. Now, you can also hide these nulls and shy them if you want to just get them out of the way. We also need to go back into our basket position and add some easing to these keyframes and then let's also make sure that they are looping so I'm just going to use that same loop expression that I've been using throughout the class. That's going to be loop out "ping-pong" and so let's take a look at that. I think that looks pretty good. We can maybe even make this move just a little bit less and maybe choose a different easing [inaudible] I don't think I like the way that looks so let's choose something that's a little bit more like that. Yeah, I think that looks better. Just something nice and smooth. All right, so now, let's animate the dog. Of course we need his ears which are going to work just the same way as the ponytail. I'll just kind of speed through this part because we're just going to be putting the ear into its own composition and then adding the wave warp to it, which you already saw how to do for the ponytail. If you want to get the exact settings that I used, you can just pause the video and copy those down. Now, I just need to add this into our composition and make sure that you parent the dog's ear to the dog's head and then I'm even going to rotate it down like maybe negative five just a little bit. All right so we have one ear. It's fun. Maybe not really accurate, but I like how that looks. Now, let's make the second ear by just duplicating this ear, so Command D to duplicate, and then we can just take the duplicated ear and drag it below the head. Let's take the top ear and just rotate that down maybe a little bit more just so we can see the back ear and let's also recolor the back ear so that we can see it behind the front ear. So to recolor this back ear, I'm just going to go over to Effects and Presets and look for Fill. I just want to take this fill effect and just drop it onto the dog's ear. Let's color it the color of his nose. Since the back ear is further away, I can make the front ear just a tiny bit bigger, just to make those a little bit different looking. Another thing that I can do is offset the ears so that we don't have both of them in the same way position at the same time. I'm just going to offset the back ear by dragging it to the left, so maybe something like that. I think that looks pretty good. I could also raise the back ear up just a little bit to make it a little bit more visible. The last thing to do here is to animate the dog's tongue, like he's panting and having a good time. I'm first going to set the anchor point to the upper-left corner. You can use the Pan-Behind tool or a shortcut-like motion and then I'm going to set position and rotation keyframes. I'll just set these positioning rotations for zero and then let's make this happen over four frames because four is divisible by our 32 frame total so this will still loop. I'm just going to bring the dog's tongue up a little bit and let's rotate it maybe like that. All right, let's add some easing to this. I want this to be like a quick motion. This preset's going to be good because this is a steep speed change. I'm going to make sure that these loop with that same loop expression we've been using and let's just see how that looks. All right, I think the dog is looking good. Let's play back our entire animation. You could obviously just leave this as is, or if you want to, you could add elements in the background that are moving past her to make her look like she's moving.
17. Bonus: Loop a Composition: In this video, I'll
show you how to loop a composition
and after effects. If I play this animation within the work
area that I've set, it already loops perfectly. What I want to do
now is render out a video that plays this
loop multiple times. In other words, I want the video to last, say, 10 seconds, rather than just
the 1 " second that I'd get if I just
rendered this out. As you know, I've used a loop expression on a
lot of these properties. If I were to just
extend the work area, a lot of these animations
would continue to loop. You might be wondering why I don't just add the
loop expression to all the rest of
the properties to make this whole animation loop. Well, if you go into the petal, I already have an
expression set on the rotation property to counter the parents rotation of this
petal so it stays flat. But then I also set these
keyframes to rotate the petal so that the ankle
position looks natural. I can't just add
the loop expression to loop these keyframes because there's
already an expression set also on the torso. I've animated the
path property and the loop expressions won't
work with the path property. To avoid these issues,
I'm just going to loop the entire composition. The first step is to
trim this composition. It's just the
section that loops. I've already set my work area to just the section that loops. Right now my work area is set to 1 second and two
frames, or 32 frames. That's the exact amount of time that this animation
takes to loop. But I actually am going to need this to be one frame longer. And you'll see why that's
important in a second. I'm just going to
drag this work area out to one more frame. It actually is 1 second
and three frames. Then I'm going to right
click on the work area, just this gray bar here, and choose trim
comp to work area. You can also do
command K to get to the composition settings
and set the duration. Just double check that
it's one frame longer than the amount of time
that it actually takes for your
composition to loop. My loop is 12 and
my duration is 13. Now what I need to do is put this whole composition
into another composition. I'm going to find this
composition in the project panel, and then I'll just select
it and drag it onto this composition
button that will create a new composition with
the original inside of it. I'm just going to rename the
new composition Biking Loop. Then down in the time line with the biking loop
composition open, you can see that it's
the exact same length as the original composition. I need to increase
the duration of this. I'm going to hit command
or control K to get to composition settings and then
just adjust the duration. If you also want this entire composition
to loop perfectly, then you want to make sure
that your duration is a multiple of the
original short loop. I'm going to do ten times
1 second and two frames. That's going to be 10
seconds and 20 frames. Now if I zoom out
on the timeline, you can see that it extends
to 10 seconds and 20 frames. Now what I need to
do is right click on this original
biking composition, go to time, and then
enable time remapping. Then I'm going to go to this
last keyframe and zoom in. And if you drag out
your composition, you can see that
nothing is happening. There's nothing visible
on this last keyframe. But if you go one
frame before that, the composition is visible. What I'm going to do is set a key frame right
here for one oh two. That's the duration of the loop. And then I'm going to delete this other key frame that is
set for me at one oh three. That way, this will
remain visible, but it's not looping yet. The next step is going
to be to option or click on the stopwatch to write that loop
expression in here. The loop expression that
you need is just going to be loop and then out. And it'll probably guess
what you're looking for. It's going to be
like that. You don't need to put anything inside of the parentheses because
what we want is the default options for the things that go
in the parentheses. We can just click out of it. Now if we zoom out
of the timeline and extend this competition
all the way to the end, play this back, it'll loop. That's how you loop
a composition. If you want to learn more about creating looping animations, including how to
make an entire scene like this loop seamlessly, check out my class looping animated scenes in
Adobe after effects.
18. Wrap Up: Congrats on completing
this course. I hope you feel
more confident in efficiently rigging and
animating characters. Don't forget to post
your class project. If you want feedback
on something specific, be sure to include
a note to let me know if you post your
project on Instagram. Tag me at explanimated so
that I can see it there. Then click on my name above this video to check out the other classes
that I'm teaching. And make sure that you're
following me on Skill Share and Instagram to get notified when I have a new class for you. Thanks so much for being here until next time.
Happy. Animating.
 Megan Friesth, Motion Designer