Transcripts
1. Class Introduction: There's something
magical about taking a simple piece of paper and turning it into
something beautiful. In this class, I'm
going to help you spark your creative fire
through printables. Digital downloadable
designs you can print, cut, and transform into heartfelt
projects in just minutes. As a professional paper
crafter for over 12 years, I've designed for
top manufacturers, taught classes both
online and in person, served as a contributing
editor for two magazines, and had more than 500 projects published
around the world, through it all, my favorite
part has always been helping others discover how joyful
and simple creativity can be. My love of paper runs deep. For the last year, I've
been working on creating printable paper crafting kits
to make paper crafting fun, easy to do with busy lives, and a way to help
you spread love and joy to those who matter most. Using an exclusive
mini printable kit designed just for this class, I'll guide you step by step through making your
first project. Whether you create a card, tag or mini treat bag, you'll see how effortless and
rewarding handmade can be. This class is for anyone craving creativity that fits
beautifully into real life. By the end, you'll have finished projects that you will love and the confidence to keep creating
one printable at a time.
2. Class Project: I know how busy life can get, and sometimes our creative time gets pushed to the
bottom of the list. So I designed a mini
printable kit just for you. Everything you need to make
something beautiful today. No fancy tools required, just your printer, scissors
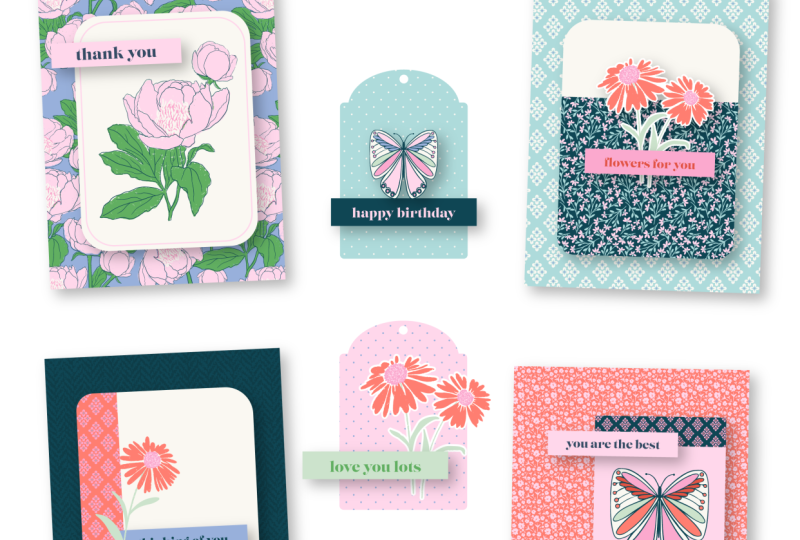
and a little tape or glue. For my friend Mini printable kit includes eight pattern papers, five decorative
panels, two tags, eight pieces of ephemera,
seven sentiment strips, and a treat bag or a little gift card
holder and instructions. Your class project is to play. Yep, play. Enjoy creative time while making something
for someone special. Use the kit to create a tag, card, gift card holder, whatever your heart desires. Share your project in the class projects and resources tab. When you share your
project, be sure and tell us who your project is for. Remember, creativity doesn't
have to be complicated. It just has to come
from the heart.
3. Printables Are Magic: I want to share with
you why I think printables are absolute magic. The thing that I love
about printables is they are a downloadable
file that you can print. So that means you can
access these kits anytime that you want to anytime you have a few
minutes to be creative. And you can also print them
as many times as you want. I love that part because my
perfectionism takes over, and I'm always
worried about, well, if I ruin this paper or if I cut this paper, I
can never get it back. I can get it back now because
I can just go ahead and print another page to use
and I love that part. The other part I like is these kits, everything
coordinates. All the papers, all
the embellishments, all the sentiments,
everything matches. So there's no planning
that you have to do. It's just I like this piece and I like that part and
I want to bring that together to make a birthday card because my sister
needs a birthday card. I absolutely love that. I love
that I have this at home. I can print it at home and I don't have to
run to the store, I don't have to buy anything and I have to wait for anything. Then the last thing that I absolutely love about
printables is just the time getting to be
creative and getting the opportunity to
spend some time that's not clicking on the
computer or worrying about typing an email newsletter
or social media post. I can just enjoy creating and putting things
together that I enjoy and then giving
them to people who matter the most to me and give it to the people
who are special. I love that I can
take my creativity and turn it into
something thoughtful. That's why printables
are absolute magic.
4. Tools and Supplies: This might be my absolute
favorite supply video because of how few supplies you need to play with printables. You need the downloads, a printer, scissors,
and adhesive. With just that, you could make any of the projects that I'm
going to show in the class. Now there are always in crafting fun extra tools
that we enjoy having. A couple of things
you could have that would help a little bit would be a scoring tool or at
least just a bone folder. Or also if you have a
digital die cutting machine, and I'm going to
be talking about the cricket because that is the die cutting machine that I have and talk
about using that. But again, all you really
need the files, a printer, scissors, and some
kind of adhesive, Awesome supply list for
fun and creativity. But
5. Printing Made Easy Home or Away: If you are lucky enough to have a good printer at
home, first of all, I'm jealous, but second of all, it's real easy to just
print these at home. You are going to use the link in the class description to go
to a Google Drive folder, and in it, you are going to find all the files that
you need to download. If you are going to print
and just cut with scissors, you're going to open the
PDF and download it. And you can see all the
pages here in the PDF. And after you download it, go into your computer into the folder where your
downloads are being held. I am using a PC, so this is what mine
is going to look like. And I'm going to find my
file. Ah, there it is. I popped up. Alright, so
here's my PDF of the kit. I'm going to double click
and open up that PDF, and it should launch
into Adobe Acrobat. And now you can
see all the pages, and you can decide
if you want to only print one or two pages if you're going to reprint or not, or you can print
the whole thing. Use the printer
icon up at the top, and what will happen is a dialog box will open when
your printer wakes up. Mine likes to take
a nap. Here we go. I can see my printer at the top, and this is the one
that I want to use. And I'm not going to use this fit button here because I want it to
print actual size. And if you want to check on each page that you're
going to print, you can scroll through
those right down here, make sure that
everything looks okay. And when you're ready,
you can click Print, and you will be good to go. And you'll have all the
files that you need for cutting with your scissors. So again, be sure to use the PDF if you are going to print
and cut with scissors. Now, if you're like me and
your printer is terrible, there are a few
places that you can go to have things printed. And my favorite place out of these three is to go to
my local print shop. And the reason I
love that print shop is they make things well, they print things beautifully, and I love the way
they turn out. But also, I can upload files
to a website with them, and they can print,
and I can just go pick them up,
which is awesome. So let's go through the
process of what you need to do if you are going
to print away from home. If you are going to
print away from home, you're going to follow
the same process. It's just you're going to
send your file to either, like, a drive or to a
website for the print shop. So just send that PDF on its
way and have things printed. If you're going
to use the print, then cut feature
with the cricket, but you want to print away
from home, which is what I do, you're going to launch
the cricket program, and you're going to start
with a blank Canvas. The first step is
going to be to upload the file that you want to print. So I'm going to
follow the prompts here and figure out
what images I want. And please note that
these are the PNG files. These are not the PDF files. That is the image I want to use, so I'm going to click Continue. There are many options here that you can use for your file, but for PNG files
for print the cut, the one I probably use, the only one I ever
use is the eraser because I don't want to print the cut the name of the kit or the person's
name at the bottom. So I'm going to apply
that and continue. When I convert the upload, I want to use this flat graphic for print the cut projects. I got to select it and
then click Continue. I won't put any image
details in right now. I'll do that in a moment. Click Upload. The image
will appear on your Canvas. Over to the right, you can
see there is a red warning, and that is because the
image is too large, and it really isn't a problem, but all you're going to
click is Auto Resize Image. Also ignore the Low Res thing. I don't know what that's about. This is now the
correct size to fit onto the 8.5 by 11 piece
of paper we want to use. Click Me because we want
to continue the next step, and it is going to ask
us if we want to save. This is critical, critical critical. You have to save this. So when you come back to cut
it after it's been printed, you have the file set up exactly the way
you need it to be. So name it and save the project. And then we're going to go
through the next process, the print, then cut. We're going to be on our
mat 8.5 by 11 paper, checking everything looks good. Continue. And we're going to want to do this
send a printer. Over to the right,
you're going to see, I've already printed.
Don't use that yet. Check the printer settings, and now instead of sending
it to my printer at home, I'm going to use the drop
down menu to say Adobe PDF. And I'm going to change this
to a PDF to have it printed. And it is preparing the print. It's going to launch a window where you're going
to want to save these files. And I'm just going
through a process and saving them where
I want them to go. Be sure and name the file so
that you can find it again. And this is going to be the
file that you're either going to put on a drive or you're going to upload to the copy shop's
website for printing. When everything is ready,
you're going to verify print. Okay? This is saying the
machine isn't available. I know because I
don't want to print, and I'm just going to
say, Yes, that's fine. Now that I've got this setup, I can cancel everything
and go back and do the process again for
the next set of images. So let's do it again. New
project blank Canvas. I move those over.
It drives me crazy. Upload, grab your
next set of images. Looks good. Once again, go to use that eraser tool and get rid of that stuff
I don't want there. Carry on. Choose, print, then cut. I'm going
to skip this part. It's going to put
it on my canvas. I'm going to move that
annoying menu over again and do this adjustment. Again, auto resize and
ignore the low resolution. These are 300 DPI. They are in a great spot. Once I click Make, it's
going to ask me to save, and you already know
how critical it is to save these files so that you can cut them once you get
the prints picked up. Everything looks great. It's within the printing bounds. I'm going to send to
printer, but not really. I'm actually going to
choose the Adobe PDF again. And sometimes I forget
that that little window pops open where I
have to name the file. I will think, Where did that go? Where did that file end up? I have to remember to click
that pop up window down below to name everything and
get it in the right place. And there we can
see, once again, it is ready to go. I can close these tabs out and close this file down
and just continue on. And that is how you're
going to prep for the print away from home and
then cut with your cricket.
6. Digital Cutting with the Cricut: Alright, so we are going to use the print and cut feature with the cricket with
our printer at home. So I'm going to choose a
new project blank project, and then I'm going to upload. And I'm going to make
sure that I'm uploading a PNG file because that is the file we need
for the print and cut. So not a PDF, the PNG file. And you can check the
labels on your file. And I also tried
to separate them out so that they were
labeled differently, so it was easier to
know to use the PNG. So that's the image
that we want to use. And we're going to go
in and use this eraser. And the reason I'm going
to us this eraser is because I'm going to get rid
of the name at the bottom, but you could also
use it to get rid of anything you didn't want
to print and cut again. Let's choose the
flat graphic option, which is the print
then cut and continue. And I'm not going to save
anything here just yet. When the next menu opens, I have a red warning on
the right hand side. Click that, open it up and
just say Auto resize image, and it will fit it to the 8.5 by 11 mat that we need,
which is perfect. And we're ready to
save our project. And the reason you're going
to save this is because if you want to do it again, you always have
access to the file so you can do another
print then cut, which is wonderful to have. Everything looks
great. It's within our cutting boundaries.
Let's continue on. And we're going to
send to our printer. When the box opens
up with options, it's just asking you to double check your
printing options. You're going to send
it to your printer and find your printer at home. And then go ahead and click the Send button
and it will print, and it'll be ready to bring back and put on your cutting mat and send through your cricket
for the print then cut. After lining my print up in the top left corner
of my cutting mat, I have loaded it into
my cricket machine, and now watch it, go and cut all my wonderful
little pieces out. We have already printed our
files either at home or away, and now it is time to use the print then cut
feature of the cricket. So open up the cricket
program and click my stuff. And here you will
see the files that we created before and saved. And now we can use these. So we're going to click Make it. And once again, it's gonna
drop it on our canvas and show us what we've already seen before, which is wonderful. And now instead of sending
it to the printer this time, we're going to go to
I've already printed. We're going to choose
our base material here, and this is whatever you have put down on
your cutting mat. There are a ton of options. You can use this search
up at the top to help you find your material
that you're using. But, I mean, look at all this. This is a lot of fun. There is a lot of options and a lot of choices and a lot of creative
possibilities here. But what I'm going to
use is I'm going to use this light cardstock option. The light cardstock
is about 65 pound. I would recommend that is
probably the best one to use, but regular printer paper
is just fine, as well. It just won't have
the same sturdiness, but it's really not a big issue. My base material is set, and now the machine is
ready for me to load my mat that has
my printed paper. On it in place. You can run a calibration test
on your cricket, which will make sure that
the mat is lined up, the cuts lined up, and everything is working well. And I'd highly recommend doing that before you start
any of your projects. I always do.
Everything is loaded. The machine is now ready
for us to click the G, and this will send it to the machine to start
the cutting process. Now we wait for the
machine to finish cutting. And when it's done, it will ask us to unload the mat and it will
kick the mat out. And now we have our
beautiful pieces all printed and cut and
ready to get created with.
7. Making Projects with Printables: All right, so let's start
having some creative fun. Included with your kit, I gave you a sheet of ideas, a good place to start
with how you can use your pieces and parts of the
for my friend printable kit. So let's go ahead
and let's start with something basic and simple, and we're just going
to start with the tag. And the best part about this kit is that once you have
everything all cut out, all you have to do
is mix and match because everything
absolutely coordinates. And I think that's the
most fun is that you can just pick and choose
whatever you like, or whatever you think the
person that you're going to give this to is going to like. So let's go ahead and
let's just kind of copy what we've got on
the sheet here. I've got these really
cute little flowers, and then let's put
a sentiment here. Maybe we'll do love you lots. Now we can see this is just ready to be adhered to this tag. You can use just like
a double sided tape. You could use an
adhesive runner. You could use glue,
a glue stick. A kind adhesive that you have, go ahead and use that. That's the part that
I like about this. Anything will work. I'm just going to throw
just a little bit of tape on these for now. And with these smaller ones, some little bit of
glue actually would be very helpful with this. Kind of put our flowers just a little off
center of our tag. Then one of the things I like to do with these
sentiment strips to make it stand out
a little bit more is I like to use a
little foam adhesive. You can buy foam adhesive in
little squares like this. You can buy it in big rolls. There's lots of different
ways that you can do it. And this is pretty easy to
find at any craft store. I just put these
on the back and I like these ones because I can remove the backing when
I'm ready to stick it down until I'm not ready. If I'm not ready, then I can
go ahead and move things. So right now we've got this and this
little tag is so cute. It's all ready to go. I could put it on a gift bag or
any of that kind of stuff. Here's the fun part about this. You can give this this way or you could do something like, let's add a little
bit of twine to this, a cute little piece
of decorative twine, just to step it up a bit. I think that's
probably the thing I love most about these
printables is do it fast and easy because it's
quick and you can do something thoughtful or
with a few extra supplies, you can step this tag up and then we'll just kind of turn this up just a little. And now we have a
super sweet tag. The other thing you could do
with this tag is you could actually use this tag on a card. I mean, we could take one of our pattern paper card
bases and I mean, we could put this right here
and then this would just be a darling addition to a card. There we go. We have a tag
perfect for so many things. Let's go to the next project. Our second project is
going to be a card, and I have given you
four card ideas, again, just as a place to start. Let's go ahead and make
one of these cards. I love the ability to make a
card because let's face it, how many times do you need
a card last minute and you just need to make
one quickly and you don't have to
run to the store, and this just means more
because you made it. All of the papers
that are included in this kit are all made for
what's called an A two card, just a standard card size. It's four and a quarter by 5.5. These are trimmed down so that they layer perfectly on
a half sheet of paper. That's the best part about a two is it is basically
a sheet of paper. If I put out four
of these together, this is the size of a standard
piece, a printer paper. When you go to make a card base, you can get two card bases
for a piece of paper. This is the size of
these to make a card. You could cut this
apart. You could do 1 million things with it, but I like it how it is. I think we're just going to
use this and I really like this butterfly here and how
this coordinates like that. Yeah, I really like
that. I think I'm just going to glue or tape this down. I'm not going to use
foam on this part, but I bet the sentiments
probably going to look really great with some foam under it. Let's place this. Trying
to get that straight. All right. There we go.
Let's add a sentiment to this and maybe we should use this one about
you are the best. How many times do
we have friends or family or somebody in our
life that we're just like, Man, you are the best and you just want to
tell them how great they are. This is a quick way to do that. Once again, I'm just going to use some of this little bit of foam to put this sentiment down. Also, I'm laughing
while making this. I want to pull
this right next to me so I can be
over the top while I'm making this just kind of funny. But
that's how I work. Alright, so you could add a lot more to this
if you wanted to. In fact, I was thinking
it would even be fun to put this butterfly up on a little bit of foam to make it even a little
more extra special. But the one thing I
want you to be aware of is you do need a card base. So you can use some cardstock
if you have it or you can just use printer paper and just go ahead
and fold it in half, and then you can adhere. This card right to the base. Now you've got a card
ready to be written on, ready to be used. You could decorate the
inside of this card. You can put another sentiment inside the card if you wanted. Lots of possibilities, but printables for quick
and easy cards to skip running to the store. Our third project is this absolutely adorable treat
bag or gift card holder. However you want to use it, you put little candy in
there, candy bars, whatever. And look at how cute this is, and the best part about this is it is on one sheet of paper, and it is cut with scissors and fold on the lines
and adhere together. Then, I mean, how
adorable is this? So cute. Extra special,
more than just a card. I don't know, it's
just way cute, and I absolutely love this
and I love using these. So let's get to making one. As we get started, I did
want to mention that I do have just some
quick instructions on how to assemble this. But as soon as you see one made, you're really not gonna need
the instructions anymore. To start with, we're going to cut all the way around
the outside edge. All right, so now I
have this cut out and I'm going to bring it
closer and hopefully you can see the little lines here that are set up
to help you fold. You can use a score
tool if you want to, or you can just fold
this by hand by using the lines here and just rolling your paper until
you get to the line. If you make sure that
your edges are lined up, you will get a straight,
nice fold here. I'm going to repeat again
for the other side, you can see I'm just
going to roll it until I get to that point of the line is in the
middle of my roll. And then just use my finger
to help flatten that out. Now we have the
part for closing. Now, there are a
couple ways that you can fold this to close it. You could just do
a straight fold on here if you'd like to, or you could make it just a little fancier. I
like doing this. What I do is I take this
corner and go right up to the fold line there and
make an angular fold. I'm going to do the same
thing here. Bring this corner up to that fold line. Your fingernail
works really good for making that a
little more solid. Then you can fold it up and here's how it'll
be all put together. Let's talk about adhering. One of the things when you're doing projects is you want to make sure that you don't do
something like put glue here, so you seal the whole bag. That is not what you want to do. So make sure that
you're paying attention to where you're
putting your adhesive. And I'm just going to put
some along this edge here. In fact, I'm thinking I may end up putting a little candy
bar or something in here, one of the really
good chocolate bars. I'm actually knowing this
is going to fold over. I'm going to put some tape here also just to get a tighter, better seal, so I don't
have to worry about it falling apart when I decide
to put treats in there. Let's go ahead and close that and then we're going
to fold this like this. To help the pressure of
these being folded down, I'm actually going to put
some tape inside these. Just like right here,
not a very big piece, just a little piece,
and right here. Now, when they close
in on themselves, they'll hold in place. Then we'll get some
tape along the fold, and then I'll do one
more towards the top. All right. Now we are ready
to hold this upwards. Make sure that seals. And now we have this darling
little gift card holder. As I was playing around the other day making
things and using the kit, I had an idea, and I thought it
would be really fun to take one of these panels, and it fits in here. I thought, Well, what if I made a little pocket that could
hold a gift card on here. So let's grab a couple
of things and let's make a little pocket to step this
up just a little bit more. All right, this little
pocket to add a gift card. I was noticing that a gift
card fit really nicely here. I was thinking, well,
if I just cut this, it would make a little pocket. I'm going to go ahead and
this is the best part about these printable kits is you can cut this and then if
it doesn't work out, you could just go
print another one, which is awesome
and I love that. Now I'm going to be
able to put this here. I'm going to want to adhere this pocket all the way around, and here's where adhering
again becomes important. You're going to want to
make sure that it's small enough around here
that it seals, but doesn't take up
the space you need to put your gift card in. I think what I'm
going to do is take my double sided tape
and fold it in half. That way, I won't
take up as much of the space where my gift
card needs to live. All right, folding that in half. Then again, just along
the bottom because we don't want to seal the top. I can't tell you
how many times I've done something like
that, though, honestly, because you just
get busy making and you forget the practicality. All right, so now we've got this cute little pocket we've made. That our little gift
card can slide in. Let's make the inside as cute as the outside because everything
in our kit coordinates, we can match things together. I still have a little butterfly here that I could use to
bring the butterfly together, and then I could do something
like put a thank you here, this was a thank you
for my friend or, you know, sometimes
a friend just needs a little coffee break
and just want to say, Hey, I'm thinking of you. Oh. Yeah, I really love this. I'm not going to foam any of these because they're on
the inside of this tag. So I'm just going to
adhere them per normal. Use my tape here, and again, glue would
work well here. I think a glue stick
would be the best, just because it doesn't paper as much as
sometimes real glue, the liquid glue can. Okay. Thinking of you with
our little butterfly. Okay, now that's really cute. Let's do one more thing. I think we should
put some ribbon or twine up here because then
it'll be easier to pull out. I'm going to grab a
whole punch here, let's go with a
little smaller one. Take that gift card out, let's go ahead and
find the center. Let's poke a little hole. And we'll take a piece of twine. This is just my favorite.
This is Baker's twine, it's just so cute. Like, I love all the colors
that's available in. It just adds a sweet
little homey touch. It is a personal favorite.
So we're going to feed. I fold it in half and
I'm just going to feed the loop through the
hole we punched here, maybe. There we go. Then while that loop is open, then I'm going to
feed those two tail ends through there and just pull and trim
those up a little. And then we can slide
our gift card in here. How cute is that? And then our gift card can slide down in our little pouch. I'm super excited about this. But I also want
you to see look at all the fun and creative
possibilities you have with having printable kits because you have all
these papers that you can cut and use and just have fun and have a joyful time creating something thoughtful
for somebody else.
8. Class Wrap Up: Now that you've experienced the magic of printables
for yourself, I hope that you're
excited to continue to use these and to
try a little bit more. The quick creativity that
you can do with printables, whether it's trying
to squeeze in some time right
after school pickup or trying to do a little bit of crafting those few
minutes before you fall asleep on the couch. I hope that these encourage you to find some time
to be creative. Now, if you love working with this mini kit that I've
given you for the class, I want to tell you that
in the Skillshare shop, there is a full kit of this exact collection
with more papers, more beautiful bits
and pieces that all coordinate and a ton more
sentiments in different colors. You can make dozens
and dozens of cards, and I just know
you're going to have an absolute blast with that kit. Let me show you
where you can find that in the Skillshare shop. Here is this
Skillshare website and you can see my kit
already up in the shop. But to find it, go to Browse, and you'll see
under Shop there's digital products and a couple of other categories, as well. And when you go
there, you're gonna see all the different
items for sale. And here on my kit page, you can see a description about the kit frequently asked questions, which
is really helpful. And then a place that you
can purchase the kit. This is really exciting, and I can't wait to see what
you think about the kit. Thank you for joining me in this class and learning
about principles. I hope that you're
having a great time creating and don't forget to share your projects in the
class project section. We'll see you over there.
 Kimberly Crawford, flower obsessed, surface designer