Transcripts
1. Introduction: Everyone, My name is. And today I'll be
teaching you how to create contemporary
art in Photoshop. This is a really popular
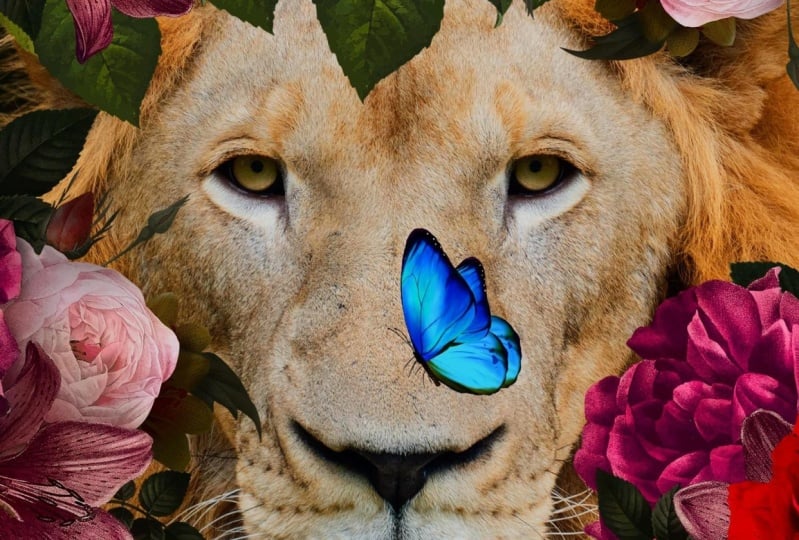
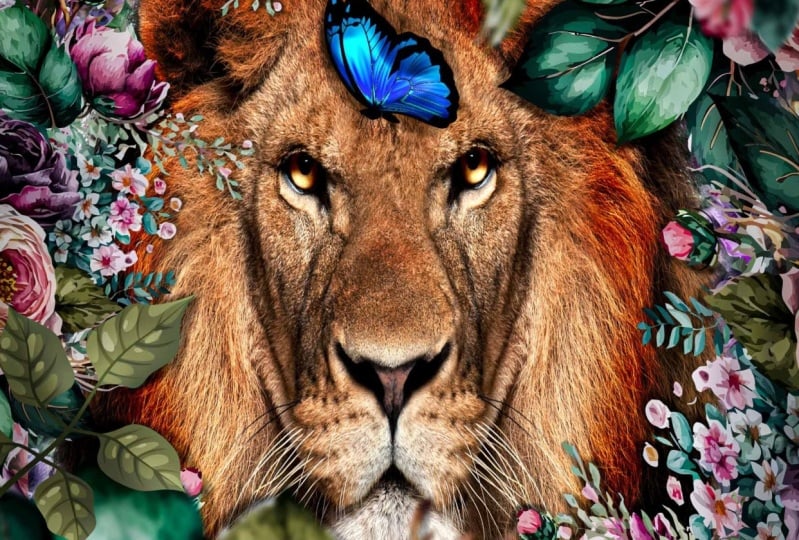
art form these days, and I will show you exactly how you can create this image. I've been using Photoshop
for almost 20 years now. And the last couple of years, I've been focusing on digital art with animals,
especially portraits. This class is great
for beginners. It's very slow, so
you can easily follow along and do exactly what I do. And after this class
you will learn some cool techniques
which you can use to use for your own photos. Or just simply use free
stock photos like I usually do to
create digital art. If you want to learn more, check out my other classes
or simply go to my website. I have a lot of
courses in Photoshop. Check it out. I've also some Lightroom
presets in case you want to bring your art to the next level with just a simple mouse-click. Anyways, I hope to see you
in the class and have fun.
2. How To Create Patterns: Let's start with
creating our artwork. So first of all, open up Photoshop and
download the project files. Now, in this project
files you can see we only have four images. And that will be actually
enough to create this artwork. So let's first open up
flowers PNG into Photoshop. And the first thing
we want to do is we want to create a
pattern of this image. You can see here this
image has no background, so that is really good. So first of all, let's go to Edit,
Define Pattern. And this will actually save this pattern in your
Photoshop library. You can name this
however you want. I'm just going to leave
it like this press, Okay? Now we have created our pattern. Now we want to
make sure we start working on the
image of the line. So let's open up the line
PNG, also into Photoshop. And we don't have to
change anything here. I've already made sure
it's the right size. Now, to make some patterns around this image on a grade these flowers around this line, I'm going to create a new layer first by pressing this here. Then go to Edit. And this time I'm
going to select Fill. And with fill, we can select some contents
that we want to do. So obviously, we want to
create a pattern, right? So select pattern here. Make sure you have
script selected here, because when you
first open this up, It's not selected,
select script. And here you can select
the custom pattern. So this is the pattern
we just created. If you click on that,
it's going to select it and make sure you have
selected random field. And that's gonna go into
the other ones right now, because I just want to show you how to create these quickly. Now, if we press Okay, we get this second
window popping up. Here we have the settings
of this pattern. And here you can
see how it looks. Now, I want to make sure the density is
somewhere between 36. I have this, this,
and this looks like the best results
for this kind of image. You can also play around
with these if you want to. And let's make them a bit
smaller so they are too big. So maybe something at one. And this one, let's say
something at one also. Let's keep that one
to keep it simple. Now, here you can also
play with the colors. This will make it
really colorful, but I don't want to do that now. I want to make sure
it's still realistic instead of like a
fantasy kind of artwork. So make sure to keep it a bit low to have
it like realistic. But if you want to have
more funky colors, you can also increase that one. But I like to have stuff
realistic and just keep it at, let's say even less
than one like this. Now here you can also
play with the brightness, but we're not going
to do it now. I'm going to click on, Okay, and it's going to
create this pattern. You can see already
we have created this pretty cool pattern
and it felt a lot of area. Now let's create a new layer
again and go to Edit. Fill. This. I'm gonna do the same. And what Photoshop does is
it's going to create, again, this kind of pattern, but it's gonna be different
because it's always random. So if we're going to click Okay, now we have this window again, I'm going to leave the
settings the same disk. Click Okay, again, a gassy, it's a different kind of
image that is created. And let's, let's do one more. Let's go to Edit, Fill, and keep the settings
again the same. And this one also
just press Okay, and we have another one. And you can see it
fills the whole area up with these flowers.
3. Filing The Area: The next thing we need to
do here is to make sure we see our line because
he's in the background now, if we want to make sure he's like in-between these flowers. So what I'm gonna do now is I'm going to duplicate this
background layer with the line. So for this, you can
press Control J. Or if you're on a Mac Command J, or simply take this layer and
drag it to this icon here. And this will
duplicate the layer. Now we need to make sure
it's above the flowers. So I'm going to drag
this all the way up here and put it there. Now, obviously, it's
covering up the flowers. Now, I want to make
sure we don't see the stuff that's going on
like here, here and here. So let's make a mask by
pressing on this layer here. This is a adjustment layer and it's going to create this mask. Now, if you want to
brush stuff away, we need to use a black brush
and with a white brush, we can bring stuff back. So first of all, click on the brush here, or you can press B on your
keyboard to select the brush. Now, if you go here, we have the settings
here for the brushes. And I'm going to
click on this one. It's going to open
up this window. And here I have all my
different kinds of brushes. Now, if you just
started the Photoshop, you have the general brushes. And the first one is
the soft round brush, which I use a lot of times. Now click on the
soft round brush. Let's close this window
again and make the size, let's make it a bit bigger here. And you can see this size
in this brush actually. And if I'm going to
select colors here, so the foreground color
is what you're brushing. So I'm gonna switch
these to make the black. And I'm going to
start with brushing. Make sure you have
this clicked and this, you can see the stroke
around this icon. So make sure it's the right
one to brush in the mask. Now, I'm going to brush here
and just gently click brush. And you can see how easily we
can remove the background. Because this line has
like a lot of fur here. It's actually really easy to
brush this stuff away and already it blends pretty
well with this image. Now, obviously it is better to remove the
background separately, but I'm not doing that
in this free training. If you watch my courses, I'm showing you exactly
how to perfectly cut out images like lions with
first or humans with hair. It's all actually the same. So in this free training,
we're gonna do it like this, to do it quickly. Now, let's brush a bit here. Still see some breakdowns. And I wanna make sure like
this area is also feasible. So now it looks like the
line is sitting instead of laying down like the
original photo was. So something like this and
maybe a bit more there. And that's it. If you want to zoom
out the image, you can hold down Alt on
your keyboard or Option on Mac and scroll your middle mouse and it's really easy
to zoom in and out. I use that a lot to see how my image looks from a
distance and from clause. Now, if you accidentally
breast maybe too much like they're just rotate, switch these colors
from black to white and you can bring back
the line again, right? So black to remove Antwi
to bring them back. And you can also see here
the areas that you pressed. So we removed some, some of the line here. Let's do a bit more so we can see some more of these flowers. And now it looks like he's just in front of
these these flowers. So I want to make sure it looks like he's in-between
these flowers. So we need to create some depth. So I'm gonna go back
into this flower. And the only thing I have to do is I have to
take this flower, make sure you have this
selected the Move tool, and just take it and
drag it in this file. And it's going to
put it above there. And this way we can put flowers in front of him and
not only in the background. So I'm going to place them
somewhere, maybe here. Have discovered up
in front of him. Now, obviously we need a
bit more of these flowers. So what I'm gonna
do is I'm going to press Control or Command J, like we did with the
align to duplicate it. Or you can just
simply take this and drag it here and it's going
to duplicate this, right? So duplicate this and
move them around. Let's fill the area
a bit more up. Let's play some, maybe there. Then press Control J again. And let's, let's
place maybe there. Let's, let's make a rotation to this image so we don't
see the same pattern. Now, to rotate the image, we can simply press Control
T or Command T on Mac, and you can take this
Free Transform window. Now, if you see this icon, it's already shown you,
you can rotate it. So let's rotate it a bit to have some different types of flowers. Now, let's duplicate it again
and let's move some there. Let's press Control T again. Maybe rotate it another way. And Control T again. Maybe their console t Again. Let's rotate this again. Control J. To duplicate it. Command J, if you're Mac, I'm using a maximum used to pressing command
instead of console. And I think this
is already enough, maybe some, some leaves that are sticking
out in front of its face. You can also make
it a bit bigger. If you see this icon, maybe
some are bigger like that. Let's do some there. And let's do some here. I think this is already enough. Now we have all
these flowers here. Our Photoshop file is
gonna get a bit messy. So what I usually do is I
start organizing it a bit. So I put stuff in folders to F, a bit of overview of everything. So let's select this one, the last layer that
you have created. And until this one, by holding down Shift,
you can select them all. So take the first one, hold down Shift, select the last one. If you're going to press
Control G or Command G, you can make a group. You can also drag
them into this icon. If you select them all and
just drag them into this icon. It's also going to make a group, and this is our flowers
on the foreground. And let's move them around. And now you can play
with them if you want. Let's put also
these in the group. So hold on shifts like this. Let's Control G and
this is our background. You can see we already
created a pretty good image. Now I want to make
sure these flowers are a bit more in space. So I'm going to move them
slightly to the frontier. If you hold on
Control or Command and click on a layer,
it's going to select it. Or you can select, auto select. But I hate this option because
you click so many times, you accidentally
going to click on something. You
don't want to move. So this, select this and hold on control if you want to click and select something like that. Alright, so I think this
is already pretty cool. For now. We need to make sure
that it's going to look realistic now because
we don't have lighting. We don't have colors
that we changed. We didn't change anything yet. We just made the composite now.
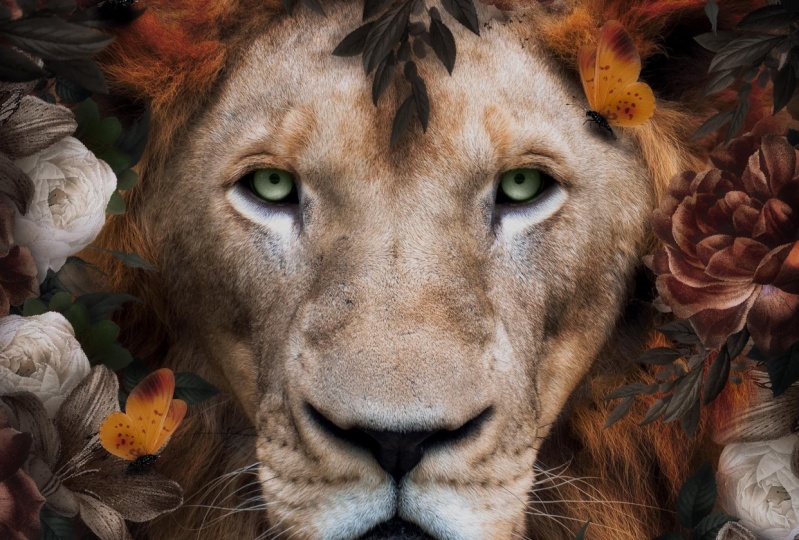
4. Lighting & Colors: Let's work on the
face of the lion. So this layer, I want to make sure it
looks better than now. And the first thing I'm gonna
do is I'm going to select this layer and then go to
adjustment layers here. And I'm going to select curves. And with course we can
change the lighting. Now, here we have the height
highlights and here we have the darker tones and incentive,
we have some midtones. So first of all, let's make them dark and take the mid tones
and bring this also done. So if bit more contrast. Now we're going to create
a new curves again by going down here and
select curves again. One thing we need
to make sure that we only edit this layer. So press this button here, so only affects that layer
and add the flowers. And the same goes for this one. Click on the layer
and press this. Alright? And for this one, I want to make sure it's
going to make it light again. And something like this. You can see it already
is a lot better now. The next thing to do is
to make some areas a bit darker around him because
in the sites around them, I'm gonna make sure
it's a bit darker so we have more focus on its face. So what I'm gonna do is I'm gonna create a new layer again. And I'm going to
press right mouse on this layer and create
a clipping mask. This means we only work
inside this layer. Then I'm gonna go to Edit Fill. I would edit fill. We can select something. We want to fill this area. Now, I want to make
sure it's 50% gray. With 50% gray, we are creating a 50% gray layer
which we can work on. So if I change this
from normal to overlay, you won't see this
layer anymore. You only see what I'm doing with different tools
that I select here. So I want to select
the burn tool. Now, let's select
the burn tool here. And the first thing
to do is to change these two highlights and
exposure somewhere around 50. And let's brush the outer
area a bit darker like that. Just a bit of a
brushing, not much. We can have some
dark areas there. And that's it. And
if I compare this, you can see it's a bit darker. Now, I'm going to
move from highlights, midtones, and drop the exposure a bit so it won't be too much. Maybe you're out 20
and do this again. Like dead. It's also a bit in his face. So we have some nice
dark areas in its face. And let's move to shadows
and do it one more time, like really low, like that. And that's it. Now, if I compare
before and after, it's a bit darker. Now I'm going to
select the Dodge Tool now, which is here. And I'm going to make sure
we have mid tones around 50. And I'm simply going to make the eyes a bit
lighter like that. So we can still see this IS, and this looks
already a lot better. Now, the next thing
we need to do here is to make sure the
colors are right. So this purple is
really purplish. I want to make sure
it's a bit less purple. So I'm going to
click on the layer from the foreground here. And we're gonna go down here. And we're going to select
Hue and Saturation. Make sure we press this one. Only affect this folder
here of all the flowers. And let's bring the
saturation down. Just a bit like that, maybe minus 40 something
in this range. You can also change the
colors here if you want to. But I'm going to leave
it like the purple one. Alright? Now we
need to make sure this background here
is also less colorful. So I'm simply going to duplicate this adjustment layer by clicking on this
given situation. Press Control J or Command J. Take this layer and drag it
underneath the line here, and click on this double-click
and make sure to press this saying only affect
those layers there, right? And let's also make them a bit darker by adding some curves. Now, press this again and make them a bit
darker like that.
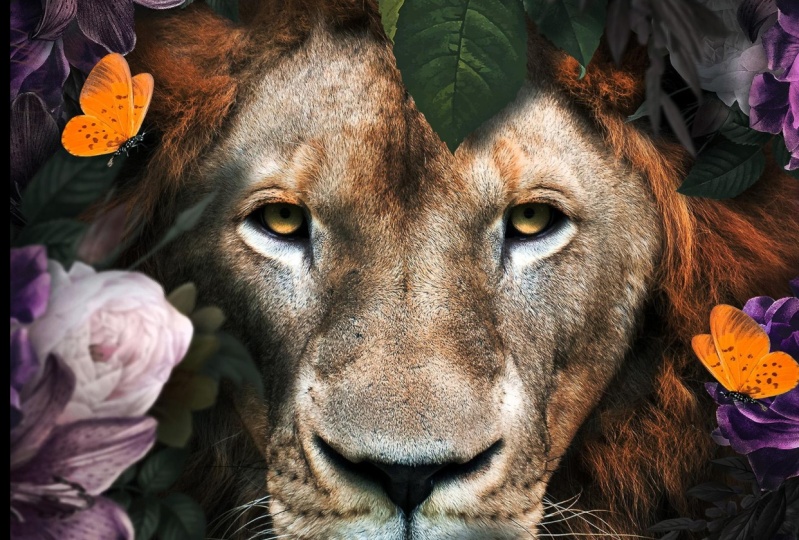
5. Corrections: Let's work a bit more on these
flowers in the foreground. They can look a lot
better than now. So that's this one, this folder. And if we create a new
layer on top of this one, press right mouse and select
Create Clipping Mask. So we only work
inside this folder. And I'm going to go
again here and fill this with 50% gray like
we did before. Now, change the blend mode
from normal to overlay again. And let's select the burn tool so we can bring some areas, make sure we have. Let's do highlights here a bit. And let's burn these
flowers a bit more, especially on the outer areas. So it's a bit darker. Let's change this to mid
tones and drop the exposure. So this is actually
the same as we did before with the line. So we have some more
contrast like that. Let's see. And maybe if you go into this
folder of these flowers, you can eventually
even make some more. So if you're going
to press Control J again like we did before, maybe you want to
fill this whole area a bit more like dead. But I want to make some of these flowers also blurred out. I'm going to press
Control T or Command T and make like really
big flower here. Let's do one big and go to filter blur and
select Gaussian blur. And we're going to
blur out some flowers. So we create a bit of adapting
this image just like that. Press. Okay, and that's it. And let's see, I don't want
to ruin this image with it. So I'm printing press Control
J or Command J again to duplicate this place
somewhere, maybe, maybe here. And let's do some there. Just make sure we don't
ruin the image with this. Something like, let's
see, let's do there. On each side, I'm going to place this flower and I'm
going to rotate it to make sure it's not the
same, same pattern, right? So something like this. Maybe move this a bit closer
so it covers up this phase. Just be creative with this. You can try a lot
of different stuff. Alright, so we have a lot
of stuff now going on. The only thing
that's missing here is we don't really see
shadows from these images. I want to make sure we
also have some shadows and some lighter areas. So let's first go into
this layer again. I'm going to drop the
opacity here because I feel like it's too
intense, like that. And I'm going to
select the Dutch tool. So instead of the burn
tool now I'm going to select the Dodge
Tool with digital, we can make areas lighter. So let's go here. Mid tones. And I'm going to
press some areas lighter. Just they're, they're not much. This will make some
highlights in this image. And I think this
is already enough. We're going to drop
the opacity even more. Now, let's create some shadows. So for the shadows, I'm gonna go here and make sure it's between this
folder and the line, because we want to create
shadows on the line itself. So let's create a
new layer here. And select a brush. Make sure it's the soft
round brush again. And drop the opacity and flow
to 2020 is a good range. We have black
selected as a color and make the brush
a bit smaller. And let's just simply
start brushing. Maybe this is too much. I'm going to make the
brush a bit smaller. Like they're some shadow there. So the only places I'm actually
going to make the shadow is the areas that are
touching its phase. So they're baked here. We don't have so much
stuff that's touching m, So maybe a bit there. They're just these
areas around it. And some here. A bit more dire there. Now, now they're
going to go really into detail with brushing. In my courses, I do
this really precisely, but this is just
a free training. So I'm just doing this quickly
to show you how it's done. And if you really want to
go into details with this, you should definitely
check out the course itself to master
all these kind of little tricks to
make your image look more realistic than just placing something
in front of it. And then like I'm doing
now in them brushing. Alright, so I think we
have some shadows here. I can go on for hours
with zooming in and making this pixel perfect. But Let's do much time. Alright, so these
are the shadows, and let's change the blend mode to multiply so they look more realistic and let's drop
the opacity like that. Now, to make this a bit better, I want to place something
in front of it. So what I'm going to deny, I'm going to take this
leaf from this project. And let's first make sure
it's above all other layers. Let's do it somewhere there, above, above the shadows. So let's take this
leaf and put it there. Maybe make it a bit bigger. And let's put it
somewhere there. Like he's having a
leaf in front of him. And I'm going to add
some crystals leave. Don't forget this. And make it like that. Just a bit more contrast. And also going to
brush some shadows. So I'm going back
to the shadow layer and especially some shadows. So I'm quickly
doing this now too, at some nice stuff in
front of his face. So it looks a bit more creative. Now we have also another image, and this is the butterfly. I like to play stuff
in front of his face. So we have really a
lot of stuff going on. So you can play with
this, maybe want to, like here on its
nose or on side. It's all depends on what
you want to do this. Now I'm going to instantly
add some curves to this and make it like that. And also add some
human situation and drop the color bits so it blends better
with this image, maybe a bit more
right to the left, sorry, and bit darker. Now, it also needs
another layer. Create a clipping mask again, and fill this with
50% gray again. I might go a bit fast
now because I don't go into details now
and just show you quickly how I create this stuff. But if you want to go really into the
details of everything, if you want everything
really slow, you should check out
the course itself. They are very slow end. I'm explaining everything
more than I'm doing now. So let's change this
to five bit more. Shadow here, like that. Alright, so we have a lot
of stuff now going on here. We're going to
take these layers, maybe nothing in his face. Let's duplicate this. Maybe on the other side. I'm going to transform this,
flip, this horizontal. There. Maybe want more,
dare say we have a lot of these butterflies
flying around him. Maybe some they're just wrote datum, place
them somewhere. Different parts of this image. I think four is too much. I'm going to delete this layer. Alright, what I want to do now is accidentally
disabled something. What I want to do now is I
want to finish this image by adding some
final adjustments. Now, what I'm going to
do now is I'm going to create a new layer Command, Alt Shift E. So we have a duplicated
version of everything. Then press right mouse, Convert to Smart Object and go to Filter, camera Raw Filter. And this is the last step
what I do in my artwork. I always adjust stuff here. So here we have all
these settings. We can change the lighting
colors and all that stuff. So actually just
watching the image, what happens when I
move these sliders? So usually I make a bit
more contrast here. Let's make this highlights pub. Let's see, let's make them
a bit more contrast again. Let's increase the whites so we still have some nice highlights. And maybe bring down the texture and clarity like
that. Let's see. We don't need these guys. If you want to make it colorful, you can really boost these
vibrance and saturation. But I still like to keep
it a bit more real. So I'm going to move on. And let's see highlights here. Bit more highlights. But not too much.
So I'm gonna jump the light and the darks there. Let's increase the shadows a bit so it doesn't get too dark. Now here are some sharpening. To make this really sharp. We don't have nice
soft, don't need that. And here can play
with the colors. So this is a really fun part of the editing process where you
can change all the colors, especially when you have like this image a
lot of flowers here. So we can easily change the colors of the flowers
to something else. Or for instance, this leaf here, maybe a bit more greenish, bit more yellow, greenish. And let's see, let's
move on. Purple. Not really. I think this is fine for now. I'm going to leave it like this. And here I can also change the saturation of these colors. So first I play around with
the color itself and then I can change the saturation on
how many colors do I want? The 1 third less
situation or more? And here can control
everything in this artwork. I think this is
actually pretty fine. I move on to, let's
see what do I fear of? And yet, it's also good in these kinds of
images at some vignette. Move on. This is the really
intense vignette. I don't touch that one. And here we have
the colors again. Let's see, maybe if we play
around with the settings, sometimes you get a
better kind of artwork, but sometimes it gets worse. So this all depends on playing around
with these settings. You can see this bit better. Now, I'm going to press Okay, I think this is fine. And you can see
it really changed his image that looked
a lot better now.
6. Final Thoughts: To finish this design off, I'm going to create a
new layer on top of everything and go to Edit, Fill, and fill this
with 50% gray. Again. Change the blend mode to overlay and select
the Burn tool. So I want to make some
areas a bit darker. So I've mid tones here. Exposure 34 is fine. I'm going to just simply
brush a bit areas darker. This will create even
more depth in this image, especially the stuff
that's in the background, maybe a bit darker
around its phase. Let's drop the
exposure bit here. So at this stage, it's pretty much done. I could also run this into Lightroom and apply
one of my presets. That's what I usually do. I like to apply my presets
to give that extra, extra touch to it, which makes it really different
from the image sometimes. So also check out my presets. They work really
good for kind of artworks and also for photos. So this might be a bit dark, so I just dropped
the opacity here. Let's also make sure the
colors are balanced. So I'm going to add
a color balance. Let's give it a bit more. Debt like that. Not green, but we'll punish. So yeah, that's pretty much it. I also like to add
some curves here to bring up the highlights so
it doesn't get too dark now. And maybe a bit like, like dead. So this all depends
on your own taste. If you want to have like
really contrast image, you can make it like that. So that's pretty much it. Thanks for watching. I hope this will inspire
you to create even more. So check out the courses. They are really good for
beginners if you want to. Of the course is really slow because this
one is pretty fast. But in the course is,
everything is really slow and in detail. And now in this video, it was a bit fast. In the beginning, it was. It was okay Then it went first. But I did this on purpose. So you could actually go
to the image quickly, but to create even more stuff with stuff in details and different kinds of
effects, you get. Check out the courses. So thanks for watching and I hope to see you in the courses.
 Zenja Gammer, Digital Artist & Educator