Transcripts
1. Intruduction: Hello everyone, this is Margarita. I'm a digital content creator and unable to either sister studio dot JPEG. So in today's class we're going to talk about Procreate brushes. And I'm going to teach you how to create a multi-line brush on procreate. We're gonna do two lines, three lines, four lines, five lines, as many as you want. Really wet once you know how to do it, It's easy enough to add extra lines to your brush. And so, as a disclaimer would say that, I will maybe take a couple of steps for granted. So if you're not 100% familiar with the Procreate app, I would suggest that you rewind and go back and watch as many times as you need to understand what I'm doing. And yeah, so for this tutorial, you'll just need your iPad to your Apple pencil and the latest version of Procreate. So let's get started.
2. Design the tip of the brush: Night, so we're going to make five lines brush today. That looks like this. But we're also going to create a Fourier line three, line two lines, just so you know how to do it. So first thing first, you want to work on our square canvas. While it, I like to work in a square canvas, you can choose whatever canvas size canvas you like. And I am going to click on Columbus and then drawing guide, edit, drawing guide, and increase the grid size two. Yeah. And then click condition. And this is just easier. So you go a little bit about evidence when you draw your SOC circles, that will be the tip of your brush. So I am going to color the BAC clones in block and then create a new level. And obviously I can't see my drawing guide here, so I'm just going to go in and edit the color, maybe to white so I can see it. And then I'm going to choose the color white. And on these level with my calligraphy mono line brush, I am going to create, I'm going to, I'm going to draw a circle just about the size and I will fill it. And then what I'm going to do is just duplicate the circle and making sure that I've got the snapping and my authentic of snapping gone. So it's easier to transport it in line with the other one. I am going to maybe drug into here. Yet that's enough, That's enough distance. And then what I'm going to do is group those layers and then duplicate the group and then move it. Just done that. Or I can drag this one a little bit up. Think that looks better, and then I'm going to duplicate just one the same. All right, so I've got my five circles now. And this is exactly the tip of your brush. So this is what you see if you would have a brush that looked like this just here on the tip of your brush. So when you go through it and the tip of your brush full, draw five circles that will become line, lines. So I'm going to flatten the groups and then merge, merge it down together. So I'll go one level. Now don't go only one level. And I'm going to click on an ad, copy Columbus. And I'm ready to create my brush. So discount Canvas has been copied. And I'm going to click on my Brush Library and create a new folder. And you can call this folder whatever you like. So I'm going to call it multi line. Just because of go out idea multi-line. And then I'm going to click on the Plus, which brings us to the brush editor.
3. Edit the brush settings: Now that you've got your brush editor open, you don't need to know exactly wall will all the things do you do your brush? I'm just going to show you the settings that you need for this particular brush. So the first thing that I want to do is click on shape and written out the tip of our brush. Looks, it looks like this, which is just like a basic circle. And that's the basic setting that procreate gives you. So that would be the tip of your brush here. And so what I've got I want to do is click on Edit and then import and then paste. Because remember we just copy the canvas so it's copied into memory. And so you basically there, if you, if you didn't want to copy the Canvas and you wanted to do something else in between. So you just wanted to save the photo. You could just save the canvas in your library, in your photo library, and then click on import a photo and you can also do it like dot. But I've got it here now, so I'm going to click Done. So that's the shape of my brush now. And as you can see, It's not what we want. It's very, it's very pretty. You could work with that. You could do so many different variations of this brush. But this is not what we want just now for disgust. So I'm just going to click on the stroke path and I'm going to modify the settings. So for the spacing, for this brush, I would like it to be to none. So see how the spacing changes and it's all these little dark dots next to each other. We just want a line like a seamless line with no space. Just going to cleave it. That's much better. Um, but I would like to add maybe 36, 8 percent to the streaming ETL streamline. And then these will aid you when you draw curves. There are much smoother now. So I'm happy, actually, 60 percent, I'm happy with that. And I'm going to leave the other settings do none. But you can see now my brushes, it looks like an open because the curves when my Apple Pencil court was M, and we're trying to modify that. We're going to modify dot because we want just the streamline. We don't want any curve. So for our taper, we basically for these brush, It's a very basic brush and we want everything to be very basic and very flat. What we're gonna do is just set everything into none or is the EIDL when possible. So Tip Animation and ticked the shape. We already looked into the shape, but we're also going to add the rotation up to follow stroke, which is the maximum that you could do. And in this way, as you can see, my stroke doesn't bend like a ribbon anymore, but it's more like flow and it will follow the stroke of my, of my pin instead of bending. So that's the most important setting that we need. And then we are just going to leave everything to 0. Gradient we don't need because it's not getting any texture that we went after. We just want a three things, smooth silver, just going to leave this as it is friending, wet mix. We don't need, we don't need anything from here. Color dynamics as well. Dynamics would just leave everything to see it all. Apple pencil. We want the opacity to 0. See how it changes it. You probably won't be able to see it from the screen. Because the white, it's quite bright on camera. When you are on. Maximum, the edges are quite transparent. So I'm just going to take it down to 0 or none, just to make it more uniform. And I'm happy with all of this. And then I'm going to click on property. I'm going to untick oriented screen. And I'm going to leave everything as it is just now. You could change this size in here. But I'm happy with the sky, so I'm not going to bother. And then About this brush you can made by, you can write your name here. So I'm going to say and get ETL. You could oops, you could cite it. You can add your logo or your photo and then this is very important. You should name your brush. So five lines. And I'm just checking if I go everything set. Yes, so ever go. I like this is a very subtle change, but I like to click on intense that I ending. And it just, it blends the colors a little bit better. I feel. And you're not able to see it when you're on the drawing pad just now, you will be able to see the difference a little bit more when you click on down and you actually start using the brush. And this is my brush. I'm going to click on Create new reset point. And safe. In this way. Whenever you change something and then you decide to console that changes, it will always go back to this point because I'm happy with the brush right now. Now I've got my brush saved. I am going to click on Done. And as you can see in multiline to, I've got my five lines here and I can start using it. So over use it. I'm just going to go on to gobbledy and politcal a new canvas so I can start fresh and then choose a color. I'm going to use this orange. And I'm going to start drawing with my brand new brush.
4. Tricks and tips: These brush because it follows the curve of your pen and sometime can be a little bit messy at the edges and at the start and the end. So for example, here you see and you see it gets a little bit messy, especially if you do a coroner, it gets messy there. So to prevent it, what I like to do is when possible, start outside my canvas in these wavy edges are unsure, but it's not always possible. So sometimes I like to give myself enough space. I'm at the bottom and especially to go back and get rid of anything that I don't need. Just so it's much cleaner or a few, hold your line and it will automatically get rid of the bad edges. So for example, if a goat this, and then I hold my line, my line will get straighter like with any other brush and procreate. But also it will get, I will get a clean line. And that is not really a solution for the, for the edges. And there are just a little bit messy. So what I like to do is just go back with like a mono line and then manually create a link between adults and not be imbedded precise year. And then here I'll just get rid of all the bits in between. And this is just a way that you could clean out your design.
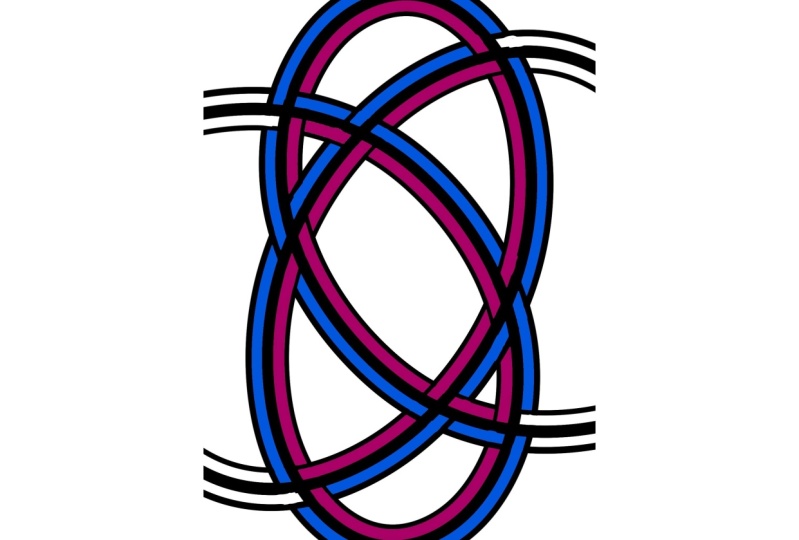
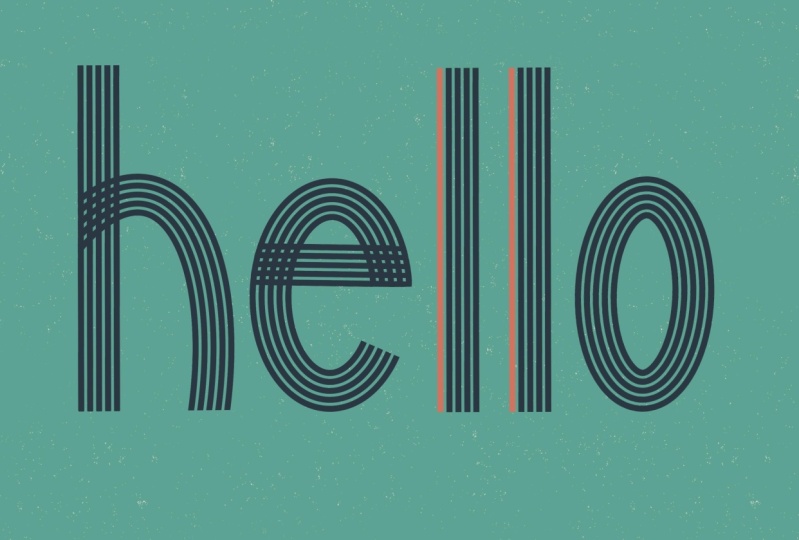
5. Lettering Project: So I'm gonna write the word hello and you could follow along with me. So for the H, I'm just going to draw a straight line. And then I'm going to change the layer. And you'll see why. Because later on I will want to get the dog or intricate effect on this part of the H. I don't want to be able to go with my eraser on the free traders as much as I want without worrying about also damaging this line. And then on a different layer, I'm going to start the vector e. And because I worked on a different layer, now, I can just move this letter with no problem. And then on a different layer again. And as you can see, if I just hold, I didn't and easy can see if I just hold my O, it will become a seamless circle or oval. So now that I've got my word, it's not centered. So I'm just going to select all the layers and then move it a little bit to the side. Okay? And then I'm gonna go ahead and clean all the bits that I don't bond with my technical pen. It is, or because I find it, it's got a very tapered end and it's a very precise tool. So for this one here, I will do braided effect. So I will need to add a little bit here because that's missing. So I will just hide it with my thin. So I'll leave it like that. But for the E, I would like to get rid of this. So I'm just going to click on my layer here. And then I'll create the same effect they are due for my L's. I'll just clean up the edges straight line and then move them down. And I forgot. Okay, Now I'm happy with this. So I know that this is just one stroke. So for example, these, these pipeline, they all are in one layer and we created them with just one stroke. However, there are five different lines. So I could actually just color them width, height, different colors, which is a very nice effect. So I've got some shades of blue here. And just making sure that I'm on the right layer. I'm going to color. Whoops, I'm just going to stay on the right layer. I'm just going to change the shades of blue. So I'm going to click off this one. And I will create a nice gradient effect on, I'll fast-forward while I'll do everything else. So I'm actually quite happy with what this looks like. But what I want to do is just clean up this bit here a little bit. So for that, I'm just going to click on my eraser. And I want to make this a little bit cleaner. And then I'm gonna do like up, down, up, down and effect. So this will be up and these will be under, over. And then the opposite for this one. So this one will be over, this one will be under, this one will be under this file. And over. So we'll just do dot and I will do the same for the EE. And this is what I'm left with. I'm actually quite happy with the little over and under design, design here. This is why I really like this brush for left to the end. But let's just go and I'll show you how to do three or four or even more than five. I find that more than five sometimes it gets a little bit messy and you really have to have like very small circles. And, but I'll just quickly show you.
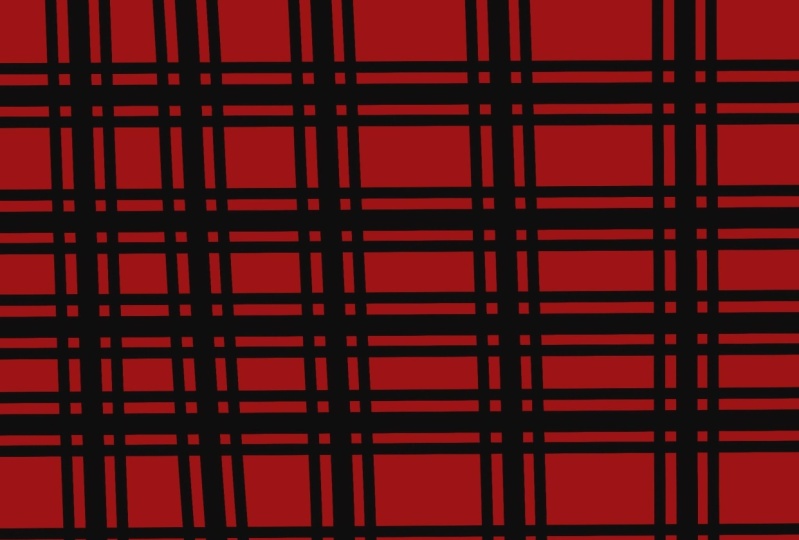
6. Brush variations: I'm back on my brush tip Canvas and I'm just going to show you how to do line. Let's just keep it simple. And I'm just going to delete this layer, create a new one, a goldmine borderline calligraphy brush with the color white. This big white. And then duplicate. And you can change the spacing as much as you want and play with not as well. So I've got my two circles selected. Let's just make sure that it's aligned. And once I'm happy with how this looks, I'm going to click on Add copy canvas, and then finally click on my multiline two folder and click on Plus. So we're back on the brush editor and they Stein, we're going to click on Shape, Edit, Import and paste. And you see you go. I've got my two dots, two dots here. So I'm going to click on Done. I'm going to do the same exact same thing as that's done for my five dots brush. We're going to have it up to 60 percent. No taper. I'm going to rotate it to 100% opacity down to 0. And as you can see, I've got my two line here. Can name the brush to click on Done. And then let's try out this branch. So I'm going to pick another color. I'm going to choose this orange. Create another layer. You can really have fun with this brush. It's really a fun one specially for lessening and that is it for this class. I hope you enjoyed it. I hope you learned something new and I hope you will enjoy playing with a new brushes. So if you create any design, I would love to see them. Please stop me on Instagram at sister studio dot JPEG. Otherwise, just leave them in the project. See you later.
 Margherita Ambrosi, Illustration Artist