Transcripts
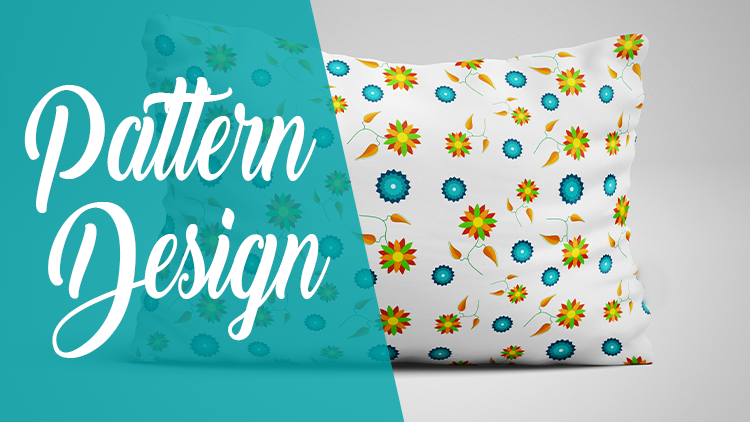
1. Introduction: hello and welcome to the bed and design course with me that we photo shop software. In this course, you will learn to design your own parents in any lucky one. Parent is a very important tool that enables you to design backgrounds and material products, but that's like cups, mattresses, phone covers, gloats and a lot more. This course you will learn to design veterans in a simple, easy way and in a short amount of time course starts with you from scratch until you finish your design and converted to also show you how to use your patterns in your product designs and how to access your bed and at any time in a single Glick.
2. Shape design Part 1: Hello, everyone. And welcome to the score Sent this video in which we will work on this pattern right here. As you see, we have here these designs. It's a bed, mattress, foam and a mug. And you can use what you learned in this course to create your own designs. Like these designs right here. So I hope you like this course and we will start by working on this bellow design right here. So we start by creating a new documents. Go to file you and we will make this documents with these settings. Then reflect creates. And these are the colors that we would use in our design. We will work with these two shapes you know, designed. The 1st 1 is half of a watermelon and the other is 1/4 of what watermelon. And in this video we will design the quarter off the watermelon. So we select the pencil. Here it is, and we zoom in. Then we will drop triangle in here so we would use the rulers. Make sure to activate the rulers From here you go to view and you check the rulers from here. Now put The rules are in here. Another one in here. Keep going like this and the less one in here. Now we start growing. You put the first dot in here in a 2nd 1 in here. 3rd 1 in here. Then we reconnect them like this. Now we removed the rulers. It's like the triangle and we remove its internal color and we make it as a stroke. Now let's click on the pencil. Then we select the curvature. Pencil was selected and then we put the dots in here. Then we click and drag like this to make the train go look like this. We just to shape a little bit like this, make it wider. Perfect click. Answer. Then we go here to change the triangle color. You will select the green color we copied from here it is. Then we go back to our design page and we based it right here. We zoom in a little bit and now we will duplicate the triangle like this Rights collect and we go to duplicates layer. Then we removed the stroke and we make the duplicated one in this color, the lighter green color in this one. So he faces right here Here we are. We check the short transform controls so this week, and adjust the size off the triangle like this. Put it right here. That's perfect. Acute supply changes. Now we duplicated trend in one more time, and this time we will paint it with the red color. It it is. We copy the red color. Go back here. Double click here. And we based the color like this. Then again, we checked the short transfer controls to adjust the third triangle like this. Perfect. Now we will draw the black seeds right here. So we select the pencil and we drove C shape right here. He's room in a little bit. Then we use the perfecter pencil to fix the shape a little bit. That's perfect. Now we will make it in black. You put the seat in here right here. Then we duplicated multiple times. Put the 1st 1 right here, Another one in here and we keep going. That's perfect. So here we have our first shape. That's it for this video. See you in the next one toe work on the second chip
3. Shape design Part 2: Hello, everyone. And welcome to this video and former video. We worked on this shape right here and in this video we'll work on the second shape. So first of all these layers in one folder to do that, we select the bottom layer. Then we hold the shift and old buttons, and we select the top layer like this. Then we clicked here to put them in a single folder. Now open in your folder. Then we select the lips too. And we drove circle right here. We removed the internal color. Then we use the curvature pencil to just the circle. We select the start and we drive it like this. So I need to put another one in here and another one in here. Then I dragged like this. Go back and I dragged like this double click on the on the dot and the edge to make the edge straight. And now we have health a circle like this. Perfect. No. Paint this shape with this color. Same color in here. Then we duplicate the shape and we make it in this corner, the red color. Then we just its position like this. Zoom in a little bit. So that work properly, we painted with this color. Then we duplicated Now we painted in red and we just its position like this. Perfect. Just a little. That's great. Now we will create the black seeds in this shape. So we selected and we copy its layer from this folder to our current shape folder and we drag it right here like this, and we will duplicate it multiple times, like with it in the former video. Keep going until we make it reasonable. We don't want to put too much seeds, and we don't want to make a large blank spaces in the shape that's perfect. And, he thinks is defined a look of boat off the shapes that we will use in our pattern and design. So see you in the next video to start working on our pattern design. Thanks for watching
4. Arrangement shapes: Hello, everyone, and welcome to this video and this video will work on our better designed. We have completed these two shapes in the former videos so that we can use them in our pattern design. These other two shapes we have had for watermelon and the courts are over watermelon. Now we select the two shapes layers, and we dragged them here to duplicate them. We will hide these two shapes in case we want to edit them. Because if we did not weigh started our work, we want to be able to edit them. That's why we keep these two as percussions and always remember to save your designs from time to time so that you don't lose it in case if anything happened, I'm going to open a new folder to save our design in it. Perfect number, click. Save anywhere. Now we select these this shape file and we make it as a layer right click and we select group. As I said before, we want to be able to edit the layer now. That's why we kept those two once. Now rescuers here at again merged group. And as you see, the two folders are layers. Now zoom in a little bit and we're gonna put the two shapes in order so that we can make our better design Mikola curious so that we can adjust the size and we rotate like this. You put it here. Perfect. So I need to duplicate it. Here we are again. They duplicated and I put it here. I'm going to duplicate the shapes multiple times and I'm gonna put them in order so that we can have our pattern design. But this one right here and this one are you same thing for this one again. Copy it And I put it right here. I rotated and remember as they said before, you don't have to make Don't make two shapes next to each other in the same position and this facing the same direction. And here we are. All the shapes are in order. Now we select the top layer here it is with selected. Then we hold the shift and control buttons and we go all the way down here to the last. But I'm layer and we selected to select all the layers together. Then we click here to put all the layers in a single folder like with it in the former video to the layers off the shapes. Now right, click and select merged group to make all the layers in the folder as one single layer. As you see, this whole design is a single layer. And here we are. We completed our design and we moved to the next video to see how to use this design as it better. Thanks for watching, and I'll see you in the next video.
5. Converting shapes to pattern: Hello, everyone. And welcome to this video to see how we use our design as it better. As you see, this is designed that we made in the former video. Of course, your design don't have to be exactly like this one. You feed to make it as you want. Now we select the layer. Then we go to filter other and we go to offset. And from the offset window, we control the design like this. As you see, you can control the design horizontally and vertically. I can adjust it any way you want. Click on the wraparound and that's it. The wraparound sitting is the one that I wanted We selected first before we eat it or we could just anything we select the wraparound option. Then, As you see, we get these shapes right here the rest of the shapes, as you see in the bottom here These shapes are not completed, so the rest of the shapes will appear into the top right here. Then you can adjust the design right here. And as you see, it's the same thing from the rights to the left. Those shapes that are not finished will appear in the the first direction. If you have unfinished shape in the bottle in the bottom, it will appear the rest of it will appear in the tub. Same thing for the right and the left. Then we click OK to apply it. And here we are. Our design is ready to become a better now we go to it it to find better. We named our better. You could call it anything he wants. Like okay. And we have a better right here. Now we go to file on you. He creates a new documents with any given settings. We unlock the background there, reds, Blake, and we go to blended options and we go toe better overlay. And here we are. As you see, our design is a better. This is the design I already made. So I'm gonna go to the one that we just did. Here it is. And you can just It's skate like this. You can put any scale you once so totally up to you. I'm gonna leave it at this 37% Then I click. OK, and here we are. Our design is officially a better, and we can put our pattern design on Mo cops like this one. You have a cell phone cover a bed cover. To do that, you go to the market page and you don't move the existing color. Here it is. You replace it with your own pattern. Design rights lately go to blending options that an overlay and you select the better. You just designed it. Just it's scale again. As they said, you can put it at any scary ones. Okay, then we go to save. And here we are. Our design is on. Um, look up. And as you see, we have multiple mock ups right here. This bed cover. We have iPhone case we have. We have this one right here as a mug, a mud muck up. And I'm still I still have another design. Look up. I think this is Yes, this isn't It's a fellow. Look up and you can put your design on any more copy ones. So this is our first design and how to make it as it better and put it or more cups. That's it for this video. Thanks for watching. And I'll see you in the next videos to work on the next designs. Thanks for watching
6. Design shapes: Hello, everyone. And welcome to this video and this video will work on our seven design. So we opened a new documents with the same settings we used for the 1st 1 to tell Isn't boats in the winds and the height and 72 in euros lotion. Now we paint the background with pink like this wouldn't move this extra page. And here are colors that we videos in this design. Now I have here this heart shape. Here it is. It's the one I will be using in this design. And if you want, you can download any shape and work with it. You can draw the shape manually if he wants all you Condell loaded and to download the shape you go to flood Icahn dot com Here it is. You select the shape you want, you can type whatever you want and search for it. For example, we have this shape right here. Then you select its type better be PNG, then used to look at the size and you downloaded. Then he open it and you add it to the photo shop software like this and you start your design now. We selected the heart shape. It is We selected end. We drove it right here. We painted with this color It is we duplicate the heart shape. Then we adjust the size of the duplicated shape like this and we put it right here. Then we could be this cover and we painted the heart with it. Then we put it right here in the center of the former shape. Now we duplicate the shape and we put it right here about all the shapes here. And I just do size a little bit. That's perfect. I duplicate this shape. I brought it here that I do the same thing for this shape I duplicated. And I put it right here. No, I select the player. Then I hold the shift plus control button and I select the bottom layer to select all the layers like this the night like you to put all the layers in a single folder. I duplicate this folder like this that I am Check this box and I put the duplicated shapes right here. I duplicate shapes again, and I put them here. What I'm about to do is optional. If you don't want to do with the dot I would reverse these two shapes. Viper in this shape up here. And this one right here got us like these two shapes like this. Put them down here and I select this one. And I put it up here like this. Basically, I reversed these two shapes like this. Perfect. Now we hold control bottom and we select all the folders and we duplicate them like this. Then we select these folders. We hide them. Let's click here. And we slept Murders layer to make all these layers in these folders as one single layer. So that's it for this video. Thanks for watching. And I'll see you in the next video.
7. Converting shapes to pattern: hello and welcome to this video. And this video will see help to turn out design into a better and how to use it. This is our design that we created in the form of video. You just need to adjust the size a little bit to cover most of the space. Perfect. Now we go here to filter other offset. Then we just our desire like this. We just had like this same thing vertically. Basically as I told you before, this is how the design would look if the these shapes are not completed. If a shape is not completed from the right, it will be completed in the left, you will find the rest of it and the opposite side se think vertically from bottoms. It's up. The shape is not finished or completed in the top. It would be the rest of it would be in the butter and vice versa. That's why we do this adjustment. Now we look OK. Then we go to it. Defined pattern. We named our bedroom, for example. We call it Neo to click OK, and our design is a better now. Now to try to open a new documents using the usual settings we unlock this layer writes collect will go to blending options. Go to pattern overlay Then we select our better design from here I bet are better present. Isn't that available here? So I will delete this one And here we are. This is better designed as we just designed we selected and here it is from here you can adjust its scale Click OK and here we are. This is our pattern design Now we put our design in a mocha Have some three more cups I downloaded for example We will put out design into this fellow mock up right here So double click here We could look off better overlay Then we replace this design pattern with our design better we just It's came like this Click ok because you file safe You go back to the book up and here we are This is our design on a pillow mocha And as you see here this is what I was talking about. You see, these shapes are not completed in the sight of zoom into so that you can take a good look. As you see this shapes are not completed and decide. And when you go to the other side to find the rest of these shapes, that is why we just the design in the offset window before we put it on a mocha. And here we are. Take a good look at our pattern design on a pillow mocha. In case there was something wrong with the design. You can always go back from history option and fix the design like this. Then make it as a better design again. This just in case there is something grown went with your design. And I will include all these all the designs and images we used with the course. So you can use it. That's it for this video. Thanks for watching. And I'll see you in the next video.
8. Design shapes Part 1: Hello, everyone, and welcome to this video. In this video, we will be working on this better and design right here. We will start by creating shapes. Then we will turn them into a better. So we opened a new page with the same settings as the former Videos 2000 in the woods in the Heights and 72 in the resolution. Here we are. I zoom in a little bit now. We select the pencil and we start from drawing to flower shape. We click and drag like this same thing, you and we use the curvature pencil to fix the shape. Keep going like this until I get the shape I want just a little bit more perfect. That's good. Now let's click on the ship player and we slept. Restore eyes, layer. We selected this breath right here. We just its size and you can select any brush you want for me. I selected this one, but you can select any brush your like. It's like this color a little bit orange. Then I hold the control button and I select this layer. Then I start painting in a Now let's look the same color only a little bit lighter and I paint in here. Then I select another bunch. This one I just its size and again, Same color, but even a little bit lighter. And I paint like this. This time I would select a darker color. Then I paint a little bit in here. Perfect. In case you want to paint the flower with just a single color right click on its layer than culture blended options and select the color from here. Then you painted with a single car. Now we opened a new folder and who put this layer in it and we duplicate this one. We rotate this leaf like this, and we put it here. We duplicate these two layers. We rotate these two leaves like this and we put them right here to make a single full flower. Now we slept the whole folder and we rotate the shaped like this. Perfect. Then we duplicate this folder. We select the butter folder and we rotate this shape like this. Now, right, click on this holder and we select merged group to make it as a single layer. We select the new situation, then right click on the layer and then we select creates clipping musk to apply the changes on Lee on this layer. Then we changed the color of the shaped like this. I choose this color Now I select this folder and I duplicates only this flower leaf layer. Then I put it all the way down here. Here it is. I put it here so you can see it. Then I would change its color like this and go to image adjustments. You situation like look OK then I put it right here. Now I opened a new folder and I put its layer in its that I duplicate the folder and I put the lead right here and I keep duplicated its and putting its between the Greenleaf and the orange one one more time. And here we are. Now I look the folder and I select the alleged stool and I will draw symmetrical circle in here. I just It's metrics to make it symmetrical. That's it. And we paint it in yellow. That's it. I just circle size a little bit. That's perfect. Position it right in the center. Now it's like the pencil to draw the flower stem. I removed the internal color that I activate stroke and I make it in green like this. Then I select the pencil again to draw this. Leave right here. Zoom in so that I can just shape correctly, and I would select the curvature pencil to in just the shape. Now right click go to blending options. Radiance overlay. I just the angle. Click here to select the first color. Make it an orange dark orange, and in here I won't make it a little bit lighter lights orange like this perfect go ph of my changes. Okay again, and I will just scale a little bit. Make it only 47%. That's better. I click OK to price changes, and here we are. Leave is ready now. I will duplicate the leaf layer. Then I remove the radiance color and I go here. Remove the Internet color and I would activate the stroke, and I'll make it in green Copy, Discover, it says then I would just its size make it two pixels. Two is perfect. Then I adjusted and I drag it like this. Zoom out. It's like the two layers like this. Click here and I would rotate. I would just first that I would rotate the leave like this. That's better. Then I will use the mental to draw the small step like this. That said just a little bit. Perfect. Now I will put all these layers in a single folder like this. Then I will duplicate the folder like this. I duplicated like this and I will position it right here after I rotated and I put it right here. Perfect his remote. And here we are. Flower design is completed. Now we move to the next video to design our second shape. Thanks for watching. And I'll see you in the next video.
9. Design shapes Part 2: Hello, everyone. And welcome to this video to work on the second shape Our design Here it is. This is designed this. We will be working on this video and in the former video we worked on this design right here and in this video will work on this one. This is the former design that we worked with. So we select all of it. We put all the layers in a single folder, will select the bottom layer than we hold the shift plus control button. And we select its A player that we put them all in a single folder. Now we saved a design. We select the rectangle tool and we will grow square. Right? You just It's metrics we painted with Discover. Here it is. We duplicate the box. Then we rotated like this. I opened a new folder and I put on I put these two layers inside of it. I duplicate this layer that I would rotate the box like this again. I duplicate the layer and I rotate the books like this. Perfect. He we are Take a look at the design. So far now we selected this folder right click and select merged group to make all the layers in the folder as one single layer. Sorry. First I go back, and I will duplicate the folder before I make it as a layer so that we keep the layers in here in case we wanted to change anything later. Then I turned the folder into layer. Perfect. Now I duplicate this layer that I will adjust the size of the duplicated shape and I will change its color. That's great. We go to blended options going overlay, and we select the cutter from here. Let's let lighter color than the first shape. Okay? And the rear. Now I just its size, and I center it like this perfect again. I duplicate this layer. I just decides with this shape, and I changed its color as well does Clegg and go to blending options color overlay, and we selected the color from here again. It will be a lighter color in the former one, and I center it like this. I select the lips toe, and I drove symmetrical circle in here. I just it's metrics to make sure that it's symmetrical. Double click here that I would paint it with white And here we are, these other two shapes that we will use our better and design. So that's it for this video. Thanks for watching. And I'll see you in the next video. You to create our better design.
10. Shapes Arrangement: hello and welcome to this video. And this video will work on our better and design. Using these two shapes that we created in the former videos now is amount like this. And these are the two shapes that we used in the former designs in the former video. So now we need to merge All this shapes layers into one single layer. To do that, we hold control button and we select all these layers, then writes click and we selects merged layers in here we have this shape folding. So we duplicated and we put it up here and I hide this folder. These folders I hide are the source, the source folders in case I wanted to change anything in the desired. Later Now, right, click on this folder and I select manage group. And now both shapes are single layers. Now I zoom in the nice like this shape. I just its position and I put it here. Then I will adjust its size. Same thing for this shape. I just its size. And I put it here in the center just a little bit more and he really I put it right here. Then I duplicated and I just its size. And I put it here, Same thing. Duplicate this shape. I just its size. And I would put it right here. And I will keep going until I make a full design. Just the position of this shape as well. Then I duplicated like this. I just its size like this. And this is our design, just the order I selected for the design. Now we need to select all these shapes layers. So I select the bottom of the top layer. I hold control plus shift and I select the bottom layer like this to select all the letters together. Then writes collect and I click merged layers. And here we are all the shapes layers are in one single lives. Our whole design is a single layer. So that's it for this video. Thanks for watching. And I'll see you in the next video to make this design as it better
11. Convert shapes to pattern: Hello, everyone. And welcome to this video and the former video. We created this design and positioned each shape in its position. Now we will turn this design into a better so we select the desire layer. Then we go here to filter other offset and we adjust the design It just it horizontally until we get we keep going until we get the results. We want this adjustment. You don't have to adjust the same way I do with just suggested dependent on your vision, dependent on how you see your design on a mock up. Because this is how the design would appear in a mock up. No matter what more capital is, I will keep it like this. Just a slight adjustment. That's perfect. Then we click. OK, now we go to edit define better and we name or pattern Your name is whatever you want. Then we click. Ok, now we go to file new We opened this base right here with a look The layer Then we go right click We go to blended options pattern overlay and we will select our better. Our button does not show here, so we need to delete this one It is right. Click Delete better. And here we are. This is depression that we just created. Here it is. Take a good look at it. And I was like, Okay. And as you see, this is our pattern design in the bedroom. Now show you how to help our mock up. Looks like how our desire looks on a mock up. So we go to the market, page will move. This better not here we replace it with our own pattern design. Go to file. Save save. Better known. Then we go back to the market page and here we are. This is how our pattern designed. Look on a fellow mocha. It looks beautiful and attractive. I'm gonna show you how our better and desire look on a phone case Smoke up so again wouldn't move this design. Replace it with our better and design And we adjust its scale. You can select any scale you want as it's it depends on your vision. For example, I will leave it like this just a little bit Perfect. I click Ok, I save it. Then I go back to the mock up design page and here we are This is how our better design look on a phone case smoke up and of course, you can change it. If you want case you don't like it, just go back to the market page. Double click on the mock up design place and just scale again. Save it. Go back to the mocha page and here we are. This is a second look off our pattern design on a phone case mocha. And as they said, you can just control your pattern design any way you want. And here we are. We've reached the end of this video and discourse, I hope your life discourse and it was useful. Thanks for watching. And I hope to see you in another course of mind. If you have any question, feel free to contact me and I will get back to you as soon as I can. Thanks again And have a nice day
 Joseph Adam, Graphic Designer