Transcripts
1. 1 Hello and Welcome: Hello and welcome. If you want to create a beautiful, professionally-looking workbook for your clients and charge more for your services, you are at the right place. My name is Mila and I am an English Communication Coach. I have a 10-week course for recruiters and headhunters and I've created countless workbooks and guidebooks for my clients. Today, I'm going to show you how to create a workbook from scratch so that you don't have to spend hours trying to figure everything out by yourself. All you need before you start is a free Canva account. You don't need to be tech-savvy or have any previous experience with Canva because I'm going to walk you through the whole process step by step and you can follow along. All right, ready? Let's get started.
2. 2 Setting up the Document: Okay, let's get started. The first step is to create our document. All my workbooks are in A4. I think it's the most convenient size. All we need to do is to click on Create a design. And here if you type A4, you'll see A4 document. Here you can see the dimensions. In case you don't want to use A4, maybe you want an A5, you want a letter, whatever. You can customize the size by clicking on this, see? And here you choose centimeters. And I will put 21 and 29.7, which is the size of A4. These are the dimensions of A4 document. And let's click on Create new design. Okay, see, this is our new document that we will be using. Perfect. Let's continue.
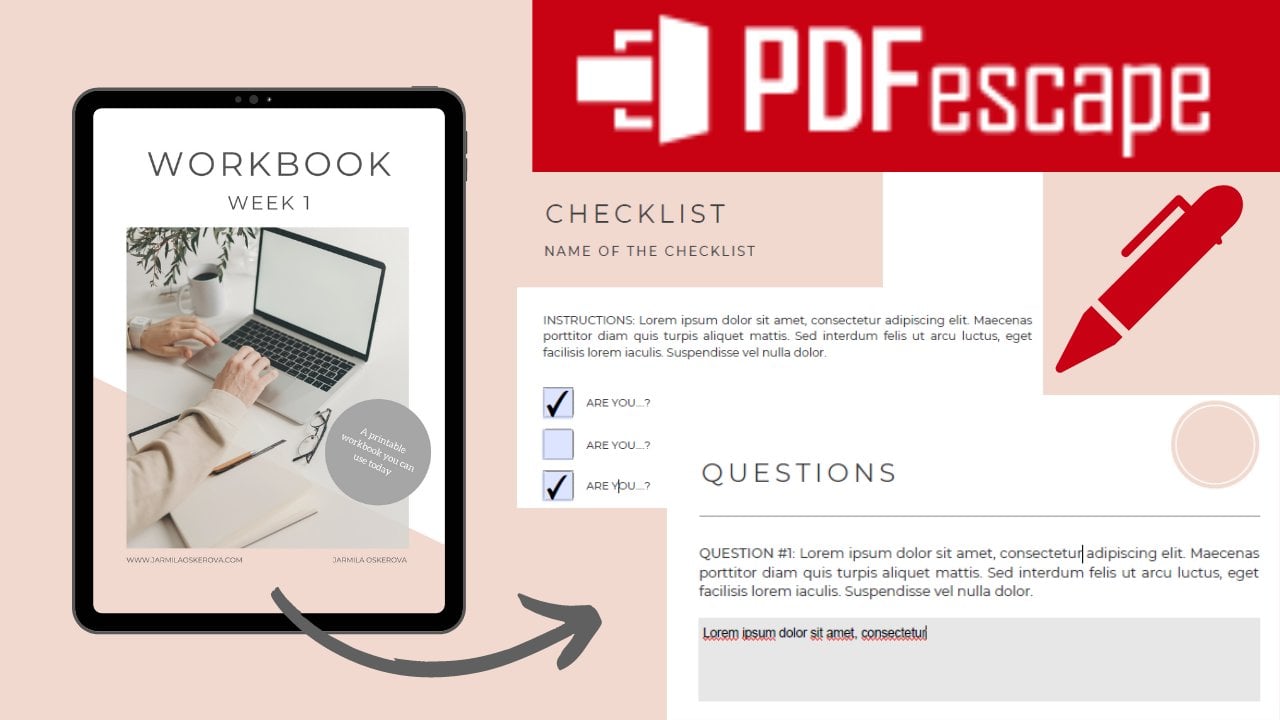
3. 3 Cover Page: Now we have our document and you can also create your file name. Okay? Just click on it. I already named my document Workbook - new. And you click Enter and it will be saved. So here in Canva, everything is saved automatically. See all changes saved. You don't have to save it manually. Yeah. So now we will create the cover of the workbook. So here you can zoom the document, okay, for a closer look. And first, we will go to elements. We type: grid. And we choose the first one. Okay? This is because we want to put an image on the cover so you can adjust the size. How big we want the image, maybe like this. We can adjust it later as well. Now. Always, when you move, when you can just click on it and drag it. When you do it, make sure it's centered. See the line in the middle? Okay. Now we want an image. You go to photos. Here you can type a keyword and it will show you images, For example: roses. Yeah. If it says PRO, you have to pay for an upgrade, you need to have the PRO version. But it needs to say FREE so that you can use it. Sometimes, it shows you just paid photos. No worries, what I do. I use Pexels. Let me show you Pexels.com. I type, for example, desk. Here you can choose the picture you like. Okay, for example. Let's choose. Now I cannot find the picture that I wanted to show you. Okay, let's choose, for example, this one. Click on Free Download. Now, it's downloaded. We will close this. Let's go back here. Click on Uploads, upload media from your device. I go to the files that I've downloaded. Click now, look, it's being uploaded, see. And now you just click on it and drag it into your grid like this, like this, like this. And now when you double-click on the image, you can move it up and down. To the right, to the left. You can adjust it where you want it to be. But I don't want this image. I want this one. You click on it, delete, you can choose another one. This is the image that I already have, it's from Pexels as well. And I wanted to use it as the cover image. Okay? Like this. Now we have the image, now I want a heading. So we go to the Text, Add a heading. Again. When you click on it, you can drag it. When you double-click, you can write, then click somewhere else, Click again, and you can move it. So what we are going to do, we will call it a workbook. Now, the size, we will leave the size 56. I want to change it to Montserrat. Okay. Now I will change the color. I will use gray. Here when you click, you can choose any shade, any color you want. Or you can if you know the color code, you can type it here. Yeah. So I will choose this one or this one. Little bit darker. I want it to be uppercase. So I click on the three dots over here and this icon. Okay. Now you can adjust the letter spacing. We will go here. Spacing. See. I want the letter spacing to be 110. You can just type it here like this. Now again, we want to center the heading like this. See, these lines are telling you, okay, you shouldn't go further. These are the margins. But you can, if you want. Now, I want a subheading. What I could do, just click on Add subheading and do it all over again. But I want to save some time, so I just click once on the workbook, Control C, Control V. Okay, I copy it and paste it. And now I can adjust it and it's easier because I want to have the same font and the same letter spacing, so I don't want to do it from scratch again. I can just copy it and paste it. Now. The subheading, for example, call it Week 1. I want to use the size 32. Okay, let's make it smaller. Letter spacing is the same. Yeah, 110, uppercase. Let's center it in the middle And here we go. Now let's make it more beautiful. Let's go to elements. Let's write shapes. And let's select this one to square. Now, let's change the color. I will use the color code that you saw in the mock-up. So I know the code which is f1d9d0. Enter. Here we go. Now I can adjust it. I want to make it a big rectangle like this. And now what we can do, we can also rotate the shapes. Can you see the circle here? So you just click on it and drag it, move it like this. You can rotate it. So I will rotate it a little bit. I will make it 50 % so that I can see the cover better. Then I will move it like this and make it even bigger. Maybe like this, okay. It doesn't matter that it's here now because you won't see it. See, look, it's not visible. You see just the A4 size. Now, I don't want it to be like this. We need to move it backward. So I click on the shape, position, backward. And now it's behind the picture. Also, when you click on the picture on this transparency icon, you can make it a little bit transparent, I like to make it maybe 85. I prefer the picture to be a little transparent. Okay. Now, we want to we want to put your name and website over here. So we go to Text, Add a little bit of body text. I will write I will write here my website. www.jarmilaoskerova.com Now. Okay. Now I want to be Montserrat, the font. The size, we will put 11.7. Enter. Now we have to make it bigger so that we can see it. And I want to make it uppercase like this. And then I move it over here so that it's aligned with the picture. And you can see the line there like this. Okay. And we've got it. And now maybe you can just click on it once, again, copy, paste Control C, Control V. And now you can maybe... You can write your name here. Because my website is my name and surname, but maybe your website is something else. You can just write your name over here, then align it with the right-hand side of the picture. Watch for the lines. And we have it. And now let's make it more interactive, more playful. I go to Elements. I already have shapes here. Let's choose the circle. Let's choose some light gray color. Again, I click on it and I will rotate it a bit like this. Now I'll put it here, make it a little bit smaller, and just play with it. Now, I will add Text. Add a little body of text. And I will write: A printable workbook you can use today. So that the client knows immediately that they can print it out. Okay, color, color of the text: white. Font: Aleo, and size 16. Okay? Now look, here we have a long text like this, it's too wide. So you can just adjust it by dragging the side points like this. Now, I can also rotate the text like this. Center it and... Here we go. So I think that's it. Yeah. Let's have a look. 50 % - beautiful. Okay. Let's continue with the next page.
4. 4 A Note from the Author: We finished our cover page and we are going to make a note from the author. So to add another page, you can just click here at page or here at page. And here we have a new page. A note from the author. You can use it to tell your readers whatever you want to tell them before, before they dive into the workbook itself. So first we need a headline. Add a heading. Let's try it. A note from the author. We will use Montserrat and the size 32. Click on Letter spacing. We will use 110. And let's click on the three dots and let's use Uppercase. Now look here we have the headline. And we can adjust it like this. You can make it whatever size you want by moving the side points - the sidebars. I will...I will use this kind of alignment like this, then we can adjust it later. Maybe like this. Now subtitle. Again, I don't want to insert a new text so I just copy this one, Control C, Control V. And here you can add any subtitle you want. For example, this is the workbook for the first week of my course so I will write: Welcome to the week 1. Okay, I will make it 11, size 11. See, look here. We don't have 11. So what do you do? You just write it. Okay. It's too small, so I will zoom it in. I will align it okay with the headline. And here we have the subtitle. Oh, I forgot to change the color. I don't want it black. I want it gray, maybe like this. Now, the reason I use gray color for the text is because I find it easier on my eyes to read. And also it saves toner when you want to print it out. So two big advantages, but feel free to use black text if that's what you prefer. Now. If you want, you can insert a picture. Now, how do I do it? We will use the grid, again, the same as we did with the cover page because I want to give it a shape. So I will go to Elements and I will type Frame. Now, why not shape? Why? Because I will use this circle one. Because shape. When you insert your picture, the picture will have this shape of the frame, and so rectangles, circles, whatever. So it will...when you drag the picture like this. Let me show you. I will go to my Uploads. Let me choose my picture. Where is my picture? Okay, for example, I want to use this one. So look, when I just click on the picture and insert it like this, I can just...the only thing I can do is adjust the size, make it smaller or bigger and move it on the page. That's it. But I want it to be a circle. So I drag it, I click on the picture and drag it. Not like this, here, to the circle. And now I don't want it to be like that. So I just double-click the image and move it. I can drag it again. Yeah. Okay. That's it. Perfect. Okay. So again, align it with the headline. Maybe...oh, one more thing that I want to show you. Now, I have three elements on the page so far. And maybe I want to move them more toward the top of the page. And I don't want to move all three elements separately, so I just do this. Yeah, I select them all. And now I can move it all like this. I don't have to do it separately. I will align it according to the borders. Okay. All right. Maybe I want to center it to be in the middle of the picture. Like this. Or maybe like this. You can always play with it later. Now. I want the text. Okay. What I want, what I'm going to tell my clients. So we go to the text, Add a little bit of body text. Here you can copy text from your Microsoft Word or Open doc document and look, I will just copy this and paste it here. Now we can adjust the size. So I, again, I choose Montserrat because it's my favorite font. Size. I usually use size 11 for the text. So 11. And letter spacing I leave at 0. And align it. Yeah. And again we can adjust it okay. Align it together along the margins like this. Okay. Now you can write, write, write. I like to insert my signature here. I create my signature online at signaturely.com. I think. So. I have it saved as a picture. Okay. Let me find it. Okay, here we go. See. So this is my signature. So again, I will adjust the size. I want to rotate it a little bit like this. Maybe it's too much. And now I want to write a little bit about myself. What do I do, who I am? So I will add text. I will write my name and surname. Language coaching. I want to make it a little bit smaller than the text itself. Let's choose size 8. And I will move it here. Okay? All right. Let me see how it looks. Not bad. Now. As you can see, this is our color. Yeah, as you can see. Here, you have the color code if you don't remember. Yeah. When you click on the color, it will always tell you the code. So now I want to do it a little bit more interactive. So I will go through elements, rectangle, no, sorry, shapes. Choose the square one. Change the color for our color. And I want to put it at the bottom of the page like this. You can play with it. Now, I wanted to be like this. So you just drag it and move it however you want. Okay? And here we go. Let me see. Beautiful.
5. 5 Contents: Now we've got our cover page, the note from the author and let's click on Add page and let's go to the contents. Now what I like to do, I like to use the sidebars on this page. So I will go again to Elements, shapes. I will choose the square, I will choose our color. And I do this. Okay? More or less, maybe a little bit narrower. Okay. Like this. Now, so that I don't have to do it again, I just click on this, control copy, control paste, click, and drag to the right side. Okay, here we go. Maybe I will make it a little bit narrower. O k. Perfect. Now, let's write, let's go to text, add a heading, contents. Let's change the color to our gray color. The gray one that I use... as you can see, the color code is #545454. Now, I want it to be size 32. And Montserrat, of course. Uppercase. Perfect. Let me check the... No, no, no, no, no. Look, always when you make a mistake like this, you'll click on this. Undo. Yeah. And you go one step backward. Now what I wanted to say...letter spacing 110. Okay? And here we go. Now let's center it into the middle and the middle like this. And now the body. So we go to: add text. I will use again Montserrat size 13. We don't have 13, so we will type type it manually, enter and letter spacing. We will use 77. All right. And again, upper-case. Allrigt. like this. And now we can type. So for example, I will start with Chapter 1. Now you just...I do dots and I do it manually like this. Maybe on page one. Then... You get...Oh. And also if you want... Numbers 1, 2, 3, 4. Click on this. Now you have bullet points and when you click for the second time you get numbers. When you click for the third time, nothing. So you have to click twice on this. All right? Enter. Then we can do Chapter 2. And let's do the same maybe be chapter 2 is on page 3. Chapter 3 will be on page 5 and so on. I will just copy just for our purpose here. So that, you can see how it looks. Okay. Now, as you can see, it's not aligned. So you can always just add dots like this. It's up to you. As you want it to be. I don't know why it's all moving now. It wasn't like that before. Well, it doesn't have to be perfect. Like this. More or less. Yes. Maybe let's add one here. Okay? So now we have the table of contents. Now if you have some subchapters, you just use the Tab Yeah, and it will give you the option A or whatever you want. So here we have the contents. Now, let's center them to the middle. And now we need to...oh. Let me check if I did letter spacing. Okay, so now we have letter spacing 77, but I also want the line spacing. I want the line spacing to be 1.7. Like this. It looks better. Okay? And now I want to make a little footer. I will insert text. And I always use the footer with the... with my website and copyright. Because if you don't, then someone can use your materials without your permission. So it's always better to do this. Here I put my website, I insert that vertical slash. Yeah, you can do it by pressing Ctrl, Alt and number 1, Nope. Weird. Let's do it again. Ctrl, Alt, 1. Okay, it's not working anyway. You can just figure out how you'll make the vertical slash. Let's use just a normal one. And copyright, so copyright you can do with pressing Alt 0169 and 2021. Okay. Now, we will make it again. Montserrat, size 11. Uppercase, letter spacing... We will use 340. So that it looks better. I like to place it somewhere here at the bottom of the page. Okay. Like this. Make sure it's in the middle. Ok, let's have a look. Perfect. We can put it maybe over here. Beautiful.
6. 6 Pages with Text: All right, so we've got a cover page and note from the author, contents, and now it's time to create the main text page. So let's start with Elements, shapes. We will choose this one again. Let's choose a very light gray color. I think it's this one. #a6a6a6. Let's align it. Let's put it on the top. Like this. I think it's this one. It doesn't matter. Just light gray. All right. We can make it that big and we can adjust it later. So this will be our background. Now we need a grid. So let's go to Elements. Let's choose this one. We will put it on top. So we need to click on it, position, forward and adjust it so that it's aligned with the with the gray rectangle. Okay, so this is our grit for our picture. Now, you can choose a picture to put here. Now for example, again, I can write desk. Yeah, I can put something like this here. Again, it's all PRO. We don't want PRO, right? So again, you can download your picture from Pexels or Unsplash. Let me see if I have something in Uploads. Let me see something convenient. Okay, for example, I will put this one. Okay. Now, I will have the name of the chapter, right, here. So I want to make the picture a little transparent. So we will click on Transparency. And let's put 40 like this. Okay, perfect. Now I need a title, the name of our chapter. So, Text, Add a heading. For example Introduction. Let's make it white, maybe white color. Let's see how it's going to look. Now again, Montserrat, size 42, uppercase and letter spacing 120. Alright. Now you can put it wherever you want. I like to put it a little bit towards the bottom of the background image. Again, I like to do this. Let's make sure it's centered. Here we go. Okay, here we will have the text, So, Add a little body of text... and as I said before, I make all my text Montserrat and the size 11. And color, I use this gray #545454. Again, you can copy your text from wherever you have it. Paste. You can adjust it. Okay. Because we need to follow the margins so that we can print it out later and align it. Let me check the letter spacing. Yes, we leave it to 0. Okay. Now, I like to use these margins that are indicated here, okay? Like this. Let's put more text. Okay. All right. Okay, so here we have our page. You can always change the margins and always make sure that it's in the middle, that it's centered. Now, I want to go back. What happened? Where is our picture? We can go back to see what happened. I'm going forward. Sometimes it disappears, but then it's there. So you just cannot see it immediately. I don't know why. Let's hope it's there. Look, when I close...close it now... I will open the document again. Let's see if it's there. Okay. See now it's here. Yeah. So sometimes it just disappears but then when you close it and open it again it's there so, what I was saying, we will go back here to our contents and we will copy the copyright. Because as I said, we want it on every page. Now when you copy something from another page and insert it and paste it on your current page, It will always be in the same place. Now, I want to copy this as well. Yeah, the bottom bar. Let's paste it. Like this. Too much. Okay, maybe we've put a lot of text, so we can delete a bit. Make sure it's in the center. And here we go. One more thing, we need to insert the number of the page. So you can just copy this for example And you will write number 1. I like to use it. I like to put it here. Okay? Somewhere here. Like this, maybe. Perfect. Now, we have the introduction. You want to continue with our text so you don't click on Add page, but you click here, on the Duplicate page, see, and you will have the exact same pages. Now maybe you want Chapter 1, so you just change the headline, you'll change the text and copy your new text. You change the page number. Oh my goodness, it's too small. You have to zoom it in. Number 2, like this. Okay, and everything else stays the same. Now, imagine that you want pictures on the page. So for example, let's delete a little bit of the text. I want to insert a picture. So again, you'll go to Elements, shapes, and you can...oh, sorry, sorry...frames. I always do the same thing. Instead of Frames, I type Shapes. Here. You can choose whatever frame you want, okay? You can choose how you want your picture to look. So let's say you want this one. So you just click on it. We can put it somewhere here. Photos, maybe you have your own photo. You'll just choose the picture. Or I don't know, cupcakes. Wonderful. Again, you can double-click, move it up and down like this. You can change the transparency, like maybe this, OK. And now you want the text here, so you just copy the text, paste it. And now you do this, okay? Like this. And you can put it...we can make sure it's in the same line. All right, then again, you can choose, as I said, any frame you want. And that's it.
7. 7 How to Adapt Your Worksheets to Your Needs: Well done, good job! We are in the middle. So far, we've created the cover page, the note from the author, the table of contents, and some pages with text. Amazing job! Now, before we dive into creating worksheets, let me tell you one thing. You can always recycle your worksheets. What I mean by recycling. For example, the quiz worksheet, you can adjust it and make it a checklist. You just change the headline and that's it. So make it easy for you. You don't have to spend hours creating new designs for every single activity in your workbook. You can just change the picture or the position of the text and it looks brand new. So this is my technique, this is the strategy that I use. Just by changing one single element you can change the whole layout and it looks brand new. So that is my tip. Let's continue.
8. 8 Worksheet 1 – Questions and Answers: Let's start with our worksheets. Our first worksheet is questions, questions and answers. So what I'm going to do, I will go back to Contents and copy the sidebar, control + copy, control + paste. Okay. Now, the worksheet pages are the ones where I usually put my logo, but my logo is blue. Our workbook is pink. So I will ... I will create a new logo just for the purpose of our workbook. So I will go to Elements. I will find a circle badge. Okay, maybe let's use this one, it's free. When you choose elements to use in your workbook, you can usually change the colors as well. We can use our color, which is this one. Okay? This one. And this one, we will leave gray or white. It doesn't matter. like this. Okay, I will use it somewhere here. I will change the position later. Now, we want a headline. So, Text, Add a heading and we will call it Questions. Again, Montserrat. And the size, we will use 21, letter spacing 170, and uppercase. Okay? Now, and of course, the color...our gray color. It will be somewhere here. Maybe we can align it with the center of the logo or the bottom, because now I will insert a line to separate the headline and the text. So we will go to Elements, we write Line. I just chose a simple line like this one. I will make it gray, light gray. I will move it over here. I will make the logo smaller. Okay. Now I need to zoom in to see it clearly, to adjust the size of the line. Okay. Now look, it's too thick. I want to make it thinner. So I can choose the line weight, maybe just 1. Okay. Now it's time to insert our questions. So let's go to text, and for example, I use Caps Lock. Question number 1. I will copy my question from somewhere. Or you just type it. Control + Copy, Control + Paste. Okay. Montserrat. Montserrat 11. Gray color. Okay, it's already there. And the letter spacing is 0, it's the same. Now we just need to change the margins...oh, we have to align it. Okay. We will align it according to the line here. Okay, So this is our question. I want to make it bold. And now we need to insert the space for the answer. So we will go to Elements again, shapes, our favorite rectangle. And I like to make it the lightest gray possible. So like this one, maybe, so that when you print it out, you can write on it. If you make it too dark, you cannot write on it. Okay? Now, you can adjust the space according to the length of the answer. Now if you need, let's say this answer will be short, so we will leave it like this. Now, let's say you have four questions or more and you don't want to do it again. So you just copy all of this and Control + Copy, Control + Paste, and you drag it over here and align it. Now you can do it with both of them. Copy all of that, Control + Copy, Control + Paste. And we have it all. Okay? Like this. But let's say, one question is longer. Yeah. This one, for example, the answer will be longer. So you can change it. And then obviously you just need to change the number of the question, and that's it. And for the footer, we will use the same. Now we need the bar and the copyright so you don't have to copy it separately. You just copy all of it. Like this. Control + Copy, Control + Paste. And we have it. Oh, yeah, I didn't want this bar actually because we already have the sidebar. I just wanted a number of the page like this. Let's have a look. Perfect. Beautiful.
9. 9 Worksheet 2 – Before and After: Our second worksheet is Before and After. Or you can call it Then and Now, however you want. I don't want to create it from scratch because I already have this worksheet. So I just duplicate the page. And I will delete this. And you can leave it like this, you know, and just changed the name. Okay. And then continue with the new worksheet, or if you want to make it different, you can delete the line, move this under the logo. Like this. I will use a question from the previous worksheet for our Instructions. Let's center it. Not a question but instructions. Okay. Here you can describe what they need to do on this page. Now. I need the Before and After subtitles, right? So I can use this or I will use this one, look, copy, paste, before, but obviously I want it smaller. So maybe 14. Again, I will copy it. After. And this will be here. Now, I still...I'm not going to center it because I need to do another thing first. Now, I go to Elements, shapes, I choose our favorites rectangle. I will make it more or less a rectangle like this, a little bit wider. Again, I want to choose the same light gray color as before for questions. Okay, Let's make it like this. I will align it with the instructions. Let's center the Before title. And now, once I have my rectangle ready, the final look, I will just copy it, paste it, do the same over here with After. But be careful to center it always so that you don't go behind margins. And let's center the After. Oops, No. Okay, Now, like this, and we already have the copyright, but we just need to change the number of the page. So this was number 3, so this will be number 4. And that's it. Now, if you want a different look, of Before and After, we can do it with triangles instead of rectangles. So let's duplicate the page. Let's just delete the rectangles. And we will insert two triangles, but not this one. But type here: Solid Isosceles triangle. Okay. We need this one. Again, choose the same light gray color. And now we want to use the reversed triangle. So we need to rotate it 180 degrees. Okay, let's make it bigger. Let me see. Anyway, this After will go down. So let's see, I will copy the triangle, paste it here. Rotate it back 0 degrees. Okay. I think that's great. Now, I will just center the After. Yeah, I think it looks great. Okay, so here you have two different layouts for Before and After.
10. 10 Worksheet 3 – Checklist: Perfect. Now, let's start with our third worksheet, which is a checklist. I will show you two different ways of different layouts that you can use for a checklist, or maybe a quiz. As I told you in one of the videos before, you can adapt it, you can always change to the layout and have something completely different with minimal work. So we are going to copy the sidebar. Now, I go to Elements, shapes. This one. I will change the color to the same one. I will create a rectangle like this. Look. Now there is a little white space, so you can just do this. It won't be visible the line that you see now, it won't be there. You can even do this. Anyway. So we need this. Now. I will... I need a headline. So, Text, Add a heading, let's call it Checklist. Now we change the color to gray color, Montserrat, and you will use the size 24, letter spacing 170, and uppercase, of course. And we are going to put it here. Now, I will copy it, paste it here. Now you can create a subheading. You can create the name of the checklist, right? Whatever you want. This will be size 12. And the rest is the same. I will make this smaller, let's align it. Maybe like this. Okay, perfect. Now, for the Instructions you can again... you can copy the same thing from Before and After. Maybe it would be even better to align it with the Instructions. Okay? Now, you want to insert the boxes, right? We go to Elements and you search for Square Box. Which one was that? Where is the free one? This one. What is the name? Outlined Square Let me see. Outlined square, apparently. Okay. The color: this one #a6a6a6. Yes. Okay. And now, I want the size 1 to 1, width 1, and height 1, and just drag it like this. Perfect. All right. So yes, so the name of the square is Outlined Square. So this will be the checkbox and now we need the question, right? So I can copy this and I will adjust it. So we will do Montserrat again, we can do size 10, letter spacing 0. We can do it uppercase. Make it uppercase. For example, Are you.....bla bla bla something or I don't know...whatever. So look here when you see this line, it's in the center, make sure that also this one is centered. Okay? Look, when you click on this, it will show you all your pages. Then you'll click on it again and you are back. Now. We want to copy, right? We want to make more options. So let's just copy it all and paste. And now we will adjust it. Okay. Now I have to, I can copy all of them. Oops. Control + Copy, Control + Paste Aligned. Perfect. Now I copy all four of them to make it faster. Here we go. Okay. Now, you can continue like this. And that's it. Let's not forget your copyright and the page number. So this was page 5. So this will be the page 6 and that's it. This is our simple checklist. Now, let's make a different one. It will be very similar so I can duplicate the page. But now I will select this. I will move it because we'll use it later. I will also move all of these here. I will make the sidebar wider. Okay? Like this. I want to insert a photo here. So we will do a similar thing as we did here. Okay? So this, the pink color will serve me as a background. You can leave it or you can delete it as you wish. I go to Elements. I type Grid This one. Always, when you do something you didn't want to do, you just undo it. Okay. Again, it's behind the sidebar. I want to change the position. I want to put it forward like this. And now I can drag it. I can adjust it, make it longer or wider. Okay. Now I want to use some pictures. Let's go to Photos, let's use the roses, I just love these. Oh, it's PRO again. Of course. A couple of days ago, when I searched for roses, it was all free and I don't know why now, it's all PRO version. Anyway, let's go to Pexels. These ones are beautiful. Download. Let's go back to our workbook. Uploads, upload media, choose from our device. Okay. And here we have it. Now, I just drag it over here. Okay, so now again, you can double-click and move it wherever you want. You can leave it like this. But I always like to make it transparent. So I click on Transparency, 35 maybe, like this. And now obviously I need to adjust everything else. So again, if you do this, you adjust just one element. I want to save time, so I will select all of this. You can even do this. And then you click on this, Position, Backward so that it's not visible. And here we go. We can move it a little bit here. Then I select all of this and align it together with the headline. Then obviously, you need to change this. Okay? And that's it. Let's see. Beautiful, isn't it? So here we have two different types of checklists. As I said, you can use them as a quiz, questions, Whatever.
11. 11 Meet the Author: We finished with our worksheets and now we are going to do The Meet the Author page where you can write more about yourself. And we will also insert your social media icons here and so on. So first, I will go to Elements, Shapes. I will chooseour rectangle, I will use our pink color, and I will put it on top of the page. More or less. You can use it in more or less like half of the page. Again, we can adjust it later. Something like that. Now, you can insert your picture here. To do so, go to Elements. Grid. We will use this grid. It's behind the rectangle, so, Position, Forward. We will leave a little bit of the pink background. And here we will insert your picture. You can insert a picture of yourself or whatever you want. So for our purpose, I will say 'woman'. Oh my goodness. Everything is PRO again. Never mind. I'll use one of the pictures that I have in Uploads like this one. Okay. And you've got again, you can choose the transparency. You can make it even like this. I will usually use it around 80. Now. Headline. We want our headline. So, Text, Add a heading. Meet the Author. Again, Montserrat, gray color, size 20, letter spacing 170, and uppercase. This will go somewhere here. Now we will need a subtitle. I will just copy this. Here. You can write your name. We will make it 12 in size, and the rest is the same. Okay. And now we need the body, the text where you will write something about yourself. So this will be Montserrat size 12. And we will change the letter spacing to 0. Okay. So here, again, insert something about you. Let's align it like this. Maybe. Okay. It's like this. We should use the middle of the page, the left side. Okay. All right. We've got this. Now. You can insert your quote. So I will just copy this. Quote will be here. For the quote, I'm going to use the font which is called Playfair Display. This one, size 16, coursive. And I will align it. Alignment. I will choose to the right. Oh, I don't know which one is better. Maybe on the left. We'll see. Anyway. Okay. We should always be careful with the margins. Okay, so that we can print it out. You can play with it a little bit. Okay. Now you can copy the text again. And this, I will write: Have questions? I will make it 14 in size, and letter spacing 170, Uppercase. This will go over here. Here. I will write...you can write your... maybe... yur website or your name or your email. Yeah. I have it size 12. Letter spacing 0. Perfect. Right now, I want to make the Footer Bar. So I go back here where we've got the footer, I'll copy it, paste. Now, I want to make sure...I will delete a little bit of this text because I want to make it wider because I will be putting the icons here of social media. So first...it depends on what social media you've got. Let's go to Elements. If you have Instagram, Instagram icon, let's choose this one because we are going to make it smaller and gray, as our text. We can adjust it later. All right. And now the text, I will copy this one to make it easier. It will be just one line. You can write here your Instagram name and we will make it Montserrat 9.7 and letter spacing so that it's easier to read, will be 100, and uppercase. And then you can change it. I don't know how long is your Instagram name? Okay. Now, the next icon, we can choose the Facebook icon. Again. Let's choose the same gray color. Let's try to make it similar in size to all the icons. So you can see this one is 1.4*1.4 so let's make it the same. 1.4*1.4. Let's copy this, let's paste it here. I'll make it shorter so that it fits. Center. Now, maybe I want LinkedIn. Again. Change the color, move it over here. 1.4 in size...whoops, why it's 1.5. It doesn't matter. Copy, paste. This will be your LinkedIn name. I will leave it. Here we have a Facebook name, LinkedIn name... Okay. Let's have a look if it's all aligned. Let me check. Okay, it's the same gray. Perfect. All right. Let's have a look at the whole page. Beautiful, isn't it?
12. 12 Last Page with a Quote: All right. We are almost finished. Just one more page to go. The last page with the quote. You can use a quote from your favorite author or your own quote or something related to the topic of your workbook, whatever you want. So in this picture, we will use a full-page photo. So let's go to Elements, grid. You'll leave it like this. I go to Photos. I will use maybe.... No. I will use this one that I have in Uploads. This one. Now...Because I will use text, so I want to make it transparent. Maybe 50. And now we will insert the quote. So: Text, Heading. Let's copy the quote. Gray color, Montserrat, size 28, letter spacing 60 uppercase, and aligned in the middle. It's too long. Let's delete it a bit. Okay. Now, I also, will make it bold and cursive, like this. Okay. Now, I will insert the name of the author. So let's go to Text. The name of the author. Again. Montserrat, let's make it 15, letter spacing 240, uppercase, and let's center it. Don't forget to insert your copyright. Every page needs to have your copyright. Okay. Let's have a look. Good. I can even make it a bit more transparent so that it's easier to read the text, right? Maybe like this. And make sure this is in the middle as well. Okay, now. Perfect. Now let's have a look. Here is our workbook. Finished. Perfect. Well done, well done!
13. 13 Make Your Wokbook Reusable: Okay, so we've finished the workbook. Now, let's have a look at how we can change the position of pages. You can do it here. Remember, you just click here. Here you can see all your pages and you just click on the page and drag it here. And when you see the line, yeah. Now I will move it back. You can also do it here. You can see the two arrows here. This means you move it once, one place down. Here, you move it back up. So also, as I said, you can delete the pages that you don't like or you can duplicate them. This will make everything easier for you and you want to add additional pages. And now, when we go back here, so we will close this page. Look, this is my workbook. When you click on the three dots here: Make a copy. It will create a copy of your document so that you don't have to copy everything separately. See, now, I have the same workbook here and you just change the file name. Yeah, to: Workbook 2, for example, you have to wait, unsaved changes, wait a bit until it's saved. Saving changes, all changes saved. Now we can close it. And when you go back here, let's refresh it so that we can see it. See, now I have my workbook number two here. And then you can just change it. Yes. So you can reuse the same workbook forever and you can just change some elements. You don't have to create a new workbook from scratch every single time. So it will save you tons of work.
14. 14 How to Use Your Workbook: We've finished. Amazing! Now you have your own professional workbook. Let me give you some tips on how to use it. If you are a teacher, you can use the workbook for your students. You can put your theory of the topic, that your teaching to the workbook and make it a guidebook. Or you can use just one page and make a worksheet. Maybe a test. You can even use it to make an exam, an exercise, a quiz... As I said, you can always delete or duplicate the pages. So if you are a coach, you can create some checklists for your coachees. You can use it to make a freebie for your website. That's what I did. I used the template to make my freebie. To make my lead magnet to be precise. If you have a challenge, you can use it to create your materials for the challenge. If you have an online course. Even if you have an offline course, because as I said, the workbook is fully printable. So you can print it out and distribute the worksheets to your students. You can use it in offline classes. There are many different ways. So just find your own way, find what you like, how you like to use it and enjoy and have fun. I hope the class was useful. Feel free to leave your comments in the discussion. And I can't wait to see your projects. Thank you for watching and see you next time. Bye, bye.
 Jarmila Oškerová, English Tutor and Neurolanguage Coach®