Transcripts
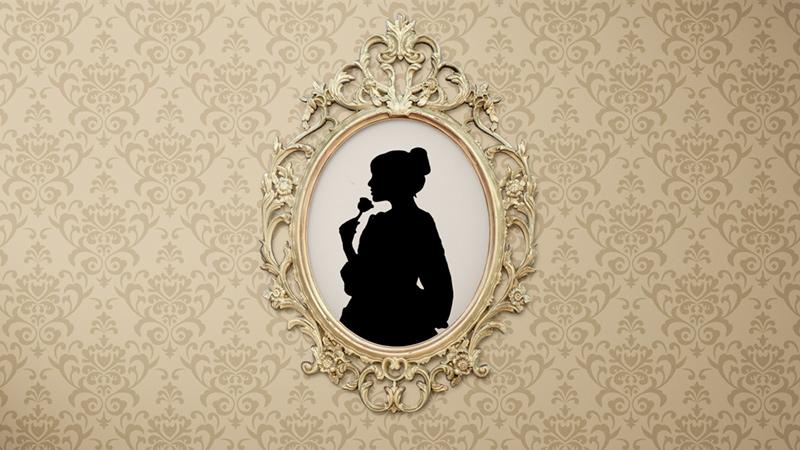
1. Create a Stylized Silhouette Portrait: My name is Khara
Plicanic and I've been a design geek and professional photographer
for over 20 years now and I've been teaching for nearly just as long
with courses on everything from photography to Photoshop and InDesign
to Illustrator. In this course, we'll take
the beauty and elegance of traditional silhouette portraits
created with paper and scissors and learn how to create a similar style in today's
digital world using Photoshop. You'll learn how to
select your subject and create their
stylized silhouette. Personalizing it with things like jewelry and
other accessories. Then we'll explore
some ways to add a touch of fun and wincy to your silhouette
with features like crown, birds, fairy wings, or banners that are great for adding text and I'll
show you some of my favorite tricks for
adding and styling portrait frames and
texture rich backgrounds. Included in the course files, you'll find links to
practice images along with a custom hair brush I created specifically
for this course. There's also a PSD
swipe file filled with drag-and-drop
vector hairstyles and other bits and bobs. You can use to polish the
profile of any silhouette. I'm talking multiple pony tails, different up dues, and even
some luxurious eyelashes. This class is great for photographers and graphic
designers looking for something new to offer for anyone who enjoys
working in Photoshop. Really, for anyone and
everyone who just loves pretty things and
wants to create a unique image for
someone special. I'll walk you through the
process from the beginning, step-by-step so it's doable for adventurous
Photoshop newbies, and if you're already somewhat
familiar with Photoshop, you will still likely
come away with plenty of new tricks. Your project for this course
is to apply what you learn here to create silhouette
portrait of your own. It could be a portrait for
anyone including yourself. You can get as whimsical and
imaginative as you want, or keep your design more
elegant and traditional. When you're finished, in addition to your completed
silhouette portrait, you'll have the
skills and know-how to create portraits for anyone. Along with a solid command
of Photoshop basics, and a bank of ideas and
resources you can take with you into whatever
learning adventure you decide to tackle next. I'm excited you're here
and in the next video, we'll get you all set up and ready to hit the ground running.
2. Set Up: Before we jump in,
let's take a minute to get everything set up. In the resources
for this course, you'll find a couple of different files as
well as some links. There is a bits and bobs, psd, and a ChoppyHair.abr file. You want to download those. You'll also find links to some practice images that are from Adobe stocks
free collection. You can license those
yourself using your Adobe ID. You can license them for free if you want to follow along. Otherwise, of course, you are welcome to
use your own images. I've also included some
links there to some of my favorite sources
for free assets. Things like Vecteezy, Brusheezy, Adobe stocks, free collection and Unsplash. Later when we talk about
some fun feature items, those are my go-to sources. One of the things
that can be helpful in making these
silhouettes is to load Photoshop's Legacy Shapes. Chances are you probably
don't have yours loaded. Let's do that now. Under the Window
menu, choose Shapes. In the Shapes panel, from the panel menu choose
Legacy Shapes and More. Within this folder,
there are a bunch of different shapes and we'll see how those can be helpful later. The last thing
we'll do is install the free brush that I've included in the freebie
resources for this course. To do that, we're going to
press B for our brush tool. With the brush tool active, if we come into
our control panel up here and yours may look
different. That's okay. Go ahead and click whatever
little preview you've got up here and then come
over to this cogwheel. Click the cogwheel and
choose Import Brushes. Then navigate to wherever
you saved this file, ChoppyHair.abr and click Open. Now, if we scroll to the bottom, we'll see a folder
called Choppy Hair. Inside is the choppy hair brush. We'll learn how to
use this later. For now, just click away in an empty area to
close the panel. We've installed the brush and
loaded our legacy shapes. Join me in the next
video and we will get started making our
first silhouette.
3. Selecting Your Subject: In this video, we're going to learn how to make a selection to create the actual silhouette. To do that, we're
going to select one of our wizardry selection tool by pressing "W" on our keyboard, that will select one of these three tools over here
and it doesn't really matter which one because
they all come with this magical Select
Subject button. Now when we click on this, Photoshop is going to use its fancy Sensei technology to make a selection
and we can tell Photoshop if we want that
selection and all that data to be processed on our local
device or on the Cloud, and typically, you'll get best results if you
choose on the Cloud, but you'll obviously need
an Internet connection. I'll also point out that
for the sake of recording, I have reduced the
size of these images. If you license these
yourself from Adobe Stock, they are massive, and just to make it a
little bit easier to work with here on camera
while I'm recording this, I have reduced their size. To get started, we'll
click "Select Subject" and you can see we get marching
ants around our subject. Now, obviously,
the more contrast between your subject and
the background, the better. If you're photographing
your own kids or family or friends, you'd want to have
them stand in front of a clear area. This
looks pretty good. But before we move on, let's fine-tune it by
choosing "Select and Mask". This takes us to the select and mask workspace
and what you're seeing might look a little
bit different than what I have over here on
the right side. If you scroll all the
way up to the top of this panel, next to view, we can choose different ways to view our selection,
and in this case, the most helpful
option is to view it in terms of black and white. We'll click to select that. That looks pretty good. The only things I'm
not thrilled about are these soft areas. Traditional silhouettes were
cut by hand with scissors and paper and you wouldn't
have soft edges like this. To address that, over here
on the right-hand side, if we scroll down a bit
under global refinements, we'll see a slider for contrast and I'm
going to drag that all the way to the right and then let Photoshop chew
on that for a minute. Finally, we can see that some of the edges are a bit jaggy, so I'm going to take the smooth slider and drag that far to
the right as well, and then Photoshop cleans
that up pretty nicely. Finally, down here where
it says output to, let's select "New Layer"
and then click "Okay". Now we should see
whatever image you have, you'll have the background here. It will be hidden and
then we will have our selected subject
on a layer of its own. Now for the silhouette part. There's a thousand different
ways we could do this, but let's just keep it simple. Let's lock the transparency
of this layer by clicking this button right here at the top of
the layers panel. This means we can only
paint on existing pixels. We can't add anything
else outside of that. Now we can choose
"Edit", "Fill". Here under Contents, choose "Black" and click "Okay". Let's take a look
at another example. Here we have another image with a bit of a different hairstyle. Let's see how this works. We're going to do the
same thing with one of our wizard-like
selection tools active. We'll come up here and
choose "Select Subject''. Then let's preview it by
choosing "Select and Mask". You can see we have
little soft areas here. So again, I'm going to
crank up the contrast, and if you're working with a really high-resolution image, you may have to wait a second
before you see it process. It can be pretty slow. These images, if you
license things from Adobe Stock or you
downloaded from Unsplash, they're typically
really large files, so just practice patience. Then let's smooth this out. Drag the slider and again, we wait a minute, and
that looks pretty good. Output to, let's choose ''New Layer''
and click ''Okay''. We'll lock the transparency again by clicking over here in the layers panel and then
we'll choose "Edit'', "Fill" with black, and "Okay". One more example,
we'll come over here and again,
select "Subject", "Select and Mask", "Boost the Contrast",
and "Smooth". Awesome "Output To", "New Layer", "Okay", Again, lock transparency, and again, "Edit",
"Fill" with black. That's the basic process. Obviously, some selections might be a little bit
trickier than others, and making selections could
be a whole course of its own. Ultimately, we can
alter the image very easily even after making
a not so great selection, and one of the areas
that probably ends up needing the most attention
is your subject's hair. Join me in the next
video and I'll show you some tips for making
it look great.
4. Touching Up Your Silhouette: In the last video,
we learned how to create our
initial silhouettes. In this video, I'm
going to show you some techniques for
cleaning them up or reshaping the hair a little bit and I think you'll be surprised
how easy it is. The first step is, let's duplicate this
original silhouette layer by pressing "Command or
Control" and the letter J to jump a copy up here in
our layers panel and the great thing is this copy is not locked the
same way this one was so it's easy to work with and we're going
to maintain this one in case we really make a mess of things and we want to go back
to where we started from. But to avoid confusion, we want to make sure we
turn off the visibility of our original silhouette
by clicking right here to remove the little
visibility icon. Typically the areas that end up needing the most
attention is the hair. I'm going to zoom in
on the hair up here by pressing Command or
Control and the space bar. I'm going to hold that down and you'll notice that gives you the Zoom tool as long as you hold Command
or Control Spacebar. Now if I want to
zoom in on the hair, I'm just going to drag
across it like that. Now we can see that we still have some of these
gray areas and I don't want any of
that so you'll be surprised how easy
this is to adjust. We're going to use
our brush tool so you're going to
press B for brush. If we come up here in
the Control panel, we can see our brush preset or preview right here and yours might be different
than mine that's okay. If we click on this, we can select from
different brushes. We should all have just a hard round brush
that's all we want right now. Nothing fancy, hard round brush and we can change the size of our brush using the left or right bracket
keys on our keyboard. Those are the two brackets next to the letter P for perfect. Left bracket makes
your brush smaller, right bracket key
makes it bigger. I'm going to hit the left
bracket a few times. Now with this round
hard brush selected, we can see here that
it's hard because it looks like a pepperoni
and not a fuzzy pom. The number down here refers
to the diameter of the brush. Another thing we want
to pay attention to is over here where
it says smoothing. This tells Photoshop
how much help you want, smoothing out your lines. Now, if you're working
with a tablet, like a Wacom, pen, or something like that maybe
you need less smoothing, but I am working
on my laptop with my index finger on the touchpad so I want all
the smoothing I can get. I'm going to crank
this up and I'm just going to come in here and I
think you'll be surprised. You can just start painting and you'll notice
that it's a little laggy. That's the smoothing
factor happening. It's going to run
a little behind you because it's
calculating the smoothing. You want black paint, obviously. If you don't have it already, you can press the letter D on your keyboard to get
your default colors. Or you can click this
little icon right here, which will set your colors
back to their default. Then you can just
come in here and literally brush some new hair. If you want to add
little more bits, you can just paint them in, some of that when we
make the selections, we smoothed over some things and maybe we want to bring
back some of that detail. But you can see that it's really forgiving and you
don't have to be perfect. I'm just brushing in
a little more detail. If the lagginess of
that bothers you, then turn down the smoothness. That is just what
happens when it's trying to give you
nice smooth lines. To zoom back out press Command or Control
and the Number 0. That looks great. Let's pop over and see
another image here. Same thing we're
going to duplicate the layer by pressing
Command or Control J, and then hide the visibility of the original silhouette here. In this case, I'm going to make my brush quite a bit larger. I'm just going to give her
a little bit more hair so you'd be surprised what you can get away with by just
clicking with a round brush. Look at this. Just fill
out that bun a little bit, maybe give her a bit of
more hair up here upfront. We have a little
bit of a line that separates the hairline
from the forehead. If you want to smooth
out any of these edges, you can just brush over it. You can also for example, if we look down here, if we wanted to
smooth this area out, we could either paint
from the inside and extend the area like this. Or if we switch to our eraser tool by
pressing E for eraser, which is also a brush. We also want to check
our same settings. We want to make sure
we're at 100% hardness. If you click the preset here, you can choose 100% hardness. You can adjust the size using your same bracket keys and
you can adjust the smoothing. In this case, because this is the eraser I want to erase maybe from the outside and
just smooth those bumps. Again, I'm just working
on my little touchpad. But because we have the
smoothing turned all the way up, I get great results even still. You can go around
your image switching back and forth
between the eraser and the brush tool
by pressing B for brush or E for eraser. You'll know when you
have by just checking your toolbar so B for
brush, E for eraser. I'm just going to clean up
this hairline a little bit, smooth it out and let's
check this image here. This one looks pretty good, but let's review
just for practice, let's press Command or
Control J to make a copy of our silhouette and hide the
original silhouette layer. We can zoom in by either pressing Command or
Control Spacebar and dragging or you can press
Command or Control and hit the plus
key a few times. That's another way to zoom in. If we want to smooth this out, and same thing, maybe we want to create a little separation. That is how you
clean up your image, whether you are smoothing out the hairline or the neckline. It's simple, just using a combination of a
hard-edged brush or a hard-edged eraser with the smoothing value
cranked up as needed. But what about ponytails? What about bangs? In my next video, we'll explore the bits and bobs resource file to take your
hairstyles to the next level.
5. Adding a Ponytail: Here's where things get fun. For the sake of demonstration, I'm going to change this little girl's hair
from this cute little Bob. We're going to give
her a ponytail. To make that look right, we need to get rid of her hair. I'm going to grab my
eraser tool and I'm just going to come in here and
is this a good head shape? I don't know. Looks
like an alien. [LAUGHTER] Let's fix that. I'll press B for brush and give her her bit of
a better head shape. Doesn't have to be
perfect because we're going to go get
some bits and bobs. In the resources
for this course, you will find a PSD file called bits and bobs and
check this out. It is a layered PSD with hair bits and bobs and even a neck line bits and
bobs and some other things. Let me show you how this works. Let's say we want to add this ponytail to
our little girl. To auto select it without having to look
through all this, you press V for the move
tool and if you Command, or Control, click on it. It will activate over
here in the layers panel. To do all that, you want to
make sure you actually have auto select off by default
because holding Command, or Control actually enables it. If you have this on
and you hold Command, or Control, you'll disable it, which is really confusing. Turn off auto
select and you want to have it set to
layer not group. Then if you Command, or Control click
on any of these, you will select it. Command, or Control click on
this little ponytail right here and you're going to hold your mouse down, keep
holding, holding, holding and you're working your mouse because you'll
see the ponytail disappears, but I'm still holding my mouse, so I've still got it. You're watching
your mouse cursor and you're going to come up to the tab for the image
you want to drop it into and tab and then hold, keep holding your mouse. You'll see the image switch over then you can come in here
and before you drop it, I like to tell people to hold the Shift key while you drop it. The reason for
that is if you are new to Photoshop and
you're not careful, you can end up
dropping the object out in the pasteboard like this and then you won't see it. What Shifts does is it
drops it in the middle of your image and then
you can avoid that. Now, she has this cute little ponytail
and what's really cool is I drew all of these with the pen tool so they
are all vector shapes, which means you can scale this as big or small
as you need to, and you don't have to
worry about resolution. If you want to scale this, you're going to press Command, or Control T so just
think Transform. If you want to transform this, you're going
to press Command, or Control T and then you can drag from a corner
to make it bigger, or drag inward to
make it smaller. If you need to rotate it, maybe your subject has their head in some
different position, or at a different angle, or they're looking
down, or whatever. Then if you hover outside
these corner points, you'll see this
double-headed arrow. If you click and drag, that will allow you to
rotate the object as needed. I'm going to make this
maybe a little bigger. Once you're happy with
your transformation, you just go ahead and
press Enter, or Return. That will set the
transformation. You can still use the
move tool to move it around as needed. We can give her a
way high up pony, or a lower pony is up to you. If we look at the bits and bobs, you'll see that there's a
lot of different pony tails. There are some bigger hair, some curly hair, some wavy hair, some longer hair and just different
shapes and you can layer all this stuff up too. We'll come back and do some more fun things
here in a minute. But I just wanted
to show you that. There may be cases where
someone has a ponytail, but it's hard to really
read in an image. Maybe it doesn't look
like a ponytail, or it's not a
good-looking ponytail. We can have some
fun with this too. As you can see, just using that hard-edged brush
and hard edged eraser, you can really just reshape
someone's hair, or head, or whatever you need to do to create a silhouette that
you are happy with. Join me in the next video and
I'll show you some tricks for working with
shorter, choppy hair.
6. Creating a Cowlick: In the last video we
learned about bits and bobs and how you can use that file I created just for you to enhance your silhouettes. Now I wanted to show you some
techniques for working with shorter, maybe choppier hair. Here I have a picture of a
little boy, and if I zoom in, you can see that
he's got very fuzzy, pointy, prickly hair here. What we're going to do is basically, we're stylizing this. We don't necessarily need the exact perfect
hair silhouette, we need something
that represents it. In this case, I'm working
on a copy here like usual. I'm going to grab my brush
tool by pressing "B", and I'm going to just brush
right over all of this. Just smooth that out. Here we can see he's
got these little wisps, so I'll switch to my
eraser by pressing "E", and I'm just going
to erase those. Remember I've got the
smoothing turned on, so that is incredibly helpful. We've smoothed out this hair and we really lost some
of the personality. You'll notice in the bits
and bobs that I do have this little chunk
that might be helpful for short hair or a
little boys hair. But I'm going to show
you how you make that because you also might want
to just do it yourself. Here's how we're
going to do that. We're going to use
Photoshop's shape tools. They can be found
on your toolbar. If you press the letter "U", you'll grab the
Shape Tool Family, and if you click and hold
on the "Shape Tool Family", you'll notice there's
a lot of shapes. For this example,
the one that we want is the ellipse tool. With the ellipse tool selected, you want to come
up to the control panel and make sure that this option right
here is set to shape. Then we want to choose our
fill and stroke colors. This means that
there is no stroke, so that's what we want here. We want the fill set to black. If you need to change
either of these, you can just click
on whichever one, select the color,
in this case black, and click "Away" to close it. Here under Stroke, you can find the
non swatch right here and click
"Away" to close it. This is going to create
a vector shape for us, and we're going to
draw two ellipses, and we'll use the second one to change the shape
of the first one. To do that up here in
the control panel, if you're familiar
with Illustrator, we have Photoshop's version of Illustrator's
Pathfinder panel. This is our Pathfinder
operations. What we want to do is choose
Subtract Front Shape. Then, just somewhere
off to the side here, we're going to click
and hold "Shift" to draw out a circle
and then let go. We've got the ellipse tool, we have Subtract Front Shape selected and then
we hold "Shift" and click "Drag"
to draw a circle. Now we're going to
drag one more circle. Again, off to the side, we're
going to click and drag, but this time we're not going
to let go of our mouse or trackpad until we're
in the sweet spot. Here's what that looks like. We're going to click
and drag holding Shift, don't let go of your mouse or
your trackpad or whatever. We're holding Shift,
we're holding our mouse, track pad. Now, we need to move this, so we're going to add to Shift
and to track pad or mouse. We're going to add
the space bar, and you'll notice
now we can position this and what we
want to do is put it over the first one so that
we get a crescent shape. Maybe something like here. Now watch, this
is my sweet spot. Now I'm going to let go off my mouse and then my keyboard. You see what happened?
Photoshop subtracted this second ellipse from the first one and now we have
this black crescent shape. We also have this mess. To fix this mess, let's come up to our
Pathfinder Operations and choose Merge
Shape Components. It's going to give
us this warning about turning this into a path, and we'll say yes. Now we have this little wedge, this little crescent,
and its vector. What's cool is we can grab our move tool by
pressing "V" for move, and now we can drag
this over here. I'll transform it by pressing
"Command or Control T", and if we scale this down
and we can squish it, we can shape this
however we want. We're not hurting anything. But we can make a little colic
sticking up. There's one. Now I'm going to
duplicate that layer. We'll jump a copy by pressing
"Command" or Control J". I'm going to bring
up Free Transform, Command or Control T.
Now we have two of them, but this time I want to flip
this the other direction. How do we do that? Well, with transform active, we put our cursor in here, and if you right-click or control-click or at a touch pad, I'm two-finger clicking, we get the sub menu. Down here we can choose Flip Horizontal and
we can rotate this. Then we have this
cute little cowlick, and maybe we put one more. Let's duplicate that one
more Command or Control J and V for the move tool and
do something like this. Now, these three little shapes make up this little cowlick and we can move it around on the
head by selecting all three. In the Layers Panel I've
got this one selected, and then I'm going to Shift
click this bottom one. Top one selected,
Shift-click the bottom, selects this whole series. Now I can move this around
using my move tool, and if I press "Command
or Control T", I can rotate the whole thing. We can put this wherever it needs to be and we can pull
it in to make it very short, or maybe if long, maybe we make it bigger, but pull it in. You can see that that just adds a great
little touch here. We could do the same
thing in the front. Maybe we just pick one of these. Here's another tip, we can duplicate it on the
fly using our move tool. I've got this one selected
and I've got my move tool. Now if I hold down
Alt or Option, you see we get this
double arrow and now if I just drag, we get a copy. I'll press "Command
or Control T" again. Let's see how do we want, and Enter to set it. Maybe we just want this here. You can also use your arrow
keys to nudge these shapes. Maybe he's got a little bang happening here. I don't know. It depends on your person, and how their hair is. Keep in mind that these
little cowlick pieces can be used for more
than just cowlicks. If I grab one of these using my move tool and drag
it into this image, and we scale it down using Command or Control T for that free transform and maybe
we squish it a little bit, reshape it, here, this can end up being like a little wisps in the
back of her hair here. Maybe we drag it up on top and maybe she's got
a bit of a messy bun. You can play with
this stuff however you need to to get the effect
that you're going for. Don't limit yourself to just
what I've shown you here. That's a look at how you can use the ellipse shape tool and
Photoshop's subtract from front shape path
operation to create this little crescent shape that is useful for so many things. In the next video, I'm
going to show you how to use the brush I created from this shape to create a whole head full of
short and choppy hair.
7. Working with Short and Choppy Hair: In the last video, we
learned how to create these fun little
curlic wisps using the Ellipse shape tool and Photoshop's
pathfinder operations. In this video, I'm going
to show you how to use the brush I created using that shape to make it even easier to make
choppy short hair. We want to make sure
we're on a blank layer. By now you should have
already downloaded and installed the brush pack. To get it with our brush tool active
we'll just come up here. At the very bottom
of our brush panel, you should see choppy hair, so we'll double-click
to select it. The way this brush works is it's directional based on how
you draw the stroke. It's always going to be facing the direction
you're dragging. If I drag from left to right, the little wisps go this way and if I drag right to left, you see that they go back. You can control which way the
hair is [LAUGHTER] going, so to speak, by changing the direction
that you draw the stroke. I can position my brush
here and I can just ever so gently drag to
the front like that. I'm dragging left to
right in this case. If I want to add some
pieces down the back, I would drag from
the top down so that they're facing downwards. I'm just going to drag ever so gently and
there you have it. That simple crescent shape, turned into a brush to create a whole head full of
short choppy hair. Now that we have a great
looking silhouette, join me in the next
video and I'll show you how we can create the nice line down here
at the base of the neck.
8. Shaping the Neckline: Now that we have our
silhouette ready, we are in a place where we
can decide if we want to use the whole silhouette or maybe we just want the collarbone up. I which case we need to get
rid of everything else. We want to make sure
we're on the layer that actually contains
the silhouette. The easiest way to do this
is just going to be with that eraser brush and the smoothness all
the way up to 100%. You could put any shape
that you want in here. Traditionally it's a swoopy line that gives a hint of a shoulder. If we imagine a
shoulder right here coming down like her arm
maybe coming down like that, then here's one way
we could do this. As we come down, we swoop up to that
shoulder and then you come down like a
neck line like that. That could be perfectly
fine and then we just get rid of all of this. You can brush it away. You can press "M" for
the marquee tool, and then you can just draw a box around it
and press "Delete". Here we have another image and I'm just going to
do the same thing. I'm just going to
use my eraser brush with the smoothing set to 100. Of course, you can also use the pen tool but if you're
new to the pen tool, I'm not going to
be teaching it in this course because I
wanted to just keep things simple for everyone even
if you are new to this. Same thing here. I'm just
going to use the eraser brush and I might make it
a little smaller. I'm just going to create a whole different bus
down here because we have the shoulders here and I
want to turn this into just an upper, a
traditional bust. I'm going to follow this
line, maybe I'll zoom in. I'm going to follow this
line from her neck down. Maybe something like this and maybe like that. That
looks pretty good. You can keep all of
this if you want, but if you don't, then just get rid of it. Another great way to get
rid of all of this very easily is to press "L"
for the lasso tool. You'll see there's three
different Lasso tools. The one that I want in this case is just the regular Lasso tool. Just like it sounds, you click and drag to draw
a lasso around something, so all the way around. I'm going to come back
to the beginning, and then when I let go, I get a selection and I
can just hit "Delete". If you have trouble
with the neck, you can open up that bits and bobs file and you'll
see that I have just a generic shoulder, neck, chest shape, and
you can drag this in to whatever silhouette you're working with and
adjust as needed. Hopefully that helps you out. We'll do one more here. If you're ever trying to erase
and nothing is happening, you want to check
your layers panel. In this case, I can erase because I'm on a
layer that's black, so I can get rid of that. You got to be on the layer
that you want to erase and you won't be able to
erase the shapes. The eraser is a
pixel based tool, so it only works with pixels. You can delete the shapes
and you can reshape the shapes but you can't
erase the same way. If you're familiar with
Photoshop you can go ahead and use a mask
that would work as well. But we're going to not
get into masks here. Let's do one more here
with this little guy. Maybe instead of coming from
the front and going up, we'll start here and I can see the neck line of his shirt. Maybe I'll just roll with that. I'm going to come right down
here and just up and swoop. I mean, really any shape goes, you can even just go
straight across if you want, or maybe we make this a
little more dramatic. Sometimes people really like a big front, maybe like that. So fun, isn't it? Then I'm going to switch
to my Lasso tool, so I'm pressing "L"
and I'll just draw a bagel lasso and hit "Delete". Then to get rid of
your selection, you're going to press
"Command" or "Control" "D", or you can come up to the select menu and
choose deselect. Now that we have several
bust shapes to work with, in the next video
we're going to create a new document that will
become our finished piece.
9. Creating a New Document: We've got our bus, we've cleaned up our hair, we've carved out the neck line, if that's something we
want to do, don't have to. Now we're going to create a new document to put
our final artwork in. We'll come up to File
and choose "New". You can enter whatever
size you want here. I'm just going to go to Photo
and I'm going to choose 5 by 7 and over here I'm
going to make it vertical. Under Photo, that's a preset, and then over here
you can switch it between horizontal
or vertical. That's going to be
5 by 7 inches with 300 pixels per inch on
a white background, and I'll click "Create". Now all we need to do is
put our silhouette in here. Let's start with this one here. This one is all on one layer, so we don't have
to drag and drop, we could copy and paste. I'm going to press
Command or Control A. That puts a selection
around the whole document. We'll copy it,
Command or Control C. Now if I come over
to this document, I can paste, Command
or Control V. Then we can use the move
tool to move it around. Now this is not a vector shape, so if we want to scale it, we can press Command or
Control T and we can scale it. It's not vector, but as long as you're not
trying to make it fit on a bus, I think we have a little bit of leeway here because we're not worried about
photographic detail. These are just pixels
filled with black. We can scale a little
bit if we need to. Remember that this is
a silhouette I created from an image that I
downsized from the original, just to make it easier
while I'm recording. But in real life, you would work with
as many pixels as you can and you can always
downsize later. The short of it is, it's better
to bring in a silhouette that's far too big than it is to have one that's teeny-tiny. Here we have one silhouette. Let's actually create
another new document. I'll press "Command" or
"Control N", and again, I'll hit "Photo" 5 by
7 vertical create. This time we'll bring
in this silhouette. Now here, we see in
our layers panel that we've got two separate layers. If I want to drag and drop, I need to select
both layers so I can command or control click so that I have both of
these layers selected. Then I can use my Move tool
and I can drag and drop, or if I want to copy and paste, then we can press
Command or Control A to put a selection
around everything. But we want to copy the
contents of both layers. Instead of just Command
or Control C to copy, we want to choose Copy Merged, so Shift Command C or
Shift Control C on a PC. Now it will copy this as
if it was on one layer. Now we can come back over here and Command or Control V to paste and let's do one
more just for fun, so we can practice and let's
get our little boy here. He's got multiple
layers, so same thing. I can either select
all these layers. In this case, with
the bottom selected, I can Shift click up
here and I will select the whole string of layers
and I can drag and drop. Or if I press Command or
Control A, select All, and then Command or
Control Shift C to copy as if this was one layer. You'll notice I took out
his short choppy hair because I like this better. [LAUGHTER] But to
each their own. Then we'll come over
here and paste it in. Now this one is big, so we'll scale it down
by transforming it with free transform
Command or Control T and about something like this. Remember, anytime you transform, you have to commit
your transformation by pressing Enter or Return. These are looking so great,
and in the next video, I'm going to show you
how to add eyelashes.
10. Adding Some Lovely Lashes: Here we've got three
different silhouettes, and we're going to add eyelashes to them because
it makes a huge difference. There's a number of
ways we can do this. One is in the Bits & Bobs file, you'll notice right here
that I have a lashes layer. Again, as long as you
have that move tool, V for move tool, for move of a V, you can
Command or Control click, and that will select that layer. This is called lashes one. I'm just going to
drag and drop it into my first
silhouette up here. Whenever we do this, use
the move tool and you click and you drag and you
don't worry about the eyelash. You look at your mouse cursor and you keep holding
your button. Pause on the tab at the top. It'll switch scenes. I'm still holding my trackpad. Then when you drop, you get your eyelash. In this case because we
dragged and dropped, instead of copy and paste, we have the actual vector shape. Now we're going to
bring this down, and those are some
really big lashes. Let's scale them by pressing Command or Control
T. I'm going to drag in and I'll zoom in so I can
see Command or Control plus, plus, plus, and we can
scooch these over. If you need to rotate
them, we can do that too. There we go. Now, we have some eyelashes. Now, for here, we may not want to give her
quite the same big lashes. Let's go back to Bits & Bobs. Right here we have a
more simple eyelash. I'm going to Command or
Control click on this one. Same thing, click and drag, hovering up here, still holding my mouse,
bringing it down here. Remember, if we add shift, then we'll drop it in the
center of our document. Just because we can't see, it doesn't mean it's not here. We know it's here because in the layers panel
we see it and we don't see it here because
it's on top of silhouettes. We have a black
eyelash on top of a black silhouette. Of
course we can't see it. Now this is going
the other direction, so we want to flip this over. The way that we
flip things is we transform them, so again, Command or Control T. Because this is a
special transformation, zoom in so we can get in there, you're going to Right-click
or Control click inside the transformation box
because we're going to go from just a regular
transformation into a flip horizontal
transformation. We press Command or Control
T to get the free transform. Right-click or Control click
and choose Flip Horizontal. Now we can drag this down and we got to scale
that down quite a bit. This is really what
they look like. If you've ever had
your silhouette made by one of the silhouette
artists at Disney World, for example, this is literally what they do
for your eyelashes. They cut out a little
piece just like that. You'll notice that
this is going to work great for our
little boy too. Same with my move tool, I'm going to click and
drag and drop in here, and you can see he has a bit
of a lash that shows up, but we're going to just add
a little more with that. Again, if we want to rotate
it, we can do that too. You can use the Arrow keys
on your keyboard to nudge it up or down or in or out to get it in
just the right spot. If you somehow lost your Bits & Bobs and
you're all distraught, remember, you can draw your own little shape
like one of these wedges. This could also work
for an eyelash. Or if we go to our toolbar and you press
U for the shape tools, if you click and hold
over here you'll notice the custom shape tool. If you release to select that one and you come up
to the control panel, and yours will look
different right here, but if you click this Drop-down, you're going to
have these folders and you're going to have one, or in my case, two of the
legacy shapes and more folder. If we twirl that open, we'll see two more
folders and if we open up All Legacy Default Shapes, and we come down here
to Artistic Textures. Look at that. There
are these things right here that are
basically [LAUGHTER] an eyelash or one of those
little wisps of hair. You can select any of these. This look like an eyelash. We'll just click this and then we can click
and drag with it. It's almost the
same exact thing. We can repeat Command
or Control T. Then you would
right-click or Control click Flip Horizontal, and we could use this instead. That one's got a little
more curve there. Now that's a more curly lash. Maybe we rotate it. Even if you lost your
Bits & Bobs file, you are not out of luck. Isn't a so fun. I could play with these all day. In the next video, I'm going to show you how to take this up another level by adding some jewelry and
even some headwear.
11. Accessorizing with Jewelry and More: Here I have another
document that I created. This is the silhouette that
we did together earlier, where I made her band
a little bit bigger. In this video, I'm going to show you how
we can have some fun, adding jewelry, and other
fun things to our piece. Let's start by giving
her an earring. Now, the fun thing
about the jewelry, or anything really
that we add is, it ends up being
a negative shape. We're actually going to create a shape and fill it with white, but it's going to operate almost like a hole in the silhouette. Let's say we want to give her
a little pendant earring. Let's press "U" for
our shape tool family, and let's go back to that ellipse tool and
we can change the color of our fill here by coming
up to the control panel. With that shape tool selected, right now I've got the
fill set to black, and the stroke is set to none. I'm going to leave the
stroke set to none, but let's change
the fill to white. It's important that we do that without another shape
layer selected, because otherwise it will change the color of that shape layer. If that ever happens to you, you can click away in
the layers panel to deselect and then
choose your color. I'm going to make
a new blank layer. We'll click down here at the
bottom of the layers panel. We've got a white fill, no stroke, and I'm
going to hold shift, and I'm just going
to draw a circle, like that and I'm going
to zoom in on it. That's cool. It
looks like a pearl. If I press "Return" or "Enter", it's a nice little pearl. But if we wanted a
teardrop pendant, then we need to
actually manipulate the circle to do that. The way that we manipulate
the points of this path, is we use these two tools. We have the path selection tool, the black arrow and
this white one. In this case, because
we only want to manipulate one point
along the path, we need the white arrow here, direct selection tool, because this allows us to directly edit individual points. With that tool selected, we're going to come over
here and just click. You'll notice that
when we do that, we see the circle around this
shape has four points; 1, 2, 3, and 4, and then it has
little handles here, which control the curves. All we're going to do, is click to select
this topmost curve, and then if you press
the Up arrow Key, Photoshop is going to yell
at you and say, " Hey, you're turning this live
shape into a regular path. Are you sure?" Yes. Now, we can just hit the up
arrow on our keyboard, and we can pull this into
a little teardrop shape. When zoom out, we see, that looks nice. When we're happy with this, we'll just click
away to deselect it, and her ear is not this high, so we need to move this down. To switch to the Move tool, we press "V" for
move, and drag this. I don't know where's her ear. Here? That's probably about. There is a little earring. Another thing we can do that
is super fun is a necklace. This is going to blow you away, because it's so simple. Let's make another new layer. Click the "New layer button", and we're going to
grab our brush, B for brush, and we're going to go back to our hard round brush. If you still have our
choppy hair brush, you want to click on the
little preview up here, and then at the very top, we should have this
hard round brush, and you can double-click
to select that, and that will close the panel. We don't really care
about smoothing, but I'll go ahead and turn
it back up to a 100 percent, and I'm going to make my
brush like the size of a pearl if we imagine
either pearl necklace here, and I want to paint. We'll do this two ways, with white paint first. I'm going to flip
flop my colors, so that white is the
active one on top. That is as easy as pressing
X on your keyboard, or you can click this little switcheroo
button right here. That's its sole purpose in life, is to just flip
flop these colors. Now we have white on top. But, rather than
trying to be like dot, you can do that, but it would be frustrating to make all the dots the
perfect amount of spacing. Check this out. With
our brush active, we're going to choose
Window, brush settings. In here, we're going to select brush tip shape from the
menu on this left side. We want to make the spacing, we drag that out to the
right, look what happened. We get perfect dots
and we can put them close together like that. That's just the spacing
slider right here. I'm going to have them so they
are just barely touching. Now if I come in here, and I just click and drag, then I get perfect pearls. Now to space them
evenly on her neck, after I've got it drawn here, I can use my move tool, and I can just
move it like that, or rotate it, or what have you. That is one option. Another thing that's fun, if I hide this layer, we'll add one more. I'm going to switch
back to black paint, so I'm pressing X to
exchange my colors. I'll press B to
get my brush tool again and I'm going to go
back to my brush settings. I've got that panel over here. But if you don't see it, again, you can go under Window, and you can choose
brush settings, or this little folder
icon right here, this is a shortcut
to that same panel. In this case, I'm going to stretch these out a
little bit further, so there's actual
space between them. Sometimes it's fun to just
do something like that. Then maybe we even take
this little earring, and I'm going to duplicate
it by using my move tool, and the earring layer selected, and I'll hold Alt or Option, and I can make a copy, and we won't see it,
because it's white. But, if we press "U"
to get our shape tool, now we are able to choose a
different fill right here. Maybe we have a little pendant
here, something like that. Couple of other options. I didn't give her eyelashes. Let's get her some eyelashes. There we go. Very nice. Does not make such a difference? It's amazing. The other thing that I wanted to show
you. Two more things. One is, we should put a flower
in her hair. Guess what? If we press U for
the shape tools, and you choose the
custom shape tool, and we come back up here, and we've got all these shapes. I encourage you to play, and look through all of these, because there's so
many neat things. But, there's also this
folder with flowers. If we twirl that open, We can use any of these
shapes right here. Maybe, let's do this one. I'm going to double-click
to select that shape, and close the panel. I'll set the fill
over here to white. We want to make sure that
this is set to shape. Then I'm just going
to click and drag. I'm holding Shift. That might just be a
preference of mine, I'm not sure if you have
to hold Shift or not. But, what you don't want is
squished flower like this. If you're giving a squished
flower, then hold Shift. If you're not, then
don't worry about it. But let's see. We've
got this flower here. Maybe it's in the
back of her band, or up here at the front. When we let go, we have
this fun little flower, and you'll notice that changed
the color of her eyelash. Let me put that
back. There we go. Gorgeous. Now, my
favorite is over here, let's give her a head band. You can do this a
number of ways. You can use the Pen tool. You can use the
Polygonal Lasso tool. I'm going to use the Pen tool, because it gives us
more flexibility, and this is really easy. Even if you're new to the
Pen tool, you can do this. Select the Pen tool. You want to make
sure that this says, shape, and we want to
set the fill to white. But you see, because I'm
on the eyelash layer, this is what happens now. Her eyelashes are
white, so nope. First, put those back, and I'd have to click away
so that nothing is selected. With the Pen tool active, now we can come up here
and change this to white. If you have a shape
layer active, then Photoshop just thinks
you're trying to change it. Nothing selected in
the layers panel, Pen tool, white fill. We're not going to
draw any curves, so don't worry about curves. We're going to click
to start a point, and then we'll click down here, and you don't even
have to try to perfectly shape it to her head. But, we want it to be wider in the back so maybe
we'll come up here. This is all just drawing straight lines and
then we'll click here, and then we have to
close the shape. We'll go back to
this first point, and you'll notice when I hover, we get the little circle icon. That's letting us know we can
click to close our shape. Now, we've got
this shape closed. It extends past her head. We don't care,
because it's white, but we would care if we put
in another background here. I'm going to show you
how we deal with this. In the layers panel, we want to take this
headband layer, and we want to drag
it down so it's directly above the
silhouette layer. Then, we're going to
tell Photoshop to clip the headband to
the silhouette shape. That means, that the
headband will only be visible wherever it overlaps
with the head shape. To do this, the
easiest way is you hold down Alt or Option. Then look, if you
hover your cursor in this zone between the
headband and the silhouette, you get this funky cursor. When you click,
this shape will now be clipped to the silhouette. To really see what's happening, if I turn off the the
white background, we can see, or better yet, let me just fill
this with a color. Here we go. Here, we can see that the headband is clipped to the silhouette. If I unclip it by again just Option or Alt
clicking between here, we can see this is
how it normally is. We drew this shape, it's sitting on top of our silhouette. If we want it to conform to
the shape of the silhouette, then rather than trying
to manipulate it, we can just clip it by Alt
or Option clicking in here. So you hold Alt or option, and when your cursor
looks like this, then you click, and you can see that it just shrink wraps to the layer below. That means that this headband
will only be seen anytime that it's on top of
the silhouette layer. To clip or unclip, you hold Alt or Option, and click in the space between the two layers that
you want to clip together. This is looking really cool. But, it's weird that
it ends right here. In real-life, she'd probably have some hair coming over this. We're going to paint in
a few more hair bits. But I don't want to paint it on the same layer
as the silhouette. If I click to make a
new layer, right now, it's going to put it here and also clip it
to the silhouette. First, I'm going to click this layer just to get
out of this situation. Then let's click to
add a new blank layer. I'm going to press
"B" for my brush. I'm just using my
hard round brush. I'll use the Bracket key
to make it small so it matches all these
little hair bits, and then I'm just going to draw. You know what? This
is [LAUGHTER], what you have to be careful of. I forgot we're
still drawing this, because I didn't set our
brush settings back. We just need to go back
to our brush settings. I can click any
number of places. I'll just come up here
and click the shortcut. Remember, this is the brush tip shape category and spacing. I'm going to drag that all
the way down to the left. Now, I can come in here, and draw a few more hair bits coming in front
of this headband. I'm not sure how far we want
to have them coming down. I'm thinking that I
want this headband actually lower on her forehead. I'm going to select it
in the layers panel, and press "Command"
or "Control T", and I'm going to
rotate it and scale it so it's a little more
up on her forehead. There we go. Now I'll
go back to this layer, and switch back
to my brush tool. I can paint some more hair here, and we have more headband
area to work with. If you look at it,
and you're like, "I don't like it at all", you can press "Command"
or "Control A" to select everything on that layer, hit "Delete" and try again. I'll deselect the selection, Command or Control D and B for brush, and
we'll try again. Maybe I'll drag up all
the way through there, maybe the key is to have some that go all the way through. There we go. I like that. There we go. This headband
is now in her hair. Love it. The final
touch on this piece is, I really want her to
have a hoop earring. I love hoop earrings. Let's grab our Ellipse tool. That's U for the
shape tool family. Then if you find it
here on your toolbar, then you want the Ellipse tool. This time, we're going
to set the fill to none and the stroke to white. Then we'll click
away to close that. If we come down here
and Shift drag, we're going to get
a nice big circle. I'm holding Shift to
make a perfect circle. Then when I let go, I can adjust the thickness of the outline or the stroke
a couple of places. Over here, my Properties
panel popped open, so I can do it right here, or I can come up here in the control panel and play
with the slider here. Then the value that
you choose here is going to depend on the
resolution of your image. I'm going to try
something like this, and I'll press my move tool to get off of that and now I
can see how that looks. If I want to move it, so you've got to play with it. But, I love how that looks. But earrings,
necklaces, head bands, and flowers are
not the end of it. I'll give you some ideas
for some extra features you can add for even
more silhouette fun.
12. Fun with Feature Items: Here we have a silhouette of someone holding her hand out, and I have a picture of a bird. Using that same procedure
of pressing "W" for our wizard-like
selection tools and hitting "Select Subject", I can get a selection around
the bird and we can choose, "Select and Mask" if we
want to check it out. I'm not worried
about the feet down here because I'm just
going to take them off. But I will smooth
this out and I'm going to output this to a
new layer and click "OK". Lock the layer transparency
and fill it with black. I'll grab my Move
tool and click and drag to put it in over here. You can see it's far too big. Let's transform it, command or control T. We can put this sweet little bird
right in her hand. If we want to take off the feet, we don't need to because they
can just overlap like this. But if we wanted to, we just grab our
eraser and we erase. It looks like they're erased. But if we bring him down, you'll see we basically
just painted them white. The reason is because that
transparency was locked. What happens is when
you try to erase, when you're either
on the background or a layer with a
locked transparency, what's really happening
is you're basically painting this background color. If we truly went to erase, I just need to get rid of this transparency lock
by clicking right here. Now if we press "E" for eraser, we can buzz off the little feet and now
they're actually gone. Now she's holding a
cute little bird. How fun is that? Another thing that can be fun is a crown or a set of wings. These I got from Adobe
Stocks Free collection, and they are Illustrator files. This one is Illustrator,
this is an SVG, but by default they're going to open in Illustrator,
which is great. But I don't even want to
launch Illustrator right now. What I'll do instead is
click on the AI file here. Because I'm in
Bridge, this works, but if you're not in Bridge, I think you can still do
this in your file browser. I'm going to right-click and
choose open with photoshop. You might also be able
to drag it and drop it down onto photoshop workspace. Because it's a vector file, when we bring it into Photoshop, Photoshop is going
to rasterize it, which means turn it into pixels. We can tell it here how many
pixels we want it to have. What you choose here will
depend on what you need. I'm just going to type in1,800 pixels for the width
and click "Okay". Now it's opening that file. It has rasterized
the illustration. Now it's just pixels. You can see where
we're going with this. We can use it as it is. Or if I want to
paint this black, I'll just lock the transparency
and then we'll fill it, edit, fill black. Now, we can go paste this
in wherever we want. We can click and
drag or we can press "Command" or "Control A" and because it's all on one layer, we can copy it like normal
Command or Control C, and here I have that little
girl without the ponytail, and I'll just paste it
in Command or Control V. There it is. It's a little bit small in
this case, which is fine. I can either rebring
it in and rasterize it at a larger size
or just work with it. Here you can see to make it fit, we can either tuck it down
in the head like that or, if we want to keep it
far out like this, we can also warp this. Within the transform box here, if we right click
or control click, just like we did when we
previously wanted to flip it. We can also choose Warp
and then with Warp, we can take these pieces and
just pull it, look at that. Just till it fits. Perfect. Now we have a crown, we have a bird, the other thing that
we can try is a wing. This is that SVG
file and by default, Illustrator wants
to take this one. If I right click or control click and choose "Open With", you'll notice in Bridge anyway, on my system, it's not even giving me Photoshop
as an option. But, if I take this
thumbnail and I drag it to Photoshop and drop it, guess what? It's going to work. Just like the AI file, it's got to rasterize it. Here again, we can
tell it what size we want to make this in pixels. Again, I'll just do
like 1,800 or 2,000. We get this wing here. Let's select all, Command or Control A, Command or control C to copy. Then let's see where. [LAUGHTER] Who do we have
still here that has a bird? Now we'll paste it in and Command or Control
T to scale it down. Somebody can have a
magical fairy wing. One other thing we can do
is use our shape tool. If we press "U" for
the shape tool family, and then you can either
come over here and grab the custom shape
tool or press and hold "Shift" and
keep pressing you until you cycle all the way through to the
custom shape tool. If you come up to the shapes up here and you look under
legacy shapes and more. You come down to all
legacy default shapes. You check out this folder
here, banners and awards. You'll see this little ribbon. Here, if we grab this and we choose a fill and
probably no stroke, then you can click and drag. I'm holding Shift to
make it proportional. You could drag out
a little banner and that'd be super fun
to add some text too, for something fun like
a birthday party. Now that we have
some ideas for fun, extra features you
can add crowns, birds, wings, banners,
and all of that. In the next video, we'll
take a look at how we add a frame to our scene.
13. Adding a Photo Frame: In this video,
we're going to take a look at how to finish off our piece with a frame. Now you can find frames in
a lot of different places, you can search for photos
of frames at Unsplash, you can license photos or illustrations of frames
from Adobe Stock, you can of course, take pictures of frames
around your house. Any of those will work. Here, this is a JPEG
from Adobe Stock, from their free collection. We've got two oval frames, and I think I'm going to use
this one here on the right. The first thing I'm
going to do is come to the Layers panel and click on that little lock to unlock that layer and that
layer's transparency. Then I'm going to come
over to my toolbar and I want specifically
my magic wand tool. Up here in the
control panel I want to make sure this
option is selected. These are the modifying keys for how the selections behave, and this one lets
us make a selection and then add to the selection
with another selection. I'll leave the tolerance
set to the default of 32, and over here, this
one's really important, we want to make sure that we enable the option
for contiguous. Then we can come
in here and just click to select the
white background, click again to
select the inside of this frame and hit ''Delete''. Then we can de-select our selection by
pressing ''Command'' or ''Control D.'' We've
got two frames now, this one isn't really
done being selected, but we're going to use this one. Let's select it
by pressing M for the Marquee Tool and I specifically want the
rectangle Marquee Tool. Then I'm just going
to click and drag to select this area, copy, come over here and paste. We can see that it lands as a pretty small size and
I did not resize this, so that is just the way it
is coming from Adobe Stock. But considering that,
we're probably just going to paint over it and
fill it with a color. We're just using it more
or less for a shape. I think we'll be okay. If that upsets you, you can either downsize
the image that you're putting the frame into or
find a different frame. I'm going to press
"Command" or "Control T" and scale it to about that big and select our subject inside and shrink them a
little bit so they fit. I think that even
looks good by itself. But once we have our frame, we can either use it
as it is or there are a few ways we can modify it. Some quick and easy
ways to modify are to add a color overlay layer style. With that frame layer selected, come down to the Effects button
and choose Color Overlay. What you see here is
going to look different than mine depending on
what your settings are. But basically, what you want
to do is choose a color, so you click on the
little swatch here and then maybe if we
want like a blue, I'll drag this to the blue zone and then we can pick the
shade of blue that we want, and we'll click "Okay". Then once you have a color, then you want to explore
the blend modes because what you choose here is really going to change
how this looks. You can see that
the blend modes are broken up into little sections. Generally, these ones are
going to darken things, these ones are going
to lighten things, these are going to saturate
and boost contrast, and [LAUGHTER] these
ones are wacky, but they're fun to experiment
with and then down here, this mostly affects
color in different ways. Just play with these. I tend to find that
for this stuff, Multiply is great, Color is great, Color Dodge, not-so-great. Anyway, you just
really have to play. I'm going to choose Color, I guess for now,
and click "Okay". Because this is a layer style, it's really easy to come
back in here and edit it. If later we're like, maybe we wish that this
was a different color, we can just double-click
right here in the layers panel on the words
Color Overlay and we can pop up here and we could choose pink or purple or
whatever we want. I'm going to go
ahead and cancel out because I do like that blue. The last thing that is nice when you're working with
frames is to add a mat. Right now it looks like the inside of the
frame is white, but that's just because
it's on a white background. We know that the frame is
actually transparent inside. If we want to add
something else in here, the best way to do it is to grab our shape tool yet again, so U for the shape tool, and specifically, we
want the ellipse tool. We want to make sure it's set to shape so we can choose a fill. Maybe I'll go with a fun green. I'm going to leave the
stroke set to none. Then we'll just come in and draw a little shape,
a little oval. I'm holding my mouse
or trackpad down. If I want to reposition it, I can just add the space bar. Or you can just drag it and then reposition it afterwards,
that works too. Once you have your oval, you can press
''Enter'' to get rid of the surrounding bounding box. We can either leave
it here on top of the frame or drag it underneath. If you drag it underneath,
which makes sense, you might realize your selection is possibly less than perfect. We can either go in
and clean this up, or if you don't even want
to spend time doing that, we can drag the
oval back on top, and maybe we just scale it so that it sits on top
in an even way. One of the final things that
I like to do is add a bit of an inner shadow to the oval, except I want it to come
from all the sides. Inner shadows are one
directional only. Instead of an inner shadow, we're going to add
an inner glow, but make it into a shadow. With that ellipse layer
selected we'll come down to effects and I'm going
to choose Inner Glow, and by default, it's going
to be set to Screen and white because that's
more how glows work. But I want to turn
this into a shadow. I'm going to change it
from Screen blend mode to Linear Burn and I'm going to change the color from white to this
bottom-left corner, black, and now we can play
with the opacity settings and the size here to
adjust the shadow. I just wanted something
a little subtle. Since I'm faking this
oval being inside the frame by adding
this little rim shadow, it really helps sell the illusion that this mat is
actually behind the frame. We'll click "Okay" and we have a really great
looking frame. If we wanted to
tweak things more, we could add adjustment layers. If I click to select the frame and I want
to maybe darken it, we can come down to the Adjustment Layer button
and click and choose Levels. Because I did that with
the frame layer selected, the levels adjustments can
appear directly above it, which in this case
doesn't change anything. But in some cases we might
have some other layers below our frame, for example, if we had the mat below it, we wouldn't want the levels
adjustment to impact the mat. What we can do to make this adjustment only
impact the frame layer directly below is once the Properties panel
pops open here, we can click this little
button and that will clip it to affect
only the frame. Then I could come in here and maybe darken it a little
bit. I like that. Reduce some of those
bright highlights, that looks really good.
There you have it. Our silhouette has a
frame and a custom mat. In the next video,
we're going to bring it home by adding a background.
14. Finish with a Background and Texture: In the last video,
we saw how to create this cool frame and matte look. Now we're going to
add in a background. There's a lot of different
ways we could do this. We could simply
add a fill color. If we click to add an adjustment layer and
we choose Solid Color, it's going to ask
us for a color, and we could choose any
color that we want. Maybe a fun purple color. Now, here it's
covering up our frame because it's on top of it all. So if we drag this
down below the frame, now we have just a solid
purple fill color. Another option is to add in some texture or just
a whole other image. Here from Adobe Stocks
free collection, I have this wallpaper image. If we open this up, I'll just Select All, copy. Bring it back over here and paste and that looks cool too. And we can also play
with the blend mode. With this layer selected, if we come up to the
top of the layers panel where it's currently set
to normal, we can click, and then if we just mouse over these we get to scroll through, Oh, my gosh, they're so pretty. We get to scroll through
all the blend modes, I'm getting distracted and
see which ones we like. I think for me I'm liking hard light a lot.
There you have it. So be sure to experiment with loads of different backgrounds, fill colors, and blend modes.
15. Next Steps & Thank You!: I'm so glad you joined me for this course. We covered a lot. From selecting your subject and turning them into
a silhouette all the way through customizing a frame and adding a background. I hope you come away
from this course feeling great about
everything you've learned, and I can't wait to
see your silhouettes and how you put what you've
learned here into practice. Along the way, don't hesitate to reach out anytime if you have questions or you just want to share a portrait that
you're proud of. Please share your work here with all of us at
Skillshare by posting your project right here in
the project section for this course because in addition to the pride that you'll
feel in sharing your work, you'll also be helping
to inspire others and we all know the world
needs all the good, happy inspiration it can get. If you share on social, be sure to tag me so
I can cheer you on. I'm Khara Plicanic
and you can find me my free creative toolkit for Photoshop and all
my latest events and courses on my site. Thanks again for joining me and as always, happy photoshopping.
 Khara Plicanic, Photographer, Designer, Adobe Educator