Transcripts
1. Introduction: Hello, everyone. My name is Debbie Marriage. In this class, I will be teaching how to create a mixed media art journal style collage piece using the app procreate. The finished piece will look like it was created using scrapbook papers, magazine cutouts, your own photos, paint, pastels, hand drawn elements and all kinds of fun things kind of what you do in your real art journal. For this class, you will need an iPad and the app procreate. I'm using an iPad pro and an apple pencil. You don't need the apple pencil. Any stylist will work even your finger. When our pieces complete, I will finish it in the APP stackable. This step is optional, but it will give our collage a more cohesive look. Once we're done with our image, we can use it in many different ways, and we'll go over that in the last video. Let's get started
2. Gathering Photos and Textures: first thing I'm going to do is walk around my yard with my iPad and use the camera to take some pictures of some textures. The first picture I'm gonna take is of my patio, The cement on my patio. This is the stucco on the side of my house. Here's an old wood vents and some more old would that I found all of these will make great textures for our image. Now, I'm gonna go to pick sabei dot com and download some images of people and other items that I may want to use in my image. I just did a search of faces. People, men, women, Children. The first image I downloaded was is of a baby and I already know the number for that image . So I'm gonna type in the number for this image. And here is a cute little baby. What we want to notice is on the right hand side. It says cco, Creative Commons, free for commercial use and no attribution required. So this is the kind of image that I want to use next. I'm gonna tap on free download, and I'm gonna pick the highest resolution. That way I can get a really nice big, high quality image to use in my collage. So then you push download and it will start downloading. It may take a little bit because this is a very high resolution photo. As soon as it downloads completely, I'm going to press my finger on the screen and wait until it says, Save image and then click on Save Image and my image will be saved to my camera roll. Then I will tap the back arrow and go back and download as many images is, I think I might need for my peace. The other thing that's great, too, is to use your own photos that'll make it more personal.
3. Make a Stripes Brush: first thing we're going to do is get a new canvas. It doesn't matter what size. We're just going to use this campus to test our brush. So pick whatever you like. We need to choose a brush set to create our new brush. You can choose a new brush set or you can use one that you already have. I'm gonna choose one that I already have called Debs. Custom brushes. Once I'm in that brush set, I'm going to tap the plus sign. And that will give us the brush. The new brush studio. First, we're gonna add a new shape click on the edit button, and we're gonna import from the source library. We're gonna choose grain source and then choose blank and click done to select that. Next, we're gonna go to grain again. Tap edit, choose import from source library. This time, we're gonna go to shape source, and we're going to scroll down until we find calligraphy one. And we're going to choose that next tap on auto. Repeat, and we're gonna change the grain scale. We're gonna move. We're gonna slide this around until we find a nice, smooth stripe looking texture and also before we get out of here, make sure you turn off pyramid blending tap done, and then it's gonna create the texture. Next, let's adjust our scale. We're gonna move it around to see what looks good. See how How are stripes fit on the page? Also, be sure to turn off offset Geter. You can test your brush out on the drawing pad. Next we'll go to about this brush. We're gonna rename our brush. I'm gonna name mind, stripes, brush. Then you can either at a picture in there if you'd like, or your logo. You can sign your name. I'm gonna sign mine. And then I'm gonna tap, create new reset point. This will save the brush at the point that it's at tap. Done and we'll go out and test our brush. Looks pretty good. Let's see what happens if I turn the size up. Not much difference looks about the same. If I go back into my brush studio and make some adjustments, let's see what happens. Going to properties. If I change the maximum size toe, a higher number, let's see what happens here. So the stripes were the same size, but I can now fill my page much quicker with that larger size. But if I want something smaller, let's see what I need to do here. I need to go back into my brush studio. And rather than changing this the maximum size I need to go back into my grain and changed my scale. This will give me a smaller size brush. And there we go. We have our stripes brush.
4. Make Stamps: Let's pick a new canvas. The size doesn't matter. We need to fill our canvas with complete black. So rather than using the discolor picker, I'm gonna go to the value color picker. We're gonna slide the RGB sliders all the way down to zero, and that'll give us pure black. Now, tap on that color dots in the upper right hand corner and drag it to your palate, and it'll fill it with black. Next, we're going to do the same things that we're gonna pick pure white. So slide the RGB sliders all the way to the right side, and that will give us pure white. Now I'm gonna pick a brush to paint with and from the painting category. I picked nickel rule, and I'm going to draw a quick, quick flower. Now I'm gonna turn this drawing into a stamp, So I want to go to my layers and I want a copy. This layer. Then I'm going to go to my stamp category. Deb stamps and I'm gonna hit the plus key and we're gonna go to shape and tap edit, and I'm going to import and then paste and then tap done under grain It's already got blank in there, which is what I want to use down in the properties category. I want to use stamp preview, and then I'm going to move the preview up a little bit. I want toe underbrush behavior. I want to put my maximum size all the way up under stroked paths. I want toe move spacing to the max. And then I can tap in my drawing pad and see my stamp there. Now, I'm gonna name the brush. I'm gonna call this flower stamp, I'm going to sign it, and then I'm going to create new reset point. So if I ever mess my settings up, I can come back to this point. Then I'm gonna click done. That'll save my stamp. Now let's test it on a new layer. I'm going to go back to the disc color picker and choose a color. Now, if I tap my brush, my stample appear. And if I tap with a little bit of pressure, its full capacity and if I'm a little lighter with my touch, then it's a little bit more transparent. I'm gonna make one more stamp using the exact same steps as before and I'm gonna speed this up a little bit. When you make your stamps, pick different brushes, experiment, make different kinds of marks and see what you can come up with. Making stamps is a lot of fun.
5. Background: All right, let's open our campus in procreate. We're gonna hit the plus button and create a custom size canvas. I'm gonna do 11 inches by 14 inches, and I'm going to select 300 d. P. I and hit create, and it opens our campus. First thing we're gonna do is set a background color. I'm gonna pick a beige color tan color. Next, I'm going to pick the color red, and I'm going to use the stripes fresh that I created earlier and paint stripes on the page . I'm gonna paint the top of the page without lifting my stylists, and I'm not gonna paint the whole page. I'm just gonna paint a portion of the top and then we're gonna stretch that out to fill our whole page. So just make sure when you're painting you're not lifting your stylists and fill in everything. Make sure there's no gaps. The bottom does not need to be straight. We're going to stretch it out and fix that. So once you've got your stripes painted, we're gonna tap the arrow at the top of the page, which is our transform button, and make sure at the bottom that setting is on magnetic and just stretch it out to the bottom until it passes are the bottom of our page. And now we have straight lines going all the way up and down our page. Next, let's go to the camera, roll and pick one of the textures that we took pictures off and make it fit our canvas. So it covers it nicely that I'm going to experiment with blending modes by clicking on the end on that layer and just scroll through and see which blending mode I like. What I'm trying to do is make this page look kind of grungy. I think I like the multiply blending mode. Next, I'm gonna go to buy stripes layer and on the eraser I'm going to choose a clouds brush that's a standard brush that comes with procreate. And then I'm going to very lightly erase some of the stripes so that it looks like it's been The page has been distressed somewhat. All right, so now we have, ah, pretty nice background layer to work with. Let's experiment and try one more. I'm going to add a new layer and hide the stripes layer and then I'm going to pick a new brush and I'm going to pick another color. I'm gonna pick Brown and I picked the Victorian brush and I'm do the same thing. Just swipe it across the page without lifting my stylist. That way the pattern stays seamless going to my texture layer again. I tapped on the M and I'm gonna look around and see if there's any other setting that I like better. And I've chosen color burn and reduce the opacity on it. I like the way it looks with that brown Victorian brush. I'm going to reduce the opacity a little bit on that Victorian layer. And then again, with the cloudy racer brush, I'm gonna distress the Victorian print just like I did with the stripes. And there we have another background that we could use So he just experiment and have fun with it, going back to my stripes layer and my texture layer. I'm just gonna mess around with the settings a little bit with the opacity and the different blend modes and see what I like. And once I'm done with that, we will move on to creating our face
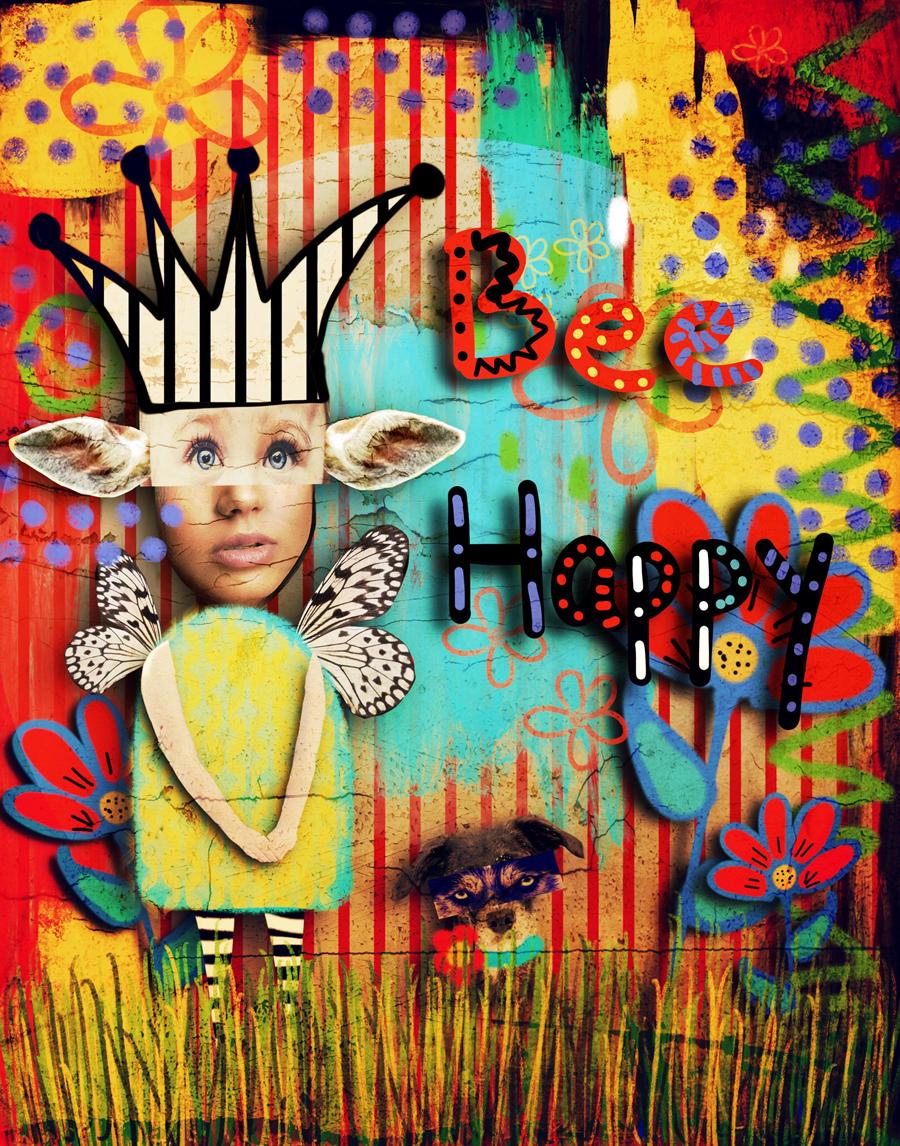
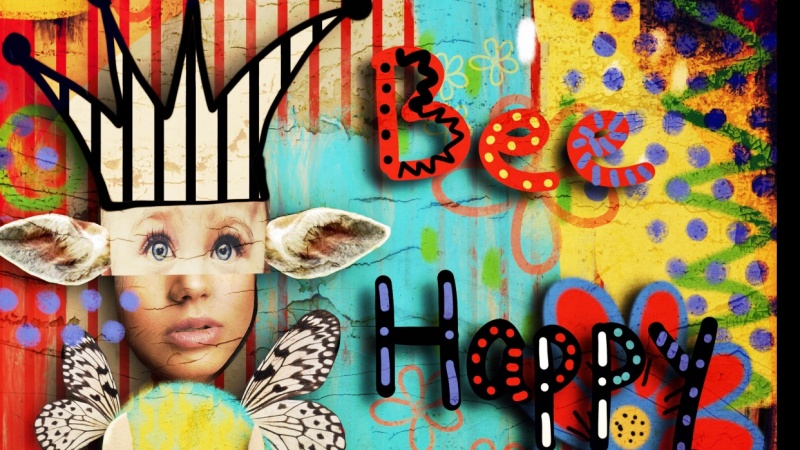
6. Creating a Face: All right, let's grab our pictures from our camera roll, Go to the wrench and on under image Insert a photo. First photo I'm gonna pick is the baby's photo. Now I need to crop this and procreate doesn't have a crop function. So we're going to use the transform tool, which is the arrow at the top. Tap on that. And then we're gonna move our photo around and pull it off the edge for the pieces that we don't want. And that's gonna crop our photo for Boris. When you pull your photo off to the side, make sure you tap the transform button again to turn it off and that will crop the photo. I'm going to repeat the previous steps with another photo so that we can get a nose and a mouth to go with their eyes, and we're gonna do the same thing to crop everything out of the picture that we don't want to use. Then I will use the transform tool and make sure my setting is magnetic so that everything stays in proportion. I will use a transform tool to resize everything and make move them around to make sure that they fit together that I'm gonna take my medium hard airbrush and on the layer with the nose and the mouth, I'm going to erase out the dark parts of the photo that I don't want. And you can zoom in if you need to to get really close toe the lines that you're trying to erase to zoom in. You just put two fingers on the screen and spread them out and that zooms you in.
7. Creating the Body: let's work on the body. I'm gonna do a little rearranging. I need to move my pictures ups that I have room to draw her dress. Then on a new layer with the charcoal block, I'm gonna draw a very basic shaped little dress, kind of like an upside down U and just fill it in. Then I'm going to add a pattern to her dress in another color. So I picked the fever brush and with the yellow color, I'm gonna draw a little bit of a pattern on her dress on a new layer. And I went a little bit outside the blue, so I'm going to use my airbrush she racer and just erase a little bit. And because it's on a separate layer, it's not gonna erase the blue part of the dress new layer. And with the Joe Penn and the color Black, I'm gonna draw a triangle on upside down triangle, and that's gonna be for her leg and then tap on that color circle in the upper right hand corner and drag it over to the leg and it'll fill it in for us. Then I'm going to duplicate it, and with my transform button. I'm gonna scoot it over. And now I have two identical legs. Tap on the top layer and choose merged down that way there on one layer that I'm gonna tap on that layer and drag it down behind the body. Jill pin and choose the color white. And on that layer, tap on it and choose Alfa Lock. And now I'm going to draw white stripes on her stockings and I can just draw over it and it won't go outside the black lines because of the Alfa lock. Makes it really easy to put a design on top of another design. Tap on the layer again and undo Alfa Lock and add a new layer. I'm going to insert a photo. This time we're going to give her some arms, so I'm gonna crop the photo a little bit. Same way we did before adjuster toe make the dimensions fit within my body that I'm going to erase out the parts I don't need. And as I go along, I will adjust the size of my brush so I can get in fairly close and get some of those detailed areas erased. Don't worry about the hair. We're gonna take care of that. In a second. - I'm going to adjust the position of her arm. So I'm going to push. I'm going to tap the S at the top of the screen, which is the selection button, and then trace around her arm. And then I'm a swipe down with three fingers, which brings up this menu, and I'm choosing cut and paste that puts that arm on another layer. And now I can use my transform tool to move it around and adjust it to the position that I would like once I'm happy with it. I just tapped the transform button again to set it in place. Then I go to my layers and I tap on that first layer and choose merge down and it puts it on one layer again, going to that layer, tapping on and choosing Alfa Lock. Now I'm going to paint away that hair on her arm. I used one finger and I pressed down on it until I get that color circle and that chooses the color of her arm for me. And now, with the airbrush, the soft airbrush, I'm going to paint away that hair and because I have my layer Alfa locked, it's not going to allow me to go outside of the lines of her arm now to make it look a little bit more realistic. I'm also going to choose the shadow color of her arm again by pressing down and holding, which gives me that color. And then I'm going to brush in real softly on the inside of her arm to make that shadow go all the way up that I'm going to choose the smudge brush, which is also on the soft airbrush, and I'm going to just really lightly blend that in. So it looks a little bit more natural tap on the transform button, and we're going to move her arms into a position that looks a little bit better with her body shape, her dress shape and I'm not on magnetic. I'm on free form so I could rotate it and kind of move it around the way I need to to make it look right now. Tap on that layer and take off the Alfa lock, and we're going to duplicate that layer on the lower layer. We're going to choose out flock and with the black color. We're going to fill the layer. So now her arms air black on that layer, selective transform tool. And let's scoot her the black layer of her arms over just slightly. Then turn off the Alfa lock and we're gonna go to the magic wand at the top and choose Ghazi and Blur and slide it over to blur that black layer. I chose about 25% and now it looks like she's got a drop shadow on her arms. Let's adjust her body and put it in a better position on our canvas. So tap on each layer and slide it to the right on each layer, and that will group them all together so that we can move it as one. Then you tap on the transform button and we can make her bigger or smaller and move everything around. All is one group now do the same thing again, tapping and sliding them to the right to that un groups. Um, let's add a new layer, and we're gonna insert a photo time to put some ears on this kid. This time I'm going to use my selection tool the ass at the top and I'm gonna draw around the ear. Then I slide with three fingers. I slide down and copy and paste. Then in my layers tab, I uncheck that little check mark so that I don't see that photo anymore. And now with my transform tool, I'm gonna move that ear around and adjust it to fit my my person. Now we'll zoom in and with my eraser brush, I'm gonna go around and clean up the edges of the ear in my layers tab. I'm going to slide my layer to the left, and I'm going to choose duplicates that I have two ears that I'm going to tap on the transform button. And at the bottom, there is a little bracket with an arrow facing horizontally. If you tap that, it'll flip the ear and then I can position it on the other side of the face, and I'm still always adjusting the layers, making them fit together, making them so they look OK proportionally and in the right position and also from front to back. If I need to move something back, we'll do that as well on a new layer. I'm going to grab my gel pen in the color black, and I'm going to draw a crown on the head. I'm going to make sure that my lines come together so they completely enclosed this shape. That way I can grab a color the color dot at the top right and drag it over and fill in this shape. If I had left it open, it would have filled the whole screen. So I have to make sure those shapes are closed. So I've dragged like a white color into her crown. And now I'm going to Alfa lock this layer, and I'm going to choose my stripes Bresch with a black color. And I'm going to stripe the crown again, not picking up my brush so that I have a seamless pattern that I'm gonna turn off Alfa Locks that I can draw some little circles on the top of her crown with the gel pen again. Now I'm going to add some wings, so I'm gonna pick my butterfly photo from my camera roll, and I'm gonna use my selection tool and trace around a pair of wings. Then I will drag three fingers down and copy and paste, and then I'm going to go ahead and delete my butterfly because I don't need it anymore. And then back to my wings and I will clean up the edges with the eraser tool using the transform button. I'm gonna move it around and put it into position. I'm going to duplicate it and flip it and move them to the other side. So she has a nice pair of wings. I'm going to tap and hold on that wing layer and slide it down to the bottom so that it's behind her body. I'm gonna do it to both layers. Next, I'm going to merge all the layers of her body. So to do that, I'm going to put one finger on the top layer and another on the bottom layer and pinch them together. And sometimes it's hard to grab them all at the same time. So you see, I had to do it in a couple of steps to do it. But now her body is all on one layer. Duplicate that body layer on the bottom layer. I'm going to Alfa lock it, and I'm going to fill it with black that I'm going to use my transform button and move the black layer over slightly again that go to the magic wand and Ghazi Ambler. Oh, don't forget toe check off the Alfa lock, then go back to Galaxy Ambler and blur it to make a drop shadow for her body.
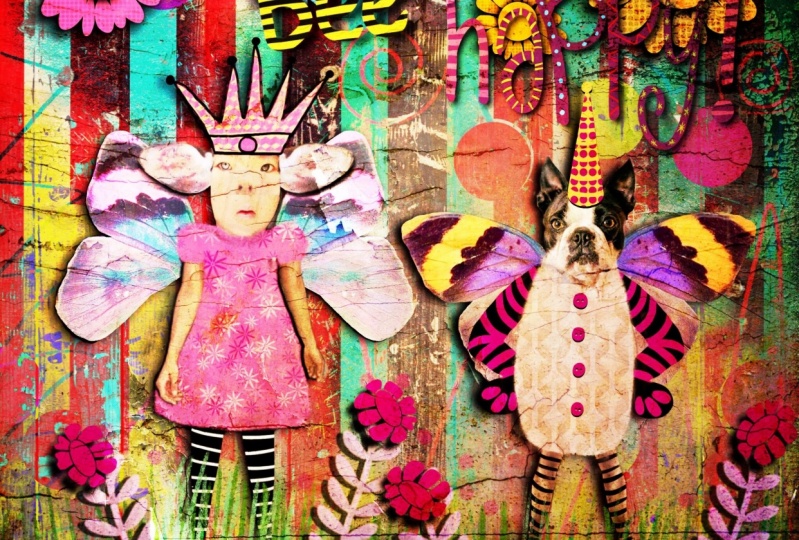
8. Creating a Second Character : Let's give our character companion going to insert a photo of this cute little dog. And this time I'm going to use my eraser brush to crop this photo. I'm not being very precise. I'm not worrying about all the little hairs on him. We're gonna fix that in a second. Next, let's use thesis much tool. We're going to use the short hair brush under touch ups, and we're just going to take that brush and put it on his body and pull the strokes outward . And that will form hairs all around hiss for so that we can replace the ones that we erased away. - Let's duplicate this layer and add a drop shadow. Next, let's add another photo and give him some funny eyes. - I'm going to change the color of this photo. I'm going to the magic wand and I went to color balance and under the shadows area. I'm gonna move the slider bar around and make this photo just a little bit more blue just so that it stands out a little bit more from his body. Then on a new layer, I'm going to grab my jail pin and I'm going to color a collar on him with a flower, just a real simple lying drawing
9. Painting, Marks, Flowers and Letters: in this video, I'm going to go a little crazy and just start painting all kinds of things on our page. First thing I'm gonna do is take the old brush, which is in the painting section, and I'm gonna choose colors that match my characters and just start painting and having fun . This is all random, and I'm just gonna go for it. And I just realized that I'm painting on top of the character and I don't want to do that. So I've moved the layer so it would be behind my characters. Now, I chose the nickel role under the charcoal sections. I can get a little bit of pastel charcoal looking brushes going kind of mixing up my textures Now, on a new layer. I'm gonna make some other marks using some other brushes. Maybe not quite so big on a new layer. I'm going to start drawing some flowers with my gel pen. I want this layer to be in front of my characters. So the layers at the top of the stack to make the stem of the flower I use the quick line function in procreate when you draw a line. If you hold it at the end of the line for a second. It will straighten out. And that's how I made the straight line for my stem. With these flowers. I'm going to duplicate them and fill them with black to create drop shadows. And I'm going to do that for a couple more times and flip my flowers. That way, I don't have to make separate flowers. I can just draw one and use it multiple times this flower. I've actually decided to move the two layers back behind my characters body just to give the scene a little bit more interest. I'm adding a new layer at the top of the stack again, and I'm choosing my six b pencil under sketching and I'm going to draw some grass. This layer is going to be in front of the characters, and that's why it's at the top of the stack. I'm just gonna draws random lines, making them go different directions, and I'm going to change the color a couple of times draw all across the page that I'm going to duplicate the layer and move it a little bit. Flip. It may be that way. It adds more grass without having to draw all those extra little stems. Now on another layer, I'm going to choose the stamps that we made previously and start placing them on the page. I'm going to do various colors and sizes, and now I'm going to erase some of the areas where it where I stamped on top of my character, another new layer, and I'm choosing them on a line pen and I'm going to write the words, Be happy. And then I'm going to add some marks to my letters to make them stand out. Some and last, I'm going to duplicate the layer and turn it into a drop shadow, and we're done. Here's our finished piece In the last video. I'm going to take this into stackable Z and adds some texture to it. The last step is optional
10. Conclusion: are images done. So let's save our image to the camera roll. So click on the wrench and tap the share button, and we're gonna save it as a J peg. Due to the fact that the stackable zap is no longer available, I'm gonna finish this image in procreate. I'm gonna open that photo that we just saved from my camera roll and begin working on it in procreate. Now let's begin working on this image. I'm going to add a new layer and with the round brush, I'm gonna draw a circle in white and this is gonna be on the new layer. When you draw your circle, keep your pen press down so that we can invoke the quick line, and that will enable us to get a perfect circle. I'm gonna choose circle on the tab in the middle and then position my circle around my image. When I'm happy, I'm going to drag that white color and fill the circle. Then I'm going to use the transform tool at the top to make it even bigger. And I'm gonna surround my image with that white circle, then pressing on the and I'm going to choose overlay as the blending mode, and then I'm gonna reduce the capacity to about 43%. This puts kind of a spotlight on our image. Next with the Nico role brush, I'm going to use this smudge tool and smudge out that bottom line to kind of soften that hard edge and blend it into the grass. Now we're gonna do a new layer, and on this layer, I'm gonna choose the color orange and I'm gonna drag that color into that layer, then clicking on the blue layer. I'm going to reduce the opacity, and that allows our image to be seen underneath it. And this kind of adds up kind of an overall warmth to our image. Next, on another layer, I'm going to bring in one of my cement pictures. This is an image that I got off of picks obey, and I'm gonna add some cracks to it to give it some texture. So here's the image I got from picks Obey. And now I'm gonna rotate it and then I'm gonna fit it to canvas. Then I'm gonna tap on the end and choose, multiply and reduce the opacity, and then it allow some of the texture from the cement to show through our image, giving some cracks and some fun fun effects. Now I'm going to share it to my camera roll, and our image is complete. Here's our finished image. These images air so much fun to create. I hope you enjoy creating your own, and when you do, please post them in the project section of the class. I can't wait to see him. And if you have any questions, please let me know, and I will try to answer them as best I can. Here are a few more images that I've created using the same techniques that we went over in this class. When you're done with your page, you can print it out and add it to an art journal. You can print it out and frame it. You can use your J Peg file to upload to a site like Society six or Zazzle and create cards . You can have it printed on canvas. If you want to print it on a canvas, Just remember that the size that you created in procreate you don't want to go much bigger than that on a real campus because it'll be pixelated. So if you want to do it big, you need to start with a big campus and procreate. You could have your image printed on a mug to make as a gift. There are just so many different products out there, so just have fun with it. Thank you so much for taking this class with me. I hope you enjoyed it. I certainly had fun. Thank you so much.
 Debbie Merhege, Artist, Illustrator, Teacher