Transcripts
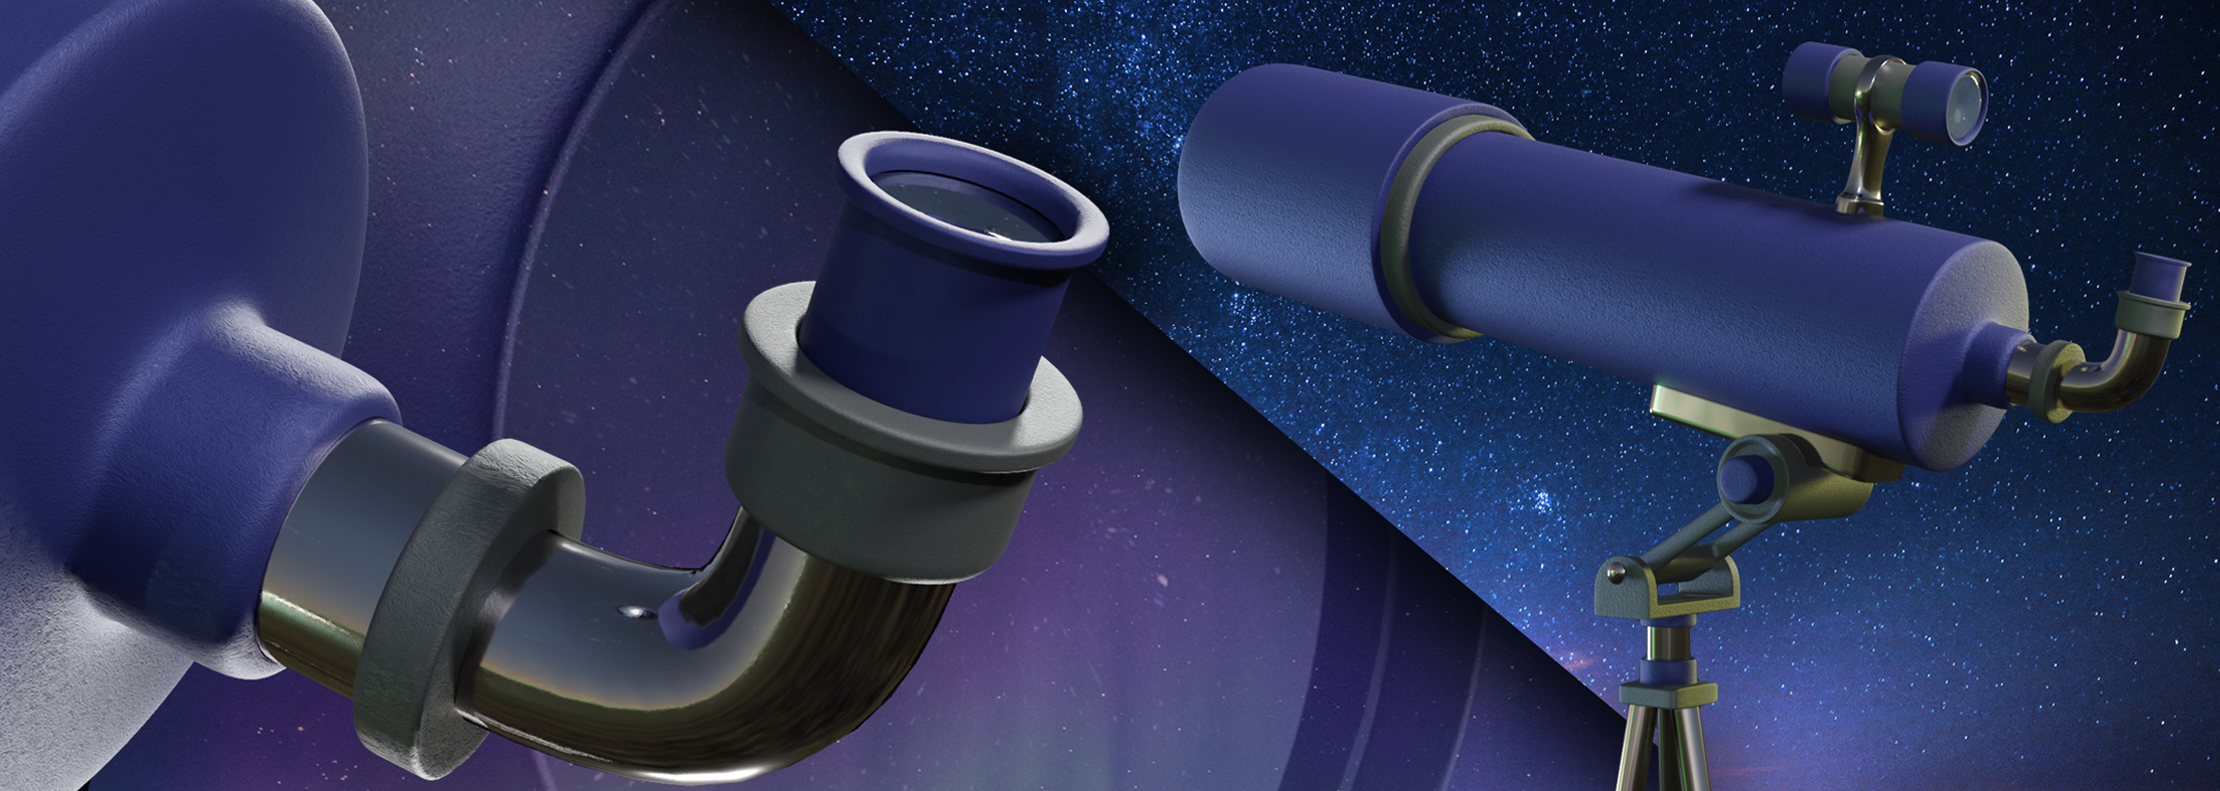
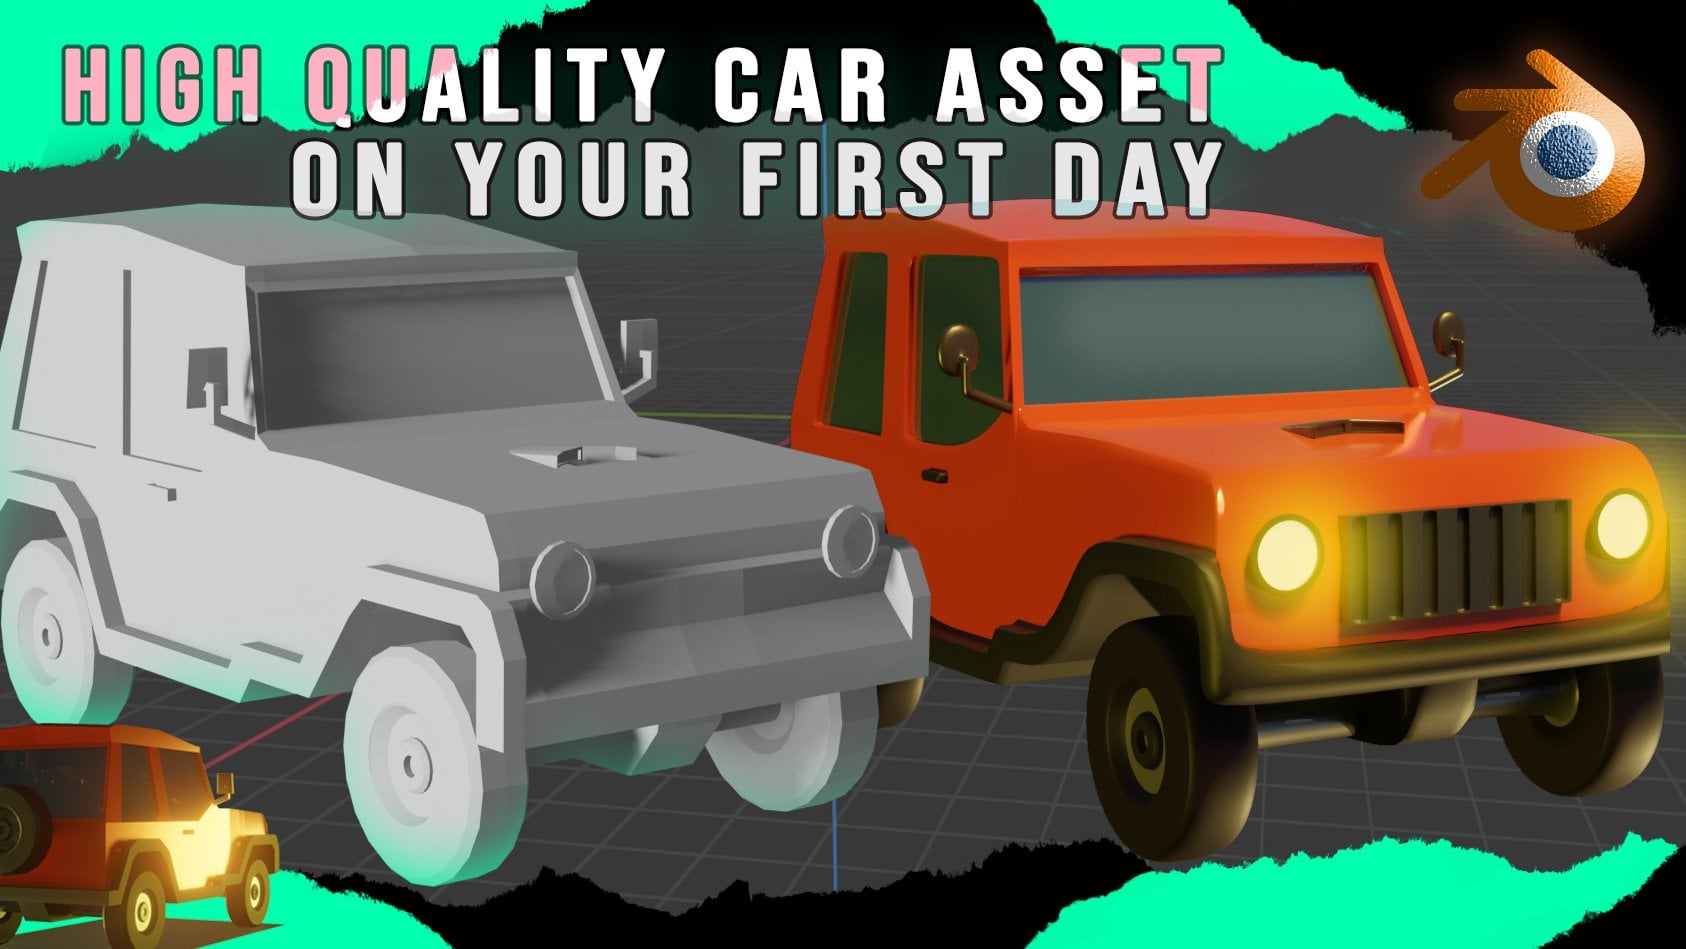
1. Introduction!: Welcome everyone to the class today we're going
to learn how to create this telescope
that you are seeing on screen in Blender 2.9, step-by-step class
so everyone can do it even if it's your
first day on Blender. So prepare yourself
because we do about it.
2. Modeling basics (Optional): So now you can see that
I'm in the version 2.9. To begin with, we're
going to create a new file here in general. But we can go up here
to File new general. You'll see this
screen right here. At the beginning. It can be a little
bit confusing, but don't worry about it. You're going to add the
hang of it really quickly. So I'm going to show you the very basics of
Orlando really fast. And to move, you're going to just hold down the
middle mouse button. And we will rotate our view. If you hold down Shift as well. You can see that we pan around by holding Shift
and middle mouse button. We can also zoom in or zoom
out by scrolling the wheel. And with these tumors were able to get full control of our scene and
move around freely. Another interesting thing to
know Are those lines here. The green one, right there. You can see also up here, the green one is the y-axis and the x axis is the red one. So this will be coming very
handy because in Blender, some of the tools are able
to perform axial movements, meaning that they will only
act on a certain axis. Let me show you a
better example of that. So e.g. if we press down
the letter G, G, while the queue is selected, we can move around with it. But if we want just to
move it along the x-axis, we press G and
then the letter x. So g. And then the letter x. We can see that the cube is snaps to the right
axis, the x axis. We can do the same by
pressing G and then y, and it will snap only to
the green axis, the y-axis. So it worked as well
with dessert axis, which is up and down. We're going to
press G and then z. And with these two combinations, we can move around the cube
really, really easily. I'm very accurate. So you're going to
press Alt plus j. Oh gee, to clear any
movements of the queue. And it will return
back to the center. And I'm going to show you
another tool right now, which is the rotate tool. The shortcut is the letter R. So who are? You can see that the
coop rotates around. But it's not really accurate. So we're going to press
Control Z to undo the changes. We will try again the
same technique as before. If we press R and
then the letter X, you can see that the cube just
rotates along the x-axis. Press the same, but air than y, it will only rotate
along the y-axis. We can do the same with z axis. And this will become really
useful during this tutorial. So make sure that you understand how those axial movements are. You understand these
coordinates here. And another useful tool that we're going to use
a lot is the scale tool. We're going to press the
letter S. You can see that the cube gets bigger or
smaller as we move the mouse. So it works the
same way as before. You can press S and then y. And you can see that we
scale it along the y-axis. We can do the same
with the x axis. That axis. You can see that we can create a lot
of shifts with that. Would have gone to
feed down Control Z. And another thing that I totally forgot to mention is that when you
rotate the cube, breast old are it will
clear up any rotation. So if you move it around
right here, rotate it. You can press or r and it will clear an
irritation and then all G. And it will come back
to the beginning. So we'll make sure that you know how to use these three tools, how to perform these axial movements
and how to move around, because we're going to use that a lot during the tutorial. And don't worry about it, just practice a little
bit on your own. You're going to see
that it's really simple and just make
sure that you're comfortable because it's the most important
thing on Blender. So what we're gonna
do now is we're going to switch from object
mode too. I did not. And to do that,
we're going to go up here and click Edit mode, or we can just press Tab on
your keyboard and that will switch here and ended mode. We have full control
of our cube. And it's more technical, but you'll see that it
gives us plenty of options. So if you zoom in, you can see that we now see
every edge of the cube, every vertex, every phase. And if you click, Make
sure that you aren't here. Vertex select or pressing
one on your keyboard. We now can select
just the vertex of the cube and not the whole
cube like we did before. If you press now G to
move or G and then x, move it along the x-axis. You can see that we only move the vertex and not the whole
cube like we did before. So that's really, really useful. You can select multiple
vertices by holding down Shift and clicking Shift, click here, click here, e.g. and then we can
scale it if we want. And you can see that
we can start to create different and creative shapes. So we can press Control
Z to undo the changes. Here we go. And we can switch here
too, chmod at select. So we can click here. And we now see that we just select the edges
and not the vertices. So e.g. we can try new things out. So acting and you can see the degree press
G and N or something. We are creating new shapes. Control Z to undo. And we have also the face
select or 300 keyboard. So pressed ways you can
play around with it. It's really, really useful. So I'm going to show
you different tools and features of lender
during this class. I don't want to
teach you everything right now because there's a lot of inflammation and it
will be very, very dense. So I wanted to
make the class the more entertaining
for you as possible. So keep watching it, be ready because in the
next video we're going to model our first part
in the telescope. And we have a lot to learn. We have a new journey
in front of us. So make sure that you stay here.
3. The main tube/lens: Where we left here
before and now. What we want to do to begin our model is to
start a new project. We can get rid of this cube. So we're going to go
to File new general. We wouldn't save these changes. So now we're going to create the first part of our telescope. And this part is the main
fuel particle density. And we could actually
start by reshaping this cube and make it look like a cylinder or a telescope. But that will be really, really unnecessary and heart. So what we're gonna do is
delete it by pressing delete. And we will also hide this light and the camera
so they don't bother us. So we're going to
click it to select it. Then click this small
icon right here. And we're going to come
back to them later. And what were you
going to do now is add a shape that
resembles a telescope. And to do this, we're going
to click Shift a or at here. So we're going to click mesh. What we need is a mesh, and here we have
plenty of options. We just had a cube
but we don't need it. So we're going to
add a cylinder. And you can see now we have a
cylinder instead of a cube. Don't click away.
Done, de-select it because those options
Here's will disappear. If you see that,
if we click away, these options are
not there anymore, but we need to change
something before. So if you pick the way, simply delete it
and add it again. Shift day cylinder. And what we're gonna do is
decrease the vertices 32-12. You'd like this, and you can
see that it looks more flat. Don't be worried about that
because we're going to change the letter and it
will look around again. But this will make
the work much easier. So we're going to click away. We have our cylinder right now. And what we're gonna
do now is make it. So the top face and the bottom phase are facing the x-axis, so it's horizontal. And to do this, we're
going to select it and use the tool that we learned
before, the rotate tool. So we're going to press R and we need to rotate
it along the y-axis. So it should be
something like this, but we need some
really exact measure. So we're going to type it. Actually. We're going to
press Control that. We're going to rotate
it along the y-axis, our y, and then type
90 on our keyboard. So 90 and click. So now we see that
we have rotated it 90 degrees and it's
perfectly horizontal. And we're going to
start from here. So the first thing that we need to do is make
it a little bit longer. So we're going to
use the scale tool. We can see that
we scale it along the x-axis and it
makes it longer. So if that's what we need, something like this should work. And what we're gonna do now
is add the lenses here. And we could actually
add another cylinder. But I want to keep it
simpler and I'm going to add just from this one. So to do this what
I'm going to go to Edit Mode or press
Tab on your keyboard. So now we're in edit
mode and we're going to select this face and we're going to delete it
because we don't need it. We don't need to face
right here because we weren't actually see the
interior of the telescope. So we're going to press three or click here to select the faces. And click this one here. And we display selected, we're going to press Delete and click face because
we don't want this face. And you can see that
it disappeared. And now what we're
gonna do is use another tool that
is new for you. So we're going to
select this ring by pressing Alt and left-click. You can see that it selects
every single edge here. So we could just simply do this by holding down Shift and
clicking every single one. Or we can just press
Alt and left-click. And we have bothering
selected all this loop. We're going to use this
new tool which is extrude. So if we press the letter E, Now you can see that we have this new geometry
that is being created. And this is really,
really useful. It doesn't really look so
great right now, right now. So what we're gonna do
is press Control Z. Make sure that this
selected and press extrude the letter E
and then the letter S. So P, letter S. And you can see
now, look at this, it looks really, really good. So that's what we need. And
we'll do something like this. You repress shift as
well while we are, while we are dragging the
mouse, it will make it really, really slow, which is really, really handy when these
things are really close. So something like
this should work. And now what we're gonna do
is extrude this top ring. So we're going to press E and we're going to move
it along the x-axis, this red one here. So e, x. And you can see
something like this. What we're going to
make it shorter, actually, something like this. And then we're gonna
do the same again. So we're going to
select these three E and then scale it s,
something like this. If you actually want
to make it smaller, you can, you can scale it down. So scale. You can see that it
makes it smaller. Something like this should work. And then what we're gonna do
is extruded along the x-axis again, something like this. So we press that x, something like this.
I like this shape. So we have this right now. It looks much better. And what we're gonna
do as well is make little place for
the lenses to go. So we're going to actually extruded and scale
it down like we did before, E, S and make it real bit
smaller, something like this. And we're going to extrude
it again along the x axis, but this time we're
going to go inside. So we're going to press, well, let me undo changes so
you can see it better. We're going to press E and then x and we're
going to go inside. Just something like this works. It doesn't need to
go all the way down. Just for security, for being much comfortable with this and making sure
that it doesn't overlap. So now we have the main shape and
you can see that it already looks Much
better like a telescope. And another thing that
I'm going to do there was seeing off this main tube. It will be adding
another cube right here, small cylinder just from it. We're going to create
the eye piece. So to do is we're going to
jump to edit mode again. So press Tab on your keyboard. Make sure that
we're in edit mode. And what we're
gonna do is select this face to face,
select activated. And what are you going
to press the letter I. So we can see that we
can make an inset. But let's make sure that we have our mouse far away from it because we
need to zoom in a lot. So we press I and we keeps
coming in, coming in. Something like this. Works for me. Yeah, I like this. So now what we're gonna
do is extrude this phase. But it's the same as before. We're going to
delete this because we don't need that face. So we're going to
press delete faces. And we're going to select
this ring with two on our keyboard to select these edges and extruded
along the x axis. Something like this. Make sure that you like
it. It looks great for me. I'm going to move it a
little bit closer to zero, so g and then x, and then something like this. It looks right. I'm going to also move
a little bit, this one. So I'm going to select
it and press G x. I'm going to move it,
something like this so we know that flat. And just to finish this, but we're going to
select this ring. And we're going to
press the letter F. So it feels the
phase F for field. Now we have a face here and
it's not like an open space. So as you can see, we've created this telescope. The first part, it looks great. And in the next tutorial, we're going to create
the finder scope. And it's the first,
the top part here. So stay ready
because here we go.
4. The finderscope: So the next thing
that we're gonna do is define the scope. That it's a small device that it's used to
aim the telescope. So to create it, it looks really similar to this. And we're going to
create a new shape. So make sure that you
are not in edit mode, you are actually in object mode and you have nothing selected. So double tap the letter a. So we deselect everything and then Shift a and we're
going to add another cylinder. And you see that it's here. You can hide the other
one by clicking on it and clicking this icon here and
see that it disappears. But if you can make it appear
again by pressing the I, we're going to actually
change the name as well. We're going to double-click
the name here. I'm going to type telescope. And we're going to
hide it for now. And we're going to
select this one and we're going to diabetes. Find their scope. Now, what we're
gonna do is similar, a similar process as before. So we're going to rotate it. Again. As we see. It has too many faces, so we're going to have
to grade it again. So let me copy the name. Let me simply delete it
by pressing Delete Shifts a mesh cylinder and we're going to decrease
that to 12 again. So it looks like this. We're going to change
the name. Finder scope. Here we go. So just as we did before, we're going to rotate
it along the y-axis. So our Y 90, press Enter or right-click,
left-click, sorry. You can see that 90 degrees. And what we're gonna do
is show the telescope again because we need to
see how big we want it. So we're going to press G, then make sure that it doesn't
move along the y-axis. Because if it moves
along the y-axis, it wouldn't be centered anymore. And we need it to
be in the center. We're going to make sure
that it's in the middle. And we're going to do is
make it smaller for sure. We're going to scale it down. Make it smaller,
something like this. We're going to move it
along the z-axis. So g, z. What we're gonna
do is press here. These are small dot. So we can see it from the front view. So front, you can see now here we are in the front
view that will help us set the finder scope
in the right position. So it goes actually we'll be something like
this and pressing, holding down Shift
so it moves slower. It looks red here.
And what I'm gonna do is skeletal on the x-axis to make it a little bit
longer, something like this. Not too much because we will another cylinder
number on both sides. Something like this. We can also press here, or letter or number
three on our keyboard. So we'll, we'll go number three on there,
an ampere, sorry. And it will simply
go to the right. You've got C. And we can see it here. In the middle. It's red. I like it this way. We're going to move it a little bit down. And we're going to
start creating, define the scope again. So we're going to
go into edit mode, rest up, select this phase. We're going to delete it
by pressing Delete base. And we're going to do the
same as we had before. So we're going to select to left-click and altered the
same time here are left. We're going to press E to extrude it and scale
it at the same time. So e then S and scale
it, something like this. And then we're going to extrude
it again in the x-axis. So either x,
something like this, I won't make it, I will
make this part right here. So now we're going to press E. Then as again, make it. We'll insert here. And we're going to extrude it again along the
x-axis and go inward. So it has someplace to
our feet, the lenses. So we're going to do
the same as well here. So we're going to
select this face, delete it by pressing
delete faces, and select this edge, scale it and extruded
the same time. So we're gonna go
to this front view. So we're going to press the
number one are numbered. So we can see it better. We will zoom in. I'm going to
scale it a little bit more. So it's kinda similar to this. So S Something like this. I'm
not sure if you can see it, but make sure you have dark
lines here to guide you. So I'm gonna go back to the front view with
number one on your numpad. I'm going to extrude
again along the x-axis. So either an x, I'm going to make it kinda
similar to the one before, but it doesn't really matter. Something like
these. I guess you can guide yourself with
the squares on top. So this is just four squares. These as well. They look really similar and we're
going to do the same even scale it inwards,
something like this. Which through it again.
So think like this. Perfect. Now we have it. Here. We can see them the front
view, it looks great. What we're gonna do now is really important
because we need to add a mount here so it connects the telescope,
we define their scope. And maybe you thought that it would have been better
to start with the mountain, go from the bottom to the top. But I actually did
this on purpose. And starting with
this finder scope is much easier because
now what we're gonna do is press a natural
fear of the middle ones. It could be anything of
those or even the face. And we're going to
press Control R. And you can see that
it creates a loop. Control that and you can
see it better. Grades. Look here. So we're going
to press left-click. And now we can move it again. But we're going to
leave it on the center. So we're going to
press right-click. So it stays in the middle. Now we have a look at here. So what are we
going to do now is create another silly nerve, small cylinder here, like a ring to hold these
fingers scope. To do this, we're
going to actually make another object so they
don't stay connected. And to do this, we're going
to use a really cool method. And that's why we
created this loop. So we're going to select the
floor by all left clicking. And we're going to press,
we're going to duplicate it. So to do this, we're
going to press Shift D. And if we can drag this, these loops, so we
have it right here, but we want it in
the same place. So we're going to control that. And make sure that
you don't have to merge selected here
on tools, Options. Make sure that
that's not selected. So make sure it's off. And then press Shift
D to duplicate. And without moving your mouse, press Enter or right-click. And now we have another copy
of it at the same place. If you press G, you can
see it but don't move it. So control Z, it's
right here. Now. What we're gonna do now
is press the letter P and press selection. You can see separate selection. Now if you see here, if we hide everything, everything but this part, you can see that now we
have another object. If we go to object mode, we can see that we have
another separate type object. It just this loop right here. And that will be
really, really useful. So we're going to
work from here now. We're going to click it, go to Edit Mode. We tap, we're going to select this loop and we're
going to extrude it. So E then x, something like this should work. We're going to show
these finer scope again. So make sure that you
like the size of this. Yeah, something like this works. So what we're gonna do
now is make it thicker. So we're going to select it and we're going to press the
flash on our, on our numbers. Or we can also hide it manually. But if we personalize
it hides everything but this object that
we're working on. So we have only these rings selected appearing
on the screen. So what we're gonna do is
scale it, make it thicker. So to do this, we're
going to select the edges, faces right here. And what we're gonna do is
extrude it and scale it. So e then S, like we did before. So something like this. We're going to press
of large again. Make sure that you like it. I'm going to go to the
front view and move it a little bit to the
x axis, to the center. Well, let me select all the objects instead
of only these phases. So we're going to
go to object mode. So the object is selected and we're going to move it along the x axis, something like this. Perfect. What we're going to do
as well is right-click and click Set Origin,
origin to geometry. And just look at this, how it. How it goes back to center. And that's really important
because we need those points to always be in the center of our object to make it even so. Now what we're gonna do is
activate the telescope again. And we're going to connect it. So let me scale it a little
bit more in along the x axis, actually something like this. Yeah. And now we're going
to connect that. So what I'm gonna do is
grab those two faces. Entering edit mode and having
the face select activated. We're going to press Shift click and have them both activated. And I'm going to extrude them downwards by pressing E and Z. And you can see that
they are not even. So. To fix that, we're
going to make sure that they are
selected and press S. So select them then than zero. And look now what we've done
there in the same level. So we're going to move
them again downwards. We could, we could do that by pressing E, then that again. But what we're gonna do is
just press G and then z. So this way, it doesn't
create new faces. Something like this, a
little bit more, I guess. So. What are we going to do
now is hide everything. So we're going to
place a slashing are given so we can see it better. I'm gonna delete those two faces because we don't need
actually two faces here. With one, it would work as well. So delete faces. And I'm gonna go to Edge mode
or press T on our keyboard. Alt and click. And we're going to
press F to fill. So we have now only
one phase here. With this phase, I'm going
to show everything again. I'm going to create with
this edge, select it. Just yet. We're going
to press two right here and extrude and scale it. Just like we've done a
lot, something like this. And we're going to just simply delete the
overlapping phases. So I'm going to press the
face here, unimpressed face. So you can see that now we
only have those edges here. And we actually then need to
create that phase with Phil. You can see that
it's easy to fix. So we're going to select
this edge right here. Click this loop, and we're
going to scale it down again. So E, extrude it down, they mean, so even z. So it goes inside,
something like this. I'm going to put a
slash at the end. We actually need our face, so we're going to press F
here, and that's perfect. We're going to press
the sludge again. And I'm going to
go to front view. And I'm going to press, or I'm gonna go here. And click. So you can see now
that we are in wireframe mode where you
can see through everything. So you can go and
scale this down. And you can see that
now it's inside. So make sure that
you like how it is. I'm going to leave it like this. Just make sure that it's
really fitting inside of it. So I'm going to go
back to Solid mode. So click here. You can actually press Shift Z to enter wireframe
mode and choose that again to go
back to Solid mode. That's a really, really
useful thing to know. So now we have these mount here, which looks really great. And that's another part
of the telescope done. In the next video, we're
going to create the IPs. So we're going to
work out of here. And you can see that
it's really similar and we'll learn some new tools. So make sure to stay ready and concentrated because
we have a lot to go steal.
5. The eyepiece: As I said before,
the next part that we're going to work
on is the eyepiece. That's the part where
you put your eye on just to look at the refraction of this guy are the stars
that you're looking at. So we don't want to
work from this phase. But first of all, let me change the name of
this Finder Scope. You can see the amount. We're going to
rename it to mount. And it's a really similar
process that what we did here. So we're going to just go
there in the telescope, rest up and we're going to delete this face by
pressing Delete. We're going to select this ring, this look here by
pressing Alt left-click. And we're gonna
do the same as we did during this tutorial. We're going to press E and S. Something like this should work. Maybe a little bit more. I'm going to scale it down
with just S right now. Because we already have
the geometry as perfect. I'm going to extrude
along the x-axis. So E Then x,
something like this. I'm going to go to front view
by pressing the number one on the numpad or I can press
this point right here. It depends actually on where you orientate it,
your telescope. But just make sure
that to look at it to the front and then click
the nearest point here. So here, like this, and it looks great to me. I'm going to make it
a little bit longer. So I'm gonna select this way. I'm going to press G, then x. Not really match something
like this and I'm going to make another extrusion. So even when I go out, you want to go back again
to this front view. And I'm going to make sure
that it's similar to this one. So I'm going to have to scale
it down with S. I guess. Now, something like this. So the next I'm gonna
make this one shorter. Something like this,
a little bit more. So g, x, perfect. And not what I'm gonna
do is fill the space. So if you remember, we selected and press
F, that looks decent. So what we're going to need
to do is add the scope, like the place
where we look from. But we don't want
it horizontally. I want it to be vertical. So we look from the top. That makes much more
sense in real life. So what do we have to do is create a curve here
so we can connect the vertical scope with
this horizontal cylinder. So what we're gonna
do is create a curve. And that's a new thing
that we haven't done. So make sure that you are in object mode because we're
going to add another object. So make sure that you
are in object mode. Because if you're in edit
mode and you add an object, I'm going to show
you the example, Shift a and add the queue, e.g. if we move it, you can see that when we
go back to object mode, this cube and this telescope
or the same object, you can see they are always
merged and that's a problem. So make sure that when
you create an object, you are in object mode. So we're gonna go back
to press Control J hat. Okay? Now what we're gonna
do is go into object non reassuring the select
everything and go to shift day. And now we're going to add a
Bezier curve, not the mesh. You can go here, curve Bezier. We can actually see it because it is inside
the telescope. It has generated here inside. So what we're gonna do
is present slashing are numbered with the curve selected or we can just hide it,
minority everything. So we have the curve right now. What we're gonna do is
go to the top bill. So we're going to
press seven or numpad, or we can press,
you can clear here. So what we're gonna do
is make it horizontal. And to do that, you'll see
that we can go to Edit mode. But here we just
have some handles. This handle right
here from this point, and this handle right here. And as you move them, if you select one and press G, you can modify your curve and you can create really
interesting shapes. But what we are going to
do is make it horizontal. So then later we will be able to make another type of
curve just facing up. So to do that, we're going to press snap here and we're
going to activate it. So click. And we're going to show this menu and click
in increments, and then make sure that
absolute grid snap is on. So now, see what happens
when we move it. When we move this handle,
we can see how it snaps at every corner. So what we're gonna do
is make it horizontal. And if the what, if, what handles are
horizontal like this? Like this, the curve
will be horizontally. So now as we see, we have a perfectly
horizontal curve, straight. And so we're going
to now move it. So we're going to
move it like this. Here. We're going to show
our telescope. Well, like more of it a lot. We're going to go to front view repressing number one
and we're going to move it. So it's close to this
cylinder right here. Okay? So what we're gonna do now is
create like a decent curve. Because now it's just
a straight line. What we're gonna do
is grab this handle. I'm going to turn off snapping. So you can select this
object and we shift up, shift and tap, and
it will deselect. And if you click it,
it will toggle it on. So we're just going to
make sure that these off and we're going to
move it, move this handle. So something like
this will work, but I don't really like
this type of curves, so I'm going to have
to move this handle. You can see that
now it's creating a much better curve,
something like this. I like it. But well, let me move a lot, a little bit. The handles,
something like this. We're going to fix that later. Let's just make this
general shape, right? Make sure that this point
is actually inside. So to see, to check
that you can go back to wireframe clicking here or
Shift Z on your keyboard. So if you go on out
to the front view, we can see that the curve is actually inside,
which is great. I'm going to just change
it a little bit more. So I'm happy with
the shape I've run. Now, you can see
actually this end, but I'm going to make
sure we have to make sure that the end or this end is vertical and
design is horizontal, so it will fit
better in the shape. So we have to go here and
make it the top vertical. We will have to make
this handle vertical. So I'm going to go here, turn on snapping
again, shift up. And I'm going to G and
make it sure that nubs, that the top handle and these points are
in the same line. So something like this word, I'm going to move
it this one again. Okay, now they are
in the same line, so it is a vertical. I'm going to make sure that these pressing wireframe mode. That is correct. Yeah, yeah, It's perfect. It's in the x-axis. You can see, we're going to
go back to Solid mode here. Shoes that and see, make sure that it is inside. It is perfect, just
inside little bit. But if you see now
we just have a curve here and it's very flat tool. We need to add thickness to it. So what we're gonna do is select the curve in object mode. And we're gonna go to
this tab right here, this green one, which is the data of the
properties of this object. And it changes for every shape, you can see that
fear is different for the curve is different. So what do we have to do
is make it more thicker. So to do that, we're going to go to
the geometry tab here. And here we have a
bunch of options. But the most important one, the one that we need is
they're going to make that, sorry, procuring Bevel. We're
going to increase that. You see, but you see how
it changes the thickness. So we're going to
go back to front view and I'm going
to make it smaller. Something like this. Make sure that you
like it, how it looks. And then really bothered
about the resolution. The higher you are,
the better looks. We're going to just
leave it in for. And as you see. Now we have a really
decent curve. I'm going to make it
a little bit smaller. Just like that, I guess. Yeah. That looks right to me. So
what we're going to have to do now is make sure that
we like how it is. Because we're going
to go back to here and press on the
curve, right-click. And we're going to
convert it to mesh. So when we read it, we click. And as you see
now, it is a mesh. It's not a simple line
with two handles. We have a mesh and we
could, if we really wanted, we could play along
with the moving, those with scaling, make
sure that you turn off snapping because it
does crazy things. So turn it off and you can move. You could scale it, you could
do really sort of things. But now we need to just like this and we'll
make sure that it's really it's horizontal, it's not the same level, so we're going to press S zero. And it didn't change. Well, it was just to make
sure that it was flat. Just in case, if you
are like this, e.g. just press S zero and it
will make it horizontal. And what's the hardest part? We're going to make sure
that we are in object mode. We're going to add
another cylinder. So mash cylinder. We're going to
decrease that to 12th. We're going to move
it along the x axis, make sure that it's centered. And along that axis and we're
going to scale it down. I'm going to go to front view. I'm going to make it. So it's in the center. Something like this. I like it. Maybe a little bit here. So make sure that you
make sure to use Shift while you're moving
in these cases so it doesn't go so fast. Something like this. I like
I'm going to make it shorter. So I'm going to move it,
move it into that axis. Something like this should work. So now what we're going to do is go to this top face in edit mode. I'm
going to select it. And I'm going to
delete this face. And I'm going to grab this ring, makes sure that
you are in select. And I'm going to
extrude it outwards, something like this. And I'm gonna make it through the windows that
axis, so it ends at. And I'm going to
press F to feel. And well, while we're actually going to
do is delete this. So Control Z or delete the face. I'm going to extrude it in. So E S, then scale it
in, something like this. And we could actually
leave it like this. It looks decent, but
I'm going to add another one because the
real telescopes have that. So I'm going to scale it, extruded along the
z-axis and go downwards. Little bit like this. And we're gonna do the
same as we did before. So we're going to make sure
that this one is selected. I'm going to press Shift
D and right-click. It stays in the same place. I'm going to press P to
separate based selection. And as you can see, now we
have another object here. So what I'm gonna
do is select it, go to Edit Mode and
extruded along that axis. And we can show this again. You're gonna make it just
a little bit smaller. So I'm going to scale
it down a little bit. So it fits nicely
inside the other one. You can see that we have
a real bit of a gap here. That looks right to me. We will be able to change
the later if we need to. And I'm gonna do the
same as I did before, I'm going to extrude scale. So B then S extrude to the zed axis through
it and scale it again. Something like this. Make sure that when you do that, make sure that when you
do that, it's great. It's longer than this side. Because if we then
scale it down, we would have these
overlapping geometry here and we didn't want that. So make sure that when you
extrude it and scale it, it fits nicely inside. So I'm going to make it a
little bit smaller with S and extrude it again in
the other axis, e and z. And perfect. We're going to add
the lenses here. Clear and clear. We're not forgetting that. And as you can see, I'm
going to go to front view. I like how it looks. I'm going to make it just
a little bit smaller. So I'm going to make it, but then I'm going to
make this graph a little bit smaller as well. So I'm going to
select this cylinder. We're going to select
all these faces here. We pressing Alt and clicking. So I'm going to check
this look here. Make sure you can press slash on your keyboard if you
need to see it better. So left-click in this line here, no edge here, because
we do it in the middle. It selects the vertical loop. If we do it on edge, It's like the horizontal loop. So you have to understand this and have that in mind
while you are clicking. So I want to fly again to see it, and
I'm going to scale it down. Something like this. Make sure that Roboto gap
by which to Columbia. And I like how it looks. I'm going to move this early, actually something like this
and I'm going to extrude, well I'm not moving, I'm going to move these more. So select these gene that I'm going to turn on
wireframe, but shifts that. We're going to go back to rugby. You want to see that it's
inside, just like this. Perfect. I'm going to hope that the
solid mode by pressing here or shifts that.
And it looks red. We don't really have to fill the space because there
will be a lens here. It's not really necessary,
but I'm gonna do it anyways, just in case here. I like how it looks. Maybe there's some refraction
that will help us. So electric. So you can see we now
have a finder scope. It's now already. You will have a lot of progress. And C. So what we're gonna do is make sure that you save
the project constantly. Press Control S to save.
6. The objective lens: So as I said, we have to create the piece of glass
that goes here, here, the finder scope or
in the eyepiece there. So we're going to
start off by here. It's all of them are
the same process, so it will be really fast. So we're gonna, I'm gonna move this a little bit to the outside because I don't want the
D lens to be that deep. So inside the telescope. So I'm going to move it
a little bit outside. And we're gonna do the
same as we did before. We have to duplicate this. Look here and paste
it in the same place. And then with one of the, of the two lobes that
are in the same place, we're going to separate
and create an oval object. So what are you
going to shift D? We have another one. We're going to right-click. And it's now based it
in the same place. So now here there are two
lobes instead of one. So what we're gonna
do is select one of them and press the letter P. And selection. Let's make sure though, that we have the one that
we just created. Select it. So I'm going to do is again, shift the right-click, be, separate one of
them by selection. And now we have
another object here. So you can see that if I'm
going to object mode and I, if I hide this telescope, the week one, you can see it. And now we have this
shape here that is just the exact size
as this hole here. And that's really,
really useful. We are doing it this way because instead we could actually create another cylinder and just try to eyeball
the size of these. But I feel that it's much
better. Do it this way. So we could actually select
this ring and press F two. Then now we have a
decent ring right here on this glass lens, but it doesn't really
regret, it looks so flat. And the real-life telescopes have kinda like a curve here. It curves. So we want to do this and
it will look much better. So I'm going to undo control
Z. I'm going to hide this. So what we're gonna do is we're gonna do a new thing
that we haven't done. So we're going to press E and then S, something like this. But we have to leave a
space in the middle. Something like
this. You can see. And then what we're
gonna do is from here, we're going to press Control F. And we're going to go down here and
search for Greenfield. Okay? So we're going to select this
edge Control F grid filled. And you can see what
that does, okay? And if we go to object
mode, it looks the same. You will see that
nothing has changed. But what we're gonna
do is we're going to select this middle
phase right here. We're going to turn off
proportional editing. You will see now
that if we press the letter G without
proportional editing on, you can see that it
moves along the x-axis. You can see what it does. But if we now turn proportional editing,
you, Professor G, we have now circle that we
can move with the scroll, we excluding the world. So you can see now that
you've requested and x, look at what can we create. So now we create it. A really cool slope here and a circular shape that looks really great. But what
were you gonna do? I'm gonna go back. I'm going to turn this on, and I'm going to open this menu. I'm going to click
on inverse square. You can check each one of these affects the circle
of different ways. But I think that this one
will really works the best. So I'm going to the bigger
it is the monitor effects, so don't go crazy with it. So I'm going to just
make it a little bit. I'm going to hold down shift. And I think that this
looks really great now. So now you can see
that we have a really, really cool base here. Now when we add the
telescope again, we can see that it's not
just a straight line. I'm going to move it closer
to the outside as well. Something like this. I think it looks really, really great. So now what we're gonna do the same with all the other faces. So I'm going to do
this really fast. We're going to go here
to the finder scope. If it happens. Just like me that it's really hard to move actually
want to turn to. Go and spin around. It just doesn't feel great. I'm trying to move it so slow. What I'm gonna do is
hold down the Alt key and then press with the middle mouse button
here in the finder scope. So now it has centered my
view here feels much better. We can see that this
is overlapping with the way it doesn't
really matter. But if we want to solve this, we can just scale it. Does finer scoped just a little
bit down, just like that. And you can see
that it disappears. That was because they
were overlapping. These faces of the
mountain. Finally scope. But it's a really
easy thing to fix. So what we're gonna do is
select this shift. Right-click. Separate by selection
with the letter B. We have another
piece right here. Selected. Go into Edit Mode. S, something like this. I'm going to press
Control F Whitfield. I'm going to select the
middle phase letter 0 to activate
proportional editing. Something like this. You can play around with
the other options. Maybe you'll like it better when it's sharp wherever you can, keep trying. She is an x. It just got a different class, different approaches, but I'm gonna keep using
the same as before. G then x. That
looks right to me. We could actually make this even rounder by creating
another phase here. So if we press
select this face and press Shift H. You can see
what we did with here. And now what we're gonna do, click Control R to
create a loop here. And right-click to leave
it in the center and create a little
clear controller. Make sure that it's here in the middle and you can move it. So then right-click to
leave it in the center, both h. And here you go. Now we can actually even
make it rounder by pressing G. And then moving this real
bit more towards the x-axis. Make sure that it is more shape. And look at this smooth
panel that we, if you click, right-click and
hit Shade Smooth, you can see what we have
actually created a smooth glass. It broke through the
right. I'm going to go back to shade flat. Make sure that it looks flat now because that
helps out a lot. And I'm gonna move it a
little bit outside as well. Something like this. Don't worry about it. It will look much better after
we apply some modifiers. I'm going to explain you
more about that later. So I'm going to do
this as well here. So Shift H to hide everything
but the selected face, old H to unhide everything. So Shift H. I'm doing Shift H just to make sure with
this face selected, just to make sure
that the control, our loop only affects
this part of the square. Because if you see that when I do a loop without
hiding the other parts, it will put everything
about all the circle. And we don't want this, we
just want a simple code here. So we're going to
select this face. Now. There are two phases, but we're going to select them. Shift H or Control R. Click here, right-click to
leave it in the center. We have a point here that
we can select white, selecting the vertices here. And we're going to Alt
H to unhide everything. Make sure that only
the sporadic selected, I'm going to pull it. I'm going to turn off
proportional editing with, oh, I like how it looks now, you can see that this
has a nice curve to it. So I'm going to
activate it again. You'll have this nice, this nice shape here,
this nice curve. We're going to do
the same as well. I'm going to do is really fast. So can we go, we have all the lenses done. What I did, what I did
here in these two lenses. Actually made it go inside. Because that's where
you put your eye and it will be kind
of awkward if you had a glass line curving
out to your right, they are instead going
having the curve down, but that doesn't really matter. So here we have the glasses will make them
transparent and more glassy. After when we add the
materials will make it look really, really great. We'll make them really
be thicker probably. In the next video, we're actually going to
start with the mount. Here. We're going to create a
mount. It would look really great to support the telescope
and make it adjustable. So stay tuned. See you there.
7. The mount: So as I said, now we're going
to start with the Mount. And the first thing that we're going to do
is add a queue. So shift a queue. But wait a second. Before that, let me
undo the changes and let me organize this a little bit
because as you can see, we have a mess of names so that we don't
even know what they are. So e.g. this Finder Scope one, let's just change it, the name. So let me do this real fast. So now as you can
see, we have this much more organized and that will help us a lot
of the when we are, when we add the
materials to the, to each part of these
to each object. So have that in mind. Always keep
everything organized. Well. As always, we were
saying, your static cue. Make sure that it is
aligned along the x-axis. Don't move it along
the y-axis because it would be off centered
and we don't want this. If that happens to you, just, you can click
the letter n. And you can see that we've
moved it along the y-axis. So please type in zero here. And I will come, that will go
back to the original state. So I'm going to go to front view actually,
sorry, click here. I'm going to press N
again to hide this. I'm going to go to front view. We don't number one
in the in the numpad. So I'm going to move it here. I'm going to scale
it along the z axis. I'm going to scale it on the
y-axis. Little bit more. Something like
this. This will be, will be a metal piece that
supports the telescope. We're gonna make it
a little bit longer so it can fit inside
the telescope. It's just like this. If you take a look at
this, like we did before, we made sure that it
sticks in the telescope. That's really useful. So we're gonna do the same here. We're going to go
in wireframe mode, which shifts that
are right here. We're going to pull
this a little bit, something like
this. A little bit. I'm going to make it
a little bit shorter. Something like this
looks great to me. Move it up a little
bit more. Okay. That looks great to me.
But just take a look. I'm going to make it
a little bit shorter. So, sorry. S x, something like
this movie with g, g then x, I'm going to write
here, That looks great. I like it. So let's continue. We've created this
cube, which is here. I'm going to name it again, mount to I guess something. So something that
you can recognize. So I'm going to now a cylinder. So mash cylinder makes sure
that you are in object mode. And we're going to rotate it
this time along the x-axis. So our X 90. And that's great. So we're going to go to
front view fresh g of x. I'm going to make sure that it's
sticking out a little bit. So something like
this looks great. Yeah. Sure that you like it. I'm going to move it
a little bit more. Just like this. We're
going to pull it up. I like it now. Looks right. I want to make
actually a little bit smaller, something like this. So that's the part that you spin to point the telescope
up to a certain angle. So that would go, that
would make these possible. So okay, And what we're
gonna do actually, it looks really basically flat. So what we're gonna do is
we're going to actually show, I'm going to show
you another thing. So we're going to hide everything
now that it's in place. So we're going to select it
and press the flashing or keyword or hide everything
manually, like this. But slash makes it much faster. We're going to do is go back to object to edit mode, sorry. And we're going to add a look
kid. Right in the middle. I'll look at look
at control arm. Left-click and right-click
to leave it in the center. So now we have a look at here. And what we're gonna do now is delete everything
on this side, and we're going to
mirror this side. So let me show you
how that's done. So we're going to
press Control Z, she zed, sorry, to
go into wireframe. And we're going to make sure
that we have just selected here or even faces. We will, we will foster make sure that
we are in wireframe. Because if we're
not in wireframe, when we select this, you can see it only selects
the visible part. So with wireframe, we can
select every everything. So delete faces are new. Consider now we have
just how the cylinder we place on our keyboard. Now we just have half of it. But don't worry about that. We're going to fix that later. So we're going to delete
this phase as well. I'm going to just
do a little bit of geometry to make
it look better. I'm going to actually
move it a little bit. I have proportional editing
on, let me turn it up. So g x, y, sorry. Then E, S makes some
sort of shape here. And then fill this phase. Now if I have a decent, something cooler,
we can actually do is make a loop here.
In the middle. Press Enter or right-click. And I'm going to select all these faces here
with Alt left-click. Make sure that you
press on the side. And I'm going to move it, move them towards the inside, G, then y will be inside. Something like this.
It looks cool. I like how it looks,
this kind of a slope. We're going to
leave it like this. And what we're gonna do now
is add a modifier here. So we're going to click this, this cylinder and click this modifier properties
here. This blue. And click on Add Modifier. And we're going to
go down here to generate search for mirror. And what that will do is we're going to
de-select the X, Y. That depends actually
on your own how you have the orientating
the telescope. So it's not, maybe in your case, would be the x, y or the y one. Just, you can try them out or just you can
think about it. So the z axis here is the one that's cutting in
half this cylinder. So we have to mirror with this, makes sure that you
turn clipping on Done. And now you can see we didn't have to do that
manually in the both side. Instead, we just one we just did this in one side and now
we have it on both sides. So I like how it looks. We can change that later
if we don't like it. We can come and change it. So what I'm gonna do as
well as add another part. So I'm going to, first of all, I'm going to change this name. And I'm going to
add another part. You can just improvise. Or do you think it looks right? I'm going to just make
this a little bit smaller. I'm going to scale
it along the y-axis. Like this. I'm going to go to front
view and I'm going to rotate it actually along the y-axis, which kind of a
search an angle here. And I'm going to move it here. I'm going to rotate
it a little bit more. You can type in number
if you need to, 45 degrees or wherever. And that will connect these
mounts to the tripod. So I don't want it to be
solid piece of metal. So I'm going to add
something to it. So I'm going to go to Edit Mode. I'm going to add to it
look at, and I'm going to, this time I'm going
to move it here. And I'm gonna do another one. I'm going to move it here. Then I'm going to
select this face. Actually those two faces, and I'm gonna delete
them. So delete faces. And I'm gonna select this
edge, this one on the top. This and this one on the bottom. We're going to click
better than S, just as with before. Something like this. And I'm going to click Control
E or Control E. Clear, make sure that the
both are selected. Control E. And we're
going to search here, reach excellent edge loops. Click it, and you can see
what we've done here. Looks really great. Now we have a decent shape
now, looks much better. So what we're gonna do now, It's actually, I'm going to make it a little bit longer here. So I'm going to press
G. Then I'm going to press Y, X, sorry, twice. It depends on
whether you have it. Where, where is
your orientation? So let me go back again. And if you see, if I press G and then x
moves it along this x axis. But if we press X twice, you can see that it moves
it along the x-axis, but it's actually rotated
the same angle, This cubed. So that's really, really
useful as we see. That's really helpful to
maintain the same angle. So I'm going to leave it like this just to have more
space to work with. And I'm going to add
now in other queue, just like these, I'm gonna
move it downward like this. You can see that now we are
getting the hang of it, of the control of
scaling down the things. Just a matter of
time. And practice. With once you get the job done. Really, really amazing
to work with Blender. So what we're gonna do
is just to fill in more. And I'm going to do the same
as I did with the cylinder. Remember how we did that? I'm going to read the slash. I'm going to go there. In
edit mode, controller. Look good in the middle, left clicking or just not
moving the mouse. So I'm going to select the face here with number
three on the numbers. I'm going to shift that
to go into wireframe. I'm going to delete those faces. Sorry. Now, we have just
the half of that cube. And what I'm gonna do is
just create this part. I'm going to work
with this half only. So what I'm gonna do, you'll
see what I'm trying to do. Now. So I'm going to
create a look at here. I'm going to move it to here. What I'm gonna do is grab
this face and G and Z. Well, what I'm gonna do
because I don't want this to follow along
with this face. I'm going to simply
delete this face. I'm going to select this loop. I'm going to now extrude. So e then that doesn't
follow with this slope here. Something a little bit more. And one now I'm going to
do is press F to close it. And now I'm going to
show you another tool, another really useful tool
to make it this much. Create kind of a bevel here. So it doesn't, it doesn't
look so squaring. So I'm going to select
those two to edge. And I'm going to
press control B. Control B. As we drag down, you can see what it does. It looks really good,
but as we can see, it affects much more decide
instead of this one. So to fix that, I'm going to Control Z that I'm going to
go to object mode, and we're going to
right-click it. I'm going to first
make sure that the origin is it
to the geometry. Well, let's just undo that. Because we actually
this time need to up their origin to be this, to be here for the
mirror to work with. What I'm gonna do is press Control a and apply
all transforms. So click here. And they'll see that now when we
do the bevels here. And you'll see what we have, what we have achieved here. And now it looks much better. You can actually press control V and scroll the wheel
so it adds more. You're going to
see what it looks. Don't add too much. I'm just going to and you can see that
what we've got here, I'm going to add
just one, actually. Something like this
because it looks great. I like it. I'm going to
move it a little bit. Something like this.
And I'm going to add the modifier here. Again. Is that axis. So the y-axis, sorry,
you have to try. It depends actually on where
you have your, your origin. But as I said, if you actually set origin to the
geometry, look what happens. So make sure that
when you mirror, the origin is set at the part
where you want to mirror, so the half of it. So What we're gonna do now is now here a cylinder
and other cylinders. So object mode,
shift the cylinder. I'm gonna make it smaller, but I don't want it to
scale it along the y-axis. So what I'm gonna do
is read the scale. And if I want to make it
smaller but not shorter, I'm going to press
scale and shift Y. So you can see now make it
smaller and making it smaller, but not like this. But like this, which is
really, really handy here. So yeah, something
like this works. What I'm gonna do is create
something else here. So I'm going to do
the same a mirror. We're going to cut it in half. Make sure that the origin is where you place your cursor,
where you are going to cut. So wireframe, I'm going to delete the oldest
faces and from one side. And now I'm going to
just show you again. What I'm going to do
is make this fear. We're going to add a
loop cut and I'm going to move it here. So let me do that again for you. Or the lubricant in
the middle and move it just here to the n.
Something like this. Now I can press the flash again. What I'm gonna do is
make it a little bit. I'm going to scale it actually. So I'm going to add
another look at here. Well, this one is
going to get scaled. So something like this. But not too crazy, of course. Something like this. I think it looks
right. Maybe I'm going to actually add
another loop cut. So what we're gonna do here is select a look at
what before clicking. You're going to scroll
down the wheel. Scroll up the wheel so
you can add multiple. And what I'm gonna do is just press Control R before clicking, just scroll up the
wheel and then right-click and you have to
get centered in the middle. Now, I'm going to scale
these faces here. Something like this. It looks better. And
I'm actually going to scale all of these and move
it closer to the center. So it's not this gap here. So to do this, I'm going
to choose wireframe. I'm going to select
all of these, these faces and g, y, sorry, something like this. I can go back to Solid mode. And I think it looks
really, really great now. I'm happy with this. So we're going to apply the
mirror modifier. Now. Here you go. You say, well this one,
now it's desert one. I think it looks really great. So now look at
what we have here. It looks really, really decent. And now here we're going to
actually add the tripod. So it's not that hard. I'm going to show you a
few different tricks. So make sure to stay to
save your project actually, to rename the thing. So I'm going to rename
this really fast. Now in the next
video, we're going to do the tripod, as I said, would be, you will be
set from the side, from this face right here. So we're going to
create a cylinder here. You can think about
how you will do it. You can just try it on your
own or simply stay tuned to the next video because now
it kind of see it in action. To save it. See you there.
8. The tripod: So let's continue with a tripod. And to do that, we're going to start by adding a cylinder. But first let me clarify that. When we added those, when I added this
cylinder and this one, I didn't decrease the
vertices to 12th. If that's happened
to you as well. Don't worry about that too. Not really a problem where I'm going to tell you
how to fix that later. Okay? So let's add
the image here. N cylinder. Makes sure that it's
inside a little bit. Something like this.
Okay, that works. And now I'm going to
create another one. Make sure that you are
in object mode cylinder. We have this one here. I'm going to move it downwards. Will fit inside this one. Something like this. We can do here though, is go to Edit Mode and
symbolically this face. Select those edges and really hundreds of times
during this tutorial, I'm going to press S
and scale it until it fits this cylinder right
here. Something like this. Then just scale it, extruded along these axes,
something like this. Perfect. Now I'm going to just make
it a little bit bigger. So happy, smaller here. It looks perfect to me. So I'm gonna kinda repeat the
same process really fast. I'm going to add another
cylinder, G and Z. We could actually use
the same technique as before to create, to duplicate this little pen
and separate the selection. But since it doesn't have
to be really precise here, we're going to
keep it like this, so scaly that
something like this. And then as we did
with the cylinder, the cylinder here,
we're going to delete this face like this loop, E, S. Scale it until
it fits something. It is really close. You can see how close it is by looking at
the orange line. Once it disappears,
it means that it already inside this cylinder. So make sure that it's not
inside, something like this. Then you can press Shift
and scale it down. So extrude down, sorry, e then that something like this. You can see what we did. Perfect. Looks great. I'm going to move this phase
will be just this face. See that it looks great. A little bit more. Something
like this looks great to me. We didn't use the 12th
vertices here either. But as I said, I'm gonna do is I'm
going to fix this later. But that's mainly because
it's very easy to work with this kind of cylinders because we are only
extruding them in and out, in and out and make
it and moving them. But if you have to do something more complex like we did here, it's better to work
with less basis. So shift a cube. Make sure that these ones with the front view is actually
inside this one as well. So they fit really nicely. Here. What we're gonna do is I'm gonna make a little bit bigger. So scale it up. I'm going to move
it down. Or it will be something like this. And what, we're going
to create the legs, the three legs of the tripod. So we're going to add
another cylinder. This time we're going to
simply use the 12th phase one. Make the shape, make
a long actually. You look at it from far away. So you have a decent view of
the telescope. As you see. I created the cylinder
in edit mode. So now those two
objects are the same. So I'm going to
tell you how to fix this if that happens to you. Because now we could
actually delete, but we will lose the
part of the top. So I'm going to Control Z. Make sure to never
do this mistake. What are we going to
do is select the face of the cylinder and
press the letter L. And what we will do that
is select the link faces. So now we can press delete
faces and as you can see, it just remove the cylinder. And we are, again, we just divide that square. So that's a really cool tool. Make sure that you don't make this mistake because it
doesn't work all the time. But now that we're
in object mode, we're going to say cylinder. I'm going to do this really
fast now to scale it only on the x and y-axis with or
without making it longer. You can press scale
and then Shift Z. So S, then shift that. We can make it bigger or smaller without losing its length. So here we go a little bit more and we have to
get three of them. But as we did before, we can actually
duplicate things. So I'm gonna what I'm
gonna do is, first of all, for duplicating, I'm
going to rotate it. So let's select it. Then y. I'm going to just
do something real is more like 15 or even ten
degrees or white, then I'm going to move it here. It will be something like this. And now what we can do is
simply duplicate this Running, going to Columbia shifting. And I'm going to
press the letter X. So it moves. It stays in the same height. So I'm going to do one
and Shift D again, and I'm going to
create another one. We're going to place
it better than worry. But what we're gonna do now
is rotated along the z-axis. So we're going to type 120. So we're going to now place
it like it should be. And now we're going
to place this one. We're going to rotate it along the that actually is again, but this time to 4,240 degrees. So you will see now we
just have the relax. And they are all, they all have the same angle between them. And that
looks really great. We're going to fix this. And I did this because I just
simply divided by three. So three sig D is the
complete, a complete spin. So if we divide it by three, we will get three
equal divisions for each each leg of the tripod. We're going to finish this. So I'm gonna go to the top view. And then to the bottom view. You can press Control seven. Something like
this works for me. And here we have it. We finish it. The telescope. The thing is that I don't
know that I see it. It kinda looks this part
looks really big, I guess. So to fix this, I'm going
to make this longer. So I'm going to go
to object mode. I'm going to go to two, I'm going to select
these two pieces. Those to the glass than
blends in the telescope. And I'm going to go now to
edit mode with both selected. So now I can edit
at the same time. What I'm gonna do is in
wireframe all these faces. And I'm going to move them
along the x-axis a little bit. So you can see I'm making
it a little bit longer. I guess now it looks
a little bit better. And I'm going to scale it to make it a little bit smaller. So I'm going to select it. If I only select this
telescope, you'll see that. You've now I just
got to move it. Nothing would be in place, so I have to select everything. And I'm going to fix this here. I'm going to move it
along the x-axis. Make sure that it fits inside. Just very subtle change, but also now that
we've made it's more, I'm gonna make this
smaller as well. I'm going to actually place it, everything in there
a little bit closer. So the tripod is in the
middle of the telescope. So here we have it actually. Well, what are you gonna
do now is separate. Make sure that we have
everything separated. Well, we want to just check everything in all the names here really fast.
Let me change them. Okay? So everything is clear now. We can press Control S
to save our project. If you want to fix anything
else, feel free to do it. If you wanted to
change something. I actually wanted
to change these. I'm going to add to
control our fear a loop. I'm going to place
it in the middle. And I'm going to make sure that these are in the same place. So you'll have to scale
them on the y-axis. So as y zero, you can see that now they
are both in the same place. And I'm going to add it really
small, simple bevel here. I'm going to select these
control V. Something like this. Perfect, looks great. Now, in the next video, we're going to apply
some modifiers to the telescope to make it look
much better and smoother. So stay there because it
will be a quick video, but really, really
powerful and interesting. So see you there.
9. Applying modifiers: Here we go. We found
our telescope here. And as I said, now we have to add
some modifiers to it. So to do that, we're
going to have to add a modifier to every single, every single object here. So e.g. we're going to
start with the telescope. Click here to add modifier,
subdivision surface. And you're going to see the
difference that it makes. And at the beginning
it may result really. It can look very deceiving,
but don't worry, because it's really easy to
fix n looks much better. So let's click
subdivision surface here. And as I said, just look what it does and it kinda looks bad. But what we're gonna do is increase the levels
viewport to two. And we're gonna go
to object mode and right-click it and shade smooth. Now, see, and check how
better, much better looks. But it still doesn't. It has lost its shape. So to fix that, we're going
to press here on cage. And what we're going
to start doing is we're going to start adding what we call
here proximity goods. So that's, those are
basically loops look at. So as we did before,
control are. But check what this does now. If I add a look here, can you see what it does, e.g. if we look here, can you see what he's doing? So what I'm going to
start doing is adding loops near the edges
that we had before. So here we had an edge. So I'm going to add a loop here. And you can see
that what it does, you can play around with this. You can actually hear and push this one towards
something like this. I'm going to add
another one here. Another one in the
middle to move. This one closer to here. Don't go really,
really close because then it makes a really,
really sharp edge. So something like this
should work here as well. And now what we're
gonna do as well is select a look here. And we're going to
press the letter N and increase the
mean, the main Chris. So if you move it, you can see what it's doing. It increases the sharpness. And sometimes you got it. Come on, really great. I'm going to increase
it a little bit here. Three, it works a little
bit here as well. What I'm gonna do as
well is another look at, you can try sometimes. As you can see, if
you go very hard, it creates this sort of shapes, which it's not what we want. But what I'm gonna do is
I'm gonna look at here. If I can put it
here in a second. Sometimes here. And I'm going to pull it
towards the x-axis, so g, x. And you see what I've done here, it looks much
better, looks real, it looks like this piece. This lens here is
fitting inside this. So to do that, I'm
gonna do this one here. So I'm going to add it, look at, look at here. And as you can see,
it kinda looks bad, but if we move it
up on the x-axis, we can make it look much better. So as you can see, look at this, really
looks really great. And I'm going to increase
the main course here. So take a look at
this part here. You can see how it gets closer and something like this looks really, really
great, Great. So yeah, I'm gonna
keep doing this for all the telescope
and I'm going to stop with you if there's
something important. And as you can see here, it really looks like this part. It's fitting inside here and
it has some movement on it. So make sure to play
around with it. Play around with it because it really will create
some nice shapes. So now what we're
gonna do is add another subdivision surface
modifier to this piece here. We could actually click here, but we can just click it on
object mode and press control to control to add a division surface modifier
and see what this has done. We really wanted to fix that. So let's shade this mode. To look better,
activate the cage, go into edit mode and start
adding some loops. And what? Sometimes we will have actually to move it
a little bit down because you can
see that it's not really inside, like
it was before. So what I'm gonna
do is select all of these G and pull it in again. So now it's in because
sometimes it kind of makes the shape a little bit shorter depending on
where you add the loop. So, yeah, make sure that we turn on
Shade Smooth for each object. Let's see if it looks right. Really. At least one looks
really around. I'm going to look at here. Now it looks much better. This just one more. Okay? So what we're gonna do now is add a control
to the glass. And you can see that
these extremely smooth, we can add a shade smooth. And that's, looks,
That looks amazing. You can see that the gap is
or will be noticeable here. So we're going to scale both of these objects a
little bit perfect. So we're going to
do this again here, control to shade, smooth. The glass doesn't need
any type of changes, any type of look at. Just going to scale it a little beat up so
it fits inside. Okay, perfect. I'm going to do is actually go to Edit mode
without the cage. Now, what I'm gonna
do is look at here. I'm going to Pull it just a
little bit on the x-axis. As well as all of those. I couldn't actually
select this loop with odd because we did some control loops here that
modified this geometry. And now we can then
select the full circle, but it's not much of a deal. So yeah, now it's hitting, it works really great. This one. We're going to just go there. Remember to press Alt
and middle mouse button to center the view here. And see you after I'm done. Let's square that.
There wasn't a button. It actually disappeared
because of the modifier. But remember that we just
only have to look at here Control R. And here we go. We recovered. But I like
how it looked like this. So I'm going to
leave it like this. In this case though, since we added a
lot of geometry, we're going to just click on Control one and shade smooth. And we can see that
it still looks, looks really great with
just one geometry. That happens with this one, with this one, this one. And we didn't want, they
don't really need that much of a subdivision modifier. You can see that this phase,
though, doesn't look great. So we're going to
try to fix this. So it looks great. But just to fix this, we're going to go and
press this button here. These activate the modifier and then we're going to
press to shake flat. And we have, we now have the same fuel that we had
before. The same object. So we're going to delete
this face because that's causing some trouble. And we're going
to extrude scale. And we're going to
Control F rakefile. And that will actually, when we turn that
subdivision surface again, you can see **** mode. It looks much, much better. So make sure that the
Indiana of some of the circle cylinders you have, you don't have a flat face. Instead you can add a grid fill in and it will look
much, much better. So let's keep the
same career going on. Hold on our faces. And since we have the
mirror modifier here, light, it, does the
job on both sides. Perfect. We can, since we
have this geometry here, I'm going to actually make
a little bit of a curve. With this, let's select
the middle fishes. Breast Bo, Ji, Movie Talk
a little bit, the y-axis. So it creates this
kind of slope. It has actually created a
really much motor shape. I didn't grow up
goods at the end. The most important thing, we're going to add that
actually one here and see how much it affects. So another one here, same here. Let's just add a little
bit of main three sphere, two books, a little bit sharper. Same here. You can
actually create these if you feel like
it doesn't really look so smooth. So
we're going to do that. But it's a really subtle change. Here. We have it.
Nice piece of metal. So the last thing
are those here? Let me show you
first the lack ones, because those we already
know how to deal with. And you will see that
it destroys the leg. But look at this. So it just does simple
as adding more loops. So just, we need two of them. So make sure to put your
mouse in the middle, in the center of the length of the cylinder and
then pull the top. Same here. You can see, make sure to share it
moves everything. So yeah. And if you want to move, you look at you could actually
delete it by pressing, delete these off edges. But you can also double tap G. And you can see that it
snaps inside of the object. You can move it. So here we go. I'm going to add another one
here just to make it look. Just fix these kind
of issue here. Another one here, here as well. So let's just finish this. So we are done with
the modifiers. Just make sure to
save your project. And we're going to
select everything and Shade Smooth just in case
we forgot something. You haven't seen it. We're going to actually go there and go mad cap and
turn on cavity. And see that if we go there
and you can select something, anything you like,
you'll be able to see it much the way over to see
much better your projects. So look at how nice the
edges are developed, how smooth everything is
C. So in the next episode, we're going to start
here at the shading tab. And we're going to see some other concepts like the camera. The light's going to work with the environment,
the material. So make sure to stay focused
because now it comes.
10. Camera basics: So now that we've finished
or model or a telescope, we will jump to the shading tab. This will be a short video, but we will see
the basics of it. So here you can see that
we have a new interface. And it's not really
good for editing. I mean, the tools still
work if we press G moves, there are still the
axis or g and x, but I don't really recommend using these to edit or model. So what we're gonna
do is activate the camera and jump back
to the modeling tool tab. So here, That's your camera. And if we go to object mode, we can select it again. And if we press zero
on your numpad, you'll see that this frame
is what the camera sees. Everything that's outside,
the camera doesn't see that. So if we press F2, That's how our final
render will look like. And it doesn't fit everything, every part of the telescope. So we're going to
have to change that. And to do this, we're
going to go to, we're going to press N.
We're going to go to bill. We're going to click
camera to Bill. Bill lock camera tubule. So now if we e.g. go fear and press F2, the render will look
like this because we are zooming in in this
part of the telescope. So first, what do we want to do is find a real cool angle. It's cool, but I don't really like the telescope being flat. So I'm going to turn that
off. I'm going to move. And what I'm gonna
do is first of all, I'm going to select everything
here and I'm going to press M and new collection. So let's name it Telescope. And that's the group. So now every part of the telescope is grouped
in a single layer. So e.g. if I turn off this layer here, you can see that it
contains every part, every single part of the
telescope hula similar object. And we can hide it instead of hiding every part 11 by one. So now I'm going to
duplicate this fear. So I mean, we're going
to select it here, Shift D, and we're going to
move it along the x-axis. So now both telescopes are in the same collection and
we don't want this. So I'm going to just create a new collection out
of this, so sorry m. And we're going to
create telescope. To now. You can see that we have this telescope
and this telescope. So that's the original one. And we don't want to mess around with it because
now it's really good. So what we're gonna
do is with this one, the telescope do is
it's like a copy. So it doesn't matter
if we screw up and mess our project because
everything will be saved to Q. So what we're gonna
do is actually rotated a little bit
along the y-axis. So RY, something like this. I think it looks much, much better when I go to front view and
I'm going to move. It's like right there. So I'm going to walk
through from you. Something like this. It looks great, a
little bit closer here. So now you can see that if
we go back to the camera, click camera to bill for zero, and we're going to move
to that telescope. We're going to use this
telescope to render. So I'm going to just maybe that will be
a better angle here. So we're going to press F2. And you can see that now it looks much better since
it's, it has an angle. It looks much more realistic. So I'm going to turn
that off camera to view. So we set our camera there. If you don't want this telescope
to rendering the image. Because if we go
here and if we e.g. just when this bill, when we press F2, we're going
to see that in the back, that part of the telescope,
and we don't want this. So what we can do
is simply go there. This telescope,
and if we hide it, it doesn't work either. It will still show up.
That's because we have to go here and press this
disabled in renders. Click. And now we have another option. Hide it, and we can hide
it from the random. So if we click here, now it's greater than, so. It doesn't appear okay? That's really, really
useful and you can do this for every single part. So e.g. we didn't
want the telescope, the finder scope, sorry. We could just go there
and disabled that. E.g. you can see that if
we hide this as well, Mt. Now we have a telescope
without, without finder scope. So let me turn this
back on to really, really useful thing to know. So just have that in mind. I'm going to set the camera again to that view and
we will be better. Something like this. And don't worry about it.
We will fix everything, the lighting, the colors, and it will look much better. So I know that was
a short video, but it's important to know
how the camera works, how to set it up correctly. So here we go. In the next video, we will, we will actually start working on the
materials and that will be really different video because it's much
more technical, but just feel free to
watch it with Kalman. Don't get stressed, okay, so see you there and
show your modeling.
11. Adding materials: Let's keep going with the materials and the
first thing that we're going to do is
collapse this menu. So we're going to place the mouse between
these two windows. And when this line,
this arrow appears, we're going to
right-click join areas. And I'm going to place
this arrow like this. We're going to do the same here. We don't need these
menus right now. So let's start by creating
an environment texture. So we're gonna go here to
object and then world. And we're actually going
to go to this Render tab. And as you see, that's
what the camera sees. Really similar view. So the first thing
that we're gonna do is press Shift a
or add right here. And here we don't have the
meshes like the cube cylinder. We have another type of things
which are called nodes. So we're going to type in search here and write
environment texture. And we're going to click it. And now we're going to
place it right here. We're going to join these two colors and
see what happens. To fix this problem,
we have to add a HDRI. So to do this, we're
going to click on Open and search for NHGRI. I have one here, so I'm going to open it and see. My HDRI is this one. You can see I've used one that had some stars with a nice background on
Slack, nice landscape. I'm going to show you a picture
of how it is right here. And you'll have to dull. And now we can see
if you press F2, it looks much, much better. But it's still look
really, really plane. So the first thing that we're going to do
is actually hide it. So we're going to go to the Render Settings
here, which the scammer. And we're gonna go to Fill. I'm going to hit
here transparent. So now we don't have
the background. And we're going to make sure that we are in
the render engine. So make sure that you are here. And let's just start out
by adding materials. Now that we have a
great life thing. And we can actually change
the string for the moment. We're going to leave
it at zero but on one. But we might change it later. So we're going to start
by clicking anywhere. We're going to start by this. And if we go now to object, we can click on New. And that will bring
us a material. And hearing the best color. We can actually change
it or material color, which is really cool because we can do that
with every single piece. But as you can see, we might not want this piece, all of this to be
the same color. So we're going to
have to change that. We'll do that later. So let's just create
a decent color. I'm going to, you can make it dark, darker but decreasing. In this point here, we could go down,
makes it darker. If you've got your app, it makes it more clear. So I'm gonna, yeah. So now here we have different options that will
change the properties, properties of this material. Most of them won't
be really useful. So we're just going
to use metallic. You can see that if we
do oh, really high, it looks like a
metallic cylinder. We're just going to turn
off something like this. I think it looks great. Then we're going to
decrease the specular. You can see that
as you turn it up, it kinda makes it shinier. So we're going to
decrease it or little be something like this. And the roughness is the amount of light
that it reflects. So if you go up, it doesn't reflect any light. If you hold down.
You can see that. You can even see the
background right here. So we're just going
to turn it up. I guess 0.5. What great looks, right, so what we're gonna do is
create another material here. We're going to create
a metal right now. So here we're just going to go with a much lighter
color, something like this. We're going to do it buried metallic, something like this. You can play around
with this a little bit. We can actually go to
here material preview. That way we can see
it much better. We will decrease the roughness. See what we're
getting right here. Maybe not that match,
something like this. You can see how
great that looks. So e.g. I want to do this, mount the same
material as this one. So we're going to click it. And instead of creating
a new material, we're going to select
this arrow here, implicit the second
material that we created. So you can see that now it has the same material as this here. I'm going to change
the name to metal. And I'm going to change
his name to blue. So we can make these things
a little bit easier. So now you can just find
every metal piece on your, on your telescope and apply
them in the metal material. So this one maybe
this one as well. Yeah. Maybe the legs will
save maybe. So. I like this piece, this part of the
meal to be metal, but you can see they change it. It will turn all the telescope. So notice that we have to
change it on the modeling tab. So let's get there. What are you going to do is
actually go into edit mode, select this object,
go into edit mode. And we're going to select
this loop by left clicking. And what are you
going to, sorry. We're going to simply
called control plus. And you can see that we've
selected all this look here. This cylinder that goes
between these and the fear. So make sure that you start
by the middle and you'll go to the outside parts of it. So now when we have it selected, you can now also
selected one only or select each loop like this. And then this one, and then this one. Okay? Whatever you want. I just prefer to do it
by pressing Control plus when we have it selected the part that
we want to change it, we can just press the letter P, but separate and then
press selection. So now when we go
back to shading, you can see that that's
a different object and we can apply the material. So now you can see that we
have another part here. So let's create
another material. And I'd like to change this part here to
some sort of black. So we're going to go to modeling again. We're going
to do the same. So I'm going to select
the loop here. Sorry. I'm going to press Control plus. And I'm gonna, I'm gonna
do this one more time. But I see that I've selected as well this edge on
the top right here. And I don't want this, so
I'm going to get rid of it by clicking on it. Like if I wanted to,
if I was to select it, but this time it
will deselect it. So both left-click. Well, let's do that
again because I pressed, I didn't press on the edge here. So just like this, nice. See how now we just
select that path. So I'm going to press P
separately selection. Now when we go to shading,
It's another object. So at that time I'm
going to create an own new material
until it does. We're going to press
here new material. And you can see that
the same because it has duplicated the blue,
because there are two. Now, I'm going to make
some gray or black, so it's going to make it darker. Like this. Looks great. I want to make it a little
bit something like this, and I actually will make
them a little bit darker. Something like this. I think that looks really
great and then Join now. So let's change
this part as well. So let's go to modeling. Let's separate this part again. So this front row, it's everything selected yet. Be separate based
selection, shaving. And let's apply
this material here. The gray one. I'm going to
make this gray as well. This book. Yeah. You can just be free and choose
whatever color you want. I'm going to separate
these again. So like this. What are you going to extend
the selection? Here we go. I'm gonna apply blue
here and gray here. Yeah, like how it looks. Don't worry because
we will fix it, make it look more realistic. We will add it kind of like
a grain texture to it. So it looks much better. But first we're going
to do the basic, the basic coloring and material. I'm going to select this. Until this. I'm going to
just go with the wireframe. I'm going to select
all of these basis. Yeah, I'm going to expand
the selection like this. If you press Control
plus too much, you can decrease the selection
by pressing Control minus. So something like this. Selection. Here we go. So if you want to apply the metal to all of the three at the same
time we have you can select them, all of them. But make sure that
the last one that you select is another object with the metal that
you want to play. So if you buy one, then those
two the legs to be metal. I'm going to select
the last word on this piece of object,
this piece of cylinder. And you can see a
different color. We got because it's the last because it's the last object
that has been selected. So what I'm gonna
do is now press Control L and click
on materials. So you can see that the thrill x have adopted the same material as the last object Right-click. And that's really,
really useful. That looks right. Kinda want
it a little bit more darker. Something like this. And then I'm going
to make the gray will be darker as well. Maybe. There is another color
that looks right. Nice. I like it this way. Wondering crystal,
there'll be peace. Maybe a little bit
more metallic. Yeah. I'm okay with that. So now you can see that
the only thing that we that we have to add the material on is are the glasses, the
pieces of glass. So you want to create
a new material. So with to create
the glass texture, we're going to first of all, increase the transmission
to the maximum. We're going to decrease. Everything of these
will increase while actually decrease
the roughness. You can see now that
it kinda looks well. These ones here, these are the ones that we
are working with. We can see that it kinda
looks more like glass. But when we can do to
make it look even better. Well, first of all, let's make all of them the same material. So remember what we did before. The last one, select it has to be the one
with the material. So this one. So then those three that are selected in red will be the same material as
the one that's in orange. So Control L materials. Now, we created a glass texture. To make it look even better. We're going to go into the render settings and press skins, screen
space reflections. We're going to open this up
and we press refraction. And we're going to turn
off half restaurants. And we've kind of got a
better looking glass on. What we can also do is
go back to modelling. Because now it's really flat. So we're going to
go to object mode. And we're going to apply
a solidify modifier. You can see now it's
not really noticeable, but just take a closer
look how it changes. And it makes it more rounder. So we're gonna do
this with everyone. Solid defy, you can actually change how much you want to get, how much thickness you want
to get so we can increase it. You can decrease it. I'm going
to just leave it at 0001. So we're going to
go back to shading. You can see that now
it looks much better. So if we go back here to
render, look at that. Look at Dan masterpiece. It looks much,
much, much better. Here we go, you can see
how the class looks. But another important
thing they wanted to do, as I said before, is at some
sort of grainy texture here. So we're going to
do that. So let's select this material
to blue one. And what we're gonna do is add some notes here that will
modify the material. So first of all, I'm going to turn Walter
Cannon right away. So what we're gonna do
is we're going to do is, so this part is kinda hard and you don't really
have to understand it. If you want, you can
leave it like this. But if you want to follow along, I'm going to show you how
to create a grainy texture. So just come with
me and go Shift a. You cannot search here. Bumped modifier. I'm sorry. So also color ramp. Here is just going to try
to keep this organized. We're going to create
a texture here. So Tuesday, wave texture. We're going to do another one. Mapping. Now we're going to add also a noise
texture and a mix here. Node next shadow
just mix makes RGB, sorry, and finally, a
texture coordinate. Now what we have to connect
everything together. So go to object to
the vector here. Object to the color
two and factor, the factor like this. Then let's just go
color with vector here. This vector to the other
vector, like this. So let's just make a
little bit of space here. Let's connect the
color to the factor. The other color to decay. Right here. At least normal, we want to connect
it to other normal. Hear you, you will see
that it has to load a little bit and see what we've created
doesn't look really great. So we're just going to change a little
bit to settings here. First of all, we're going
to decrease the strength, something like this because
let's make it less evidence. So whereas accuracy, Let's see. So something like this. Yeah. Maybe we can
just play along with the scale on
something like this. Increase the detail,
detail scale well, this little bit of retouching
fear, detailed roughness. So if you go back a little bit, just see how much
better it looks. We don't really have to change
anything of this actually. Maybe we go clamped. See that we get some sort of shapes here that
might look good. But don't take it
off for the moment. We want to as well. The color here. Just see if you
like how it looks. So those are the properties
of the noise texture. We can go to the material
preview, preview again. So if we want to add this again
to these other materials, I want to add this again
to the gray material. So I'm gonna just go up to here. I'm going to copy all
of this with Control C. I'm going to go there
to the gray material. Make sure during the
gray one, Control B. Let's just all of these connect
these normal, the normal. Yet you can see that now the gray material also has this texture,
everything of it. So if we go back
to the Render tab, you can check the result. Just press F2, and it
looks really good. But don't worry if it
doesn't look really good because we will make it better. So let's just say that.
12. Lighting and rendering: First of all, what we're
gonna do is change this background and
add a solid color. And to do this, we're
going to go toward, and we're going to play
out in some of the notes. So first of all, we're going to a mix
shader. Here we go. Sorry. Not this one. Mix shader here. And we're going to add it between the background
and the world output. Just like this. We're going
to duplicate this background. Now we're going
to add this color background to the shader. We're going to also
add a light path. So right here, I'm going to
make this a little bit weird. So you can see we want to add is camera array
to the factor. And we're going to add
just to mark mapping. You'll see what that does
after a texture coordinate. We're going to just more of
a generator to the vector. One here, two here,
and we're done. So what we're gonna do
this now is decreased this try not to zero, something, 0.5, maybe
this one as well. So we're going to press F2. You're going to see that
now it's transparent. But still because we have
these transparent activated, but if we remove it, you can see that now we have
a background color. So if we want to change it, we have to go here. It's hard to see, but
there's a color wheel. So we compress it.
And we're going to something like this. Maybe. That looks better. But we can also do is
selecting and moving the HDRI. So now you can see that if we go there and play
with the rotation, you can see how it
affects the glass. So let's just go
again to the object. So I was taking a closer look to the glass and whether we
can do to make it look even better is actually
decrease the roughness. Just like this.
And we're going to decrease this one as well. Now it looks much better. So the final thing
that we can do to make the scene look perfect, and it's probably the
most important thing here is add some lights. So you can see now that
it looks really flat. So what we can do is turn on the light that we had before. You even sit here.
And we're going to go to the light properties. This green icon right here. We're going to go to sun. And you can see that now we have light coming
in into our scene. But it's very strong. So we're going to decrease the strength to
something around 20. And if we press F2, now, you can see the difference
that this makes. We can actually make it even
better by adding more light. We can do this by
pressing Shift. And we're actually gonna
go to w by passing seven. And we're going to move them. We're going to just three with them in some sort like
a triangle shape. And we're going to first
hide this one. And this one. So we can work better
with just this light. We're going to rotate it because that's what makes the most
impact to the final render. So we're going to click
zero on our number. That way we can see how it
looks on the final render. So let's try rotating it a
little bit more. We can. Search. Nice angle. I'm liking this position here. We can actually decrease or elevate the string
because you know, it's a little bit too high, so I'm gonna go nine. But that really depends on
your size of your telescopes. So we can see that nine
is still too much. But let's just go lower. And we're going to go here. And we're going to disable the other lights just to see it. How this one looks.
Yeah, that's great. So we're going to now play
around with the other light. So this one here, we're going to go back to
the camera view by pressing zero and our num, num bet. So now we're going to just
rotate this one a little bit. Maybe something like
this and running decreased strength to something like ten, even less. Maybe five or six. I'm pressing Shift. Well, maybe it's a little
bit too high. You can sit here really bright. So I'm gonna go down to three. I'm going to change the color, maybe to something like a light blue,
something like this. You can see, I really
liked this much better. And finally, we're going to just play around with
the third light. So we're going to select it. One right here. We're going to walk
through our camera and we're going to
rotate this one. Yeah, I like this one,
so I'm going to decrease the strength and maybe use a green light or
maybe yellowish. Yeah. It's kinda layout.
Yellowish worked for me. So I'm going to press F
12 now, see if I like it. It looks really good. So what I'm gonna do
now is we can actually, if we like this photo, we can actually go there, press Image, Save, and we can
save it to somewhere else. So you can do that. I'm going to save it. Because now what I'm gonna do is I'm going to change
the camera angle. So I'm gonna go
back to modelling. I'm going to press zero. Make sure that the view, we have the camera here. So now the camera is
locked to our view. So if we now just change
the camera angle, we will see that in the render, it will look just like this. So maybe now I press F2 here. You can see how great it looks. I'm going to disabled
this telescope one here. So make sure that you
have this on and you can turn this telescope off. So now it shouldn't show
in the renders like that. And it looks really great. I'm going to make maybe go a little bit higher.
Something like this. You can see that
it looks amazing. But what I don't like is
this part of the background. I would like to
just see the sky. So what I can do is
go back to shading. And in the world properties. As I said here before, we added this mapping. So it can help us
rotate the background. So if you see, we can
actually play around. And I'm rotating it
around the y-axis. And you can see that. Now,
I don't see it anymore. So if I've got F 12, I just see some stars
here. Looks really great. We can actually now decreased strength here if we need to. Something like maybe
this so better. Well, I prefer like
it was before. You can make them brighter. But let's just stay like before. So while they don't like now, that part here that you
can see, it's really dark. This part of the metal
as well as these. So we're going to
move the lighting. We're going to move
the slide here, or maybe this one. This one we're
going to rotate it. So it makes this part
of the image, right? So. You can see that now we're getting a much decent look here. That still looks
too bright for me. So we can just play a little bit with the
strength of the light. And it looks really
great right now. We can also try to go
to the materials again. So object. And you can try
to unplug these normal. You may like this
smooth, look better. I prefer it with the normal. But now we can do one thing more to make
it look even better. Because if you see right
now, this looks really, really flat because there's not really much shading on this. And that's because we
are on the EB and gene. We can switch to cycles, which makes it look
much more realistic. But it comes at a price. The thing is that cycles
is much more slower because it has to work with more stuff just like lighting. And you'll see that
if we present cycles. First of all,
you're going to see that it's really much lower. See that here. It's, it has
to sample the information. But we can also go here. We can turn the GPU, GPU compute just
to make it faster. And we're going to
turn denoising on. So in the render. So now when we impressive 12th, we will notice that
it's much slower, but the quality will
be much, much better. So let me show you what I mean. So take a look at that. You can see that now it
looks much, much better. I'm gonna save this again. And we can play a little bit
tomorrow with this material. We go to material preview. So I'm happy with this now. And another thing
that we can fix is that I'm not sure if you'll
be able to see that. But there are some lines
here, very sharp lines. And we can actually
fix that by going to the modeling tab and make sure that we don't
affect the camera. So just click on the sphere so we can move
without affecting the camera. What we're gonna do is
actually go here to the modifier and increase
the render levels. So we're going to
just go out one more and you'll see how now
will have disappeared. And you can, we have it
really much smoother? And we can also fix
this part right here. So we can place on the rim. We also get this really
cool effect here. But if you are not
happy with that, you can simply move it. There'll be downward. But I like it this
way. I'm going to save this image as well. So that is our model. We
just finished it right now. And DSPD was the last one of
our modelling and shading. Now we just apply the
final recap that will be really useful because
although the commands and tools, any useful information
will be there. But I can understand as well. During the end, it was kinda hard because we
were working with the materials and the knowledge and all these
slides and cameras. But it's just a matter of practice and you'll
get good colleges. You have to keep trying and
seeing different models and examples was an honor for
me to teach you this class. I'm just very glad that you are still here and listening to me. So I'm gonna see you
that at the recap.
13. Outro/Recap!: So that's our model. It turned
out really, really great. I'm really happy about this. Just very high-quality. I really like how the materials fit together on the colors. You can just feel free to
change anything you want. The materials to call us, the lighting, the camera angle. You can add new things to it, or just, you can create
completely different objects. Just feel free to
try new things. Theorem blender. It just really,
really creative program. You can just do anything new on. I'm going to show
you some examples of other models that you
can create your own screen. But just know that you
know the basics of it. I'm going to show you as well all the comments and
tools that we learned. And just feel free to
try out new things. Don't worry if you
make mistakes. You're going to fix them easily. You can search in Internet. There's a lot, a
lot of information. There is a very big and very
nice community out there. So make use of that. I'm sure that you'll have a lot of great experiences here. And once you get the hang of it, it becomes a really,
really, really nice copy. And you can just keep pushing and pushing and
develop new things. Because now we're just on top of the iceberg and
there's a lot, a lot more to discover. I mean, I've covered
a lot of hours in this program and I'm still
learning new things every day. So don't lose hope
if you are tired, just take a break but
leave this problem. Just keep calm because
you'll see that it has so much potential. And I really, really
encourage you to stay there for foods
and keep creating, exploring, whatever
you want to do it. Oh darn blender, just to try and build the final
results are always, always really, really
amazing, if you will, one, to step it out a little bit
further, you can swell, take these and export it to
game engine seed on a game. And you mentioned there are
plenty, plenty of options. So before leaving
and we just want to wish you very good luck. You have joined the world of 3D modeling and it's a
really, really cool place. I'm going to say again, sorry for my English. I know it's not the best. I tried my best to make it as easy for you
to understand it. I appreciate you staying to
this last minute of class, so really, really happy about
that means a lot to me. So again, I wish you good luck, and I hope that you have a
great modelling experience.
 Auripher ∞, Creator