Transcripts
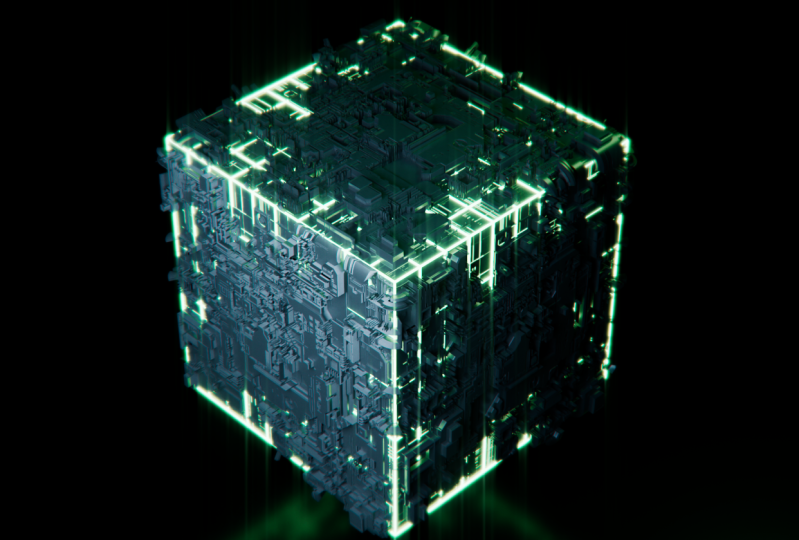
1. Create a Greeble Cube in C4D + Redshift Displacement (Beginner Friendly Project): Dear Kurt, from a full-time teaching instructor and trainer, you might've seen
some of my YouTube ad effective Tron or maybe you've seen me teaching over on
CG shortcuts.com as well. I love teaching and creating and I've created this
group of course, because one, I love
peoples and the whole cyber punk aesthetic too. It's one of those
designs that I used to look at when I was starting
my 3D journey and be like, man, one day I want to
be able to make this. Well, it turns out they're actually not that hard to make. They look difficult to craft and they're very
impressive looking. But in reality they actually
are very simple once you know what tools to use and that's what
this course is for. I will equip you with
the tools you need to create a music
greebles of your own, as well as step-by-step
instructions and resources to follow along. The first half of the course is about creating the
table design and then using native C4D to
create the Greenville. We'll cover how to make them and troubleshoot some common
issues that you may face. The second half of the course
is for my Redshift users out there will use
ours displacement and tessellation to create even better and more
detailed greebles will also go step-by-step
through creating the materials and lighting
setup to create the scene. We'll also cover
rendering and post effects as well as some
camera tips and tricks. Even if you don't have Redshift, I encourage you to at least skim through the
redshift lessons just to kind of see how much better redshift handles
this kind of thing. But the end of the
course, you'll have a scene that you
can drag and drop your own Google
Maps into an easily create your very own
unique greed will render. All right, let's get started.
2. Setting Up A Default Layout For Your Workflow: For C, we are instead
of Cinema 4D or 25. First thing we want to do is set up our render
settings and stuff. Because every time you
open up Cinema 4D, you can see that it's
set to the default of standard and 720 p and
all these settings. And we pretty much
have to go in here and change this every time. I'm gonna show you
how to set up a scene with Redshift and then how to save all this as a preset that way when we come back
and open up Cinema 4D, next time we won't have to
touch any of this stuff again. So firstly, let's go up here to this little gear on
the clipboard here, IT control B to open up
the Render Settings. Appear in the top
left we have render here we want to choose redshift. Now for my non-written
diffusers, like I mentioned
earlier, this course is not redshift exclusive. So if you're not
a re-shift user, these changes and
things will still apply to you as far as saving, you're seen as a default, but we'll just use
the standard of physical render or octane
wherever you want. Set up your render settings
to where you want it. I'm gonna walk through
Redshift for this bit. But then we're gonna go
through and show you how to save this as a default. Seeing this case, you
need it from a retrofit. Users go ahead and
choose redshift. Firstly, we want to set
up our output settings because beyond just
our render settings, It's also going to save as our default settings for
whatever file we want to output. So if there's a certain
type of file or image size, do you output out the most? Go ahead and set that up and save that because that's just gonna be one less thing you have to set up every new time. Once that set, we
can go ahead and go down to the orange
shift option here. You can see here
we have a couple. They've simplified
this so we have a basic tab and an advanced tip. Now, instead of the basic tab, we have Bucher quality. So bucket quality is going
to be your bucket rendering. And so these are just
presets that set a value for your bucket
quality threshold. Changes in this slide
set up and we're gonna go ahead and
just say the book of quality of low for this, because we're actually
going to be using the denoise or as well. This is a post effects smooth. It is applied at render time to try and fix
any noise or speckled. So we may have. Lastly, if you have an RTX card, you're definitely going
to want to choose hardware ray tracing
if available. If you don't have an RTX curb, sorry, just won't do anything. But if you do have an RTX card, this actually will speed up
your render is quite a bit. Go to the Advanced tab
real quick and there's a few things I want to
change a super-quick. I'm gonna go to a global illumination and
you want to make sure these are set to brute
force and brute force. And you don't have to do this. I often like to just
boost the raise up to at least 128 with the Automatic Sampling they were actually going to use
here is on by default, it should sit there for you, but I'd just like to be safe. Last thing in our Advanced
tab under the sampling Tim, go ahead and twirl
down this denoising and we're gonna make sure
optics is being used. If for some reason you have a scene that has a lot of detail and stuff and you seems like the denoise or is
blowing it out. The ALT is dual is slower, but a lot better
option for smoothing out your scene without
removing a lot of detail. But for the optics, we're
going to go ahead and take this deal is
called a down to 0. This is going to speed
up our render and actually make it so that we're not trying to smooth out
our scene while rendering. It's going to wait till
it renders to seem completely and then
smooth it out. But that's it. Now lastly, we could do
is if you wanted to do a multi-pass image or an ESR
looking multilayer image. You can set that stuff up. Like I said, we're not going into detail about this workflow. So I just like to
use a JPEG or PNG, and you just choose where
you want to save that file. Now that we have these
settings setup and we'll right-click down here
and say Save Preset. Double-click in here
to rename this. And we can rename this
fast Redshift noise. That way when we open this backup will have
this preset setup. And if you want to have
one that's set to medium, low or high, you can just
quickly click those. And if you have other settings
that you want in here, you can just save
those as a preset. And you won't have to
recreate those every time. We have our render
settings set up, whether it's redshift,
octane, whatever. Go ahead and create
those presets you want. So you have a default one that's gonna be loaded up
because we're going to disable this so that every time your prompts in
40 in the future, it's going to be
saved like this. Now this also applies to how you want to lay
out your scene. I always like to have
the material thing open, but it's way too big. We don't need it
to be that thing. Just going to slide
that back over. And so odd to have this
screen space here. And if you're using Redshift, you can open up the
render view if you want. I often like to have
it as a pop-out because I use it a
lot when teaching. But if you went to
lock it in somewhere, you can either sit in a
sudden monitor or something. But if you just grab
these three lines, you can place this in your
scene somewhere if you want. If you want to have
that built-in, you can have a designated
area to build that in. If you don't like
it, just click and undock it and puts it back
out to the pop-up window. You can set things where
you want them if you know you like to have these
tours somewhere else, go ahead and set that up. Because this is all
going to be saved in our layout and our
default scene. Besides render settings
and your layout, you can actually load in
actual objects in your scene. They will be loaded up at
the default start as well, such as a floor and some
lighting that I've added here. I'm just going to
add a floor and a redshift overhead light so that every time
I open up my scene, I don't have to add
those things in. So go ahead and add in
whatever it is very common for you to be at
a floor or a cyc wall, maybe a studio setup if
you want a dome light wherever you use most often and go ahead and
add those things in. This is just gonna be again, one less step you have to do. Every time you open up some 40. We're going to just
make sure that we have. I'm going to hit Control
D and your viewport, and that's going to open
up your project settings. We're gonna make
sure that we have the scale set to how we want it. And the frame is set
to how we wanted to. Well, make sure this stuff that matches your render
settings, you set up. One last thing that
I really like to do is I go in here to the View
and I go to Configure. I go to Safe Frames. I turn the opacity
of these renders safe frames all the way to black because sometimes the
light you don't notice, you don't notice them and you can put something up here and it's not going to show up in your render because it's
actually out of frame. I just go ahead and
crank that all the way up so that I do not get confused as to what is
actually going to be in my scene and the V is
visible in the render. Now that we have this
setup like this, I want to do is compute
a Window customization. And we're gonna go ahead
and say Save Layout as we can change this as
Redshift simple startup. Now they have this
saved. You can go to Window customization again and go ahead and say
Save as Startup Layout. And then one more time, go to customization and go down here and say Save as Default scene. Now if we go in here and
we go to new project, you'll see that our
scene is already open. Here in our new project,
we have a floor, we have a light,
we have a plane. Render settings are already
set up with redshifts. And in our settings
we have here. So now we are good to go and all we have to do
when we open up some 40 is start creating
and not to worry about changing those winner
settings every time. Again, this works with
octane physical render. All of this center
render, everything. If you have a standard
workflow that you use a lot, go ahead and set
this up that way every time you open up somebody, it's one less thing
you have to do. Awesome. So now they're all
in the same space. Let's go ahead and go to
the next lesson where we'll start creating our
global cube here.
3. Setting Up Our Cube: In this video, we're going to
create our cube instead it up for displacement
and go over that. All I need to do for that is we need to go ahead
and add our cubed. Just go ahead and click
this Add Cube object here. It's going
to add our cube. You can see it's going to splice it right here into the ground. So we need to go into
the Coordinates tab and raise that up about 220
centimeters in the y. And that's just
going to raise that up off the ground a little bit. Because what we're
going to want to do is we're going to
want our object be floating and we're gonna
rotate it towards us here. So what we want to
do is for the H, the rotation are excited to 48. Hit tab to go to the next one, hit 21 for the p tab and
negative 21 for the b. So now we have this
nice object where it's just facing a right at us and
we'll add a camera later. But this is the look
we're going for here. That's it for this video. Actually, we're just
going to go ahead and go over the displacement and finish setting up our cube for that in the next lesson.
4. What is Displacement?: In this lesson, we're going
to cover displacement. Displacement is, well
way of displacing geometry of an object based on a texture map or a noise map, often using grayscale
values where white means a displacement value of one and black means a
displacement value of 0. Everything in-between is
giving a relative value. But default, white values
are pushed away from the surface 100% of the
strength of the displacement. And the black values are left where they are
because they're getting 0% of the
strength of displacement. Easiest to understand visually. So let me just show
you what I mean. First, there are two ways to do displacement in Cinema
4D with Redshift. One way is to use a displacement
modifier for Cinema 4D. But you're not gonna
be able to get as much detail as the redshift
displacement can get, but you might still be able
to get a really cool effect. So keep that in mind. In order for displacement
to work correctly, there must be enough geometry on your object to actually
displace it accurately. Let's select our cube and
hold shift and click and hold this purple bend modifier and
go down to the displacer. Shift click and hold makes
this apply as the child of our selected cubes
so we don't have to drag it in right afterwards. Inside our displacer, let's
click the shading tab at twirl down this
arrow and select Noise. See it creates a black
and white map for us. We can do is we can
just change this noise to say total noise. You can see we have all these
white areas in black areas, but nothing is
happening on our cube. And that's because we don't
have any geometry for a cube. What we could do is we
can increase the sigma. So this, Let's go
ahead and change. This is 202020. You'll see it's displacing
stuff with that isn't at all look like our
texture map there. Because we're going to
need a lot more geometry. We can go to the display here, turn on the lines, and you
can see it's displacing. Whereas just got these points where our intersections
are reading because there's not
enough detail on this to actually displaced correctly. Let's just go ahead and add
more segments to work cube. Let's go ahead and just
add 0 to each axis, so it's two hundred and
two hundred or 200. Now we actually have a really
nice boxy displacement on our cube here. This demonstrates how the
more detail you want, the more geometry you need. Now I will say around or diagonal texture
maps or noise maps will require a lot more geometry in the basic quad
displacement maps. Now, some things can
need a ton of geometry. In our 25, it is
much better than the previous versions about handling high geometry
in the viewport. It used to really lock up your
computer almost instantly. But the issue is
you can still run into too much geometry
in your scene and it can really slow
down performance and cause some lag and
even crashes Still. But this isn't the case
with the redshifts method. And so that's why I will
say if you really wanted to make a lot of greebles stuff
with a lot of high detail. You're going to want to
definitely look into Redshift. So like I mentioned in the
intro video of this course, you do not have to have
redshift to follow along. For you Cinema 4D
standard render or physical render users. Or if you're using another
third-party software, there's still a way that I
will show you how to create the fund Google Maps and how
you can create your own, apply them in Cinema 4D. Using the Cinema 4D is
built-in displacer and still create some really cool,
amazing looking greebles. You can follow along now
I'm not gonna go into materials and lighting and post effects for those renders, but for the redshift
users out there, I will show you how to do that. And for your
non-registered users, I highly recommend
you watch the video on redshift displacement
so that you can see how much more detail on how much better and
faster redshift is since Cinema 4D display certain when
it comes to displacement. So no matter what render
engine you are using, you can follow along. In this next video,
we're going to make our agreeable maps.
5. Creating A Greeble Map: To create these really
cool green balls, you actually need a really
nice grip or texture map. Then there's an
amazing free to use software out there
called JS placement. There is a link to it
in the class notes. So go ahead and download that. And once that's installed, we can open that up. Click the little box grid
up here in the top-left, we have options of all types of greebles here
that we can choose from. So just take a second
and kind of click through those and see
that a lot of them are pretty cool and just
kinda understand how it's working in generating maps
and things like that. Now let's go ahead and create
what we want for our class. So let's choose
JS placement too. You can see here we've got
a classic set crap pack, big data, aromatics
and custom sprays. Now we definitely want
to use the crap PECC. It's awesome. It's just gonna
witchcraft in here. And it's really cool looking. You can see this is the
one that I would say avoid if you don't have redshift because there are a lot of around things and
diagonal lines. And this one, if you
don't want to use this, you can use something more
like the classic set, which has some diagonal lines, but in some round
things as well, this is more of a sci-fi look. Big data is what I
would recommend if you're using something
like Cinema 4D to do this. It's a lot of very
straight edges. There's no round bids and
it's still looks pretty cool. So let's go back to
our crept back here. What we can do is
we can actually adjust the settings here. And the first thing we want
to do is you want to go ahead and take this background brightness
and turn it down to 0. And that's just
going to go ahead and regenerate this every
time we change something. This is going to be
our surface that it will not be affected
by our displacement. Anyone where it's white, you see it's going
to be affected at a 100% and everything
else is in-between. If you click here, you'll
see you just regenerate a map to get a random
seed every time. And the best part
about these is that it is completely seamless, meaning you'll tie all
these and there will be no hard edges or borders. It will be a really cool click until you find one
that you'd like. You can just go ahead
and choose Save. You can adjust the
number of iterations. The sprite scaling as well. Lower these down and
it'll have less objects. And you can increase
the size and that'll make it those objects larger. You can see how you can really
create a whole bunch of really cool looks in here
without a lot of work. Very cool. Once you have one
that you'd like, go ahead and go to Save height, saved your object, and be
sure to leave this dot PNG. It's very easy to
accidentally delete that, name your object and save it. You may not have the same
exact map this nice, so I'll make sure I provide
those maps so you can follow along perfectly
the first time. And then I encourage
you to go back and add in your maps
that you create. Keep in mind the
smaller the detail and the smaller the items
in your texture map, the more polygons
should go into neat, these are AK images. A small little lines
are very small. If you are using Cinema
4D and not Redshift, I encourage you to try more
blocky map like a big data or some of the others
that don't have as many diagonal lines or these round bits
that this one has. Let's go back into Cinema 4D. And real quick, we'll just up the segments for our cube
here to one hundred, ten hundred, ten hundred, ten hundred, which is
the maximum let you do. This is just going to
give us the most detail possible before
adding subdivisions and before starting to take a real big hit to the
viewport performance. Now that we have
enough segments, Let's take a look
at loading that map in and creating our grip or using the standard Cinema 4D displacer in the next lesson.
6. C4D Displacer : Let's go ahead and
look at this lines. You can see it's so dense. There's a lot of
segments here which is going to allow us to have a lot more detail,
which is what we want. Let's go ahead and
turn off shadings. We can actually see
what's going on here. Instead of our displacer, go down to the
shadings tab and then twirl down this little
arrow and go to Load image. This is where we're gonna grab that grip of math that we made. You can see that
that applied very quickly or viewport
is still running very smooth in our 25
thousand segments. But you can tell that
it's just doesn't quite have the
detail that we want. All of our circles. And things are still
very jagged, almost. Have a Minecraft look to them. Where are these little tiny
details are in our map? We have these kind of little weird spiky bits and you can see what I'm
talking about with our, all of our diagonal lines in our curves are where
we're heading issues. It's straight across,
is looking really, really clean and nice. So how do you
problem-solve this? Well, we can try to
sub-divide this. We can throw the save. Before we do this, throw
in a subdivision surface, we're going to hold Alt and
click solution surface. You can keep trying
to divide this out more and add
more subdivisions. But each time you do it's
gonna get slower and slower. And also it's just going
to take a whole lot to actually get that level of detail that you're looking for. It's not really
ideal to try to do this kind of map with
Cinema 4D displacement. Alternatively, what
we could do is create a map that doesn't
have any round bits. But for this piece, we're
just going to scale this up to scale out of the way. And so we just kind
of have this part here. This can be blown up. So go down a mapping which can change the
strength of 200 by 200. That should show up a lot of
that stuff out of the way. We went to offset this
became, There we go. Now we have more of
these rectangular bits. It looks a lot better this way in our diagonal
lines are still jagged, but only so much you
can do with this. Now one thing you could do is because our edges here looking kind of funky when using
the Cinema 4D displacer, it's helpful to go in
and fill out your cube. And we're just going
to go ahead and make this radius pretty big. Tin changes. So divisions in
here to about 50. You can still create
cool gribble objects. Just be careful
what maps you use and you are gonna be
limited to more of a blocky look versus rounded diagonal lines
and things like that. That's how you can do
it with Cinema 4D. And you can see it
definitely works and you can definitely
create some things. But there are some
issues that you might come across and you might
have some limitations. Now if you have your group
will create it and you want to control
the height of it. You can adjust the
height here or the strength of the displacement and you can make
things more subtle like that's a pretty
cool looking ahead look. So we can always have to be
a little miniature cities. They can be useful for nice
hard surface modeling to make something for a space block
or something like that, that just looks like a panel
on a spaceship or something. That's really nice-looking. And it's more detailed and more pronounced in a bump map
is able to create them. So that's when you
use displacement, is when you want
to make something that basically you don't know how to harden
surface model. And you want to use a
texture map and make it stand out more than
a bump map can do. This is really neat if you
want it to be sunk in, in, in the white instead of being
pushed out in the white, you just need to make
this a negative number. Now we'll have the inverted
effect of what we had, which can produce some
cool it looks as well. We also could have
just the height rather than the strength
if you wanted to. That's how you can create and control some really cool looks. You can just plug
in different maps and try those out as well. The cool thing about this
is it's very fast and you can just click and drag. And then all of a
sudden you have a completely different look. But by the end, product
is always pretty cool. And since it's soluble, we can offset these
things like that. And I'll never have these
really harsh seems. It'll all look pretty good. But once you scale things up, you lose that seamlessness. So think about that when
you're creating your people, you can see there's
just a lot of really cool things you can
create very quickly with the combination between
your displacement map and your displacer settings
when you have the geometry. And I'll show you how to do it with redshift
in the next lesson. And if you were a C4D user that doesn't have redshift yet. I highly encourage you to
just kind of watch it to see the amount of detail
that you can get with Redshift and still keep
viewport performance. It won't slow down
and won't lag. And you'll be able to get
such smooth things so your circles who are
actually perfectly around. So it's kind of amazing the
detail you can get with redshift displacement will check that out in the next lesson.
7. Redshift Displacement + Tessellation: Now that we've learned how
to do it in cinema 4D, Let's show how we can
do this with Redshift as a few things we want
to change real quick. Firstly, for a cube, we're gonna go ahead
and go back down to five hundred and five
hundred and five hundred for the segments and uncheck this fillet because
we won't actually need to fix those corners
that way with Redshift. And we won't actually need
that many segments in our viewport or on our
object for redshift either. But we've still been
able to get more detail and I'll show you how
in just a minute. The first thing we
need to do when using Redshift is it displaces it through a material and
not through a modifier. So the first thing we
need to do is create a redshift material,
material, material. It'll throw that on our cube. Double-click that to open it up. Now all we need to do is open up our texture map that
we just created. Just drag and drop that in here. That's going to
go ahead and just create a texture node for you. This is gonna be labeled. Instead of here, we have the option to under
the General tab, to adjust the gamma or adjust remap the scale or choose
whether they want to wrap, you can rotate it offset at all. Those options are
built-in right here. Already to do now is we don't actually connect this to
our RS material at all. What we need is a
displacement node. So go ahead and type in display. And you're going to bring in a displacement node right here. We take our texture, grab a little circle
plugged into the blue, go to texture, texture map. Instead the r's displacement, we have the scale
of our texture, which is going to
determine how much the redshift displacement
number is multiplied by. So it's very good to just
leave this at one and adjust the scale of this
inside of the redshift tag, which I'll show you
here in a minute, versus doing it here. Height field is what we
want because we're using a black and white grayscale map space type. We want object. You only ever want to use tangent really if you're
using a vector map, which for displacement is a really cool multi-colored map that allows you to
do so many things. But we're just going to use
this black and white map. It's super easy to use. Instead of our
displacement, we also have these change range, which we are going to use later on to make some adjustments. This is all we need to add, and we just need to
connect this into our shader graph here correctly. Now this does not
connect to our material. This actually just connects
straight to the output. Let's go to this blue box for your output and
choose displacement. And that's all we
need to do for that. Now if you look at
this, will render this. You'll notice nothing has
happened in our viewport. And that's kind of how it's
going to go with Redshift. You'll notice that
nothing is happening in our render view as well. Now that's because we actually, there's a few things
you need to do to activate redshift
displacement. We need to right-click
our cube and go to the redshift tags,
redshift object. Instead of here, we
have a geometry tab. And this is where we can override and create
our displacement. We want to check override and we want to
enable tessellation. This is a redshifts
subdivision at render time. We also need to check
redshift displacement. Now if we hit render on this, we'll see that it calculates the tessellation and
displacement first. And then it will render. You can tell our
displacement is here, but it's not really looking
like we want it to look, so we need to make
some adjustments. Firstly, like I was
talking about here, we have the displacement scale
and maximum displacement. And this is what's correlated to our height field and our scale field inside of
our displacement node. Living that at one allows
us to just use numbers here to adjust the
scale of our object. What we want to do for
this, instead of 21515. The way this is going to work is it's going to displace it away from the surface
15 times further. And the maximum
displacement means that it will allow it to
go all the way to 15. You can have a higher maximum displacement
and displacement scale. But if you put your
displacement scale higher than your
maximum displacement, what you're gonna
do is you're gonna run into some clamping, or basically it's going to
push everything out but stop it at the maximum
displacement value. For example, here we have a displacement scale of 15 and a maximum
displacement of 15. If we were to lower our
maximum displacement down to just two, what's going to
happen is it's going to clamp everything down to just the height of two rather than allowing everything
to push out 15. That's how that works. As long as your displacement, your maximum displacement is equal to or higher than
your displacement scale, you'll be able to have as
much range as possible. Let's go back to 1515 and
take a look at how to get the most detailed possible with this
redshift displacement. Here's a bird's-eye view of our circles when we
have the main imagining the four maximum
subdivisions at six and the displacement on with enable auto bump
mapping on as well. The first thing we can
do to add more divisions here and make this smoother
is add more subdivisions. So we can go ahead and increase this all the way up to 16. That's the max. The maximum subdivisions
is going to tell redshift to allow it to
sub-divide it 16 times, which if you add a
subdivision surface and put 16 in there, you're gonna break
your computer. But with Redshift, it does it at render time and it doesn't
really have an issue. It does calculate. And then goes. And you can see that it doesn't really make
that big a difference right away because this only works in conjunction with a
minimum edge length. Basically the way
this works is it's going to say use up to 16 subdivisions and in order to obtain a minimum
edge length of four, it's only going to divide
it that many times if it needs to get this
minimum edge length. And the minimum edge length, the lower that is the smoother these
corners are gonna be. Let's go ahead and take
this from four down to 0.1. You'll see this going
to calculate that. It's gonna take longer because it's going to use
more subdivisions. But the cool thing is is
that once we get to sit, we can actually load this in so it doesn't have to
calculate it every time. And wallah, you can take a
look at this and holy count, that is a perfect circle. Doesn't look like
Minecraft anymore at all. So with our render
region removed, we can see that we have a ton of detail in all this
and this is all super clean. Diagonal lines are perfectly clean or round
corners are clean. These little circles are clean. Everything is looking
really, really good. So what we can do now
is if we take a look at this and we move our camera
around in the viewport. You'll notice there's some lag here and it's going
to wait and then recalculate what we actually can set this up so that it doesn't have to do
that every time. Now that we have everything, how we want it. All we need to do is click
these two snowflakes appear. These are going to freeze
and freeze the geometry. So basically this is going to cache redshift displacement
in Redshift installation. So that remembers that, that it doesn't need
to calculate at every time when we hit Render. Now this will work
as long as we don't close or stop our
IPR window here. Now that we have that cached, we can go ahead and
zoom out and look around and we get
live feedback of this insanely detailed
displacement, which is just awesome. But still in our viewport, we don't have anything going on. This is normally
pretty fine because this is so Real-time
that we don't need this. You can just run
into some issues if you're trying to align something up with your displacement or
something like that. Like if you have
it for a ground, you will need to
use the IPR view two lines and the
officers on the ground. Now we have this displacement
looking really good. What we want to do is
clean up these corners. And the way I want
to do that is a little different than
the wave for Cinema 4D. I actually went to go into
my Redshift material, go to my risk of displacement. I have old and new ranges. The way this works is
basically if I say the new range is 0 and
the maximum just one, everything that is black
in my shader graph, in my texture note here
it gets applied 0 scale. Everything that is white
gets applied to one scale. And then that's multiplied by the object tag settings
in our displacement. Now if I say negative 0.5.5, what that's gonna do
is everything that's black is going to be sucked in. Half of this scale. And everything that's
pushed out is going to be pushed out
half of the scale. We're still gonna
get the same ratio between our black
and white values. But we're not gonna have the issues of these
weird, clunky edges. So it actually
gives you a really nice cool look where
it pulls it in and pushes it out and it makes these squares corners
a little better. If there is an area in
your map like here, see this, where this half circle is getting clipped
into the side, I hate that and then
drives me crazy. I'm going to offset this texture map this
way just a little bit. So let's go ahead and
open up this scene. Go to our texture map. We want to move this
in the y negative 0.1. Want to make sure that this
value is less than one because one is just going
to tile it completely. So it's going to move it, but you won't be able to tell because it's seamless texture. You can see everything
is sliding over now. So now we have that split over. Our circle is not being
cut off for the edge here. And we've got this nice, much cleaner edge going
on because of that. In the next video, we're
going to go ahead and create some cool glowing lines that we're gonna put
throughout this. This will do in the next one.
8. Glowly Lines: Glowy lines that I have
on our thumbnail here. In order to do that, what
we're gonna do is we're going to create a new material. We're going to go to Redshift
Materials incandescent. Before we get into that, we wanted to go into
open up a JS placement. Again. We're going to use this
to create our alliance. We're going to click this
box and go to classic. Instead of classic
that lets us have all these settings. We
have all these shapes. We just want this form, we just want these cool lines. So we're going to go
ahead and just drag all these down to 0. Our leftist with
are these lines. And there's a couple
of squares in here and that's from the
background brightness. And we're gonna go ahead and
just turn that down as well. Now we have these cool lines. They're just gonna be kind of
flowing through our scene. So let's go ahead and save that. We're going to call
this glowy lines. Use. Okay. We're open up our incandescent
material here in Redshift, you can see it's
a different node. We're going to make
sure we go under the illumination tab here so you can see what we're doing. We're going to want to drag
in that file we just saved. That's gonna go ahead and just create that texture node for us. We can connect that to
the Rs incandescent and we're going to go to Alpha. What that's gonna do
is you'll see here, it's going to change it
to just an Alpha Lear. Everywhere that's black
will be see-through and everywhere that's
white will be light. Now we want to cover this and call this allergies or ramp. You can use a color node. I just go to ramps
because just two ramps. So we're going to connect
that to elimination color. Instead of this ramp,
we're just going to grab this notch here and we're gonna make it a nice blue, but 205 blue there. I'm going to delete
this black one, so it's just pure blue. You might want to go a
little lighter blooms, so 1956 somewhere around there. Close that. And what we want to do is
we want to create a copy of this cube that's going to just
have this material on it. So we're going to copy
this cubic copy and paste. Go in here and we
can just change the segments down to one because we don't need to do any displacement or
anything for it. So we can uncheck the override tab for our geometry so it doesn't
try to displace this. We can remove that material and put our incandescent
material on here. Now, firstly, we need to go back into our
incandescent material inside the R-S
incandescent and make sure you have the intensity
multiplier is set to 20. Now the way incandescent works versus like an
emission layer is that this intensity multiplier works exactly the same as
Redshift lights. These values are
going to be very similar with your life
values and things like that. The brightness of
this is gonna be the same as if you said
a light to 20. It is a good gauge of understanding how this
is going to work. Well hit render
on this right now just to see what
this looks like. You can see it's
adding these cool blue glowy lines all
across our scene, but it's also asking
weird dark areas. And that's because even
though our cube is set, our material is set
to have an Alpha. It's still casting
shadows for that alpha is causing some really
bizarre issues. I wanted to do is go
into this redshift tag, go to the visibility option. Click override. Uncheck cast shadows
and self shadows. You can also cast
uncheck receive shadows because it
doesn't need to do that either because
it is glowing. Now we see we just have
pure lines of light running through our scene and everything's just
kind of floating, kind of a little oddly
above our green bowl. And because we have our
agreeable set to sink into our surface and
now we can actually, I want this to look like it's more built into the gray wolf. So we're gonna go in here. We're going to sink it in by shrinking the
shape of the cube. That is just going to bring
all of those lines in to make it look more like it's within
our greebles surface here. So it's just kind
of a lot more of our gribble is going to be
poking out above our lines, which just gives it a
more dynamic, cool look. You can see how that is working really nicely and that's
looking pretty cool. Okay, so now that we
have these lines, we want to set up
these cool neon lines. It gets just going to
go around the border. And that's just
going to look cool, but it's also just
going to cover up these weird edges here a
little bit to make it, it looks a little cleaner. What we want to do is
go and copy this cube. We can delete this switch
if tag and this as well. What we can do is go ahead
and what this cube selected, click and hold the
solution surface. Go down here to Atom Array, hold Alt and let go. And that's going to put that
into our Atom Array for us. Because our segments
are set to one. We can turn this cube off
the viewport so you can see it's based on the
segments of our cube. If we increase this,
increases the atom array. So that's why it's kind of nice. So if you wanted
to add extra lines in here, you totally could. And we have these little circles here where every point
is intersecting here. We don't want that. We actually want this all to be at one. So if we just change the
sphere radius down to one, That's going to take
the cylinder radius down to one as well. The cylinder radius can't
exceed the sphere radius. So as long as this is the
lowest one will be good to go. We have these match. Now, what we want to do is
we want to make a copy of our incandescent layer here
and just connect the texture. Now we just have this blue
color here and we just want this solid blue to
go on our Atom Array. Go back in here, and let's just make sure our cube set to one. There we go. So now
we have this nice, cool just glowing edge
around everything. Like I said, if you
wanted to add more, you can definitely just up the values of these until
some more segments in there. If you wanted more lines, I think it looks really nice
and clean without those, but if always, make it your
own, It's pretty cool. What we need to do next
is we need to set up our material for a cube
and then do our lighting. It's important to set
your materials before your lighting so that you can
get your lighting accurate. And we'll do that
in the next lesson.
9. Redshift Materials and Lighting: In this lesson, we
want to go ahead and fix our material on our
object before we light it. Because it's important to
have your materials right before your lighting
is finalized. Because you weigh
your materials, are going to look is
really going to depend on how the light hits
them and stuff like that. And a lot of n vice versa. The way your lighting looks, you might have your lighting
looking really good with the default material than you thought your material on and you realize it doesn't
actually look as good. So I find it better to throw your material on
first and then adjust the lighting afterwards
rather than trying to tweak your material
to fit your lighting is most likely you're
going to need to tweak your lighting to figure rather than material feet lighting. First thing we want
to do is begin. We can go to edit here and just go delete unused materials. Sometimes when you copy
things and paste them, it creates a duplicate
of your material. Even if it's not being used in that can be
kind of confusing. So you can just clean
that up a bit there. Let's go ahead and open up
our displacement material. And we're gonna go into
our color and the diffuse. And we're gonna set
this to 12% black. There we go. So it's just slightly
above black. Then we're gonna go
down to the reflection roughness and we type in 0.35 and change our IOR to 1.8. And that's going
to give it a more metallic look at
anaplastic look. That's all we need
to do for that. Now you can see our materials
looking pretty cool. We're getting some
reflections from our cubes, but our light is kind
of boring right now. Also, let's go ahead and create a material for our floor here. We're just gonna go
ahead and create Redshift Material, Material. Double-click that, reset
this to pure black. And which refers to
point to the IOR to 1.8. And we'll just throw that
on our floor real quick. We can't see our floor
reflecting here very well. We're going to
change your camera angle a little bit here, but let's go ahead
and grab our plane. And we're just going to pull
that up a bit to be a little closer to our floor
and see if you can't cheat their reflection
in there a little bit. Okay, cool. We can zoom out a tiny bit here. More fixer camera angle
here in a second. We just want to make
sure that the floor is looking pretty cool
in this reflection. This is where our freezing our tessellation is
going to come into play when we start moving
our lights around. This is really what's going
to give our scene life. Like this looks kind of neat, but it's very flat and steel and that's because
our letting me is just to pick overhead light that really only looks
good on things like cars that are very curved and have a bunch of
cool looking stuff. A cube needs more angular
light to make it look better. Let's go ahead into our
redshift area light here. Richard area light. And what we're going to
do is we're going to firstly increase the
intensity to 20. We're going to change
the color more blue. I say 1350 for the red
and 135 for the green, and that's going to give
it this nice blue color. What we're gonna do is
we're gonna take our null, which can erase up our
null 200 meters just so it puts it in the
center of our cube here. Now, when we move
our light around, which what we're gonna
do is we're going to move it closer to our camera. What we need to do
is make sure we have our cameras set where
we want it before we finalize this
flooding as well in our camera is actually not
quite where we want it. For our camera, we have
this kind of see a warped, this cube looks with these
lines being very angular. And that's because we're using a 36 millimeter lens and
that's prospective bending. In order to fix that, we need a longer focal
length for our lens. We're just gonna go
with an 85 millimeter. One of my favorite ones
is to use really nice. You can see when we do
that, we get tighter here. We can take our camera
and our top view and just slide
that back until we get it where we want
it. We can do that. And then let's go ahead
and just pull it down a bit so that we get a little more of that
floor in there. And our q is more than the
upper part of our scene here. Just like that. You've
got that floor in there, and we have our
cube here as well. Now we have that right. Now we can go ahead and put our protection tag back
on that if you want. Rigging protection. Now we want to grab
our area light. We just want to pull it back
towards our camera here. Just grab that and pull it back here to the
right of our camera. And we just want to
gently light cube here. We're going to pull
it down a bit. I really want to
light these two, this side of our cube more than this side to kind
of add some dynamics to that. So let's bring this
more this way. There we go. Now with just
shrink this up a bit, we go into our area that we
could change this to 1500. By 1500. Women want to
do is pull it over a little bit more to the right
because we really don't want any light to fall on
this set of R cubed. We really want it to
have a more dynamic look where we're gonna have this slit and the slit and the slit. But we still wanted to catch some of those highlights here. Go ahead and pull this
up a bit more to, it's more on the
top and the side. There we go. We have
three different levels of brightness across R cubed. Now, we want to create
a copy of this light, will control click and
drag and bring that over. The first, this is
gonna be way too much, but we want to do is go
in here and change this to it all the way to slide
this over to a cyan color. Then increase the
intensity up to 50, which seems very high. But we're going to change the
scale down to 500 by 500. Now we have this sharp light. We're going to drag this
back behind our cube. What we're looking
for here is we want a nice fall off
across the top here. And it's very high up. Make sure you can see
it in all three views and bring this down low. Then we'll slide
it over and back. So now it's should cascade
across the top here. What we can do is bring
it down a bit more. There we go. Now we can have this nice
highlight coming by backlight, coming across from here,
this nice cascading light across the top here. We can delete this target, this just so we can
kind of adjust this a little more if we want
to kind of tilt it down, is to add a little bit
more onto our surface. Here. We go because
we like having a nice highlight here and it falling off across
this top here. We still have almost total
darkness on this side and we have some more light on
this side, which looks nice. Now that we've got our
lighting, how you want it. We don't have any reflections of our lights which is good. In the floor. We're looking. It looks like it's
just in this nice boy does so now we need to go into the post effects in
the next lesson and clean this up and make
it look polished.
10. Redshift Post Fx: So now for the post effects, we can go ahead and pull
this out and make it bigger. What we want to do
is go into click this little gear here
in our render view. And that's going to open
up our settings and that includes all of our
posts defects stuff. This allows you to change your view port mode on tone map if you want to
do something different, but aces is the default
and that's what we want. You can apply. Let's, if you want, you
can do color controls such as s-curves and
different curves, the RGB curves,
photographic exposure, which is like camera controls. We'll get into that
bloom, flare streaks, Bokeh, which is depth
of field de-noise. And if you have
magic, but it looks, you can use that here as well. The first one we're going
to get into is we're going to use the color
control enable that. What we want to do
is we have exposure, we have contrast, and
we have a line here. You don't want to do
is we want to create an S-curve just
ever so slightly. Let's just going to
make our darks a little darker and our brides
a little brighter. And this basically is the
same thing as contrast, except it gives you just a
little bit more control. Very small S-curve here. You see the
difference, just very slight and just makes
our darks darker. And we want to go into
photographic exposure. By default, our f-stop
is set to eight. And we want to actually pull
that back a bit to say 10.5. That's the same as closing
your iris on your camera. Higher F-stop, less light comes in the dark your
image is going to be. Now we also want to go to the saturation and
just bump this up to 1.2 and this is going to make it pop a little bit more. Next one we have here is bloom and re-enable
that you can see already that that is giving this nice glow from our
corner material here. This looks nice. What we can do is we can take the threshold value down to 15. Softness down a bit. I think this office
can go almost all the way down. We'll leave it at 0.1. Then for bloom intensity, we can turn that up
or pull that down. But I think turning that down to 0.8 is gonna be a
nice spot for us. Next, we could add a
lens flare to this, but those really
only react best to visible area lights
and things like that. We don't want that in our scene, so we're just going to skip
past islands layer for now. Backend. If you ever get lost in here and you can't find it, just hit F and that's going to frame it up to full
screen for you. We're going to add Street, which kind of adds this nice cool 80s basketball games
Star Filter, kind of look. Pharaoh, watch old gains. A lot of the cameras
had started filters on the lenses which
may not have this really nice, cool look. I love it, but we want to change the number of streaks
to just one streak. And we wanted to change
the angle to 90. That's just going to
give us this cool blur. Line appears. Glowy bits are just going to
stretch and causes streaks. This is also a cool
way to make cool. Lens flare looking looks. If you wanted to
with horizontal, if you wanted to make it
look more like a lens flare. We can do softness, but we don't need to kinda
like it being sharp. Only the download and intensity, we can print it up just a
bit to 1.5. There you go. And you can also obviously just play with the color
of your lights. You can bring this back
to be more of a blue. Think it looks pretty nice. We could change
this back to 170. I think that's going to look a little nicer than that cyan. Very cool now. And it looks pretty good. Now to render this out, we need to go to our render
settings. We haven't set up. We can change it to something like two k square or something, or we can I2k. Teach it to fork if you want. Then make sure you save it. I'll save it as a PNG, you can save it for whatever
file or close you want. And if you're still getting some noise or in your
render or anything, it's just increased the book
quality a little bit or this adjust this slider
closer down to 0. You'll get, it'll take
longer to render, but it will look cleaner. But let's go ahead and
just do a render for this. It is important to note that when you're
using the render view, it will not apply. Your post effect looks until it was finished
rendering everything. You can start hitting Render and you can look at
it and you're like, That doesn't look right at all. And that's because it applies
to post effects. A post. So as long as it looks
correct in your IPR view, your bucket quality view of
your Redshift RenderView, it will look correct when you render it out through
the render viewer. There we go. All so it took one
minute and 11 seconds. We have a fork render
of our green wall here. And now in the next
lesson, I'll show you how to create a cool Depth of Field Camera to get those nice tilt shift looking
shots of your Google keeps.
11. Redshift Camera Depth of Field (Bokeh) Tips: In this lesson, I'm
going to show you how to create this really
cool tilt shift look with tip the
field really quickly with it RS camera
inside a redshift. The first thing we want to do is uncheck our camera
that we have here. Let's zoom in close to the edge here of our
top of our object here. And then once we have this sort of roughly where
we want it to be, we can go to Redshift
cameras, standard camera. It makes sure to click
this little box here, which is going to make
sure we're looking through that camera. Bring up your render
window, hit IPR, be sure to hit those snowflakes once
those pop-up as an option. Let that calculate. Let's go ahead and just tilt up just a bit and move
forward a bit here. So we're just kinda
have the circles in this sort of quadrant
of our screen here. Next we want to click
this Redshift camera tag. Go to the bokeh tab, click override and enable. Instead of focus
distance and COC radius, we're just going to change
this to just focus distance. Now we can control the COC radius and
the power separately. And our focus distance is
derived from the camera. But there's actually a
very easy cool setting instead of redshift where we can actually just use a
render view here, box here with a dot
in the middle of it. And that's actually
going to bring up your clip to focus option. Like it says, click
or drag to adjust the bokeh focus
distance and Alt. Click Alt drag to
adjust the COC. Let's say we want to focus
on our circles here. We're just going to
click our circles. It's going to initialize
and then render that out. There we go. We can see now
these circles are in focus and we've got a little blur before in the foreground
and the background there. Now, if you want to
increase the blur, just need to increase
the COC size. We're gonna set
this up to three. There we go. Instantly you have this nice sort of
microscopic tilt shift. Look. The cool thing about this
is we actually can't do this inside of our RenderView because our displacement
isn't there. If we try to click on sort
of roughly where those are with our object
focus distance. It's just not going
to work properly. This way we can actually
use our displacement and just click or displacement
to adjust the focus here. When it comes to
Boca with Redshift, the only setting this going
to affect how clean that is. Going to be your Min
and max samples, which are going to
be controlled by your threshold here in
your bucket quality. If you want to lower the threshold value
to clean those up, you'll be good to go, but
you denoise is going to do a really good job of cleaning
and those up for you. There you go. That's how you create some
cool till shift things. Now, if you want, you can set this up. If you notice when we click
is going to adjust it here. Change that because
you've clicked closer. We can do is if you
want to keyframe this to make a sort of a
rack focus effect, you can just keep
him that GoTo later on and then click further down. Let that load in.
Keeping that again. Now everything in-between
will be that transition between sort of a rack focus from one object to the other. You could obviously do
an animation keyframe on this and make it
look more organic. I could add some overshoot. You can really control the
focus and stuff are very easily just with this
little button here. Instead of your render view. Pretty cool. In the next lesson, I'm
going to show you just how, how easy it is now that
we've built this scene. How easy it is to just plug in new maps and change
your lighting a little bit to get
completely different looks.
12. Make It Your Own!: In this lesson,
I'm gonna show you how to quickly change out your maps and change the lighting just enough
to get a really cool, instantly different
looking green ball. Let's say you make a
different looking pre-built inside of your JS placement, you need to do is drag and drop that greed Berlin and or replace it here
in the general tab. And just connect that up. That's gonna give us our
different look there. And then for our lines, we can also change those out. For this, we can go in and
change the lines here. We can use to one
that is designed for a diagonal lines that we created using the wire mode
and JS placement. Also, we can go in
here to the color, and we could change this to say, a punk style, yellow. The same for our
incandescent color here. Then lastly, do the
same for our top light. Change it to yellow. There are big light changed
that to more of a sign-in. Hit render on this,
you can see we have a completely looking, completely different
looking agreeable. And we can go into
her up-close view here and play around with that. And you can just see already how different and cool
these greebles can be. You can always just tweak
the lighting a little bit. You could take this light, you could turn it down. If you wanted to. You can lower it down as well. It around, do whatever you want. You just instantly change the
vibe and feel of your PCR. But completely different. Google didn't change anything, but the texture maps. This looks completely different
than the thing we made. Really cool just to swap
those out and see how quickly that works right away
to make alternate looks. Also, feel free to add
different colors in here. You can use the actual ramp to create ramps in your scene. Very cool way to create alternate looks very quickly now that
we've set it all up. Also feel free to change
out your materials, something like glass or use
mixed materials or things. It just have fun. Make it your own.
And just really, now that you understand
how to do it, it's actually very
simple to set up the right way and make
it happen really fast. Joy. Thank you so
much for watching. Please leave a
positive review if you enjoyed the class
and let me know, let me see anything
you make posts it in Instagram tag at affects, try and be sure to share
it in the class projects. I'd love to see
what you guys make. Let me know any
feedback you guys have, what you want to see next. I always want to hear
back from you guys. Thank you all so much. We're all supporting. See you next time. Thank you all so
much for watching.
 Derek Kirk, 3D Instructor-Effectatron & CGshortcuts