Transcripts
1. Create a Retro Style Sunset Loop in Cinema 4D with Redshift: Hey, I'm Derek Kirk, and I'm gonna show you how to make a cool retro style sunset loop. We'll be cruising along the road past low, fully mountains forever towards the sunset beyond the city's guy. I just love this style in this aesthetic. And I think you're really gonna have fun creating it, too. Whether you're new to Cinema 40 or an experienced user, you're gonna be able to follow along step by step as we create this loop as well as hopefully pick up on some tips and tricks along the way, the first part of this course is gonna be for all cinema 40 users. We're going to focus on creating a customizable seamless loop will cover creating geometry that, specifically designed for loop as well is how to create that cool, low Polly. Look, we're also gonna learn the power of cloners as well as some animation tips for that perfect loop. Beyond that, we're gonna use red shift to create lights, cameras and materials for our scene will also cover some helpful render settings as well as motion blur and the red shift post effects settings. Lastly, we're gonna take our rendered animation into adobe aftereffects toe. Add some heat waves in some final touches. Whoa! This is gonna be totally radical. Let's get started.
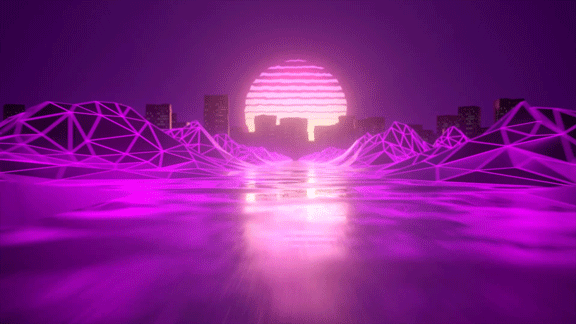
2. Creating the Base: So let's get started. The first thing we're gonna need to do is create the geometry for are based foundation for our loop. We're gonna want to create the road, the floor and the mountains in the city in a way that will allow us to loop things so that nothing is stands out. And it's obvious that it's a loop. It's gonna be very seamless, and that's kind of key in the way. To make things seamless, you have to start at the very beginning. Your geometry has to be created in a way that allows it to repeat without being very noticeable. Because if you have geometry that's very unique and stands out or something, when you start looping it, you see the loop really quickly. And whenever you see the loop happening very easily, it kind of loses the cool, effective a loop. When you are watching a loop and you can't really tell when it starts and when it begins, that's when it's a good loop. When you start seeing these patterns and things that are there, stand out to you because of unique geometry or special things that weren't built right, that so it's not seamless. It really loses the effect of the loop. OK, so let's dive in and start making our geometry Now, right off the bat, there's gonna be a difference between whether using red shift or if you're using cinema, forties physical render or something like that. One thing Red ship does not support is this little button right here. The floor object can use that. But that's okay. We're going to use a plane and it's not gonna be any different. You're not gonna be able to tell. So we've got our plane here. I don't think I like to do is double click that and we're gonna rename that floor, type that in there and click off of that. So I like to try to label my things as I make them, especially when we're going to use more than one of the same type of object or primitive by the end of the out the scene. A lot of the times if I'm just playing around and I haven't been naming things, I get to a point where I have to start clicking through them to figure out what the heck I'm looking at. And it's kind of like, super easy to take two seconds to name it when you're making it. And it's going to save you a lot of time of the India project. If you do that on the forefront rather than trying to go back and then name it all, it's just a headache. So first things are floor. So we've got 404 100 centimeters. That's our default. We're gonna change that to 4000 by 4000 and we're going to be very specific about an intentional about thes sizes. They were creating this because we need to have everything relative to each other in a way that when we create this loop, that will allow to be seamless. This is a very big part of it, and you'll see what I mean as we keep going a little further. Okay, so next we're gonna create another plane. I was gonna go appear, clip this cube, go to plane, or we could hold copy on this and we could hit control C control V or Apple see apple V and paste a coffi of it if he wanted to. Whatever you want to do to create that, what we're gonna do is with this plane. We're gonna call this road, okay? And again, you don't click. Type it in. So row, we're going to set the height of this to 4000. So it's exactly the same. Height and height is gonna be rz when you're dealing with a plane because the planes created on the Z and X okay, axes. So everything is a 00000 That means the origin of these points are at the same point. And so we know that these air gonna line up. This is important. So as far as the road goes, we've got 4000 centimeters long and for the with we're gonna go 350. So move around your view port We're gonna hold Ault and hit Left, Click And we're gonna be able to orbit our perspective camera around which we're gonna need to do that. If you hold all too and middle mouse click. You can click and drag and pen and go up and down in this direction here and then, Ah, if you scroll wheel in and out, you can zoom in and out And if you ever get lost and you're like Oh, gosh. Where the Where the heck? Oh! Oh, boy. Where am I? Just hit H And that's gonna frame everything in your seen in view. And then you can hold old and left mouse click to figure out where you were. Okay, in case you don't have a camera set or anything yet, and you get very lost in diffuse just h, and that's gonna pull you out. Okay, Good little tip, in case you ever get lost. I remember when I was first starting out, I would try to zoom in really far and something and stuff. Start clipping, and I'd look at something, and I realized I was upside down. And I have to invert. My entire seeing is like, I confused anyway, So just a little helpful tip there. And so another thing that's very common that a lot of, um, you'll notice this and video games and stuff to Sometimes you'll see these when two planes , because a plane has zero thickness, right? Like a cube or a rectangular prism. Anything has a little thickness, but a plane is literally just two dimensions, so there's no thickness to this. So when a plane is on the same. Why value, or X or whatever value as another plane. They are completely overlapping. So right now our why value of this plane were said it. Zero. And if this floor plane is also set a zero so they are exactly in the same spot. And if we go to display here and turn on Gerard shading lines, we're gonna be able to see these two planes. But if we were go to go appear and hit Render on this. You'll realise there's nothing there like you can't see where the road is, versus where the floor is. And one thing that's gonna happen if you notice if you leave these two planes overlapping is you're gonna get this weird glitchy overlap. E Look, if you have any kind of camera movement or light changes, it's not gonna be able to decide whether the floor should be what you see or whether the road should be what you see. So it's gonna kind of flicker in and out, and you've probably seen that before in some stuff. So what we're gonna want to do for this road is we're just gonna lift it up just a little bit So we're going to do that down here or over here. The coordinates tab and we're gonna do it here in the coordinates. Tow. Have numbers. Go look it up. 0.1. And that's gonna be enough that when you enter this now, obviously can't get There's no lighting in this scene. But if there was letting, you would be able to tell that these air not on the same plane anymore. You're not gonna get that weird glitchy look because thes air now at different elevations, and they're not actually overlapping there very close to each other, But they're not going overlap. So you're not gonna get that weird flickering glitch. Very, very important to know. Especially when doing okay, That's it for this. Now, we've made our road in our plane. Let's move on. And how to make these mountains in the next video. See, there
3. Moving Mountains: So now we want to make our mountains. Okay, so we're gonna go ahead and click this cube up here and hold the left click as we go over here and we choose landscape. Well, look at this. So I'm like, Whoa doggie. That has a lot of geometry that doesn't look like that cool arcade, low polygon style. But it's okay. We're gonna use this regardless. So we'll leave it here. I move it over, and then I hit control C control, they will put it back, will undo. So so for our landscape here, landscaped objects are really cool. Primitive because they're a little more detailed in your cube or anything like that. They have this really nice built in effect. It looks like a nice little mountain. And what you can do with the landscape is it to go the objects tab. Here you'll have all these attributes you've got the size you've got with segments, the depth segments that furrows. So the furrows were going to be like, you know, if it's a real jagged rocky mountain and the fine furrows, they're gonna be those little things that kind of give it those veins like a Bob Ross painting where he takes little knife who makes happy little cliffs? So you're gonna have those little extra details, and the more segments you have go 505 100. The more details you can get in the sun you can really start to see what the fine for roses doing. See how that's adding all those little bitty those things like that and rough is gonna be your bigger, more chunky mountains like that saying it's a really nice looking mountains just with a landscape. And besides that, we've got scale and all kinds of things t fool around with. You can grab these knobs and pullup and adjust the size of these things. Just like that. A lot of really cool things we can go around. And if you start messing with things and you realize, well, I kind of liked how it looked originally and you can't undo back far enough back. One thing with any object. Most things if you right click diesel arrow keys is going to set them back to their default values. There are some things where it will set it back to zero instead of the default value and just get a kind of learn what those are. Honestly, I couldn't give you a quick guide. Of what? How to tell What's going to set you back to default on what's gonna be normal, but just a quick little tip. Eso Let's say we had this movie this to 511 were like, Oh, shoot. I want that to go back to zero. You can right Click this and it won't work. Right, But go back Type and zero. You're fine. Well, she would, but let's say we go. We're here to coordinates. Were moving about 511 and then right, click this That does set it back. So I just kind of kind of learned where that will work and where it won't. Okay, little side tip there. Okay. So with our a landscape here, you see, obviously we don't have that cool will probably. Look, what we're gonna want to do is get the setting right for our landscapes. And the cool thing with this is we're going to set this to have a death, which is this value here. The Z, it's divisible by 4000 so we're gonna make it easy on ourselves. and where it's gonna be 1000. Which means if we have four of these landscapes back to back to back, that's gonna be exactly the same. With is our square Good. Let's go ahead and right. Click that tip that back to default. That's cool. OK, so what we're gonna want to do with our landscape here is we are going to want to go up here and go to the subdivide button and we're going to click and hold that and we're gonna do the opposite of subdivision surface. So but so subdivision surfaces going to add more geometry to your object and smooth out the edges. We're going to want to do the opposite that because we want to look kind of cool. Lo Polly, look. So we're gonna go to here to polygon reduction and we're gonna click that, and then we're gonna take our landscape, and we're gonna put it inside of that A quick tip. If you want to do that quicker without having to click and drag this when you have this landscape selected your object that you want to add this attribute to click and hold bolt and it will automatically put that inside that. So anything that's green up here, you want your object to go as a child of that, it needs to be in the side of that for that to work anything that this purple e blue purplish color here, you're gonna want the purplish blue. You're a D former to be underneath your object, so that needs to be a child of the object. And the object used to be a child off these green icons here. It's a good thing to keep that in mind. It's nice that the color code that for you, so you can kind of get a visual feel for that. So now that our landscape is insider polygon reduction, you can kind of see already what it's done. And by default, it set to 90%. And we're actually gonna take that even further and go 99%. And now you can see we have this really nice low Polly. Look, now we've lost a lot of detail, which is fine, but we've kind of lost too much. So the beauty of not converting your simple shapes like our landscape here we are editing in a non destructive way. So If we need to change our landscape, we still can. We can alter that. We don't have to lock in any values. We can always change it at any time. So what I'm gonna want to do here is I'm actually take this size of this and I'm gonna pull it up. There we go. So let's say Well, say get up to 2 20 Now that looks more like a little mountain that I'm looking for. And the beautiful thing about these lines games is they have what's called a seed. Now a seed is just a randomly generated pattern associated with a number. So if you've ever played Minecraft, we have, like map seeds, Age of empires. I've just dated myself. I am a gamer, Yes. And who, and you do random seeds. It will create a world randomly. So let's say you go to 100 is the seed so you can see that is different. Then our zero c they weaken. Just cycle through these and find something you like. You can just scroll will through them and get a quick view. Find something you really like. Let's go with 1 55 I like the way that's looking so one thing to keep in mind what we're doing. These landscapes you want to pick one that's way smaller than all your other landscapes like this one. Because when you have mountains that are tall and then you have one that's really short, that's gonna create a pattern that you're going to see. And it's gonna be obvious when the patterns repeating and when. It's obvious that patterns repeating the effect of the loop is kind of lost. So I like for 1 55 was, Well, hang with that right now and you can see it's kind of overlapping when we have this geometry is laying it back over top of it. If you ever realized itself is slowing down too much or anything, it's because it's polygon. Reduction is calculating. It's alive calculation. So turn that off. You can click this check mark here to turn that off, and you can see what you're drawn when she looks like already, and you could turn it back on and get the check box, and it's gonna bake that calculation back on. So what we're gonna do is we're gonna twirl this down to close that up and we're gonna hit control C and then we're gonna hit control V B V and we're gonna move this up here. So now we have four copies of the exact same mountain. So we're gonna want to do is troll these back down and in this landscape, we're going to go ahead and we're just gonna change the seed and it gets kind of convoluted . It's kind of hard to see what's going on because we have four copies of a landscape on top of each other. So one new tip you can do is if you want to hide things in your view port, there are multiple things you can do. You can have your object selected and then go over here and say this button right here, Vieux Port Solo single. And it's just gonna Onley show you this object, and that's gonna be pretty good. So let's say I mean, that would be good for us to go through and see what this is doing. But now we can really see how that compares to other landscapes. So what we're gonna want to do is under that, and you click off of this and click back to this gray, which is the solo off, and you could do group solo so you could have them all there if you want. But what we're gonna do is we're just gonna turn off two of them and just leave one of them , two of them on. So I want to do that. There's a couple ways we could do that. We could go through and then click and hold and just see our cursor becomes a little pink brush and you can just turn all those off. Or if you want to use these little buttons here, these are Vieux Port and render toggles so gray means by default they're all on okay, but if you click this top one, you'll see it turns green. Click it again. It turns red and then click again. It goes back to grey, so the way it works is green means it's going to show up, no matter what you have said. If you do read, it means it's not going to show up. You're not going to see it, so if you hold Ault, you can click and it will do both. Now the top one is your view port. The bottom one is render. So if you have something set to show up in your view port but not show up in the render, you're going to see it here. But you're not going to see it in your render, and vice versa. So a couple you know it's good for like this stuff gets too messy you want you want to make sure it renders, but you don't want it mucking up your view port cause you know it's in a good spot and just want it out the way. That's a good way to do that. You could just turn this off by double clicking and having that often the view port, and it will still render for you. You could hold Ault in control, and that will go the opposite. That will do, uh, the parent and child. When you hold control, it will do that. You could do individual, or you can hold Ault in control, and it would do the parent and child both so pretty cool. Just a couple of tips that you can do there. If you do shift and halt, it will go the opposite direction. So we're gonna hold um, Ault and Control. And we're just gonna go down to here and then down again. Okay? Click and hold, and we're gonna have to Here is just so we can see to landscapes Ah, and relationship to each other without having to worry about all four. So I was gonna make a little easier for us to go on here under polygon reduction one. This landscape, we're going to change the seat of that, and we're gonna start clicking around and we want to be different looking, but not that different looking. We don't want to be so low that it looks obvious that it's separate. We don't be so different that it's blatantly something else. So I cycled through and I chose 1 95 for the second seed. You see, it's very similar height, but it's a different layout. So you've got there very similar, but they're slightly different. Okay, so now we're gonna hold ultimate control, and we're gonna turn off this one. DoubleClick, DoubleClick, DoubleClick. Here we go. So I got these 21 for this landscape. We're going to go backwards and 1 45 keep going down. So for this landscape, we're gonna go down and choose 1 30 for the for the seed there. And then the final landscape. We're going to choose the the seed to 32. Okay, so right now we need to make sure we hold altar and click things back on. Everything's visible. And right now you can tell We've got four polygon reductions of landscapes all on top of each other, so they don't look very good. But there's a reason we did that. And that's because we're gonna put them in a cloner object. And I'm gonna show you how to do that in the next video.
4. Cloners Cloners Cloners: Now we have our little landscapes made here and unorganized. Hello, Polly Form. We're going to hold this button right here. This is the cloner object, and we're gonna click that we're going to select this top one and they were hold shift in left click to select all of them. And that's going to select the Children inside of them as well. When you take those click holding, drag and plot them inside the cloner. So the first thing I'd like to do when I create a cloner object is go down here to the instance mode and change it to render instance. And that's just gonna help it run fast in the view port, you can stop if you accidentally click. Something too far is something you might save yourself from your computer crashing, which, by the way, I should mention you should save control s to save. So we've got our cloner here and what we want to do next is change the mode. We've got it in grid a rate by default. We want to choose linear. So what that's going to do is that is going to disperse these objects evenly along an axis and by default. The Axis is want is not what we want. We actually want the axis to be the Z axis. So you said that zero. And since we have four mountains, we know we want to have four count for the instances. So now it's going to say I'm gonna make one copy of this. Will copy that one. Copy this one company that So basically all this cloner is doing right now is sorting these forests, but it'll come in handy here in a minute. So what I'm gonna do is go to the Z property, which is our height here for our plane. And we want to set that to 1000. And the reason I did 1000 is because our plane is 4000 deep. So if I have four landscaped objects that are 1000 centimeters when im space them out by it , that was the cinemas each that makes it 4000 centimeters total. So you noticed This doesn't line up evenly because our origin point is still a 000 So we need to adjust where this cloner is in order for it to work for the first thing, we're gonna want to do is pull it back in the Z direction. A certain amount and an easy way to do this and make sure you're lining things up correctly is to click the middle mouse button and pull up your orthez graphic views here. So what we've got here is our top right in front of you. If you don't have a middle mouse button, you can also click this here. This will do the same thing so we can see we have this year. So if we have a 4000 if you do a little math here, okay, a little math, we've got it. We got a plane here. 4000. We've got 4000 meters worth of mountains here. They want to line up. So if we know that this origin point is in the middle of our first mountain, we know that from here to here is 500 right? So we know we need to go 2000 because that's half of the 4000 this way. But we need account for this 500. So we need to move it 1500 centimeters this way because we're gonna move it 2000 and then 500 back so that this isn't hanging off the edge and you follow 2000 minus 515 100. So to do that, we can go in here to the coordinates here, and we can just do some math. We could either type in negative 500. Sorry. 1500. Another way. You could do it. If you don't have, like, an evenly space object or something, and you need to do the math. You actually can just type in math in here. So let's say we have 4000 and then we want to say, Well, actually, we we want to move that 2000 minus 500 whatever that is and that will do that math for you . So since we did the opposite direction, we're just not gonna make that a negative. And there you go. So if you didn't know, you could actually do math inside there. That's very, very helpful. If you're dealing with big numbers or you just don't want to the math, you can go ahead and calculate that in there follows the foil rules. Everything, um, multiplication division. Wherever you want. Throw at it. It will handle. So now, as we look at our top view. If I middle mouse click and hold Alton Middle mouse drag around, You can see that these line up perfectly, which is exactly what we want. Okay, So before I give too much further, let's double click this Kloner and called this mountain one. Not in one. Okay? And so what we're gonna do is we're also gonna slide this over to pull this off to the side , and we're going to kind of get it close to the edge of that road. We're say, negative. 400. Okay, cool. Cool. Cool. Cool. And we're gonna pull it down just a bit. Put down one point. Moral native, two centimeters. Whoops. Meters native to centimeters. There we go. And the reason I'm pulling that into our floor here and into our road is I kind of want this nice organic, you know, Rough edge. I don't want this hard, clean, sharp edge that the landscapes have. I want to kind of hide that underneath the floor, and it kind of gave it this organic little roughened edge Look that we're gonna see on the side of a road. This is our road here. Okay? So now we have that. What we can do is we can hold control seat and hit control. Be and copy our mountains, and then take these mountains and slide him over quick. And while we do that, we also since we didn't bake anything down, we still have all these landscapes. So what we could do is go in and alter the seed of all of these. So we go to object, tag, we're gonna click up and go 1 57 for that one 1 97 for that one. Click up go up to M 1 32 Not that one. Might be a little too unique looking every *** 1 33 for that one and this one will hit up to. And I'm just sitting up to for for fun. Honestly, no real reason we'll go 3 to 2 35 for that one. So now we have eight unique different mountains, and it just took a few clicks. So now what we can do is grab Mountain 1.1 hold control, and this is the same Is that copying, pacing. But we're gonna hold control and click end or ah, that over here to this side of this road. Okay, so you see, it's over here on this side of the road. It is at four. Will make this a little cleaner for 30 on the X axis here, negative to below the ground. So if we scroll in here and kind of tilt down and kind of this is kind of what are our view is going to be right, so we can kind of see these back mountains, and they're really just there to kind of give us some parallax Comptel were passing by Mom Mountain range little bit here. So now we have this second mountain range copied over here. We can do the same thing, and we can go in and we can mess the seeds hit, plus one. Bush won fish one and plus one. And those look pretty good. Okay, Now again, we're gonna do the same thing. Click and drag back here, and these are going to the same thing. We're a plus one. So 1 35 1 99 and last. I'm pretty not No one's too low. One sixties. Find for them. Okay, so now we have what we have 16. Completely unique. mountains and all it took was building one landscape, one polygon reduction and then copying and changing it just a little bit with a few clicks over to cool. We don't have to model. All this or anything like that is just pretty randomly generated, which is fantastic. And they're all pretty similar, but different enough to look different now if we were to look at this right now, obviously there's no lighting in this scene. Um, was came on top of that. It doesn't really look very good. And one thing we need to do. Let's go to red shift hitter interview real quick. You see that look bad? That's like early nineties. You know, Ted, Saturday morning cartoon bands like reboot or something indicating Ruby was awesome. Um, when the reason that this is doing that is because of this little tag right here. This is called a phone tag. So when you have an object that has a long tag on it, like a sphere is a really good example. You know, when you see a sphere, you don't see all the individual polygons together. You see that they kind of are smoothed out and create a smooth surface versus a sharp surface. So when you have edges like this, um, it's going to try to smooth those out so you don't have really sharp, jagged edges. But when you're going for a low polly, look, you want sharp, jagged edges and so all you need to do is click and drag and hold and go down through here . Well, you select all those hit elites need to make sure we get into these ones as well Cook and drag and elite. So now when we hit rendered, you can already see the view port The difference the way this looks before and after. So now we have this really cool low Poley mountain. And you think OK, we're going lower lower Polly is gonna look worse. Actually, it looks better. I really like this. OK, so that's really important. Really cool to get that cool Arcady Retro low Polly Look easy peasy. Just a few mountain cloners. Easily done, easily changeable. You can make infinite varieties of all these just by changing a few numbers, you can change the height, everything, the depth, whatever you do, the furrows, the roughness. You can really start miss around these, you can lower the reduction blah, blah, blah. Basically, we've built it in a way that's very customizable and provides lots of options that having to go back to square one and remodel anything. Okay, so now that we have our base square created, we are going to go in here and create a no. I'm gonna call this Bush just getting face, and we are going to click all these mountains and our road and our floor everything we've created and dragged it into the base. Okay, so now we've got our view port or our hierarchy over here, it's all cleaned up. Got a base. Now we're gonna do is now hold Ault and click this cloner object. And that's gonna go ahead and put our base instead of a cloner. And again, we're gonna go down to render instance, we're gonna change it to a linear. We're gonna right click this. So the why is it zero? And we're gonna set this to 4000 because our squares 4000. So now we have these squares going back this way, and we're gonna do a count of 10. Okay, So, as you see, we've created 10 copies of these mountains and it doesn't look like a whole lot right now, But you have to remember we're gonna go in here and we're gonna put our camera like this. And so now you start looking this you're like, Oh, what's kind of cool? I just was like a a road that kind of just goes away off into the horizon. And the beauty of it is because we created it in a way, it will loop seamlessly, and that's what we're about to do. So now we've got this set up in a way that we're gonna be able to animate this later, and it's gonna be a seamless loop that's just gonna loop forever and ever and ever, And you're never gonna be able to tell where it starts and where it stops. So it's really cool, and it's really exciting. But first we need to make are really neat city skyline, not the video game city skylines, which is really fun. I like I said, I'm a gamer. Um, we're gonna make our city skyline in the background real quick, using you guessed it a cloner object. So let's do that in the next video
5. City Skylines: Okay, so now we're going to create our city skyline. So we'll start with Cube. We're just gonna click this button, right? They're gonna go ahead and make that cube forests. And what we're gonna do is we're gonna set the size of this. Q. We can see it down here is we're going to change the X to 1200 the U Y. 2 5200 and the Z 2 1000 Okay. And they were gonna go with the fill it. We're gonna turn that on. And all that's gonna do is create these alleges. So you have these nice little corners to help catch highlights when you have stuff that doesn't have this on if you're not going for that low, Polly, look, um, this could be really jarring and disruptive. And when things were the distance or things are gonna be backlit, anything you kind of want these little highlights sometimes, Um, especially on something that's this flat, because this is going to kind of catch that extra little glint of light. This is gonna make it look a little bit nicer. So we've got that, and we're gonna change the subdivision down to two, Because these are gonna be far away. We don't need a ton of detail. We just want that little highlighted catch. And we can leave it at one segment by one segment by one segment. And right now you're thinking, Well, it doesn't look very good, Adul. But we're going to add a cloners. We're gonna hold Ault and click that Kloner, and that's gonna go and put that right in there and you guessed it. We're going to change this to Ridder instance, but we're actually gonna leave it. Agreed Array. We're not going to change that to Linear. So under Grid Array, we are going to change the count to 20 in the X Step Street Corner copies 20 copies of it along the X axis. We're gonna leave it in one. In the White House. We start cranking this. Why things you're gonna get up and down, which we don't need? That, that nobody's building buildings on top of buildings, buildings on top of buildings. So we've got the 10 for the easy here. Now you can tell this doesn't look very good. This is looks like just a pack of just a bunch of rectangles packed together. So we're gonna do is we're gonna want to drag that down to the end of our horizon line here that we've got made for ourselves. Now that we've got this weird block back here at the end of our horizon, we need to alter this so they're not so crammed packed together. So the first thing we're gonna want to do is we're gonna want to adjust the per step size. Okay, so this is just going to space out how thes objects are distributed in between the cloner amongst the count of them. Okay, so with the grid, this is X, Y and Z, we need to set this too much higher number. So 2100. Now we've got them spread out nicely now for the Y Value 200 is gonna be OK because we're gonna add a little difference in the height with something else. Now, with disease base, we're going to set this to 1000 and so you can tell if the middle mouse click and look at this. You can see it's just kind of spreading out our buildings a little bit, and I'm just gonna click and drag that up and we're gonna go ahead and make this 1500. So now we have this nice city block, but that doesn't look like a cool skyline That looks kind of lame. That's like something out of the Matrix from all the gun Rose fly out at him. So what we want to do to add some variety of this without going in and modeling a city and getting kit bash and all this stuff, we're just gonna go ahead and add of what's called a defector to this. So we're gonna hold the cloner button while we have our This is important to have your cloner. You want to affect selected click and hold this and go to a random and let go. And that's gonna add this random a factor. Now, defectors don't have to be Children of anything or nothing has to be a child of it because they link separately. So if you go to our skyline here, you'll see it hasn defectors Tab You under that Defectors tab has defectors, and we see we have this random effect. Er here just got a big check mark by it, which means it is this cloner is being affected by this random effect. Er are cloner for our base does not have it, which is good. We don't want this to be affected by it. So now when we adjust the parameters of this random effect, er you will see the difference in the way that this cloner is distributing its objects Random effect, er, where you're going to want to change what this is going to do. So when we change the values of the X, Y and Z, that is going to change per object in relationship to each other, how far each one can move in a random direction. So if I say 500 you know, let's say 5000 meters, the X it's gonna take each object and give it its own range within 5000 centimeters of where it can be along the x axis from where it was, it could move that far from its origin point so we can right click and take it back to 50 and we get a little more precise with this. So we all have the same city here. Okay, so what I'm gonna do for the exes, type in 1500. Okay, so you could see that we've already spread out. Nothing is perfectly even. We don't have those nice rose anymore. And then for the why were actually do with 1000. And so what that did is that just offset it? You know, since we can hide half our stuff below the ground and we're gonna change rz 22225 And that has just spread this out. And you can see already This is a little looking a little bit more like a skyline. And ah, what we're gonna do next is going here with scale. We're gonna check this box and what we have right now is an X Y and z you we can control these individually, but I'm actually gonna choose uniforms scale. And that's just gonna affect X, y and Z all the same time. So I'm gonna do is on a tie pin 0.5 and what that is going to do, you'll notice something's got bigger. You would think everything would be half the size, but the way it works is basically everything has a 0.5 variants, so everything could be half the size or twice as big. So now the scale is not wanted very, you know, 50% bigger or 50% smaller. So now we have this variation amongst all of our objects here. And then lastly, we're gonna check this rotation, and we're gonna rotate in the h here, Which would be if we rotate around the y axis. If I could move my mouse around this way so you'll see as we slide this little guy over so I could see this. We can see how that rotates. There were type of 90. So the way that works is now, it could either be ah zero or could be 45 degrees left end or 45 degrees right, which would be a 90 degree variation from its original zero. So it could be the 45 this way fortified that way. So that's just gonna give us these cool little angles here, which I think are pretty neat for a skyline. So we've got some buildings clipping into each other here a little bit. We can go on our random and, you know, kind of tweaked these a little bit deceiving. Hide some of those. But honestly, it's gonna be fine, because the way we're gonna light are seen up. They'll be backlit very much. But we'll go in here and we'll just spread out the Z a little bit more to kind of spread those out just a bit like that. So we'll say this is at 3000 now. Okay, so we'll hit the middle mouse button and we'll see we're getting kind of over our objects here are floor here. So we're gonna pull this back so it's kind of back at the horizon bit, and we're gonna pull it out just a scope. Just so we see that, you know, we have the edges filled all the way. So we ended up with, Let's say, 2 to 80 right? Is that it's but right. 2 to 8200 and 3000. And you can change those around all you want. But the main thing is, we've got this gray area here. This is not going to show up in our 1920 1980 render. But as we click in here, you'll see from the edge of the frame to this edge of the frame. You've got that skyline. Nothing's overlapping. Too bad that's gonna cause any issues. These are kind of funky, but we're gonna back like this so much that you're not really even going to see any of this happen. But you've got The main thing is we got this nice organic city skyline outline. What? Didn't have to model the thing. We just threw it a Cuban, a cloner and put a random effect er on it. Okay, so pretty cool. We didn't have to model a cityscape or anything like that. And so now that we've got that done, we can talk about how to animate this loop, and we'll do that in the next video.
6. Camera and Scene Setup: first thing you're gonna want to do and this is key. For every animation you do, you're gonna want to make sure you know what output you want, whether you want to be 24 frames per second or 30 frames per second or 60 friends for second. Know that ahead of time. And make sure you're seeing this set up for that. We're gonna do 24 frames a second. It's set Nice, Phil. Make look. But honestly, their main reason I'm going to do that is because at six less frames a second to render so that means faster. Render times for your entire project and you're not gonna lose any any detail. Really? So here we go. 24. I like that. So what we to do if see, we've got 90? Here's like 2490 bubble blah. That's ivory. Even What's going on? Soviet control D. That's gonna bring up your project settings, and you can also find this up here in the edit tab, appear and go down the project settings. You'll see the shortcut there's controlled deep, so that's gonna do is that's gonna bring up the way your project is set up by default. And that's 30 FPs. This is frames per second. So that means 24 images will make up a second of time. Okay, so every second you'll see 24 different images that 24 frames you'll have to render to Philip that second. So if we do 24 c, we change that 24 instantly our timeline here changed from 90 frames to 72. And this because the way the timeline works, it's based on the seconds even though it doesn't tell you them anywhere, which is very odd. I wish it would just say it in parentheses next to it. Like it would just display both. I don't want that feature. I want to display both. If you know how to do that, let me know. So you want to do three seconds for our loop? We're gonna say 24 times three, 72 frames. Right. So now we've got our 72 frames. We've got our project set to 24 frames per second. This is exactly what we want. Okay, so now that that's set up now we can animate. So in order to animate what we have here. You can see we've got our skyline in a random. We don't want these to move this city. This stays exactly where it is. This is gonna be a lock in shot. We're only gonna want to move this a cloner. So few middle mouse click and zoom out a bit. Scroll down. You can see we have this year. Now, one thing I want to do, which is just gonna help with the animation, is I'm gonna kind of align this just a little bit right here. And I'm gonna go appear on the gold red shift, camera centered camera. And if you don't have red shift, you could just create a camera. There you go. And what we're gonna do is we're gonna click this, and this is gonna take us to that camera view, okay? And we're gonna change this to 35 because 35 is an actual lens Millimeter. 36 is not very common. Um, I like 35. Like shootings. If I'm shooting something real life, I'll use a 50 millimeter or 35 for interviews and things like that. If I was gonna have a scene like this, I would have probably 35 on that, or 24. Or that might be a little too wide. So it's a 28 just one year. Creating lens focal length. That's hard to shame when you're creating lens focal links. It's important to try to mirror real world lenses. If you don't have any experience with videography and lenses and things like that Google and look up what lenses you could buy And don't look up variable and discuss. That's not gonna help you. Look up, Fix Linda's. You know, most of time they're gonna be, like 24 28 35 50 80 and 100. But you're not gonna have a focal length of like 47. You know, it might look nice, but it's something about it's just gonna not seem right. So when you're rendering, I always like to try. There's no heart set rules. You do whatever you want, but I like to try to do rial lenses that really exist. Okay, so we've got our camera made here about where we want it we're gonna do is we're gonna right Click this and we're going to go to, uh, we're gonna go to animation. You're going to go to rigging tags and we're gonna hit a protection tag on that. And the reason we're doing that is because a lot of times, if you're creating a camera, you're seeing what you're still in the process of making things and moving things around. You can accidentally move it around. So right now, if I try to move and click and move, I can't do anything. This is locked into place. I can still go tomorrow with the graphic views and move around. But when I try to move my camera view here, I can't. I can't change for that is so we can click out of our camera. You with this little box and it's a move around are seen right. And we could see our camera here. All we need to do to go back to this camera is click this little box and our cameras exactly where it is because a lot of times, if you don't have this tag, ah, you'll have this checked and forget you have a checked after you open your seen Mac up or something and you start moving it around like OK, I'm just looking to check on some things. Don't look at this city and make sure that I have these cubes in right spot. Like Okay, then I go to click to my camera like, Oh, shoot. I just move my camera around. Then you control Z and he controls he. And you're like, What the heck wise in my camera going back. Why is my camera still over here? That's bull crap. That's because that doesn't work. You do need to go to undo view, which is shift control, Z and that will move your camera back. Okay, but since I undid it, put the protection tag back on it. But it put the protection tag on it after I moved the camera, even though I did that after I put the tag on it so that you can run into some issues like that. And that's kind of the whole point of this is so you don't run into that issue, so we'll go ahead and will be set this camera back to where it is looking. Jang Hoon. You were just gonna sit that back like so? And it goes up to 35. Still, we're gonna bring it down a bid, pull it back. Yeah, right there. Okay. Make up. Uh, okay, cool. So the key is we don't want to see, you know, the edge of our floor in all the loops, the keys kind of hide that distance and those repetitions there. So we've got this year like this, but want it, you know, we don't wanna be super low on the ground. It could be, But we're gonna go about right here because you want to try to have, you know, think about the focal points of when you're creating an image. You've got 2/3 stuff like that going on. You know, we're gonna have a nice, symmetrical image going on. It's now we have that where we want it. We're going to right click and go back to rigging protection tag. It's now we won't have that up and get that all over the place. And we still have that camera to go back to at any time to see what things were actually going to look like, Very helpful when you're animating things and you actually animate your camera all over the place. And then you just annoyed you should to go back. And he said stuff so lock that down. So you don't have that happen. Okay? Now that we've got our frames set up in our cameras set up, we are ready to start animating in the next video.
7. Animating our Loop For-ev-ver: are animating our Kloner. So what we're going to do with this cloner is we're going to move it in disease plane towards the camera. And so since at 8000 4000 4000 he's repeat, you're not going to see that change now and I'll show you what I'm talking about here so we can ah, we'll leave our skyline on its stuff. So what we're gonna do to animate you have several things you can do. You can click these individual parameters, which when you do that, you'll see you get a little red button. This means that when you slide along to the end, you can change the value when it turns yellow. That means that this value has been changed at this point but has not been recorded yet. So it's like, OK, this is now different than it was the last point recorded. If you want to record this point, you need to click that button now. It will go automatically from 4000 2 2000 Okay, over time, which is fine. If to undo that, you can hold control and click whole control and shift, and they will undo any key frames on that you also can grab down here. It's kind of fickle. You have to get below the line. This line whores on the line here and drag in this little tiny little window that you have space for here is really hard to do with the tiny screen. If you don't have a lot of real of screen real estate, you you're kind of screwed. But so now we can see we can highlight that and move it and stuff is getting really weird, right? Okay, So here's what I wanted it. We're gonna delete that, uh, what we're gonna do, and we're gonna delete this key for him too. So we're going to go here and we can do it a different way. And the way we're going to do it, we're gonna hit control shift to make sure we don't have anything selected. And what we have are cloners selected. We're gonna hit this key right here, and this is going to say, create key frames called record active objects, objects, and that's gonna set a key frame for the position, the rotation, everything. You see, These didn't show up because we're inside the objects tab, but the coordinates of our cloner have all been recorded. Now they've all got a mark, a key frame, which is what this little dashes here. And if you go to the end of our object here at 72 frames and we say, Let's move this negative 4000 and hit that, it's like it's in the fight for them. 4000. There we go now hit that. OK, so now we've recorded that. Or you could hit this again, and I will keep from everything. This button here will automatically key frame things. I don't recommend doing that unless you're pretty experience in doing stuff, because what can happen is that's well, said, a key frame for every time you move this in any attributes you change, it will automatically make a key frame at that time for that. So it's very easy to accidentally add too many key frames and keep in things you didn't mean to keep frame and then going back and finding out where you messed up is a cluster, so Onley uses with caution. It can be a great time saver. It can also be a huge time suck. So be be mindful that I try to just be intentional about using the key frame button. Okay, so now what we have is if you go to our camera view, actually, we don't have to do If you hit play, we'll see a plane is moving, which is pretty cool. And if you go to a camera view, we've got our plane here and let me that pretty cool eso you like. Well, now it's kind of neat. Doesn't look, you know, it doesn't look very well because nothing's loading here, but also the speed of it is kind of funky. Ah, and the reason that is is by default thes speed curve of your animations. That's the the amount that it moves over time from your first key frame to your second key frame is naturally a Annie's so we can look at that by going to the window here and going into the F curve Timeline shift cult F three. If you're ever going to remember that, that's very impressive. But I That's okay. It's too much. Whenever involved in NF button. I'm like, I mean, is that I feel like I'm coding at that poor hacking or something. Okay, Maybe that's a silly of me, but you can see here we've got our cloner selected you to make sure you have the object selected before you open up. That because it will show you that object. Okay. And you can see here we've got all this stuff appear that looks like craziness, and it's kind of confusing. There's lines going all over the place, and if you knew, this could be overwhelming. But trust me, it's pretty easy and basic. And there's a lot of things you need to do for every, uh, loop that will make it helpful. This is easy to do with camera moves and stuff like that. The first thing we're gonna do is we're gonna click this button right here, and this is going to change all of our interpretive interpolation from Spine two. Linear. So right now, if we twirl this down, we see we have the positions e selected here, and you can select each individual attributes. And when you have selected, you can frame it up in the window. You can frame everything where you can framed selected with these buttons here, which gets very helpful when you have a lot of things with a bunch of different values. So now we can see really? Because this one Ah, this view it is it's worth noting that this view port doesn't work like other view ports. If you scroll Ah, it doesn't really zoom in it. It zooms in the numbers, but then everything I can't like going to look at this up close. I can sort of zoom in like that. Yes, it's very based on where you're pointing, and it's very easy to get alone around Ah and get confused and everything's that's fitting in there at the same time. Like I want to look at this whiter. How come I can't you know, it gets kind of funky, so I like to try to use the frame all button whenever possible and work from there. And there are the same controls here. You can look left and right with all of these, but in the h that will frame everything back up. H is always a safe bet to push in a window to frame everything up. Okay, so now I've got that we have this s curve. And so what this is doing is that means that went from frame zero. If I hit, play, it goes, and so it slows down. That means it starts off slow velocity and then it gets faster and it's going. So from each of these ticks is a frame, right? And so this line represents the amount that that is moving. So from this to there, you see, it just kind of moved just a little bit. If this is negative 100 from here, it took seven frames to go negative 100. But down here, we noticed that it actually only takes almost a little over one frame to go negative 100. So it's traveling a lot faster here. So what we want to do for a loop in the key for a good loop is we wanted to be constant. You need did not see a variation in speed unless you've got, like, a longer loop, and you can do that Variation in speed smoothly and even that needs to repeat. So what we're gonna do is we're going to click this linear here, so that means it's gonna have a constant speed. The difference between frame one and frame to is exactly the same as it is between frame 48 49. All of these between each of these. It's exactly the same speed the entire way. So now when you hit play, it's gonna go. Same exact speed all the way through, and you're not going to see that speed up, slow down. And that is very, very key for a nice, looping animation. And so we've got from frame on frame zero. We've got it at exactly the same point as friends 72. It should look exactly the same Boop and poop. So, yeah, when we go from the first frame to the last time using these buttons, you'll notice that there's no difference in our be important. And you think that's perfect. That's what you want. It is not what you want in a loop. You actually do not want the first frame and the last frame to be identical, And the reason that is because the way loop works is, let's say you take it these three seconds and you copy and paste them and paste them and paste in the basement. Pace in back to back to back to back to back so they're gonna go through these 72 frames 73 frames and then to the next 73 frames. Bubble bubble blonde they're gonna repeat. So once it's goes from 0 to 72 you now we're gonna go back to zero and go to again. So if frame zero and frame 72 are identical, that means that when it first goes through, friend 0 to 72. If the next frame is identical to frame 72 that's gonna be framed 72 frame zero next to each other. And when you have those two frames next to each other, that is two identical frames back to back for two frames. So now you've gone from having a constant speed between every frame toe, all the sudden having this, these two frames, that there is no change at all. So what that's going to do if you render that out, you'll notice that that creates a little hiccup in your loop. And you had that little that little one frame where you noticed something's not right. The motion stops just enough, and we can render that out. I love to do this with little test, uh, going here, the render settings we could change the red shift real quick. We don't to save it will do. Real tiny. We'll do 300 by 200 or something like that. Okay. And we're not gonna worry about the way this looks or anything. We're gonna go in here, red shift. We're gonna scroll this all the way down a 111 and we're gonna hit output, going to choose all friends, and we're gonna hit Render. Yep. We're not gonna say that. So we're just gonna render that out so that we can actually look at this animation smoothly and a looping manner because of the few. Port has some hiccups where it doesn't want to show you it all the way. And so you notice one thing that's happened here is we rented out 90 frames, but our project is set to 24. So why did we do? We have 90 frames now, and I'll talk about that in just a second. But first, let's talk about our loop. It's gonna be the same regards. Gave play. Okay. Cool. Cool. Cool. Oh, yeah, That looks pretty good, but, you know, it's right right there. There's that little bitty hiccup what it does. A little, uh, we'll try to cover this up and see if you can see where it is. It's tough to see, but it's there. There was. You can see it and it's a lot of times you can get away with it. But I'm telling you, there's a really easy way where you can avoid that and you never have to run into that. So here's how you do it first. We're going to go to our output here and make sure we're out putting our frame rate at 24 which is what we have are seen it set up. Second, we are going to take this key frame and slide it up 73 or we're gonna take this key frame zero and slide it back to negative one, which is actually what we're gonna do because we're going to deal with motion Blur. We're going to take this key frame, which you can just click and drag an ASL area and have it selected highlighted yellow, and we're gonna click and drag that back one frame. So now it's back here at negative one, and then we take our timeline, set it back to zero if you still see it over here, hanging out, negative one area. But basically the reason we're gonna do that. And I'll explain that when we get the motion blur. So now that the frame after 72 is now gonna be the frame that was after zero, which is what we want because 72 0 were the same. So now it's gonna go frame after 72 to 72 from after 72 to 72 from 70. But so now we're not gonna have that little two frames of the same thing. They're gonna be office it so well that Rittner on this again so we could see the difference. It is easier to see you in their higher resolution, but I like to these quick little things just so I'm not, you know, noticing something supergiant that shows up and you can see when we don't have our mountains. Like all of our mountains, air, kind of the same height, they're different enough that we know they're different, but they aren't that different enough that we start really, you know, picking out where they're repeating like it's like, OK, I think I see where the Lupus. So here we go New. Our new renter is now done rendered and will hit play. Now, Now you don't have that. You don't have a hiccup it all, and you try to pick out where this started. You know you can't and that's the beauty of a seamless loop, as you can turn it, tune in and look at it and you're like, I just looked away and look back, and I don't know if I'm looking at the same part or if it's still going or if it's changing , that's perfect. That's exactly what we want. So by offsetting that frame, we now remove that loop, that little hiccup. And like I said, you could change. Take 72 move it off to 73 leave the frame zero key frame where it was. But because we're gonna deal with motion blur and stuff, I like to do it the opposite moved the beginning frame, but at this point, hopefully you've learned some tips about how to create a nice, seamless loop. You you know, we've got in a non destructive way, so if we want to change this, we still have the ability to change our buildings. We could swap this out with something else. We could change shapes. We can remodel that Reese level are cloners. We can choose different seeds. We can change it, so it's not gonna be exactly the same. And then we have infinite combinations. We could change the size, all this stuff. So we have all these attributes that we can still change. Nothing is locked in so we can have infinite various versions of this. So, you know, if you're doing a V. J, D. J. Said, and you, like, don't want to make it obvious that you're just Duke copying and pasting the same project. But with a different color palette, you can now copy and paste the project, tweak a few little numbers, and then it looks totally different. But it's similar enough, right? But you could change attributes about whatever he could flip these two and make this make these cubes and make this skyline whatever you want to do with mountains in the background , anyway. So now you have this looping thing, and the beauty of it is if you do want to, um, replace stuff, you kind of have it set up in a way that you now know If you want to bring ah, model of something in, you can plop it in a cloner, its face it correctly and then all once you get your 4000 centimeter block built that will clone and be animated for you automatically so you can just drop in things and replace things. And then you could just add in some palm trees and stuff in here will hit these little Polly Mountains and it would be pretty cool, so really neat. Easy way to do that nondestructive. Nothing is locked in and will automatically update and loop for you a za long as you keep that 4000 centimeter the lock of the same. Okay, so now let's talk about adding lights to our scene real quick before we wrap this up. Looking at this, I kind of want Mawr Road knock either to grab my camera, believe my protection tag, kind of arc it down a little bit, which I think is maybe what I'm gonna do. I was gonna hold all just kind of that down just a bit. There's other ways you could do that. You could click in. Go to your camera from the side of you. Here, Hit our to rotate and rotate your camera that way and it e to move it. Yeah. You want to do it that way? But I like to take control it from the first person point of view here. Uh, interview. Okay, now I got my camera exactly where I want it. I'm gonna lock that in with everything again. Here we go. OK, now onto lighting.
8. Lighting: Now we have a perfectly looping Now we need to set up all the stuff to make a scene, but cool. And like I said, you can use the renderings you want. I'm gonna use red shift here. So the first thing we're gonna want to create is a red shift dome light. So do that. We're gonna go appeared red shift goto lights and choose dome light with this dome light selected, you'll see it pops up in a little window down here and we're gonna pull that over so we can see what we're dealing with here Under the general tab for the dome light, we have this option for a dome map with an image in a path. So we're gonna choose this path. Then you can use whatever you want for this kind of thing. Ah, HD Ours formations are having all kinds of environment math. Spherical maps have lots of names. They're all the same. It's just these 23 60 image. It's gonna be wrapped around and create the light that way. Now the image you're going to want to choose is an image I provided you. It's called Sky and all. It is is a noise of just deep purple and, ah, sort of a dark blue just to kind of create that purplish, bluish nighttime retro sky. Okay. And we're gonna bring that in, and we got to the exposure to negative one, and we couldn't go ahead and render this in red shift and see what that's gonna look like. Let's go ahead and change it up a little bit of quality from 300 and we're gonna go screen . I've started output film video. We're gonna do HD TV at 24. So that's 10 80 p at 24 frames per second. Okay, so now we're gonna reinterview the I p r. And you'll see now we have our whole scene with justice. Nice purple e light on everything. Obviously have no textures, so it's not gonna look awesome, But this is just gonna be this ambient light that's gonna be kind of just defused across the whole map, and we're gonna We're gonna want that. Okay, so that's it for the dome light. So what we're gonna do next is create the light oven area light, and so were the lights area light. And we're gonna see that it creates is so rectangle here and we're gonna middle mouse click to go to our top you because you're gonna want to drag this mouse this light back behind our cityscape because this is gonna be our sunset. So if you're used to using cinema 40 and physical render and stuff, you'll see they have this ah, background tag. You cannot use that with red shift. Kind of a bummer. I wish Red Shift could use floors and backgrounds, but honestly, uh, there's easy ways to get the same effect, so it's not that big a deal. So here we go. We've got in our area light back here how we can hit t to scale of that up and we're going to scale it a pretty big We're gonna let go and click and drag, click and drag, and we're gonna wait till it gets all the way big. So it's outside of our field of view here, and we're gonna middle mouse click. And if you notice when you look at this, we have these little angled lines and that means that this light is shooting off That way, if you notice here in your seen your it's all black. And that's because this light is not hitting anything. So what we do is or rotate this led around. We can say our and grab the Z, grab this axis here and hold, shift and rotate. That shift makes it rotate in five degree increments, 180 degrees back towards us. And then we're gonna pull that up just a little, and you'll see all that light spill out onto our scene. And we're gonna go to our texture here under the general tab of this area liked. And we're gonna choose this have made this, like for you and sunset dot jp and all I did. But this is I made a little sun Ah, and then Photoshopped, but made the campus really big because I knew that I want my son to be really tiny and then the area around it to be really big. And I want to be large. So it's high resolution because I'm gonna wanna have some wiggle room with it. You know, I want to be able to make the sun really big if I want. I want to be able to make assembly small if I want, and I don't want there to be that weird space where I have, like, a gap where I don't have the the light showing up or I'm set in stone on a size that it has to be. So I like having a little wiggle room. Keep that in mind when you're creating images and things like that for backgrounds and whatnot. So we got this area light here. Let's go down here and click visible. That's huge. That's a very big, big part of this second thing you're gonna want to do is you're gonna want to change your intensity multiplier. And the reason you want to do that is because for some reason and it might be the fact that were set in centimeters. But red shift almost always starts off your lights with just the power of the sun, and they're way too intense. So we're gonna take this down about two and you'll see now we're still getting a light on our seeing here. It's just not gonna be blown out that intensely. And so now we're gonna scroll down and we're gonna see this spread and real quick. Before we get into that, we're gonna go to every Ryner preview. They were gonna render that out. And you see, we can see our son here. Now, if you notice that our image, the horizontal dashi lines are actually on the bottom, so are light where we rotated it. 100 degrees is now upside down or images upside down. But I actually like the way this looks versus the opposite, so I'm totally cool with it. You can keep that in mind too. Um, with the way you're gonna work. But see how we have all this purple here you don't see, like in your heart lines or anything where the edge of the aerial itis is stopped or anything. And the fact that we have this turn on divisible allows us to see that image there. And once we add textures here, you'll be able to see that the light from this is actually reflecting off of it. Okay, which is gonna be really nice. So let's go ahead and go grab a material red shift materials and just slap it on our road here. Well, quick. Just so we can see these reflections. And already you get this really nice, cool, trippy effect right cause we just put our whole texture on her whole cloner. We've got this really nice, cool, mere effect going on. That's kind of awesome, actually. So you'll see you get the reflections from this light, and another thing you can do is control the spread of the light. So if I start pulling in this spread, you'll notice that our afflictions get a little weird. And the way our lighting hits is a little different. So we want to set this spread 2.5, and I'll explain what spread is right now. So let's say that this is our light, which it is, and this boxes cone I've created represents the way light is going to admit out of there. So by default, the spread is set the one. So we've got this nice soft light that's just gonna shoot out really wide and just kind of create these nice soft shadows on an area light. The bigger the light, that soft with shadows. But the lighting is just gonna spill out of that all over the place. Now, if we start closing in the spread and take it down below one and we go to start closing that enclosing that in, we're gonna tighten up the way our light is spread. So now if something was over here when it was getting lit by this light, it is now not lit. So the light is kind of like a, um, like barn doors or ah, for Nell on a spotlight, your kind of switching it from a floodlight to a spotlight. And when you get that spread all the way down to zero, you create a perfectly sharp line where you get the exact box of your light, a replica of your light and just shoot out perfectly straight. No light escapes beyond their size of your box. It just it takes from the access of the middle of the light and just shoots out from their boom perfectly straight. No spill, no nothing. So, you know there's a good time to use that in a time to not use it for us. We're gonna go right in the middle, and so we're gonna have kind of this spill, but not a total floodlight. So we're gonna go with 0.5 for our sittings, and the reason we're gonna do that is because it's just going to kind of funnel that light down towards the camera pretty well and kind of leave that dramatic effect of of not just lighting up everything. So everything's not it's flat. With this backlight, it's gonna make it a little more dramatic and contrast stylistic choice for the scene. But this way I like it. Um, we've got that going. OK, so now we've got our lights. Those willing to lights we have in the scene, that's it. Easy peasy. So now we're gonna move on to creating the textures and we're going to start with the cool neon wire frame. Tron, look on these mountains.
9. Wireframe Mountains: This is the part of the editorial beyond the lighting where red shift is is kind of unique . And I don't I haven't used octane enough personally to know how much it mirrors red shift. And if you'll be able to follow along, I've been told that the way that red she works with nodes, some of the names are different, but the actual workflow is the same. You're just gonna have to replace certain things. So keep that I'm on, but I'm gonna show you how to do red shift. Ah, here we go. So we've got our material here. Let's just go ahead and create a red shift material material just to start from scratch. And let's name this before we forget, we're gonna click the basic tag here, and we're to call this neon Trone for fun. Okay, Neon Trump. And we're gonna double click that and that's gonna open up our shader graph. Now, this can look very confusing and very overwhelming. I have a skill share class on creating over 50 medals with this where I go deep dive into Aton of these features were not gonna do that in this tutorial, but we're not gonna worry about that. We're just gonna deal with creating a very simple neon look. So we are going to click and drag this on to our cloner here. Now, I wish I could just select these mountains and say Click and drag on there, and I would love to be able to do that from here. But what we need to do is turn off this Kloner, okay? And then we're gonna go in here and we're gonna turn off. Actually, we're just leave it like this. So without that corner on, we just have our mountains here in our little broken up into our little arranges. So for grab this neon Tron, drag it onto that mountain dragon on that mountain. And we can either do that through the view port Or once we have it over here, we can click and drag things over here. Or once we have one, we can hold control and click and drag to make a copy, control, click and drag. So now each of these mountains all has his texture on it. And just to test that, we're gonna go on go and she's a color. It's like a blood red to make it very obvious. And you can see that indeed does have that on it and render and to see all these air red, which is exactly what we want. Okay, we don't want to be read, but we've got our textures where we want them so they could turn our clone or back on. And that's gonna make our images there. And we're gonna open our render Vieux Port back up and take a look at our seen here and what we're gonna do here, we're going to change the color back. Teoh Black. It's fine. Um, where you want to type in wire frame. We've got wire frame under the textures here. We're gonna click and drag that in here, and we're gonna plug that into the RS material here. So you're gonna grab this little circle and click and hold and take that to this blue square here, and we're gonna want to put this in the base properties diffuse color. And we also want to put this in the overall admission color. Okay, not going to see any change when that happens. So what we need to do is you need to go in here to our eat red shift material. Go to our overall tab. And then our mission weight is said to zero, which is why we don't see any effect from our emission color. We're gonna want change this to 10. It's now your bland You're really seeing that the blasts out of their let's say five just so you can see this leisure. Okay, so you can see now these air glowing white, which is perfect. So we want. But that that's good. That's working. So we're gonna go into our wire frame mode and to get that cool, try and look. There's a few things you need to do. One when you to swap these colors. We want our polygons to be black in our wire color to be like this. Cool purple e color right like that. You want to go a little darker than bright because you're gonna be plugging into an admission. Changing it to an emission setting is gonna go ahead and brighten that up because there's gonna apply it like it's a light. So you wanted to be a little darker, because if you go all the way up at the highest value, where you add it into a light. It's just gonna blow it out and it's gonna look white. It's gonna lose all the color information that it had. So get somewhere a little lower and you can see already we can't have this cool. Um, really nice glow Be arcade. Look to it. And one thing we can do is change off the show hidden edges. But you're not going to really see that big of a difference in this because we use polygon reduction. But let's say you don't have polygon reduction on your scene if something is made out of ah quads, which almost all models and things are made out of rectangles, right? Every rectangle is actually made up of two triangles, but in that those lines are called hidden edges. So those if we had something like a sphere, we could bring in here, plop this on that sphere. You see, you have these hidden edges lines here, even though in our geometry of squares here we have triangles. So we turn that off and then that hide. So it's hit and edges. So you would just see the geometry you see in your view port. Okay, so We've got our mountains here with this cool edge. And so all what we can do is thicken up these lines. We can take this up to two, and that's gonna make these nice and thick So they kind of have a cool, very standout D's are arcade retro mountains that are low Polly, We could go 1.5. Yeah, I like that. So we're at the word 60 for the purple value 60 and ah to 90 to appear if you wanna have the exact same color is me and you can tweet that and set that. But I think that looks That looks nice. Diffused color is good. We've got the base properties set the weight of that diffuses there. The roughness is set to zero. So these are going to reflect super sharp like a mirror. And we don't want that. We want to see a little bit of roughness. So we're gonna sit that 2.3 and that's just going to spread that lights. When that light hits this object, it's not gonna be like a mirror. It's gonna be like, um, form or more of a matte finish kind of mirror. So you see that light kind of bins and stretches across the polygons there. And I think that is just gonna add just a really nice let's look to this scene. This is where this spread of our light comes into play. You can look at that really quick. We take our light spread and we go up the one these are gonna be really soft. We take it down real tight. You're not getting that reflections not leaking out. The nearest much is very tight, so we'll go back to five. I like the way that's wrapping across like the inner bits of the mountains and not really all over the place. Okey dokey. So that is our cool, low Polly Neon wire frame glow. And you can put that in any model and make it, you know, really neat. And you got this cool Tron style. Look, if you want to do something, this is a real quick little bonus. I know I talked too much for Check this out. If you took your object here with your wire frame and you held control and click and drag drug this no down, you can then click and drag this into here and go toe overall Opacity color reset thes colors so that the wire frame is white. Keep the polygon black and maybe up the sick thickness About five. Okay, so now when we look at this, they're see through. So you can get some, like, cool models and do like a really nice ah hologram wire frame display of your model, you know, without having to make anything clear, do anything you can just use one wire frame, texture node at said to black and white, where everything that's white is what's gonna show up everything that's black. It's what's gonna be transparent by plugging that into the red shift. Opacity color. So pretty cool. Little easier way to do some, you know, nice HUD elements and stuff like that. All right, so that is our cool low Poley mountain. I think the next thing I'm going to show you how to do is create just some textures for a little city back here. And then, lastly, it will go over creating. Okay, See, in the next video
10. City Lights: Okay, so now I'm gonna show you how to create just a cool little quick city texture for these for these buildings back here. This is something I kind of discovered accident, but I really love it. So there's a a third party standalone software. It's called Js placement, and it's free to download. I'll link to it in the notes and Js placement is just this awesome, completely free Griebel maker. And it can do all kinds of Grable's uses a lot in my red shift. Riner, my materials class, the owner has to do some really cool Grable's Check that one out. This is a amazing tool. So what we're gonna do is choose dot grid. We're gonna click in here to get that open, and you could see already this kind of looks like the side of a building at night time. There's a little extra going on, so we're gonna fix that. So we're gonna go ahead in here and click off all this stuff, But we're gonna leave this white box and all the use patterns here, and we're gonna go ahead and change the drawing chance up to about eight. We're going to go and change the scale. It about 66 pick up sticks. Yep. And we're gonna change the pattern Length about eight money. There we go. And then we're gonna say save height meant we're gonna make sure you will go. Uh, city Lights one. Okay. Make sure saves is a P and G Go back to our seen create a red shift. Material material, delicate debt. Open that up. Goto our textures tent. I'm bringing a texture note, and then out of the General tab will have this option here to go to the path. Okay, so we got our texture staff from right here, and we're gonna open up a path we're gonna link to that object City lights. We can say yes. Here. Metal. Copy it to our path. That's fine. That helps with you. Just copy and move stuff over. Make duplicates such as helps. So we've got this texture here, and we're gonna plug that into our red ship, diffuse, and we're gonna plug bed and again. Let me think. There we go. Plug that in again to our overall emission color. So we're going on here, are based properties, and we're going to go to our reflection roughness, and we're gonna go 2.5. We just want these Teoh. Well, we're gonna go 2.35 We want our buildings to have a little reflection. But we don't really want the nap like a ton of reflection because they're gonna be backlit so much, it's not gonna really matter. But we want them to catch those highlights just a little bit. And we can tell it's not blowing like we thought it should be. So we're gonna goto overall and again, we have to turn up our emission weight and we're set this to We started 10 and we're just gonna make this really bright and we're gonna goto overall tent, click this. We're gonna bring it to just a little bit of a yellowy orange. I'm gonna pull this bag just a bit like 5% saturation, and that's just going to give it that no city night light color value to it. And we leave this open just in case we can start messing around with the emissions. But we're gonna go in at a red shift, reinterview open that up and play, and you'll notice that nothing changes and that's because we don't have this material on our city, so well, boot that on our skyline and boom. Look at that. I love how well that works for a city in the distance and is stupid. It's really, really nice. Really pretty, really effective. Easy way to do that with justice Placement makes that possible to take me forever to model . So there, let the paint something. That look that Well, okay, so we're gonna take our mission. We're down to, like, one air we go. We want to be a little subtle. Maybe even 0.5. We don't want to steal the show. And then the oral 10 we're gonna make it a little more saturated. We're trying, like, 20. Okay? Yep. And then 0.25 and said, Here we go. So now we just have this nice background, the overall tent. We're gonna go 40%. Yeah. Okay. Cool. So we've got this kind of city, you know, we've got the little lights and windows and stuff. We didn't have to UV map that on their anything, you just plopped it on their works. Totally fine. We're gonna go with 0.1, because I still think it's too obvious. There we go. I want to be subtle. I want to be nice, because we're gonna have this bright of a light. These wouldn't be that right. Right. So we've got this nice, bright sun. We've got city lights that aren't distracting, but we can tell there a little, uh, close together. So what we can do is we can either go into the UV map or we could go to the texture itself . We're gonna go to the texture is. All we're gonna do is we're gonna go here under the remap of this texture and want to change this 2.8 on the X value. And this is going to spread those out just a little bit there. You said it's not so smooshed again. Really, really want this to be the highlight of the peace. Who we just wanted to know that they're there. Very cool. Okay, so now the Superfund part and that's gonna be the road. So let's get into that in the next video
11. Creating a Procedural Wet Road: Okay, let's make this cool, reflective road. So we've got a new regift material we're gonna go to create over the red ship materials material. Double click that. And if you want, we can label it here. But if we call it here under the basic tab, it's just gonna change the name of it here. It's not actually going to change the name of it in the scene. Kind of annoying and misleading. But if we change it here that we were not confused, we'll call it road. Okay, there are road here. Don't click that. Open it back up. And the first thing really want to do is create a noise. So we're gonna type of noise. You see, we have two options here. We've got Max on noise and regular noise, but we're gonna use Max on noise if you don't have maximum noise. It was introduced in red shift. Three point. Oh, and up, I believe. Um, if you don't have that version, I highly suggest updating the newer versions of Red Shift. Really? Do you have a lot of nice features that make the ah maintenance update reminder worth it? If you bought a license or if you get it, bundled the package. Just make sure it's up to date. Do that on the red shift three d website. Um, also, if you don't have it her, that's not an option because you've got a student license or something and you're just stuck with what you got. What you can do is go in here and go to see 40 shader, then goto textures if I can type texture and what we can do is inside the C 40 shader. You could go in here, you choose noise going to your noise, and it's gonna open it up. Over here we have all these settings, Tony, of all these noise options, grab that and plug that into the texture text zero and then plug that in. And that worked. It just is gonna take a little longer to render when you get a whole bunch of them and you're seeing because basically is having a bake that down and then into a texture and then put it into your Reggie material rather than just using the maximum noise here. There actually are a few advantages to doing that. They have a little fume or controls here that you don't have enrich of noise. But I want to see it's not that big a deal. I like to use knifes on noise because that's what we've got here. Ah, and that's all we need for this project. So we're gonna have our noise, and we're gonna go ahead and grab that and plug it into our surface so I can see what the heck were doing with it. Right now we'll slide that over, will pull up our interview, hit the little play button so we can see what our little scenes looking like. I'm gonna grab our road and just drag it up onto our road up there. Wow, that looks amazing, right? It's not gonna look good right now, but what we're what we're looking for is we want to see where our values are going to be white and we're gonna be black. And what we're looking to create with this one is the reflection map. So anything that's a white is going to be sort of that rough, glossier look in anything that is the sort of more matte finish a matte finish, right? It's gonna really spread the light across it anything that's black is gonna be like a mirror is gonna be perfectly reflective. So what we want to do is we're gonna choose a noise type here. Over here on this side, you've got type. We're going to choose turbulence now that we've chosen turbulence, that we are going to go on here to the overall scale under the input tab here and type in 10 and that's gonna blow it up. So now that our maximum noise is 10 times bigger, so one thing to note is a maximum noise kind of works the opposite of the way texture works . If you told the texture to be the scale of 10 it's going to repeat itself 10 times versus expanding itself 10 times. So keep that in mind that they're kind of the opposite. So I think noises make more sense. If you type a larger number, it's gonna be a larger looking pattern s. Oh, there you go. We've got that going. And so the next time I'm gonna start doing is we're gonna change the seed, appear to 4 88 and it's just to see that I know I dabbled in these and so I found out that this one looks pretty good. You can use whatever side you want. Once again, we're creating stuff in a way that it's not destructive. It's not finite. We can have infinite possibilities with these objects with these seeds. So in the octaves were to turn that up to 14 and that's not gonna be that much different looking at all. But really, what that's gonna do is that that kind of creates a little more detail and stuff in between , and we're gonna start messing with the output down here. So what we have here, we can drag this oversight could see more of it. We've got cycles, low clip, high clip brightness and contrast. So the way these work is low clip the values Default said 20 And as you pull that up, you'll start seeing that you are now clipping everything towards all black. So what it means is that at a certain point, as this slides of that means anything that is ah ah, value of brightness lower than 0.0.6, with one being white, zero being black, anything that's a value of 00.6 or lower, it's just gonna make that zero it's not gonna be this Grady int is gonna instantly make at zero and the same the high clip or the vice versa. Where the highest one, the low is zero. When I go down here, anything that is going to be above 00.27 brightness is gonna instantly returned into pure white. So that's how that works. And so remember why it is rougher looking reflections. Black is shining it reflections. So we're gonna take this low clip and we're gonna pull it up 2.24 and we're gonna take the high clip and we're gonna pull that all the way down 2.6 and then we take the brightness. And the way the brightness works is that and that affects the overall of both values, the highs and the lows. So the whole entire scene is affected by that, And in the contrast is though everything that's above 0.5 brightness gets brighter, everything is below 0.5 brighten. It gets darker, so it kind of is kind of splits the difference there. So we're gonna take our contrasts. We're gonna put it at 0.288 and we take our brightness and put it at negative 0.12 These are arbitrary numbers and you'll notice this isn't look like a reflective, shiny road for looking at this for like, OK, wolf, this is gonna be, ah, reflective. Uh, I'm only going to get a couple of puddles here and there most are. Road's gonna be, um, rough looking then we don't actually want that. We want to be kind of the opposite. So already to do is drag, click and drag and swap that and then take this top color and make it back. So already was invert the colors. We're actually take this white and we're gonna pull it down a bit. I'm going to go about 75%. So what, 75%? The reason we're doing that is we don't really want anything to be super rough and not reflective looking. Because if we have a wet road, there's pretty much just gonna be water on the road all the way across. There's just gonna be some areas where it's huddled together, but nothing is gonna be not reflective at all. So we've got a look at that. And so what we can do now is now we have that plebian tore surface output weaken. Instead, plug this into the Oreste material, take it and plug it into the reflection, reflection, roughness. And then from that, we're going to take this and plug it in to our output here, and you're gonna see instantly. We have this really nice, cool looking puddle e looking road. Uh, that was fast. That was awesome. And all we have to do if you want to change it, is change the seed and you can just scroll around and here, change the seed. You see how fast that updates with red shift so you can really find tune and get that road you like. And then one thing you could do is you miss the low clip and high clip. Make your puddles bigger, make your more matte finish more, Matt. See more puddles, less puddles. Pretty cool. So that looks pretty nice, But tell them about that. Just doesn't quite have the detail that we want in a road. Now, we don't need to make it a super ultra photo realistic road because we're gonna be putting motion blur on this and is gonna be a big blur anyway. But we are gonna add a little more detail to this, so I'll show you how to do that right now. So we're going to create a new max on noise. You can either do this through the texture tab here or if you want, you can control, click and drag this node and do it that way. So grab your maxim noise, pull it in, and for this one, we're gonna change the type, and we're gonna pull this up so you can see our little arrows and everything here. And so what really? With distance? We're gonna choose Pox O and we're gonna click our type. Choose Park. So we're gonna plug this into the surface so we can see once again what we're doing, and you kind of get an idea of what we're going for here. We're kind of going for that. That roughness look of sort of the asphalt. So this is actually gonna be a bump map. So that's what we're creating now is a bump map instead of a roughness map math. So we've got these right here. We got park. So we've got the C 123 That's fine. We're going head in here and turn up the overall skill to five. And that looks pretty good. We are going to take this contrast up 2.3. And so just we have all these little bitty things here, and I think, honestly, looking at this, I think we're gonna take the scale back down to two. Yeah, I like all those little Biti's scuffs in the road here, and what I'm gonna do is everything that is. So the way a bump Mapple work is everything that's a black value will not be affected by the bump. Everything that has a white value will be affected by the bump map, whether it's increased or decreased. You see, they're gonna be excluded or lower this and have that effect as if it's no unique. Okay, so we've got that. So now we need to do is add a bump map. So we go bump map. Okay, max that noise into the bump map texture and put but map into a rigid material overall bump input, bridge of material into the surface. And so now you can see we kind of have more texture on our road, and it's a little intense. That's kind of very high. So we're gonna want to do is we're gonna flip this so that it's not raised up, but it more looks like cracks in the road and David's out of the road. So we're gonna set this to negative 0.5. So that's gonna make thes cracks in the road instead of cracks. Ah, a sort of dense on top of the road. They're gonna be cut into the road. So now you see, that kind of looks a little bit more like asphalt, and we still have these reflection areas, But we also have this bump area that's being affected as well. Now, one thing I will say is things start looking a little bit better when they're mixed together. So what we want to do is actually mix these two bump maps. So we're gonna use this texture here with the reflections and use that to create a bump map . This well, that way, it looks like where the water is collected. It's gonna look like a puddle of water actually pulled up on the ground rather than just, um, shiny floor. So we're gonna grab it, but map, we're gonna pull that in take our max on noise here, plugged that into the bump map, input, texture, and then to combine to bump maps that we're gonna need a bump blender were globe drag that bump blundering. We're gonna set this base one the one that's our reflection. Roughness. We're gonna make that the base input right here of the bump. Linder, we'll take this other bump map, and we're gonna plug that in and make it our layer zero bump input. And we're gonna grab our bump, blunder and replace the bump input on our regift material, so you'll notice. Um, there's no riel semblance of this other texture existing, but you can tell. So all we're getting right now is the same as if we just plug this bum map into here. So we have now where the road is raised up and where the water is kind of collected. You kind of it kind of looks more like it makes sense that water would pool up there, and that looks really nice. So what we're doing is we're gonna plug our bump blender backing or bump input. We're gonna go to a bump input, and we're gonna switch this to additive mode. And so what this is gonna do is under this blend weight. As we slide this up, you're going to see that it starts having this other bump map play a role in the way this bump is looking. So think of it and photo shop or something like that, where you have a layer on top of it and you're kind of setting it to screen when he said to additive mode and then you're adjusting the opacity of it. So we're gonna bring that up just a little bit to about 2.3. Yeah, that looks pretty good. So now we still have these little dips and things in the road. But we also have our overall roughest going on with the water. That's gonna look really nice. I believe when we start blurring that with this, that looks really, really good. Now you can spend forever working on little details on your road and stuff. But honestly, you don't need to, because we are gonna blur that and you're gonna lose those effects. But so there we go. We've got no textures, no nothing. You can change the seed of these things and get totally different looks and everything will update. Find out you don't really like it. But your clothes you could play around that 48. I like the way that's looking and like that is looking really nice for no textures or anything. It looks like a really nice the road. I like that. You can still see the sun in there. And if you want, you can check this to make sure as we slide through here, you'll notice that it moves because our road is moving as well. So we can kind of see different areas of the road and how that's gonna look. And that's really cool just to see that kind of transition. So really nice fun looking road, easy peasy. Red shift is the best. I love it. That was so fast, so easy to use. So now we are ready to talk about our camera and, uh, setting up the motion blur and how to render this out. See, in the next video
12. Motion Blur: Okay, so we've got a red shift camera here, and like I mentioned earlier, I like the focal length of 35. I think that works good. So we're gonna talk about using motion blur inside of red Shift, and we're gonna go appear to our settings, and that's where the motion blur is gonna be inside this. Make sure you're under the red shift. Render over. We're gonna go down here to the red shift tab, and you're going to see all your settings here. And what we see here is a little twirl down a row where we can click motion blur, and all we'll do is click enable that and then for our shudder, efficiency one is fine. But if you go to 0.5, that's gonna be a little more accurate. More like a filmic camera at half shutter. So that's that's kind of need if you want to think about it. Ah, that is all we're gonna need to do for this scene. And if you remember on my cloner object, I offset that first key frame back below the zero. And the reason I did that was so when we did the motion blur if you sometimes if you have your objects set to be at frame zero as the first key frame, then there is no inherent motion built into that key frame, so we can take a look at this and it should work right now. One thing I will say is if you hit I pr this play button to do a progressive render. You are not going to see the effects of motion blur. They just are not calculated in the I p r renderers, you have to do a bucket render to see motion blur so I can't do it there. Got to do it here. So we'll click this here. Well, see, it's preparing, and there we go. Is that renders you see that motion blur and you can tell our road All these little details are now blurring because we're wizened across this road. We're driving down towards the horizon and off into the sunset. So we've got all the details are now blurring across. You can see here, uh, over here, you know, these air crisp still things that are moving or Chris. But these things they're moving as to get close to the camera. They're moving further, so their blurring mawr and the details of these motion blurs look horrible. Looks horrible. Looks absolutely awful. But that's because we haven't fixed our settings to deal with motion blur. This is the one downside of using motion. Blur is you do have to crank up your settings to get it right. This is the same thing with depth of field or anything like that. So again, progressive render, you won't see that motion blur. It's not gonna happen even if you do the bucket. Render inside of that. It's just not gonna work the when you're using the I P R. It just doesn't show you motion blur. You have to do a an actual render to see the effects of motion blur. So keep that in mind. So if we didn't have this frame before zero, there's a chance that that first being no initial motion happening because that nothing has moved yet because it doesn't move until it goes from friends. Zero to frame one. Your first frame might look like this, so if it looks like that, that's not good when you want it to loop, when every other sprain and you're seen has motion blur. But your first frame doesn't. It's gonna stand out, and it's gonna be like flip. So when I back that frame up that creates that motion before we even see our frame So there's gonna be motion blur with our shutter efficiency at 0.5, and that's gonna let hours to have that motion blur at frame zero here. Now you can tell that this is looking really crappy. We're gonna go ahead and do our render region gonna pull this box just to save some time and want to drag that down and we're gonna look at right here. So I kind of got a mix of the mountains and a little bit of the ground here, and we'll start messing with settings for this motion blur. We're gonna open up her render settings and the Onley settings that effect motion blur. You can do transformation step stuff like that. You know, that might help. We might bump that up to four. That's just gonna allow that to be like bump bump 1234 copies of itself for them just to and blurring those so that that will help a little bit. Basically, it's just gonna blur between four echoes of itself. But what we need to really do is effect the unified sampling. No. Now we need to talk about setting up how to render a scene in red shift as well as rendering four motion blur. So, in order to render a scene, normally, I would say, if you're not doing depth of field and you're not doing motion blur and you're not doing fog, you don't need to touch these these samples at all. You can do everything through these sampling overrides, and normally I do g I on the scene. So we're going to go ahead and scroll down and scroll down till we have brute force, brute force, and we're gonna go ahead and set those raise to 5 12 g uys global illumination. And that just means light is going to bounce off of an object, and that light is going to not just bounce off of it. But take some of the color attributes of that object on light and bounce back. So, you know, if you have a red ball over top of a white ground when the light bounces off, the white ground hits the red ball and goes back onto the ground. So instead of just having a shadow underneath the ball, you now have some of that red light returning off the ball, filling that shadow. There's lots of tutorials and stuff about explaining global illumination. So we're gonna talk about that too much. And it's not too important in our scene. We don't really have too much going on. This is really gonna be affected mailing these mountains here. So anyway, we are going to go back to our basics and under the sampling overrides, we're gonna start messing with some features. Full reflections. These are important in our scene. And so we're going to override the samples, and we're gonna set this to 5 12 to start out. You want to do things? Um, exponents of force of 4 16 32 64 128 512 206,024 Yeah, so we'll start with 5 12 And the reason you do that is that just kind of is the way that the GPU is built to understand the rendering out office, the GPU or what? But I've been told that that's the way you're supposed to do it. So there you go. Um, rather than just being like, whoa, seven or six. I think that you get cleaner results. It's more efficient if you use the samples at that rate, refraction. We don't have any reflection. Refraction is when things are glass and stuff. So we just turned that to zero. Don't waste any time calculating fractions. Ah, I mean, inclusion. Replace that with its fine. We don't really have that going on either. Lighting, we do have lighting and lighting is very important. And we're gonna go with 5 12 for that as well. Volume we have no volume. Turned it off. Don't waste any time cranking that out, saying with single scattering saying was so service scattering Turn those off. So now we have these all set to replace and zero. Now, whenever we affect these numbers, it's not going to affect the way it calculates these things. So if I said this to, you know, with 5000 it's not actually gonna take 5000 samples. When is doing the reflections or the refraction? It's on Lee going to take 5 12 and it's not gonna take less than 5 12 is just gonna take 5 12 It's not gonna do amid Max. It's gonna do exactly what we're told to do. So these are exponential as well, so these are related to each other. If you have these high and these high Ah, and you have a set to scale instead of replace, you're gonna get so that, like, this is high and this is high and it's at the scale you're gonna get like, crazy high. And it's your understanding we're just gonna take forever. So what we're looking for here is a way, and we contract this out. Look, look at our floor a little bit more is just a way to get clean reflections and clean lighting, but also have clean motion blur and motion blur is gonna be the thing that we're really tweaking because it with red shift, you can get clean lighting and everything without motion blur on we can tear emotional are awful quick that this back to 16. This is the default settings we've replaced. Our sampling overrides here, so you'll see the difference here when we render this out. Just be without motion blur. There you go. So you see, that's really clean. We barely have any noise. The lights and a reflection super clean have a little bit of noise here from that bump blending in, though. But this more the bump blend that it is the lighting 60 right here. All this very clean. Everything looks nice. Yep. And that was pretty quick. So now what we now we know. Okay. Well, good. Then 5 12 and 5 12 for reflection and lighting is momeni. Looks good. Okay, very nice. So next we need to just figure out how to make this nasty motion blur look like clean, crisp motion blur. So in order to do that, we're going to turn on motion Blur, and we're gonna go appear, and we're gonna type in 1 28 It's important to do the sample max first because it won't let you type in the men. That's higher than the max. So if I come in here and I talked to 36 it's going to swap it for me and put that in there . But then the men is now half of that. This kind of annoying. Ah, it only let you do the men up to 2 50 sick up to, um, whatever the max number is suppressive fire 12. It's gonna make this to 36. Just kind of annoying. But anyway, so we're gonna go 64 for the minimum and to 36 for the max. I'm gonna take our adaptive threshold and put it down to Boop boop, boop, boop, boop, boop, boop 360.3 And that's just gonna kind of cleanup, literal, tight little noises and things like that. So basically, this is going to determine where it's gonna try to use mawr sample maxes than sample minimums. And we're not gonna get into the whole, like viewing the samples everything inside of our render engine. But we are just going to take a look at the different in the way this motion blur looks using higher samples so you can see this is taking longer to render. But you can already tell Look at the difference. That is a nice, clean motion blur. You're still able to see some of the details of the road. But you also have this clear indication that it's blurring. The motion is blurring. And that's really nice and all of our lines way clear very nice and they don't look like this anymore. That noise doesn't look like this anymore. It's clean, and that's what we want to see. So that's really nice. I like that. I think that'll be good enough because we're actually going to put on some post effects that is going to kind of even blow out these these lines here, that kind of fill those out where there's a little bit of noise in there. We could up the samples a little bit if you want to. We can change this minimum. 2128. Ah, and if we want to And I think that's pretty much all we're gonna need to do we could clean it up Mawr by upping this to 5 12 But every time you know, you double this, you double your under time. So you know, what's my angle for this? Is this gonna be a super high def screen somewhere playing It's gonna really gonna be important. People gonna be nitpicking it Or is this going to go on some YouTube video or some instagram story, uh, where it's just kind of cool music going on, and it's just needs to look me on. No one's really gonna notice that there's a little bit of noise, so you decide. So that's pretty awesome. Now let's take a look at adding some post effects on to this inside of Red Shift, and that will be the second last thing we're going to do.
13. Redshift Post FX: Okay, We're gonna get rid of our render region, and we'll go ahead and go back to our I p R. I know it's gonna get rid of our motion blur. We're gonna close this and we're gonna slide this out. I'll suddenly see you have this little gear here if you don't have room to slide that out. Ah, when it's closed, you'll see you have these little arrows here. You can click those and open up the gear. Here. You're here. So now we have this gear and what this is These are red shift post effects settings. And what we're gonna do is we have all these settings inside of red shift that we can use, such as color controls were click that on. We can change the contrast of our scene. We can do the exposure of our scene. We can go in here and at an s curve, all kinds of things. Group, group and group. You know, if you want really kind of play around with all this stuff that you normally do in post, we're not gonna do that. We're gonna double click, right click. I said 00 delete. Okay, So what we are going to do is we're gonna take our contrast, and we're gonna pull it up just a bit like porno, for just like I always like to add just a tiny bit a contrast to my scenes. Um, And then we're gonna go down here to my favorite, which is Bloom. But for that we have photographic exposure. And what that does is this is allows you to control your scene as if it was through a real camera. So, you know, f stops if you, you know, lower the f stop. You're opening the aperture upset. You're letting in more light into the camera shutter speed. Ah, you know, the higher the shutter speed, the less light that's getting through in the sharper your image is gonna be And the more that the field is gonna be with the higher sugar stop in a lower F stop blah, blah, blah. Camera stuff I saw. Same thing is artificial brightening of the scene. We don't need to mess with any of this. We cannot even had a vignette, which is kind of cool. We actually are gonna Adam. And yet, because sometimes vignettes just look nice. You can adjust the saturation. You could make it black and whites could do all this cool stuff inside of here. You can even add Lutz, if you have a lot plot that in their you know what this photographic exposure going, We're just going to reset this the default. And we are going to add just a little bit of vignette just a little bit. Just kind of dark in those corners up, okay? And then we're gonna go to Bloom, and this is the one that's really cool. So, Bloom, check that on. And as we lowered this bloom a threshold down. This is the exact same as, like, glow and after effects. So if we bring that down, you're gonna notice that all over highlights home cash. They're going, uh, so good. We could bring this office down on those, and we can bring the bloom up on them. So now we have this nice shiny Oh, yeah. So you know, it's our son is really glowing. Relieve. Right. But our lines aren't really glowing that bright, and I kind of want our lines to glow a little bit more. So the reason they're not is because they're not hitting this threshold. So that means that this is brighter than these lines. And in order to brighten up those lines were just gonna need to brighten them up. So to brighten these up, we need to go to our overall emission weight. And we can start adjusting this value to increase the brightness of these. We try 15. Now, you see that these are getting that those are getting picked up on in this bloom threshold . You bring this office down and weaken just a tiny bit of glow on those. Yep. Like that. Pretty, pretty cool. We're covering our intensity down a bit. Yeah, I think like Like that's a 0.95 and their shoulder About one. Yeah. Yep. Yep. We could mess with lens flares and things like that. These air Pretty cool. I don't think this scene needs it. If you wanted to, you could put one on their puts, um, chromatic aberration on their softness, blah, blah, blah. There's a really cool if you have, like, headlights and stuff in your scene. Ah, Streak streak might look nice in this scene. We can bring that streak threshold down a bit and bring the number of tales down so you can increase the tail. And so you can see what that's doing is as creating this streaking light effect, and you can adjust the angle of that. And that's pretty eighties looking. You know, you can always increase the number and get a nice star filter going that nothing's more eighties than a nice star filter. Pretty nice over that down churn threshold backup. So you can leave that on there a little bit off on off on. We'll leave it on and then Boca, is that the field? But you're not gonna really want to do that with Post. Normally, I like to control that with the camera. So now that we've got all those settings set up, if we go back into our red shift, render her. You'll see that we now have this thing that's been added on called red Shift post effects, and you have all those controls and set off years. Well, even have a really cool, nice RGB curves split up into each individual color all at once. Exposure bloom. Everything is here, and you can enable disabled all within here, so that is all we need to do we've got our render settings. We've got our post of X settings, and now we need to go to our output, make shiver, rendering out all frames. 24 frames. That's the correct frame rate. 10. 80 p. That's perfect. So we need to now choose where to save these files. So we're gonna click this little box and choose file, save skill share loops. We're gonna call this actual loop okay inside there. And we're gonna call this looping retro since said, and we're still looping, right, And which is a format, Uh, you can do all kinds of formats. Whatever works best for your workflow, you can. You p and G's you can do J pegs. You could do open e eggs are. That's kind of that would be the format I would use if you were going to use something like Lutz and stuff opening X are your files are gonna be huge, but they're gonna have all the raw data inside of them. So you live to actually be able to adjust him in post more. But I mean, there gonna be way bigger file size. And for something like this, I'm just gonna use J peg, I don't I would use PNG or tiff or target if I had an Alfa Channel that I needed, But we're not gonna worry about that for this. I will show you how to do that here in a second. But we're gonna doj peg. And the reason I don't want to MP four or something like that is because if you have it set to that and you go to render and you get 50 frames rendered and then your power goes out or you need to stop it, you don't have anything to show that you've been rendering you. Don't you have, like, a partial clip and it's not gonna work right, and it's gonna be broken. But if you did rendered out these frames each frame you now have those 50 frames that you can take and drag into a project and create an animation out of that. So look like a video Also, uh, so that way, you know, you don't lose that progress and have toe end up with 1/2 clip where you have to start all over again, so you'll notice with the J pick or a PNG. You have this Alfa channel option real quick. Just a nice little tip for a red shift. Users. Let's say you wanted to take this in and we wanted the reflection of the sun. But we wanted to add this son into post with, um you know, something else were you know, um, for whatever reason, let's say you wanted to put some effect on here, do something. We sort of this skyline in these mountains here, but we're going to put more stuff in the background here. It wasn't gonna reflect here. So what we would do is we would go to our dome light, um, and go down here to enable background, and we would check that off and we would also click Alfa Channel replace. And if you had rendered preview, you'll notice that nothing has changed. We're gonna go to our RS area light and go down the visible, and we're gonna tackle Toggle that off. So now that's not visible. We still have all the reflections and the effects of this light. But if we go in here to this RGB button and we go down here and we choose Alfa, we now have an Alfa Channel of everything that we see. So now we have this background is empty. So if you render this out and brought it in, you would be able to put this layer on top of something in have a different background if you wanted to. The way that works is because of our Alfa General Place without a background. If he innit able the background, you'll see we don't have that empty space anymore. So you can do that. The light bet. Very cool. Okay. Anyway, a little side note. We don't need to do that, though. And we definitely want our area light visible because I like that sunset looks awesome. Okay, so to render that out, we have it all set to save. We're gonna choose J pig. Abe, It's fine for now for this easy peasy hit render and let that go. So we have our render here. So vendors done and you can see that it only took about two minutes per frame sometimes under, sometimes above. It's really awesome for a 10 80 frame with motion blur and everything. So let's take a look at this. That looks really good. It's hard to see where loops and now you could drag this down so you can't see a little slider and then really try to guess where it's starting. It's really tough. Ah, there is one thing, though. If you know, it is really quick right there. You notice at the in frame you're only getting half the motion blur. And this is what I was talking about with moving the of the offsetting the frame at the beginning. And now that we've done that, we're not getting this whole blur from Frame 72 because we have motion from frame 71 to frame 72. But we don't have motion from 72 to 73 so you're only getting half of emotion blur for that frame. So there's an easy way for us to fix this, and all we're gonna need to do is just replace this one frame. We don't have to re render out everything else. Just this one frame. So about two minutes. So what you can do is you know, you've got all these files saved. You can, um, say just j pegs. You could render out the fixed frame and replace this And then when you use that J pig sequence in your animation, you can, um, just place save over it, and then your animation Stevens will be correct. Ah, One thing I'm gonna do is I'm just gonna save it as something else and show you how to use Premiere. They're just replace the frame if you need to. Also mainly cause I want to show off that if you have a sequence rendered out in this little folder here this folder, it's created. You can just go to safe and choose your type, and you can choose animation and then you can choose an MP four and you could just save it . And you don't have to use 1/3 party software to to convert your J peg sequence into a movie and it before whatever, you can automatically create a video file with that that way. So in order to fix our motion blur on this last frame, we just need to do one thing. So we just need to go into our render settings and underneath the motion blur tab, we're gonna change shutter position to end own frame, and this is all we're gonna need to do, and we're gonna go to output and make sure we have just chosen our current frame of 72 and we are going to are under that. We can go to Red Shift or interviewer and we could just use this surrender out or one frame . Um and so we're gonna hit this little clapboard right here and render that out. So I want to do is we can either we could go to file and we can say, Save image. We're going to choose a J pig sequence and where to call it underscore one replace just so we can find it. No, we need to replace that. So you can see here that the motion blur has now worked. It's fully. It's taken that blur from frame 71 all the way through 72. So now serves normally. When it's set to center, you get half the blur from the frame before half the player from the frame. After. Now, in the next video, I'm gonna show you how to use. It will be premier to fix a frame that you need to replace
14. Using Adobe Premiere Pro To Replace A Frame: So what we're gonna do now is going to premiere and fix that. So I brought my loop in here. The original loop. You see the last frame. It still has only half the motion blur. We're going to right Click in here and go to import. And we're gonna choose a replace frame. Yep. We're gonna click and drag, and so an easy way we'll get rid of this real quick so I can show you some stuff. Une easy way to go to the end of your sequences it down on the arrow keys, and then I'll go to the very end. Then it will hit left on the arrow keys to go to the very last frame. So we've got the beginning of the last frame. So now we can drag or replace and line that up with that, using the s for the snapping tool we hit c to cut this and then it v to go back to our selectable. Okay, so we've got our frame replaced here. Ah, One thing you can do is go over here, hit this little plus button and find this little loop playback. You can click and drag that down into your toolbar. So you have that there, you're gonna go ahead and click that and then that you go back to the very first frame me at the home key and hit play. It gives him out with minus. And that Luke playbacks. Just gonna allow it to Luke. Okay, So one thing to pay attention to is our secret settings appear 24 friends. And what happened when we brought this in this animation was that this was originally set to here. Not sure why that defaulted to right there. I think it's because we actually have here is half of a frame, so we needed to be right here on the end of these. So just that weird half frame spot. So we were getting that black frame in there, and that was making it look like there is something different. We've got a perfect endless blue. There we go. So we can say that we can export that app. I didn't control em. It's gonna bring up your expert window. We can do manage bit rate. That's fine. I like to go down here and change this to a big do. VVe are to pass that we find 10 and 12 more than enough looping retro sunset for a Okay, So render that out. Save your project in close this and we'll open up aftereffects. Because in the next video, I'm gonna show you how to add heat waves and fake a depth of field. Look on this with aftereffects.
15. Using Adobe After Effects To Add Heatwaves and Depth of Field: Okay, now we're inside of after effects, and what we're gonna need to do is create a new composition. In order to do that, we're gonna hit this little create new composition button down here, which I did, and we're gonna choose H D TV. 10 80 24. And so we've got that Cheney situation to three seconds, because that's how long are clip is and with it. Okay, I already did that. So this was his complaint. That's why it canceled there. Okay, so now we need to import our footage. So right, click in the project window here, go to file actual loop. And we want that loop that we replaced, which is called Looping Sunset for a E. There it ISS import that footage. Click and drag that down here. There we go. So now we have our footage here. Zero, and it will render that out on the number of bad. There we go. We can see you've got this nice loop. So what we want to do is add some heat waves of this son to make it look like a hot summer day. We're gonna right click and go to new adjustment layer under this underneath this adjustment, we're gonna add, in effect, to go toe effect appear and we go to a distort and turbulent displace and our Mackley that looks really funky and crazy. So one thing we want to do before we effect the entire layer, which is how an adjustment layer works. Anything beneath this layer it's going to affect. Ah, So we need to turn this off by clicking this FX. We need to go into Adjustment Layer, go appear to the pin tool. And we're just gonna roughly kind of scoop around here like that. Okay. And we're gonna go and hit F, and that's gonna go ahead and do our mass feather, and we're gonna feather that out a little bit. So now we could turn this on. We'll see. It's on Lee affecting stuff inside of here, which is exactly what we want because we don't really want the heat waves to be all over the road and everything we wanna have that detail. We wanted to be in the distance. So we need to now adjust our settings within attributes displace because clearly this doesn't look like heat waves. This looks like a bad trip or something. So we go to the amount we're gonna turn that down to about 36 and that's a little better. But the size we're gonna turn that way down to about six air we go Now, we're getting this kind of heat wave look, and so you'll see nothing that doesn't look right cause it's static. So we need to do is animate the evolution of this. So click this little stopwatch here on evolution. Well, right frame zero, go the in frame and we grant this and we're type 20 and the enter. And so what that's gonna do is going zero boom instant. He weighs easy peasy. Pretty cool little effect. And you can leave it at that if you want to. Or you can add some fake depth of field to this, which, since we have a lock down camera shot and work along an easy plain where we could do that, we could actually create fake depth of field on this shot as well. I like this. We're going to go to right click new adjustment layer and this will be our depth of field. So what we'll do is we'll create a box live with the rectangle tool here. A little highlight about there, and it would make another box, and we'll do it about there. And we hit V and slipped with ease and kind of bring that up a little bit. So the idea here is that we're gonna blur everything within these two boxes. So the only thing that's gonna be in focus is gonna be this road right here. So we're gonna pull this up just a bit. And we could hit G and add to pin markers here, here and here and had V to go back to select. And we'll just kind of What am I thinking here? We'll do like, we'll do like this. So when the mountains were kind of close will be in focus, G, we don't want it to be super shoot. Upsy super hobbies. That's we're doing. Okay, so we've got this little bit here, okay? And we're gonna hit f again. What? We have the adjustment are selected, and we're gonna feather both these up a little bit about 47. And now we are just really We're gonna go to effect and go to Blur and Ghazi and blur and we're gonna hit repeat edge pixels and we're start cranking that up. You'll see automatically. We have this kind of depth fueled look going on. So now it looks like this little piece of land is what's in focus with zero. You're gonna have that nice depth of field look going on. And if you want toe, move your focal length. Obviously, you just you could just, like, move your mask around if you want more of the foreground to be in focus. And you just wanted kind of the background to be out of focus. You could do that, Which looks kind of cool. Or if, you know, you just wanted some of the foreground to be out of focus and you want the background of being focused. Move that mask and we could do something like that. Also kind of neat. So it's really up to you, I think, for the sake of this loop, um, we might be able to just turn the blur down a little bit, like yeah, maybe, like seven, five, even Just a little bit of blur. I think it might just be over need? Yep, I like that. So we'll leave it at five. So it's just a tiny, tiny bit of blur that's looking really nice control in to bring up our runner. Q. And put that in there and we'll choose a format that we can use and weaken Jay Peak secrets , anything we want. I don't like the options that after fix gives you. Ah, actually want to make a quick time, but I don't want to use the GoPro format. So I'm going to do is Q and A me, which is encoder. So it's gonna send it to another program in Adobe that's going to allow you to actually export it out. Is in a to 64 which is what I want. It's annoying. Okay, so now look. Okay, Boom's gonna automatically populate that. Give us our H 264 option here, and we'll do the same thing we did. We'll do very to past 10 and 12 will use a maximum render quality and will say this as final loop, which is risky, Risky thing to do. Good. Okay, You see, there's only three megabytes, so that's gonna post on instagram and stuff really quick and easy. Well, uh, there you go. Hopefully you learn some things about red shift. Also, you learned just some things about motion blur fixing little gaps and things like that, as well as just how to make a seamless loop in a nondestructive way so you can go back in here, change the seat on any of these, move things around as long as they're all within that 4000 square in that original Kloner, it's gonna automatically updated automatically loop so you can just mess around. You could start moving camera moves and stuff, but the beauty of of a loop is that you can do, like, three seconds, and it'll work for much longer than that. So if you start messed around with camera moves and stuff, um, maybe make I would suggest making your loop longer before loops, because when you have camera moves in that short of a time frame, they really start to get repetitive in loop and the mawr simple. You can keep your loop, the more effective it is. So there you go. Hopefully enjoyed how to make a nice little road, some wire frame mountains, cityscape, easy peasy. Thank you so much for watching
16. Export Your Loop for Social media: Hey, I just wanted to show some options you have when regarding loops and how to use them and export them for social media. So initially you have just what we did here. Which would mean yeah, cue this up in a me. We just had an age 264 And when you age 264 What is still frame? Wow, this guy, um when you in age to 64 Ah, and you post that on Instagram instagram will loop that automatically over and over and over again if you're not worried about audio or something. But if you want to put like music underneath it, you wanted to do it for YouTube or something like that. You need to take that into premiere. You could use aftereffects. I like to use Premiere when I'm doing videos. Ah, specific music. It just renders faster to me. In my opinion, it's kind of less confusing than and clunky. Then after effects for just simple edits. So I'll show you how to do that real quick. Most a new project. Would you say OK? Because we're not going to say this right? Click import. Let's take our final loop and we're gonna grab that and drag that in. And if you have music, this is where you would, you know, use your music was living like that. I like to use sound stripe. It's what I have. They have a really nice extension that actually works. Its subscription based. This isn't had Ah, I just really enjoy it. So you can type in like synth groups, right? Boop. But there we go. Very old license that use this real quick. Ah, school share project type into content. Boom B three. Okay, so we've brought in our music and we've got our loop here. So we're gonna do is we're gonna have our lives selected. You can either make sure you have this on, so it's likes both. If you have audio that you need to loop with it. This will allow you to select audio and video letters separately. Would need a video on audio lair for this because there is no audio. So I'm going to do is grab this hit control C control BBB, BBB BBB. So let's that you have ah, video. You're gonna put on YouTube and we're just you can either expand that a bunch Or once you have a bunch, you could just I like them all Hit control C control V Then you can start, you know, really jumping ahead. So we'll grab our song and we'll just grab this and pull that in So you can see your song is really long Let minus Dizzy mountain They were also did too much We can go here and like thes and we'll put a cross fade on this last one just for fun So now forget enter Look, just automatically have this nice, looping video is awesome I don't know why that's so satisfying, but it is. I love a good seamless loop with some nice music. And so now if I wanted to take this and put this on Instagram or something or YouTube I would take control him Export it out. I can you format better performance You want 86 4 is good. Don't do gifts through Premier, I would go through Photoshopped to do a gift. I don't like the way encoder and stuffed his gifts. They don't work right. Ah, so they don't do that. But 86 4 is what I would recommend doing for for social media content and save that. And you could export that right out. Another way is to take it into photo shop. Still open up, voter. Chappelle, Quick! And this is if you want to make a gift because I know gifts. A really huge. They're nice way to spice up your website or content or post if you're not worried about having audio with it or anything, So all you gotta do is have your photo shop open hit open and you can literally just shoes . Your final loop that you've rendered out from aftereffects has a 86 4 and it will go ahead and open that up and bring that in with a little timeline Down here, all we need to do is go appear to file will go down to export, save for Web or old 50 Control s if you're feeling froggy and that's gonna open a powder create these gifts and the only down side with this is this is slow. I don't know why they came in cause faster, but it just takes forever to load. Doesn't matter. All right, so here we go. So you can see our gift sizes got did a 100% lossy. Zero are size is 50 megabytes megabits and ah, we got a 1920 18 80. If there's a lot of limitations. Were you post gifts? As far as size, file size and stuff goes, first thing I would recommend turn off transparency. If your gift is not transparency, that's going to save you a little bit. Secondly, I would reduce the size before I start messing with the dither and the los E. Okay, so we'll say size. We've got 1920 1980. Let's do, like 30%. There you go. That's a pretty good size gift. Still, let that calculate and C We've got our gift down or seven megabytes, and it still looks pretty good. So we haven't had to mess with dinner or lossy. If you need your gift to be bigger and you would start missing with dinner and lost you. But when you start bringing this down, you'll see the quality. Really, You get banding really bad, especially with glowy stuff. Sometimes you get away with stuff like that, but with stuff like glow, you're gonna get this banding Superbad. But let's go in and turn that back up lost. He's kind of same thing. It's kind of just noisy. You can, you know, it's less bandy, but more noisy. Civil is to lossy like three. And we'll take this back up to, like, 15. Well, suit that gets us and you'll see the final size is gonna go back up because we got exercise yet 14 0.8. So I'd say to keep it under eight. To be safe for most websites, I think, is probably a good bet. So we should go and do 30 Cause me. No, that's under eight. And you can choose difficulty. You could do by cubic you could do by linear. I don't know a bunch about gifts, but I know that you know this. You know all you do to check your GIF. If you want to post this on Reddit or something ready, you can actually just post nation 64 and convert. It converts it to a gift way faster than this whole process. I don't know how, but it's amazing. Um, but you also can share these gifts on. You can use giffey. You can put it on image or whatever you want. You can create your own gifts. And then you can slap these on your website and they'll load a lot faster and auto play and stuff, which is really cool versus having a video that somebody has to click on this just kind of any way to have some, like instant art working. So you're preview what this is gonna look like you're just a preview and that will actually open up the web and you'll see it's just playing and you can see the dimensions the size and you just watch it and make sure looks good. Looks pretty good to me. Cool. So we can cause that And then I have to do is it safe and just save it out and will be a dot gif or Jif. Whatever you want to say. You know I don't get Christmas Jeffs. So I'm just kidding. Just save it out. However you want to pronounce its fund. Ah, there you go. Easy peasy again. That's it. So now you know how to do a video with music. You know how to do a gift. You know how to do a loop before instagram That's gonna loop. Hopefully you enjoyed this class. I just want to throw that in there, just in case, you know, take you all the way up to the very end. And I almost left you hanging without actually doing the last little bit. So I want to make sure I included that. So you guys could take your content and post it wherever you want it. So enjoy. Be sure to check out my other classes if you enjoyed this one. I haven't introduction to red shift class and I also have a class. Where will we create? Or 50 red shift metal materials where we really take a deep dive into the material note editor inside of Red Shift. It's a lot of fun and be sure to follow. I am going to do more videos. 100%. Cinema four D based also read ship based, maybe some after effects and stuff too. But definitely more cinema 40 stuff. So be sure to follow and stay tuned and follow me on instagram ad effect. Itron as well as on YouTube and affected trying to for more tutorials and live streams things like that. Thank you guys so much you made at this point you are awesome and you're the best. All right. See you guys next time
 Derek Kirk, 3D Instructor-Effectatron & CGshortcuts