Transcripts
1. Introduction: In this course, I'm going
to talk you through the process of how
you can convert one of your spare rooms into
a dedicated filming space. Now, this could be for
your YouTube channel, so maybe you're making
regular YouTube videos, maybe you're creating
courses like this, or maybe you just want a really fancy dedicated space to make your Zoom
calls in private. Well, whatever option
you're going for, it's really awesome
and really beneficial to have a dedicated
filming space. Throughout this course, I'm
going to walk you through the benefits of having a dedicated filming
space or app studio. Then I'll talk
about positioning, background props, lighting, sound, and how you can make it easy for yourself throughout
this entire process. But before we get
into the course, let me please just
first introduce myself. My name is Chris
Brooker and I run the Brooker Films
YouTube channel, and the channel is currently at around 89,000 subscribers. Having a dedicated filming
space has made it easy to produce videos
on a regular basis. As well as YouTube
though, I also create these courses and I use
this filming space for these courses as well as
YouTube so I'm doubling this space up and filming all of my content in this one room. I launched my YouTube
channel back in 2018, and since then, I've moved addresses a few times so I filmed in different spaces, different rooms,
different environments, filmed in different angles, and played with
different setups. I've gone through this
process many times. Let me share what I
know about creating a dedicated filming space
for your YouTube videos, courses, or other
online video content. Let's get into it.
2. What are the Benefits of having a Filming Space?: Now before we get into the how, how you can make a studio
or a filming room, I first just want to talk a
little bit about the why, why build a dedicated
filming room? What are the benefits? Well, instantly the
first major benefit you'll notice is having a dedicated filming
room cuts out any excuses and increases
your productivity. If you're producing videos
on a regular basis, and every time you make a video, you have to set the camera up, you have to put
it on the tripod, get the lights source set up, get the angle right,
adjust the focus, put the camera settings in. It's a long process
and this can take potentially hours every
time you film a video. But when you have a
dedicated filming space, you can leave everything
set up, ready to go. This means all you have to do is plan what you're going to do. Make the notes in your
notebook, sit down, turn the cameras on, turn the lights on and
you start recording. Instantly, you've got rid
of that half an hour, one hour, two hour setup time. This means you're
more likely to get into the seat and start
filming your videos. Instantly, the first benefit is it increases
your productivity. Now the second benefit is all
of your videos have a look. Filming in the same space using the same setup with the same
colors and the same props, it creates that level
of consistency. This means all of your
videos and all of your courses will
have a similar look. This means without even
looking at the title of the video or looking at
the owner of the video, you can quickly tell
that this video is linked to another video
with this same setup. It's creating that
brand awareness and that consistency
in your look. If you film your videos
in different rooms, in different areas, or even if you're filming
in the same space, but the camera is moving
around a little bit, unfortunately, there's not really much consistency there. Unless you've got
a really powerful style in your filmmaking, it can be quite difficult to create that level
of consistency. Having a dedicated filming room with your cameras
and your lights, everything all set up in place, one is going to increase
your productivity, but two, it will give you a
consistent look across all of your videos
and your courses.
3. Positioning: Now that you've decided to
create a filming space, you first just need
to figure out where you're going to actually
put this filming space. Do you have a spare
bedroom that you can convert into a studio? Is there a corner
in your bedroom that you could maybe film into? Is there somewhere in your living room
potentially that you could angle and convert
into a filming space? Ideally, you want
to try and find somewhere where you can
leave your cameras, your lighting, and
all your prop setup in between filming. Obviously, if you've
got your cameras and your lights all set up in the middle of
your living room, it's going to be very
difficult to live, move around all of
these equipment. But if you have a spare bedroom that you don't use too much, or if you have a quiet corner of your bedroom which isn't
used too frequently, then you can maybe
block this off and treat this as your
filming space. Now when you're looking
to find this space, the first thing that you want
to look for are windows. Ideally, you don't
want to be next to or in front of a big window, and the reason is because it's
very difficult to control the lighting unless you
have a blackout blind. If you're filming next to
a window or if there is a big bright window behind you and you can't control that, then you're going to get
sunlight blaring into your room. This means if you bring in
color lighting later on, the sunlight is going
to wash that color out and will lose
that consistency. As well if you're filming first thing in the morning
when it's bright and sunny and you also want to film late at night when
it's gone dark, unfortunately, your studio, your setup is going to have two completely different looks, you will have the daytime
look and the evening look. Now this can work, but this
means you have to be very clever about what you're doing and where you're
placing your lights, so you want to try and avoid
being next to windows. Now, this setup is
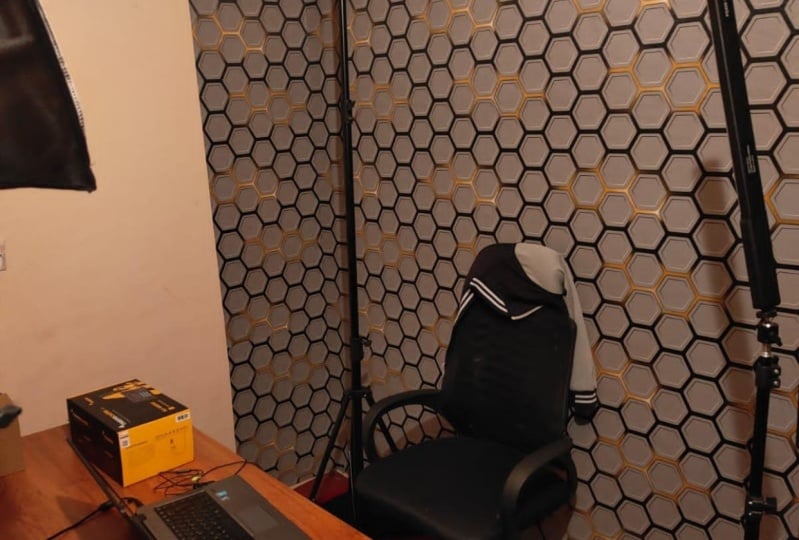
a spare bedroom. I live in a two bed-rented flat, and I've converted the second
bedroom into the studio. As you can see, there
is a very small window just over here. Now, on bright sunny days this does actually let in a
little bit of light, but I've closed the blind and placed a little bit of cloth behind the blind to try and minimize that light coming in. If the only space that you have is next to a window or has
a window in the frame, then maybe just try
blocking it off. Close the blinds,
close the curtains, place some cloth in front of it, try and control that
light if you can. Then of course you
want to think about the position of your camera, your lights, and yourself. You definitely do not want
to be pushed up against the back wall because you're
going to lose your depth. It's really important
when you're creating videos to create depth. The depth is essentially
just having space between yourself
and the back wall. Now if I was pushed up against that back wall and I would basically touch
in the back wall, everything would
feel very flat and I would really struggle
to light this as well. If you can try it and
place the person talking, whether that's yourself
or somebody else, try and place them around
a meter in front of the wall if you can but if
you can't quite get a meter, then even just half a meter will make a massive difference. Just try and step away
from the back wall. You also want to think about
where your cameras are going to go because you don't want these to be in the way, especially if you're using half of a bedroom or
half of a living room. You want to try and find a nice corner where you
can tuck them into, where they won't be in the way. But you also want to pay close
attention to the shots so make sure you're not sacrificing the shot for practicality. There's a give-and-take here. Make sure you get a good shot, but make sure you
can also live with the position of the camera
because you want to try and keep this
setup at all times to reap the full benefits of
having a filming space. Now the room that
I'm filming in is not a large room at all. If I reach out, I'm not that far off touching
both walls on either side, and I'm not the tallest
person in the world. If you find yourself in a
similar position where you find yourself forced to film in a smaller room or a
small corner of a room, there's a few things
that you can do. First of all, is your position, so trying to get away from
the back wall as much as you can is going to help
like we've mentioned, but also shooting on a wide-angle lens is really going to help the
room to fill larger. I don't want to
get too technical, but I used to film on a 24 millimeter lens so this
was quite zoomed in but I swap that for an
18 millimeter lens and instantly
opened up the room. Just shooting on a wider lens, it meant I was able to get more of the room into the shot. I could push in closer to the camera to give
myself more depth and that has created quite a decent amount
of space in camera. This really is
quite a small room, I could probably
reach out and touch the back wall if I let
my chair back and again, I can almost touch these walls. It's not a large room
at all but by pushing myself close to the camera
and using a wide-angle lens, I've made the space feel
slightly larger than it is. You want to do the same thing if you have a smaller space. To sum this all up, you
want to try and find a dedicated room or a corner of a room that you can
comfortably leave all of your equipment
setup ready to go, then you want to try and
position yourself away from the wall and place the
cameras in a good position. If you've got a smaller space, you can use a wide-angle lens to create depth in the
space and you also want to make sure that
you're not directly next to any windows and if you are, try and block those
off if you can to avoid any light spilling in. Once you've done all of that, you can now go on to think
about the background, what is in the back of the shots
4. Background: When you're filming
a video, of course, the person on-screen is the most important
part of the frame. They have to look great,
they have to sound great, but they have to deliver important information
that people appreciate because
otherwise there's no point of the video. But if the background
is really boring, the back of the shot,
there's nothing going on, then you're missing a trick here because you
can use colors and props to create a really
great looking shot. Of course, you can also tie in your branding just by using
specific prompts and colors. In this episode, I'm talking
all about the background, what's behind the person, and I'm going to
show you how I've created this setup
and what you can do to add character and
style into your background. When you're filming in a
bedroom or your filming and in a living room or a space
base in your house, chances are, straight
off the bat, it's not going to be the most
visually interesting space. It might just be a
plain white wall, there might not be
any character there, so it's up to you to
really think about what you can add into the space. First of all, you want to
think about what props or what furniture you
can add into the space. If you look at my
setup, for example, if you look just behind me, over my left shoulder, you can see I've got this unit here and I've put
this in place so that I can add in some
props onto the unit. If I didn't have that there, all you would see is just a boring white wall and you would just see that small window
that I previously mentioned, so adding this in has allowed me to create this shelf space, and this means I can actually
add props into the space. Of course, though,
you don't have to go for a unit like this, you can maybe add a sofa
into the back of the shot, you could add a desk
with a computer, really think about what
furniture you can add in. You could also maybe
add in a lamp or some small practical
light source into the space to
add that character, and then once you've
added in some furniture, you can then move on and
start to think about props. What props can you add into the space to add a
story or add character? The Brooker Films YouTube
channel and the course pages, that's all about filmmaking, video production, and even a
little bit of photography. So all of the props
and everything you see behind me truly represent what I am and what I'm delivering
through Brooker Films. As you can see,
instantly behind me, I have a small light just here. This says recording, so this is just a
nice little accent light just to add recording, again, a small detail. Above that you can
see, I have a drone, just below here I've
got a B and an F, that is just a really
nice subtle light just to add Brooker Films, to add a layer of branding in. Then of course you can see as it's falling off
into soft focus, you can see I've got cameras
and I've got a microphone, and then I've also got a
gimbal up here as well, and these are just loads
of prompts that are showing off that I'm a
filmmaker and I produce videos. Then of course, on this side, you can see I've got a
photo frame of a camera. I've got a picture
of the London Eye. I've got a photo
of a London bus, and then I've got
the shard down here. This is demonstrating
my photography skills. It's showing that I
work with cameras, and it's also showing
that I'm based in England because they're
all photos of London. So they're all there to paint
this story of who I am, where I am, and what the
context of this channel is. Now, of course, you
don't have to go into that much detail. You don't have to try and paint a story through your props, but it is definitely worth thinking about what
is in the back of the shots and what
that's telling the audience about yourself. Let's step out of my example. Let's step out to the
filmmaking example, and let's give you a
few other examples. Maybe you have a podcast or
maybe a YouTube channel, and you talk all about coffee, or maybe in the
back of the shot, you can have a few
bags of coffee. You could have a coffee machine, you could have some kettles, you can have some equipment
related to coffee, or maybe you could even
just use the color of the coffee beans to
represent the coffee. You could have a brown so
for in the back of the shot, or you can have something
brown in the shot to add that brown coffee color. Again, it's reinforcing
what you're talking about. Or maybe we're not
talking about coffee, maybe you have a YouTube channel dedicated to superhero movies, well, maybe you could have many figurines in the
back of the shot, or maybe you could
have something that is going to
show that story off. I would definitely recommend
thinking about who you are, what your personality is
like, what you're offering, what you're talking about, and try and find
furniture or props to represent that visually
in the back of the shot. Then, of course, as
well, you can go even further into this and
think about colors, because color can actually have a massive effect on
the back of the shot. As you can see, if you
look back at all of my previous courses and all of my previous
YouTube videos, you'll see purple in pretty
much everything you look at. There are exceptions when
I was experimenting, but most of the work is purple, so having that
purple in the back of the shot creates
a brand awareness, and it just means that
purple is Brooker Films, and of course as well,
I've got this red and the white just
to create an accent. But this is all simply just done with a strip light
behind this unit. I've got two colored
lights here, and then I have another
light just out of frame, just up here, shining
down on the back wall, and that's just adding
color into the space. Because if I was to turn
all of these colors off, even though I've got all
of the props and the unit, and I've got all of these
photos in the frame, even though my story
and my character is being portrayed through
the props in the space, by missing that color, we're missing quite a
big part of the scene. That purple is adding a lot into the scene visually
and without it, this space feels a
little bit empty. Of course, you don't have to go to the full extent
that I've gone. Maybe you could just
have a few accents. So as you can see, I have not turned on this light
that is lighting the back wall and I
have not turned on the purple light
behind the units. I've only turned on this
small accent light, so I've got these two
strip lights here. I've got the B, the
F, and the recording. This is just adding
a little bit of extra something into the space. It feels a bit more visually interesting and
there's more going on, and honestly this is quite nice because it's giving
us some visual depth. However, you can go all the way and add
a splash of color across the entire scene if you wanted to make
your colors pop. As you can see, I've got all
of those colors back on. I've got the back
wall now illuminated, the unit over here, its got its life back on, and this all finishes
off the look. But again, you don't
have to go this intense, you can just add a few
accent colored lights into the back of the shot
just to add your character. Now, when you're
thinking about colors, you want to think
about your branding, so what are the colors
of your business, your YouTube channel,
your courses page? What is the general color
that you're leaning into? Then you also want to
think about mood and feelings because different colors have
different connotations. So red, for example, can be seen as a
very lovely, warm, and intimate color,
but it could also be seen as quite an angry color, blue and purple are
both seen as very relaxing and calming colors, and then you've also got yellow, which looks like a happy color, and it's really worth thinking
about color psychology when you're putting colors
into the back of your videos. Of course, you don't
have to go this deep, you can just pick a color
because it looks nice. But also be aware that using a certain color can have
a specific connotation, so when it comes
to thinking about the background and what's
behind you in your frame, you want to think
about the furniture. You want to think
about the props, and you want to think
about the color. Just paying attention to
these three things will make a massive
difference in your shot. If you just film against
a plain white wall, there'll be no character and there'll be no
life to the video. But if you add in
some nice furniture, you add some colorant, and you put some props in that, they're telling your story and telling the audience
more about yourself, then you are going to create a really visually
interesting frame. Now, even though we've
touched upon lighting the back of the shots,
in the next episode, I'm going to talk
about lighting and show you how you can efficiently light yourself when you're
filming these type of videos.
5. Lighting Yourself: When it comes to lighting,
you cannot go wrong with a two or a three-point
lighting setup. If you know what
two-point lighting and three-point lighting is, then you can skip this episode
and go on to the next one. But if you don't, let
me briefly just talk about what two and
three-point lighting is. Now three-point lighting is your generic go-to lighting setup. It gives you a really
smooth look on your face and it gives you separation from the background. Three-point lighting
consists of three lights. You've got your key,
fill and back light. If I was here
talking into camera, my first light would be on
this side of the camera, and this would be my key light. It's just one light shining
at me from this angle. Then you would have
your fill light. That's another light on the
other side of the camera, that's just over here, and that's just filling in
the shadows on this side of the face that the key
light has created. As a general rule of thumb, I like to keep the fill lights a little bit dimmer
than the key lights. I've got the key lights over here, which is quite bright, and then I've got
the fill light, which is a little bit dimmer. We've got two lights
setup in front of myself and just to the
side of the camera. Then we've got
light number three, which is the back light. This is a light which is
just outside of the frame, which is giving us
our hair light. As you can see in this example, my back light is just giving
me this glow on my hair. It's just adding separation
from me and the background. That he's three-point
lighting, very simple setup. Now, if you wanted two, you could go for
two-point lighting and two-point lighting just gets
rid of light number two. We get rid of the fill
lights and we have a key light and a back light. I've got one light next to the camera and I've
got one light behind back here and
that's shining back on the hair to give
that separation. Whether you go for
three-point or two-point, that is completely up to you. Generally, if you've
got the light at the side and you go for
two-point lighting, two-point is going to
give you more shadow. That's going to make
it fill a little bit moodier and a little darker, whereas your
three-point is going to give you a very soft even look. Three and two-point are your
standard lighting setups. Now, because I'm filming
in such a small space, I don't have the luxury of
having three-point lighting. It would be nice to have
three-point lighting, but unfortunately, I haven't quite got the space to put two lights upfront next to the camera because
there is a door just next to the cameras. Instead, what I've done is I've mounted a rail
between the walls. I've used a Manfrotto autopole and this is just a big
poll which stretches out between the walls and that basically acts as a
light stand in the air. Rather than having
a big light stand on the side of the camera, I've got no room for
that here, and instead, I've just put that
up in the ceiling. This is mounted
between the walls and then I've strapped one
light to this auto poll, put a big softbox adapter on
this one light and I'm using this one light at a slight angle just to act as my
key and my fill. As you can see, this has given
me a nice subtle roll off. This light should be
rolling off this side. We're getting a
little bit of shadow, but nothing as dramatic as
two-point lighting would be. Then as you can see, I have a poll just
above my head here. This is another auto poll. I've got that going
from the top of the unit all the way
up to the ceiling. Then I've got to mount
so that I've got a light to give me
this back light. Because you don't want your back light to
be in the frame, you want your back light
to be out of the frame. But because I'm in
such a small room, there's nowhere to
hide a back light, so instead, I just mounted it up out of the frame
just up here. In this setup, I'm only actually using two lights
to light myself. I've got the key and
I've got the back light, but the key is acting as a key and a fill
at the same time. Then of course I'm controlling this light spill with this
big piece of black cloth. If I was to pull this cloth up, you can see we got
a lot of light spilling into the
back of the frame, but when I pull that down, you can see that
actually does help to control some of
that light spill. This right here is just
a black bed sheet that I've thrown on top
of the auto poll just in front of the lights, just to control
that light spill. Those are three different setups that you could try
for your studio. You could go for a
three-point lighting, you can go for two-point
lighting or you could do a bit of both
and do what I've done. Mountain the light just above yourself and then have a
two-point lighting setup, but control the
spill of the light with one of these black cloths. That's everything that
you need to know to get started with lighting yourself. I generally would just recommend one softbox in
front of yourself, mounted just above an angle
and then one back light. But if you can use
three-point lighting, then go for that option as well. Then of course, this
is why you have to pay close attention to the
lights in the background, because these two
lights that I've talked about are only lighting myself. You've also got to
pay close attention to the lights in the background, but we've already
talked about that. Use two-point lighting, a three-point lighting
or rigor lies above yourself to get this really
soft and natural look. In the next episode, I'm
talking all about sound because sound is
really important.
6. Sound and Audio Quality: When it comes to capturing
sound for your videos, it's really important
that you're in the right environment. Because you could have
the best microphones in the world and they could
be positioned perfectly, but if you're in the
wrong room or you haven't paid attention
to what the room sounds like then you're probably just going to end
up capturing bad audio. But before we get onto
looking at the room, let me just reel this back
a few steps and talk about how you can capture clean sound. Now, when you're
capturing your videos it's really important that you have a microphone
separate to the camera. Never use the inbuilt
camera's microphone. Get a separate
microphone and get that as close to the person
talking as possible. Now, this microphone sounds incredible
when I'm this close, but even just going over here the audio
doesn't sound great. Regardless of
whether you're using a studio microphone,
a boom microphone, a wireless lavalier
clip-on microphone, whatever it is, you want to make sure it's nice and close. Then of course as well you
just have to make sure that your levels are not
peaking or are too low. If all of this is
confusing you by the way, if you're not sure
how to capture audio, then I do have an
audio recording course for you and I would definitely recommend checking that out. Assuming that you
know the basics of how to capture clean audio, we now need to look at the room that you want
to be filming in. Because you can have a room
that is lit beautifully, you could have really awesome and well-thought-out props in the background and it
could look visually great. But if you're filming
in a room and the air conditioning won't
turn off or if you're next to a window and
there's a lot of street noise coming in and
it's ruining the audio, you're never going
to get great audio. It's worth just
sitting in the space and carefully listen
to what you can hear. You really want to listen
to everything because a microphone will pick up everything if
you're not careful. If you've got air conditioning, turn the air conditioning off. If there's a fridge in the room, try and turn it off or
film in a different space. If you're filming
next to a window and you can hear the cars
passing by outside, then try and dampen
that sound if you can. Or if you're just filming
in a room and there are lots of hard surfaces and
you have a lot of echo, then you're going to
want to try and treat this to remove that echo. That's what I had to
do for this room. When I moved into
this apartment and converted this second
bedroom into a studio, it was just hard surface galore. There's carpet on the floor but every single wall and
ceiling was just hard. There was nothing
on them whatsoever. When I was recording audio, the audio would just bounce all over the place and I would have a lot of reverb
in my audio recording. Essentially, nesting
is just grouping footage together into
its own sequence. This is why I had to
try and soften up that sound and soak
up some of that echo. Now because the room
that I'm filming in is a dedicated filming room, I took over a second bedroom and converted it into a studio, I was able to mount
these foam panels. I bought a pack of 50
of these foam panels, stuck them to the walls, and it has made such
a massive difference. My previous YouTube
videos were really echoey because the sound was
bouncing all over the place. But after putting these on all of the walls that the
camera can't see, it has made such a
massive difference and my audio is now much clearer. Of course though, if you're
setting up your filming space in 1/2 of your bedroom or you're filming this
in your living room, you can't exactly mount loads of foam panels to the
walls and the ceiling. Instead, you can use
blankets, duvets, and any soft furnishings to try and cover those
hard surfaces. You can also just get a blanket and pin
this up on the wall. Or you could get some poles
and mount them up on poles. But you want to try and remove as many hard
surfaces as you can. I promise you, if you do this, you will make such a
massive difference to your audio and your audio is
going to sound much clearer. Have you ever
noticed that if you phone somebody when
you're in the bathroom, the audio sounds terrible? There's lots of echo and everyone instantly knows
you're in the bathroom. The reason why is because there's hard
surfaces everywhere. You've got tiled
floor, tiled walls, hard ceiling, hard
bath, toilet, sink. It's all just hard surfaces and the sound is
echoing everywhere. If you can do the opposite
of that and film in an environment with lots of soft furnishings rather
than hard furnishings, you get rid of that echo
and it would sound great. It's really important that you pay very close attention to the room that you're filming
in in regards to the sound. Because like I said, any echo, any air con noise, any street noise, any sound that you might
typically not notice, it could ruin your audio. It's also worth
noting as well that on cold days you might not want the heating on in
that room because the radiator could
make clicking noises. If you're filming on a hot day, try not to use fans
in the filming room because that sound would
be picked up in the audio. Really pay close attention
to your audio if you want to get beautiful sounding audio
in your filming space.
7. Tip: Make It Easy!: Now my next tip is to make this process as
easy as possible. The whole point of having a dedicated filming space or a filming room is
to make it easy. You just want to walk in, turn the camera on, start
rolling and create your videos. If there's things
that are getting in the way if there are hurdles you have to get over and this
thing is tripping you up. You're going to be less
likely to film and it defeats the point of
having a filming space. Now, this is
something that I have suffered with, to be honest, because this is an empty
room five days of the week, I only normally film two
or three days a week. For the four or five days
that I'm not in here, I do have a tendency to
turn this into a junk room. I put the shopping in here, I put my clothes in here. I find after a few days, bits and bobs of clutter
start to appear. Then every time I film, I
have to empty the room. I have to tidy the room again. Unfortunately, that just
adds 15-20 minutes of preparation before I can
actually sit down and film. I'm getting better at this. I'm trying my very
best to keep their unclear and tidy it all times, but it does creep in and it does start to add up that prep time. If you can have a dedicated
camera for filming as well, that would be incredible
because you could keep the cameras setup in
the right settings, all focused up, ready
to go at all times. Now this is a luxury. You may not have
multiple cameras, but if you are able to
use multiple cameras, I would keep one
mounted in the room at all times and then have
one to go out with. Of course, this may
not be possible, but if you do have
the means to do it, then I would definitely
recommend doing so. Of course, if you get
nervous when you're filming around people or if you
get self-conscious, then try not to put your
filming space in a space that is quite commonly used
in the house or the flat. If you live with your partner, you live with children. Don't build this up
in the living room or a room that is
commonly used because somebody is always going to be in the way
and it's going to be difficult to get the
piece that you need to film. If you can, try
and take this away into a room where you
can take yourself off, it will remove any
distractions and it will also remove that horrible
self-conscious feeling. When I started my
YouTube channel, I lived in a one-bedroom
flat with my partner, and this meant there was
no spare spaces to film, so I had to film in
the living room. This meant when she was around, I felt really self-conscious
and I would never film and I would wait until she went to work before I film these videos. Now I live in a two bed flat. I've converted the
second bedroom into a dedicated filming space. Now she can't see or hear
me whilst I'm filming. This means regardless of
what time of the day it is, I can just walk in, turn the camera on, and feel
comfortable enough to film. That's really important. Make sure you position
your filming space in a space where you can film
at anytime of the day. Of course as well, there
are a few more hurdles that may get in the way and
might try and trip you up. But if you could just
try and streamline the process to the point
where you could just walk in, turn the camera on,
and start filming, you'll honestly make
this filming process so much easier for yourself.
8. Save Space: My next tip is to really think about how you can save
space when you're setting up your room
because if you've got tripods and light stands
and everything in the way, it can swallow up a
lot of floor space. If you have a small room or a very small corner to film in, this is very precious real
estate so I would definitely recommend looking at ways of slimming down your equipment. I've mentioned this in
the lighting episode but I use something called a Manfrotto Autopole to mount
my lights up off the floor. Now, this right here is a very small and compact light stand. Even with this, when it's folded out, is going to take up a
lot of real estate. As you can see, it is this wide, and when I mount this down
it takes up a lot of space. If you've got three of these for a three-point lighting setup
and you've got a tripod, that's going to swallow
a lot of floor space. Instead, what I do is I use
these Manfrotto Autopoles. Other brands are
available, by the way, it's not just Manfrotto that
produces these but they are basically big poles that you can mount up to the ceiling, you don't need to screw
these or secure these in. These just work with tension so you open it up to the
point where each side is touching a wall and then
you just pull the handle to tighten it up and then that's going to be
nice and secure. It doesn't damage
your wall and it safely keeps all your
equipment up there. Then you can just
mount your lighting. If you've got a lighter camera, so you've got a mirrorless
camera or a DSLR camera, you could actually
get some source of mount to attach to the
pole and you could have the camera mounted
to the Autopole in the sky rather than on a tripod. Of course, you could
also try and place your camera into a bookshelf, you could place it onto a
cupboard or some surface. I have a small table tripod, rather than having a
full-length high tripod. It definitely is worth thinking about ways to try and save space because if you can
save valuable floor space, the setup is going
to get less in the way and you won't
be tripping over it and you won't be
tempted to take it down or move things
out of the way. Then that again is
going to help you to just jump in front of
camera and start filming. As well as thinking about what the shot looks like,
what's in the background, what it sounds like, what everything visually looks like, it's also worth
stopping and thinking, can I slim this setup down and save myself some
valuable floor space? Of course, you might have the luxury of not having
to worry about this. If you have a large
spare bedroom, you'll be completely fine
using the light stands. But if you're in a
small room like myself, having that extra
floor space by putting the lights in the sky
is really valuable.
9. Outro: There you go. At
this moment in time, you should feel pretty
comfortable building out your own studio
or filming space. If you've built out
your own studio or your own filming space, or if you've tried
to but you've got some questions or concerns, I would love to see your
work and I would love to help you build out the
perfect filming space. Please just take a
picture or take a video, upload that to the
student's project section, and I promise I will
check it out and give you my honest feedback and opinions. Thank you ever so much
for watching this course. I really do appreciate it. Of course, if you are interested
in learning more about video production or
YouTube or photography, then please do check out
my profile because I have many more courses available
for you to watch. Thank you ever so much for
watching, and hopefully, I will see you on the next
course. See you there.
 Chris Brooker, Filmmaker & YouTuber