Transcripts
1. Introduction: Hello. Do you like to be happy? I do. And if you do too, you're in the right spot because in this course, I'm going to show you exactly how I designed my own little watch friend to remind me to be happy every time I check what time it is. My name's Benji and I'm a massive believer in designing my environment to make me the person that I want to be. So what better way to do that then creating your own little friend who's going to be there for you whenever you need them. If you want to make your own little watch face to remind you whatever it is that you want to be reminded of on a daily basis. We're in the right spot and we're going to jump in and design it from the ground up. It's really a simple process that anyone could do. All you need is Photoshop and an ion, a little apple Watch, and we're ready to go. So let's jump straight into the project and create your little friend from the ground up.
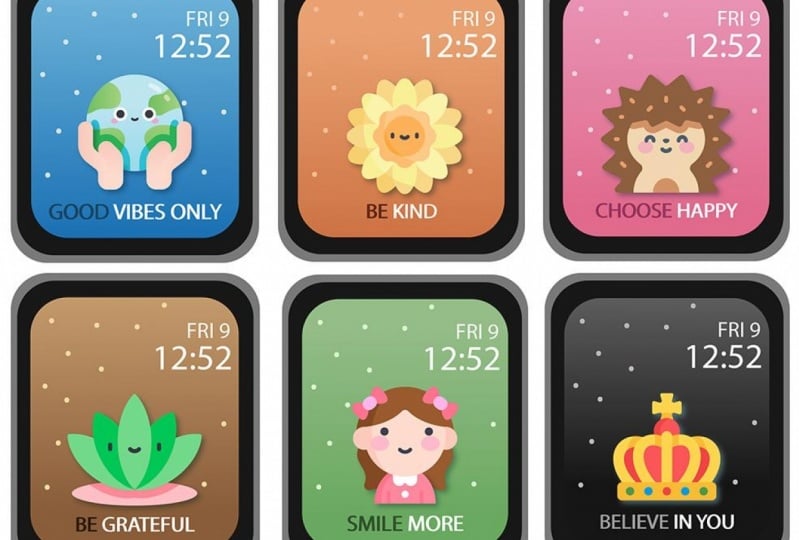
2. Class Project: Awesome. So we are creating a friend for you who's going to remind you what you need to be reminded to be happy to smile, to be grateful to be giving, to be carrying, that you are amazing. Oh, that's you. Awesome. And he's going to remind you or she is going to remind you every time you check the time. That is our class project and you get to design them. Who do you want your friend to be? Do you want it to be an animal and you want to be a cool palm tree, you want it to be in Little Rock. The pet rocks were thinking a while ago. So in this class project, you're literally going to design your friend from the ground up. We're going to choose the color scheme that you want. You're going to choose your favorite colors, show you how to get a contrast and then show you how to change any colors in the icon or the little friend that you choose. We're going to choose exactly what the animal or thing is. I'm also going to choose what is your inspirational, a positive message. So this is going to be very fun. But by the end of this, I'm going to show you how to completely create it from the ground up and then transfer it onto your watch and have it ready to go whenever you want to check the time. So let's jump straight in.
3. Create Your Template: Awesome. So the first thing we need to do to jump into this is open your watch app on your phone. Now this is really important because what we're trying to do is create a template like you can see on my computer screen right now. Well, we know exactly what the dimensions of watches and where you need to fill. We want to make sure we're blocking out where the time comes up or the date comes up, or whatever it is on your watch that comes up. So go into your app because there's so many different watched sizes and watch faces and dimensions. The best way to get the template for your specific Apple Watch. It's just to take a screenshot. We're going to pull that into Photoshop and then we're going to edit around it. So we want to make sure that you can take a screenshot on your phone. So we're gonna go to general and we're going to scroll down to enable screenshots. You can see this little toggle right here. Make sure he is turned on. And once he's turned on, you'll be able to go to your watch. And what you can actually do is you push the both buttons together. So the little dial, you push him in with a little button below him and he pushed both those buttons together. And he's gonna take a screenshot just like that. Now that should sync to your photos. So all you need to do is come into your photos now, Apple photos there. And you can see right there is my screenshot from 10, 57, which is right now of my smile more little unicorn friend. What I'm gonna do now is simply tap on the share and then click MacBook Pro. And that's going to pull it into my MacBook Pro here. We're then going to click File New on Photoshop create. Gonna go down to my downloads, pulling the little watch face guy and basically just make him full screen, pull him out like this until it fits the entire screen. But once he is pulled out to the size of the canvas, you can see that it's essentially going to be our template. Now I'm going to show you one thing before we jump in and edit and create your exact watch face, make sure you choose whatever photo watch face that it is you're actually going to be using on your watch. And if you have extra stuff on your Canvas here, you can simply hit the Crop tool and move this in our app just to get around of our little friend and watch face here. So what I wanna do is I want to select this magic wand. And I've got to set it about 50 tolerance because my photo that I took is not black, so he's going to select pretty easy. I'm holding Shift and I'm just selecting those corners. Then I'm going to command X to cut that. I'll Command C to cut that. And then I'm going to command V to paste that. And you can see it's going to paste in the new layer. We're going to call that the colon is because corner, we can call it a colon is corners because that's going to be going over al actual little watch face that we're going to be creating together. So you can see, even if I get, take that away, whatever we create in here, it's going to be the right dimensions and the right size to fit your specific watch face perfectly. Now the last thing that I want to do is I want to block out where the time and date actually come in because you don't want to be creating things and I'm just going to make it no stroke, no outline that is on that square and then a white one here. And then what I'm going to do is close it down, open our layers back out. You can see that pops up there on top and click back to this little arrow tool here, hold my Alt key and just drag that up to duplicate that command T to resize him. And I'm just can change the opacity so I can see where I'm pulling it over. You can see that the data there and we'll just center m. So now we know we can change the opacity back once that's in place. These two here, you're going to rasterize it and then you can convert it to smart objects is so it's one object. I'm just going to make it black to match the background there. And you can see, if I group these together, this now is our template because we can remove anything behind this. And we know that whatever we fit in here is going to be the exact dimensions of a watch face where the clock is he and now you'll click might be in a different place and might be in the bottom, might be in the middle. This is all customizable on your own watch faces dependent on what you want. But for me this is what I want right now. So we're gonna go ahead and design this, and I'm actually, I'll upload this to the course files just in case you're using the same template and have the same size as me, just so it's easy for you. But if not, you know, had a credit yourself. So now we have to go and choose our friend and add design and stop pump and a Min ready to news on our watch.
4. Choose Your Friend: Awesome. So now we have our template set up and don't worry about the black over thing. We're going to customize everything. This is just so we know the dimensions and where we want to put things and start AB design because we're about to go and adopt a friend. So the best place that I like to get really cute icons from is called flat icon.com. You can see this is just the trending icon packs. You can seeing it really cool things like little dogs, some animals, this hippos and some elephants and some turtles over there. And it's got really cool icons, basically, anything you want. So you gotta come in here and you can search for what you want to say. We want a cheetah, come in here and type in cheetah. And it's going to pull up really cute little cheetahs. And then you get to choose their own, these ones here with the crown a premium. So these ones are going to cost a little bit of money at the gifted, have a subscription, but anyone that doesn't have the crown, I'll all free to use. You can see this guy over there. It's very cute and you want to just come in and select who is it that you want to be a friend? Who is it that you want to look at and bring it around to life with you and give you that positive message that we all need. So that's one for cheetah. Say we wanted to do an elephant, look good, just obviously type in elephant. And therefore we get all these potential friends. I like this little guy over here. He's very cute. So what we need to do is you need to download them and as big a file as possible. So you can see here it says PNG, click the 512 and then click Free Download. Now, once again, if you had artistic talent, you could draw your own. If you know how to do that in Photoshop, create your own alibis, come over to flat icon like I do because I couldn't make it cute elephant than this myself. And you can see sometimes they have different selections depending on what you want. But once you've got your elephant downloaded, I'm going to pop back, open my template. And then I'm gonna go to my Downloads here and just drag him in. And you can see this is why we have the template, because that's right there in the middle. You can see the pink lines line up with the middle pop in there. I'm going to command T once again just to make him a little bit bigger because I want to see him and nice and big on my watch face when I look and I'm going to pop him back in line there and just up a bit because remember the time's going to come here at the top of him, coming over the top a little bit. It doesn't actually matter. This is pests and preference if you want, you could have it totally under the time where you can have him really big. We can have it in just a little tiny, but I like to have a reasonable size like that. And I'm going to move him up because remember our inspirational quote, at least for my design is gonna go in below there. So if it's an incentive too much, it's going to look a little bottom heavy. For, for an elephant, that's probably the fitting. But I'm just going to drag him in there. I make sure I he's aligned between the left and the right. I'm just going to hit enter it like that. Now the last thing I wanna do is just turn a little bit of a drop shadow on him. So you can see here, we want to make him really pop out from the background. So I like to go no distance, increase the size, increase the spread, and then just down the opacity like that. And you can also change the color of your drop shadow to whatever you want it to be. It's not actually going to matter because we're going to put a background behind it which is going to make it look quite different. Now once we've got our friend, Ernie here, I'm calling him only the elephant. We wanna make sure we choose our background. So the background is going to be very easy because it's just gonna be that you really want to pull the elephant below the template. That background is going to go behind this template. So essentially come over here to your square tool. I'm going to make sure that there is no stroke and the fill. We can just have black, blacks and other good idea because we've got, we can just do a blue for now. And then we're going to go and give them a nice gradient. So you can see that we want to pull him under, obviously only because he needs to shine is the main stage. And what we do now once we've got that background as we double-click on it and come over here to gradient overlay. And you can see that these COO, radial, if he didn't have radio clicks, you might have linear clicked, click on radio because it really draws your eye to the middle to only they're sitting there. And obviously our code's gonna go below it here. So come and click Radial, then click on the if you didn't say what I did there, I just clicked on this color here. And then I want to have a nice blue watch face. So I'm going to come and have a look at the pre created for us, gradients in Photoshop. So something like this is a little bit bright for me, something like this. We can come in and edit all of these as we need. And you can also flip side. If you click on reverse there you can see it's going to flip. I quite like that bright color then I think what I'm gonna do is gonna lighten that background color a little bit to match. And I'm going to make sure your knee is a little bit. You can try white background on him to make him sort of glow to kinda like the look of their increase the size of that. So it really is glowing. I'm just going to see what it would look like in black man, and see it much better and white, we could do a different color, blue in mind. Just a little bit of fiddling here to see what's right for you. I'm actually might make this a little bit darker. Let's bring that down a little bit like that. And on this side, just a little bit darker and a little bit more muted again like that. And then last thing we can do now is just change that shadow to be a little bit less aggressive. They don't look like he's fully glowing. Just a little bit. There we go, like that. So they would go, we've got Ernie, we got him on a nice blue background. And the last thing that we need to do is we're going to put in some placeholder text for our query. I'm going to show you how to choose your best quote, but you can see alarm Ipsum is what comes up by default. That's perfect. I'm going to command T to make that bigger because we're going to want him down about there like that. And in the next lecture, which will jump straight into, I'm going to show you how to choose whatever quote you really resonate with them. What works for you, the thing that you want or need to be telling you that whatever your cute little animal on your watches. And we're gonna go and design that together. So let's jump in.
5. Choose Your Quote: Awesome cinema got only the elephant waiting here and he's nice blue background. We need the inspiring quote. There's a lot of different ways you can choose this inspiring quote. I actually got inspiration from Pinterest myself. I typed in custom watch faces and I saw some custom ones. I saw that a lot of positivity ones in there. And so I've copied them onto a sheet for us. So I'm just gonna pull this here. I'll also attach this into the class resources if you want to download it and add to it yourself. But you can see here are some short, happy encouraging quotes that you could add to your little friend on his watch face. Now, I like to keep them as short as you can tell from these ones here, because if it's too long, it's going to be sort of too small when it comes to actually being able to see it on your watch. So one or two words is good. If you want, you can put some of the words up to the top as well. If you want more than two words or you can put, you can put forwards there and you can have this sentence. So if it's, for example, a longer sentence, you can make him a little bit smaller. Of course, we're going to change this color here. We don't want it to be the maroon or the brown. We're going to have it unless white and blue. But you can have it smaller and bigger just to fit whatever quote that is that you choose. So I'm gonna come over here and go quote, shopping. What do I want earning to remind me of when I look at my watch during the day and what sort of motivational inspiration. So you are beautiful is a really nice one. Live happy smile more behind I'm actually really liking. Be your own biggest fan. I really like that as a lifeless iffy, because if you're not who is, have courage and be kind to see a longer one need to have to break down into two lines. Make today count, believe in yourself, believe in yourself so good as well. Life is good. Once again, you can just Google the quotes, or if you have a quote or a motto that you like to live by, definitely use that highly, highly recommend. So I think be kind is a good one for me. Sums going to move this back at the way, come back to our Photoshop and you can see be kind is going to be a really short word. So we can either keeping them show it like small like that or we can really make him a lot bigger like that and keeping in the center. Now, I'd like to do this little thing where we do two tone texts. So I got my textbook, highlight the text, and I come up here and I select the white. Now you can see it looks a lot better than the member whom. But what I actually like to do is I like to change one of the words to be a similar color to the background. You can see it blend in there, but just DACA so you can see it stands out a little bit. Mind that. So be kind like that. And you want to really sent a hint up. Now if I wanted to do something like be kind to yourself, I'm going to show you how I did that. So to yourself. I'm going to push Command T to scale that to the size that I would like to scale it to now, which is basically I want to make it a square on the left-hand square to the right of that text. So it's going to be a little bit smaller, remember, because it's a longer text. Be kind to yourself. I would have that in that same blue. So I highlight that and with that text tool, grab that blue there. And you can even just staggers he be kind to yourself. You could have this one in the wild like that too, or you can play around with it and just see what I'm actually looking at. As you can see be a self is also in this text. So if I wanted to instead switch the colors up here so that the baby was in the white here. And then feel self. You can see down here on the bottom. And so we've almost got two quotes in the one text be kind and D, uh, be kind to yourself and be yourself as well. So you can see I do it like that. And then what I'll do is I'll select both of these, make them both just a little bit smaller and pop them up here like that. You can see what I was talking about before. It's getting a little bottom heavy Sung. I'll move Ernie up just a little bit. Remember this is not going to be black like this. It's going to be more transparent because it's just the time that goes over it. And if it's not at 12 o'clock and sending like one o'clock, the numbers won't even stretch out to here like this. Just going to put the opacity down on that so I can see what it is going to go ever on any here. I'm going to put a little more spacing between this text like this. I'm really center it up like that. And then pop that in there like that. So there's my watch face like that. Be kind to yourself with Ernie in the middle. Remember, come in, choose your own motivational quote of what you want to see. And once again, you can actually add a shadow to your texts. I'm going to bring him down over the background like this. You can go and copy that shadow from, from the elephant at the top. Or you can commands that, that be kind. I'm gonna double-click that click on that drop shadow and you can see it starts to highlight. I'm going to just see what it looks like. If I have a darker blue on this one, it's got to match the actual background blue though. It's like this. Let's, That's the sort of pop without looking too muddy or dirty, it quite like that. So I'm going to Alt and get that to yourself on the top of that as well. And then actually it looks dirty, then it does more muddy than it does with that. And so I'm going to stick with that. I like that. So there we go. We have our quote, we have our friend. Now we have to remove this or edit this to be where you want it. So you can see on the one I'm not sure if you can see from there, but I'll pop it on the screen if it can't have actually on the one I'm using at the moment. I've got these little things just to, just there on the actual end product. But if you don't want that, you can come into your template and just turn them off because you know the time will go there anyway, and this is your template. So in the next lecture, I'm going to show you how to bring it altogether and then get it across TO watch so you can start going on daily adventures with different as of today.
6. Bring It Together : Awesome. So I've got only waiting to be installed on my watch face, whatever it is that you've got, whatever cool little friend you've created with a motivational quote there, ready to be installed on your watch face too. So let's get them on. So the first thing we need to do is you need to decide if you want these little tabs, underwear, the time and date are going to be displayed. If you do keep him there, you can change their color by simply changing this color overlay like this into whatever color you want for me. I don't want them then, so I'm going to unclick that little eye button and the corners you can keep or you don't have to, it doesn't matter. They're going to get cut off anyway by your watch face. So what we wanna do is we want to come over and I'm going to click File, Save as. And I've saved mine in here as any dot-dot-dot JPEG. So ab.js JPEG, it was going to come in and do this again and override it right there just to show you, maximum file is fine. It's an a to a 120 kilobytes. So you can have a big file and that's going to be saved. So if I'm going to find that on my Finder, and I'm going to get find a new window over here. You probably can't see this yet, but I'm just going to drag it into you now Floyd. So you can see I've got only copy and Ernie because I did a test run before I recorded this just to make sure it all worked seamlessly for you guys. Well, we need to do is I'm going to use my own and I'm going to actually AirDrop it. So here's a second window here. Resize this. And you can see this is my iPhone, Benji blue iPhone. That's my iPhone over here where I'm all ready and waiting in the gallery for it. Kinda drop him in. And he should come straight down in and you can see it's straight there on my firm. The big thing you have to do now is click Share down the bottom left, scroll down to create watch face. Now you can see it offers you a couple of views. You can see this actually looks cool. Be kind of a self with the kaleidoscope, but we're going to choose the normal watch face like this. You can edit anything you want, like what do you want to do? Want to show any of these companies sound level stopwatch, the strong app I'm using during the time of day to be toppled bottom. You can choose there and then simply click the Add button like that. And then when you go into your phone, you'd be able to long press your watch face and a country record. My I have my white screen but I'll show you. You can see can long press this is already there for me, but go over to photos and you'll be able to choose any to be on your own. Watch. So install yours now and show me a photo of that in the Skillshare class project file. Love to see what you've created and I'll see you in the next lecture.
7. Next Steps: Awesome. Thank you so much for following along. I hope you enjoyed it as much as I did. And I hope you're now sitting there with a little watch friend who's going to remind you to be grateful and to be happy. There's three things I'd love you to do before you go. The first is to follow me here on Skillshare and leave me a review. I look at these are views that good on their dad and I had to change what I'm doing here to help suit you and your needs. So I really appreciate that. The second one is you can come follow us on YouTube. We have little bite-sized clips and pieces and things that econ put into a Skillshare course that I know you love if you enjoyed this course. So go ahead, go to our instructor profile and go click on our YouTube profile to go and follow us over there. The third thing is check out my other Skillshare courses. We have over 25 Skillshare courses at the moment, and I'm building more every single week. Come on, find a course that suits your needs and will help you achieve whatever it is that you want to achieve. And we'll go on another adventure together. Thank you so much once again, and I'll see you in the next one.
 Benji Wilson, Social Media & Entrepreneurship