Transcripts
1. Introduction - Let's Make A Coloring Page: Hey there, my name is Melanie. I'm the artist behind the swimming owl. You can find my artwork on several print-on-demand sites as well as in my very own Etsy shop where I sell everything from clip art graphics to original paintings, stickers, and even coloring pages and coloring books. Most recently, I actually published my very own coloring book. And I made the coloring pages using the same techniques that I'm going to show you today. As you can see, I dabble in a lab things including teaching. I've taught art classes to all ages, from tiny kids to senior citizens. So you're in very good hands today and I'm super excited to show you this process to create your own coloring pages. So let's dive in and talk about it.
2. Your Project - Plan, Sketch, Ink: With iPads and drawing apps, making your own unique coloring pages is easier than ever. I actually really enjoy making custom coloring pages for my two-year-old daughter using this exact process. And she loves it they're made specifically for her. But you can also use this technique to make coloring pages to sell as printables on sites like Etsy or when you get really good and you have a big collection of coloring pages that all fit within a theme. You can then arrange them into a coloring book that you can then self-publish, which is really exciting to think about that, right? Did you think that you can make your own coloring book using your iPad? Well, you can, and I'm excited to teach you. So if that sounds fun to you, stick around.
3. Supplies + Downloads: Okay, So really quickly Let's talk supplies and resources. First, you are definitely going to need some reference photos. Now, I'm going to be working in some kind of woodland theme and I'm going to provide you with some images in a collage that kinda go in that theme. In case you don't want to spend all of your creative free time going down a rabbit hole of Pinterest or Unsplash searching. So that will be available to you in the projects and resources tab. But definitely feel free to go find your own reference photos if you want to work with in a different theme. Next, we need a program that allows us to work with layers and allows you to draw. I'll be using Procreate on the iPad. However, you could also use Adobe fresco or Photoshop, as long as you can work with layers and draw with a stylus or an Apple console. I'll be using the Apple pencil. All the brushes we're using today are already built in native brushes to procreate. If you are also working in Procreate, I'm going to show you how to make some small changes to those brushes to make the workflow eaten easier. It's also helpful to have a printer. It is not necessary by any means, but I always like to print my coloring page out at the end to look for any mistakes that sometimes you miss on screen. Or if you want to be able to then color that coloring page. And traditionally, a printer is going to be pretty helpful there. So that's all we need for supplies. Let's start talking about reference photos in the next video.
4. Gather References + Make A Plan: Alright, so the first thing we need to decide is what you're going to draw for your coloring page. You could do an animal or some kind of house of fantasy creature. You could illustrate a phrase with a pattern around it. So come up with your grand idea right now. And then we're going to do some image searching and planning and collecting some resource images so that you have something to work from. I think for me, I'd like to do like a little whimsical woodland scene of a mushroom that's been turned into like a little house for some little creature. But we'll see how it evolves during the sketch. Always stay open to your idea. Evolving and blossoming into something different you hadn't thought of before. That's what the sketching process is. Four. So the sites that I'd recommend are either Pinterest or Unsplash. With Pinterest, you have to just be a little bit careful because you're gonna see a lot of other people's artwork on there. So if you do pull something from Pinterest, make sure you're using a lot of creative freedom and license with that image and really change it. So that way you're not directly copying anything you're seeing because I just, I do not recommend using someone else's artwork. That is not going to be something that they gave you permission to do. Whereas if we go to a site like Unsplash, it's a stock photography website where the photographers are uploading, knowing that you might use their photos for both personal and commercial projects, which is really awesome of them to give you that permission. So I always start with Unsplash. And what I'd like to do is just grab a screenshot. You can also download an image though pretty easily. So I'm going to look for one that I like the shape to start to make a little, like a little house out of. And it might be kinda cool to do one with like multiple mushrooms have like multiple layers of a house. I kinda like this one. And I really like that one. So the way I do that is I just tap the image to make it larger. And then I just grab a screenshot with this to button click at the top. If you have a different iPad, there might be a different way that you get a screenshot. I'm not sure I have the iPad Pro 11 inch and that's how you grab a screenshot on here. The other thing that it allows you to do on Unsplash is download your image. There's different sizes you can choose from. But again, I just grabbed a screenshot. So I have also included a collage for you though in the projects and resources tab with a bunch of woodland and animal themed images in case you don't want to get stuck going down a little rabbit hole of searching and wasting whatever creative free time you might have today to do this coloring page. So you can go ahead and use that to get started immediately if you don't want to look for your own images. So in the next video, we're going to talk about setting up our canvas. I'm going to show you how I pull in my reference photo in get going on creating a really cool sketch.
5. Canvas Settings: Okay, so now that we have our fun idea, we are ready to set up our canvas. I am inside the latest version of Procreate. I am going to go ahead and make a new canvas with you right now. So I'm going to hit the Plus button right here. And then right here there's another little icon. We're going to tap that to make something new. We want this to be in inches and we're going to make it 8.5 by 11. That's like the size of a normal sheet of paper. And you can also reverse those dimensions if you'd rather have a landscape version of a coloring page, most coloring pages though, are going to be a portrait style page. And so that's what I usually do. I've got my DPI set at 300. You could also do 600 if you for some reason wanted to make this even larger sometime, but 300 is fine for me and that's plenty of layers on mine. You don't need to worry about the color. Excuse me. You don't need to worry about color profile because we are working in black and white. So I'm going to then just title this coloring page. And then I'm going to put 300 DPI just so I know in case I decide to make a different version of this later. So I'm going to create, it's going to open up my new page and I am ready to get going. I always start by adding a border to my coloring pages. You can totally skip this step or put a border in later, but I find that I make us stronger composition when I start with a border, I've included two different borders for you in the projects and resources tab. I've made one that's an oval shape and one that's just a rectangular shape. I'm going to use the oval. So we go to the wrench, go to Add, Insert a file. I store my files in Dropbox. So goal and find wherever you have stored your borders that I've given you, and then add them, add whichever one you'd like. So again, I'm going to do the oval border. Now mine already fit to the page perfectly. If yours didn't just go ahead and resize and I would make sure that snapping is on so that it helps you center it. You'll know it's centered when you see a gold line showing up, up and down and side to side. So you can see that popping into place like that if I move it around and that means it's centered, tap off of that. I'm going to start a new layer, and I'm actually going to tap this in locket or swipe it and lock it so that way don't ever accidentally draw on the border. And I'm going to start my sketch on layer two. So I will see you in the next video to start our sketching process.
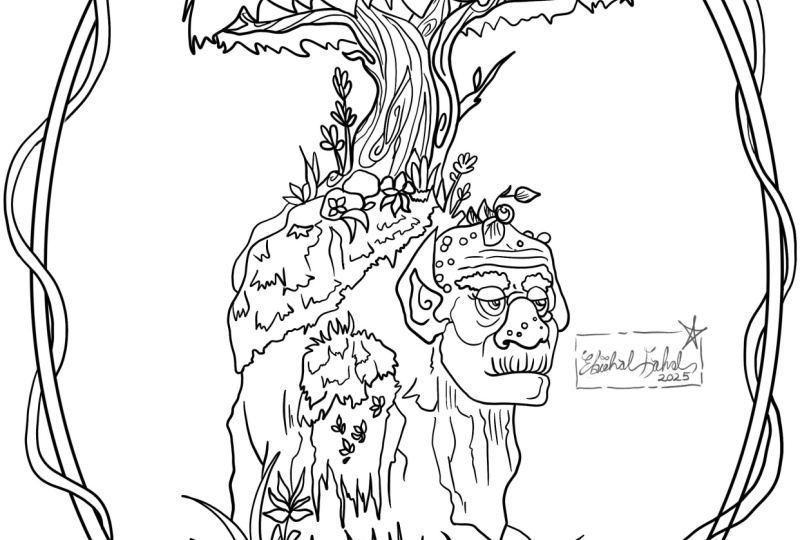
6. Start your sketch: All right, It is time to start our sketch. Here's where we're going to want to spend the majority of our time. We need to plan and schedule until we get things just right. So first things first, I'm going to pull in the photo that I want to start with. Go to the wrench, insert a photo. I'm going to start with this one. And I'm going to start with some tracing. And then I'm going to let things evolved from there. And let's all get on the same page about using reference photos and in tracing, It's totally, totally fine. I am not going to outright copy this image. I'm using it just to get me started. I clean the tweak it a lot. I'm not one of those people that can just hold a ton of reference information in my head to sketch from. So I look at reference photos and then I use the procreate app like a light box to get me started with a sketch. It's also really helpful if you feel that your drawing skills aren't quite where you want them to be yet. So just keep pulling and reference photos for each part of your sketch as needed. It helps us get past the fear of that blank white papers staring at us. It just helps us get some marks down on the page. Okay, so enough about that. I'll get off of my little soapbox there. So quick tip, I don't need all of this data here. I need to go ahead and get rid of all of this extra. So I'm going to grab this ribbon shaped tool, it's the selection tool and I'm on free hand. And then I've zoomed way in. All I wanna do is just cut out these mushrooms. I don't need everything else around it, so I've drawn a rough shape around it. Three fingers swipe down, cut, and paste. Now come up here to the layers and you'll see that it divided those two things and to do two different layers here. So I'm gonna come down to this part that I didn't need. Swipe and delete, go back up to just the mushrooms. Click the little arrow and position this around. So since I'm going to turn this into like a little house, I need these mushrooms to be fairly large and to take up a lot of the space and may actually distort it to. So I'm on that arrow, I'm gonna go to Distort. I'm going to make them like a little taller, something like that. Squeeze that in a little bit. I think that's a pretty good placement to get started with the tap off of that and let that stay there. I'm gonna come over to my layers and I'm going to turn down the opacity on this so I can trace over the top of it. I've got that at about 25 percent. And I'm going to make a new layer. You don't want to sketch on top of your photo. So definitely don't forget to make a new layer. Let's do a quick little talk about brushes. I prefer to use the 6 B pencil or the HB pencil. So you can just go under sketching in your brush library and choose a pencil here that you like. So again, I'm just going to choose the six B. I've got either a black or a gray chosen. So now I just want to start to play with the lines. Is there any movement in my scene? What action might be going on? We want to spend the majority of our time working out our sketch. And the reason for that is that cleaner and more definitive our sketches, the better off we're going to be when it comes time to inking in our coloring page. So I'm gonna go ahead and spend some time on this sketch. I'll probably speed this up because it can take an hour or more sometimes to really work out your sketch and your ideas. And then once I have that rough sketch, I'll make a new layer to make it cleaner sketch and make some more definitive choices. It makes them more definitive lines that I can then ink over the top of in the next video. So let's start sketching. So I'm gonna zoom in here and just start getting some lines down. Pencils a little thick when I make it a little smaller. And immediately I know that I don't really want this underside of the mushroom. So I'm just gonna make this like a top just like this one. And I know that I want the bottom to be a lot thicker than this because I'm making it into a house. So let's see then I need to also make a choice of is this one in front of or behind this one. So as you can see already, this is not looking like the reference photo. I'm going to actually just trace right over that line and I'll make a choice in a few minutes here. I could also have these be like a combined house, which might be kind of fun. Maybe I'll do that. So I'm going to choose my eraser and batch I have though. So by choosing, by holding down on the eraser tool, it'll choose the same brush to erase with that I was just using. So it'll erase with the 6 B pencil. You could also choose any eraser that's a lot cleaner. So a lot of times I'll go to the airbrushing and choose a hard brush to erase with. So that way I get a really clean eraser line. I don't think they like of that. Let's get rid of that and actually just make those plenty of room for like some house type structures like doors and windows. I'm gonna make this a little bit thicker. At this point. I really don't need this reference photo anymore. It's kind of just cluttering up my sketch and confusing me a little bit. So I'm going to go ahead and turn that off by just clicking this box here. I'm not going to get rid of it in case I want to use it again. I'm just going to hide it for now. I'll make this a little taller. This a little heavier. Again, don't be afraid to make a really messy sketch. We are just getting ideas down on paper right now. So I'm liking the shape of this overall so far. I can see that there could be an opportunity to put some fun things in over here. Like maybe there could be some banners or Garland hanging, maybe like a fun land turn. Adding some doors and windows, maybe even some windows up top. I could add some texture into the top of these mushrooms, trying to think what would be fun things to color in and add in like these. I don't know the proper term, but sometimes mushrooms have like these weird skirt like pieces that come out here. As you're probably look up what the actual word is for that can change up the bottom shape here a little bit. It looks a little more organic. Okay, I'm gonna go ahead and add in a door. Now. Fun little tip. If you're wanting to make a shape that is a little bit more perfect. And you don't necessarily want a hand drawn with Gallienus to your line. You can do use different gestures to make that happen. So for an arc like this or like a doorway, I'm just going to draw it and then don't live my pencil I'm holding down and it automatically corrected it. And I can then kinda like move it around like that. So if I wanted my door to be more of a perfect arc, I would hold it down and let it correct it. I almost kind of like the feel of my hand-drawn doorway though, because this is such an organic thing. We're pretending it's a whimsical woodland scene. I'm fine with it not being perfect. So then I might draw an interior of that door. Unlike a little door knob. Hey guys. So this is Melanie coming at you from the future where I've discovered that my camera very rudely cut us off when I was showing you how to do some quick shaped features during your sketching phase. So I'm just going to show you right now and maybe this is for the better. Maybe I will be even more thorough here. So I just have my sketching brush, which is my 6 B pencil chosen. And I'm going to show you how to make shapes when you might need a little more accuracy than just what's your hand is able to do. So maybe you need to make a perfect circle, or a perfect square, or a straight line. I'm going to show you how to make all of those shapes, some assistance. So let's start with a circle. I'm just going to draw a rough circle here and hold down with my pencil. I have not lifted at all. And you'll see this little thing pop up at the top that says ellipse created. Now when I lift my pencil, I can hit Edit Shape. I can either choose to leave it as an ellipse or I can hit circle and it's going to perfect it into a perfect circular shape. I can do from here now is I can actually make this larger or smaller by clicking on the side here and pulling in or out. Do not click the little blue dots that you'll see to just size things up and down. If we hold one of these and pull it will change it so that it's no longer a circle. Okay? But I can come back here and hit circle again. Again. Pull on any other spot other than those blue dots to make your circle bigger or smaller. Okay? So I'm gonna get rid of that. That's how we do a circle. If we want to do a square or rectangle, make a rough one with your pencil. Hit Edit Shape. And now we have all of these other options as time, quadrilateral square polyline. So say you needed a perfect square. This is really nice because drawing a perfect square by hand is not easy. So this automatically corrected it so that all the sides are the same. Or I could go back to having just a rectangle, which is good for like a portrait style window. So this is a good way to make a nice clean rectangle or square. Same idea applies if I want to make it bigger or smaller, click anywhere other than the blue dots. Blue dots allow you to make these kinds of changes. Instead of changing the entire shape, you can distort it. Okay? Now another nice feature is okay, I'm going to tap off. Get rid of that. We can make nice straight lines. So just draw a line and don't lift up your pencil, hold it down, and now it corrected it into a nice straight line. I can then drag this line all the way all around. I can shorten and lengthen it. If I then hold three fingers on the canvas while I'm doing this, it will snap it in 15 degree increments. Okay. If I lift those fingers back up, I have free rein to put it wherever I want. Again. If I lift up, I can even edit it again. Tap away to make that go away. So I could also make a duplicate of this little window if I wanted to make the exact same kind of window and another spot. So I'm gonna hit Duplicate once I've selected it with a free hand tool. And then I'll move it to another little location. Maybe like right up here. Okay. So it's just like a quick little hack to not have to redraw the same thing over and over again. So I know I also want to include like some little plant life down here. I also want to put that lantern I was talking about up here with a garland. So I'm just going to go ahead and start sketching those things in. So again, if you're thinking, Melanie, I don't know how to draw these things. You're making it look too easy. What if I don't know how to draw a lantern or something? Again, hop over to Pinterest or Unsplash, grab a reference photo, pull it in here and trace a little Lantern if you need to. That is okay. Or just pull up some to look at different shapes of lanterns to get like a fun idea. Number ten, this is some kind of like link. Again, we need to be thinking about things like, do we want someone to color in these little links? Or do we want to just make them as simple, round shape like this that somebody doesn't necessarily need to color in. Whereas if I make this opening here, that becomes a little space to color now. So because I made a selection and duplicate it, it, it made a new layer. So if I want to, I can go ahead and combine these now so that it's all together. And when I go to erase, I don't have to click between layers. And since this is just my rough sketch, I'm fine with it being all on one layer right now. I'm going to add in some texture to the top of the mushroom here, these little bumps that some mushrooms have. Again, these become an opportunity for somebody to color in something fun. A slightly different color, or to add in a texture when they're coloring. He's going to erase these lines out so I can remember kinda what I was, what my plan was and what I was thinking. Okay, That's starting to look really fun. This little guy needs a little some bumps. Really liking that. I think I went to put some little windows in up here and something kinda like that. And then maybe this one will have like three windows. Think I want to add in like a vine that kind of wraps around to give people a chance to color and some fun greenery. And sometimes I like to erase as I'm going to keep things a little cleaner so that I understand what my line was supposed to be representing and what is supposed to be in front of what? Fix that. That looked a little too big. Here we go. And now I'll just add some little leaves to this. You could add some little flowers to this vine, like maybe some little drop flowers off of here. It's kind of fun. Maybe I'll make like a really long one right here that has two. If you're ever feeling stuck with like what else could I add? You could always share a picture in the projects and resources tab. Open up a little discussion tab and ask me or other people in the class for some ideas. Because that definitely does happen. We have those moments where we're just kinda like, Oh man, where do I go from here? So reach out, ask people for some ideas, or do another little image search to get some inspiration. I'm going to have that fine rap. I think actually I'm going to have it be up here. Yeah, I kinda like that. So I'll erase this area away because the vine is in front. Atoms more leaves. Maybe I'll put a flower here. Okay, So we need some more interests down here at the bottom, but I'm not liking where this is placed within my border. So all I'm gonna do is come up here, make sure I'm selected on my sketch layer, tap the arrow. And I'm going to just move my sketch up a little bit. Now I've got more room to make something fun at the bottom. So what could be fun down here? Maybe like a little rock pathway, some greenery. Maybe they could have little planters with some plants in them. I could be really fun. Maybe there could be some miniature mushrooms and their yard. Maybe a little rock stack. I'm really into Cairns guys, I love. So I'm just going to start sketching out some fun ideas done here. A little planter. Whoever lives here has little green thumb. We could have another little lantern over here or we can make the Garland. I kinda wanted to that, I want to make a garland. Mips. Sometimes my hand undoes things for me. Is settleable insight card away. Kinda put some fun little patterns inside these groups. You might be a little confusing with those lines. So maybe they should go this way. Let's do some more circles just because they're so cute. Dogs, pretty cool. Income, I make leg a little. I'm going to add in some little cracks and the mushroom. I just love finding ways to add an fun little touches, character and personality into your drawing. Little details that really make us feel like it is hand drawn. This isn't something that you just took a graphic off of the Internet and call it a coloring page. You made this. Maybe this should have like some little wrinkles and then we still need some work down here at the bottom. Can make some kind of like tall grassy plants over here. Maybe over here they've got like another potted plant. Maybe this one could have some kind of flower. And I always like to put some kinda little like texture. If I'm going to have open ground, like I'll put like little squiggles to show that this is either grass or maybe it's got little like pebbles. And here, to give your colorist an idea of what's going on in that space. And give them a hint as to what colors they could use. Although there is no right or wrong with little scenes like this, they could do whatever they wanted. Maybe over here will have some kind of really cool flower. Let's see how about books at the scene. When I ink this and I will actually put a little bit of texture into these rocks. This dyads some interests to them. And obviously the person coloring this can also add their own texture in that sometimes it just, it really helps to get that started. Hi.
7. Add A Fancy Border: Okay, So overall, I'm really pretty happy with where my sketches at this point. I could just call this good and I could make it cleaner sketch over the top of this now. Or we can do something a little more fun with a fancy border. So if you're feeling extra creative and want the challenge, we can fancy up this border. You can try to make a border out of something that kinda goes with your theme. So for mine, I could actually make a border out of like a vine with flowers and then just have the bottom be kind of like a rough shape of the ground. Some other ideas could be a twisty tree limb, a rope, me. So just kinda think about something that could go with whatever it is that you've drawn. You could also something that's not quite as difficult but could easily fancy up this border is just insert a second border and make it slightly smaller or larger than the first one. So I could just do this. Then center it. And now I've got a fancy border and it automatically makes that look a little cooler and it becomes another thing that somebody can color in. Okay, so I'm actually going to select, I'm going to unlock this layer. I'm going to select all three of these and make everything just a little bit smaller because that's a little too close to the edge for me, especially if I'm going to print this out, to be a little bit careful about that. And if you are thinking long-term and want to put this into a coloring book, you need to be careful about these borders, especially this inside. Where when you open up a book, some of that's going to be stuck into the center there. And your colorist isn't going to be able to get in there very well unless they tear the paper out, of course. So that's a simple way to fancy up your border. The other way we can do this, I'm going to make a new layer. I'm going to put a fancy border on its own layer in case I decide I do not like it. I'm not messing with my original sketch. So what I could do is I could just wrap a vine around this double border, which could be really fun. So I would start at probably down here. I'd have it come over the top maybe like this. Let's see. That went under. So this will go over. Oops, I got a little thick over under, over until I get down here to about there. And at that point I would just kinda make this kinda like a ground that comes out. And then I could erase away this part of the border. So I'm gonna finish up this vine and then I'll show you what that might look like. Twisty vines can be a little bit tricky to remember which part is over, which parts under. And then we're going to have to come back in and erase away these parts of the border. So what I'm gonna do is take this border, drag it down here. And I'm gonna go ahead and since I'm fairly confident with what I'm doing, I'm going to merge these two borders. Now it will make erasing a way easier. I'm going to choose my selection tool. I'm on my border layer, choosing my selection tool. I'm going to erase away this part that I actually want to be just like the fun ground, showing the border. I don't want those border lines. Three fingers swipe down, cut. Good. So now you can see my ground has become the border. I'm going to erase away that part. I'm on the right layer. I don't need this, I don't need that. And now I need to erase the way this part because this is going to be the start of this part, so forth and so on. So I need to go for and do that with the rest of the border that's supposed to be behind my vine. All right. So tell me that doesn't immediately make your border looks so much cooler by adding another element that can be colored. So I get again, I could leave it like that or I could add an even more details like little leaves and flowers and things to that. This probably needs a little work here. I'm going to probably kind of change that shape a little bit to match up to what I've got going on because right now it seems like it's hanging kinda low. I'm gonna go back in and just fix that. That was up here on its own layer. And I'm probably just going to erase that and draw a new one. Like that. Oops, and I need to go back to my sketch layer, not the border. And I'll just add in some pieces that make that feel like it fits. That's looking really good. Now I can come back up here to this vine adherence, or I can come in here and add in some fun details. If you are struggling with border ideas, again, you could go do an image search. You could ask us, your friends for some ideas. You could also just do kinda fun flourishes are like curlies on the outside. I can show you an example of some other borders I've done. I'll show those to you right now. To give you an idea. Again, I'm going to be careful about getting too close to any edges. Just can't play around with different ideas for flower shapes.
8. Refine Your Sketch: Okay guys, so I am feeling really good about the sketch. The next thing I need to do is go ahead and make a final sketch that's a little bit cleaner. So that way when I go to ink this in later, it's much easier to see what lines I was intending to keep. What lines were just there as my practice. So in order to do that, we need to start on a whole new layer. I'm actually going to go ahead and I'm gonna get rid of my original little mushroom. I'm going to combine all of these because I'm fine with that. I don't care about saving any of that for later. To adjust later. I'm going to go ahead and I'm going to turn the opacity down on this first, down to about 25 percent or so. And I'm going to lock this to make a new sketch on top because I don't want to accidentally somehow end up back on this layer making my clean sketch. So I'm going to keep doing this and my six B pencil with my gray or black. And I'm just going to make a clean sketch right now so you guys don't necessarily need to watch me do that. You go ahead and do that on yours though. That way we have the best sketch possible to go into our inking session, which will be next. So during the second sketch phase is where you can also make some changes like do these little branches really working here? Maybe not. So maybe what I'm gonna do is just make this little like either flowers or berries on here. And I'm just going to cut that out completely. Don't be afraid to make changes at this stage. That's totally acceptable. Okay? Okay. Okay. Okay. So I have that my final sketch done. I can go ahead and turn off the bottom sketch and suddenly this looks so much cleaner. This is going to be so easy to ink over the top of and the next video. So I know that probably took you quite a while, but it is going to be worth it when it comes time to doing the next part. I'll see you for the inking video.
9. Choosing An Ink Brush + Editing It: Okay, so before we start officially inking in this sketch, and what I mean by inking in is choosing an ink brush and going over our sketch on a new layer to make those crisp black lines instead of these sketchy pencil lines, will be using an ink brush to make them really crisp and clear. But first, let's talk about the kinds of brushes we can use in the style of line work we want to work in. So first things first, I'm going to go ahead and make a new layer. I'm going to turn the opacity way down on my sketch. That's about 15%. And I'm going to lock it. Perfect. Now I cannot accidentally change that layer at all. We're gonna go back up to this layer. All right, so let's open up our brushes here. Go down to inking and stative sketching this time. In several brushes here are going to pop up that are supposed to emulate a actual ink pen. The ones that I recommend are either the syrup brush. You'll see it's got tapered ends. The technical pen, the studio pen. Or there's also the monoline pen, which I believe is under calligraphy. There it is. The monoline. And the thing about the monoline that's going to be different about those other pens is that this one has like a clean stop and start line, which works really well for some people. What I'm going to recommend you do is whatever brush you choose. I'm going to go back up here and I'm going to choose the studio pen. I recommend you make a duplicate and up the streamline in the brush settings, especially if you tend to have like a shaky hand and you want cleaner, smoother lines, streamlining your pen is going to help it automatically correct any shaking you might be feeling. So you guys, this is Melanie coming at you from the future again, because procreate actually released a new update after I finished filming this class. So procreate is now on 5.21 of the things that they did was they changed to some features to the stabilization, streamline and motion of our brush editing capabilities. So I'm going to show you that really quickly. So I'm going to go down here and choose my ink brush again, which is my studio pen. I'm going to swipe and hit Duplicate. Now it says studio pen. Yours will probably say studio pen one minus2 because I've already made another one. And this little kind of wavy ribbon over here shows that this is a duplicated brush. It's not your original. That's the one we want to make changes too. So tap it. It's going to open up the brush studio. And what I want to come down to is called stabilization. Now, we still see streamline, which is what I was originally using to make a better brush for making a coloring page, but they've also now added stabilization and motion filtering. So I'm just going to erase what was on this drawing pad by using three fingers and swiping back and forth. And right now this is what the brushes like normally. It'll kind of show every little wobble and shake my hand for the most part. When I'm making a coloring page, I want it to be a little smoother. I want it to assist me a little bit because I do have a pretty shaky hand. So what I'm gonna do is up my streamline to about 90. And now it's going to correct a lot of the shaking that might be happening in my hand and it's smoothing out that line quite a bit. The next thing you can do is if you need even more assistance as you could push up this stabilization and then try and it's going to really smooth out my curves and almost not let me do any kind of tight curve. You really have to play with this feature to feel it. It's hard to explain it. For me though. I'm actually going to leave this down and just focus on the streamline of my pen. But it's really nice that Procreate did this extra step in here in case you do need a little more assistance in smoothing out your lines. So play with those three features on your new ink pen. For me, again, I'm going to bump my stream line up to about 90 percent and maybe stabilization could go up a little bit if you'd like to. So I'm going to hit Done. And now that studio pen to is what I would use to make my final inked version of my coloring page. So that is the five-point to update that I needed to throw in here for you. We next want to choose black for our color. Double-tap at the bottom of your color wheel and it will automatically select the darkest, deepest black. And here's where we want to warm up our hand and our wrist a little bit. Try out different brushes. Try out different brush sizes to vary the weight of your line and figure out what the right line work style is going to be. For your coloring page. So before we start truly inking this in, we want to go ahead and warm up our hand and our wrist, play with a few different brushes to see what you really like. Try varying the weight of your lines and see what the right line work style's going to be for your coloring page. This is totally your artistic choice for your coloring page, you get to decide what you prefer. Do you like a brush with a tapered end or do you like that monoline pen that has a clean start and stop to it. I would actually recommend making a coupled different inversions of your coloring page. Print them out, look at them and see what your style is going to be when you start making coloring pages. And that doesn't mean you can't change it in the future, but just see what really appeals to you. My preferred method tends to be using a tapered inking pen, like the studio studio pen that I showed you. I like to vary the size of my lines just a little bit. And I like to add in detailed line work throughout my coloring page, but not an overwhelming amount. My next tip for you really quickly as once you've decided what you like is to make a, another layer that you're going to hide. And on this hidden layer, you're going to write down what brush you used. So I'm going to write studio pen and approximately what sizes you're enjoying. So that's too thick. Let's see. That looks about right, so what sizes that somewhere between. So I'm going to write three to 10 percent maybe. What's this one? Or maybe two even. So I'm going to write two to 8% size. And then I'm going to hide this layer because if I don't finish this all in one sitting, but I forget what brush was I using and what size approximately was I using. It's kinda hard to match backup later. So now I have a like a little note to myself, I'll just put it at the bottom and hide it. So that's just my quick little tip for if you need to come back to this a day later, a week later, a month later, you'll remember what tools you were using. Okay, so let's warm up for a few minutes here. I've got my sketch down in opacity, so it's not going to bother me too much and I'm just going to warm up by like making some circles loosing my wrist up. I tend to have a very shaky hand and so it helps me to just kind of like get this warmed up, loosen up. So that way I'm ready to come in here and sketch with as calm of a hand as I can. And I can delete this layer once I'm done with that. Let's just do a little bit of practicing now to see if we like our line weight and style that's looking pretty good. And then again, I like to kind of taper things off and makes thick in parts on my coloring page by just pressing harder in some areas. So I'm thinking that about 5% on my studio pen is a pretty good weight. It might actually be a little thick. Which is something this is another point to bring up is what age Am I making this coloring page four? Is this for an adult or a child? I tend to make my coloring pages for teens and adults, so I don't need to have these really thick bold lines that little kids will need. But this is like a good in-between right here. I'm liking this field. If you are making a coloring page for a child, you need to make simpler boulder shapes and lines. So they need like a really obvious border, something a little harder like that. That might be a little extreme. But you get what I'm saying. There's a difference between making a coloring page for adults and children. So keep that in mind before you make your final decision on your pen choice and how thick your lines are going to be.
10. Ink Over Your Sketch + Line Style Choices: Okay, so we are ready to start inking our page in and making the final line art. Now remember, you may notice in some coloring pages that all of the shapes are perfect and the lines are perfect. But what I really love about making my own coloring pages is giving it that hand-drawn feel. So don't feel like everything that you make on here needs to be perfect. All glow. That is totally your artistic choice. So you decide what you like. Now, the last tip I wanna give you before I start jumping in is that if you plan to take this coloring page and color it digitally, like I teach you in my first Skillshare class. This one here. Then when you make this coloring page, you're going to want to be really mindful about closing all of your shapes that you might want to drop, fill color into during that class or when you go to color this in digitally. And what I mean by that is I'm going to show you on this window. So first, I need to make sure okay, I am on a clean layer. My sketches locked, perfect. For this window, for instance. If I wanted to be able to drop color into this, this whole shape means to be perfectly closed like that, that way then when I go to drop color in, it is going to actually be able to fill this space and not leak out. So even if you had it like that, There's a tiny little couple of pixels that are left open. Our color is not going to be able to drop fill in there. So just be really mindful as you go to ink this in that all of your shapes are closed, really nice and neatly to be able to color this in later. All right, so I'm just gonna go ahead and get to work. I'm going to start inking this coloring page. In this part, you can kind of zone out while you're doing that. It's put a television show on and just start tracing your artwork. It's almost like a meditative experience too, because you're not having to put a whole lot of thought into it. It's relaxing and calming, just kinda like coloring is. So since we did all of that hard work on our sketch and making it so clean. This part is easy. So like I said, you don't even have to sit here and watch me do this while you're doing yours. You could put on a show or we can do it together. Like however you wanna do this part, I'm gonna go ahead and start inking now. One more time. They'll make sure you're on a new layer. Don't do it on your sketch layer. Lack that bad boy so that you don't accidentally end up tracing onto your sketch layer. So parts like this, we're going to want to be careful. Normally I would like ink in a certain section at a time. So I like finish the top of this mushroom before I went into something else. But because like I said, we wanna make sure areas are closed for digital coloring purposes. I'm going to go ahead and put that leaf in there to make sure all of my lines are touching and those shapes are fillable. Anytime you mess up on this inking, again, double-tap to undo something, three taps to make it come back. Really take your time on this part. There is no rush. I'm varying the weight of my lines by changing the amount, the pressure I'm putting on my Apple Pencil right there after you really careful that almost isn't closed. The other thing you want to be careful about is stray little like dots and lines that sometimes your hand will make. So every once in a while, just like take a good peak around, look for any little pieces that aren't supposed to be there. That's another tip I wanna give you though, is if you plan to sell this coloring page later, I will always print my pages out and look them over on a sheet of paper because Really easy to catch your mistakes that way. Sometimes you'll actually be able to see those little extra marks or missing areas when it's on paper for some reason it just makes it easier. And if you're going to sell it, you want to make sure you don't have those little random row wines. You want it to look really clean and professional. So while I'm doing that spine part, I might talk to you through some of it to give you some ideas for future coloring pages you could design. So one idea I had for you guys was you could go outside, take a picture of your house or wherever you live on your iPad. And you could make a coloring age out wherever you live, whether that be so cool or do it with your pet. Take a picture of your pet and turn them into a coloring page, right? Tracing over them. I just think there's so many fun things you can do to make your own fun coloring pages. Pretty much anything that you could take a photo of. You could then turn it into a fun coloring page for yourself. Okay, so here's where I'm going to have to make a couple edits. So I'm going to clean up this little pixel right there. So when you're erasing for your final line art, you wanna make sure you've got a really nice hard airbrush chosen for your eraser. I'm gonna make it pretty small so I can be really precise with that. It's huge. And I'm going to come in here and I am literally erasing away just a couple of pixels. But it's going to make it nice and clean and crisp. Another idea for a coloring page would be you could make a quote which I am going to show you in a future video how to make some bubble letters. And then you could make like a pattern around those letters out up like some flowers or little animals. And you would only have to like draw something once and then duplicate it and put it all around the words that you chose to illustrate or turn into page. You'll notice that I don't always follow my sketch for some of this and that's fine. I've got that idea there. Sometimes it's just easier to redraw them to follow the sketch. But either way is correct. And I like to zoom out everyone so i'll to make sure things are looking accurate. So I'm going along and this may not bother you and you may not even be able to see this when it prints out because it is so tiny. But I am going to clean up some of these little pixels that look like my line just kinda hooked a little bit. It's going to delete those out or erase those out. Because I do make coloring pages to sell. And so I do want these to be as clean looking as I can get them. That's looking really good. There isn't really a right or wrong way to go about marking in your lines. So like there's no place that you have to start. Start wherever you feel drawn to putting the lines in. I'm going to bounce back this way because I noticed I missed this part. If you want a straight line again, just hold your pencil down. You don't really want these to match up perfectly. Avila handles. Sometimes it also helps to just toggle on your sketch on and off to see how things are going in, looking good so far. To make a good circle here. So hold it down that it's shaped. Circle. Position it where I want it. That looks okay. And this kind of check, this looks a little wonky, but I don't mind it. It adds a level of character to my door. That doesn't need to be perfect. And let's make this little star. We can even minaret, this would look like. There we go. I like that, That's really cool. Okay, handle. Now for things like texture lines, I'm going to make these lines that are indicating that this is a wooden door relief thin and not perfect. So I'm putting very little pressure on my pencil and I could even make my size just a little smaller. Again, I don't want to vary this part up too much. I want to do it mostly with the pressure that I'm placing on my pen. And make like a little knot. Right? Let's back out and see how that looks. I'm going to turn my sketch off to think that looks really cute. I'm going to leave that like that. Turn my sketch back on and get me it's just a few more and some of these blank spots. And I'll get back to continue their us. So I'm going to bump my pen size back up to, I think I was at 4%. Will make that somewhat straight line. I cannot wait to see what you guys create. Clay's make sure to share in the projects tab. You're going to help inspire other people. Including and if you make multiple versions of your coloring page with different inking styles, I would love to see that as well. There are some coloring feature artists who actually make grayscale coloring pages. If you don't know what that is, Google that really quick. There are pretty cool. They actually put shading into their coloring page. And then when someone Conor's it like it already has all the depth built in because it's a grayscale coloring page and it's really cool. So there are so many ways to make this artwork. Okay. Okay, now I want to be a little bit careful here. I'm kinda going in and adding in some little details. I laughed out of the sketch. But here I'm starting to get a lot of black line work. I'm going to leave it be. But just keep in mind that that now becomes really difficult to actually color in for somebody because the lines are so tight together. So for those, like I probably don't need to be adding in these little details. I believe it out of that one maybe you'll see. Yeah. Because even though zoomed in like this, it looks like Oh yeah, there's plenty of space. When we go to zoom back out, we realise that's actually very tiny. I'm actually really loving the fact that none of the windows and this little house are the same. It makes me really happy. It does add so much charm. But like some scallops under this one. And see that happened to me. There's a stray little dot there. And get rid of that little stinger. Perfect. Random and keep carrying on. Okay, so this is looking really cool. Again, I'm just gonna do a little check ins. I like to turn my sketch back home and keep working. Okay. A lot of times when I am inking in my coloring page, I will sometimes find ways to add in more little magical details like little lines and dots and stars and moons in little sparkles and things like that. To add those extra little touches. Okay. Hello. Has just remembering earlier I said I kinda wanted to make my goal. And I never drew it in the sketch, so maybe I'll do that now. It's kind of fun. This adds in a little bit more of my personal likes and style into this. Well, if I were making this, oops, I forgot a little leaf. I would probably spend a little more time on this outside vine. And I would add in some more leaves in detail. But for the sake of learning in this class, this looks awesome. There are a lot of little things that you could go in and really embellish and put more detail into. But this is a great coloring page. It adds, or it offers lots of little details that would be fun to go in and color. It offers big open spaces where people can really get into shading. So this is just, this fits a colorist needs. Let's go ahead and turn our sketch off and take a really good look at our final line work. This is looking great. So like I said, my next step now is I'm going to export this and print it out. So in the next video, really quick, I'll just show you how I choose to export.
11. Exporting Your Coloring Page: Okay, so for exporting, I export to Dropbox. The other thing you can do is airdrop this to your MacBook or your Mac desktop. I use both a PC and a Mac. So that's why I like Dropbox because I can access it from both without having to worry about the AirDrop all the time. So to do that, go up here to the wrench, go to share. If you want to just print this out for use, a JPEG is totally fine. If you'd like to color this digitally and do that in my next class or in my first Skillshare class. Coloring digitally. You're going to want the PNG version. So let's just save a PNG because you can also print a PNG. I'm going to send it to my Dropbox. And I'm going to send it to coloring pages. I'm just going to title this. I'm going to call it mushroom manner. That's Q. And save. Perfect. I've just exported this as a PNG. You can do the same with a JPEG, a PDF. You could do it as a Photoshop file and pull this into Photoshop if you wanted to make further changes like that. So exploiting this is super easy. I'm going to go ahead and print this out and I will show you what this looks like on paper. Okay, so I've got my super precious little coloring page here. You ready to see it? So here is all finished. It looks really cute. This will be so fun to color. One thing I can actually see that I want to add in though, I missed some of my fun little lines on this part of my mushroom. And I think that's the only thing I really want to fix. I might add in a couple more pieces of grass down here. So this is why it's really helpful to print this out. Oh, and I missed a line of squiggly line there. I'm not seeing any little rogue dots or lines which is good. So I'm going to make those quick little fixes. But then after that, this coloring page is ready for color. Whether I do it or I let someone else color or I upload it to sell. So pretty cool.
12. Bonus 1 : Bubble Letter Quotes: All right, So I do have a couple of little bonus videos for you. The first is going to be if you wanted to make like a little bubble quote in your coloring page. I have included a brush for you and the projects and resources tab that will make bubble letters for you. So go ahead and locate that brush after you've imported it. It's going to be called an outline brush. And I think I'm actually, I'm going to turn off my coloring page that I'm going to go to a blank layer. And let's just say I'm going to write the word hello. As long as I don't pick my brush up. It will automatically go over any race out those lines for me that were overlapped. And I've got a perfect bubble letter that I can now color in. However, if you've got a word that has a t in it, right? Like say you're going to write thank you or thankful. And I do this. Or we'll just do this for simplicity sake. It's not going to do that because I've picked up my brush. Okay. So the way we fix that is we just manually erase out any parts that are not supposed to be showing. So again, you're going to want like a really hard line eraser brush like the airbrush one in. You can either do it like that and leave that overlap or you can erase all of that out. You could also do it and get a cleaner edge by using the selection tool. So I'll show you how to do that selection freehand. And then you can just come in here and draw around it. Three swipes down and cut and it'll cut it out too. I prefer to just erased by hand, even if it's not totally perfect. So that brush will be included for you so you can make bubble letters in your coloring page. And then what might be kinda fun is to put like a pattern around it or like draw one thing, draw a flower drawn animal, and then kind of stamp it in around your letter and make a really cool, cute little coloring page for yourself. Now, if you wanted to do it on your finished page that you just made, you could always put something kind of small down here in the corner. So like whatever your title is of this little coloring page. So I could write mushroom manner right here. Okay, so you could write something really cute like that. And you can have little bubble letters for your coloring page. So that's a quick little bonus. The next bonus I'm going to show you is if you want to make something with symmetry to it, if you want to make asymmetrical coloring page, I'll show you that really quick. And another bonus video.
13. Bonus 2 : The Symmetry Tool: All right, now another idea for you, if you wanted to make a coloring page, was something that had something symmetrical and maybe a butterfly or something like a min dialogue to color, you're going to want to use the drawing guide. So I'm going to turn off my coloring page here. I'm gonna make a new layer and just show you how to do that. Come up here to the wrench, go to Canvas and go to Drawing Guide and tap that on and then go to Edit Drawing Guide. Here, we want to go to symmetry and choose options. So your options are you can have something repeat or be symmetrical vertically, horizontally in all four quadrants or radial. So I'm just going to show you a vertical really quick. I'm going to hit Done. And now I'm going to choose my six B pencil. And let's just say I want to make like a really cool insect groups. Everything I do on one side is going to repeat on the other. So this is how you can make like a really cool insect coloring page where you want both sides to be exactly the same. You can now make a really cool butterfly coloring page. Now if you wanted to make a Mandela coloring page, Let's just get rid of this. I don't need that. I'm gonna make a new layer. Come back to the edit drawing guide, go to Options under symmetry again, let's go to radial. Make sure that drawing assist is on hit Done. And now everything I do in this section is going to repeat in all of the other ones. So this is how you can make a really cool Mandela for yourself. Okay? Now, if you're doing like a Mendota, you might want to go ahead and just skip straight to the inking of it and not worry about making a sketch right away. Simply because it's gonna be kinda hard to go back over your lines after the fact. So this is how you could kind of now, if you want to see what this looks like without the guides, just come over here and turn drawing guide off and you can get an idea of what your coloring page will look like. And then if you want to make elements around that, that are no longer going to be repeating and all of the quadrants, you can make a new layer, just make sure Drawing Assist is not turned on. If you see assisted, that means it's going to replicate in other quadrants. So just make sure that's turned off. And now you can make individual elements around your coloring page that are not being duplicated or replicated. Okay, so that's how you can make a symmetrical coloring page with elements that get repeated.
14. Final Timelapse + Thank You: All right guys. So that's it. We just completed a coloring page together. Did you know that it was that easy to make your own coloring pages? I am so thankful that you joined me in this class. Please, please, please share your work with us and their projects tab. And if you make multiple versions or multiple coloring pages, share them all with us. We'd love to see what you've made. I, again, I'm still thankful for you for being here if you loved this class. Leave me a review. Let me know what was working. Gloria, what do you enjoyed? And help encourage other people to practice and stretch their creativity and make their own coloring pages too. Ahead and hop over to my next Skillshare class, if you'd like to learn how to color your coloring page digitally in Procreate. It's so much fun. You know, once you learn how to do it, you won't want to stop. Thanks again for joining me today, guys. See you guys in the next class. Hi.
 Melanie Bess, Painting By The Light Of The Moon