Transcripts
1. Wellcome to the Inkscape tileset design class!: Do you know how to build to the game? Words effectively? Well, instead of using your hands used tie sets, dice that's around seems the down off gaming, and they are here to stay. Why? Because with a little planning, the variations are endless because they are easy to use and because they are saving resources not just the memory but time and money. To my name is Eastern and demographic design teacher and an indie game developers like you . During the class, I will show you how to create seamlessly matching ties for your game with escape. Starting with the sketch, we create a blueprint for the ties, then designed them. One by one, we will create a tie set for grass that I set for water ties to build roads and individual ties for rocks and bushes. During the class, you will learn to create eyes with clipping, mask, inning escape, and you will learn to create seamless potters and how to use some intermediate level escape tools. And when all the ties are finished, you will be able to build your very own to the game up like this one. Come and join me today and let's create this awesome ties it together
2. Creating the first tile!: in this chapter, we will create a tie set for a top down game. This much entire system will make you able to build seamless partners with endless possibilities. Think about games like Zelda or any top down shooter. I will show you how to think with ties to be more creative and efficient. Okay, Ready? Let's start. As you can see on my sketch, I was already thinking and planning on my blueprint while doing my sketches. So I grabbed the pencil and created, agreed on a simple piece of paper and drew my sketches into that grid. Because creating a die system is about planning a lot even more than we did before with modular characters or the spaceships, you have to plan this out. So to this little character to be able to move around, I need matching styles to build the word up around, which means matching means that these elements are fitting together. We will create roads and water and grass, and I will show you how to create matching elements. All these elements will come together on the end, and we will be able to build the word. So let's start. If I think in ties. I want to start with an element which will be a standard for me. I make it 50 pixel by 50 pixels. You can do 32 by 32. 64. Whatever is helping you. What? It depends only how big is your game or how you want your elements. It's up to you. But once you decided the size off your element, you cannot change it. That has to be a standard. Cannot be bigger or smaller. Renting it has to be the same so the ties will match. I want to create ties, which has little edges. So I will have these off the background color. And as you see here, I create the little edge. This will help me to create the grass ties first. So in my blueprint, I will create little corners around the slide green will be the background for the whole show. That will be the background for my whole map. And the brighter green is the grass. I've your colored later, of course. So I just created the corner and now I created the tile, which is an edge. I aligned them to each other and you see, they are matching. Of course. My tell you be a bit more complex than this. I take it that the sizes are exact. So with my tile standard is 50 pixel. I make this 40 so the edge will be 10 picks up. The reason I want to be this precise is so I can plan on this later on and use the same standard sizes everywhere. So 50 pixel around and then 40 and 10 pixels. I just duplicate the horizontal one and rotated 90 degrees to have the vertical one. I duplicated again. Delete the little green square from it and make it all green. That will be my middle tired. If I duplicate this one, this corner and flip it, I already have the bottom left corner. I duplicate the horizontal one and flip it. I have the corner on the bottom. I duplicate the three and flip them. And now I have closed square. If I mention everything up like I do it here, it will create a seamless potter. It's a close cube, but if I delete these elements, I can make even more complex stuff. So I put it a side of it. I align this elements to each other and they duplicate these two. Now I see there is a mistake. But that's why we create a blueprint to realize mistakes. Early on, this corner is not matching. So I duplicate the original green shape and color it to the background. And I made the square, then pixel by 10 pixels to match the edge off the ties next to this one. The whole idea is to match the ties next to the other one. So the pattern you create will look seamless. And also here it's not working. If I want the tile turning, I need to change this one as well. I want to be able to create fields of grass which are looking square. Okay, but organic. So any shape possible from a few times. So I need a corner like this, just turning the other way. So I duplicate this with control D and rotated, and that's another curve I will build. So this will make able to finish this corner on the bottom, right? I duplicate my corner, flip it, read age, put it here, replicated again. Flip it with the vertical it this time and put it here And now I have disclosed shape. This could be any size and any shape. Really. I created the blueprint that is able to make anything out of these few elements. It could be water. It could be stone. It could be grass. Doesn't matter. No, I duplicated. And because the blueprint is there, I know how much corners I need and how much edges I need. Which shift. I'm just selecting the bright green grass parts and color them blue. And that would be my water. I keep the light green background color because that will be my base color for the home up and that's it. Grass and voter. I know it needs It looks very simple, but this is the base. This is the blueprint, Renate to create, to have your building stones. And actually, I only need these four parts and I can rotate them around. I need a middle part. I need this corner one the outside corner and a horizontal one. I can rotate these elements and applicator them to create all the parts I need to build up . Now, If it would be flat color like this, I these four parts would be enough these four parts would be able to build up. But I'm not gonna do fed colors off course. I want to create a perfect looking game texture with you. So if this is grass, I need some grass parts drawing some cartooning. Grass blades. I think they've ever. So I'm using the basic tool, the pen tool and growing a little green wave that said the color. Then let's draw some other ones. I'm just simply quickly click clicking. I'm not holding the mouse. I'm just clicking to create straight lines. And then I have with the no tool I go in and modify the notes. I moved the notes toe, move the edges and move the edge off the drawing the lines to make them curving. So I moved the corners and moved the edges toe. Make this waves much more organic and curvy. I do the same middle three. Okay, now this one move this edge and that's it. I grew them up. Put it next to each other. Okay, looks nice with here as well. It's already looks like a little carpet off grass, and that's what I want matching edges. But I could make it even more interesting and even more matching. So I just wrote a little circle, make it white, duplicated and make the other circle yellow and scale it into the middle. So this is like a little flower. I know it looks like a Friday as well, but into green it will be a little flower. I put it together to an al IBS, so it's not absolutely from the top and abdicated in different sizes. And that's it. I have a field of grass with little white flowers. You can add more details to the flowers. It doesn't matter. I just keep them this simple now because they are not so important. So let's see how the tie looks. Now. If I put more next to each other, they look good. But I want to make it more interesting and also more organic looking for, because if you zoom out, you see that there are least little streets between the ties from a distance, they you can recognize the square off the tile. So what do we do? We put these two ties next to each other, so I like the same elements and move them aside horizontally. So they are overlapping, So select the same two elements and moved them aside. So they are overlapping on the edge of the style. I measured him perfectly so again and with this ties to or the flowers so like this flower and also select this one and move them a bit out of the edge. This is how, actually patterns for clothes are created as well. This is how you create a seamless pattern because it is out off one tile. A smart us coming in on the other side, off the type I break up the groups. Now both of them is shift control G. And send the background back. Now I delete the style and you see what I'm talking about, Ideally the unnecessary elements. I just keep these flowers and the grass which I touched. And you see, it's the exact amount because I move them together is the exact amount. On one side, I select everything and replicate this whole group a group it up it control G and duplicate this whole group. What is under each other? I measure them together and they will do the same on the top and bottom side. If I pull this down this much. The grass on the bottom has to be pulled down the same distance, and then this one can move in a bit. Good. So now the ties are connected not just on the side, but also on the top. And I can delete this and this is coming tonight. Final tile. I click on the background shift control G. I opened on the group's totally a quick on the background and put it in the front. I duplicated. I mean so I have an orange one now in the green one. This is something we will do 100 times in the coming lessons. So I select the whole bunch off elements and shift click on the orange one. So it is not grouped a group or everything except the orange one. And then I right, click and use it us a clip. You see what happened? The clip was cutting it out nicely. If I duplicate now the element and put them each other, they are matching perfectly. If I do applicator them and put them under each other, they are matching perfectly too. If you see little eyes, the distance between the element is just because escape is not showing them perfectly pixel by pixel. But if you export your element and implement them in your game, they will match. And we're perfectly. These lies were put will be not there. But you see, other than that, it's seamless. So the grass is great and if you zoom out, you see them us one big pattern, not a bunch off small squares. This is what it would do with all the potters, all the ties in the coming lessons. So this is the first time let's do the others.
3. Adding more grass tiles: So we have the seamless pattern of grass now and that lose great. Let's create the corner ones and decide ones so we can create a closed shape, a patch of grass. So I put it here. And if I duplicated and rotated put it on the side. I have vertigo, one on horizontal. If I would just flip the ties that it would look weird because it wouldn't match. So I have to create these two things separately. I have to create for every four side left, right, bottom top. I have to create with the same pattern. So they are matching. Luckily, we have escape reaches vector based. So I will just duplicate the original element and create. From there we don't have to redrow everything and start the same process. What we did in the previous lecture, we open up the clip, Then we shift control G, open up the group and just add this little edge on the bottom. I duplicate the base, pick the color from here and make it 10 pixels high. You remember it was like 50 40 and 10 picks up. I don't need these grass because here this edge we'll be the outside edge, so there is no grass blade, but everything else has to match. It doesn't matter what I have on the bottom, but all the other side's has to match to match the neighboring ties. So here I can go crazy. And I real I'm just grabbing the baser tool depend too. And create some grass plates from the base green color. Just click, click, click again. How I created the grass blades In the previous lecture, I just creek. And with all this little cliques, I create a weird so blade and then I really just the shapes off them. So I go out of the line a bit. Good. Big, big, risking green color. It already looks nice. It just looks crazy. And now we'd the Noto again. I am managing the notes a bit, so I'm pulling some corners and pulling some edges to make them curry. You don't have to be absolutely precise. Here. Go crazy. You can play around and create your own grass. Okay, How? Free there. So don't be afraid. You really cannot make a mistake here. That's it. Now I pull it so something on edge or something is touching the edge of the square because I will duplicated and I want to know where is the side off that? So I put with the same edge because I will cut it off and this aswell will be continuous like all the other things in my design, I said, like these two elements match them together. We control plaster union de placate the base and I go to path intersection and what I have is this little blades of grass perfectly matching on both sides here and then the other side to you see a perfect match. This is what I wanted. So I to care that they're cut off at the perfect point. I align these elements to each other, and now I have this little pattern which I can put on the side. But I can also rotate it and put it on everywhere else. No, I select everything, duplicate the base shift, click the complicated part, then group everything up and used duplicated part US equipped. Let's see how it matches. Great, because I didn't touch the top part. Obviously it is matching perfectly, and if I duplicated, it's matching perfectly on the side to and as Well, my little grass blades on the bottom are perfect matches. Cool. So now how to do there? Horizontal one on the top? I cannot just rotate it. So I duplicate the original, opened the group shift control G and I can sleep the tile with holding the grass plate and I match it on the side and matched on the top, and I just delete what is not necessary. So I keep everything on the side and on the bottom. But this one on the top is not needed. Everything else should be there, so it's matching. I'm just clicking the bottom shift clicking now Control G to group it up and set clip. Let's see how it matches. Perfect because I didn't touch the one on the bottom. If I dump Lick eight, it's matching on the side because I didn't touch the one on the side, and I'm still using the same measurements on the same precision I created in the previous lecture when I created the middle type. No, let's do the sides. Open up the group, really sleep, open up the group, replicate this little fellow and rotated 90 degrees. Match it vertically and horizontally on the side and on the top. And I see already that I have to delete some tough these grass and the little flower. But everything else have to be there. I'm duplicating the base, selecting everyone shift, clicking the duplicate. So if they're selected shift, click this one, you see it separate. So when I pushed Contra G, it was not part of the group. I pushed it back with controversy and ah, I set it aside. Clip. We will do this step a lot of times and it's matching. I duplicated and it's matching on left on the bottom and top. You see, I can create something seamless. Now I only have to create the one on the left and the outside and inside corners. Still a lot of work, but if you get the hang off it it river, obviously five just rotated wouldn't be seamless pattern. So again, I duplicate there, tile in the middle and rotate my little grass blades 90 degrees to create the left side. I opened up the group and I see that there is this flower and the little grass braid on the left, which is not perfect. And this one is coming over, but I really don't care. It's it's okay. It looks nice. I select everyone and they put it here just to check. Yeah, it's a bit. It's a very tiny problem. So I'm not going to start over and clear all the ties Because of this. I do what I did before. Select everything but shift clicking the de plicating background and use it as a clip. I measured the elements. Let's see Perfect replicated much for the other one. Perfect there too. What I miss now is only corners. Okay? There is a bit of overlap there, but it still looks awesome. And my daughter is fluent. So the only thing I miss is those corners. I have this one so I can have it here That's rotated in place. I can have it here as well. Rotated 90 degrees and obviously the for the same reason. I can just rotate it around. I have to create it all the time from the basic ties I have. So I duplicate this one for me. Open the clip. Delete the clip and the shift. Contra g. I opened up the group with home. I push this to the front. But first, I've you create a corner out off it to have this left side corner. I will. I duplicate this and rotated 90 degrees by holding control. Good. It looks nice, but they're overlapping. Really? Here I manage these two elements together with Path Union. Only the background element and create disc rare to cut off the grass here. And I will create another square toe. Cut the grass off there because still there is just behind the background element. So this is what I have now. I imagine it's together. Okay? And it looks weird. It looks cut off. Really? What I have you do have you pull the corner in a bit, So I just a DoubleClick had some notes and pull it in because I wanted curry. I don't want stupor straight, so I cut off a bit more off the grass. Cela, both of them control minus or past difference. And no, I can on some new grass blades. Okay, I covered it up. I mentioned with the blades previously there, and I did what I did before. I just curved Emma, big toe, look more organic and fun. I make this one baby will be good. Let's make this one a bit bigger. I select all these and with Control path Crafter Plus or Path Union. I measure them together. So this is what I have now I group it up with the corner and with home I select this grass plate and put it on the top. Now this one I don't need for my corner. This one has to be visible and on the front. But the one on the the same rule goes us. It went here, you know, on the side they've won on the top and the left. Now it's not needed. So I delete this the lead, a little flower and villages grasp late because what matters for me is the bottom and the right part. Because those has to match what is happening on the top and the left. It doesn't matter. So again, I said at the back shift, click it group everything up. This is not part of the group and use it as a clip. And here I get a corner and it's matching perfectly on the side because I didn't touch the sides. And OK, it's not matching because I covered up a flower that's organize it. But this is why we do. This is why we always put it next to each other to test it. So there was a little mistake, but other than that, it's again seamless. I copied this part out because I can rotate it. It's not an issue. If I rotated like the same way I rotated the one on the side. I can rotate this corner to to create the top right corner. So I duplicated the base again. I duplicate my middle part on group it, just an grouping. It is deleting the clip, actually, as well. I met the corner here, and it page up. I put it and retire and these things I don't need. I don't need the ones there. So I duplicate the base again. Select everything, shift Creek, create a group and used these base off the clip. Done. Just copy that one for myself for later use. Let's match it. And because I didn't touch things here on the left and on the bottom there, matching perfectly, I just deleted the grass and the flower on the top on the right side. Now let's make the bottom right corner. I rotated that. So I rotate this one too. I feel use the same part. Just applicator my base part. Open up the group which is already Chief Control G. You can do that, mentioned a corner, put it behind this stuff and delete the ones on the right and on the bottom. I can even play with this little flower or whatever is inside. I can move that even because that doesn't matter. I can't sleep it. I can play with it. I can give more variety because what matters for me is what is happening on the top and on the left so it will match. I select everything shift click on the duplicated base, control G and then use it a secret. You see, it doesn't matter if I flip that grass inside its matching perfectly. And now the bottom left corner. That's metric. Open up the group. Match it to the left and the bottom. Select these on the left and on the bottom because I don't need them and everything else I keep on the top and on the right I duplicate the base again. Select everything. Shift recounted applicator create a group and create agree at sea. Okay, Alison. Well, okay, a lot of work, but it verse it. Now I have a nicely closed shape off grass. Congratulations for keeping up with me so far. If you have any questions, please ask. I know it is not easy and we repeat the same for the road and the same for the water in the coming lectures. But first we create the inside edges to make the shape of the grass more organic. So we not just have a square of grass, but we can create any shape we want so we can shape the tie set in any shape we want. Let's see.
4. Final grass tiles and assembly: the only thing we miss now is this inside corner to make this perfect square off grass. More organic. So a duplicate again, the middle part. And I put this little corner here. It's a 10 by 10 corner. I match it to the edge. I started this one. I opened up the group with shift control Gee or right click Open group. And now I will draw some grass blades. Same way just clicking with basic tools. Okay, You know what is coming? Bending them and making them a bit more organic and run them looking control. Click this Noto. Make it curvy and replicate the base selected. And I goto path, intersection or control. And I pushed the reader start as to risk on my keyboard So both intersection or contra star And now I clicked Path difference to cut out the blades of grass So I only have one object This little light green one which is the color of my background off the whole map a shape it a bit more. And I have just this little tentacles. Yeah, that's it. I've irritated and use it on every corner. Now I duplicate the base Select everything shift, click the based applicator create a group and used to duplicate us a clip. No one corner is done. Let's see how it works. If I put it here, I put this element aside. I'm not deleting it. I would put it aside for later. It was, of course, good. And now I need a corner here because I didn't touch any off the plates of grass of flowers . It's matching perfectly. So I opened up the group. I rotate this little element and match it to the corner. I send this to the back so it's visible. Okay, rotated 90 degrees and match it. Applicator the base, select everything. She click on the duplicate control G or set group and set. It does creep. That's metric. Align it to the elements around them. Good. It was great, really. Just put these elements aside. Do not delete them and make the two mawr inside corners. Needed two more elements to go and we can build Decide to and after that anything we want. So let's rotated. Open up this group and cope with this little corner in here. Rotated so it's matching that edge. Put this behind the blade of grass de placate the base, select everything. She have clicked the duplicate control G and use it as a clip. I know you're bored of this metal, but believe me, clipping group with the clipping mask is the best way to create seamless pattern like this . So I need only this inside corner and we will be able to create any shape we want. So we need this one. Now grab the basic element. Put this little thing here. Replicate the base opening up. We'd chief control G and mentioned element toe the bottom left corner. So I have to rotate it 90 degrees. Good and midget. I send this through the back. We'd end or page down a duplicate the base shift. Click the base and you were statistically on the group. It's a line it Let's see what we created. Oh, I made a mistake. That is no matching here, but it doesn't matter. I delete the element above it and I push everything a bit upper. Why? It doesn't matter. Because now I have all four corners, all four inside corners, the inside tile and all four edges. So all the elements I need are there so I can build anything. Let me show you. I just put back my corners to place here. And what if I want to grow this one to the left? Then I duplicate the bottom corner. Put it here. Duplicate the top corner. Of course, the line. Everything. You're not going to do this in building your game, so duplicate the top corner and the line it and that's it. It's already not the square. It has some parts coming out. Let's be with something more interesting. Even more parts coming out if I do public ate the middle is you see, the edges are not matching, so I have to duplicate horizontal ones to make the edges better duplicated. Lime it. So your game engine. You can do it by code, or you can do it by hand as well and exported us a big map. I suppose doing it from sprites it's much better. Okay, so let's make this even more bigger and interesting shaped. I duplicate my elements down here. I will order them later on. I will organize my books off Lego, if you will, And I suppose you do that too, because that helps to clean. Keep everything in order and make your elements easier to use later on. Okay, so I duplicate this medial part, match it, and if I want to grow it down here, I need an inside corner there. Which one? This one. Good. I just duplicate to insides there, because why not? I used to when they are aligned to each other anyways. Good. And I just close off the right side with top right corner and the right side vertical ones . Just applicator ID and the line it here and now I want to close off this corner, too. So I need the corner here on the right. You need a middle one. So, uh, bottom one here they are already together. So let's move them together with the corner. Good. That's it. Now we're just gonna draw a square under it. This rectangle and I can agree to the base color. And you see it seamless because we drew the grass blades on the side. It's so nice. Okay, if I zoom in, the little lines are disappearing again. The lines are just there because escape cannot really show every time everything picks up perfectly. But after you exported. It will be amazing. So we will do the same method. What we did here with the grass with building the water in the next chapters and building some other elements. I will not create the bush and the stone. You will create that on your own. But you will know how to do that because we practiced this so much so in the coming Lecture Review, build the road and the water ties together, using the same method, using the same clipping group metal and building the same seamlessly matching tiles for our amazing type system. From this much practice, you will understand all the basics. Everything you will have to know about creating top down tires and you will be able to create amazing things. I promise. So let's see. Let's go into the next lecture.
5. Starting designing the water tiles: our grass tires are looking satisfying. And now let's do the same with the water. Obviously, it's not as easy as coloring them blue, but we will follow the same ideas, the same system, to create the water ties so we will create a middle part and the exact same corners. So this one, I keep it because I like this blue and I just create little waves on it. I make a circle and applicator did, and with control miners or path difference, I cut it out and then it's become this crescent moon shape. I met the edges here, replicated again managed edges here as well. Make sure that they are aligned well, good and the Control Plus or Path Union. I merged them together to create little waves. I picked blue for them and set a different blue, duplicated them once more. And the more in thinking how to break the books. You remember we did this a few lectures ago, breaking the books to create a seamless potter. I make this one also so smaller so I will have smaller and bigger waves as well. And I will also color them different colors. Yeah, I group it up The applicator, my decides seems nice. I open up the group and delete what I don't need. Not like with the grass. I only gonna match the sides so I will not create dies under each other matching because it's much easier this way. So I take it that they're matching on both sides. But I don't care if they match on the top or the bottom because I don't put any elements there. Okay, I duplicated the Check it on on both sides. Delete what I don't need and that's it. My basics style is getting too ready. You see, the rays are coming down nicely and both on the both sides. They're looking fine. That's colored is a bit different. The big waves. Yeah, a bit lighter with Chief Contra G. I opened up the group, deprecate the base, select everything contra gee and shift, click and then use. It s a clip. That's it. We did this so many times in the previous lectures. Let's see. How does it work? Off course it works, and under it it works as well because there was nothing no part to match on the bottom and on the top This way, it's much easier to create. We're not gonna do this. What we did with the cross, it's much easier to make. Okay, now we just need some corners, sides and inside corners. So the exact same methods that behead before a duplicate my base element open the group and create a corner There. I duplicate the base pick the color. It gonna be the same color, the water, this bottle or lake or whatever. So this body of water will be over the same background, and I make it 10 pixels wide. Why? Because I want to make it us looking as the grass. So I keep my elements almost the same start. Okay, Now these are hanging out and with the same thing, like with the grass. I can delete them. And I don't care what is happening on the left. But even better, I like the little ways there. I can delete this one and this one I can just move inside or cut off. And here on the right side, it will be the edge of the lake. And on the inside, it will be continues. Now what I do, I want the lake not be straight again, like with the grass. We're not gonna do blades of grass here, but I'm adding a note on the straight line here, just double clicking to keep that little part close to the edge on the top and close to the edge on the bottom straight. You see this little part and what is inside? I can bend over so everything above this node should be straight. And what is under I can bend. Why? Because like that, if I made the Thais, they will continues straightly. I don't have to take care about how the waves off on the edge are following each other. I just measured the ties and between the straight little parts. I can do whatever I want. You see, like here on the sketches. I was throwing it wavy and curvy and not us like the grass because I wanted the field that this is like a bottle or a body of water. So that's it. We do the same method again, gripping it with this 50 by 50 pixels shape. That's metric. Let's see how it works. Perfect. And how about the straight lines? Great. You see the straight little parts are matching perfectly. And there is still a kind off wobbliness waving us to the side. But these these parts are matching perfectly great. This is what we want to have. Okay? No, I have to create the other side. I use my base and copy this little part. I flip it and match it to the side off my blue base. Yes, and I am not deleting anything on the right. I'm just keeping it off because it's nicely covering the waves here. I'm double clipping, double clicking to go into the clip and move the ways a bit around. So they are filling up the space of it. Let's see. How does it look? Great. In a few minutes, I created so much It goes so much faster than with, uh, grass moist, Mostly because I have the matter now and I have some practice and you will have the same feeling. You do it, you do it and it will be getting easier. So let's create now the horizontal one, Maj. Resting on the top or the bottom. Okay, let's make the bottom one. Flip this here with age and I have to delete those or actually doesn't matter because I will creep them. But I believe them just to keep things clean. And here on the two sides and on the top, I keep things untouched. So I duplicate the base, going through a G and use. It s a clip. Let's see. How does it look putting next to each other? Great. It looks continuous. You see, That's what I want. Okay? And let's put it on the top. Open up the group, achieve control G and just use a clip. Okay, Didn't match perfectly. Ok. Duplicate shift, click Control G and use it as a grip. Okay, lets see. How does it look here on the top. The line is great. Okay. In the next lesson asked with the grass, we will create the corners and inside corners. And after that we can be in any shape off water. We want
6. Adding the final water tiles : so the water is getting ready. I just need the corners and the outside corners us here with the grass so outside and inside corners to be able to create any shape off lake. I want I duplicate this little element here it control D and I copias well, the middle part and I want to create something like this. So this corner, I arrange these elements together, open up the group and the range into the background, then duplicated and rotated 90 degrees to the right and also fitted to the top and the right side off the other light green particle. So no, I have this corner. I don't like it that much, that it's not curved. So I said, like both of these and Measurement Control plus or Path union, delete this corner note and make it more like a corner or a curve like a corner. So it's more curvy. It's still corner rich, but it's it's better. I'm double clicking here, adding a note and playing with it. I also take care that the sides so down here and then the left are still straight. Why remember, because we want the ties matching, so keeping that little part straight. Well assured that it's matching. I copied this part, this corner because I've you needed. Later on, I select everything, duplicate the background, select everything. She controlled the duplicate, group them up and use that applicator us a clip. Okay, It seems perfect. Now I have this corner I use again the middle element and the same way as I did with the grass. I am rotating this corner because doesn't matter how it is irritated again. I am using the background element and use it as a clip. Looks nice. I know the bottom left corner I opened up. The group is shift control. Aggie, replicate the background. Okay, Not yet. Align the corner to the background. Good. I pulled this little wave out here because I can really play on the left side and the bottom. I don't touch the waves on the right side and on the top. Okay. And create the clip. Bottom left corner. Done. Yes, sir. And it is matching. Yes, it is matching perfectly. It looks very organic and baby around here. I'm very satisfied. Okay. One corner left, and we are done with the square off the lake. that one. The top left corner. So I duplicate again. Use the last corner piece. Rotated 90 degrees to the left. Open up the group a line. I can pull this innovate as well. This big one as well, but not the ones on the right. Just here on the left. Okay, select everything. She afflicted applicator. So it's not in the group and then use it. Us a clip us. We did so many times before Done a big, scary, nice, wavy sided lake. Done. So what elements did I create? Vertical left. Where to go, Right? Four corners, Horizontal bottom or isn't the top? So is the same US was with the grass. So we're isn't the top other corner, other corner, other corner, the three. So let's organize it. As I said before, let's organize my books off building blocks. So we get on my four corners left and right up and down. Good. I only need four more. The little inside corners and I am done. So I start with this one. I start again, obviously duplicating and grabbing my inside element. And I'm coping the edge from the one of the corner ones. One of the side ones. Okay, I align it, but I want to cut out this corner. I duplicated rotated Align it like I did with the corner once. But this time I'm not gonna merge them together. But I'm using Bath, Intersection or Control and Asterix and that's it. And I can play with this corner. I keep these two parts us straight us possible. And this note I can delete or move inside or make it curry with control. Click and make it. Yeah, make it curved. But this part is still 10 by 10. I duplicate them. Put it aside and that will be a nice inside corner fitting the frame around my leg. If I copied this part here, you can see I arranged them. Perfect. You see, it's in line. It cannot be anything else because both the lines are horizontal and vertical and the exit at 10 pixels on every time. So again we do the clipping, as we usually do, and that's it. We have one inside corner, three more to go and we are done with all the water ties. I just replicated the little corner element. Open up the group and rotate my little corner, 90 degrees and put it where it belongs. I arrange it to the top left corner off the background. Die and applicator. Create the group and use the background applicator us a clipping mosque. Okay to done. Just two more. So again the applicator open on the group. Rotate my little corner. Put it in its place. You see, I have top right and top left. So no, let's create the bottom ones with end. I put this back behind the little time page up. I put it above the wave and then I duplicate the background group up and create the clipping mask. Done. Okay, one more and we are done and we can close this corner in. I opened the group and copied a little corner from another tile. I rotated and I put it in the bottom left corner. So arranged to the left. Arranged to the bottom. Done. Replicate the background. Select all of them and that's it. Create the clipping mosque. Replicate. Select everyone shift Click on the double ic eight control G and use the duplicate us A clipping mosque. Okay, so I have 12 different guys. Four sides, four corner for inside corner and plus one tile, which is I arranged them a bit. You see, arranging my books off the ties. Plus, I have one more re trees. The inside tile. Let's do the same with the grass. As I said before, it would be so nice to see them the same organized way. So corners inside corners, left side, right side topside. Bottom side. Let's duplicate everyone here, guys. Okay, everyone, come here. That one. I have that when I don't have yet and I need another bottom. I mean, top left good on their one corner, too. Three and four. So again, he Restrepo and there is 12. Plus, as I said for number 13 or actually number one, the ones with no edges. Those will be very important to fill up the space between the edges off the shape. So no, we have all the elements or 13 elements, and you can create whatever you want. Really, you have everything, and you can create all the shapes you want for your water and the same for the grass. But let's focus on the water now. So let's put some corners here and there and make this little lake bending. I'm grabbing some inside corners down and the inside corners up here. I'm duplicating this inside. We don't, eh? Geez, you know, I need some bottom corners here to close it off bottom right corner. It's perfectly and I need a corner, which I just duplicate from up here, and that's it. I have the shape and it's closed off. It can be anything, really. And no, I just do the same as I did with grass. I alone get this background with my little ties. A big downer. Keep it organized. Keep it organized and you see it's perfectly matching. The side is the same color, and if you zoom in, the little lines are disappearing again. That's just how escape is showing the ties. It David look perfect in your game. Okay, just for the fun off it. Let's create another tiny lake next to this one because the magic off this is that even the ties which were not matched by creating, for example, this corners here are matching together. Why? Because we took care why we created the first very first tile that the edges are matching. And then if they match perfectly, there than they create a continuous pattern on every single time. So even if I put these four corners together to create a tiny follow, let's align them. See perfectly closed shape. I group it up and the range it here. How it would look in a game and give some space and extend the background of it. That's it. The water is done. I hope you like it. In the next lesson, we will create some roads to go between the land and the water.
7. Creating the road tiles: now let's create some roads. After creating the field and the lake, the road is again a 50 by 50 pixel tile because that's the whole point behind. Having a tie said that all the tiles have matching sizes and that the graphics are matching around the edges so you can build any type off structures you need for your game vert. So again, 50 by fix 50 Same background color. Let's put it here, left next to my sketches. So this is my rolled sketch. The road has straight part. I just duplicated and make a thinner. This will be my road. It has straight part it Huskers, and it has crossroads. Let's find a nice, suitable color. I'm looking something like a muddy dirt road fitting my field too bright. Good. This is greenish muddy, but still has enough contrast. And if I put it here, you can see it's nice. It's looking like leading into the field. Okay, let's get it back and let's build the blueprint for the road. So I need verticals. That's done. I duplicated and rotated and I need horizontal. Of course, I really need some crossroads. So okay, to have it absolutely right. I duplicate the whole where to cover one and then the applicator just the road in rotated 90 degrees and have this plus shape, which is a crossroad. I also need other type of crossroads black down here, different junctions, toe build any type off road structure I want. And also later on I really need corners and turn off roads. Obviously which are not crossroads just turned. So I do the same. Replicate, rotate and keep this here as well. So this is my blueprint. Horizontal, vertical, normal crossroad. But from the corners and from the other crossroads, I will need different as well. So us, you see, also asked with the lake and with grass I create the blueprint. And then I created my final shape out of these simple blueprints. So I duplicate this whole thing because if you noticed I was taking care to duplicate the bar in the middle to keep them the same length I receive controversy or path. Object to bath. I'm turning this into a path and then I'm double clicking on the edges. Why the same exact reason I did this on the lake. You remember here, So I want the side of the road. Toby. Curvy. But I leave a little bit on the edges, up and down on both sides. I leave early, Toby straight. So David perfectly connect to the neighbouring ties I'm using. Depends your tour. Adjusting the smoothness toe create some muddy patches, picking the color, turning off the stroke. Here. I don't need it. Connect the nodes there on deleting them. The shift control L. You can also adjust the nodes a bit. Escape is optimizing that I was deleting the ones you don't need. It's not always perfect, but it's much faster than deleting them by hand. And that's it. It looks like it's a connected, node connected road, different the edges bendy, and it has different funny shapes. Like, you know, a bike would leave a trail in the road or next to the road and make a little puddle. So I duplicated and rotated. But I already delete that element, and I already changed the shape. I'm not changing again what the straight part had left on the right side, you see, So if I duplicate, they seem continuous enough. Let's delete this, but I'm making against somebody splashes and this and that I'm just making an ellipse shift control. See, to turn it into a path and I need to know that it will be the path editor. I am playing with it a bit to create again some little modest splashes, some more tiny splashes here just to make the road more natural, more fuzzy US video with the lake and the little waves us we did with the grass and the grass blades, you remember. It's always good to have a structure but create individual elements a bit chaotic. No, I'm duplicating this rotating this 90 degrees and I want to make the crossroad, obviously the corners I want to play with because the corner off the meeting off the roads in a crossroad are never straight. Especially like this in a muddy road. So I'm using the base here to the pen tool and just click around and create this polygon. Then I saw, like the two roads and the polygon I created, and I bend these girls. If you ever saw the park. You see, the people are never keeping things straight. Let's check it. Did I make a mistake here? Yes, I have to straighten it out because it seems I made a mistake. I didn't keep this straight. So again, I'm double creaking to add some notes. It's okay to do mistake. As you see I again. I do some mistakes sometimes, but still I go back and I take care that they are not reasonable. And that's why it's good that I'm using escape and it's vector. It's very easy to go back to the previous version and we're connected again. I'm just taking care from known even better. Yes, here was the mistake. I didn't that when I copied. So I just take care even better that I'm keeping the straight lines on the edges. So I only made the mistake here, but I copied it into the new versions toe. Luckily, I found it in time. Why? I keep it in this lecture and I will not have a dis out to show you that it is fine to do mistakes in Vector because they are easy to correct. Just notice them. Okay, so also on this road, let's check straight straight. This one is good s play with these notes to make it Reavy. And here too. Oops. OK, that's it. So I keep it horizontal there and vertical on the bottom. And also here. I correct this mistake and that's it is done. But a far apart from these. The whole thing can be as crazy as I want. Really not that crazy, but like this Good. I think keeping the edges straight is one way to connect them perfectly nice. And let's make this curve as well. Nice. And if I duplicate you see, it's continues and nice. There is no mistake, no bombs. Looks perfect. And even if I put it here on the top or bottom looks perfect to I could be the whole greed off my roads and they would connect perfectly. Okay, so horizontal. A vertical and cross road. Let's measure them. Okay, look Nice. So although each of these roads look different because of the little bands and the little splashes around them, they still match nicely because elements are in place and on the edges, everything is straight, You see, Perfect. That's what I want. Now, According our blueprint, we have this re but we need as well corners or bends in the road. So I duplicate the whole thing and I use my blueprint to create two more. I duplicate this too, and flip them with age. So this is the four corners I need. These are okay. I just need one of those. But also from these junctions. I need different waas. Duplicate them again, rotate and rotate. So you see, I need all four of these and all four of these to create everything I want. Funnily again, I have certain different shapes. Like I had 13 different shapes for the grass and 13 different shapes for the water. It is because I have this type of structure for my tie system. Okay, so let's create this. How to create this type of junction like I created in the blueprint. I duplicate this. Delete what is overlapping and cut off the top of this road by drawing a square on it and using control minus or you could use a bath difference. And here as well, you see, part difference. I can do it. No, I said like these two roads and we'd path union or control. Plus, I merge them together if I check it other side. Okay. If I check it that's already seamlessly connecting and also here. Perfect. Now let's make this turn of the road a bit curvy because it's too straight. So I just select the two road pieces and merge them together with Contra Plus. And I keep everything around the edges straight. But here inside, I can delete some notes and make them curry. This is a nice girl. Already I can draw with a pencil to with something here because color and I raise the stroke. Actually, my pencil tool is remembering wrong. So I go toe edit preferences to and I set up my pencil talk to remember the last setting. This is a little trick. I using escape all the time. So my tools are remembering the last setting, which means the same color and stroke. You see, it works. I suppose you do the same with your escape. If it is not set up like this. Okay. Tiny little splash there. Select all of them control Gee, to group them up Nice. I rotated and it looks nice. I like it. Rotated them again and I have all the four corners. Obviously now they are the same rotated. So you know me. My goal is to make my game us unique, with modular design as possible. So I'm cutting and basting and growing new elements. So I'm just throwing a little fuzzy shape over here. Delete some notes just to make the road uneven. Not all of their nose. Just a few. Okay, good. I'm bending this with control. Click. So I'm doing this to give more random. It'd remember the grass. I am giving some random. It is so not every corner is the same. It's not always the same. Obviously, if people see a whole nap built from tires, they were No, it's tiles. That's the whole point between ties that behind ties that you don't throw everything individually but each dies should be different a bit. Have their unique abilities. So that's it. No inside splash here. Just a little out there on that. When I deleted that one here also, that's I did this one a bit. I'm just editing the road bend and I drove here a splash. Different shape this time. Okay, one more tiny one. Match them together. We control plus Onda Tatum a bit so they feed this corner and also here the outside I make it a bit stranger good. It is not looking perfect, and that's the whole idea. Okay, let's deal with this one. Really, These splashes. I don't need them. Let's make this road weird and not going to do the same drink like I did on the right side . But here outside, I will do to some splashes. Let's do a longer one, okay and group them up. It control G. So that's it. I have all four corners now that's aligned them two together, let's line them and let's see how they work together. If they are closing Perfect Oh, shape or an imperfectly ownership does the whole point. Then they are working. Group them up because I forgot to do this good and they have to match here on the top. Nice. So they're matching perfectly. A little car could go around and around on this little field. So that's it. I have the horizontal and vertical road crossroad and four corners. A little more work to do, and the road is done. We will do that in the next lecture. So we would create this little crossroads and I will show you how to be on the road structure. Just a simple one
8. Additional road tiles for junctions: So let's create little junctions and all our row ties are done. I'm duplicating the horizontal one. And instead of getting this one the vertical I'm duplicating in rotating this So everything is in the same place and that's very important. So I do basically the same. What I did. Read the blueprints. I am just throwing a square and with path difference. I'm cutting off the top. And now, selecting these two shapes and control plus or path union, I measure them together. This little fellow. I reshape and resize a bit and use it up there. Cool. Everything is straight, but it should be. And I just made these corners a bit less straight. But before that, I duplicate what I have rotating 90 degrees for my next junctions I'm creating, and now I'm changing it. So when every junction, this little corner, this it occurs, we're be unique. It's really not about sparing time this time, because it's really just a few seconds. You just pulled the notes here and there. Okay, I delete this so it's not the same, like on the other one. Andro samu waas and modified them a bit. Read this note with inside. Make it more curvy. Make this inside Absolutely a double creed than I did some node and grow a little puddle here. Group them up with Contra Gee and I'm done. Let's check how good they are aligned them c could go around in the round. Looks very nice. I duplicated and rotated. This is what I need Injunction to the left. If I put it here, I can change these notes a bit again just to create some randomized, natural, organic looking and muddy roads. I drove a different type of U shaped bottle here, and even another one here closer match them together with going through a plus. Good. Delete this guy because he is everywhere and these two So they were not used too many times . And on some other shapes here I'm creating a dent here. So that's why I double click twice to add two nodes. And here I will draw a little triangle like or long tear drop like shape to feel this hole in Good. Take care that the smoothness it's set perfectly because a lot of people complain about the pencil toe. Try it with different smoothness. It worse it. It's a very good two or four. Random, free and shapes. Let's group up everything aligned them good. I only miss one injunction to the top this one. So I just flip the treat Age of it. V. I mean, like vertical vertical flip. So push the bottom three. Do you read these things? Modify the shape of it. This time I will draw some little ellipses and match them with the road. Select everything in control. Plus and then just control. Click these notes that makes them curve here and makes that there is mud splashed out from the road. Here is where I make a little connect good magic together. Play with this negative shape a bit. Delete some notes here and there. Good. Okay, that was too much. I need that note. So control Z and some splitter again. Small details that but they look so good only this corner to do delete them and done. It is worse. Noting at this point how I work with Rhonda, my zing tiles I keep the structure. I keep the edgy straight I killed them matching and also take care that I'm not drawing little weird elements in every corner us. You see, on every tide I have maximum two difference platters, corners, you know, little play for things to make them unique. But it's not in every corner, not in every part off the drawing because that would be over doing it. Keep some parts or actually a lot of parts, plain and simple and ed 20% of 10% little things here and there to make it interesting. Imagine, like wearing a nice, simple dress or suit and just having one little jewelry or something to make it interesting and unique. When you would put jewelry on all over all around you rings on every finger and the top hat and everything, you would look like a clown. The same is applied here, so less is more just a little interesting particle in some corners, not in every corner. Okay, keep it simple, but make it interesting and organic. So we have everything we have all these certain different shapes the junctions, the corners, the straight roads and the crossroad. So all these 13 elements us I define before here in the blueprint, and we can build any road from it. So let's put the blueprints up here next to the previous ones. It's so nice to see them together. You see old following the sketch, creating over the blueprints here and now let's extend the background a bit. Put these back down again, organize our books off building blocks and I will show this little faster because I am just the applicator ing and aligning the elements together to build a simple, very simple road system. After I'm done, I will extend the background to it so you can see that it's fitting perfectly as well. That's it. And done. I'm very satisfied we did because I know I can build anything with it. This could go here even between the water and the grass. I will show you in the next lecture. The road looks cool. Water looks cool. Grass looks cool. There are some more elements which I will not do. Reach our the bush and the stone. In the next lecture, I will create only one single bush and one single stone. If you want to create a continuous pattern off a bush and the stone, you should make it yourself. That's your practice exercise. Create a stone and create a bush for yourself. But I will show you how to make them the single unit in the next lecture
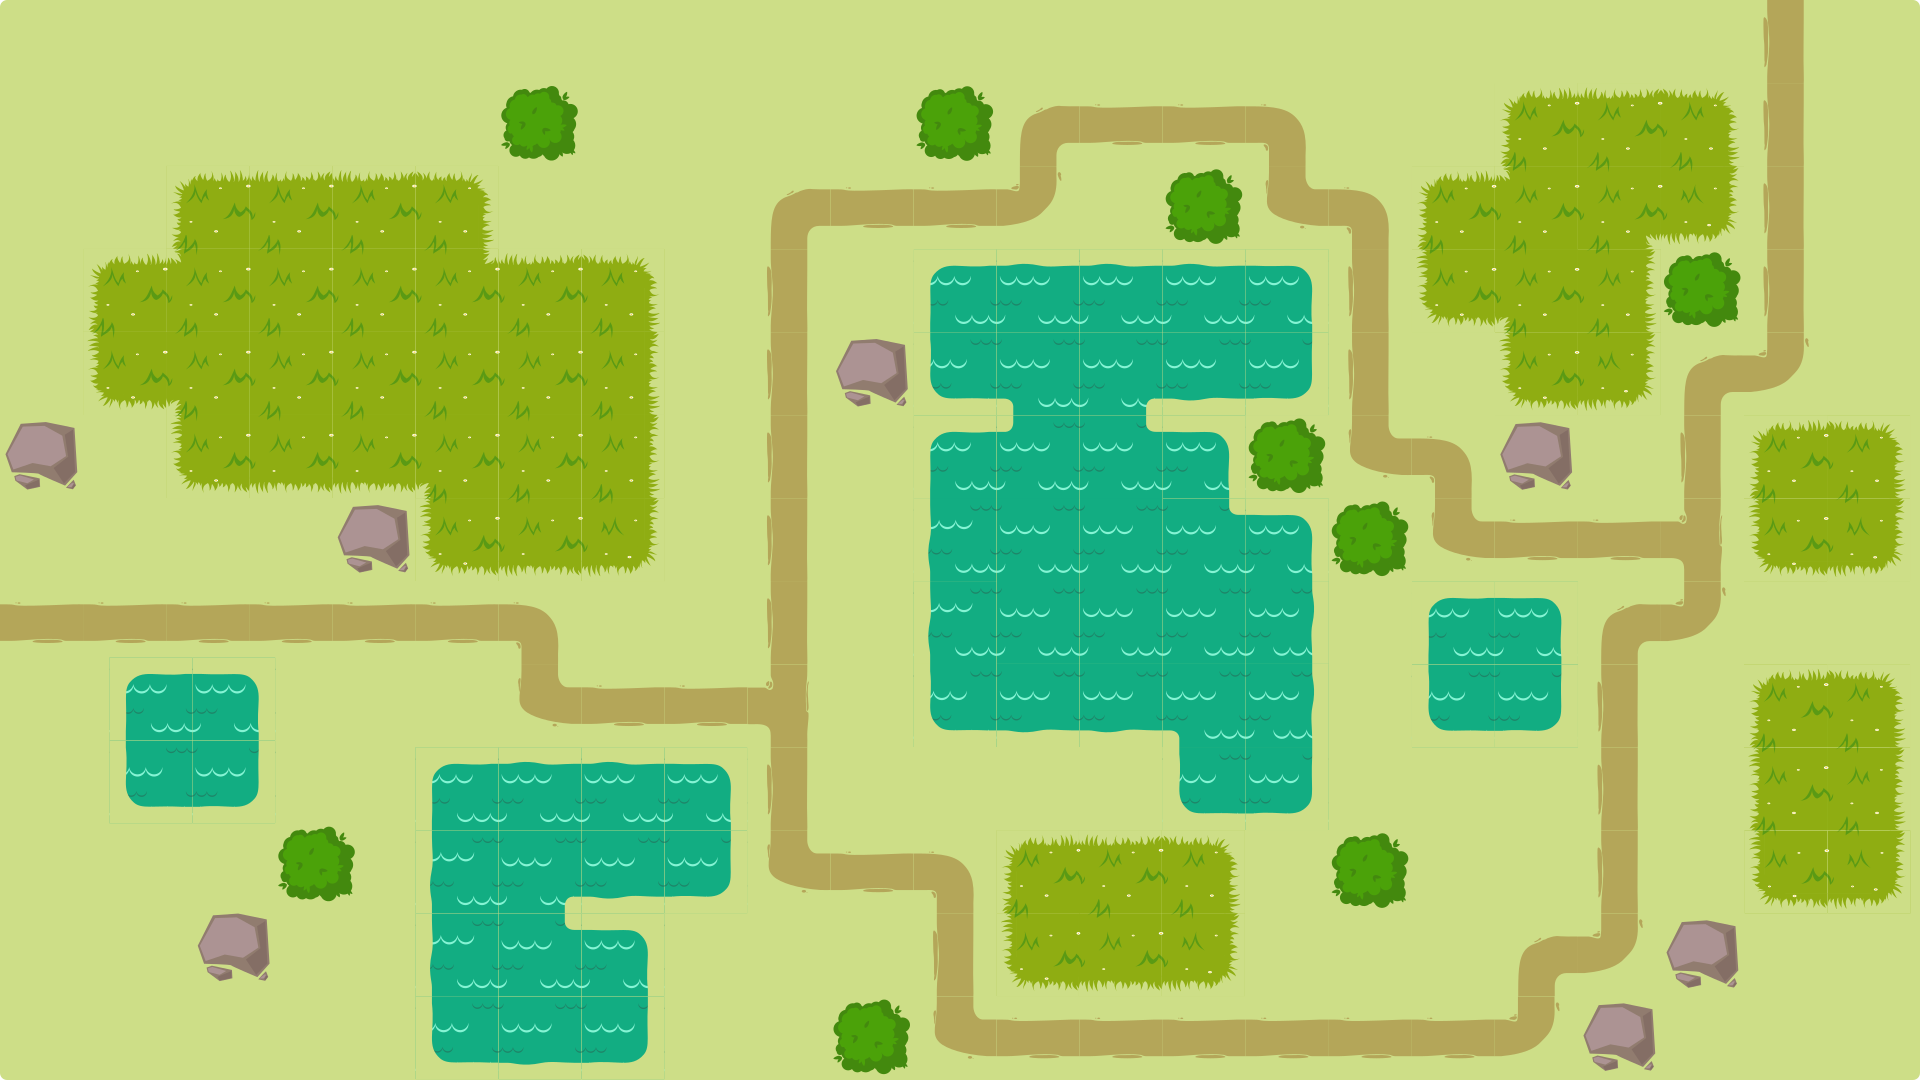
9. Design unique tiles to make it more alive!: okay, starts to look good. We have grass, we have the water and we just created a very simple road system. Now we could make the bush and the stone the same modular way I showed before. But now we will focus on creating a single element off rock and Bush to spice things up. And it will fit into a well, these so nicely. So again, we create the same lie greed, color, square us. We did before, and besides it 50 by 50 picks up. Why? Because all our ties has to be the same size and how to make a bush. There is a tool. People don't use that much and escape, but it's a great tool to creating controlled random elements. I call it controlled random because it's random, but it's also you control the flow, and there's the spray toe. So create an element. Play vid the size and the scatter and rotation. I will not explain all of these. What I do. I create a circle, a green circle and spray it around us. You see, the side is worrying very much, I said, like them. Mash them together with path union or control plus drew a circle in it and grow some little circles still on the edges just to refine it. So this is also means for me controlled randomness. So it is Rondo. I don't have to think about every leaf for every toe fluff on the bush. But all together, it looks nice and ordered. I select everything control plus or path union. And I have this little broccoli and then I will create some leaf shapes to out here and there. Leaves are super easy to doing escape. Make an ellipse control de to duplicate and then path intersection. That's the leaf shape. Now, if you want to make it even better, pull these two nose down to create this nice spearhead shape. Okay, Now I'm just going to scale it, rotated and duplicated with Control De here and there to create more little leaves. That's it. I duplicate these two together. Put it here on the other side. Okay, Down here stated. It's fitting nicely in that little space. The applicator single leave. Nah, plicating yet again to be good. So now if I look at it, okay, it's green, but it's not like a cloud anymore. It has little leaves on it. And although everything so far was kind of flat, I want this bush to stand out. So I duplicate the shape, make everything dark green doublet. Kate this middle part and make it a lighter green. This looks like it's coming from the top is too light. Okay, Make it a bit more similar. Yes, measure the two colors to each other, so there is not too big difference. And then all the leaves. I have to color to the color of the darker parts of the bush and this one. Then I can doublet Kate and add some more leaves inside the bright part. So again controlled chaos Just put them randomly. Just a few and again. Like I said, with the road in the previous lecture, you don't have to put it in every little corner. If I move this part around, it seems that the light is coming from top down direction. Top left. I could also apply a Grady int, but I just creepy flat because everything else is flat in these design. So that's it. Very simple. Just a few leaves. Let's play with it a bit more. I can make it bright. So I have brightly says, Well, just like a top layer off leaves. But it's not just the same object duplicated like the one in the background, and that's it. It looks interesting. It looks bushy. It looks like a three. It could be a tree. In your design. It could be a bush. In your design, the whole idea is toe be playful. And again, this is modularity and so on a smaller scale. Why? Because I had circles and I have these leave shapes and I create this whole little bush from it. No, If we would continue as we did before, I would know, slides this up, scale it, and create all the certain elements that I need to create a pattern off it. But now I just gonna keep it like this, group it up with control G and use it as a single element so I can add it anywhere in my design. A bush next to a road bush next to a lake wherever I put it down in my books. So I heavy there, I duplicated, and I put this duplicated designs here and there. Now, the next thing I will create is Iraq again. I could create a big, scalable 13 parts rock, Tai said. But now I just going to focus on a single rock ship. I'm just clicking around with the base here, too, because I will create a hard edge Rock. Why? Because I wanted to be very different from everything. Us like. Imagine the bush was from small circles. The road was wavy, the water was way we and this one just straight. I'm not gonna bend these shapes. I keep it straight. I picked the dark gray color, and now the same way I did with the bush I drove apart over it. Another polygon, which will be lighter color. Pick a lighter. One, like the shaped like the light is coming a bit from the top left side. It's not exactly the same shape, and it's not in the middle, you see. So here on the left are some darker parts, and I can even emphasize it with creating a bit more doctor element That's too dark. Let's pick a lighter color. Let's make some good. And there was on the smaller pieces just a time here and this small Here I leave enough part of the stone visible like the original shape, the middle gray. But all these are nice. And if I zoom out, it looks like a stone from top. I select all off it, control G and that's my stone again. In this part, you can stop slice it and build the same tie system like we did for the grass and the water to have a huge rock surface or to have a huge bush surface on your game. But we will not do that. We will use these two elements just in small pieces and we will spice our design up. So we have the road. We have these little things the stone and the bush. We have water. We have grass. So almost everything to make an interesting and very various tie set and create a map for our game or a backdrop for our game. Okay, you can create new elements and show me later because I would be very happy to see over. But now I will just show you how much and how different stuff I can build from these few elements in my playbooks. Have you used the basic background drop? USAA placeholder here just to measure the elements. So they are the same distance from each other in the greed when you would export these ties are sprites and use them. You're your own to the game engine. You could build it there, obviously, and it would snap, and it would be much easier to use. I'm showing this part again in the time lapse six times faster than real life because I don't want to bore you with all the application and everything. But of course, if you really, really, really want to see the original speed video, just email me and I can send you a link to it. Okay, so I'm putting everything together and as you see building road system, I will Ardmore water more grass and then again coping huge pieces off pre mai tais. Why should I build a whole square off a patch of grass or a big square off the water when it is already done? I'm just selecting multiple ties and then replicating them also, I'm using my little tight books up here. So I'm going here and I'm coping the pieces I need and use them to build my background and off course, it's recognizable. It's a background build from tides. But because I'm using this little elements to spice it up the road, the broke the little splashes around the road, the bushes. It seems very interesting. It is not boring. It seems cute, and I'm over the Imagine little other insurer going around on these roads, looking for treasure and fighting cute enemies. So, as you see, I'm creating and application a lot and building road system around. Obviously, when you do your game, you will design your level better. This is just for showing what is possible with such a simple Thai system, because the variations are endless truly, and I only have a certain ties for the grass. 13 for the road, searching for the water shapes and to individual shapes, the bush and the rock. So all together, that's just 41 little ties, and you can create hundreds of thousands of maps off it. Really, you can even make it procedurally generated. I would love to do that. This is not part of the show, but maybe I will do it myself just for my amusement. I will surely do that with the spaceships from the other lecture. So that's it. I just put the background behind it. And again, if the lines are appearing, is just because it's inning escape. If you export it, it will be flawless, I promise. That's it. There's the map I created. They took me only a few minutes putting together over the ties we made before your assignment. To pass this course is to create this. But what I'm interested mostly is how you create a tie set for the stone and the tie set for the bush. So send me those two elements a tie set for the stone and the start a Tizer for the Bush using the same principles and the same way off thinking and planning like we did with the grass, the water and the road. Most of the grass and the grass and the water drove the special case. That's it. This was the final lecture off the ties. That chapter. I really hope you enjoyed it. And please, if you have any questions, left me. No, because I'm here to help you. I won't think with you, and I want to make your game successful.
 István Szép, Designer and design teacher