Transcripts
1. Intro: What we'll learn: Hi, I'm David. I'm a filmmaker, and I also do cosplay and fabrication in my spare time. I've been making costumes for a little over five years, and I've made many of those costumes out of phone. It's one of my favorite mediums toe work with because it's so cheap and versatile. When I first started, though, it was a little intimidating. So I created this workshop to introduce some of the basics of working with bone so hopefully others can start working with this amazing material. Create the next costume. Now I've taught this workshop numerous times, and it's my hope that I could bring this workshop toe, water audience like skill share. In this course. We're gonna learn some of the basics of working with the foam or commonly known as yoga mats to create a basic wearable helmet like this. We're gonna go step by step so that you can follow along over the processes that I used to make this moment from scratch. These things that will be learning day with transparent translate into all areas of bone complication. Whether you're creating a helmet or chest armour or even more complex form, it helps if you know a little basic sewing as the skills or nearly identical. But don't worry. If you don't, I'll be covering everything you need in detail so that no matter what your skill level, whether an absolute beginner are you have some costing making experience. You'll find this class helpful in your quest to create better cough teams that will wow your friends. Now this class, we're gonna cover tools that you need pattern making, transferring your pattern to funnel, cutting phone tips and tricks, shaping phone when preparing for going, gluing her parts together and creating curves, shapes, pining scenes, preparing for paint, painting tips and tricks. And then finally will have an overview will go some of the best practices that will pair you to take your costumes to the next level while having fun in the process. So welcome to my workshop. Now let's not waste any more time, and we'll get right to our first lesson tools that you'll need
2. Tools that you will need: All right, let's cover some of the supplies that we're going to need in the creation of our E V a foam helmet. First, I'll cover some of the essentials, and then I'll go over the optional supplies that will just make your crafting life easier. Obviously, the first thing that we're gonna need is we need e v a foe. Now this is something I picked up from Harbor freight called anti fatigue Matt. It comes in two varieties. One is a puzzle type pieces that's four pieces, and it runs for about $10.1 is slightly thinner and it's a role, and it also runs about 9 $10. This is 3/8 of an inch thick. This is 1/4 inch thick. I recommend that you pick up both varieties. They're smooth on one side. They're textured on the other, totally fine for 90% or more of the applications that you're going to use foam for As you Onley ever need one side, you put the texture side on the inside of your body, and it's totally fine. Nobody will ever know. I recommend you pick up some of this. This this phone right here is what we're gonna use in the creation of our Eva foam helmet. Now, if you need to see both sides, you need to be smooth on both sides. And you can pick up specialty phone like this from walmart dot com or TNT Cosplay. This is smooth on both sides. It's the same thickness. Is this I always have a role. Or so the smooth on both sides foam in case I need it. You never know when that's gonna happen. Then I have, ah, same things moved on both sides, but it's a two millimeter thick foam. It's a very then boom. This is great for making armor pieces for gloves or for adding accents toe other pieces. You can pick this up at any craft store. It's totally fine. And as you can see, it doesn't matter what color we choose. They're all good. We're gonna paint over this so it really doesn't matter what color you choose. All right, let's set that aside and let's start start talking about some of the tools that we're gonna use and, uh, cutting our foam and shaping our home and things like that. The first thing that we're gonna need is we're gonna need a nice snap off utility blade. I like these. The fat Max Stanley there. Retractable. They have a very long played. That's replaceable. But I really replace them because I use a knife sharpener. This is a crucial knife sharpener. Um, I use this to sharpen my blades in the way I do that as I take a little WD 40 here, you spray it on the knife sharpener here, and then you take your blade and you run your blade a couple of times over knife sharpener and then wipe off the WD 40 off your blade. If you do that, maintain that your blade will last you almost forever. Eso this knife sharpener runs about 20 bucks, but it will save you so much money down the road. You can also use the knife sharpener on an exact a utility blade. Now, we use this for the finer cut, so pick up an exact tonight if you don't already have one, the next thing we're gonna need obviously is a nice cutting mat that we can cut all the way through. So we don't mar any of our furniture or anything like that, Um next thing I like toe have is I like to have a metal ruler. This is great for cutting straight lines. As you can actually use this as a guide when you're cutting, it makes it very convenient, and your lines come out perfectly straight. All right. Next thing we're gonna need for when we make patterns is running the role of cheap aluminum bowl. The cheaper the better. We'll go over the detailed use of this and the next step. You're also going to need a roll of duct tape. Ah, it has many, many uses, but we're gonna use this in the end, the role of making patterns the next thing that we're gonna need is going to need either a black Sharpie or black ballpoint pen. We do want to make sure we use black. However, as the other colors have a tendency to bleed through the pain. And we are not going to want that last late. We're gonna use some rubber cement. I prefer barge all purpose contacts in minutes. I just find that this holds better. They sell adapt Wedgwood contacts and men at Home Depot. That's easy to pick up. You can use that if you want. This is just a preference for me. Um then additionally, there are some tools that we're going to use in addition to this build. We're gonna use this quick seal. We're going to use this. The Haidar seems later on in a future lesson, we're gonna use this plastic dip, uh, in painting and I'll show you how to use this. In another lesson that's coming down the line. Other optional things that we might want to consider. You might want to consider getting yourself a nice Dremel these air very handy for doing doing intricate shapes or doing complicated things that we might want it. It's gonna make our lives a little bit easier. Ah, the very, very last thing you might want to consider getting yourself a nice heat gun. We're gonna use this, the form the phone just a little bit. That's gonna make it easier on us when we start creating our curve shapes. All right, so once you have all these supplies together, let's move on and start making our pattern pieces that we're gonna use in the creation of our e v a foam helmet
3. Making your pattern: All right, so we're ready to make our pattern. The tools that we're gonna need for this is we're gonna our duct tape. We're gonna need a pair of scissors. We're gonna need a black Sharpie. We're gonna need some aluminum pole, and we're gonna need a human head. Eso I recommend if you're making this helmet for you that you use your head, you have a friend help you with this step. The first thing we're gonna do is we're gonna take some aluminum foil and we're going to start raping it around the head and making yourself a nice 10 full hat to keep the voices out. All right, we're gonna go all the way around. We want to make sure this tinfoil is fitted through the head. Right When you use a little duct tape, hold it together here. So it's all nice and together, it'll make your head on. Here's a little piece of duct tape here. Uh, use one more piece. Simple. In the Barents, this is a little bit easier once you actually start using a human head. A really, even here. Uh, friend, do this. Make sure you don't get any duct tape stuck to you. All right, now that we've got that, we've got that shape and we've got it all wrapped around us. What we're going to do is we're gonna take duct tape. And when you go all around this shape, uh, before we make our pattern because the aluminum full is very fragile and we'll tear easily . So burning use duct tape to strengthen it at this point. Okay, now that we've got our nice 10 full hat here all the way around, we're going to take it back to our build space, and we're going to draw a pattern. Want Do is we want draw a pattern of our helmet here. Now, we're only gonna since we're gonna make this pattern symmetrical. We only need to do one side. We're gonna take a line down the center, the center of her head here. Oh, the way, fullback. Okay. All right. Now we're gonna pick a side that we like. I like this side. OK, we're gonna draw a pattern. Let's give Let's give him a little point here at the race. Right then come around here toward the face form, Come down, cover the cheek a little bit from up and likeness and then connect to the back here. Now, this is not gonna be one piece is gonna be to pieces, so we're gonna do this. But take another piece. We're gonna split it right here. You heard Steve. Get that words. See it? Let's split it right here. We're gonna make this two separate pieces. Okay? Now, very important. Uh, this next up, very important. We're gonna label our front, uh, and then we're gonna label the front of our other piece here also with an elf. So we know which orientation this is going to be. Uh, in between are cut pieces that need to be good. Together, we're gonna do what's called registration marks. This is where the showing skills sort of come in. You do another registration mark here, and we'll do a registration mark here. These go through to both sides, we're gonna do, since this is gonna be a symmetrical pattern. We were gonna do one registration mark here. The front and the the front edge and the back edge. You're gonna line up together, But it's nice to have a registration mark. We'll do another registration mark right there and Yep. And then the very last thing we're gonna do because we have this curve here and I'm gonna show you how this works in a little bit. It makes more sense when we're actually doing it. We're gonna make what's called a dart right here, okay? And that's going to allow us to get our curve shape. So now that we're done, that we're gonna do you take it off the dress form or taking off our head, and then we're going to start cutting this pattern up. So let's go ahead and cut it into our pieces that we need. Don't concern yourself getting too much in the line. That's fine. Now, if you see this piece here, this piece has got a very steep curve to it on. It won't lay flat. This is where the dark comes in as the technique and sewing where we take a try and go out . That allows us to make two dimensional objects in the three dimensional, more complex curve shape. So when we form this together, it's automatically going to create that curve for us. But it allows us the lay it flat for the pattern. All right, so Now that we have our pattern pieces, we're gonna take set these aside and pull out a nice clean sheet of paper here. All right, They take our patterns, and we're going to transfer these paper now. Another thing, too. I almost forgot. We want to mark what started the head these came from. So this actually came from the left side of the head. So we're gonna mark this of the big L. This is the big L, and we do the right side of the head. We're gonna flip these over, so we only need to draw this pattern once you're treats out this pattern. Uh, well, try to get it is accurately as possible, do you think? But smooth out any use this opportunity when you're transferring your pattern to smooth out any lines that are anyway be lines that are caused by the actual duct tape. And so make your trans transfer your registration march. Take your thing. Make sure your label it transfer all your labels. Okay, Transfer registration marks here. That's gonna be very important. When we lined up a pattern leader, do the same thing with the other pattern pieces. No matter how many pattern pieces you have. You do the very same thing. What we're gonna end up with when we have this out is gonna end up with to pattern pieces very similar to this. Good, uh, that we're gonna use to transfer or to our foam tune in for the next lesson and will take care of actually transferring this pattern, the foam, and starting to shape our helmet.
4. Transferring the pattern to foam: Okay. The next step is to transform newly created patterns to our phone peas and get our film ready for cutting. So we're just gonna use their black Sharpie. You can also use a black ballpoint pen. Now, we're just gonna trace their pattern out and be sure. Yeah, to make your registration marks you made here because these are the things you're going to use when you start. When you start assembling this to help line this all go ahead. Uh, registration marks here? No. Okay. All right. Make sure we label this again. Front. This is our left side. Don't worry about writing on the foam. It's perfectly fine. We're gonna cover this with paint anyway, so it's not a big deal. You can write any kind of instructions you need to help you make this piece you can use. Uh, you can also use straight pins to hold the pattern down. Um, I tend to like to just work a little bit faster, however, and I just kind of hold it down with fingers on bigger pieces. I might use a straight pin because it's gonna move around too much. Uh, but for this piece, I can just use my fingers and sort of hold it down A I'm gonna straighten out these lines even further. All right? So they don't want to lift up. I had all my registration marks. Yes. Okay, then I'm a labelled up front. Right on. This is the left side. Now we're gonna flip this for our right pieces, and so we're gonna do the very same thing for our right pieces, and we're just gonna go ahead and trace it out one more time. This time it's gonna be the right side of our helmet. All right. Make sure transferred administration marks I would have done to make the little registration. Marsa just transferred these these marks or just notches in the paper that allow me to just make a little kind of line there. All right, So you can see I have my registration marks here. That's the right side. And this is the front. You could Now we can move. We're done with that piece. So we're just going to use this piece here a little bit out of line. All right. Transfer my registration marks in. Sure. I have this set trying to put it in supply that's possible with my fingers. All right, Transfer again. All right, on the label. This this is our center, and this is our front. Okay, so that's what you should have. Uh, now we're gonna go on to the next up. Well, we actually cut this out of the phone.
5. Cutting the foam: All right, Now we're ready to cut our pattern. So we're gonna take our utility, baby. But before we start cutting, let's make sure that this is very sharp. So we take our sharpener just a couple of times, went the blade wipe off the WD 40. All right, now we take our blade, make sure there's enough to go all the way through the foam and into the Mac. What we won't do is we want to come at a 90 degree angle. All right? We want to make this one cut. Just take the blade and slowly trace your line without lifting your blade from the cut. What will happen if you lift your blade is you get a jagged surface because you'll never get back exactly to where you were and go all the way through. You see? And then that is cut. So we want to do that with all our sides again. We're just gonna punch through until we get into that phone. Gonna come and 90 degree angle. Okay. Now the blade. The tip of the blade should be touching your cutting mat all the way through this cut. If you're not, you're not getting all the way through the bone. All right, there we go. And then we're gonna do We're going to the same thing over here. We're gonna punch through, punched through a little bit before line. Come in, cut our line, cut a little bit out and then weaken. Then we can remove this piece. Cut off the access the excess here, this last little piece we're gonna cut off. All right, so this piece away, And then there we go. We've got one pattern piece. We're gonna repeat this process three more times for all of our all of our pieces, and then we'll have our pattern. Perfect. We've got this piece cut. We're gonna cut out these darts in just a second. I like to cut out my pattern pieces first out of the main part and then do all my like, darting and stuff like that. But it's part it easier. But you could do however you want. All were down. Good. Do this here. Now I'm starting. Feel a little jagged nous when I pull my blade through like it's kind of resisting a little bit. That means the blade is getting dull. Phone dolls. These plays out very, very quickly. So what we do is we just want to quickly take our sharpener again, sharpen it up just a few times on each side can wipe away the WD 40 and we'll be good to go again So we can go again and cut. And now the blade feels much better. So now we have a much better thing. Now take this piece out. We're gonna cut that little excess off. I want to clear some space here because we're working with this large Matt. And so it's hard for everybody to see from and make sure all this is on camera something that cut this up until a little bit more manageable for camera sizes, huh? Do some are fine cuts and keep it smooth all the way through. Pressing down firmly. You have to go too hard, but firmly. 90 degrees. All right, take that out of the way. Let's make our little cuts here. Okay? See, that didn't go all the way through. So take it and very carefully make sure you go all the way through. All right, um, here a way through. All right. Yeah. I like to extend my cuts just to make sure that I'm clean. Have a clean exit through that piece from away. That's crap right now cutting our darts. Hi. You sure have a dart. All right. Now is a dark the darts because you're cut. You don't want to cut too much past the line. You need to do a little bit just to get make sure you got it. But you don't want too much past the line, because otherwise it'll create a big divot there. So there we go. There's our darts. Now we have all our pieces, and we are ready for assembly. Are very next step is going to start shaping the phone with our heat done, uh, and preparation for gluing. And then we're going to start gluing and actually starting to see this helmet come together .
6. Shaping the foam - preparing for glue: now we could start gluing right away. However, since we're dealing with some rather sharp curves, um, I want to make the process of gluing easier, and I want to heat shape the foam a little bit before we start the process of gluing and what money uses. I'm gonna use my heat gun and because I'm using my heat gun, I'm wearing gloves because the heat gun is very hot. You can also use a hair dryer. Just takes a little bit longer. The other thing you want to be aware of when you do this is you want to be in a well ventilated space because this stuff is toxic. You do not want to breathe this stuff in, so be sure you're in a well ventilated space. But let's go ahead and start shaping this. Now. The P the two main pieces that are most important to shape are these. Get a little loud the heat gun turns on, but you want to make sure you get an even distribution. Don't hold the heat gun in one place too long are will start to melt the phone. All right, that's starting to get hot. I'm gonna start shaping it with my hands, not Boma. Somewhat memory retentive. What that means is that it will the shape that you put it in it will tend to remember that shape somewhat. So now you can even take it a little step further. What I can dio is I can use my head or another hard sort of round object here and sort of shape it around that we do this because this is gonna make gluing the process of gluing this and forcing this foam into a curved pattern a little bit easier and a less stressful on the glue. All right, so that's good. I like that. You can see when this cools. It maintains that curve shape. It's no longer flat. We want to do this with all our pieces now, and I like to heat on the underside. You can also go on to the side that I'm actually using. But you got to be a lot more careful, because again, you don't want to hold the heat over this too long. We'll start to melt this bone fairly quickly. So you want to make sure you move. You don't have to use high setting either if you have a variable feet, variable temperature, heat gun, you want to use the low setting. It doesn't need to be a lot. You don't need a lot for this. For other pieces, you'll need mawr. Uh, breastplates or something like that. You might need more, but you don't need a lot. And you can see now the foam is cooled, but has maintained that curve shape. Now, we're also gonna do that with these. We don't necessarily need to, but I'm gonna do a little bit here. It's gonna help it. Mostly. We're worried about this curve. However, it was current. That kind of goes around cause there's a slight curve there that goes around. So we're mostly worried about that curve this middle curve that curves. Okay, that's gonna that's gonna work itself out. We want to do is we want to kind of create this can occur that you can see here. All right, You do the last piece here, Saad started curving process. It helps when you wear gloves. With this, the spoon does get hot fairly quickly, but it also cools very quickly if it takes, uh, dissipates. Heat takes heat very, very quickly. and that. Okay, so now that we've got all our pieces curved as we can see here, the next step is we're gonna actually get ready for glue. We're going to start gluing these pieces together. We're going to start seeing this thing come together. So let's go on to the next lesson, shall we?
7. Gluing pieces together - Part 1: All right, now we're ready for our gluing. We have our pieces here laid out. We're gonna glue this top section. First you conclude in any order you like, but I generally like to start with top section. So I'm gonna set these pieces aside. All right, So the first thing you wanna dio with your barge cement, you don't need a lot the way that contact cement works, rubber contact cement works is that both sods need to have the cement, and it doesn't. It doesn't react. It doesn't become sticky when wet so that the cement actually needs to be dry or semi dry for it to stick to itself. So I take a little bit of mustard meant That's one of the beautiful things about this. Barges comes with the brush already built in. Now I'm just spreading on a thin coat of the cement. So we're just doing a thin coat here. It doesn't have to be a thick coat, the thinner that better because it's gonna dry faster. And we're going to do another coat on top of this. So we want this to dry relatively fast. Now, the reason that we're gonna do it this is the only gonna be our first coat is because the it's foam and so it's soaking up. Now it's soaking up some of the actual bar cement, so we're gonna let it soak up, and then we're going to reapply. Now you can see it starts to lose that shiny nous when it dries. So as it dries, you'll notice you can start telling and it's drawing because it starts to become less shiny . All right, so this one's almost dry. Now we can put another coat on and again, just another thin coat. But this time, because we've sealed it with our contact cement now were given It's sort of a seal. Uh, this is going to be all submit now. We noticed we'll have a little bit of spill here on the edge, and I would like to do is I like to take some of our scrap bone and I take that over. If I have any glue that comes over the edge here, I like to just wipe that off, okay? And I like just take our scrap piece of foam there. We're gonna let that dry, and we're going to start sealing this we're gonna start. We're gonna do another layer of barge here with this. All right? Just another thin coat here. Nothing much. Don't worry. If you spill over on the inside of not worried about spilling over, it's not gonna matter. We're not going to see the inside. I do want to keep it nice and neat on the outside. It's just gonna make it easier to get rid of that scene when I go get rid of the seams and get this ready for painting too. It's all one smooth sort of surface. Now, this is gonna take a little while to dry. And I'm gonna show you a little trick for speeding this process up that weaken Dio, uh, you can use a heat gun on a very low setting and just rub it running over here. Right? And this will help this dry out. And again, it's gonna go from a shiny, so dull Almost. You're going to see the change in reflectiveness circus. Don't do it too hard. You don't want to start bubbling for anything. You just want to started. Brian, Another thing to remember what this contact cement is. It is, um it smells bad. So you want to do this in a well ventilated space? Now, I'm gonna start from the back seat. I have these labels, so make sure the front goes in front of me. Switch my camera view here. All right? We're gonna start in the back, and we're gonna put these together, alright? Starting at the edge. And I'm gonna use my thumb to walk this top part in and make sure they're even now one. Here's where the registration marks come in. I want these registration marks the line up. Yeah, All right. So they want a lineup. Now, the thing is, once you start sticking this, you will not be able to unstick it. This glue is very strong. When it's in the right state, when it's actually dry, it will not unstick. The boom will tear first before the glue unstick. So you want to be really careful, but use your thumb to make this even and pressed down as you go and together, and then we want these registration marks tow line up part of it. Okay. Now you could start it with the front. It doesn't matter. Me. And usually I would say you know, Probably spread. Best to start with the front, because that's what you definitely want those sides to match up perfectly. Because if they don't, people are going to see that Mawr people going to see a front more so usually want to pay more attention to the front. All right. And there we go. Okay. When we pressed together, Now I flip it. I'm gonna flip this inside out, so I compresses together. I'm gonna go back up tomorrow. The space you can see process together, and I'm gonna go like that, and I could flip this back. And then there we go. There's our first piece or top piece of this. And so we're gonna attach in the next lesson. We're gonna attach the side piece, and we're going to go through that process as well.
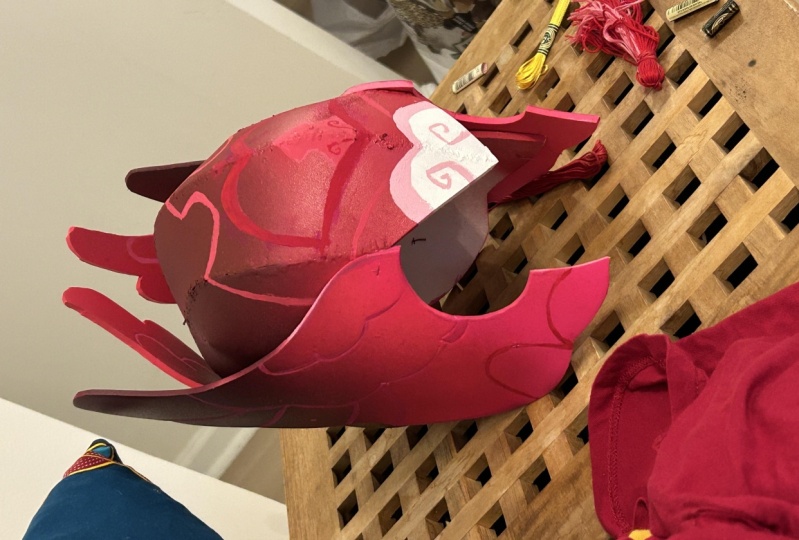
8. Gluing pieces together - Part 2: All right, let's take a moment and talk about our darts. First. We want to do our darts before we glue it to this top piece. So it's just pretty simple Or do we go in here? We're just get into a groove and try to get all the way inside that cut, okay? And, C, we have a little bit extra here on top here, so we have a little bit extra. We just want to take and wipe that right just to make it just to make it easier for that scene, going to do the same thing with this. All right, So I'm gonna do this, and they will come back. Come back when this is glued. Come back when this is ready for blue. And sometimes I like to take a little just to smooth it out just to smear that out. Just a piece of scrap. Not a big deal. And see how I have a little bit on the inside there. I could just take that. Wipe it away. That's fine. I'm not too worried about the inside. Word of how that looks. You don't want a big dump of glue. Okay, Let her drive. What I do is I want to take this from the inside, and I'm gonna work from the center point here where these points converts to the outside. So I'm gonna take this, flip it over, and then I use my thumbs pressed, used together. All right. Impress these together and then flip it over. Rest needs together. All right? Okay. And then never concede. E you can see that we have our curve that we need for the top of the helmet. So where do the same thing with the other piece? We flipped to the other camera, so you can see. All right, we're gonna do the same thing with the other piece here, work with inside to the outside, press down with my thumbs, flip over and press down with my thumbs working. This seemed together getting the seam together, all right, and then flipping over. And then there we have our curve that we're gonna need for the helmet. All right, so let's go home. Let's go on. And we're gonna continue with the rest of this, and I'm going to start gluing together, and then we'll come back when the assembly is about to happen. So instead of doing the heat gun, I'm gonna let our peace is dry, and then we're gonna start the assembly process. Okay, Now that the glue is dry, we're going to start assembly over our pieces, and you're gonna start to really see the importance of all these marks that we made earlier and how they relate to the final product. So we're gonna take our left side and are left side. We know this is the brunt because we marked it and we're gonna start. We're gonna start at the very front part, and the fronts gonna be the most visible. So we want to start where there's gonna be the most visible area. So if we mess up, at least it's gonna be hidden. Now we want a lineup. These marks very carefully. So a lot of these marks, you see how hard it is to pull apart once it comes together. So all right, now I'm gonna flatten this out, and I'm gonna start lining this up, all right? And I'm gonna have to pull now. I have to pull a little bit here. May get these tow line up. Okay, Now, we're gonna start going around. We're gonna keep going around. Pulling, pulling. Okay. You see, All these will not lining up. That's OK. All right, that's OK. We've got the front ones lined up. Means we do want to pull on this. You get these to learn Oppa's much as possible. All right. And then there we go. And now we've got these pieces assembled together inside out, and then we just Well, if it back just like that. And there we go. We've got one piece symbol of and there we go. We've got one piece assembled already. All right, we got the left side. So we're gonna do the same thing now with the right side. All right, so we got a right side, we got our front, we got our front. We'll take that. And we're gonna start lining these up. Gonna start with the corner, and I use my fingers to help me. To help guard me is toe wear these things line up pulling here. I'm pulling and pushing in order to get these marks to line up best as possible. Now, they're not gonna totally lawn up anymore, because what's happened is I've made this dart, but you want to get them to line up as best as you can and start sticking knees together, All right? And in the end, it's gonna come together here, okay? And then we're gonna press down and just make sure press down. All right? You get our scenes together, we're gonna press down, and then we're just gonna flip this. It's inside out. All right, we're gonna take this, flip it inside out here. Just flip it inside out. They seems that came out. It started coming apart. What is going to start putting back together? All right. And then there we dio we've got our helmet now. So the very next step that we're gonna dio is we're going to clean up. These seems so we can hide these seams and get this ready to be painted. But you've got your helmet, and then there we go. We've got our helmet now, just like I showed you earlier. So next thing we're gonna do is we're going to start cleaning up the seams and get this ready for paint. So it's very smooth and round
9. Minimizing seam lines: Okay, so, for seems we're gonna start working with seem so we don't want the seems to be visible when we do the final product we want All these seems to be hitting, so it appears to be all one piece. So what I like to do is I like to take about 80 grit 100 grit sandpaper, and I like to start working it over the scene. You can also do this with a Dremel, but sometimes it's easier by hand. And what you're trying to do is you're trying to get rid of any raised areas from the rubber, cement or anything like that. You want to get this nice and smooth? You would take out any of this sort of just like leftover cement, rubber cement. You know, just work it down the whole scene until both sides are on the same level, because you're not gonna be able to build this up. All right, so after we've got this sand, it o r seems or sand it and relatively smooth, we can run our fingers across here just to make sure that we don't have any raised areas that still need a little a little attention everything that we everything that we feel we're gonna see. So we just want to go over this and make sure now, when you saying you're gonna have a little bit of these little fuzzies here, Uh, and we're gonna we're gonna take care of those of the heat gun later. So we'll do now is we want to get our DAP quick seal and a bowl of water, and then we're just gonna go ahead and we're going to put a small bead dad along the seam here. Okay, a lot. A little of this stuff goes a long way. So we don't have Teoh cover the entire area. We're gonna smooth this out with their finger, your finger wet, and then we're going to smooth this out. Let's just go over the scene for right now. So we're just gonna take the scene, do only the seem when the finger starts to get Dr Take it back to the bowl of water. Okay, but the whole scene here. Okay, Now we want to start expanding our area and smoothing out around the sides. So we really want to get that smoothed out. The thinner the better because it's gonna dry faster. That's gonna dress smoother. And we want to be a gradual sort of ramp up here. So it goes fairly unnoticeable. We're gonna do that with all our seems all the way around, and then we're gonna let dry. Okay, So once we've got this all smooth and we've got all our seem lines, uh, sealed we're gonna do is we're gonna let this dry overnight because the next step is, uh, getting it ready for paint with with a heat gun and plastic depth. So we're gonna let this driver overnight, and then we'll come back in the morning and we'll start the next up, which is painting.
10. Preparing for paint: Now that we've taken care of the seams of our helmet, the next step is to pair a helmet for paint. This is a multi step process. In the first step in that process is something called heat sealing our foam. We're going to take a heat gun and pass it over the surface of the phone. This takes some of the surface cells and starts to close them, as you did earlier. You want to keep the heat gun moving so you don't actually burn your phone. It really doesn't require that much. Just a quick pass. You'll see the surface change from a dull appearance to a shiny one. After that, the next step is to actually seal the foam with a product. Now we have a few options here. I'm only gonna cover three of them, and I'll cover the pros and cons of each one. First we have wood glue or Elmer's glue. The pros are that it's cheap. It doesn't require any special equipment to apply, and you can apply it with a brush. Cons are it's brutal, and it's prone to cracking. It can also leave brush marks, which, if you're going for a shiny metal appearance is probably not what you want. The next option we have is something called March pod. You can pick this up in any craft supply store. It's easy to obtain. It doesn't require any special materials or equipment to apply, and you can also apply it with a brush. Now the cons are even though it's not as brutal as the wood glue. It is somewhat brittle and prone to cracking, and it can leave brush marks so again it might not be the best option. It really depends on the application, but the option that we're going to use to seal our phone today is something called plastic dip. This is easy to obtain. You can get it from any hardware store. No special equipment is required as it sprays on. It comes in many colors, and the biggest advantage that I have is it's flexible. The cons. It's somewhat expensive. It cost 5 to $6 a can. So if you're doing a big application, this didn't start to get pricey. Also, phone takes multiple coats of this. It can develop creases if the phone was bent as well, but it it's not prone to cracking like the other ones. There are other methods out there that you can use to seal your phone. However, we're not gonna focus on those in this course there either expensive with an initial upfront cost or they require special equipment. And that's just beyond the scope of what we're trying to do here. Now. That being said, I use plastic dip on 90% of my project. It's easy to obtain, and it works very well now. The best method for spraying plastic dip is to apply a nice light, even coat, and let that sit and cure for 30 minutes before applying the next coat. Usually you want to apply around 3 to 4 coats, depending on your project, sometimes more now. Once all those co two replied, we're gonna let this cure overnight before we take on the next step of actually spray painting a color. But that's next lesson
11. Painting - tips and tricks: Now that we've sealed our helmet, we're gonna want to move on to the last up of actually painting it now, just like we did with the plastic dip we're gonna want. Apply the spray paint the same way we're gonna apply light, even coats and allow 30 minutes between each coat to dry before applying the next one. We're gonna do this until we have the helmet fully covered after that. To protect our paint job, we're gonna use a clear enamel to cover our paint and it just to make sure it doesn't rub off. And it's got a protective shell to keep it. Do you keep it very nice and shiny or painted or whatever color that you choose for the full life of the helmet. Now they're common tips and tricks here with spray paint. I'm going to cover a few of those. First of all, we have to know that spray paint works best in low humidity if it's raining outside, uh, you're gonna want to skip painting that day. Pain does not react well with humidity at all, and you'll find that you have not only uneven coats, but it'll dry unevenly as well Secondly, you want a warm the can up the way I do this as I immerse my spray cans in some warm water for a few minutes and let them actually warm up. Now the only caveat here is you want to make sure you don't use very, very hot water, as the pressures inside the can can be too much, and it can deform the can or even caused the candid explode. So use caution and Onley use warm water. Teoh heat your cans up. Third thing Shaker spray cans Very well. This is important with all paints, but it's especially important with glossy paint. My general rule of thumb is I shake spray cans, 30 seconds for flat paint and a full minute for glossy paints, especially if the kids have been sitting up for a while and haven't been used. This is a very important step, so that's pretty much of the basics for spray Painting. Our phone creations in future lessons were undercover weathering and more complex paint jobs, but this should be a good base to get you started. Spray painting your creations. That's gonna while your friends and our very last lesson we're going to be covering some tips and tricks for maintaining your phone costumes to make them pristine and wearable for years to come.
12. Wrap Up: All right, so we've reached the end of her little journey making our helmet. Um, I'm very happy with the results. I hope you are, too. You can use this technique for many, many phone creations throughout, no matter what you're making. And I hope these techniques come in handy. I'm gonna give you two final tips. One is that sweat is kind of like battery acid to rubber cement. So I know if I'm going to wear costumes for a while that I'm gonna sweat in. What I do is I lined the inside of the scene where my body meets this cement with a cloth off just blue coffin there. And that creates a sort of barrier that I hope protect it and make it last longer. The second thing that I like to do and when we're talking about sanding and want to have a lot to Sanders, I like to create these paint sticks, the sand sticks, and what I do is it's just a paint stick, and I'm glued some sandpaper to it, and then I market grid on the back. You can do this with all kinds of grits, and they're super helpful and they'll save me a lot of our muscle. So I hope you've enjoyed this lesson. Please look for me and future lessons. I'm gonna be Go. I'm definitely gonna be going over some or detailed stuff like painting and airbrushing and stuff like that to make to really make your creation stand out. But that's all we have time for today. Please get in touch with me. If you have any questions, I'd really enjoy your feedback. Uh, and I hope that you have a great day and I hope you go and create some great foam costumes . Hey, I'd love to see your finished photos of this project or anything else you want to share with me of your costuming. Please let me know. Or if you have any questions, just contact me through here.
 David White, I make movie quality costumes