Transcripts
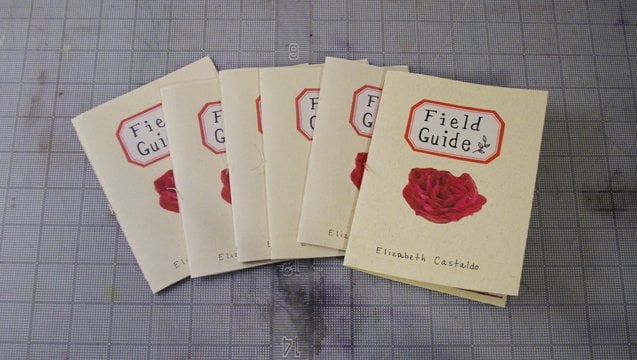
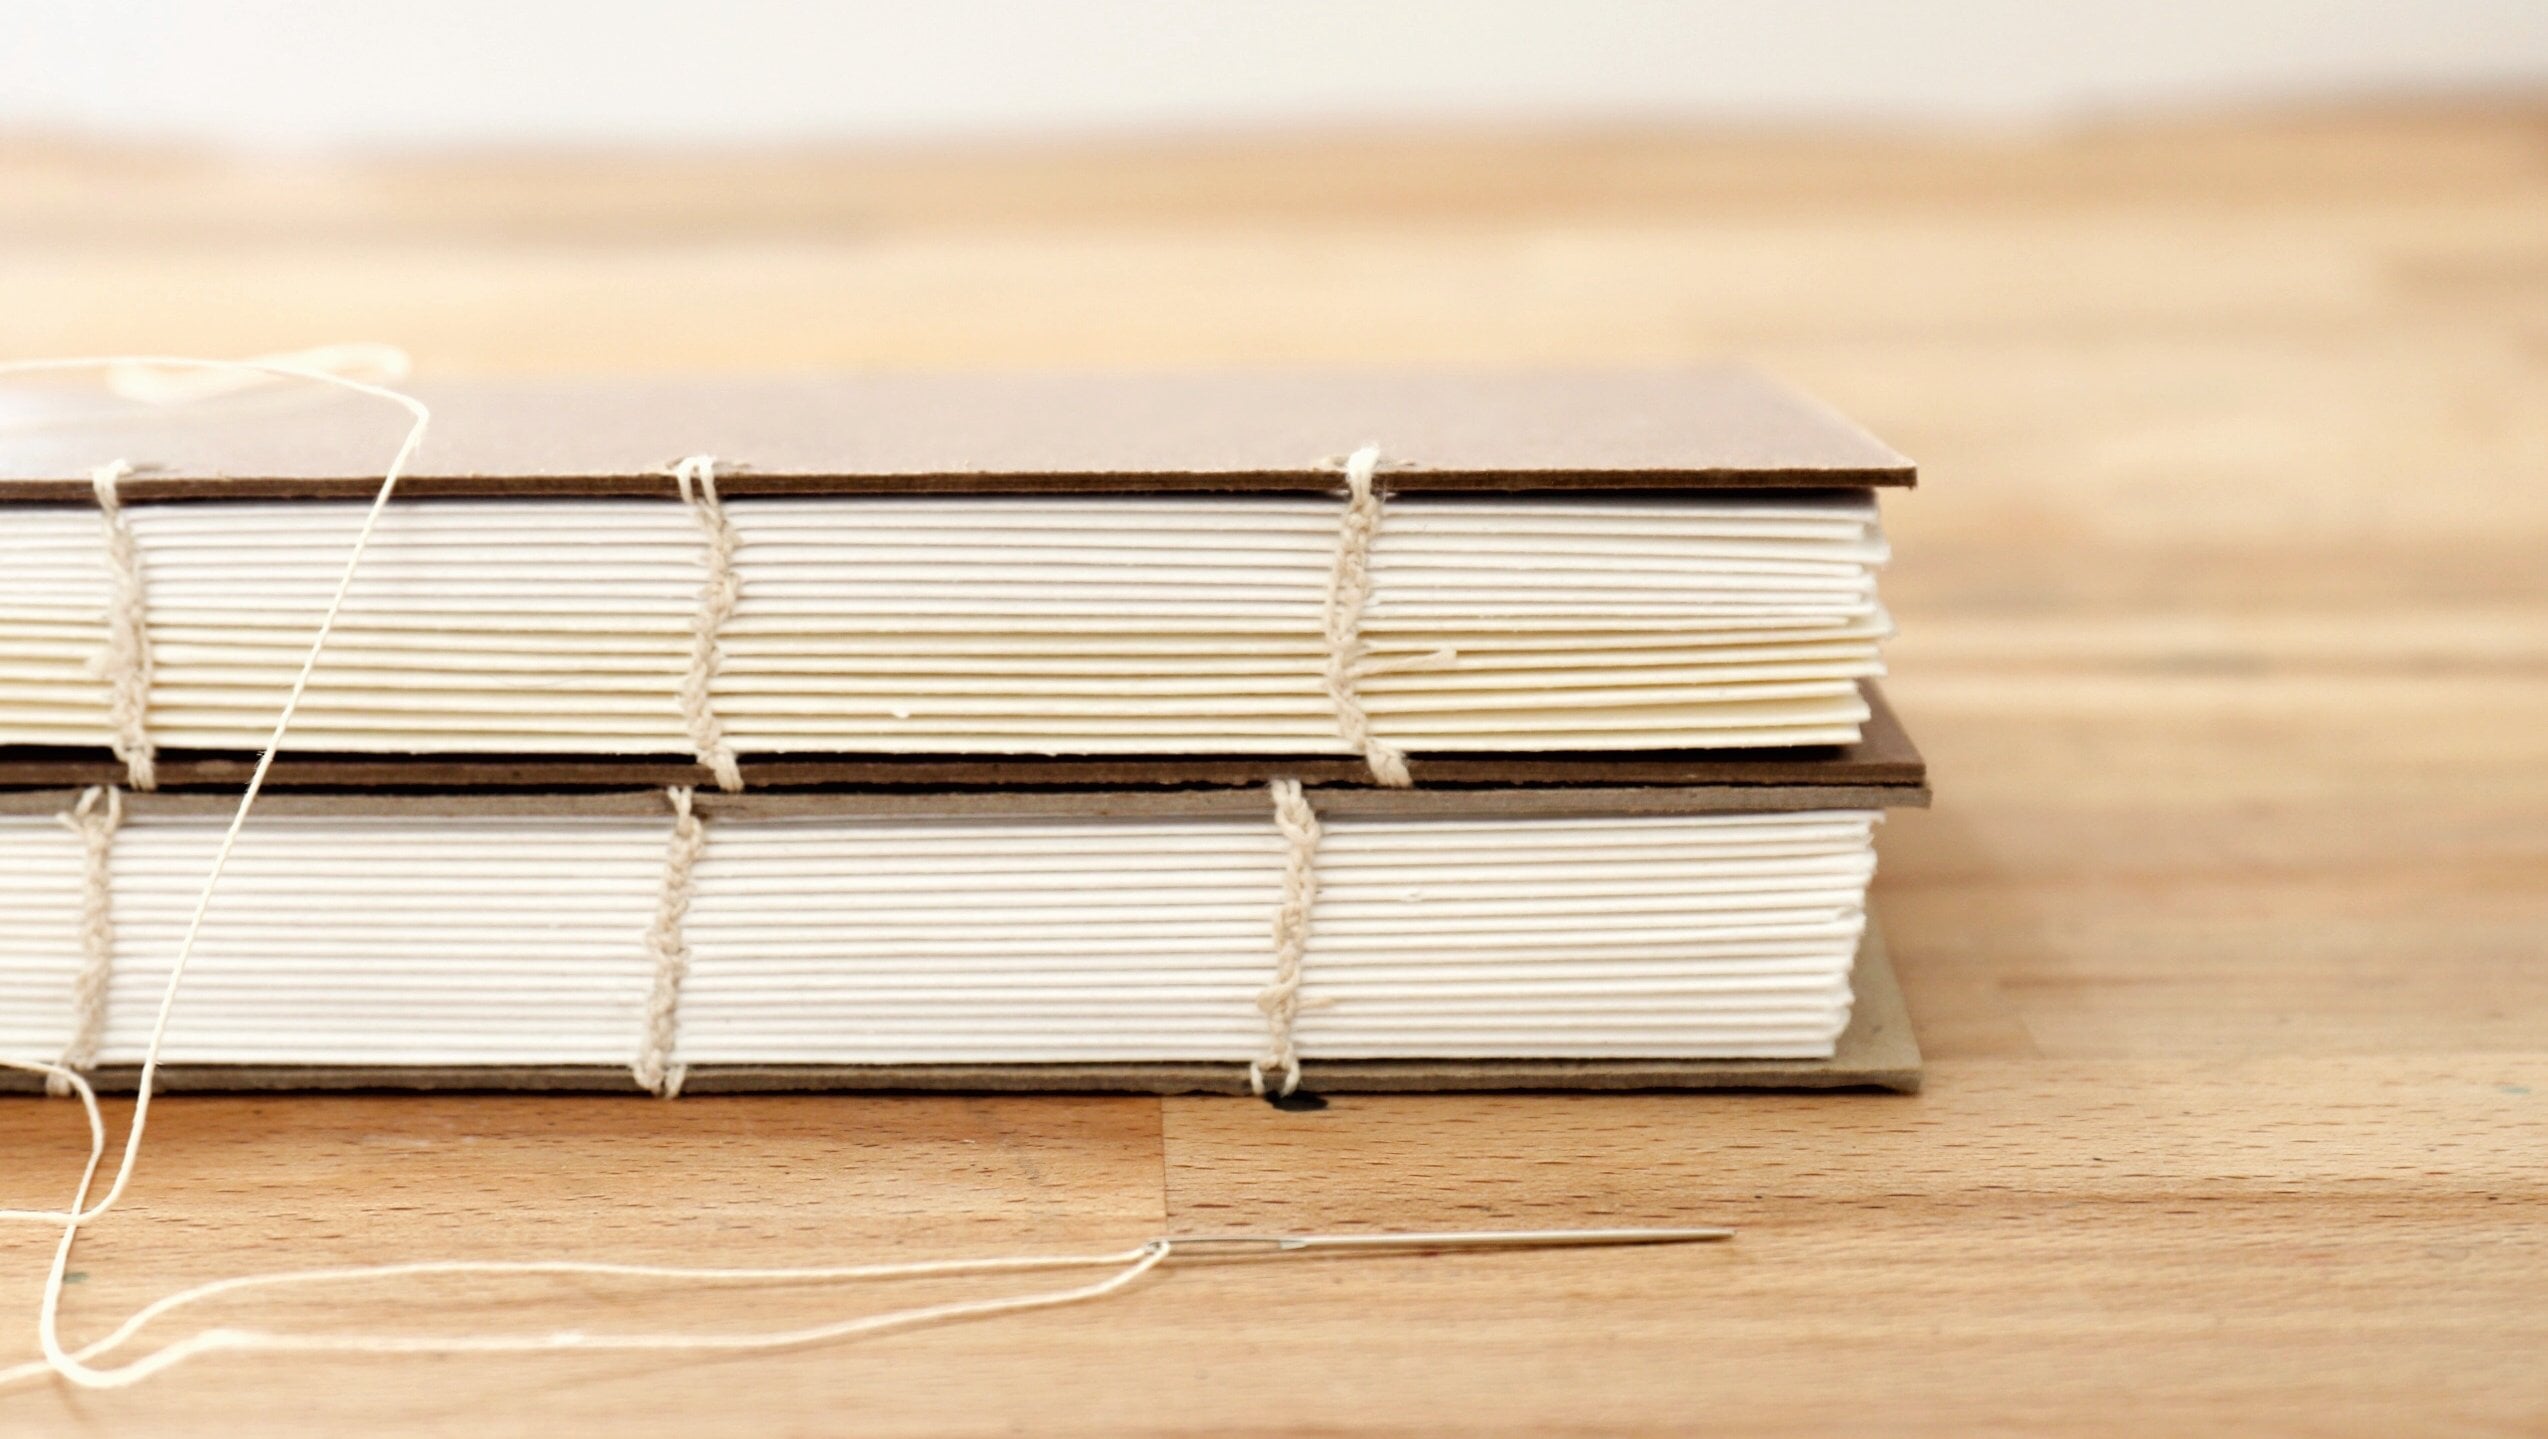
1. Introduction to Coptic Binding: Hi everyone. My name is Elizabeth Castile, though I'm an artist up a finder and a printmaker. Today we're going to learn about Coptic binding. Coptic binding is a method of bookbinding that originated in the second century AD and was used all the way up until like the 11th century by the Copts of Egypt. So they invented this great form of bookbinding that we still use today. And it's one of my favorite finding structures because it's just so great for making sketch books and journals because and the pages of your book will lie completely flat. This is a great one because you can make it at home with minimal tools and minimal equipment. Perfect for right now when we can't always be together in a shared bookbindings studio. The sewing is a little bit complex, but it's really fun and kind of meditative to work on. So as you can see, the spine of your book has exposed sewing. That gives us really beautiful braided pattern. Once it sown. For this style book, I made the cover from scratch, so using Board and then a covering in this case I use. We can also use things like found papers or like other artwork that you're not super happy with. But maybe like a part of it would be great to wrap a book cover. And you can also use found objects. So I made this tiny book using pieces of Lego for the covers. So there are so many possibilities. This is a great book structure for making your own sketch books or journals, but also for artists books. So we'll talk about all of this and more in the class. So gather up your materials and let's get started.
2. The Project and Materials: The project for this class is to make your own sketch book or journal using the Coptic binding technique. You can make yourself the best sketchbook with your favorite paper. That's really what got me into doing a lot of bookmaking like I love, like I said in the introduction, how this structure lays perfectly flat. So it makes it really nice for life drawing in. So you can make your very own unique kind of sketch book or journal you can use. I usually use blank because I'm making sketch books that you can also find lined paper or graph paper if you prefer something for writing. It's also great if you like to use a mixture of different types of papers. So you can make really like the most personalized blank book that you can think of. It can be very specific to what you need it to be. We're going to be able to make books with three different types of covers. So we're gonna go over how to make Coptic bound book with sort of like handmade hardcovers. So we start with board and then we're going to cover that board with either paper, book, cloth. So that's kind of like your typical like hardcover sketchbook. And then we'll also go over making one with soft cover. So we're just gonna use a heavy duty paper for that. And then we'll go over how to make covers using some kind of a found object. So you can use any kind of object that sort of on the flat side. So like this book I made using like Lego pieces. But you could also use a lot of different types of materials as long as you can find two things that are about the same size and they're like more or less flat. So let's talk about the types of materials that we're going to need. So first, decide if you want to make a book with this sort of traditional hardcover that we were talking about. Or if you want to use like found objects or soft cover. So if you wanted to make a book with found objects covers, again, find, find your found objects. And they should be again flat, the same size. So I have to Lego based played. Other really great things to use are just like pieces of thin would, even like the covers of an old hard cover book that's maybe falling apart or that you found in like the discount. They know how to use bookstore. You could use old postcards. You can get super creative with co-found objects thing. If you want to make a soft cover both, you just need two pieces of something that's a heavy duty paper. So I'm using these two cyanotic prints that I made in their own like watercolor paper. So it's like pretty sturdy. If you want to do a traditional hardcover than you're going to need two pieces of binders board. This is sometimes also called Davie board. So I have two pieces of that. It's going to come in a big sheet probably. So you can get the big sheet. We'll go over how to cut that down to size later on when we get into making the covers. So these are two pieces that I've already cut. For covering those boards, you're going to need two pieces of either a book, cloth or some kind of paper. So if you're using a paper covering, you want it to just be a lightweight cut paper that'll easily, easily fold or turn over the edges. If you're using book cloth. Book cloth is like a special type of cloth. It's either gonna be backed with paper or it's going to have some kind of like sizing in it that will make it resistant to the moisture of the glue going through it. So this is a book cloth that has like a sizing in it. If you use plain fabric than the glue is gonna soak through and you're going to see those glue marks. So just kind of be aware of that. But you can also use like a decorative paper, like a pattern paper or solid colored paper, as long as it's lightweight enough to fold over the edges of the board. And then for the hardcover options, you'll also need just some paper that's going to cover the inside of the cover after we wrap it with the book cloth. So I just have two pieces of solid color Canson paper if you're making the hardcover, we're also going to need some glue. So this is the only option where you need, where you need glue. But if you want to do a completely non adhesive bindings and you can choose the soft cover or the found object version. So for glue, I use PVA glue. So sometimes it comes in a bottle like this. That's called pH neutral PVA. I also like to mix it with methyl cellulose. This is pre-mixed, but methyl cellulose will come in like a powder and then you'll need some kind of brush to apply the glue with. So that's what you'll need for covers. Next, we're going to need some paper for the interior pages. So this can be any paper that you want, as long as it's easy to fold in half. So you don't want to choose something that's so stuff that you can't fold it in half. And then again, link with, with paper. A lot of the time when you buy it from an art supply store, it's gonna come in really large sheets, so we'll talk about how to cut it down. But you want your sheets of paper to be at least two times the width of your finished book size since we're going to cut these down a little bit, and then we're going to fold them in half to make our pages. So just make sure it's at least twice the width of the size that you want your book to be. And now for sewing, you're going to need at least two yards of thread. So I have some book binding thread. I have this book binding thread that's waxed binding prime, which I really like to use for Coptic binding because the wax Enos helps the selling glide a little bit easier. You can also use regular like linen bookbinding thread. This comes on waxed. So I really like this thread as well, but since it comes on wax for Coptic, I usually will wax it a little bit. And so for that, I just use a piece of bees wax. If you don't have bookbinding thread, there's lots of other threads you can use. So I also use sometimes this type of thread that's kind of made for leather working. So that's a really good option too. If you're really in a pinch, you can use a heavy dental floss phobias, really thick dental floss. And this comes waxed, so actually would work great for Coptic binding. So you can use something like that. Any heavy-duty thread, I would just suggest like not using regular sewing thread because it's usually too thin and it will end up breaking and just being very frustrating too. So with and then of course we're gonna need a needle. And so you can choose the type of needle that would work best with your thread. And these are pretty typical bookbinding needles. So they're straight needles that are just like a thick sewing needle. The eyes like kind of on the bigger side. And then I also have a curved needle. And curved needles are great for Coptic binding because there's a lot of looping involved. So if you have a curved needle, it's going to just help make some of the sewing a little bit easier. But you can totally worked with a straight needle as well. And next, you're going to need some kind of folding tool. So I have bone folders which are great like bookbinding tools for folding and helping us to make sharper creases in our paper. If you don't have a bone folder. You can also use like a non serrated butter knife. These weren't great too. So we're just looking for something that has a long flat surface that we are going to be able to sort of like press along a fold like that. So anything that's in a similar shape to this. And then we're going to need some tools for punching holes in our pages and are covers. So I usually use a light duty all for punching holes in my pages. And the thickness of this is pretty much the same as the sewing needle. So if you don't have an all like this, you can just use your straight sewing needle for punching holes. And all is basically a tool that's made to punch holes, so that's what you need. And then for punching holes in the cover, depending on the covering material, you might need a heavy duty all and a hammer. So just like a regular hammer or like a mallet that heavy duty all I like to use for punching holes in like the hardcover that will make with the board. But if you're doing like a soft cover version, you could probably just use this type of all to like the light duty one. If you're using a found object that is like kind of hard like this, like the lego plates or if you're using like wood or some kind of harder object that you might also need a drill to go through that. So if Fred, like my Lego base plates, I use a drill with a 1 16th or like a five thirty-seconds drill bit. And we're going to need some strips of scrap paper. If you have graph paper that might be like super-helpful, but if not simply in paper, you'll need either like a triangle or a ruler, like a plane ruler would be fine. I like using a triangle. And then a pencil and an eraser. And then you'll also need an exact DO later, a utility knife for cutting through the board. I really like using like a little utility knife like this with a sliding blade. But any other cutting work you can do with a regular executable aid. So those are all the tools that we really need to have on. And then some other things that might be nice to have on hand if you're doing any gluing of covers than you'll want something heavy cell. I usually like using like a heavy book like my older history book does the job for punching holes. Again, if you're either punching holes with the heavy duty all end a hammer or if you're using like a drill, I always like to have some kind of a board to punch into so that this gets marked up and not my tabletop. So those are all of the materials. And just to note, unlike where you can buy a book binding materials, since sometimes some of these kind of special bookbinding things can be a little tricky to find. I feel like most art supplies stores do carry the basics. Now if you wanna get like bookbinding thread, you might need to order that or go to a bookbinding specialty store. So I recommend either calendars or talus. Art supply store is sort of like have a lot of bookbinding supplies too. But I find that they're usually a little bit more expensive than if you went to one of the specialty places. And so all of the info on the materials and where you can buy the materials are all on the project page in Skill Share, so you can always check that to see your written out version. All right, let's move on to talking about paper.
3. About Paper: In this section we're gonna talk about paper. So you'll want to choose a paper that will work well for the purpose that you're making the book. So think about what you're going to use this book for, a sketch book, a journal. Another purpose, you want blank paper lined paper, graph paper, or some other kind of specialty paper. And then take a look around at different places where you can buy papers. So there's a list of our supply stores and book binding supply stores in the project section that you can take a look at so you can browse their selections. Some places will even send you a little sample. So once you've decided on a paper and you wanna see what size the sheets come in. So most paper sheets will come in a larger size and you'll have to cut it down to the size you want to use. When I start to make a book, I think about what size I want my pages to be, then I'm going to double the width. So I want to work with is like the size of a spread in that's the size of the two pages together. So if I want to make a book that's like five by seven inches, then my spread size is going to be seven by ten inches. And then I'm going to take a look at the size of the parent sheets. So like the larger sheet size up the paper comes in to say like that's like 26 by 40, which is kinda like a common size. The next thing we wanna think about is the grain direction. So paper has a grain, one paper is made. There's like this wet slurry of paper fiber and that's going to be shaken in a paper-making screen and water is drained out. And through that process of agitation, all of the paper fibers or most of the paper fibers are going to end up kind of like lining up in one direction. And that makes the paper grain, and that sort of makes the paper easier to fold in one way than the other. If you're ordering your paper, you can figure out what the grain is before you receive it. If you're ordering from a website like talus, they actually list the grain direction within the details of the paper listing on their website. So other stores, if they don't list on their website, you can try to call an ask. If they're not sure, you can probably find the information by searching online, maybe through the paper manufacturer or distributor if you're using a paper that you already have or if you weren't able to figure out the grain direction. There's two main ways to figure out the grain direction. And the first that I usually like the most is to just take the sheet of paper and sort of like gently roll it over in one direction. So I'm not creasing inner folding it. I'm just like gently letting it roll and I'm just kind of noticing how it feels to do that. And then I had turned the PI for and do the same thing in the other direction. And so what I'm looking for is if I feel more give in one way than the other. And so sometimes it's very lightweight paper, it's a little bit hard to tell. So you can also try it out with like a stack of paper, like maybe like five or ten sheets. And sometimes it's easier to tell that way if you're using really lately paper in it feels the same. So from doing what this paper, I can tell that this is a green short, which means that the grain runs parallel to the shorter direction of the paper. So the fibers run in this direction. So it's going to be easier to fold in that direction. The other way to test the green is to just take a little piece of the paper. And of course you want to remember how that came off of your sheet. You can even mark it in some way to indicate like where it came from. You're going to take a spray bottle or you could even just like splatter water with your hands or maybe brush it on with a paintbrush and a spritz it. And in a minute you should see that the paper will start to kind of curl from the moisture. This is starting to curl upwards away from the table. This means that the grain is on this little strip of paper. It's, it's going in the shorter direction because the paper is going to want to curl with the grain are in the same direction as the grain. I cut this off of this little scrap, but I know that it fit on here like this. So I know that my grain direction is moving in this direction on the Pixlr. So once you figured out the brain, whether that's by testing it yourself or by using the information provided from the place where you order your paper from. Now we can figure out how many of our seven by ten sheets we're gonna get out of our 26 by 40 paper. So say like that 26 by 40 paper was green long, like many larger sheets tend to be. So we know that the grain is running in the longer direction. I kind of like to just like map it out. So you can do this in whatever way is easier for you. But for me it works well if you create a little map, the sheet of paper. So I need seven by ten. And I'm going to want the grain direction to go in the direction that I'm folding the paper. So if this is my seven by ten sheet, I know I'm going to be folding those in half to create my folios, which we'll use to create the inner pages of our book. This is the ten direction and this is the seventh direction. And I'm going to have a full down the middle. So I need the grain to be in the seven direction. So I know that I need to have the 7's kind of going with the length of my large paper in the tons, going with the width of my paper. So I know I'm going to get about 57 inch sections out of the 40 inch length of my large sheet. So I'm just going to roughly draw that in. And then ten, I can get two tens out of the 26 direction. So I know that I'm going to be able to get 24681010 of my seven by 10-inch spreads out of one of these large 26 by 40 parent sheets. And then the green is going to be running in the correct direction, which will be the direction that I'm going to want to fold my pages and when I cut them all out. So once I figured all that out, that's going to help me figure out how much paper I need to order. So I'm gonna get ten sheets out of one of these large pieces of paper. Let's say I want to have this d pages in my book, that's going to be 25 sheets of paper. So if I get three of these parents sheets, that should be enough, that'll give me 30 pieces of seven by ten. So if you are planning to make your own covers from scratch using book board, you can kind of just come up with the size that you want. Sort of like how I just decided a little diagram here that I was going to make a book that was five by seven and so I would need seven by ten spreads. That would be like if I was going to make my own cover from scratch. That's one of the methods that we're going to learn in this class. So I can just choose my size. If I am using something with more of a fixed size for my covers like these lego plates, I would want to base my page size on this. So I'm going to take one of these and measure it. And these measure about five-by-five inches. So I base my size on that to make pages that will fit with this cover. I wouldn't need to cut my paper down to five by ten. So that's five inches for the height and then ten inches because we're doing twice the width. So the same idea where we're cutting down doubled the page width. Now once I've decided the size that I want to make my book into, and I have my paper in front of me. I am using a smaller sheet of paper so you can see it in the camera. This method will work the same way regardless of the sheet size that you're starting with. Let's say for like my five by seven size book. And we're going to mark off where I need to cut my paper down. So again, I need to cut seven by ten and sheets of paper. And so I know that on these sheets, migraine runs in the shorter dimension of this particular sheet that I'm using. So I'm going to measure out ten inches and I'm gonna put a little mark there with my pencil. I'm going to do that three more times. So just measuring out to ten. And now I'm going to take my ruler and I'm going to connect the dots. So I'm lining up my 123 points that I need. And There's two ways that we can do this. So if you want like a nice straight cut page, you can just cut it with an exact DO believe right against your ruler. And that's gonna give us a clean cut. But we can also make what is called a definite edge. By tearing the paper, I'm going to measure out to ten again. So making my three points. And then I'm going to line up my ruler with those three points. And I'm going to take the top corner of the paper and I'm holding my ruler down very firmly. So I'm using this hand, my left hand, and I'm spreading my fingers wide so that I get a good amount of pressure on the whole length of the ruler. And now I'm going to take the corner of the paper in my right hand. And I'm just going to pull it upwards so that the paper is kind of making contact with the edge of the ruler and it's tearing along the edge of the runway. And so that gives a light torn edge. If you're using a thicker paper, that effect will be more extreme. So it's up to you what style of edge you want, either cut or torn. So I have my sheets cut down to the width of ten now. So now I'm going to mark my seven inches in the other direction on the pH. So a God, I'm gonna do the three-point. So I made 1.2 points, three points at seven inches. And then again, I can either cutter tear. And so here's 17 by ten and cheat. So I'm just going to continue to do that with the rest of my paper until I have at least like 24 of the seven by tenant sheets.
4. Assembling the Pages: So now that we've cut down all of our paper and it sized to either are found object covers or we've cut it down to the size that we want to make our book. If we're making covers from scratch, we're going to create sections of pages that we call signatures. So these are folded groupings of paper. So if you look at the spine of this book, you can see how the threads go into these little folds. So each one of these folds is a signature that's made up of probably three to four individual pieces of paper that had just been folded together. So in our cut down sheets, we also just want to notice the grain. We can double-check to make sure we cut things down correctly. So again, I'm just going to roll my sheets and make sure that it feels like the green is in the direction that I want it to be, which is the shorter direction. It's important to have our paper be in the correct grain direction because it not only helps us fold them more easily. This is especially important for thicker papers that might be a little bit more difficult to fold as it is, but regardless of the thickness of our paper, it'll help us to fold more easily. But also once we assemble the entire book, I'm going to make the finished book live flatter and it's going to help the paper to fluctuate so that when it's humid and the paper might expand and contract a little bit. So it's going to kind of help the book to retain its shape and its integrity over time. And it's going to help the pages should turn. Can a way that feels a little bit more like flexible and natural. So these are all reasons why it's really important to pay attention to the green of your paper. The way we determine how many sheets of paper go into a signature depends on how thick are individual pieces of paper are. This is a very lightweight paper, almost as late as like printer paper might be. So that's pretty lightweight. So I would probably fold together like four sheets of these. If you had a heavier weight paper, like say you were using watercolor paper and it was really thick. You might only want to put two sheets together. So to figure that out, I'm kind of guessing, maybe based a little bit on my experience with working with that paper. But also I'm just going to take some sheets of paper and fold them together and see how they feel. I like to take my four pieces of paper and fold them together at the same time. To do this, I'm going to just jot them together to make sure that they are as even as possible. And then I'm going to place my thumbs underneath the paper and the rest of my fingers on top. Some kind of using these fingers to hold everything down and in place. While I fold over and I match up what will become the four edges of our book. In the fore edge just refers to the edge of the book that opens though I'm just like kind of matching this up right now. And then once I get it in the placement that I like, I'm going to again continue holding this all employees with my three fingers here. And then I'm going to use my thumbs. And I'm going to slide those back to the fold increase with my thumb. I'm going to use my bone folder or whatever folding tool you have you can use. And I'm going to use the edge of this tool. So I'm using like the long edge and I'm pressing and sliding that across the folds. And that's just going to help this even better. So that's one signature and you don't vote for individual sheets of my book paper and just going to set that one aside. You can also fold individual sheets and you would fold it in the same way. So again, I'm just putting my thumbs underneath the page and using my other three fingers to hold it down, line up the corners and the fore edge. Back to fold increase with my iPhone folder. So you can fold individualist sheets. And when we have just one sheet of folded paper, we call it a folio. And so we can fold a few cases like that, just one at a time. And then we're going to nest them together. Pieces may for individual folios together to make one signature. So whichever one of those methods you feel comfortable doing it, you can try them both and see what you like. I flake holding all of my sheets at once because I feel like the peaches nest together in a more seamless way. But I think full fleet is work perfectly fine. Now once I have these folded together, I'm just going to kind of evaluate like how it feels. So I can tell that four sheets of this is probably right because went the fullest creased and I'm laying it flat on the table. It doesn't want to pop open on. It doesn't seem like the pages are pushing each other out. In this direction. There are staying pretty much together. So that feels really good. If there were too many sheets and you'll either see the top pages opening like wanting to kind of stand up like that, or it would seem like the inner pages just didn't want to stay put and they kept trying to slide out. And so that's an indication that maybe you want to try to remove one sheet at a time until it feels better. And if you had too few sheets, you know, like if I had only tried to put two of these together, it might just feel really thin. And so I would know that I could probably try to put another one or two sheets in there. So you can kind of test in that way depending on what your individual paper is to figure out how many sheets you should be using to create your signatures. And I'm just going to fold all of my paper in sets of four to make my signatures. So once we have all of our signatures together, so I've made six signatures. I started with 24 sheets of paper and made signatures of four individual sheets each to come up with six signatures. So that'll give me 48 pages in my book. You can have more or less signatures, especially if you're using a thicker paper and you had to, you know, maybe you only use two sheets per signature, but you still wanted a book with like 48 pages, then you're going to have like 12 signatures and that's fine. We're going to want to press these underweight to help flatten the pages even more, which will just make everything go together much more nicely and it'll help our finished book look even better. So once I have all of my signature is folded, I'm just going to jog these to the spine side or to the folded side. It will become our spine. And I'm going to lay it nice and flat on the table trying to make sure that my fold stay aligned. If you have a board, you can place a board on top. And if not, that's okay as long as you have something flat like a book and then you're going to put a weight on top of it, but I'm gonna use my trusty art history book. Please write down on top. And then I'm just going to press this for a few hours or even up to overnight.
5. Making Your Own Covers: Cutting the Boards to Size: If you've chosen to make your own covers, you're gonna need your book pages, a piece of book Board. I just have two pieces here, but you might have purchased it in a really large sheet. That's totally fine. So we just need enough book board to make two covers that are the same size as our pages. We're going to also need some thing to cover our boards width. So that could either be book cloth, which is what I have here, or it can be a decorative paper. If you're choosing book cloth, that'll be something that you buy from an art supply store or bookbindings store that is made for bookmaking. And oftentimes it has a paper backing, so it'll be like fabric on the front end, paper on the back. This type of book cloth actually has sort of like a sizing on it. So that's fine too. And if you're using paper, it just needs to be like a paper that's flexible enough that it would be able to fold around the edges of the boards. And for the covering material it'll need to be slightly larger. So as you can see here, this book cloth has about like an inch and a half of overhang on all four sides. And we'll also need some kind of paper to make end sheets width, which is what we're just going to put on the inside of the covers to kinda finish them off. And you'll also need some glue. So I have PVA glue and then I also have some methyl cellulose that I'm going to mix in to that. Remember how we talked about paper green earlier. The board also has a grain to it, so we're going to need to determine the grain direction of the board. Whenever you are folding paper or making covers out of board, you always want the grain direction to be parallel to the spine of the book or to the direction of your fold with paper. So for, for these boards that we're using for the cover, I want to make sure that my green is going in a direction that's going to be parallel to the spine, which will be the vertical direction of the book. So to test for grain, I usually go to like the corner of my piece of board and this will work if you have a really large board as well, go to the corner of the board and just try to gently bend the material. And you'll be able to feel that in one direction. It feels like there's a lot of resistance. It's very hard. And then in another direction it'll feel like there's a little bit more give. And so I feel that give when I'm trying to fold it or bend it in this direction. But when I tried to go in this direction, I feel a lot more resistance. If you're using a really large board, you want to do this at the corner because it'll just give you a better feel for it. If you try to do this with the entire sheet of board, it will be more difficult to feel that, that subtle difference. So once I've determined the grain direction, I'm actually going to just take my pencil and mark lines along the length of the board. And so with these little boards, it's pretty easy to remember where the grain is. But if you're using a really large board, this will make sure that once you start cutting it down, even if you have a little tiny scrap, you'll always know the grain direction so you'll be able to use the leftovers for a future project. You'll just know what the grain direction is since you marked it. And then these marks will get covered up by are covering material so they won't get in the way later. So first we're going to start with. One of our signatures and our book board, we want to make sure that the board is the proper size for our covers. To do this, I'm going to use one of my signatures. Since this is cut down already to the size that I want my book to be. It's better to prepare your pages and then size your board to the actual size of the page. If you think like, oh, I'm gonna make a book that's five by seven. So I also will need to just cut to five by seven boards. Sometimes there can be something that ends up being a little bit different when you actually cut down the pages. Whenever I try to pre-cut the boards before I have made my inner pages. Sometimes it comes out a little wonky, it doesn't fit quite right. So I like to assemble my pages first and then cut the boards to size. If you have access to a board shear, which is a machine that cuts through the board very easily, often will find these in printmaking or bookbinding studios. So if you have access to that, you can use the board shear to cut your boards down. I'm just going to show you how to cut it by hand so that you can do this at home without having access to that special equipment. Some skin check to see if I have a corner that's square. And I'm just going to use my triangle to test them. And once I find a corner that I'm happy with, I'm going to use that to base my other cuts off a CPU. So I think I'm going to go at this corner. Once I've found a square corner, I'm just going to mark a little box on the edge. Just to let me know that that's where I'm starting. Oftentimes, if you buy a large piece of book board, it'll come with really rough cut edges. And in that case, I would just trim like one edge to be straight and then you can base your cuts off of that one straight edge. I'm going to take my signature and the signature in the corner of the board and I'm placing it pretty flush up to the edge. Coptic bindings usually don't have the covers, don't usually have overhang to them. They're usually about the same size as the actual pages. So I'm gonna place this in the corner and then I'm gonna take my pencil and i'm going to make a mark to set the edge of my pages. And then I'm going to use my triangle to cut off this excess. So I'm gonna take the triangle and I'm just going to line up this bottom edge, flush up to the edge of my board. And then I'm going to make sure that this corner meets at the point that I marked with my pencil. And then I'm going to cut this with a utility naive. The blade is just sticking out a little bit here. And I'm really firmly holding the triangle in place. I don't want this to slide. This is like my straight edge here. I'm going to just cut like light cuts. This board is so thick, We're not going to be able to cut through it in one pass. I'm going to just start making some light cuts. And I'm going to just keep doing this. And the blade will make a groove in the board. So every time I go back up to the top, so cut again, the blade will keep fitting into that same groove, but of course keeping the straight edge in place will help with that as well. So I'm just I'm not pressing down very hard and I'm just making several light cuts and eventually my blade will go through there. Now I'm going to take my signature again, please it back fitting into the corner here. You can check to make sure that where you've cut makes sense. So I can see that the edge of the board is right up to the edge of my page, but the pages aren't like sticking off of the edge of the board. And then I'm going to make another mark at the top edge of the pages. And I'm just going to repeat that cutting process and use my small triangle. And again, I'm just squaring up the bottom edge of the triangle to the edge of the board. And then I'm making sure that the vertical edge is crossing over the mark that I made with my pencil, which is right here. And I'm going to cut it in the same way. Very slowly and carefully. You don't want to use way too much pressure and you don't want to rush it because, you know, your blade could slip and you could end up cutting your hands. We definitely don't want that to happen. So I'm just going to check to make sure I'm happy with the cutting and the size, and I think it looks great. So I'm going to just move on and do the same thing with the second piece of Ford. So once you have two covers cut, we wanna make sure that they're the same size. So if you're happy with the covers pulled, test that out with our book pages in-between again, just to check that we're happy with the sizing of the covers and everything seems to fit together really nicely. And so now we are ready to cover our cover boards. So I'm gonna put my pages aside someplace where they're not going to get glue on them.
6. Making Your Own Covers: Covering the Boards: When we're ready to start gluing and we wanna make sure that we have everything ready to go before we get any glue out here. I have my cover boards. I have my covering materials. Might also have several sheets of newsprint, which we're going to be really good for just controlling the glue and keeping things neat. They also have some wax paper, which will also be good for pressing our gluey boards. And then I have a glue brush, my bone folder, my utility knife or exact overlaid, and I have one of those little board scraps. This is gonna be really useful to us for glue. I like to use a mixture of PVA and methyl cellulose. The PVA glue is a plastic based glue that dries very strong and it's pretty permanent. It looks kind of like Elmore's glue. It's like a white like liquidity igloo. And when it dries, it dries clear, but you can still kind of see it a little bit. So you want to be careful about getting it all over everything. And then the methyl cellulose comes in a powder. What you see here, I usually get it from talus. When you mix it up, you have to mix it with some water. It'll look like kind of like a clear, gooey liquid. The methyl cellulose is reversible with water that is going to add some drying time for us. So when we mix these two things together, we get a glue that is strong because of the PVA. And we get something that we have enough time to work with before it starts to dry, which is what we get from adding the methyl cellulose. So I've made a mixture of these. So I start with like three-quarters of PVA and then about a quarter part, one part of the mixed up liquid methyl cellulose. So as you're using the glue mixture, you can kind of control how your glue is drying a little bit. If the glue seems to be driving really fast, you can add a little bit more methyl cellulose, you know, maybe like a tablespoon out of time. And if the glue seems like a way to equity, then you probably have a little too much methyl cellulose. You can add a little bit more PVA back into the glue and that'll adjust how faster, how slow or how workable your glue is. And if you don't touch methyl cellulose, that's fine. You can just use the PVA, but maybe you just like test it first on some other materials so that you kind of have an idea of how long you'll have to work before it dries because sometimes it does dry very quickly, especially if you're in a dry climate. So I have my mixture, glue, glue, brush, newsprint, and I'm going to start with one piece of my book cloth. And I'm gonna turn that face down. And I'm going to take one of my boards. So now that I've trimmed my boards down, my book cloth is. Way bigger. This is totally fine. So I'm going to leave my book cloth as is not going to worry about trimming that down right now. Also, easy access, I have my bone folder in my laid over here and my little board scrap. I'm gonna take a piece of newsprint and please my board on top of this. So what I'm gonna do is I'm gonna take some of this glue and I'm going to brush it over the surface of the board, removed the newsprint, and then I'll flip this blue side down onto my cloth and press it down. So that's what we're gonna do first. And we don't want the glue to be super thick like we want to see it, but we don't want it to be kind of like losing over the edges. We want to have a controlled application of glue. And so I usually like to brush from the middle to the edge, which will just help with controlling the amount of blue because any excess glue will just get brushed off the edge of the board and onto the newsprint. So once I feel like I've covered the board, I'm going to just reproduce that gloomy news print. And I'll flip this over blue side down onto my book cloth. And then I'm going to just press it down really well with my hands. And you can even flip this over and then use your bone folder to smooth out any air bubbles out. And so I like to use the flat side of my bone folder for this. Some clots can get marked up by your bone folder. So if you feel like you have a delicate book, cloth or paper, especially if you're using paper covering, you can put a piece of newsprint on top and it'll help protect your book cloth as well. Okay, so now back on this side, now we want to trim away all of this excess cloth. We need to leave a little bit of an overhang. So what I have over here is pretty good. Like we want like about an inch, even a little bit more. Because what we're going to end up doing is wrapping this around the corners or the edges of the board. But we don't necessarily need this much here. So I'm going to trim all this down so you can use a ruler or you can use another type of straight edge. Just as long as you're cutting something that's pretty even on all four sides and Street. So now I have this nice even boarder. Now if I were to just start folding knees in, and now I went to fold this one in. I would end up with all of this material in the corner that would just, you know, even if I tried to do this neatly, it would end up being so bulky in the corners. So what I'm gonna do is trim the corners off a little bit. And this is where our little scrap board comes in handy. So we need to make sure that the corners are trimmed away, but that we still have enough of the book cloth material left over to cover the corners. So if we cut this too close, then the corner of the board will actually show. But we want the book clock to cover it so we need to leave a little bit of thickness. Usually that thickness is described as being 1.5 board thicknesses. So that's a little tricky like so this is a one board thickness, the thickness of the same board that we use for our covers. So I'm going to place this here at the corner. And then if I just tilt it outward a little bit from kind of like holding it at Lake, maybe a 45-degree angle to the table. I'm going to hold this down really well with my left hand and then I'm just going to use that as like a little straight edge to cut that corner away. And now as you can see, there's just a little bit of space left here. And that'll be just enough that we'll be able to fold these edges over without the bowl being there of having all of that corner material. But it will also be just enough that the clock will still cover the corner of the board. So I'm gonna do that to all four sides. So again, I'm taking the board, the board scrap and starting out with it on the table straight up and down. And then I'm gonna tilted inward towards the inside of my cover. And then holding it firmly, I'm just going to cut that quarter away. This is kind of a tricky moved. Don't worry if the first few books you make have four corners showing it definitely takes practice, but you'll get the hang of this. So next we have to glue the turn-in. So we're just gonna glue these edges and pulsatile VR. So start with some newsprint again. I usually like to start with the top and bottom edges of the cover. So on this cover that would be the shorter edges. And for this we don't need much glue at all. So I'm really kind of wiping away most of the glue, glue brush. And I'm going to brush some glue the system too much. I'm going to brush some glue onto just that edge. And again, I'm brushing from right here where the board meets the club. And I'm I'm brushing off the edge of the clock, so I'm only going in one direction also. I don't want to like swipe back. Because then I'm going to get a bunch of glue that comes off of my brush and goes underneath the book cloth. And that's just gonna make things really messy. So once I've got a nice layer of glue rush on there, I'm going to move my cover off of my newsprint. I like to just fold over this little part that has the glue on it. I'm gonna take my bone folder or whatever folding tool you have will work. And I'm going to put the point of my bone folder underneath the book club. And I'm kinda like smoothing and pressing the book cloth up onto the edge of the board. And then I'm going to take the bone folder. I'm going to place this long Andrew rate against the edge of the board. And I'm going to use the flat side of the bone folder to pull the cloth onto the board and smooth it down. And then I'm just gonna make sure that this is pressed down really well, especially at these corners here because I feel like sometimes it's easy to miss those spots. And then I'm going to do the other edge, the bottom edge. And the same way. And after I do this part, like I smooth my bone folder over and then the habit of wiping my bone folder, I always wipe it on the palm of my hand but you can also wipe it on until like a rag. And that's just in case you do end up having a little bit of glue that squeezes out here. You want to make sure that's off of your bone folder because now I'm gonna take this and I'm gonna go back to try to smooth things down a little bit better. And I don't want to be read depositing any glue that gets on my bone folder onto my book cover. So now we're going to glue the four edges or the longer edges. In this case, it's kind of the same, but there's one added step. And that's what we have to tuck in. These little corner pockets that have formed at the corners. Swan just brushing the balloon in the same way. And now you can see that right here there's like this little pocket that has been formed from folding over the first parts of the clock. So I'm gonna take the point of my bone folder and I'm just going to kind of tuck them in. So I'm really just like placing the bone folder at the edge of the board, right on top of that pocket. And I'm pressing it down and then kind of pushing it towards the middle of the board. So if I'm up here, I'm pressing it and pulling it down. And if I'm at this point I'm going to press it and push it up. And that just tuck them in. And then I'm just going to fold this turn in. This turn in the same way that I'm gonna meet the others. And I'll do the same thing on this side. Press the quarters, and then finish this turned in. I'm gonna make sure that the corners are pressed down well, since sometimes will end up with a little bit of a double layer of cloth, it's important to ensure its press down really good. Make sure there's no air bubbles. And now I'm going to take this board that we've covered and I'm going to put a piece of wax paper over this side, especially if you see any glues and out you definitely want to make sure that you put some wax paper there. And then I'm gonna take this and I'm gonna put it under weight. So I'm going to use my big art history book again and press this while I do the second cover. And now I'm going to take a second cover and just do that all over again. So the end sheets in a Coptic binding, the purpose really is to just cover this part of the inside of the cover so that when you open the book and sort of seeing like this rock cover material, we're going to see this beautiful green papers. So you can use pretty much any kind of paper for this purpose. And we're just going to size it up to fit just inside of this size of the cover. But we're going to want to see like a little bit of the edge of the book cloth. And then I like to just position it so that I can see just a bit of the cover, maybe about an eighth or a 16th of an inch showing around the edge here. And then I'm gonna take my pencil, I'm going to just make a mark where I want to cut it. So I'm going to make a mark there and I'm gonna make a mark there. And again, talking about paper greening of my, also made sure that this paper has a grain direction that is down the length or the vertical direction of the book. That will also be parallel to the spine. And it's, and the same green direction as the cover and the inner pages. Just gonna make sure that I'm happy with how this fits. I'm going to check to make sure I feel like that cuts our story and it looks good. And as long as I'm happy with that, I'm going to cut a second piece to the same size. And you can either Guys This one again in the same way using the cover, you can just use your first piece, the guide. I'm gonna take my cover and we're gonna glue out R n sheets. I'm going to do one at a time. So I have my uncovers kind of off to the side. I have a piece of wax paper ready? I'm gonna start with one of my end sheets again, link, if you have a pattern is pretty easy to tell the front or the back. But if you have a solid colored piece of paper, just decide if there's one side that you want to be showing, in which side you want to be glued down. Don't going to take some of my glue mix. And I'm going to just brush that in the same way that I brushed the glue on the board really like so from the center out to just be extra careful about holding this paper in place because if it shifts on your newsprint, then some of the extra glue that's coming off around the sides could end up getting on the front of your paper. And it's gonna be kinda like a glue spot that you'll be able to see there if it does shift, you can also just kind of get rid of this piece of news print and put in another piece underneath. So most paper, when it gets, I'm damp, it curls like this. So this particular paper that I'm using is a very curly. So I'm gonna give it a few seconds or maybe even a few minutes to kind of relax. So the reason why the paper is curling is because it's absorbing all this moisture from the glue. And the paper fibers are not able to stretch out or expand that quickly. So as it absorbs the moisture, it's going to start to relax a little bit. So I'm actually going to like put this one to the side. Since hits, it's currently in such an extreme way, I'm going to glue this second one so that I can give them both time to start to relax and the glue might dry, which is fine. We need to brush new gluons. So I'm just gonna glue out the second one. And your paper might not curl as extremely as this. Every paper reacts differently. So you're just going to do what you need to do for your particular paper. Some paper will not pearl so extremely and you'll be able to just like brush the Golan and use it right away. Okay, so now this one's going to curl and I'm going to give that one a minute to relax as well. Over there. As you can see, this one is flattening out pretty nicely now. But the glue is dry. I'm going to have to put more glue on it. But since it already absorbed moisture and the expanded the second coding of glue is not going to make it curl up the tree. You get the glue up all the way to the edges. You have to use your finger to hold it down. Just kind of dab a little bit there to cover up your fingerprint. Now, I am going to take one of my covers and I hope my gluey paper. And I'll do my best to line up these two corners with the positioning I want at the top. And I'm also looking at the sides to make sure that the overhanging or whatever the clock that's showing is even. I'm not just pressing it all the way down, I'm leaving it loose a little bit so that I can shift it into place. And then once I'm pretty happy with what I see, I'm going to just press it down and then you can also use your bone folder to smooth it down. And you can use a piece of newsprint on top just to help protect that paper. Most papers can be pretty delicate when they are wet with blue and they can be prone to tearing. So we're just going to press this down really well. We wanna make sure that there's no air bubbles are going to check it out. And this looks pretty good. So now I'm going to take a piece of wax paper and place the wax paper on the blue side. And I'm gonna put this underweight. And now I'm going to go ahead and do the same thing for my second end sheet. And I'm just going to repeat that process and press both of my boards for a few hours or even overnight.
7. Punching the Sewing Stations into the Signatures: In this section, we're going to learn about making a punching jig. So far. We should have our signatures, which are the different sections of paper that we fold it together to make the inside pages of our book. And we should also have something to use for covers. So whether you made your covers using book Gordon book cloth or you can be using some kind of found object for covers. And if you look at this book, each one of these rows of thread is able to be sewn together because there are holes that were punched into the signatures. So we're going to figure out like where we want to place those sewing stations as we call them, and also how many sewing stations we want to have. So to do this, you're just going to need some strips of paper. It could either be just like a plain piece of paper like this. It could be graph paper, which might make things a little bit easier. And then I also have this piece of paper that's just like a little bit stiffer. That will be helpful to in creating like a final jig. But if you don't have a stiffer sheet of paper, you can just use like a second strip of the same type of paper. Coptic binding is characterized by these beautiful expose stitches at the spine. And because of that, oftentimes with Coptic bound books, you'll see that there are just many rows of stitching. I think like the stitching ends up going beyond the function and it becomes kind of like a decorative element. So for a really small book like this, this book is like three by six inches. We wouldn't necessarily need to have seven rows of thread to hold this together sufficiently, three or four rows of thread would do it just for pure function. But because we end up with this exposed spine, I've added some extra ones just because I like how it looks. It just adds something a little bit more interesting to the book. The things that we really need to have here are one sewing station that is positioned really close to each end of the book. And news should be positioned about a half inch or less away from the ends, the head and the tail of the book. And then we'll need something else in the middle to better someplace else and placed in the middle in between the head and the tail sewing stations, there's a few ways that we can arrive at the pattern that we want our sewing stations to be in. And this is what these strips of paper are going to help us with. So the first thing that you'll need is just one signature. And I'm going to start with the graph paper and then I'll show you what to do if you just hook plain paper to. The first thing that we're gonna do is take our strip of paper and cut it to the height of our signature. And I'm just gonna make a mark with my pencil and then just like folded and tear it. But you can also just cut out with scissors. Okay, so now I hope this strip of graph paper that is the height of my signature. And we know that we want something that's close to each end of the book. So I'm just going to place a mark with my pencil. I'm just gonna make a mar along one of the lines of the graph paper. So maybe one there, and like one here, I could choose to put one right in the middle. And if you have trouble like visualizing the center, you can always just fold the paper in half. Just an easy way to find the center. There could be one at the center. If I like those groupings of stitches, maybe I could put one like here and maybe do like a group two. And that was about an inch away from my station. So maybe I'll do like groupings of two. So maybe I won't have one right in the center, but maybe you'll have two more that are like right around the subtour. Great. And so now I have, let's see, 246. I have eight sewing stations. And so I just did this based on how I liked the spacing of those sewing stations visually. Now, I usually tend to go for like a symmetrical design, meaning that, you know, whatever is on this half of the book will mirror this half of the book. But you don't have to do it symmetrically. You can do an asymmetrical pattern that would be totally cool. Just remember that you always need to have something close to each n. And so this was super simple with the graph paper, right? So let's see how to do it if you don't have graph paper. Because sometimes we might just not have Cosgrove papers. So if you have a plane strip of paper, again, we're gonna start just by cutting this to the height. So I put this to the height of my signature. I could do a similar thing where I'm just visually marking, but if you want it to be a little bit more measured, there's two things we could do. We can either take a ruler and lay a ruler along our strip of paper and use the increments on the ruler to make markings. So that's similar to the graph paper, but we could also just fold the paper. And then each fold would indicate a sewing stations. So I usually like to start by folding my paper and half, even if I don't want to use the center mark. And then with the paper still folded in half from the open-end, I'm gonna just fold about a quarter to a half inch down. And so this is making folds. That one that being positioned at the two ends of my book like this. And then I have the center. So if I don't want to use the center, that's fine. Maybe I want to have to sewing stations that are kind of like inbetween had entail and the center. So then I can again like fold this in half. And then I'm just going to fold the centrefold to meet this fold. And now I have two more folds. So I could use these two as sewing station. All right, have it folded up again this way? And now I'm going to put another fold that's just close to that second fold that I made. And so now when I open this back out, I have a bunch of folds. And I'm going to decide which ones I want to use and which ones I don't. The thing that the folding does is it makes all of these marks that are equal distance from one another. In some ways. It's right here. I have a nice group of three. And then the same thing over here. I have a nice group of three. I don't think I'm going to use the centre for this design. So I'm just gonna put an x to remind myself that I don't want to use that. And then I need to use the head and the tail. So here we'll have two groups of three and then I'll have my little head and tail sewing stations. That's sort of how you can accomplish the same thing just with making folds in your paper. Now, if you have an object that you're using for your cover, kind of like something like this. Where I have these bumps. I'm going to want to use this to help me figure out the position of my sewing stations. Now this would also go for like if you're using an object that already has holes in it, where I had another student who was using like a piece of an erector set that already had holes in it. So she made her punching Jake based on the holes that were already in the plate from the erector set. So I'm going to make another jig for my Lego bays. I want to start the same way by just cutting this strip of paper down and then I'm just gonna fold it over the cover and I'm going to make a mark and a tail Mark. So I have my two sewing stations that we'll be close. And what I'm trying to do here, I'm working with these little bumps from the lego pieces to make sure that my sewing stations are going to be in-between. I don't want thread to have to be going over the top of this bump. I want it to go in-between the bumps. So I'm just making a mark that corresponds with those spaces. So maybe I'll do one there and there. And because these bumps are evenly spaced, I can kind of use those almost like the grid on the graph paper. So here I have like my head and tail. We have a center and I have two groups of two on either side of the center. So I've just used the bumps on my Lego plate to position those mark. So whichever method you use, you should end up with a strip of paper where you have made marks that will indicate where we're gonna punch holes in order to create the sewing stations that will be sowing a thread through later. So now I'm going to take my kinda like stiffer piece of paper. And again, if you don't have something that's like on the stiffer side, that's fine. Just choose a new piece of paper because especially if you have a piece of paper that's folded up, this is gonna be really hard to use as a guide because it's like, you know, like you made a little accordion fold in it. So I like transferring these marks over to a new sheet of paper. And so what I do is I just lay the initial jig on top of the new piece of paper and I just put it pretty close to the edge. So I just see like a little bit of the edge of this red paper showing. And then I line up the one end flush with the end of my red paper. And then I'm just gonna take a pencil and transfer those marks over onto the Red Paper. And now I'm just going to get rid of this. And this will become the jig that I use. Now I have a red piece of paper with some pencil marks on it. I can use it just the way it is. But there's one more thing that we can do to make this even more precise. We can cut little channels, kind of like a tiny triangle shape around each one of these pencil markings. And this will create a channel that are all the tool that we're going to be using to make the holes will kind of be able to guide into that little channel. So I'm just going to start at the top of the pencil mark that I made. And I'm cutting at a slight angle very close to that mark. And then I'm going to do the same thing on the other side of the mark, starting at the same place. So I'm basically cutting out a little tiny triangle. And I'm just gonna do that. Every mark. And we wanna keep these cuts really narrow. C You can see I have these little triangular shaped cuts at each place where there was a pencil mark before. Alright, so now that we've made are Jake, we are ready to punch holes in our signatures. So now that it's time to punch holes in our signature is you'll need all of your signatures and all. So that's our tool for punching holes. I'm using this light duty All. You can also use your heavy duty sewing needle or bookbinding needle for this as well. And then we'll need the jig that we just created. So what we're gonna do is we're gonna take one of our signatures and I'm gonna make sure that the pages are nice and flush together. You know, we don't want to have like one piece that's kind of like hanging off the end. And I'm going to please stand on the table. I'm gonna take the jig. So notice how the red sheet of paper, I did not cut it to the height of my book. That's totally fine because the position of these notches that I cut is exactly the same as what it was on the initial Jake that I mean, when I look at this, I place this in to the fold of my signature. And when I look at this, I can see that all of my sewing stations, the notches that are going to help me create those sewing stations are evenly spaced in the space of my signature. And then I have this extra over here. And this actually ends up coming in handy to have this a little bit longer because this just ends up helping you move it around a little bit more like when you're taking it out, putting it into the next one. So I'm positioning this so that the edge with my notches or with my pencil marks is right into the fold of the book. And then so that the end of it is flush up against the end of my signature. And we wanna make sure that this is positioned as carefully as possible because we have six signatures to punch. And we want this positioning to be as close to the same in each signature as possible. So I'm gonna put this here. I'm going to hold it in place with my left hand and I'm gonna take my all and I'm gonna guide to the point into the notch that I created. And if you only have pencil marks, that's fine. And just make sure that your point is matched up with that pencil mark. I'm holding the ol at like a 45 degree angle. And I'm going to support this part of my signature with my left hand at this point. And I'm sort of still holding my jig and place with some of my fingers of this hand and now with the fingers of my right hand as I hold the all. So I'm going to slightly clues the signature and then I'm just gonna punch through with the all and you can see how the all has come right out of the point of the fold. And so that's what you want to see that the all is coming through at the point of the folder. Now we're gonna do this all the way down the length of the signature. So have you noticed that your Jager you felt that your Jake shifted a little bit, just reposition it. And so I'm just going to keep punching in that manner. So lining it up with my knowledge and I can feel that the point of the all will go right into the knowledge. And then I'm just gonna push gently so that it goes through. Punch all of my goals for my sewing stations in that one signature. Now I'm going to place this just ahead of my work area. And I'm going to move on to the next signature and do the same thing. And I'm just going to continue doing this until I've punched holes in all of my signatures. And each time I finish a signature, I'm going to place it in the same direction as my first one, just ahead of my work area. So I'm trying to keep these kind of in the same directional orientation so that at the end all of my punched holes should line up really nicely. So you can just go ahead and continue with your other signatures. And two, you have punched holes in all of them. Okay. And once I've finished punching holes in all of my signatures, if I jog them together, I should be able to hold these together and see that all of the punched holes are pretty much lined up with one another and nothing is like wildly off. If something does seem wildly off, it's possible that you may have just flipped one, You know. So the first thing I always check is just that I, you know, if I flipped it, so see how even though I have a symmetrical design when I flipped that one, these are very off now like that. They don't match up. So if I see something like that, the first thing I'm going to try is just flipping it around. And now those match up much better. If that is not the issue, maybe your jig just slipped and you didn't really notice. That's fine. It happens. So what I would suggest in that case is either just like scrapping that signature and then just having last signatures or you can if you have more paper, just make another one and read punch it. All right, now we're ready to move on to punching holes in our covers.
8. Punching the Sewing Stations into the Covers: Now we're ready to punch holes in our book covers. So if you look at this book, you can see that in the cover, the holes for the sewing stations are punched through the top of the cover. So we're gonna punch holes that are about a quarter inch away from the spine edge of the cover material. Before we get to the actual punching, we're going to have to make a new jig or alter the jig that we use to punch the holes in the signatures to make that work for punching holes in our cover. So you can use whichever one you use to punch the holes in the signatures. So, well, let's say if you are starting with the graph paper, the graph paper is really simple to adapt to using for the covers because we already have these grid lines and so on my graph paper, I know that each line is a quarter of an inch. So I'm just going to use the point where these two lines intersect as the position of my holes. And so I know that it's going to be along this first quarter inch line at a point that intersects with the mark that corresponds with where I punched holes in the signatures. I'm just circling those. If you were just using a plain piece of paper, you can use the piece that you cut notches into. That's totally fine. And we're going to have to just create this quarter inch line here. So I'm going to address measure a quarter of an inch from the edge. And I'm using the same edge where my notches are cut, some measuring out a quarter of an inch just using a ruler, I like to make three points. So I measured a quarter and cheer. Now I'm going to measure a quarter-inch here, and maybe I'll measure a quarter-inch here. And then I'm just gonna join these lines with a straight edge and draw a line there. Some kind of conducting my three points and then drawing a straight line. So I just use this as a straight edge. If you are sure that this is straight and this is a right angle here, then you can also just use a triangle and line the triangle with the end of your strip of paper and then with the marks that you made and do the exact same thing and then draw a line there. So whatever type of tool you have can make it work for yourself. And now need to extend where my notches are so that those points intersect with the line that I just drew it on the length of this strip. So for that I am going to use my triangles as I have it. And I'm just lining up the bottom edge of my triangle with the edge of the jig. And then I'm lining up the vertical part of the triangle with the point of the notch. And then I'm just going to draw a line and that creates an intersecting point with the long line that I drew down the length of my jig. And so I'm just gonna do that for each one of these notches. And so this should ensure that the sewing stations that were punching in the top of the covers should correspond as closely as possible with Sewing stations that we punched in the signatures. So now that we have this reading, we can go on to making the holes and the covers. So now it's time to punch the holes into our Covers. Here I have three different types of covers. A soft cover is just a sidenote tape that was made on a piece of heavy duty like watercolor paper. So it's just thick paper. And I have the cover that I made using the book Board and the book cloth. So that's like a little thicker and a little harder to punch a hole through the miss. And then I have my lego plates, which are hard plastic. And then we're also going to need the jigs that we just made. So I have a different jig for each one of my books here, whether you use graph paper or view, we're using a plain paper jig and drew your lines on it, will need that. And then we're going to need some kind of a tool for punching holes for the type of material that your cover is made out of is going to determine what type of tool you're going to use. So if you have something that's soft, like a heavy paper or like postcard or we can probably just use the same type of All that we used for our pages. If you have something that is a thicker material like the cover made with the book board or something similar to that. Then we're going to use a heavy duty all with a hammer. That hammer is going to help us to punch through. And this heavy duty all as nice and strong if I used this all for this, first of all, it might make a hole that's too small, but also this needle tip might bend under the force of the hammer if you have something that's a harder material, so like something made of plastic or maybe if you're using like wood or some other kind of hard material, I know that I would never be able to punch a hole through this, especially because this is a brittle material. So if I tried to do this, it would probably crack the plastic. That was another type of hard material like wood, like maybe the all would go into it but it probably wouldn't make a very nice hole all the way through. So for this, I'm going to use a drill with a 1 16th or a 530 seconds drill bit. So it's just like a really Syndrome is like a little bit thicker than my bookbinding needled. If you're using a drill or if you're using the hole with a hammer. I would also suggest that you have a piece of wood or something else that you can put down on your table so that you don't make holes in your work surface gears version one, these are heavyweight watercolor paper. This would also work with anything that's like made of card stock or if you're using fabrics. So I'm gonna use my light duty all. I'm going to use the jig that I created for this material. I'm going to do one cover at a time. And I'm going to place the guide right here. I'm going to take this in place with some low-tech masking tape. And then I'm just going to take my all and I'm going to line it up with the marks that I made. And I'm just gonna punch through just like that. Applying enough pressure so that the all those through and since I have this wood underneath, I can feel that the all is going into the wood, But you can also just check and make sure that it's coming through the back of your cover material. And I'm just gonna go ahead and do the same thing all the way down the length of the cover. Okay, so now when we move to the second cover, I can even just use the first cover as a guide as long as I put them really flushed together. And I can just punch through the holes that I already made really carefully. And so that's the soft cover. Next, I'm going to punch holes in my cover that I made with book or for this, I'm going to use my Jake that I true the lines on myself. And so again, I'm just going to start with one. And I'm going to line up my jig into the corner of my cover. And I'm gonna tape it in place with some masking tape. Sure. Persuasive as possible. And for this one I'm going to use my heavy duty all day and then I'm going to use my hammer and I'm going to line up the point of the all with the intersecting lines that I drew that correspond with my original sewing stations. And I'm lining up the point there and I'm going to hold it down firmly with my left hand and then I'm going to take the hammer and just give to good taps. And that should be enough to put it through the material. And you can see that it has made a hole that comes through to the other side. And I'm just gonna do that all the way down the length of the cover. Center. I have holes down the length of my cover. If you're not sure if the hole is, is the right size, you can also take one of your needles. And just double-check that it goes through. You want it to go through pretty easily without too much trouble. If it is really hard to get it through, then you just need to go back with the all again with this material because it's thick. If you look on this side, you can see that there's kind of like this blow out shape that happens from when all goes through. So we don't want to punch holes in the second cover from the inside because then we'll have that blow out on the outside. If the boil out is happening on the inside, that's okay because it will just get covered up when we saw the pages. When we move on to the second cover, it's really important that we think of this idea of mirroring the jig. So on this one I had the jig lined up like this. And I could see my pencil mark from above. That's how I knew where to punch the holes. But now with this next cover, I don't want to just take this and turn it upside down because then the holes might not be perfectly even. They might be slightly off from one another. And especially if you have an asymmetrical pattern than it's gonna make it upside-down and you're covers won't work together, so we wanna like mirror it. And so I like to position them like this. And then kind of flip this like I'm turning a page, so I'm flipping it over so that now it's mirroring its position on the first cover. And again, I can just position it super precisely. And TPP, it's down. And I can't see my pencil mark because they're on the other side. But I can see where the holes were punched. So that's what I'm going to use as my guide this time. And I'm just gonna punch, I hold again for that one. And now I'm going to punch the holes or drill the holes through my lego plates. And so again, I'm just gonna do one at a time. And I'm going to take my jig and position it. Now when I'm doing the Lego blades, there's a couple of different ways I could do this. If you're drilling through a material that's perfectly flat like a piece of wood. You can just tape this jig down and drill right through the paper into your wood or into whatever other material. But if you have something like this that's a bumpy, it might actually help to transfer the marks on with a marker. You can either punch holes in your J first and use this, tape it in place, and transfer those points through using a marker. So I'm just like pressing this marker into those little points that I just made with my all. And then I'll have those dots transferred onto my Lego plate. So that works really well. If you're using something like the Lego plate that has these kind of incremental elements to it. You can also just position your guide. That's the proper place. I'm just transfer marks over with a marker or pencil that correspond with your sewing stations. And now once I have the marks transferred onto my material or I've taped my jig down in the proper place, some materials might B set spinning by the drill bit, so it might be helpful to tape it down or you can even clamp it down. And then I'm going to line up the bottom of my drill bit with my marker mark. Just gonna slowly drill through. And I'm going to just do that all the way down the length of my color, just like with the all. Once I drove my holes, I'm just going to double check that they match up. Now at this point, you should have some signatures and use for your interior pages that have holes punched through the folds are sewing stations as well as your two covers that also have holes punched through. As long as you're up to this point, we're ready to move on to selling.
9. Binding the Book Part 1: Now that we have prepared our book pages and our cover, we're ready to put everything together. So this is the part where we learn the selling technique. Let's make sure we have everything we need. So you'll need some kind of thread. I am going to use this waxed linen bookbinding thread. I got this on the website Hollander, and this is just linen thread that already has wax on it. So the wax makes it a little bit more slit so it'll kind of glide through better when we're sewing, when we're all done, the wax helps the threads together. Then I also have a spool of clean linen bookbinding thread. So this is just an waxed basic bookbinding thread. That's also linen. This can be used on waxed or you can wax it yourself for Coptic binding, I do like to use a waxed thread and you don't need it to be very heavily wax. But if you're starting with something like this that doesn't have any wax, you can take a piece of bees wax. You can use other types of wax as well. And then you're going to cut off the length of thread that you need and then just run it through the wax a few times. So we have that option. And then I also have some other types of thread that are not for bookbinding. So this is a thread that's made for leather working. It's a really strong type of thread. I like using it for bookbinding and I've used it for Coptic bound books and it works really well. And then there's also dental floss like good old natural fiber dental floss works great as well, and this already has wax on it. So this would also be a good option if you are in a pinch and you can't find good-quality heavy-duty thread. And then we're going to need a needle. You can either use a straight sewing needle. This is a bookbinding needle. The heavy duty sewing needle would work as well as you can also use a curved needle. Curved needles are really great for Coptic binding, as you'll see very soon, the sewing involves a lot of Lake looping of thread. We're going to be doing a stitch called chain stitch. And the curved needle will make that a little bit easier on you. I ordered this one from talus and then a pair of scissors to cut your third would be great. And then of course, our cover and our book block, I have my two covers that have holes punched along one edge that correspond to the sewing stations that I created in my signatures. And I have my five signatures and I've put them together making sure that the sewing stations align on all the signatures. So I'm sure they're all in the correct orientation right now. And so once you have all that stuff gathered up, let's get started. So I like to start with a length of thread that is about as long as both of my arms stretched out. So we can call that a wingspan. So I'm just gonna go ahead and cut myself a wingspans worth of thread. And the reason why I like starting with that much thread is that it is easy enough to handle, so it's not going to be too long. I'm not going to spend an unrealistic amount of time like having to pull my thread through every time I come through. And of course it's enough thread to possibly get completely through my entire book without having to join a new piece on. And if we do have to join a new piece on, there is a way to do that. And I'm going to start off with my straight needle. I'll do a bit of the demonstration with my straight needle and some with the curved needles. You can see the difference in how those work. Before I start sewing, I also have a little trick to lock my thread onto my needle. So if threaded the needle, I'm going to just take the point of my needle and the short tail of my thread. And I'm just going to stamp the point of the needle through the threads. So I'm just kind of like splitting the thread with my needle. So you can see there how the point is coming in-between the lines of the thread. And then just slide that down to the eye. And now I'm pulling on the longer part of the thread. And I'm just gonna pull that tight so that there isn't a loop, they're anymore. And that kind of will like lock the thread in place so it won't fall off easily. So I like to have all of my signatures and my covers neatly ready to go out of my work area. And then I can just kind of take one at a time as I need it. So we're just going to start with one of the covers and one of the signatures. And we're just gonna start by bringing our needle through the first sewing station. And you can start from either end of the book. I just always like starting from the right side maybe because I'm right handed. So it feels more comfortable for you to start over here on the left. That's fine. I'm going to pull my needle and my thread through and I'm starting on the inside of the signature and pulling my throat to the outside. And I'm just going to leave like a generous tail on the inside here. I don't have a knot tied in the end of my thread and just going to leave a tail. And now I'm going to hold my first signature. And then I'm going to bring my cover into the mix and I'm going to put my needle through the corresponding cover station. And I like going from the top to the bottom. I'm pulling my thread through until the cover meets up with the first sewing station. So that's what it should look like. And then I'm just gonna take my needle and re-enter the same sewing station on my first signature. So I have my little tail of thread here as well as my main sewing thread. You can tug on both of those to tight in. So on the outside you won't see a loop or a lot of slack in the thread. And then I'm just going to tie those together in a knot and that's what's going to secure my thread together. So rather than make a knot in the tail end of my thread, I kind of like doing this a little bit better. So I'm just tying a double mom. And then you can even cut the short tail so it doesn't get in your way. And now I'm just going to go back out the next sewing station. So we're going to work our way down the length of the cover and the first sewing station until we have attached the cover. And so again, just like the first one, I'm going to put my needle in from the top to the bottom. This might cover praying the noodle back through the same Somebody station. And I'm just going to keep repeating that until I have all of the sewing stations. When you get to the last sewing station on your cover, we're just going to go through the cover in the same way, but we're not going to bring our thread back into the signature. So you're just going to end up right here on the outside of the book with the thread coming out between the cover and the signature. And now we're going to move on to adding the second signature. And so I've changed my camera angle because I think that will be a better view for the rest of the sewing for continuing to. So I'm going to keep my book flat on the table with the cover and the bottom towards the table. And then I'm going to be taking signatures and placing them on top each time I finish one. So we're ready to put the second signature in place. So I'm just going to take from my pile of signatures and I'm going to place the next one right on top of the first. And I'm just going to double-check that the sewing stations line up. Now I'm going to work in a way where with one hand. So for me, with my left hand, I'm kind of using that to hold the signature or like half open. And then I'll be sowing with my right hand. So to attach the second signature, we're just going to take the needle. And remember, we ended up at the lasso institution of the cover with a thread on the outside of the book coming out from between the cover and the signature. So I'm going to take my needle and just put it directly into the sewing station is above that on my second signature. And I'm going to pull that through to the inside of the book. And now I'm going to come out the next sewing station. For now we're going to start our chain stitching. So the chain stitching is like a loop that we're going to make around the thread that joins, in this case the cover and the first signature. And this is what's going to create that braided stitch that Coptic binding is kind of known for. So I'm gonna take my needle and I'm going to bring it in between the cover and the first signature. And I'm going in from the left of this thread, that's right under where my thread is coming out of my signature. And I'm gonna bring it through there. And now with my straight needle and I'm going to have to lift the pages of my book and I'm going to pull it through. So I'm pulling my thread through towards the back of my book and then I'm going to bring it back out on the right side of that threat. And so that has just formed a loop that goes around this thread here. And now I'm going to bring my needle back into the same sewing solution. And I'm going to pull that tight. You wanna tighten gently. But of course you want to make sure that you're not leaving a lot of slack in the thread. So you don't want to have any like big loops of thread remaining on the outside or the inside. So anytime that you're tightening your thread, you wanna make sure that you're tugging in a direction that's parallel to the spine. So that will actually tight in any slack that for instance, in this part of the thread over here, and I'm pulling it in a direction. That's the direction that I'm sewing in. So I'm sewing here from right to left. And so I'm pulling my thread to the left too tight in. We wanna pull parallel to the spine because that helps the thread slide through really nicely. But if I pull it towards me or if I pulled it backwards. That would run the risk of tearing the paper. So it could even tear from like one sewing station to the other. And then this signature would just be unusable. Now would have to take the signature out and either make another signature or just have one less signature in my book. But you do want to make sure that you're tightening as you go. Because if you leave any slack in the thread and then don't deal with it until you're all the way over here. On the left side, you've already sewn like five of the sewing stations, then it's going to be really difficult to tighten your threat enough to remove the slack x all the way over here on the right side. So now we're just going to take the needle and bring it out through the next sewing station. So coming back to the outside of the book. And again the same thing for our chain stitch. I'm going to take my needle and I'm going to bring it in between the cover and my first signature to the left side of that thread that's joining the two together. So I'm going to insert my needle there. I'm gonna pull it through into the space between the cover on the first signature. And then I'm going to bring it back out on the left side of that thread. And then I'm going to bring my needle back through the same sewing station that I came out of in the second signature. And so the next sewing stations in the same way until I get to the last one. Yeah. Get to the last sewing station. I'm going to do a candlestick, which is kind of like making a knot. And it's going to help hold our signatures together on either end of our book. We started in a very similar way to the chain stitch. So I'm going to put my needle in and loop it around the thread in the same way. And this time I did start from the left to the right. I usually do the cattle stitch starting at the inside, middle of the book and then looping to the outside. So I'm going to pull that until it's not quite all the way tight. I'm going to leave a little loop here. And then I'm going to put my needle through the loop. And I like going from the bottom to the top. So I'm gonna bring my needle through the loop. And we're just going to pull it straight up until it's tightened and it has formed a little knot right here. And now we're ready to put the third signature on. So for the third signature, I think I am going to switch to my curved needles so you can see how that works differently. So because I'm using my curved needle, I can start using a weights to help hold my pages down. You can't really do that with the straight needle because you kinda need to flip your pages back and forth a little bit more to allow for the looping to happen with the straight needle. My new signature on top for, um, again, checking to make sure that all of my sewing stations, Lena and I'm gonna make sure that I'm keeping this right to the edge of the table because that'll make it easier to work on benefits further. And now I'm just taking it away and I'm just using a rock. You can use any sort of weight that won't get your paper dirty and is heavy enough to hold things in place. And I'm just going to place my rock weight on the inside of my signature and that's going to help hold my pages in place while I'm sewing. If it isn't working for, you, don't use it, but it's an optional thing that you can try. Okay, so now I'm going to bring my needle again just right into the first sewing station. And then I'm going to come out the next sewing stations. I'm going to pull my thread tight and I'm going to continue doing the chain stitch. This time, we're going to go around the thread that connects the first second signatures, the first chain stitch that we did, we, we're looping from the left to the right. And now I'm going to loop from the right to the left. So I'm going to put my needle in to the right side of that thread that joins the two signatures together right there. And then I'm going to loop it around that thread so that it comes out on the left side. And so you can see the advantage of using the curved needle is that you just have to kind of turn it around in a circle and it'll do that loop for you really easily. And then I'm going to pull that tight. And I'm just going to bring my needle back through the same sewing station that I came out of. So again, coming out of my sewing station, going to insert my needle on the right side of the thread that's joining the first second signatures loop around. So that my needle point comes out on the left side of that threat. And then I'm going to pull that thread tight so that it creates the chain. And then I'm going to bring my needle back through the same sewing station where I came out and my top signature and pull it tight. So now you can already start to see that braided pattern starting to happen here. So with each signature that will grow. So now I'm going to, so the remaining sewing stations in that method. Okay? And again, when you get to the last sewing station, we're going to do a kettle stitch again. And so the kettle stitch One More Time is like making a knot and we're going to take the needle and loop it around that thread as if we were starting a chain stitch. But then instead of pulling it tight, we're going to leave a little loop. Put the needle from bottom to top. Coming from underneath. Pull that thread through, and then just pull that tight in place. And now we're going to join the fourth signature. And this is pretty much the same. So just remember, at the end of each signature, you're gonna do a candlestick. And when you start doing your chain stitches, you're going to alternate the direction from the previous signature. But when I sowed the last signature in place, I did my chain stitches from right to left. And so on this signature, I'm going to do my chain stitches from left to right. You want to alternate it that will keep your breeded pattern looking really neat. Okay, so you can continue selling your remaining signatures in place until you're ready to put the cover art. Okay.
10. Binding the Book Part 2: Basically we're just going to attach this cover to our book in the same way. So I have my thread right now coming out of my last signature just after I did the kettle stitch and I'm going to take my needle and just bring it through the first sewing station on the cover from the top of the cover to the bottom. And then I'm going to bring my needle to the inside of my signature. And so with this method of Coptic, we're going to end up having two rows of thread on the inside. So we have the thread running there already. That is the thread that's holding the last signature on. And now we're going to be making a new length of thread that's holding our cover onto the books. So now I'm going to just come out the next sewing station. And again, I'm just going to loop my needle through the cover station and bring it back inside the book. Through the same So institution where I came out. And I'm going to continue in this way until I get to my last sewing station. And now at the very last organization of the whole book, you will bring your needle into the last sewing station of the signature. We're going to just tie a knot. I like to loop the needle underneath this length of thread that's going from sewing station to sewing station. So you just bring the needle under there and create this loop. And then I'll bring my needle through to make a knot. And then I'll just do that one more times when you click a double knot. And that should secure everything in place. And you can cut your extra thread. And here is your beautiful Coptic found. Great job, everyone.
11. Extending Your Thread With a Weaver's Knot: Okay, so something you might be wondering about is what happens if you run out of thread during the sewing process. Like I said in the beginning of sewing, we're starting with just two arms lengths of threat or a wingspan of thread. And that was enough for me to finish selling this book, but it's my book was any longer than this or any larger. I probably would have run out of thread. And sometimes we might be sewing books that are so thick like what if I had ten signatures like to account for having enough thread at the star would mean that we're sewing with this very, very long length of thread that would be very difficult to handle and it would probably get tangled and it would be very frustrating. So we want to start with a manageable length of thread. But then when we run out of thread, there's also a special way to attach a new piece that will make sure that the new piece is secure and it won't come undone. And to do that, we make a weavers and on. So I'm going to demonstrate this with two different colors of threads so that it's easier to see what's going on. So let's say that this light green piece is the thread that I've been sewing with. So one end of this imagine is attached to my book and this red piece is the new thread that I'm putting on. So in my new thread I'm going to tie a slipknot. And this is a not that is going to be adjustable. I'm kind of like a lasso. So I start by just making a little loop where my two ends are crossing. And then I'm going to start to pull the thread through as if I were just timing a regular old not I'm going instead of pulling it all the way through, I'm just going to bring like a loop through. And I'd have my two ends of the thread hanging through this lasso part here. And so I'm going to just tighten this until it's pretty small. So I'm making my that kinda round circle. Part of the not smaller as well as the loop part that's coming through. So something about that. So I'm gonna take the end of my sewing thread and put that through this part of the loop. And now I'm going to take one of my new thread and pull that with the end of my old thread. And then I'm going to take the other end of the new thread in my other hand. And I'm just going to pull those together until they typed in. And sometimes you can even feel a clip in the tension of the thread. And that is the feeling of these threads interlocking. And if you look closely here you can see this interlocking that has happened where the green thread is being pulled into that loop and locked around the red thread. So this is just making a very strong not. And so now if I pull my red thread against my green thread, it stays really well. It's very tight and very secure. Sometimes it takes a few tries to get this right. So if you pull it and it slides off, the interlocking action didn't happen correctly and you just need to try it again. Sometimes it takes several tries to get it right, but this will ensure a nice secure knot. And then you can just trim all of the extra threads. We can cook them like fairly close. And then you would continue sewing with your new length of thread for a Coptic bound book, I recommend doing this on the inside of the book because of course, if you were doing it on the outside, it would show on your spine. So I would recommend if you have to join a new thread that you do it on the inside of a signature. And probably one of the more central sewing stations would be best.
12. Wrapping Up: Okay everyone, so that was the class. I hope you enjoyed it. I know Coptic binding can be a little bit challenging, but hopefully you are on your way to making many, many Coptic bound books. It's never been more true in anything. Then bookbinding, that practice makes perfect. So if you stick with it and finish this book up, make another one. Every time you make a boast, you will get better and better at it. I promise. I hope you enjoyed the class and I hope you enjoyed this binding style. I really want to see the books that you made so pleased. Photos and post them in the project section of the sculpture class. If you have any questions or comments about the class, please leave feedback post in the discussion section. I look forward to hearing from you and seeing what you made. Thank you so much for taking the class.
 Elizabeth Castaldo, Artist and Bookbinder