Transcripts
1. Presentation: painting realistically in or it can be very challenging. It's like our Camille baking. You need to know how to proceed step by step. If you want to get a second resort and if you follow my painting method, you would be able to create realistic paintings by learning a simple technique that will stay with you for the rest of your life. My name is Marie today and it is and a monotonous working in London. I'm originally from Italy. I was born in Rome, where I started find out painting, imploring, receiving a very traditional Italian art ification. I've been painting in order for more than 25 years now, and I always concentrated on releasing porches, still life paintings. I created this course to teach you the very basic foundation off realistic oil painting. There are many methods and many techniques out there, but in this course we're going to focus on a very classical technique. You will be able to use it to pay anything you want, as you will learn a proper painting methods. If you take a look at some of my paintings and one there are, I did them is using this method So if you want to know the secret behind this realistic paintings thesis the course for you, I chose in a magnolia branch as the subject for our painting, taking inspiration from some beautiful botanical prints from the past. By the end of the course, you will have a clear understanding or technique used. Be able to create a realistic oil painting and to take the next day on your career path. It's a painter, so let's get going.
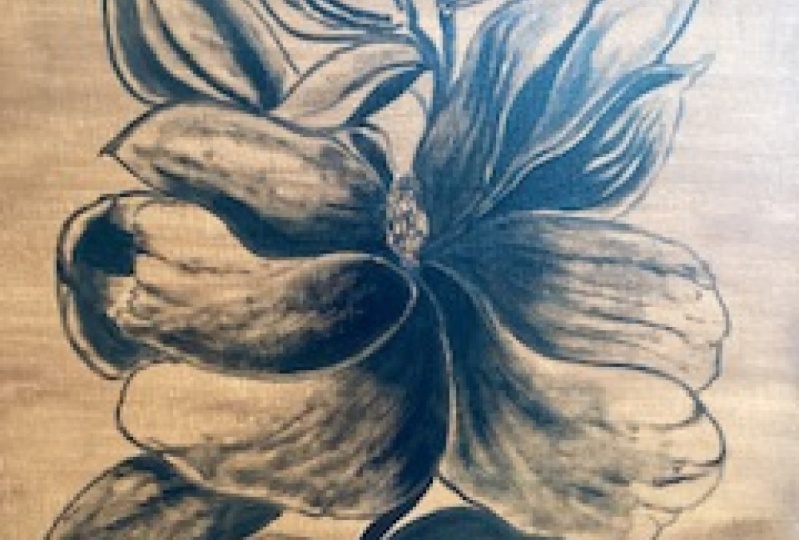
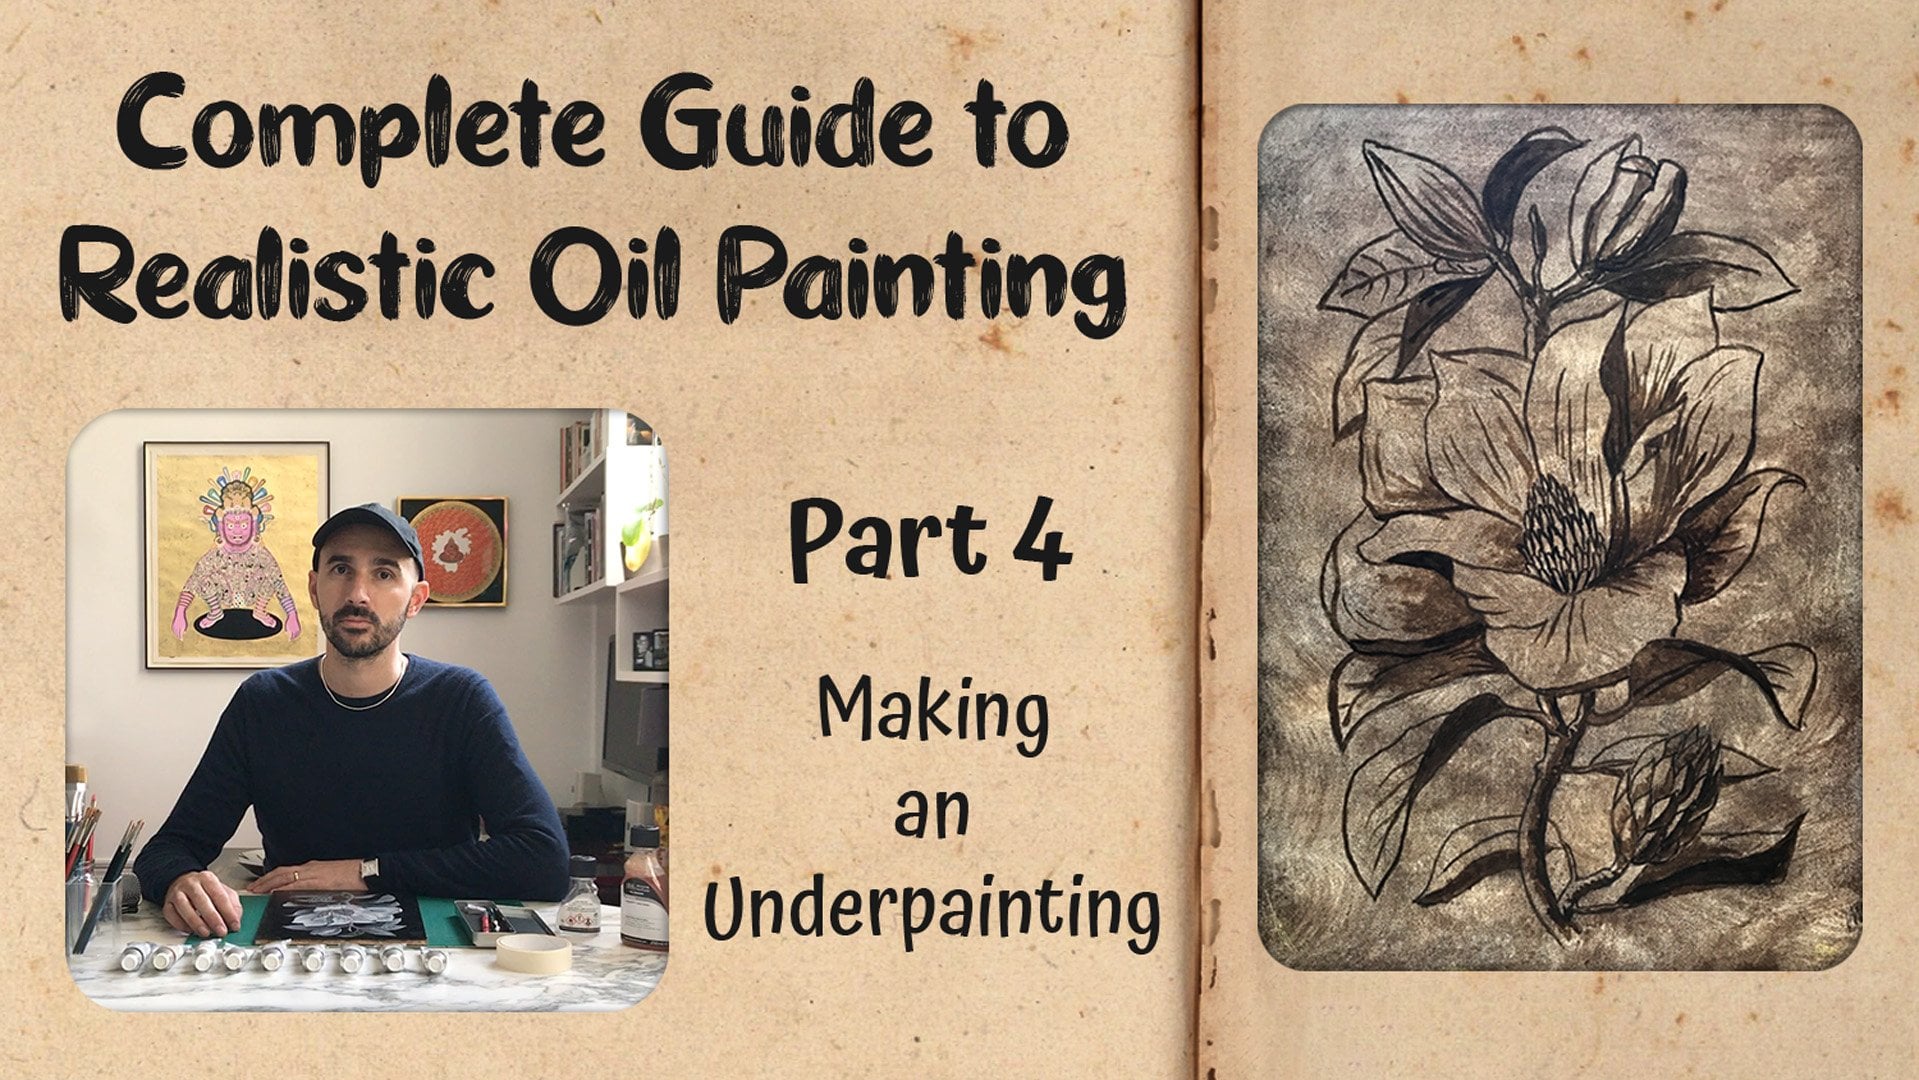
2. Making the sketch: in this lesson. We're going to make a few sketches and explore what works best for our composition. You can see the reference on the upper left inside. This species is called Magnolia Acumen. ETA. These type of magnolia has got quite long leaves their tapering towards the tip and they also have small, wide, yellowish flowers which they never really open too much. We can now make a new sketch and explore a different solution. We can take the Magnolia campus reference this plant competitive previous one has got very large flowers and they have this very captivating colors. We can start sketching out the main open flower. You can see the inside of the paddles are very wide, light pink, while on the outside the color gets quite intense and deep. - We can now escape Charlie. I'm not very open flower and are the couple of blossoms that you can see in the top part of the reference. But we want to make it different. This one. Here's another Magnolia community and these illustration The shape of the leaf is quite noticeable, and the artists really represented the fact that this planned there's more flour as you can see, that's the aim of botanical illustration. We can explore the shape a little familiarized with the plant, even though is not very captivating picture. But it's good to make a little drawing and see. Now we have on the left to images of magnolia grandiflora at the bottom and the seeds at the top, while on the right we have a magnolia Tullahoma, which is a nation plant like them Bagnoli Campbell. Then I draw a branch and the leaf. Now I want to up their deceits that we can see at the top and then towards the top, we can add a cabin off blossoms and some leaves. This composition seems to be the most interesting one, so it's going to be worth exploring this layout a bit more. I'm going to use a clutch pencil now, as I want to make it clear in the drawer. This is an HB. The black or base Penzler used before was a great for quick sketches, but I normally use a proper graphite pencil for making the actual drawing. I want to make a more detailed drawing now, so I start from the flower. You can see that the pedals are all gently represented with a lot of grace and elegance, which is a TV coughing in botanical illustration. - Now I moved to the upper part, trying to find a good place for the blossoms and leaves. We should always think about the composition as a hole in its balance. - These are the leave, and then we can move towards the bottom part of the composition, making the branch and the leaves. And like in the sketch before we block how the seeds, we can see a reference for the seeds on the right hand side of the screen, which is a very delicate drawing. Now let's say we're happy with these, and I'm going to frame this catch that I'm going to fix him there, like putting these leave on amending the Spohn. Then I start blocking out the dark areas off the drawing. The past. There are in the shade. We do imagine lies coming from the upper left hand corner near the blossom, so generally the right hand side of the plant would be in the shade. I just want to quickly block out this. Now that's optional. It's no essential I use a Marquette reinforce the drawing to better to find the shapes was amusing is a Statler pigment line 0.2 millimeters. You can use the micro, which are quite popular. In fact, they are amazing. As you can see, I'm not just raising the drawing, but I'm actually making some adjustments as well. That's a live that I drove this petrol, trapping some details You can see there. I've just decided to change the drawing and at this larger petal, same thing for the leave. I felt the need to move it a bit. Then I do the brunch. If you take a look at the seeds throwing on the right, you can see that the branch has got some sort off breaking from time to time. And we will do that in painting. Then we are the little not and now the seats part. For the time being, we can only draw the main shapes. We don't want to draw now the actual seeds, but only the shells. So we draw these sort off a tiny leaves shape that they build up towards the top. Now the leaf behind it and the ones on the left inside. It's now time to draw the pistol, and again we have this sort of crown. There are many elements here, and for each of them there's a name, associate ID. If you take a look at the Manali reference on the left, you can see that the central part is formed by the statement at the bottom and the carpal at the top. So we want to be able to see the difference between these two parts. Now I've got the feeling the upper part is too much bending on the left and I want to fix this. So I'm going to make in a man directly using the marker, and you can see that I just moved brunch towards the right and I draw the same yoga in blossom like in the reference on the Left inside and a live. Now I draw a little bad and a new blossom, this time closed and the leaves to complete the drawing. I just want to, at some lines, here and there to at some description. Now again, I want to frame the drawing, so I have a clear view of the composition. Otherwise, it's kind of floating around. It's difficult to say if it works one think is completely dry. I can erase the drawing underneath. It's quite quick to drive, but give it sometimes, otherwise it can bleed and it's not nice. So that's the finish sketch, and I think he works quite well. For the sake of this lesson, I'm going to out some shading effect with some alcohol based marker. There are several brands on the market. The most famous one is probably Pantone. They've been around for their heads, and they're still very goods I'm using. This brand is Corporal Marca I bought here in London a few years ago. I've got three tons of great plus a black marker. Those kinds of markets have two tapes and some off them that even f free. This one in particular, has got square, angular tip and then a normal classic tip. So if we start from the lightest gray, we can start defining some shoulders area. As we said, the light source is coming from the upper left inside the darks. I would be obviously on the right side, so we have to visualize. We have to imagine how the shadows with seats on the flower, - it's how we choose the meat tongue gray and basically we reinforce what we've done with the previous color, but kind of doing less, nesting more shadows into the cavities and also adding some details here and there. - Then , using the darkest, great again, we're going to paint where we think the strongest shatters will be. And this is done. We have an indication about the composition and also about lighting and shadows. In the next lesson, we're going to make the actual drawing.
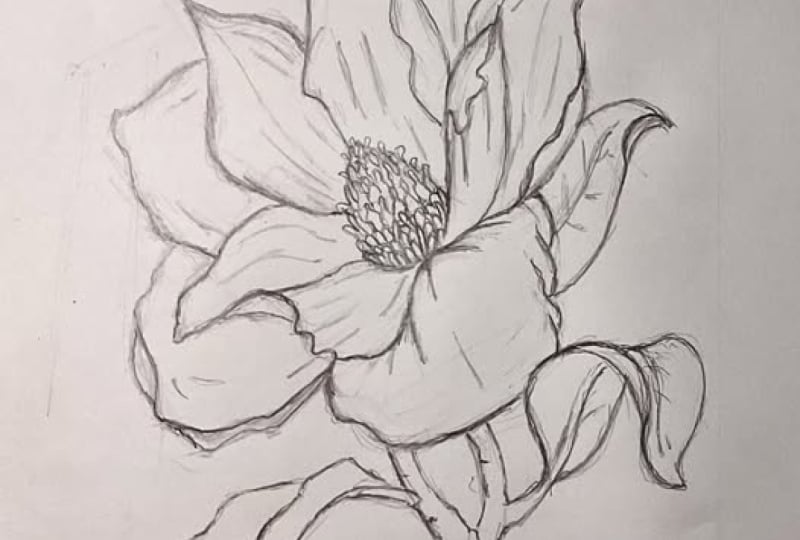
3. Making the drawing: in this lesson, I'm going to show you how to make a free and drawing. I'm going to make the drawing on a four paper, and then I'm going to transfer their onto the panel when you do a freehand draw when you must consider and carefully pond rate how and where you want to position the subject so you want to have a look at the paper and make sure you place the subject in the center. A common mistake is to wrong. Replace your artwork so you're too close to one of the margins off the paper or you don't have enough space because you didn't take any measurement. That's a very common mistake, especially the big Union. So the first question when you about to make a drawing is where is the sent off my drawing and where is the center? Off the paper? This is why I'm likely blocking out the flour. I want to be sure I get the right proportions between the parts, and I also want the plan to be in the center off the paper. So having this guy lines it would make things easier now . I switched to a mechanical pencil and I use a killing, a four paper under my hand. So when I move at Don's much the graphite and stained the pavement ruining the drawing, So that's the reason why I used this piece of paper. I start from this battle, and with this pencil I'm going to detail the drawing. We shall keep him. I will want something gracious, something elegant, So we want the petals twirling obey, kind of gently dancing around the center around the piece, too. - As you can see, when I draw is like that, I make a few lines in order to make one, and this will get the drawing a sort of dynamism. These courses know about drawing and now to make one. But it's important that the lines that you make are pleasant to the eyes, the Linus to move along its path. It has to be light in some cases and nervous and deep in shaded areas, or whether is more tension. So I like to investigate the shape, the curves, the read, um, off the line. So it seems that I meditating at times, but in fact I'm trying to carve the shape out of the paper. - Now this frontal Peto. This can be a big Triki as it's kind of facing your observer, so it's kind of skewed and there's a bit of perspective now . The lower brunch and there's a split there. A not. And then he goes down in some curvature, which gives an elegant look. - Now I live. I'm going over the petal, and I want to represent this left twisting obey. So there's a bit of a need of understanding the shape and our turns. Now the leaf on the other side again, we have one side flip being a bit, and also the edge off believers kind of curving on its way down. Then I do some internal structure. They're called the veins. No, not that lift there. - I'm defining this passable, so these petals are kind of opening up, and then they nest where they are touched to the pistol, which is the centre off the flower. Now, this patterns here and I'm going to art and live there. I'm basically following my sketch in terms off structure by you can see, is no identical. There's a bit of interpretation now . I just want to block out the size of the pistol, so I can they move to the petal? - The flipping gauge? - No , I go back down and defined his area. I dropped the brunch, holding the seats he can see. I add in some curvature to give some dynamism, - and now I'm going to draw every single shell containing the seeds. How have I? It's not my intention to draw the seats themselves. You can see that the artist in the city illustrations wanted to represent them, and I assume they wanted to describe the dynamic off the falling as well. And that's part of the botanical illustration concept to show and describe things. But in our case, maybe we wanted to keep it a bit simpler. - We can perceive the shell cracking, obey opening up, and you can also see the tips. They are kind of splitting. - Now there is a lift, which is kind of embracing the seeds I want to draw. Also, some internal structures like the veins now that aside which is behind the brunch, as you can see, is always good to differentiate and alternate the position and behavior off the elements. So we have a leaf pointing up, the other one going down one in front, one behind. And this is all about it than adding some details to the surface off the brunch. - And now it's time to define the branch and the blossoms that I the top I'm going to start from the structure off the brunch. There's a first split here that goes to the blossom, and then a 2nd 1 that goes to Abad, Right? So I'm going to draw this blossom here we can take the colored reference images a guideline . In theory, this blossom comes from another species is not from a grandiflora, but it doesn't have any specific feature. So I believe that's okay Now the left behind, drawing the mid rib fast, which is the middle line and then the margins. So the body off the leave is called La Mina, or blade. Now some veins slightly moving towards the complexion of destroying. I'm defining the branch. Now, this lift here, - you can see that I'm amending the shave that I've just drawn as it was too long. So I've just changed my mind and come up with another solution. - Now the lift here, which is particularly curved now , the blossom, which is more closed or no as much as open compared to the other one. And this is always because we want to offer a variation now . This last live here, this time behind the blossom at the central part of the World Party school. Stay min. In the upper part, Karpal, we can see they have two different shapes. Statements are longer and thinner, and they crown around the couple's, which are why they're with the curly ear tips. And this is it. The drawing is finished. I'm going to clean up by raising some pencil strokes. You want to be careful about using the razor, because if you used it in a wrong way, you can stay in the paper and the drawing. If you want to fuck, it's on the painting process. Only you can download this drawing as I included it in the materials for this course. In the next lesson, we're going to trace the drawing on the panel
 Maurizio De Angelis, Scientific Illustrator and 3D Modeller