Transcripts
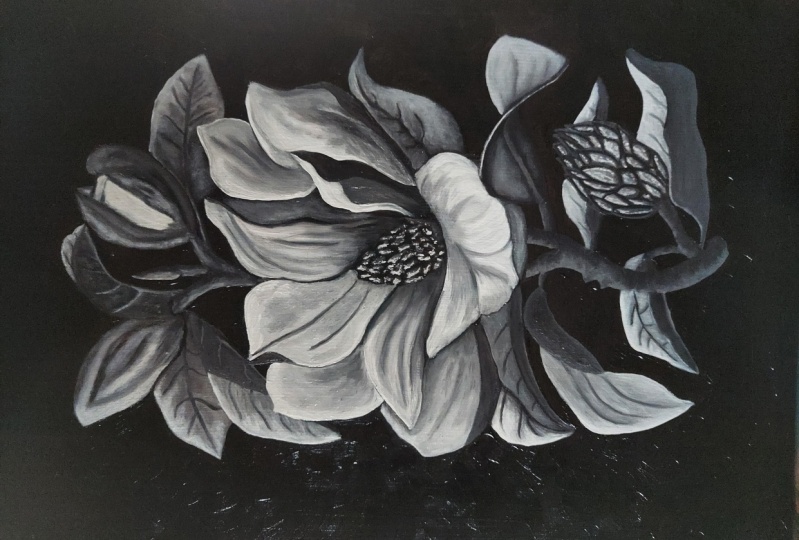
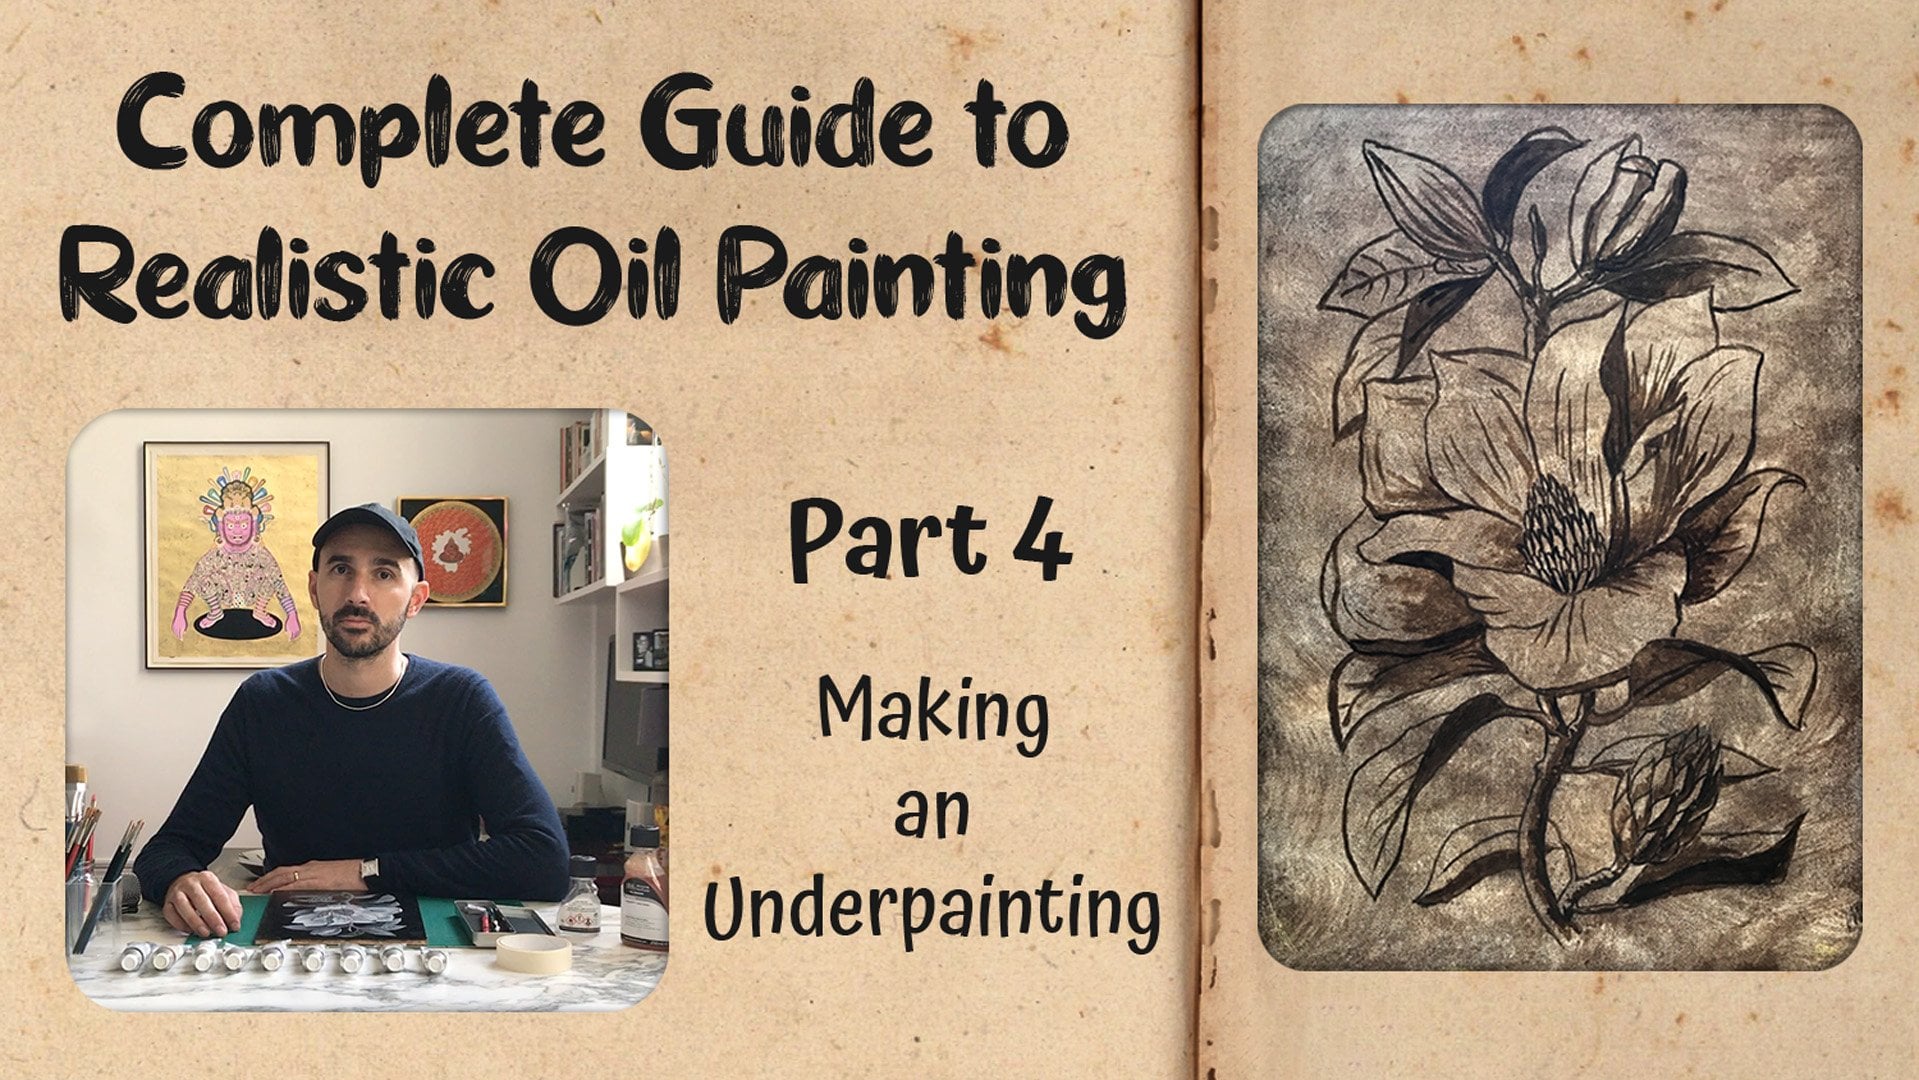
1. Presentation: painting realistically in or it can be very challenging. It's like our Camille baking. You need to know how to proceed step by step. If you want to get a second resort and if you follow my painting method, you would be able to create realistic paintings by learning a simple technique that will stay with you for the rest of your life. My name is Marie today and it is and a monotonous working in London. I'm originally from Italy. I was born in Rome, where I started find out painting, imploring, receiving a very traditional Italian art ification. I've been painting in order for more than 25 years now, and I always concentrated on releasing porches, still life paintings. I created this course to teach you the very basic foundation off realistic oil painting. There are many methods and many techniques out there, but in this course we're going to focus on a very classical technique. You will be able to use it to pay anything you want, as you will learn a proper painting methods. If you take a look at some of my paintings and one there are, I did them is using this method So if you want to know the secret behind this realistic paintings thesis the course for you, I chose in a magnolia branch as the subject for our painting, taking inspiration from some beautiful botanical prints from the past. By the end of the course, you will have a clear understanding or technique used. Be able to create a realistic oil painting and to take the next day on your career path. It's a painter, so let's get going.
2. Grisaille - Branch: in this lesson. We're going to make a crazy. I split the process into parts. Otherwise you would be a very long video. It's up to you if you want to play faster if you want to jump to a different part of the painting. I recorded the whole process So you see exactly the way I do paint. I've got the palate on my left, which is a glass with a gray paper behind. And I've got the under painting here on the left. So what we want to do is to put down some lum black and some titanium white. Now we make some black and white and we tried to get like a Mick tone, but on the darker side, Now we mix it well. - Now we're going to start from the dark areas off the branch. We're going to follow the under painting following the under painting as a guide, we going to use this quite dark shade of gray. - Now the bottom part off beliefs them and now the branch that leads to the seat spot. - I'm not going to talk off then type process as it gets too tiring and boring. Now I think some white and I get a lighter shade of gray using this color, I'm going to paint the brightest side of the brunch are not mixing colors together. I'm just placing them one next to another, like in the first part of the exercise of the previous lesson. You can actually makes them a B if you want, but not too much painting the bright side where the branch splits. - As I mentioned previously, I like to jump here, and they're not your focus too much on one spot on Lee. Now this lift. Now you can see that I'm tapping onto the paint to create additional shading. I used to brush for the black color, and I'm going to define and blend Branch. As you can see, it's more about tapping rather than brushing. - Now , I also want to define this side of the brunch and then keep blending. Basically, we only using two colors of Mick tone in a dark gray, so the towns that we gain between resource from these two colors only now blend the colors a little bit. Now, this stand and again I want to add some disturbance. Some irregularity. Now we can move to the branch at the top. We cannot approach these in the very same way we start from the dark side and we defined the shadows. We're basically funded the under painting now it was which color We start defining the Liza areas at the same time I paid. I also blend the two colors a little bit as before. I want to define the margins with the dark outline and now blend them together the base of the blossom and believe some definition along the butts them. And then I want to art some light touches. When we paying, we should also think about the real shape of the subjects. We're not just covering up canvas. What panel or just making pretty images. What we want to do is to imagine the real thing in this case and brunch. And so we should keep in mind that he has a cylindrical shape where we paid. We won't mentally visualize a branch. The smell of it, the attack tights and session that has got a raft lecture. And we want to translate these feelings into the painting and this is it. This is the kind of level of detail that we are after is not super realistic by it's good enough for our base for agrees. L In the next lesson, we're going to paint the leaves using exactly the same process.
3. Grisaille - Leaves: in this lesson. We're going to paint the leaves in the same way we painted the branches and we have the same two colors that we use before I start from this leaf on the left, and I'm going to cover the bottom part of the blade with a dark gray. - Now I moved to the bottom leave, and again, are you paying the dark side of the blade? Now I do this leaf, and once again I make the bottom side of the blade darker, like in the under painting. That's too much need to talk over these as it's quite a repetitive process. - Now , this live here, so we want to treat all the lives in the same way. By doing that, we're going to be sure that the result would be consistent. - Now , moving towards the top, we made this side of the leaf darker. Now, this lift here, I got this new much going on yet, so it's okay to paying using one color only and make the surface flat now this side of the But we changed Russian color, and we want to paint the leaf meat line, meet lines of cylindrical shapes, and this is why I want to paint them with a different color, because this cylindrical shape would be catching some highlights from somewhere. We do the same for the up leaves, basically, is the same treatment all over now . I forgot this part before, and I also want women's lightly the shape. Now I want to make some additional color and grabbing some white and black. I want to get the same shade of gray. Sometimes you see me kind of rolling the tip off the brush. That's because I want one. Load the paint now with the lighter gray, we're going to pay in the upper part off the blade. So there's a clear distinction between the top and the bottom leave. I kind of want to paint around the veins. I want to keep them untouched. For the time being, I can move to the other, leave same treatment. It is before I just want to leave some parts on done. Now this parts again, there's no much need to talk over. This process is basically the same for each leave. - We keep the veins and touched. Now they live behind the seats. - This leaf is quite lit, he has got just a tiny part in the shade, which I actually forgot to paint. I want to quickly make this flip margin darker. Now I'm going to paint this leaf margin here. It's a bit of a tricky shape. The way that leaf turns and flips a bit makes it a bit challenging to paint. - Now again, leaf, which is at the bottom off the seeds. - I want to move to D at believes. I start from this one. There will get a lot of light as it's phasing doors the light source than this bit here - that this live, which is quite late. We want to keep the veins visible because we want to use a different tone for them so we can pay the rest With this color now moving to this lift here, you can see in the under painting days a cast, a shadow from the blossom. We want to use a darker gray for that part. - No , I make more gray Ni paying. The cast shadow have just mentioned going back down with a dark and grey. I'm going to roughly define some veins and shadows, going to sketch out some veins here for the time being is just for reference on Lee. I just want to quickly understand where Baines are. Then Deters would be out the later on during glazing. - Same thing for the upper part, doing the midline in veins. Now I change color and I want to define the blade edge and then against some veins work. Here we go, negative, we paying the veins with the lighter color as we have the body off the leaf dark, some light added to the but and now filling the remaining empty spaces. So we basically have still two colors and we play we both of them. - Now I want to clean up the edges a little bit, adding the meat line and now the first lift we worked on. Obviously, you can start and finish every single leaf before moving to another one. It's just my way of keeping the quality and treatment the same throughout the painting. Now that I feel all the empty spaces, I want to clean up some bits. Now we want to blend well. We've done so far using around dome brush, as we've seen in the painting exercise. A brush like this will do the job following the same technique that we learned during the exercise. We want to gently tap on our fresh painting on the wet painting, cleaning up the brush from time to time as I'm doing now . The leave. Once you get familiar with this process, you understand our fresh are wet. Colors are on the difference in blending them. For example, the paint off the branches, slightly drier than the paint off, believes the blending process is slightly different. In fact, another technique is to pay normally, Then leave the painting to settle for about 30 minutes or an hour and then blend. Using this technique, you might find that these timing changes from summer to winter has obviously during summer . Callous tend to dry quicker. What I want now at colors were blended together. I'm after a nice, flat, opaque layer off paint, so this is no about adding many desires, but we only after a nice shaded black and white version with the correct illumination. Now I blend the midline, and I emerged it with the rest of the leaf. Same thing for the veins are now blending this margin here and the veins in sight now moving to the upper part of the painting the branch again. And believe again. You might find the paint of believes to be a be more wet compared to the brunch. So the way the pain response to blend it would be is lively. Different Now the leave on the other side. I want to ease off the veins and blend them into the blood. - This lift now lovely , these young lift here now with the dark gray. I'm going to detail what we've done so far. We're going to clean up the margins and at some details it's not too different from what we've done before. But after the blending process, some colors might have bled. So we want to out from definition like in this case, is not just about defining but amending. As I realized that shape wasn't working quite well. And then I carry on with this process for the remaining elements now moving to the upper part of the painting. Same thing cleaning up, defining and adding the hills. Now the last part of this process is to what some lights we grab some white and we make the grey shades lighter, as we did before we tapping over the painting and releasing some white paint we only want to at some splash of light. Also known a speculum light. We have to make an assumption and imagine what lie with four now towards the top. Same thing they are leave their more eliminated in others. And there are also areas that are in the shade where there won't be too much light. - Now blending again with the cleans, more mocked brush. We want to ease off the white calla. Imagine into the main body. Remember to clean the brush from time to time. - Now go back down and do the same. - Now the Browns. - I just realized that I missed the's two lives here. I'm going to speed up the videos. We already gone through those steps right in the next lesson, we're going to paint the blossoms and the seeds.
4. Grisaille - Blossoms and Seeds: after the branches and the leaves were going to pay. Now the blossoms and the seeds, how we start painting from the blossom on the left, the outside shell of the blossom, a particularly dark in color. This harder shell protects the flower inside, which will be opening when the right season arrives. Using this color, we're going to pay in the lower part blossoms of cylindrical oval shapes, so we want to be able to recreate these. - Now we are a lighter tone and as well for the other side as like this. Coming from the upper left inside you makes sense and the cheap off the blossom is more illuminated and it gets darker at his base. As you can see, it can also blending. At the same time, - I want to define this line with the darker grey. Now this side of the opening, we can now approach the Adebola, assuming the very same way, starting from the darker tone. Now we define this side of the blossom that clearly it's in the shade as he's not facing the light source. We want to keep the flower inside and touch for the time being, as it will be the same color of the flower, so well, paying the flower in the next chapter. We will pay in this part as well now under lighter tone and blend it in. As you can see, you can get the same blending effect you would get with a dry brush. Even with a wet brush, it's just about to understand our colors. Behave, you might notice that I plays a lighter strike were supposed to be dark that is given by reflected light coming from the environment surrounding the element or from the other elements next to it. Adding these deters increased the level of realism in a painting. - Now the in the part of the shell and then some disturbance over the surface, as in next had nothing's really too polished. Now, quickly, this little about here, - we're going to define this area mawr later on. Now, with the lighter gray, we're going to at some texture over the surface and break the uniformity off the shading. We goes lively, lighter. We starts. Try eight ing the blossom. We're going to out this lines. Here we invest kala for the veins and then we blend. So we get a dry and clean brush, and we start blending as we did before, very gently. We don't want to move to drug the color, but just interrupt with superficial layer. And now the seeds. This is a more complicated shape, but as we're going to break down, these into parts will see there is more achievable for this process. We want to follow on the painting. So we're going to plays are dark and grey in the same position off the brown on the nave. So you define the shadow and then you move to another seeds. So for the time being, this is what we need to do. And then we carry on Until we did, the more. - Now we changed brush, and we want to use a lighter grey. - Now , with this color, we want to pay in the other side of each individual seed. - So if we pay particularly attention to these and we keep it as clean as possible, meaning that we paying each individual seed consistently, we'll end up having a correct shape in terms off lighting and volume. Generally speaking, if you have to pay in something that looks difficult, try to break it down into parts and focus only on those parts is very easy to get overwhelmed, especially the beginning, and say, Oh no, I can't do that But this is not necessarily true. Painting is about practice. Painting is one of those things that you always get better at, like playing an instrument or performing a physical exercise. Our brain and our body of consistently train our problem to evolve, and these are price to painting as well. Now we approaching the seeds that are in the shade, so we take the other brush with the darker color. We quickly defined the seeds that we painted and fix some small empty area. Now we paying the seeds here, living the external Sadam painted as we did for the veins and midline where we painted the leaves for those areas. We want to invert and use a Liza tone to simulate some reflected lights, - then adding some leaders he in there now with the dark color again, we want to define and clean up our seeds, - and it's now time for blending. Using a clean, dry brush, we going to tap over the paint, cleaning up or even changing brush from time to time. - I just want to define these aerial. It'll be more than it gets clear. - Lastly , I want to at some highlights some speculum lights, meaning like reflections as he gives a sense of volume in shape. And this is it. Blossoms, butts and seeds are now done, and what I got is consistent with what has been painted before in terms of rendering and look in the next lesson we're going to pay in the flower and the pistol.
5. Grisaille - Flowers: in this lesson, we're going to pay in the flower and the pistol. If we take a look at some photos of magnolia flowers, we see that the other side of the patterns are darker and they inside off this pure white. For this prison, I'm not going to use the color palette we use for the other elements because we need to go much Liza for the flower. I put down some titanium white and also some lamb black. So we still have exactly the same calluses before, right? They some over exposure on the pilot side. But what I want to do is to get two colors like before. But this time they have to be lies. Her You can see better now, even if we low with the brightness of our painting, you can see now there's a difference in town between the white from the soup and the why that we're going to use. So we have a shade of white on the left, in a shade of light gray on the right. We want to mix it well. I want to go slightly darker, adding some black and make the light a grade darker as Well, thanks. Time to use a liquid original, which is an oil medium. The queen is probably the most famous medium for oil on the market. It has been around for their hits and is very good. The queen is a quick drying resin that can also improves. Glossy nous are going to use Lee Quinn in this part off the painting because titanium white can take days for drying properly. Why would liquidity will take about a day as the flowers mainly white, and we're going to be using a fixed layer off paint? The queen can also really help make their Titanic to be more flexible to be more fluid. So what I do is to play some liquid next to my colors on the palette and adding some of it in the mix. Now, with a clean brush, I get some darker grey. I'm going to start painting from this Patil here. You can see there's a lot of difference in time between the pestle and what we painted before, and this is what we want as the flowers, the most luminous thing in our composition. In fact, if we take the photos we have off the flowers and the saturated meaning that we make them black and white. You can see what I'm saying. That the flower is the most white element. Now I'm painting just the upper parts of the petals as the lower part would be surprisingly brighter. Here, for example, I defined the curve, a shelf, the pestle and then paying the tip. No, I'm painting the out that part of the petal again, only the upper parts. You can see that this petrol turns and flips very graciously. So we want to be sure to keep this movement. And we want to keep our focus on the shape are now extending some strike action towards the base. Also do the same for this special and now moved to this lower passel. I start from the strike fashion this time and it is probably the part which is more illuminated. So basically for the branches, leaves, blossoms and seeds We started from a meat tone that we went darker and then went lies her and we're going to do exactly the same for the flower. The differences that we using just lies is total. So in this case, this shade of gray is going to be our meat tone. - Now this patchwork here, there's a bit of a fleet margin. Now painting the inside of the Peschel, you can see the lower part of Depended A some cast shadow the special here. - Now I go back down to this, powering the front, and now it's a matter to jump here and there and at some details we still using one color only. But we don't want to flood the entire flower with this color. - Now it's time to create a darker gray. So again we make some black and white and some liquid in to make the imposter drying quicker and mix it well together. - Now , with this darker color, we're going to paint the middle part of the petals. It was going to join in with the lighter parts. - I just want to amend the shape of the paso. Here you can see there's a bit of a calf, - and then Ellen gating the strike action off the pedal, enjoining in now that pattern in the front defining this area, - defining also along the peaceful And now this pattern. Here there's a bit of a shadow there because of the flip tip now kind of filling the empty spaces here and there. - As I mentioned before, my way of paintings jumping from one spot to another is just my way of painting. It helps me conceive the composition to better understand what I have to do. And this is because I don't want to focus on one spot only, but work on their painting as a whole gradually and even be increasing the level of detest throughout. - No , I got back to the light of great and once again joining the two colors that I feel in this part and also this little bit now. Painting dispatcher Here I am painting with this quick short brush strokes as he creates some texture. - No , I take some liquid and mix it with the widest color. I'm going to paint in ending this bright white again, creating some striations, some texture. We don't want anything too polished now saying thing for the pattern in the front. We create some shades with this color and now some bits here in there. Our goal is to differentiate the shapes and create some dynamism. Even if we just working in black and white and I wanted the speculum light here. I'm painting this part Preiser because I want to simulate the reflected light that come from the other white elements. - Now I'm cleaning up this margin here and now I go back to the darkest great we have in our palate. They were going to pay in the air at where we think shadows will be like, for example, Here. Now I think some brighter tones there. And then this path there. - And now we're going to define the margins off the pedals and do some clean up. Now we've got the outer side of the pedals to paint in some magnolia. Spacious. The outer side is darker compared to the inside counterparts. We're not going to paint these with the dark gray. But if we then change our mind, we can always modify the color and make it brighter. Oil paint have this power that nothing's really remedial. Then we moved to this Patil here. - I want to make this side also darker. You can actually see what I was saying before about changing or amending some parts. You can see that the Cal is so opaque that we cannot see through it now I want to go even darker and paying the base of this petal. I just want to at some lamb, black and some additionally, Quinn and I create an additional shade of dark gray. Now I paint in using this new dark color we ever not pallets. I paint this flip side all today's and refining this Peschel. Now I want to rotate my painting as he makes it easier to paint some areas I want to see here. The painting from falling with a piece of type. And I'm now going to continue with this color moving to the special. - Some cleanup also here want to define the shape of the pestle, These parts again. I defined the edge, the margin off the petrol. - Now these and then this out a bit here, simply making it darker now cleaning up along the margin. Here I can place the painting upside down, and I want to focus on defining and dividing. Actually, the petals like this Now the pistol, the pistol, as we said before, was formed by to pass the statements at the base and the carpets at the top. As for the seeds, we need to approach these with great attention. We don't want anything messy, but everything must be painted and defined properly. I start from the meat town, adding Summly queen to make the color more fluid. And I simply start by painting the central part of each statements. We don't have much space to pain. Just one side. Like for the seeds. I want to skip the base off these sort off filaments. - So we're going to paint just the up part off each elements first now with speech color and with the star gray, we're going to paint the base. So we have a dark grey at the base and a light gray at the tips and he makes sense actually doing something like that. - We slightly moved towards the top. And if you work with a brush with a good tip, you can really control pretty well the level off the easels. - We are no way up. If the color I guess dry. You can cut summly Quinn, but not do much as you still want a pretty much opaque color, and liquid intends to water the impasse toe. So you want that just enough to have the color a bit more runny are now adding some highlights had the tips. We can still see younger painting between the statements and the carpools. Now, for a change, we're going to paint the flower inside the blossoms. Then I'm sorry there has been a problem with the camera. I lost this part of the video, but it's not the end of the world. I basically approached these other blossom in the same way as the rest, so there's no secret behind it. I'm grabbing some dark gray. I actually make that darker, adding some Quinn and I got some details. I want to reinforce some parts, especially the outer petal. I can see it's not visible enough, so I want to at some lum black to make it darker. And no, I can see it also defining this area and now blending. So we take our dry around brush and we're going to blend the petals. Actually, I think of my neither is likely bigger brush, but the concept stays the same. I want to brush over the painted surface and mix and blend brushstrokes until they disappear. Now here, when there's a lot of tight honey, why it gets a bit thick and sticky and Sometimes it's be of drugging, but we can know what the brush at this point. Otherwise, we would get a totally different effect. Now we clean the brush and we carry on blending. - We also want to blend over the margins. As again, the calor is quite fix, so you won't be dragged away too much after the blending of one. Once again, neither the shape of the pills a little be more like. For example, here it's quite evident what cleaning up means and now the final touches on the pistol with the dark color. I'm going to outline this diamond first and then the car pills and now defined the but and the blossoms. Now the very last step is to at some highlights, so I'll do the seats first than the leaves. You should concede that that the paint is still very wet as I've done this grease I. Over the course of one day, I split the parts into lessons, but it's a one day session, and so the colors are still wet, still fresh. I wouldn't be able to blend the white color if the underneath layer it was dry. Now the other side and now the branch having some highlights, some reflections and lastly, some final blending. - And this is it. The crease. I is finally completed. In the next lesson, we're going to paint the base for our background.
6. Making the Background: in this lesson, we're going to make a black background using the same color we used for the crazy, the lamb, black and some liquid to speed up the drying process and to make the calla more fluid. It's not at all common in botanical art having a dark background, but I wanted to create something different, something that has an impact. And I'm confident that when we increase the level of realism, the black background would be idea for the subject to pop up to stand out. Normally, black backgrounds are no achieved. We bled colors straight out from the shoe boobs. The color black can be achieved by mixing basically three colors brown, blue and red. And for our final painting, it is exactly what would be doing. But for the time being, we can use a not very thick layer off Lum Black as a base. The job would be about conjuring, arm, acknowledge, plant with around brash with a nice tip and then feel the background. I'll speed up the video, which is quite long otherwise, because it's a straightforward process and there's no much need to talk over it. You have the option to slow down the video, but again, it is self explanatory, - and this is it. We now have arm acknowledge brunch set against a black background. In the next lesson are we refined that desire.
 Maurizio De Angelis, Scientific Illustrator and 3D Modeller