Transcripts
1. Introduction to the course: Color palettes for abstracts, the mystery of color schemes
explained by Doris shy. Welcome to a two-part
course on color schemes. I have a degree in
fine arts and a master's in visual
art education. I loved teaching art. I love art. I want to share my
love of art with you. We will learn new skills while
having fun in this course, we will learn color
theory basics. We will learn a variety of classic color combinations and examples on how to
use these colors. We're going to have fun with
these color combinations. We will learn about
the color wheel and then we will get
more complicated. We will go to secondary
colors and tertiary colors, warm and cool colors. We will learn about
shades, tints, and tone. We will learn about complimentary colors,
analogous colors. Each of these videos has a painting that goes
with the color scheme. We're going to look at exciting and quite
neutral color schemes. We have color
schemes using tints, we have color schemes
using shades. We have color schemes
using high key colors. We have color schemes
using tertiary colors. And more, recover each of
these compositions and color schemes and you shall learn something with each one. So join me for my course, color palettes for abstracts. The mystery of color schemes
explained by Doris shop.
2. Materials that you may need: Materials that you will need. For this course. You'll need acrylic
paint, red, yellow, blue, black, white, and some
neutral colors if you want. You'll need paint brushes are one inch flat or
a two-inch flat. Depending on the size of canvas or paper
that you will use. Painting surfaces
of your choice. You can choose between
Canvas, watercolor, paper, illustration
boards. It's up to you. Water container to
wash your brushes, rags to clean up, plastic cover for your table. If you want to bring
anything else. For these exercises,
you're welcome to do so. Get your materials now and we'll see you in
the next lesson.
3. An explanation of how the course is structured: Hi again. What we're going to do
first is make a plan. This is my imaginary counters. I want to do is use a frame
and frame composition. Framing frame is rectangles
that overlap each other. And these rectangles are different sizes,
different colors. And I vary them with every different
exercise that I will do. They go like this. I can either fill the canvas
or leave some spaces. Some can be small, can be large. It will change. I might want some
that just stick out. I might want some that
are larger and skinny. I might want some
really small ones. For example, this one I might
want to put just like this. In fact, that would make a good composition because here I have an
instant focal point. I have a small against
the large element. All I need is to do a little bit of
variation on the rest. So it looks interesting. I have two of these small ones. I probably want the, here's a third one. I probably want to
repeat that somewhere. Maybe I'll do it this way. Because I have this I
have that sticks out. I need another one. Here we go. So my instant focal point, I think might be a light
color against a dark color. I've decided that with this
series that I'm going to do, when I show you all these
different color combinations, I'll use the same framing
frame composition. I'll try to do
something very similar. Not the same, but similar. This could be dark. I'm going to choose three areas. We're going to put dark, maybe one dark gray here. I will have a dark. I will have white areas. I will just leave. I will have mediums. These medium areas could
be different colors, so I couldn't have one color that I
represent with stripes. I have these color
in different areas. I have one color here. I want a second color. I make the stripes
go the other way. I want to repeat that. Maybe right here. Then I want that third color. I could do this way. I could have this 1
third color. This one. The colors might be
red, yellow, blue. This is what I want to do, something very similar
for this whole series or color palettes that I'm
going to be showing you. I also want some dark lines. So I went to put lines
that maybe go like this. Maybe the intersect. I might want white lines. So I'll want blinds too. I might want lines right here necessarily to
maybe one short, 11 longer, one,
accumulate ones here. One long, one short. I want to keep the
numbers on 12345, so that is odd. I have several goals
for this course. I want to use a foramen
frame composition. I want use white. I want to use darks, which is going to be a black. I'll use several colors
depending on the color palette. I will use lines like this. This is part of the goal. When you create a series or
try out different exercises, make a sketch
first, make a plan. You may not stick to the plan, but at least in your head you're clear about
what you wanted to do and how you're going
to place things on your Canvas or your paper. Make a plan now. And I'll see you in
the next section.
4. Primary colours- Great start with boldness: The color wheel. Why use a color wheel? Because it really helps. It's a great assistant
to any kind of painting. The color wheel will help you in your color combination choices. The color wheel makes
choices easier. The color wheel avoids errors, but also the color
wheel gives you ideas. A simple color wheel
consists of 12 color. Hughes. Hughes is
another word for colors. All colors come from some
combination of primary colors. The three primary colors
are red, yellow, and blue. These three colors
are essentially the parents to all
the other colors. Here they are primary colors. So let's watch a painting that shows how to paint
with primary colors. Now, I started with
yellow on this one is a bit of sunlight peeking
through from my window. I love natural light
that really helps me decide what the colors
are really like. Now, all I'm doing this
is a frame in-frame painting or a grid painting
as they call them. It's all rectangular shapes
and then I combine them. So now I'm adding blue. As I said before,
With these paintings, what I'm doing is
I'm trying to just keep the same composition and try different color
combinations with the same composition to
see which one works best. With that type of composition. You can pick a different type
of composition if you like. When you're doing
your own projects. This is primary colors. And with every painting, what I'm going to do is add marks with block and
marks with white. I'm, sometimes I will
mix the color with white or black because there'll
be part of the exercise. But for the most part, I'm using the black
and white just as another accident that I will use to complete the painting. Now I've decided that
I want that black mark larger and I want it to be
one of my focal points, perhaps the focal point. So all the elements
are going to go towards that
particular rectangle. The reds and the yellow
all lead towards there. And these white and
black lines as well. Why I chose that black element is because it's right
next to a bright yellow. Light against dark
creates a focal point. Here I have an
automatic focal point. What I'm trying to
do is guide my eye around the painting and also
towards the focal point. When I'm done, I stop. I have to be honest, I think I might tweak
this one later, but I want you to try it now. And once you to
try primary colors only in black and white. And I'll see you in
the next section.
5. Combining secondary colors: We're going to go from primary
colors, secondary colors. So when you mix a primary color, red and blue, and
you get purple. Purple is a secondary color. So you also have
blue and yellow, and that leads to green, red, and yellow, orange. So when you create a painting
with secondary colors, you get a whole different look. So let's watch the video of the painting with the
secondary colors. Now the three basic colors are
orange, green, and purple. And I'm just going
to start by making random marks in
each composition. I'm going to try to repeat the similar
composition to before, but it's almost impossible
to do everything the same. But I will aim for similar. So I'm adding the second secondary
color and that's green. And remember, you need
one element to dominate. So you need the
orange to be more powerful than the
green or the purple. To be more powerful. You need one of them
to be more powerful, you need to do is choose which one and
make that one more, just more of the,
more of that color. And it becomes the
dominant color. Now I'm adding lines and I've decided to do
this ahead of time, but I will continue to tweak. Little later. I will
change some colors. I will add maybe other marks. I might add some white. And each time I will do
something different. So I'm using a brush. I'm not using the
credit card this time. I'm just blocking in some of the colors
where I want them. When I'm ready,
I'm going to just add some more with
the credit card. Now, notice that I'm taking
out some of the orange. I'm adding some more
block Y by doing that. Well, I want one element
to be the focal point. And it didn't work for that rectangle
before to be orange. And it doesn't work for the
rectangle here to be purple. So I'm switching it around. That's the beauty of acrylic. You can change things
when you've decided that maybe that's just
not the right place. Just as here, I'm
adding more green and changing the arrangement
of the colors. I want one dominant color and won't want to be more
important than the rest. And I want the eye to lead to
that particular rectangle. That's why I'm doing this. I'm tweaking and you can
take your time to do this. You don't have to
do this overnight. You can do this over a period of several nights or evenings
depending on our days, depending on when you paint. Now normally what I do
is I wait in-between colors to add more paint in. Some of my paint is
leaking from the blacks, leaking into the
colored rectangles. Normally what I would
do is just let things dry in between each color and then I never
had that problem. Now I'm using my
credit card and I'm tweaking the look
of the painting. Now, I want to turn this from an exercise into a painting. How do I do that? Well, I have to arrange the
elements so they're visually pleasing and it makes
a good painting. So I pick a focal spot and I lead my eye towards
those elements. That's partly why I changed the colors of the
rectangles earlier. And that's how I'm arranging
these white lines. That's what I think about when I choose where to put these lines. So what I want you to do now
is try out secondary colors, and then we'll see you
in the next section.
6. Tertiary colours are three times the charm. : We're going to go from
secondary colors, green, orange, and purple. And we're going to go
to tertiary colors. Tertiary colors are the colors that come from mixing one of the primary colors with the one of the nearest
secondary colors. So what you get is red plus
orange is red, orange, yellow plus orange is yellow, orange, yellow plus green, yellow, green, blue
and green, blue-green, blue, purple, blue,
purple, red, and purple. You get red, purple. So these are the colors
that you end up with. These are great
colors to work with. Let's watch the
video on how to use some of these colors
in a painting. I'm starting with
a yellow green. It looks very yellow
in this video, but it has a tinge of
green, yellow, green. And then I'm going to
add a light green. I want variations on this green, so more colors you use that are closer to each
other in value, the more harmonious
your painting will be. So as I add yellow, green, I think of where I place
these elements so that the kind of create an ax
or they create a tea, or they lead to
the main element. Here I have a darker green. And that's one of the colors
that go with the green. So I have very light green, which looks like yellow here, and the medium green, and then a darker green
and a darker one yet. And I want a lot of variety. So I want to create
some colors that really go well together and
then add a contrasting one, which is purple in this case. So I add purple and I vary
the size of the rectangles, and I vary the shape
of the rectangles. Then I add some of
my black lines. I will add some more later. My brush isn't doing a very
good job with these lines, so I will need to tune them
up with a credit card. Sorry about my hand. It keeps getting in the way. I speed it up this video. So you actually, you
see how I did this, but much more quickly. So now I'm adding
my dark rectangles. And remember that I want
to space them just like the colors so that the lead my eye towards the focal point. So I carefully
choose each element. I've speeded up
the video and here we have my elements
with my credit card. So I've added some. Here we are. The elements lead towards the dark rectangle that's in contrast to the
very light yellow, creating an instant focal point. So try this now and we'll
see you in the next section.
7. Complementary colours- muted and popular: Now we're going to talk
about complimentary colors. Those are the colors directly opposite each other
on the color wheel. Examples of complimentary
combinations are red and green. Christmas colors,
blue and orange. Yellow green and red, purple, red, orange
and blue-green. Here's a hint. You don't use all
those colors equally. One color should dominate in the other to support our contrast. Sometimes you might just use two colors like blue and orange, or a variation of different
oranges and some blue variation of some blues
and some orange and so on. Let's watch the video for an example of how to use
complementary colors. For this example, I've chosen
to use yellow and purple. Again, it's just a
matter of blocking in. These are two colors that
work really well together. They just make everything
work really well. For example, I find
that the yellow really pops when it's next to purple. It just complimentary
colors just are great combo to use
a lot of the time. But then you'll find
your own preferences. Maybe you'll find you only like certain
complementary colors are. You'll find that you don't like complimentary colors at all. You'd like primary, try out all these color
combinations and you'll find which one works for you and your tastes and your style
that you're working with. This style that I'm
showing you now may not be your style and you
have to consider that. That's okay. You will develop
your own style here. This is going to be a dark
against light focal points. So the yellow is
against the dark. And the purple kind of leads my eye towards the
yellow and the dark. And all these lines
that I'm making also lead to the focal point. Every time I say the same thing, you're there to guide
your eye towards a central, more interesting spot. This is your turn. Now, see what you can do
with complimentary colors.
8. Monochrome -One colour does it all: We're going to leave high
key and go to monochrome, which is almost the opposite. This is where you can
take a color and then you can dilute it until it gets thinner and
thinner and thinner. Or it's alittle a
bit like a tint. You can add white or
any other color to it, but you stay within the color
family that you have there. Monochrome color combination is different variations
of a single hue. That's a single color. You can add white, black, or any other color
to vary the hue. For example, dark blue,
slightly lighter blue, light blue, like
the example we will see in this coming video. So let's watch the video. So in this case, I started off with
the lighter color. I took a brown color
and I diluted it. This is as diluted
as I could get it. And it's almost
like an off-white. I'm starting with that, and then I start with my second color is
the second value. I had it all organized. I had it all on a large pallet. I had the dark value, I had lighter, several
lighter values. And then I was all set up. So this painting is going
to be very quick that way. Light mediums and darks. So every painting should have
a light medium and dark. And here I have a little
more of a reddish color. This is the original color. I added different elements just to create
those other colors. So here I have a larger one. So this red is a beautiful
burnt sienna ear. I'm just adding the lines. I have also added several
variations on the color. So again, this is all
part of monochrome. You just take one color and
change it as much as you can. Now, I'm moving to the step away from mixing
color and monochrome. And I'm moving to the
step of painting. So I'm painting, I'm
creating the painting now. I'm working on the composition. It comes to a point.
You need to choose the composition over the color. So it's more important to create message or to create
a good focal point. I'm area of interests
than it is anything else. Now for the credit
card, I've added block, I'm adding some white and
I'm creating a painting. I added the black
with the brush tool. This is the white is the only part that I'm
adding with the credit card. It I loved the way
it adds the paint. It's a nice, strong line and it's a little
bit uneven sometimes. And I liked the unevenness. Sometimes I have
trouble with the brush creating two fat align, but in this case, it's working. So it does work in every case, it depends how delicate
you want to get. So I want some of these lines to lead towards this
dark spot that's against very light version of the color and
the original color. So that's the focal point. It's your turn now, go create a monochrome painting. Mix all your colors
I had of time. It really helps when
you start painting. Change it up enough times
that it's interesting. Do this now and we'll see
you in the next section.
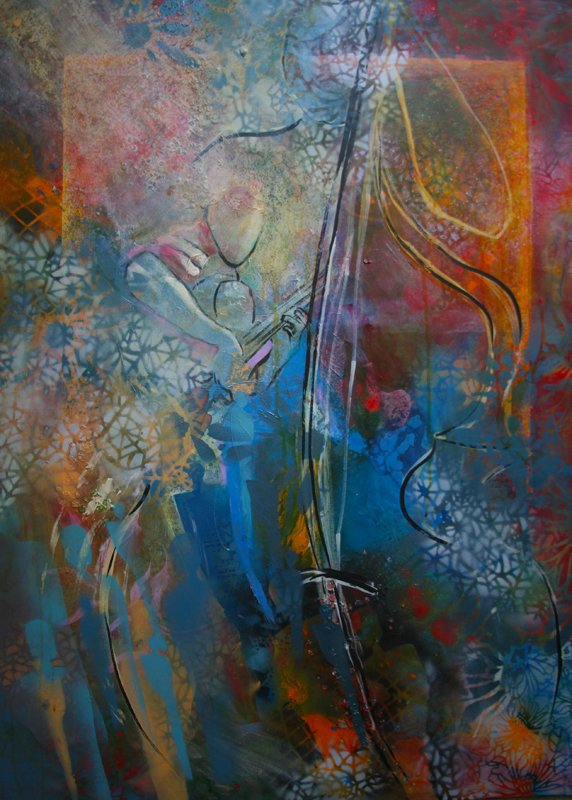
9. Analogous -similar colours that get along really well: Now we're going to move from complimentary colors,
analogous colors. Analogous colors
are colors that are side by side on the color wheel. Here are some examples, violet, blue and teal, red
Fuchsia and purple. Red, orange and yellow, blue, green, and purple. One color should dominate in the other two
support or contrast. Keep that in mind. Let's watch the video related to analogous colors for things
Gremio, I've chosen purple. You've probably guessed I like purple because I use it a lot. And I'm just blocking in. And I will add a
second color, green. So I'm going to be
working with green, purple, and a bluish color. It's more like a teal, but it's a more neutral blue. And these are colors
I love working with. I often work with these colors when I work in my own work. Again, what you're
trying to do is create a balance so you see which one, which color is
going to take over. Right now, kinda looks like they're all pretty
even and I have to decide which one I'm
going to that dominate. So I'm going to add my lines that are related
to my composition. Then I will decide how I'm
going to emphasize each one. Now this is something
you can do on your own. You can block in the
colors and then the side, which way you're going to go
for emphasizing the color, the beauty of acrylic
is you let it dry and then you can paint over
it and it's no big deal. It covers really easily. That's one of the things I
love about acrylic paint. If you're working
with watercolor, it's a different thing. If you have to plan ahead, it's really hard to change the
color once you've started. Now I'm adding the white line. And remember your planning
that white line so that it emphasizes and leads the eye
towards the focal point. Have you figured out where the focal point is
gonna be on this one? I've switched back to the black
line and I'm adding more. This composition is
getting really complex, but I kinda like it. Not all compositions really work well as simple
compositions. Some are better
with their complex, some are better if
they're simple. So with this one, I'm thinking complex wins. Everything is
different every time. So now I'm trying to
balance the darks, these darks that
I'm going to just tweak so that my eye
stays within the canvas. What I'm going to do is just
tweak these darks so that my eye is led towards
the focal point, which is a dark
against the light, which seems to be the theme of this composition as I'm
working through it. Okay, Now it's your turn. See what you can do with this combination
of colors or any of the other analogous colors
that you might prefer.
10. Shades- darken things up with class: We go from warm, cool colors, different hues and often
elicit different feelings. For example, red is
known for excitement, danger, energy, courage,
strength, anger. Orange is known for
creativity, enthusiasm, health, wealth and happiness, and encouragement and balance. Yellow is known for
sunshine, hope, optimism, light
positivity and freshness. Green for health, nature, renewal, generosity,
freshness and environment. Blue for freedom, trust, expansiveness, dependability,
faith and inspiration. Purple for royalty, luxury, power, pride,
creativity and mystery. Warm colors are usually
associated with energy and excitement
and passion, while cool colors are
meant to calm and relaxed. Maybe that's why I
like blue so much. In this next section, what we're going to do is
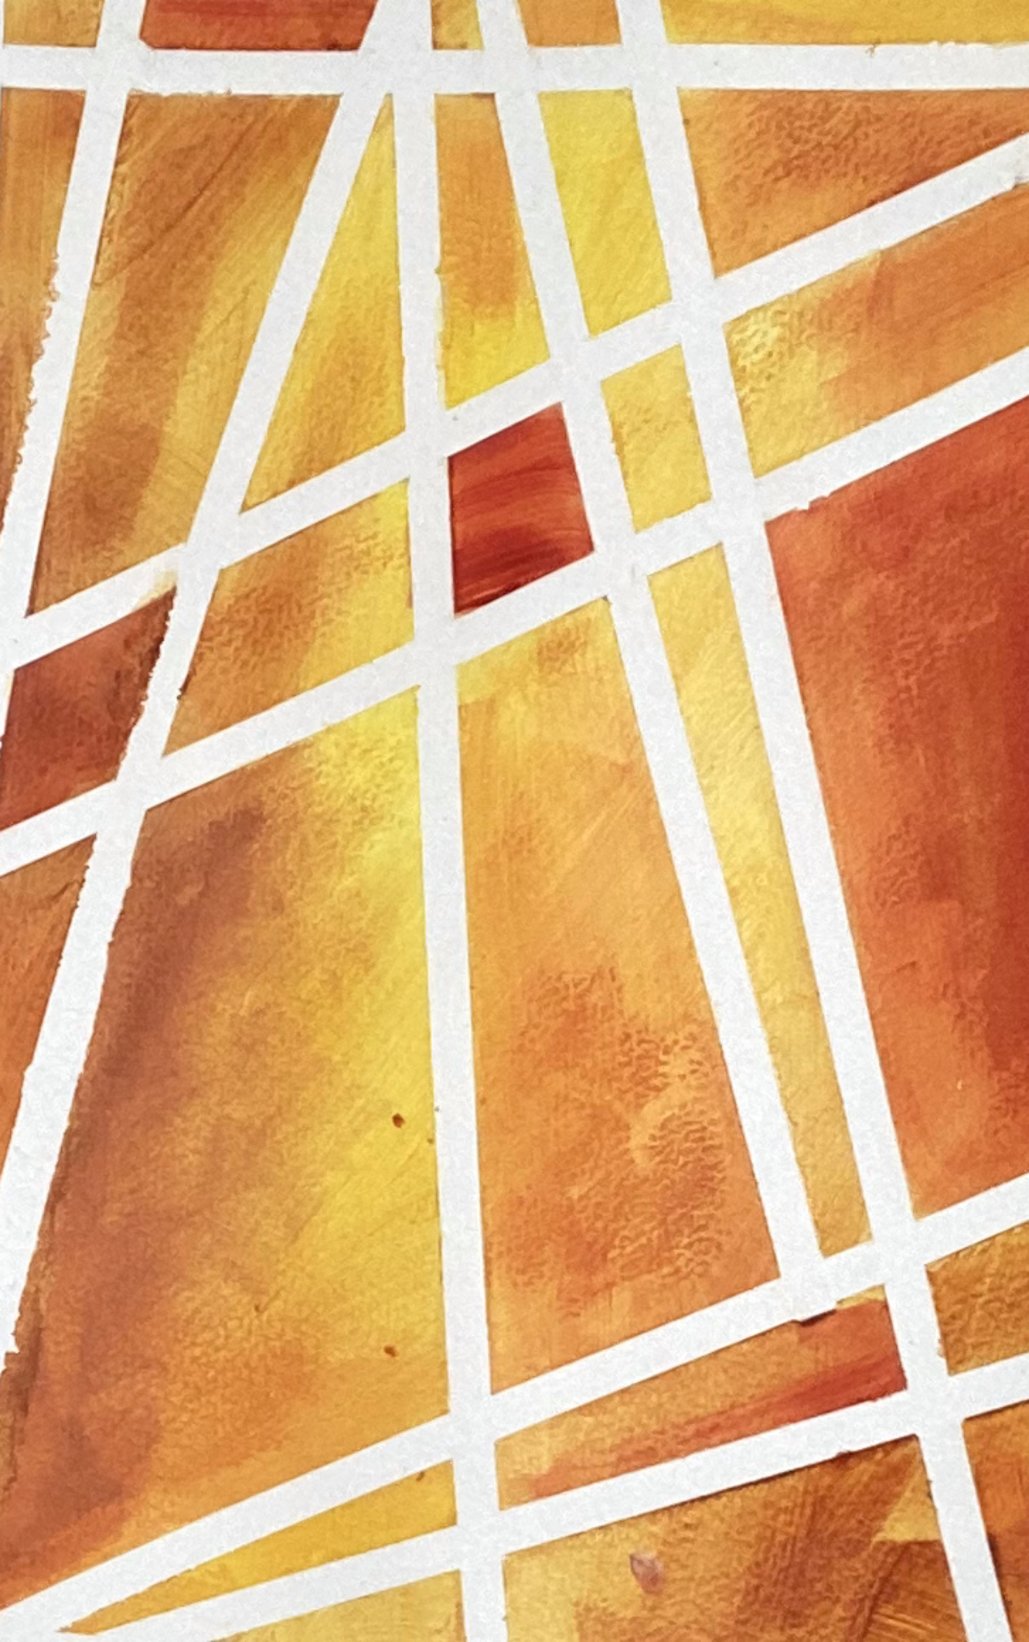
examine shades and tints. I have not included tones. Shades are when you add black. Tints are when you add white. I did not add tolls because I thought I would repeat
myself too much. Tones is just an in-between
for shades and tints. Shades are when you add black. So you take a basic color and you add a little
bit of black, little more, a little more, and then a lot of black and
you end up with a shade. Let's watch a painting
that's done with shades. I've started already and here I have my
lines, I'm starting. So I took block, I added it to my blue. And now I'm adding
lines to help me guide from the next
color, I add two. Now I have to own up. At the end, you'll see that
I added one tone in there. I just couldn't resist. I felt the painting needed it. So in the end, this is not just an exercise, It's also should be a
painting in the end. Now I'm adding a
variation on the blue. This is the original
blue I started with. Then I add a bit of white. And this is where I add
white lines as well. And I have those
lines so that the guide me towards
the focal point. All I've done in
this one is take a spatula and paint the
spatula and it makes my lines. It didn't have my credit card
for this one. Here we go. And you can add as many or
as few lines as you like. And you have them lean
towards the focal point. This doesn't do
quite as good a job as the credit card does, but I still like it. I like an irregular line. I don't want it all
completely perfect. I like it to be handmade. I want the painting to look like a painting and not like
something a machine made. So that's why I
like these edges. Now, this light
blue that I have, I opened up, I put
some white in there. Actually was a gray, so I have a gray blue. I have a pure blue, I have a dark blue. I have black and white. This is shades with one little
wee bit of tone in there. So now it's your turn. Create a painting using shades.
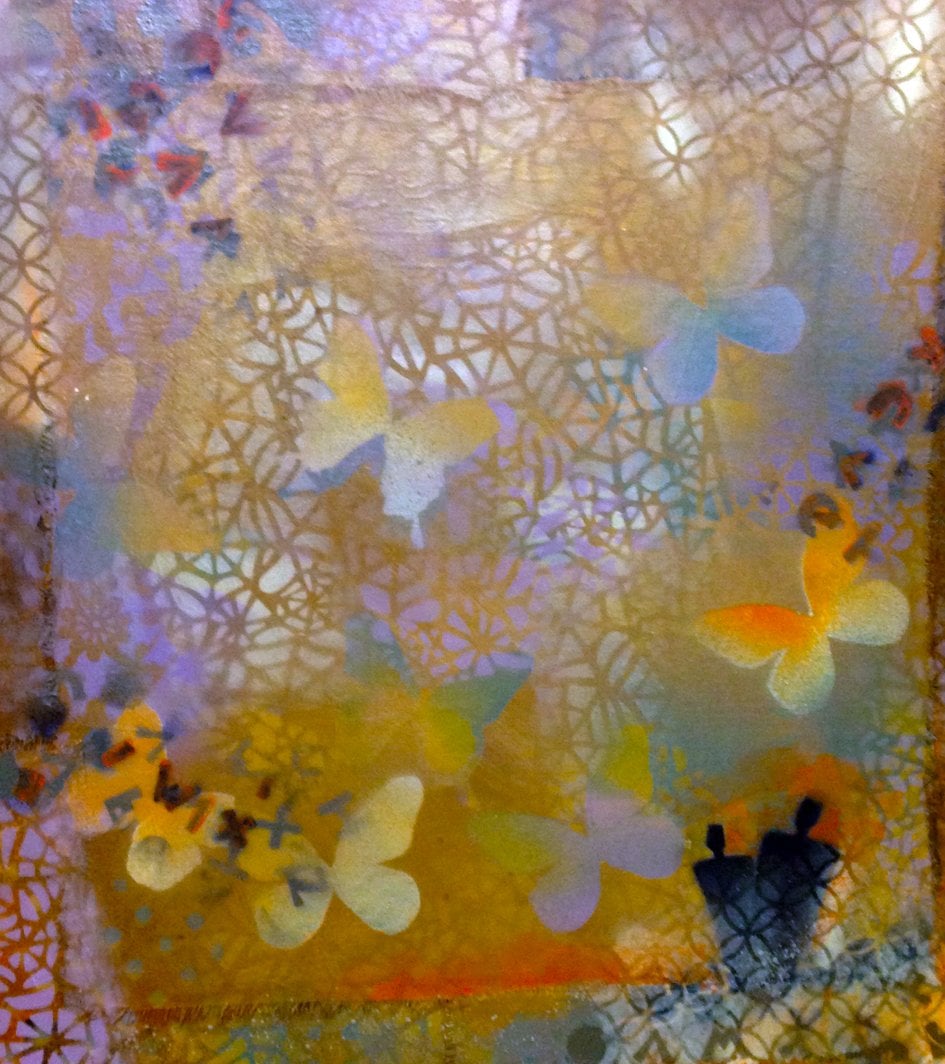
11. Tints - Create great soft colour combinations: Now we're going to
talk about tense, where you add white. You take a basic color
and you keep adding white till you have the
palest version ever. I have a video with
tints, so let's watch it. I'm going to use
three-tenths in this one. I'm going to use
this light blue. Then I'm going to
add another color, yellow and with white in it, a lot paler than
the original color. So I have a light blue, a light yellow, and
now a light pink. I'm going to just add marks and see if I
can create a balance. That's the only goal in an abstract painting other
than creating a big emotion. I want to create a balance. I thought I had put too much color there and
not left enough space. So I'm adding white back. Now I'm adding my marks and
I have my spatula again. I apologize for the camera. The cameras really close and I kept hitting the camera with my elbow or a hand when
I lifted this spatula. So that's my fault. But I like the way the
marks are going right now. I'm going to keep this
one a little simpler. I'm going to add some
white, some white marks. I want to add enough marks to lead the eye to a central point. You'll be tired of
hearing me after this, after the whole course, but I hope it echoes
in your head. Now I'm adding more pink. What you want is to
create a balance. And that's exactly it. I want to keep it up painting. I don't want it to
be just an exercise. So I am creating a
painting at the moment. I'm forgetting all about the tints and I am just
working on the composition. So I add blues in certain spots. I add pinks, I go back in, I might add white. I can do whatever it needs
to be done that this point, to create a good composition
here I'm adding more yellow. It goes on. The important part is to
just create a balance, create a good composition, and that's all that counts. I'm still knocking my camera. I apologize for that. I'm going to add
a few dark marks. Just so it's also balanced. Just like in the
other paintings. Even though I tried to create something similar for each one, it's a really hard process and it's really hard to do that. So I think I'm done. So now it's your turn. Create a painting using tints.
12. Warm and cool colors look great together: We go from tertiary
colors, which are these. Now what we're going to do is examine some basic terms
that you should know. Warm versus cool. Warm colors are those that
resemble or symbolize heat. While cool colors are attributed to ice or cooler temperatures. For example, red,
yellow, orange, and red purple are warm colors, while blue, purple, green, and blue-green or cool colors, the color wheel is split
into half or warm. Half are cool. When you create a
painting with warm tones, you add one or two small amounts of cool colors to
create a contrast. When you create a cool
painting with ice and snow, you might add small elements
of yellow or orange in there just to create the contrast and make
those cool colors pump. That's the goal of using
them as a contrast. Let's watch a video on how to paint with warm and cool colors. Now, I've already started with the purple and the dark orange. So I have an even amount here pretty well and I'm adding
my black lines already. Now. I didn't really like
all just dark purple, so I'm adding a lighter purple. Remember these are
cool colors now, so cool is starting to
dominate as I start painting. And as I keep adding
what will happen? The painting will change. Now I'm adding white elements. I discovered that if
I add these elements, not just at the end, but in-between, what happens
is I get a better painting. I have a better idea of how these elements
should be put together. So I've added orange, which is a warm color, this light green, which is technically a warmer
color and now a blue. Now this darker blue, I've decided to add
because I've decided to have the painting so that
it is cool, dominant. I want this painting to
be cooled dominance. So I want the majority of
the colors to be cool. I keep adding my
elements with my brush. And I choose spots and I choose where the focal
point should be. I've created a contrast, so I have one element
that's a little darker against some
lighter colors, and this creates my focal point. Now I am adding
this darker green just to help balance
all the colors. And then I start
adding my lines. I want these lines to lead
towards the focal point. Now this is the credit card. Could be an old library
card if you want. And you just add the elements so that everything
becomes more balanced. So now I've created
my focal point. It is blue dominant with bits of warm colors peeking through
all these cool elements. Here's a painting that is cooled dominant with bits
of warm color in it. So try this now and we'll
see you in the next section.
13. Conclusion: Conclusion. There are even more variations
than what I present. You'll have fun. What I'm showing you
is just the basics. Try out all these
color combinations and see which one you like. It's not only fun, but it will eventually lead you to find your own
color preferences. We all have colors we prefer, I prefer blues and
more neutral colors. I have a hard time with
the high key colors, but you might have a great
time of a Heikki colors. So just try them all out and see which ones you like best. Keeping in mind that you will
choose certain colors for a fact or just because
you like them. Sometimes you do choose
colors just for the effect. Here are some examples. A monochrome
painting by Picasso. It is one of the most well-known
paintings in the world. Yet it's just the
monochrome painting. The word just is
not the right word. Monochrome can be just
as effective as color. Georgia of chief uses
complimentary colors really well, and analogous
colors really well. Piet Mondrian uses
triadic color. He uses the primary colors
that I find so difficult, but he does a great job. Andy Warhol uses the mall. He tries all kinds of
color combinations. The effect is the more
important part for him. Trying to create drama, trying to create an effect. Here's some last bits of advice. The possibilities are endless. Always start with a sketch. Find the color combination
that best expresses your intent or find color
combinations that you prefer, but also express your
intact practice, practice, practice. Your own color palette will develop and you will
have fun doing that. All the examples of paintings of the masters were taken
from the Internet. Join me in one of
my other classes. I talk a lot about
composition in this course, but I really go in
depth in the elder one. Thank you for taking my course and we'll see you
in the next course.
 Doris Charest, Contemporary Fine Art Specialist and Instructor