Transcripts
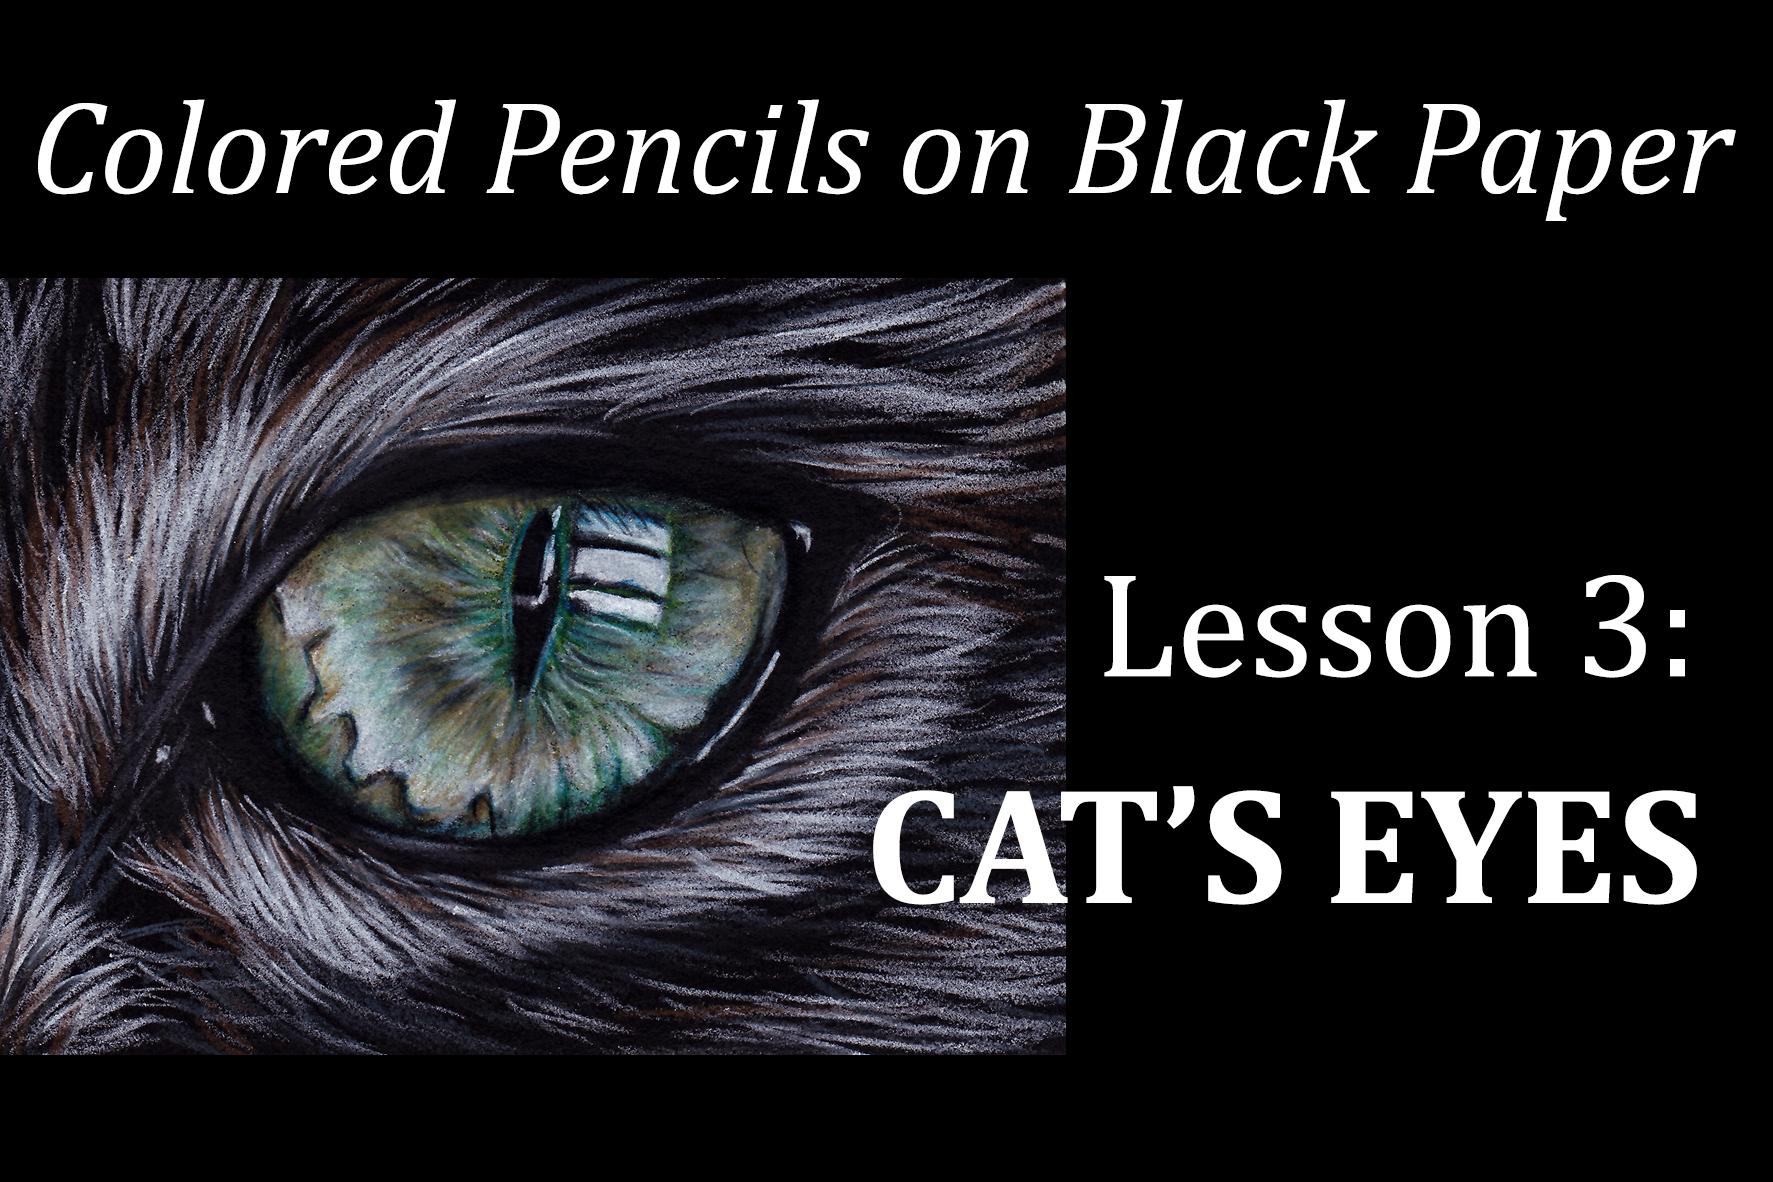
1. Introduction: Hi everyone. My name is Sandra Curtis and I'll be your teacher today. Had been drying with colored pencils on black paper for 15 years. And it's time for me to share what I've learned and the techniques I use so that maybe you love using those supplies to. In the previous classes, we went over some basic techniques and how to make colors stand out on black paper. And this time we're going to apply what we've learned and practice those techniques by doing a few cats eyes sketches. For a final project, we're going to draw a larger, more detailed I, I hope you'll join me in this class where you can follow the easy step-by-step instructions that you own pace. And please feel free to share your progress for the rest of the students. I'll see you in class.
2. Supplies: What you will need is very simple, personal need to small pieces of paper. I chose a 2.5 by 3.5 inches size because that's all we'll need to draw cat size. So one will be to draw sketches on it. The other one would be to do our final project. My favorite paper is the Stonehenge paper, because it's thick enough and there's a slight texture that allows me to add a lot of layers, but yet it's still pretty smooth. You need some PRISMA color, colored pencils. And we'll attach a PDF to this lesson with all the colors you will need for all the different sketches and the final project, the Darwin drawing pencil in ivory black is optional. But if you have one, I highly recommend it. Also a kneaded eraser and, or some postal party to clean up your paper by a dabbing on it. Or if you add too much color or draw the wrong lines, you can just dab and remove the pigments from the paper. Do not rub it. Just dab. The postal parody is a little bit more tacky. So it removes the pigments better, but the kneaded eraser works very well as well. And finally, a drafting brush to clean up the residue of the pencil from the paper. As you'll be able to see on the videos, I should have used it more often because I get a lot of residues, especially when I pushed really hard on the pencils, but I cleaned it all up at the very end. In this lesson, I encourage you to try to sketch everything straight on the paper if you can. It's just practice. So if you mess up, it's okay. But if you're not comfortable with it, especially for the final project, you can use either white transfer paper or tracing paper, and you will trace your drawing with a white color pencil. That way you can transfer it and it'll show well on the paper. So gather up all your supplies and let's get started.
3. Practice Sketch #1: For the first I practice, we're gonna do a basic blue I. So first we do a quick sketch, doesn't have to be perfect. The goal for this is to focus on the coloring rather than doing a perfect i. So do a quick sketch. If you're not comfortable doing it, you can always trace it. That's fine too. And once you have the basic shape down, the first step is the same as it always is, is to add our first layer of white pencil. So very lightly apply your white pencil in the lightest areas. And you can also add a little bit around the edges to give a context us catch. Once you've established your first layer of white, then we're going to add the colors. And the first few layers will just be like washes of colors. So the application will be very light and don't push too hard. Just covered the white with color basically. And we're gonna do that with Blue Lake to start with. Then with the sky blue light, we're going to re-establish the lighter areas. We're not gonna do that with a white pencil just yet because we want to keep on adding some blue. Always keep your pencils sharp so that you can add a lot of pigment onto your paper without having to push too hard. And that will allow you to add more colors, more layers, and be able to blend them together. With the Blue Lake. We're gonna go over the whole I again, trying to blend the two blues together, still not pushing too hard on the pencil. And then we're going to start adding more contrast. So with Dan in blue, we're going to work closer to the pupil where the blue is darker and always trying to blend it into the lighter color to obtain a gradient. And we're gonna do that again with the indigo blue, which has loved darker. The third one, drawing pencil, the ivory black. We're gonna fill up the pupil and the shadow areas. And this step is optional if you do not have this pencil, the reason why it uses pencil is so that I can get a nice gradients. And then I use a PRISMA color black to add the darker details. I tried to add a gradient at the edge of the iris so that it's softer and it blends into the shadows. And once that's done, I use a paper towel to smudge the Darwin drying pencil. And it's gonna help also with a software look. Now it's time to add even more contrast with my white. So I push a bit harder to make the highlight stand out. And so far every time I've tried to keep my lines going from the edge of the iris towards the pupil. It didn't stand up to much earlier because I was blending all the colors together, but with the white, you can see that it's standing out a little bit more. And I'm using, again all the blues that I have used so far to adjust the colors to make it look as close to the photo as possible. Always trying to blend the dark colors into the lighter colors to try to give it a soft blended look. And they keep on working back and forth with all the different colors. I think some more white and pushing harder and harder each time with a new layer. And as you push harder, you blend the colors even more.
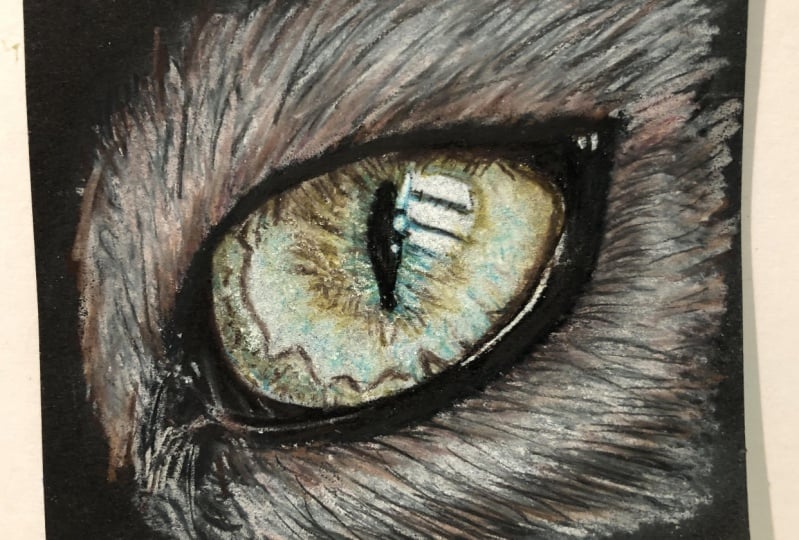
4. Practice Sketch #2: For our second practice, we're going to draw a more detail I, something that you're going to see on a very good quality photo or a photo with very good lighting, the steps are all the same and we start by doing a quick sketch. I think the highlights as well, the first white layer, and that white layer covers all the highlights and the lighter areas of the sketch. You can right away push harder where the highlights are. Once again, we're going to add a little bit of effort to give it a context. And then we'll get started with our spring green. This eye has a lot of different colors. If you take a good look, you'll see some pale yellow, some oranges and blues and greens. But sometimes when you mix them together like the yellows and the blues, you also get some greens. So we're gonna try to mix all these and build the layers to make the I look like the photo. So once the green is applied around the pupil, we're going to take the cream and apply it very lightly, about halfway all around the iris at the very edge of it. And as you can notice, again, a playing it from the edge of the IRS towards the pupil. Then we take the sand and we do the same but starting from the pupil halfway down towards the outside of the iris. And trying to blend the two colors together in the metal, we always try to get a gradient between the colors were apply. Now with the bronze, we're going to start establishing the shadows and we can start pushing on it a little bit more, not too much though. So the bronze will be closer to the pupil and also on the edge of the iris. We're gonna cover that with a yellow ochre, lightly blending them together. And with the dark green, we're going to add the little lines around the pupil and also the shadows around the pupil. With the non photo blue, we're going to start adding some highlights. Because if you look at some of the highlights on just white, they have a little hint of blue. And then we're going to take the dark green again to continue building the shadows around the pupil. With the sand again, we're gonna go on the edge of the iris and cover everything there pretty lightly. We just want to blend everything together. They're all washes, just going over the previous layers basically. And now it's time to add the details. So with the white, we're going to add the little squiggly lines on the edge of the iris, make sure that line is sharp. And then we're going to fill the inside towards the pupil without white. Then we add more highlight and more lines around the pupil with the white. You can push a little harder to. And then it's time to add a touch of orange with the golden rod so we can apply it over the dark green and on the very, very edge of the iris, on the outside of the squiggly line than with the yellow ochre. We're going to try to blend everything together to not push too hard because we still have a few layers to add. Now it's time to define the details a little bit more with the black pencil. So make sure it's nice and sharp. But we're going to define the pupil and this little lines right outside the pupil. And once again with the Darwin's drying pencil, the black one, I'm gonna fill in the pupil and the shadow area under the eyelids and around the iris. By defining the area around the eye, it really makes it pop. With the DOE and pencil, I'm also adding Reza touch of black, halfway between the edge of the iris and the pupil. And I blend all of the areas where applied that black with a paper towel to soften everything. Now it's time to work on the highlights again with the white. And I can push a lot more on my pencil this time. With the 50% warm gray, I add the lids, I guess it's still the bottom lid. And then with a black, continue defining the details, the squiggly lines at the shadow under them to make them pop up more. And then add the white on the inside of them so that they pop even more. And I continue adding those white lines closer to the pupil. Then I add a wash of yellow ochre over those white lines. And then it's time to add another touch of orange with some sunburst yellow. With these last layers, we can push a little harder again. And like with the first practice sketch, it's time to go back and forth between all the colors and play with them to obtain the final color that we want. So again, that's the time where you can push more on your pencil to make those colors really show. On the reference photo, you can actually see the shadows of the hair, kinda like eyelashes on the iris. So with your very, very sharp black pencil, I can just draw those and then define the final details. Just remember to always go back to your reference photo. Always look at it so that you know what you're working on and what you need to add next and where everything is located. One final touch of white highlights, and we're pretty much done.
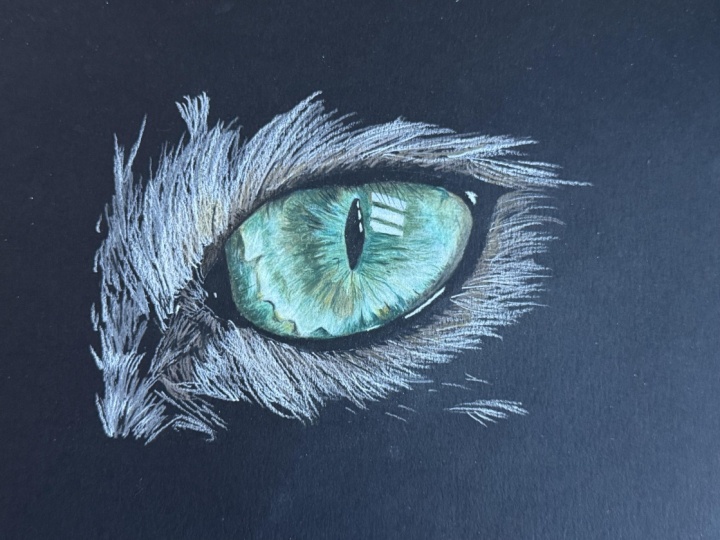
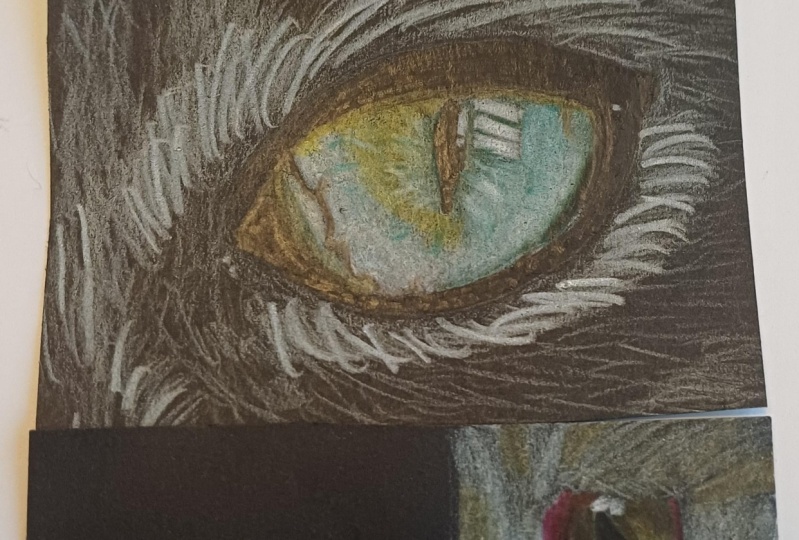
5. Practice Sketch #3: So this is our final practice sketch, and it's going to be really the one that you draw more often unless you drove on a very large-scale, often you will have reference photos that don't show any details can have like the blue eye. And again, if you don't draw on the very large scale, you don't really need to add too many details. What you need to do is mostly work on your values to make it look realistic and make sure that the highlights really pop. Once again, we're gonna do a quick sketch and in case I haven't mentioned it yet, the piece of paper that I've been using is only 3.5 by 2.5 inches. It's really small. But since I'm only drawing the eyes, there are pretty big scale already. So with the yellow occur, we're going to add the color on the inside of the eye because there is a mix of pink and orange. And since my sketch line was already pretty thick, I didn't really have to add more white there. I also added some clear rows and then I finished with a layer of Hannah. So that's quickly for the flesh, basically the insight around the eye. Then I'm working on my first layer of white as usual and then putting in the highlights. And then with the brands we can put the shadows down just a very light layer. We're going to do a wash of sand in the lighter areas because we're not going to add too many details. We can start pushing on our pencil much sooner than with a sketch number two because we had so many details. And sketch number two, with this one, we do not have that many details. So it's gonna be more of a burnishing type of process. This time I did a lot more far around the eye and then it's kind of overlapping on the eyelid. And you can really see that I'm pushing a lot harder on my pencil. First, my table move and also the white, whiter right away. On the inside of the eye and the outside on the firm. Added some gray to help create the volume, and then added a little bit more. The pink area is the flesh. Now with our Sharp black pencil, we can add all the details to defining the outside of the eye. Keeping an eye on the reference photo to make sure that the lines are correct. With a very, very light touch, we can add the shadow under the eyelid. And when I say very light touch you barely touching the paper, you just want to graze it and darken it very lightly. And then back to the pupil where you can redraw it if you hadn't drawn it the right way the first time around. And again, add more shadows with the black, but don't push too hard, except in the very black areas on the edge of the iris. I tried to add also a very light layer of black to make the iris blend into the dark shadow. And so there's a soft transition there. And then I use the bronze again to go over the black shadows that are added. It's time to add more highlights, which is done with a white pencil again. And then we can add a touch of color to the far around the I. Send pencil, get other glaze. The color all over the end, blend all the colors together to unify them. And it's time for our final touches again, using all the colors we've used so far, just like with two other sketches, just trying to achieve the colors that we see on that the reference photo. It's just a game of adding more light and dark until we get what we want. Basically.
6. Final Project Sketch: Now it's time for our final project. For this drawing, I'm using again a 3.5 by 2.5 piece of paper. The reason why I'm doing that is if you're using, for instance, of five by 70 sev paper and you do an eye covering that whole surface, your eye is going to be gigantic. And realistically you're most likely not going to draw the face of an animal with an eye this big in a future project, if you draw an eye that fits a 2.5 by 2.5 piece of paper, your portrait is already going to be very large. So that's why I decided not to go bigger than this. So once again, I start with this sketch. Feel free to trace it, transfer it, or do whatever you want. I have mentioned before in my previous classes that usually for a finished piece, do not sketch straight onto the black paper. Always transfer the line drawings just in case I make mistakes and I have to erase the lines because it's gonna compromise the surface of the paper. So is try to avoid doing this, but this is a sketch and this is just an I. And I'm not really concerned about the IUD not being exact same shape as my reference photo. And since I'm going to draw for around the eye, it's basically going to cover all my extra lines. I'm not pushing down really, really hard anyway. And I can always use either a kneaded eraser or some post somebody to dab on the areas that I want to lighten or remove. So because I'm using a smaller piece of paper, I tried to use the negative space around the eye. And what I mean by that is that I look at the shapes that the edge of the eye and the edge of the paper make so that I can determine more or less where the top of the eye is going to be. And then the sines that way can fill that piece of paper pretty much the correct way. And with the right proportions, I often try to imagine a line in the middle that crosses, a horizontal line that crosses the middle. And that helps me find the right proportions compared to the reference photo. And I can imagine like a line a quarter of the way also. And I did the same with vertical lines. So I try not to push too hard on my pencil, but I'm not extra careful either. And once I'm done establishing where everything is, that it's time to add the white layer.
7. Final Poject White Layer: If you've taken my two previous classes, you know that I always start with a layer of white pencil. Not only does it help me establish where the details will be, but also she doing a color drawing helps establish a barrier between the black of the paper and the colors. That way your colors will not sink into the darkness. This layer is very light and can be adjusted with subsequent layers. So as you can see on the reference photo, it's a very detailed, I kind of like the second sketch we did. And it does have the squiggly lines near the edge of the iris. So we're going to have to define those really well. And to define things, usually you need to work on new values. So you're going to have to have one side that's very light and the other side that's a darker. So the first part that we're doing right now is creating the highlights. That's the parts that are touched by the light and underneath there are shadows. And that's what's going to make it all pop in the end. So I push a little harder near the edge to make it wider. But as I'm going towards the pupil and make sure that my layers are lighter. And once more I'm trying to draw the lines from the pupil outward towards the edge of the iris and vice versa, because it helps create the texture that you can see in the iris. So for this drawing, we can actually fill up the whole little piece of paper. It's optional, again, the exercises the eye. So if you don't want to work on that for it's okay. I'm just adding this for those of you who are interested in adding a few more details. So I'm creating wispy lines where push a little harder when I first put the pencil down and as I reached the end of the hair, the individual hair, i less than the pressure and I lift up the pencil real quick. At the very end of the line is a lot lighter. And I do that all around the eye, always keeping an eye on the reference photo, making sure that I draw the hair in the right direction according to that photo. And because it's so close up, I don't necessarily need to sharpen my pencil as often for the hair because they look thicker. But when you do sharpen your pencil, you'll notice that your line will be a lot wider than when you don't. Because if your pencils not as sharp, it's not gonna go into the crevices of the paper. And so the pencils only going to stay on top of the paper. So I keep on looking at the reference photo, making sure I add all the details. In the areas where the highlights are nice and bright. I go over them again and I push harder on my pencil to make sure that it's nice and white. This first layer will help me establish and a good amount of my drawing. In fact, once you're done with it, it looks like a pretty nice sketch already. Once you're done with the bright highlights, he cannot start adding a little bit of the texture inside the iris and then maybe work on again to give it a little bit more sickness.
8. Final Project Color Layer: So now it's time to add all the colors to the iris and gonna take a little while because we're going to be juggling all the different colors to build the layers. But it's going to be basically the same process as when we did the practice sketches. So again, keep an eye on the reference photo and if you observe it before you get started, you'll see that once more there are lots of different colors all over the place. So we'll start with a non photo blue and add it to the top of the highlights. Its basically the reflection of the sky in the eyes. With the sand. We start a light layer, just a light even wash over the white that we've already put down with a sky blue light where extending the white highlights and I think a touch of blue to them. And then we're going to add some shadows with the bronze defining this squiggly lines. Whenever you see me pause, it's because my eyes are going back to the reference photo to figure out where to put each and every color. But the spring green, we're going over the shadow on the edge of the IRS and then adding a touch between the bronze sky blue light as well as around the pupil. Well, I think some highlights right on the edge of the pupil with the non photo blue and add those little lines around the pupil as well. And a few other areas like the edge of the iris. Now it's time to start working on the shadows again with the indigo blue. So we're deepening the shadows of the squiggly lines. And right away you can see them pop really nicely. And I'm using that color to, to blend at the edge of the iris into the shadow around the eye. Can also deep agendas that are lines around the pupil. And by doing so, it creates shadows and gives us 3d effect to those lines. And then wherever else I'm adding indigo blue as a shadow and very, very lightly pushing. I only want to add a touch of it. But sharp sky blue light. I'm going to work again on the highlights and I run the squiggly lines, I'm going to push a little harder. And then we can add a touch of solid and green lines around the pupil. They won't talk very much, but it's a dark green. Then we can keep working on the shadows just like we did with the earlier. Like I said, there's such a variety of colors in this eye. We just keep on repeating the same process over and over again. Pushing and pulling with the shadows and highlights helps us create our values. And when you have a nice contrast and it really makes everything pop and look more real. But the bronze marking on the darker areas, again, trying to blend the colors together to achieve a gradient. And you can see my table shaking really hard. It's not necessarily that I'm pushing a lot on my pencil, it's because I'm trying very long lines. But the sharp black pencil, we can find the details even more and sharpen our lines. Once again, I'm using a very light touch to blend in the edge of the iris into the shadow areas. And that helps round the, i, make it look like it's not flat on the paper, but that it's round and that it's actually an eyeball. I do the same in the shadow area under the eyelid. Here too, there are a few hair shadows and they actually crossed a highlight. Once again, make sure that your pencil is nice and sharp to draw those lines. And then when you work on those darker areas, halfway between the pupil and the edge of the iris. Make sure you do not push too hard on your pencil. 50% of one gray, You can work on the flesh around the eye. Because my white line was a bit too thick and two White. I use my kneaded eraser to lighten it because I didn't want it to show too much through the grey pencil. So it's time to sharpen the highlights and push harder on the white pencil. At this stage, we're gonna work on the texture inside the iris again, like we did when we were working on the white layer. And then add a blue and yellow. The sun to use the HDR one drawing black pencil, again, that's optional. And then with a paper towel, I just blend it. And then I go over the line on to the iris to help transition smoothly, the shadow and the light area. And the last little touch of yellow, and we're done.
9. Final Touches: And now for our final but optional step, we're going to add a little bit of color to the hair. With this crop, it looks like the hair around the eye doesn't have that much color and, but we're going to add a light touch and call it good. So we'll start with party badge and added to the base of the hair. And now we're covering it with the bronze where the eyelid is and under the eye, but adding some light, again at the base of the hair. With a sharp pencil, we can define the base of the hair by drawing the lines from the shadow area into the hair. Kind of like drawing black hair but very short. And with 70% cocoa grey, we're going to add the hair dead sin the darker areas. And every time I'm using wispy line's constantly looking at the reference photo to make sure that they're going in the right direction. With a very sharp white pencil, you can define the hair even more now as some sharp lines. And you can push pretty hard to make them pop really nicely. And continue to push and pull between white and black pencil. He's the black one to redefine the base of the hair, and the white one to add more volume, more texture to the hair. A good reason to add the color to your for is to see where your eyes stands. Once you add the color, you might notice that the eye doesn't have enough highlights or not enough shadows. You done with your hair, you can do the final adjustment to the eye.
10. Last Thoughts: This concludes our third class on colored pencils on black paper. I hope you enjoyed practicing drawing a few get size and the more you draw them even fast, simple sketches, the better and faster you'll be at drawing them. It's also a very good practice to observe and planned all the different colors you will need to use an blend while building your layers and soon became the right pencils from Musette will become second nature. As usual, if you have any questions, please don't hesitate to ask. Please share your progress drawings, sketches, and your final drawings with us. Thank you all for joining me today. I'll see you soon with another colored pencil class.
 Sandrine Curtiss, Artist, explorer.