Transcripts
1. Hello!: As a self-taught artist, I know how frustrating
and overwhelming it can be to be fascinated
with a new medium, but not knowing anything
about the way it works. This is especially true for
a medium like color pencils, whether there's so much variety available in terms of tools
as well as techniques. It's safe to say that it took me a lot of research
and a lot of failed attempts
before I could start making professional artworks
with color pencils. But through all my mistakes
and some random discoveries, my love for this medium only kept growing with
each passing day. And today, I'm here to share my love of color pencils
with all of you. Hi everyone. My name is Ridhi Rajpal and I'm a filmmaker and a multi-disciplinary
artist from India. I'm also a Certified
Zentangle Teacher and a Certified Russian
Sculpture Painting Artist. As a child, I was fascinated with the world of
movies as well as art. So I ended up building
a portfolio career in both of these industries where some days I'm working on a movie set or on
a TV commercial, but other days I'm creating
artworks in my studio, selling them as original
paintings or licensing my designs through
print on-demand websites like Society6
and Redbubble. I started my brand, TheColorBirdie in 2021 with the intention of expanding my services as a
professional artist and working with more brands,
agencies and curators. But more importantly, I wanted my brand to be
recognized as one that helps beginner artists
to level up their creativity in an experimental
and fearless manner. Being a multi-disciplinary
artist, I work with a lot of
different mediums, such as watercolors, acrylics, gouache, texture pastes,
you name it! But the primary reason why I gravitated towards color
pencils is because they served as a natural extension to the highly detailed Zentangle artworks that I love to make. In fact, the reason why I have chosen gemstones as
the core subject for this class is because
they're used extensively in Zen-doodles as well as
Zentangle Inspired Art. So basically, this
class is a 2-for-1. If you're a beginner
in color pencils, then not only will you
learn the basics of this medium and how to create beautiful Shiny
Gemstones with it. But I will also show
you how to incorporate these gemstones in Zentangle
Art Inspired projects. So if you're an existing
student of mine, and have taken my previous
classes on Zentangle, then this class on
Color Pencil Gemstones, will be a great addition
to your skill set. And if you're a beginner
in color pencils, then you can always take the Zentangle class later
on to add to your skills. So if this sounds like your jam, let's get this show on the road. And I'm going to
see you in class!
2. Class Overview & Projects: Hi everyone, and
welcome to the class. In this lesson, I'm gonna give you a quick overview
of this class, and what you can
expect to learn. First, we're going to start
with talking about Supplies. I'll walk you through
all the tools that I personally use. And I will also
share tips on how you can look for good-quality
supplies for yourself. Then we will talk about basic color pencil
techniques and how we Layer, Blend and Burnish
different colors. After that, we will move on to understanding the anatomy of a shiny translucent
gemstones and how we can get creative with shapes and colors for our various projects. After that, we will move on
to the most exciting part, where we will be working on
three main class projects, which are Inspired by emeralds,
sapphires, and rubies. For all of these three projects, we will follow six steps. We will start with a Base Layer, then add more color, move on to Blending and
finally, Burnishing. After we're done with
the first four steps, we will tangle on
the background. And last but not the least, we will add color
to the background. Now for projects 1 and 2, I will give you a
real-time demonstration of steps one to six. But in project number three, I will show you a
time-lapse version of steps one to four, but a real-time
demonstration of steps 5 and 6. This is because by the time
we reach the third project, I want to encourage you to draw independently and work
at your own pace. I'm quite confident you'll be able to do that very easily. Once the three main
projects are done, we will move on to three
additional exercises where I will talk about
unique scenarios, where we sometimes need
to break the rules or alter the process to
suit our creative needs. So we will learn how to
create a Patterned Gemstone, a Cracked Gemstone, and a
Gemstone with a Shadow. I've also included a bonus
lesson for you where you can add a tangle to the background of your
Patterned Gemstone. At the end of this class, you have the option to
share your class projects with me and receive
individual feedback. Upload a class project. All you need to do is scroll
down to the bottom of the class page and click on the tab that says
Projects and Resources. At any point during the class, if you feel like you
have any questions or would like to discuss
a topic more with me. You can do that by clicking
on the discussions tab. Keep an eye over here for interesting discussions from
fellow students as well. With that, we're ready to
move on to our next lesson, where we will be talking
about paper selection
3. Paper Selection : Color pencils are known to give extremely vibrant and
smooth results for your drawings when they're paired with the
right kind of paper. Paper Selection is perhaps as important as selecting
the Pencils itself. But there is so much variety available in the
market that it can become a little bit overwhelming for a
beginner to make a choice. So I've tried to simplify that process for
you in this lesson. Now generally
speaking, there are three main categories of papers which are
available in the market. These are rough,
semi tooth, smooth. These terms basically refer to the surface texture
of the paper. Rough papers usually have a bumpy texture and you can easily see the grain
on the surface. Smooth papers, like
the name suggests, have a very smooth
surface and there is less visibility of
the grain on the paper. And semi tooth
paper is somewhere in the middle of both
of these categories, and it has a medium grain. Now whenever you're making artworks where you
need precision, such as with technical pens
or mechanical pencils, then you will choose
the smoothest paper possible to preserve
the details. These papers are often used in architectural or
technology-driven drawings. But wherever you want to make something more
loose and abstract, where you want to emphasize
the texture of the paper, such as in watercolor paintings, then rough papers
are a great choice. Now for a medium
like color pencils, semi tooth paper
works very well. This is because the tooth of these papers will allow
you to work in layers, which is very, very
important for color pencils. But the final result will be absolutely smooth and polished, once we burnish the artwork. We will learn more
about Burnishing and Layering in our
upcoming lessons. Now you will notice
that most types of mixed media paper available in the market are actually semi-tooth. They have light texture that support wet and dry media, both. Hence they're called
"mixed media paper." For this particular class, mixed media paper is actually
the ideal choice for us because we're working
with two primary mediums. We're gonna be
using color pencils as well as drawing pens. Now, drawing pens don't hold
very well on rough paper because whenever
the nib comes in contact with the
bumpiness of the paper, the friction causes
the nibs to break. And the ink doesn't
come out smoothly. And on the other hand, color pencils don't work
very well on smooth papers because there is
not enough texture and tooth for us to layer them. So for us in today's class, the semi tooth paper is the answer to both
of these mediums. It has just the right amount of texture to support drawing pens, as well as color pencils. Now, my preferred paper is the 400 series mixed media
paper from Strathmore. This is 300 GSM thick, and is considered to be
heavyweight paper. I use this a lot for all kinds of projects
that I work on. But if you don't have
this brand available with you, that's
totally alright. You can use mixed media paper or any other good-quality semi tooth paper from
literally any brand that is available to you. My pro tip is that instead
of looking for brands, check out the characteristics
of the paper. So make sure that the paper
is at least 300 GSM thick so that we can apply
multiple layers of color pencils as well as Ink. Now let's talk about
the size of the paper. So I have actually cut down my papers into the
size of an ATC, which is an Artist Trading
Card that usually measures around two-and-a-half inches in width and three-and-a-half
inches in height. And I have six of
these ready for the six projects that
we're gonna make. However, you're welcome to work on any size and shape
that you'd like. There are no
restrictions whatsoever. In fact, you can
also draw some grids on a sketchbook and
practice on that instead. Feel free to use whatever
you have available with you. Now apart from the
papers that you will need for your
main projects, I also recommend keeping some spare sheets with you
for the practice exercises. These should ideally be the same paper
quality that you're using for the final
class projects, so that you can warm
up properly and get to know your paper and
your tools beforehand. Again, you can use a
sketchbook for this or you can also use loose papers,
whatever you like. The only thing that I
don't recommend is to do your practice exercises
or your final projects on copy paper because it is extremely thin and
the paper will not do enough justice to your hard
work when it comes to adding multiple layers of color pencils
as well as drawing pens. The paper will simply
not hold these mediums. And apart from that,
you're free to work on any heavyweight medium-
grit paper of your choice. Once you've made your
paper selections, meet me back in the next
lesson where we will discuss all the other tools that you will require
for this class.
4. Other Supplies: Once you've made your
paper selection, the next thing that you will
need is your color pencils. Now the techniques
that I'm teaching in this class are with wax
based color pencils. But if you have oil-based
or watercolor pencils, then you can still
adapt the process a little bit and achieve
similar results. The theoretical knowledge
of gemstones and the general layering
process will remain the same for all
kinds of color pencils. But please keep in mind that
I will not be going into the details of oil-based and watercolor pencils
in this class. If you want to use
those instead, I'm assuming that you have working knowledge
of these types of color pencils and are able to adapt the process
on your own. And if you're working
with wax based color pencils,
then that's great. Because that's what
I'll be focusing on and you'll be able to
follow along just fine. Now when I'm looking for
color pencils to buy, I usually prefer to
buy soft core pencils because they are much easier to blend than the hardcore ones. Soft core pencils
are buttery smooth and they require much less
effort to blend well. But with hardcore pencils, you have to work harder
to achieve smooth blends. So my preferred choice
is prismacolor premier, which is a soft core
colored pencil brand. And this is what I'll be
using in today's class. But you're welcome to use any other brand that you'd like. Now along with the pencils, you will also need
a pencil sharpener. And I recommend using
a sharpener that is made specifically
for color pencils. So if you're using the
sharpeners that are designed for regular
graphite pencils, then you will end up ruining
the bonding of the color pencil and that'll lead
to unnecessary wastage. So the best thing to do
is to use a sharpener, which is designed and manufactured specifically
for color pencils. I generally use the Prismacolor
sharpener for the same. But you're welcome to use any other brand that is
easily available to you. To blend the color pencils smoothly and to create
a burnished effect, we will also need a
colorless blender pencil. It's basically the same thing
as a regular color pencil. But the difference is that the colorless blender pencil only has a wax
core and no color. Hence, it's colorless. It is often used as a final layer on your
color pencil drawings. And again, my colorless
blender pencil is from Prismacolor. But you're welcome to use any other brand that is
easily available to you. If you don't have a colorless
blender, no problem at all. I'll be covering
the basics of how to work without a
colorless blender too. Next, we will need
some drawing pens. I generally use these
Sakura Pigma Micron pens in various different colors. But there are other
brands as well in the market that
are just as good. So feel free to use
anything that you'd like. For adding white
highlights to the gemstones, we will also need a
White Jelly Roll pen. If you don't have this
available with you, that's totally alright. You can use white acrylic
paint or gouache, or even a white paint
pen as a substitute. Sometimes, I also use colored Jelly Roll pens
and other kinds of metallic pens to add
little details to my drawings or to embellish
them a little bit more. But using these is a
matter of personal choice. And so these are optional. Now when we're working with
multiple color pencil layers, they tend to leave a lot of flecks on the paper that
we're working on. The best way to remove them
is with a soft bristle brush, such as a paintbrush
or a makeup brush. This doesn't need to
be an expensive tool. And you can use
anything that you probably already have lying
around in your home with you, which is similar to a
soft bristle paintbrush. I generally use the brush at the back of my precision eraser. So this is an eraser in
the shape of a pencil. And I can use it to erase
tiny mistakes on my drawings. And this is a great
two-in-one tool that I found from a
local brand over here. But you can totally use
a regular eraser too. And the only thing that I would recommend is that
you try and look for an eraser that is good for Colored Pencils
specifically. I also recommend keeping a regular HB pencil
and a regular eraser on standby, in case
you want to pre-draw your gemstone shapes before
you add the inky lines. So that's it for
all the supplies. So take a few moments to
gather all of these supplies. And I will see you in the
next lesson where we will talk more about the
basics of color pencils.
5. Color Pencil Basics: Generally speaking, basic
color pencil concepts can be broken down into
three commonly used terms. They are Layering,
Blending, and Burnishing. And as we do some
practice exercises ahead in this lesson, you will realize that all of these are actually
interconnected. So first, let's
start with Layering. So I'm gonna be using this Aquamarine color
pencil over here. And I'm going to put
the shade numbers on the screen at all times. So that in case you're
using the same brand as me, you can cross-reference the
colors and use the same ones. If you don't have the same
brand, that's totally alright. You can use any colors that you like for these
practice exercises. Now, starting off with this pencil that I'm
holding right now, I'm going to hold this at a slight distance
from the tip to draw loose strokes. And with very
light and gentle pressure, I'm going to lay down some
color over here on my paper. So you can see that with light pressure and
light pencil strokes, we can achieve gentle
application of the color. And the paper grain is
actually visible to us. So all of these specks of
white that we can see in the middle are actually
the tooth of the paper, which is visible to us through
the color pencil layer. Now, in contrast to this, let's try a single layer of
color with high pressure. And for that, I'm going to hold my pencil
closer to the tip. And I'm going to
press down hard to create this beautiful,
vibrant effect. It's still a single
layer of color, but the difference is quite
evident. With light pressure, a lot of the paper
white is visible. Whereas with hard pressure, the result is much more opaque and you can hardly see
any of the paper grain. This is simply because
with hard pressure, the pencil flattens the
tooth of the paper and all the pigment sinks
into the grain of the paper, thereby creating a flat surface. So the bottom line
is that when you need more opaque color
in your drawing, then hard pressure will
help you to achieve that. Whereas if your desired effect
is to show the paper grain, then the light pressure will do the trick. Now, let's talk about
multiple layers. So light pencil pressure
and layering comes in handy when you need to
gradually build up the layers. So let's say you're
working on a drawing and you're not quite sure of
the look that you want yet. So you can start working
layer by layer and you can apply the color bit by bit to
achieve the desired effect. So for example, over here, I'm gonna do one pass. And then I will go once again on top of this to
apply a second layer. Then a third layer. And I can keep going on, so on and so forth till I
get the result that I want. So we're currently doing this
with a single color only. But more importantly, Light
Pencil Pressure comes in very handy when you want to
mix or overlap two colors. So let's say, I don't have
a green pencil with me. And let's say, I've run
out of it and I want to create a
specific shade of green. So for that, I can use blue
and yellow to achieve that. I can mix these two colors and I can keep layering
them one after the other. After the blue layer, I'm applying a yellow layer. Then I can keep alternating. So once again, I'm
going to apply blue. I can keep going on, so on and so forth. So if I want a more
yellowish green, then I will apply
more yellow layers. And if I want a
more bluish green, then I will add
more blue layers. With this gradually
layering technique, we actually have a
lot more control on the shade that
we want to achieve. So let's say you have a
small box of color pencils and you don't have a lot of
variety in terms of colors. Then you can always
create and achieve custom shades using
the limited number of color pencils that you have. And you can simply
use this technique to create any kind of
shade that you want. Alright, so I'm quickly going
to get rid of this dust. These are wax
particles which have accumulated on the paper because we've been
working with layers. And so we can get rid of them
using a soft bristle brush. Alright, so now let's try multiple layers with
hard pencil pressure. Now, over here, as you try
this exercise along with me, you will realize that with
hard pencil pressure, it's a little more
difficult to keep layering continuously... because
at some point your hand will start
to feel tired. This is because with
the first layer itself, the hard pencil
pressure had done a good job of
flattening the paper. So when we add additional layers on top of already
flattened paper, then we have to work extra hard to achieve the
shade that we want. In fact, after a point, the pigment simply
slides off the paper, and the color does not hold
very well to the Base Layer. That is very minimal effect
with hard pencil pressure. And you don't get
the opportunity and the freedom to control those
layers as you would like. So it's a little difficult
for us to achieve layering with hard
pencil pressure. So whenever you're looking
to layer color pencils specifically with the intention
of achieving a new shade, it's ideal that you
start working with Light Pencil Pressure and then build the layers gradually, little by little, so
that you can achieve the desired effect and get the shade or the
color of your choice. But as I mentioned earlier, if you're looking to fill up a section of your drawing with a solid color only without
any kind of gradation, then you can use the
Hard Pencil Pressure and get it done with just one
or two passes of color. The bottom line is that you
can keep Layering for as long as the paper isn't
completely flat and burnished. Which brings us to understanding what exactly Burnishing is. Burnishing is the
act of flattening the paper tooth by applying layers and layers
of pencil over it. This produces a
smooth surface of the colors that go deep into
the grain of the paper. Each paper has a
certain threshold for the number of layers
that it can accept. Once you reach that limit, the paper will start to
suffer under the pressure of the pencils and it
might even get torn. This is the reason why it's
recommended to work on heavyweight paper so that you have enough scope to
Layer your color pencils. So for example, over here, I'm going to add a
few more layers. You can see how the
white paper grain is gradually disappearing. So we're basically
Burnishing this area. This effect that you can
see here with a smooth, shiny surface and
no paper grain visible is what is
called Burnishing. Now, you can achieve Burnishing with a single color
or multiple colors. So we just saw an example
of two colors over here. Now, let's try this with
a single color as well. So for example, this patch
over here with a single color can be burnished by going
over it once or twice. And we can keep adding layers till no paper grain
is visible to us. Now, let's try Burnishing
this one over here as well. So I will keep adding layers till I achieve
a burnished effect. With Light Pencil Pressure, I can keep adding these alternate colors and
I'll gradually increase the intensity of
the pressure when I think I'm close to the
shade that I want. Of course, it's much easier and faster to get a burnished
effect with single colors. Because you can simply apply hard pressure on the first
couple of layers itself. And you can get done
with it very quickly. But when it comes
to multiple colors, the process is a
little bit slower. Because not only are you
trying to burnish the patch, but you're also
trying to achieve a custom shade in the process. So as you go about Layering
both those colors one-by-one, it's going to take you
a little bit more time to achieve the desired effect. Now, another way to achieve Burnishing is with
the Blending Pencil. So this is basically
a colorless blender where there is no
pigment inside. It's simply colorless wax. So to achieve a Burnished
effect with this, we first have to
lay down a couple of layers of the
color that we want. Then we simply bring in the colorless
blender and apply it with hard pencil pressure
and go over it like so. As you can see, it creates this beautiful, shiny smooth effect. Now, the colorless
blender is actually a cost-effective way to
achieve Burnishing quickly. Because in the previous method, we were using a lot
of the pigment, which means that we'll run out
of the color pencils much faster when we keep applying
them layer after layer. But with the colorless blender, you can create a
burnished effect with just a couple of layers. So it won't change
the color that you already have on the paper. And you can apply just maybe one or two layers
of the color that you have in mind and then go with the colorless
blender on top of it. Now, another advantage of
the colorless blender is that when you've
mixed two colors to achieve a shade
of your choice, then you don't need
to risk changing it by applying another
layer of color. You can achieve the
burnished look with a blender pencil instead. So for example, over here, I'm going to do
alternate layers of the rose pink and the
process red color. And I'm going to keep
layering these till I get the color of my liking. Now once I'm satisfied
with the shade, I don't want to risk
the shade by going once more with either the
pink or the process red. Because let's say I'm
scared that I might not be able to achieve
the same shade again. So instead of going over it once more with the pink or
the process red and just trying to go down that rabbit hole in
achieving that shade, I will stop right here; and I will bring in my
colorless blender instead. And so over here right now, my colorless blender
actually has a little bit of residue from the previous color that we were working with. The first thing that
I want to do is clean my colorless blender
over here like so. And we just twist it around and get rid of all
of that color. And once the pencil is clean, then I will bring
it over here on this patch and I will
start to burnish this. So basically now I
have that smooth look and I was able to achieve it much faster with the
colorless blender, rather than going once more
with the pink and then the process red and then the pink again and so on and so forth. So basically this is a great way to use your
colorless blender. Once you're happy with the
shade that you like, you can simply start to
burnish it then and there. Alright, so as we
were doing this, you also saw me clean my pencil. I just want to reiterate
and emphasize on the fact that you have to keep cleaning your colorless blender whenever
you're switching colors. So for example, if I
do a yellow patch over here and I want to burnish this, then you can see that if
I don't clean my blender, then the pink residue is actually overlapping on
top of that yellow layer. And it's unnecessarily giving me another shade
or another color. And so these residue marks tend to make your
drawing look very shabby and sometimes they just really interfere
with smooth blending. The best thing to do is to keep cleaning your colorless
blender frequently, and especially when you're switching from one
color to another. And that way you'll
be able to maintain pure colors all
across your drawing. Alright, now, with
that out of the way, let's talk about Blending. Now, Blending is
simply the act of mixing two colors to
create a new color. And we actually did
cover this concept of Blending when we were practicing
the Layering over here. Layering and Blending
and Burnishing are all interconnected as I was
telling you earlier. And you cannot achieve one
without doing the other. So over here, when we
were layering the blue and the yellow to achieve
a custom shade of green, we were also Blending
them in the process. But Blending can also be
used to create transitions. That is, when you're moving from one color to another
in your drawing. So for example, we want
to create a gradual shift going from this light
purple to a dark purple. For this, I'm going
to start applying my first color
over here like so. And then I'm going to overlap my second color and
overlap my third color. Now I want you to
pay attention to these overlapping
sections over here. So the key to
Blending is to make sure that the colors are
overlapping each other. And that is how you'll be able to create smooth transitions. So your first color should overlap a little bit
into the second color. And your second color
should overlap a little bit into the third color as
well as the first color. So whenever you're
working with two colors, you want to make sure that
there is a small patch in the middle where the colors
are overlapping each other. And you are gradually
layering them with light Pencil Pressure to
create these smooth blends. Once you're happy with the
application of the color, then you can bring in
your colorless blender. So once again, I'm just
going to clean this and then we can burnish this. Overlapping the colors wherever they're meeting is the right
way to blend them. And it's the right way to
create the transitions. As opposed to that, I'm going to show you the
wrong way of doing it. So for example, over here, I'm going to lay down my color and stop it
over here like so. Then instead of overlapping
my second color, I'm going to actually start it from the very
edge of the first color. So now you can actually see a hard boundary
or a hard line, which means that you're
able to make out where the first color is
starting and stopping, where the second color
is starting and stopping and where the third color
is starting and stopping. In other words,
you're able to see these rigid boundaries or these harsh lines in the middle. And that's something
that we want to avoid when we're trying to do gradual smooth blending
and when we're trying to create smooth
transitions in our drawing. So the best way to avoid
that is by overlapping the Colors and to create a gradual shift or a
gradual transition. And make sure that you're blending it all
seamlessly and smoothly. So once again, we're
going to look at the right way of
blending two colors. So I'm gonna put in
my pink over here, and then we're going to
overlap it with the lilac. And so once again, we'll add a little
bit of pink. And then a little bit
more of the lilac. And with each pass
or with each layer, you can see that I'm actually overlapping the colors a
little bit in the middle. And that's how we're able to create this smooth transition. And we're able to get
a beautiful blend of colors like so. So this is basically us Layering and Blending
at the same time. And then since we're applying more and more color
one after the other, we're also Burnishing this in the process because with
each passing Layer, the tooth of the
paper is flattening and we're getting a smooth
surface on the top. Once again, I'm just going to
clean my colorless blender and blend this going from
one direction to the other. Alright, so let's get
this dust out of the way. And now we're gonna deal
with a very common question. What if you don't have a colorless blender to
work with right away? Well, then you don't
need to worry because the answer to that
lies in Layering. So if you don't have
a colorless blender, then you can achieve the
exact same effect by just applying one or two more
layers to your base layers. For example, over here, I'm going to use the
same two colors. I'm going to keep
going alternate between the pink and the lilac. With each passing layer. I'm just going to increase
the pressure a little bit. Which means that in the process
of layering and blending, I'm also Burnishing my
paper along the way. So you can achieve the exact same result without
a colorless blender too. The only difference or the only disadvantage
to this would be that you run out of your color pencils a
lot faster in this method, because you'll be applying
more and more layers of the color instead of using
the colorless blender. And so this is not exactly the most
cost-effective way of burnishing a drawing. But at the same time, if you don't have a
colorless blender, then this is your safest
bet; because it guarantees good saturation
of color without compromising on the
details of your drawing. So if you don't have a
colorless blender, that's totally alright! All you will need is maybe one or two extra
layers of color. Now there is one other
way of Burnishing, and that is to burnish
with a white color pencil. So once again, I'm going to use these two colors as an example, and I'm going to overlap them to create a
smooth transition. And once I have the
desired effect, then I'm going to go
in with my white color pencil from one end of
the patch to the other. I'm going to use this with
hard pencil pressure. Pretty much the same way as I would use my colorless blender. And I'm going to burnish this whole area with
my white color pencil. Now this method comes with
advantages and disadvantages, and those are
actually subjective. So over here you can see
that this entire patch has a milky cloudy
residue on top of it. And that is the effect of the
white color pencil because it lightens the color and the vibrancy of the
color under it. So unless this is the effect
that you're going for, the white is simply
going to take away the beautiful vibrance and the beautiful saturation of the color that you
have under it. But if you want to
create a more pastel look and a more dreamy, soft look, then you can definitely burnish using
your white color Pencil. And it'll help you achieve the lighter version of the color that you have
under the white layer. Alright, so this has
probably been a lot of information for you
to consume in one go. But don't worry, because I've
put all of this together in a document for you
to download in the Projects and
Resources section, which is right below this video. Once you have that document
downloaded with you, I recommend that you practice
all of these exercises. Then meet me in the next lesson. We're, we're gonna
be talking about color pencil
sharpening techniques.
6. Sharpening Techniques: Alright, so in this lesson, we're gonna be talking about how to sharpen your
color pencils, as well as how to
take care of them to avoid wastage
as well as damage. Now, whenever you purchase a new box of color pencils
that are soft core, you will notice
that they usually don't have sharp points
for all the pencils. Now, my box is pretty
used up in general. So not all of my pencils
are brand new right now. But this particular
Pencil over here, for example, has
not been used much. In fact, it's actually
never been used. So it's brand new. And you can notice
two things over here. The first thing is that the tip is not completely
pointed and sharp, and that's how you get
all the pencils in your box the first
time you buy your box. And the second thing is that this little section on
the top is pretty small. And this is because
it's been designed to maintain this length more or less even after you sharpen it. So these two factors
are actually interconnected and
we'll understand this a little better right now. The thing with soft
core pencils is that it doesn't make sense to sharpen
them to an absolute point. And the reason is that they will actually never
maintain that point. So for example, let's sharpen this one over here to
an absolute point. And now if I start to color
a small patch over here, you will notice that the point actually
vanishes pretty quickly. So the core inside is very, very soft and it simply melts away because it doesn't
have any rigidity to it. And so the pencil is just not able to maintain a sharp point. In fact, most of the time, the sharp point of a
soft core pencil will simply just snap off or it
will break away with pressure. So for example, now, this one has a sharp point. If I put even the tiniest
bit of pressure on this, it's just going to break away. So basically it
doesn't make sense to sharpen these
soft core pencils to a sharp point because we're simply just wasting
the pigment away. And instead of doing that, we should maintain a
somewhat blunt point for easy Blending. Now, in contrast, if you were using a hardcore pencil, then this would not happen. Because hardcore
pencils are able to maintain their sharp points
for a very long time. This difference between
the soft core pencils and the hardcore pencils
is important for us to know for
two primary reasons. The first one is that if we want to add fine details
in our drawings, such as drawing very
thin hair in portraits, or let's say we're drawing
animal fur, for example, then we will need a very, very thin and sharp
pencil for that. And in that case, if we are using a
soft core pencil, then we will have to keep
sharpening it over and over again to get to that
sharp point frequently. So that means the
process is going to be very time-consuming. But with hardcore pencils, the process won't be so
time-consuming because the pencils will retain that sharp point for a
very, very long time. And so you can keep using the
pencil over and over again. And secondly, with so much sharpening
of the soft core pencils, it would eventually lead to
a lot of wastage as well. Because every time
you sharpen with the intention of getting a fine point on a
soft core pencil, you're actually wasting
the pigment inside. This won't happen with a
hardcore pencil though, because you don't need
to sharpen it so much. And hardcore pencils are able to maintain a sharp point
for a very long time. Now, keeping these
aspects in mind, most people use a combination of soft core pencils
and hardcore pencils. The soft core
pencils are used for larger application of color
and broader coverage, as well as for better blending. But the hardcore pencils
are used for adding very fine details or to color in really small
sections of your drawing. Now in today's class, since we're working
on gemstones, which are generally very
smooth and glass-like, we can work with soft
core pencils only. We don't need two separate sets of color pencils for today. So prismacolor has designed this particular sharpener
with two holes, one small and one large. And the smaller hole is meant for their Prismacolor
soft core pencils. And the bigger hole
has been designed for their Verithin
range of pencils, which is their
hardcore Pencil range. So when I put my pencil
in the soft core one, it usually takes me a couple of turns to get to the
desired point. Now remember these
are soft core pencils, so there is absolutely no point in making them completely sharp. So something like this
should be absolutely fine. And the bigger hole is for
the Verithin pencils. But since we're not using those pencils in today's class, we don't need to worry
about that right now. Now, there will be some
occasions when you only have a soft core
color Pencil set, but you need to add few sharp
details in your drawings, such as the corners
of your Gemstones when you're blending
them for final touches. In that case, working with a blunt pencil might
be a little tricky. What I usually do
in that case is that just for the sake
of a few tiny details, I use the bigger hole on my
soft core colored pencils too. Now keep in mind, this is not
an ideal recommended step, but when you only
have one set of color pencils and
that is soft core, then it makes perfect sense to sharpen them in the bigger hole, rather than buying two separate
sets of color pencils. In fact, to be very honest, I only own a full set of
soft core color pencils. For the hardcore ones, I just buy them as single color pencils as
and when I require them. I don't own a full pack of
the hardcore color pencils. So if I use the soft core
Pencil on the big hole, just a little bit like so. I can achieve this fine point for a small section
of my drawing. And I can continue to
work with this rather than buying a new hardcore
Pencil altogether. So that's how I use my
prismacolor sharpener. And of course, if I don't need to add any fine details
in my drawings, then I continue to use the
small hole for all my pencils. And I maintain a blunt point on all of my soft core pencils. Now sharpening
with a bigger hole also eats away more of
the body of the Pencil, which means that this distance will become bigger or longer. And so that leads to a lot
of unnecessary wastage. So the best thing to do
is to keep sharpening on the small hole and use the larger hole only
and only when required. Now, another thing to keep
in mind is that using regular graphite
pencil sharpeners is not a good idea at all. And that's again,
for the same reason. They will eat away the body of the Pencil and it will lead
to a lot of wastage. You will run out of your
color pencils a lot faster. So it's best to use a sharpener, which is designed specifically
for color pencils. And finally, soft
core color pencils need to be treated with
a lot of love and care. If you drop them, you will cause fractures on the inside and they
will keep breaking off. So for example, this one over here has multiple
fractures inside. And whatever I do, I just can't seem
to make this pencil work because I dropped it once. And since then it's just been a wasted
pencil for me. You want to make sure
that you don't drop your pencils at any cost because the core inside will
definitely break and then you won't be able
to use your pencils again. Alright, so that's it for
all the sharpening tips. And now I will see you in the
next lesson where we will discuss the anatomy of a
smooth, shiny gemstone
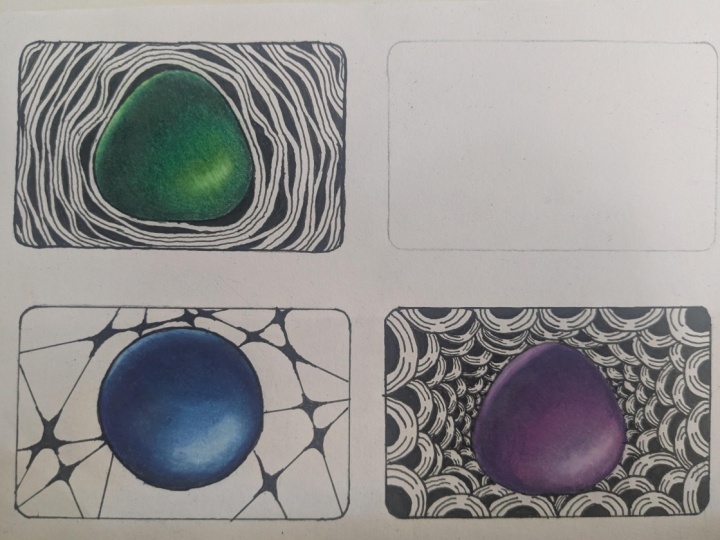
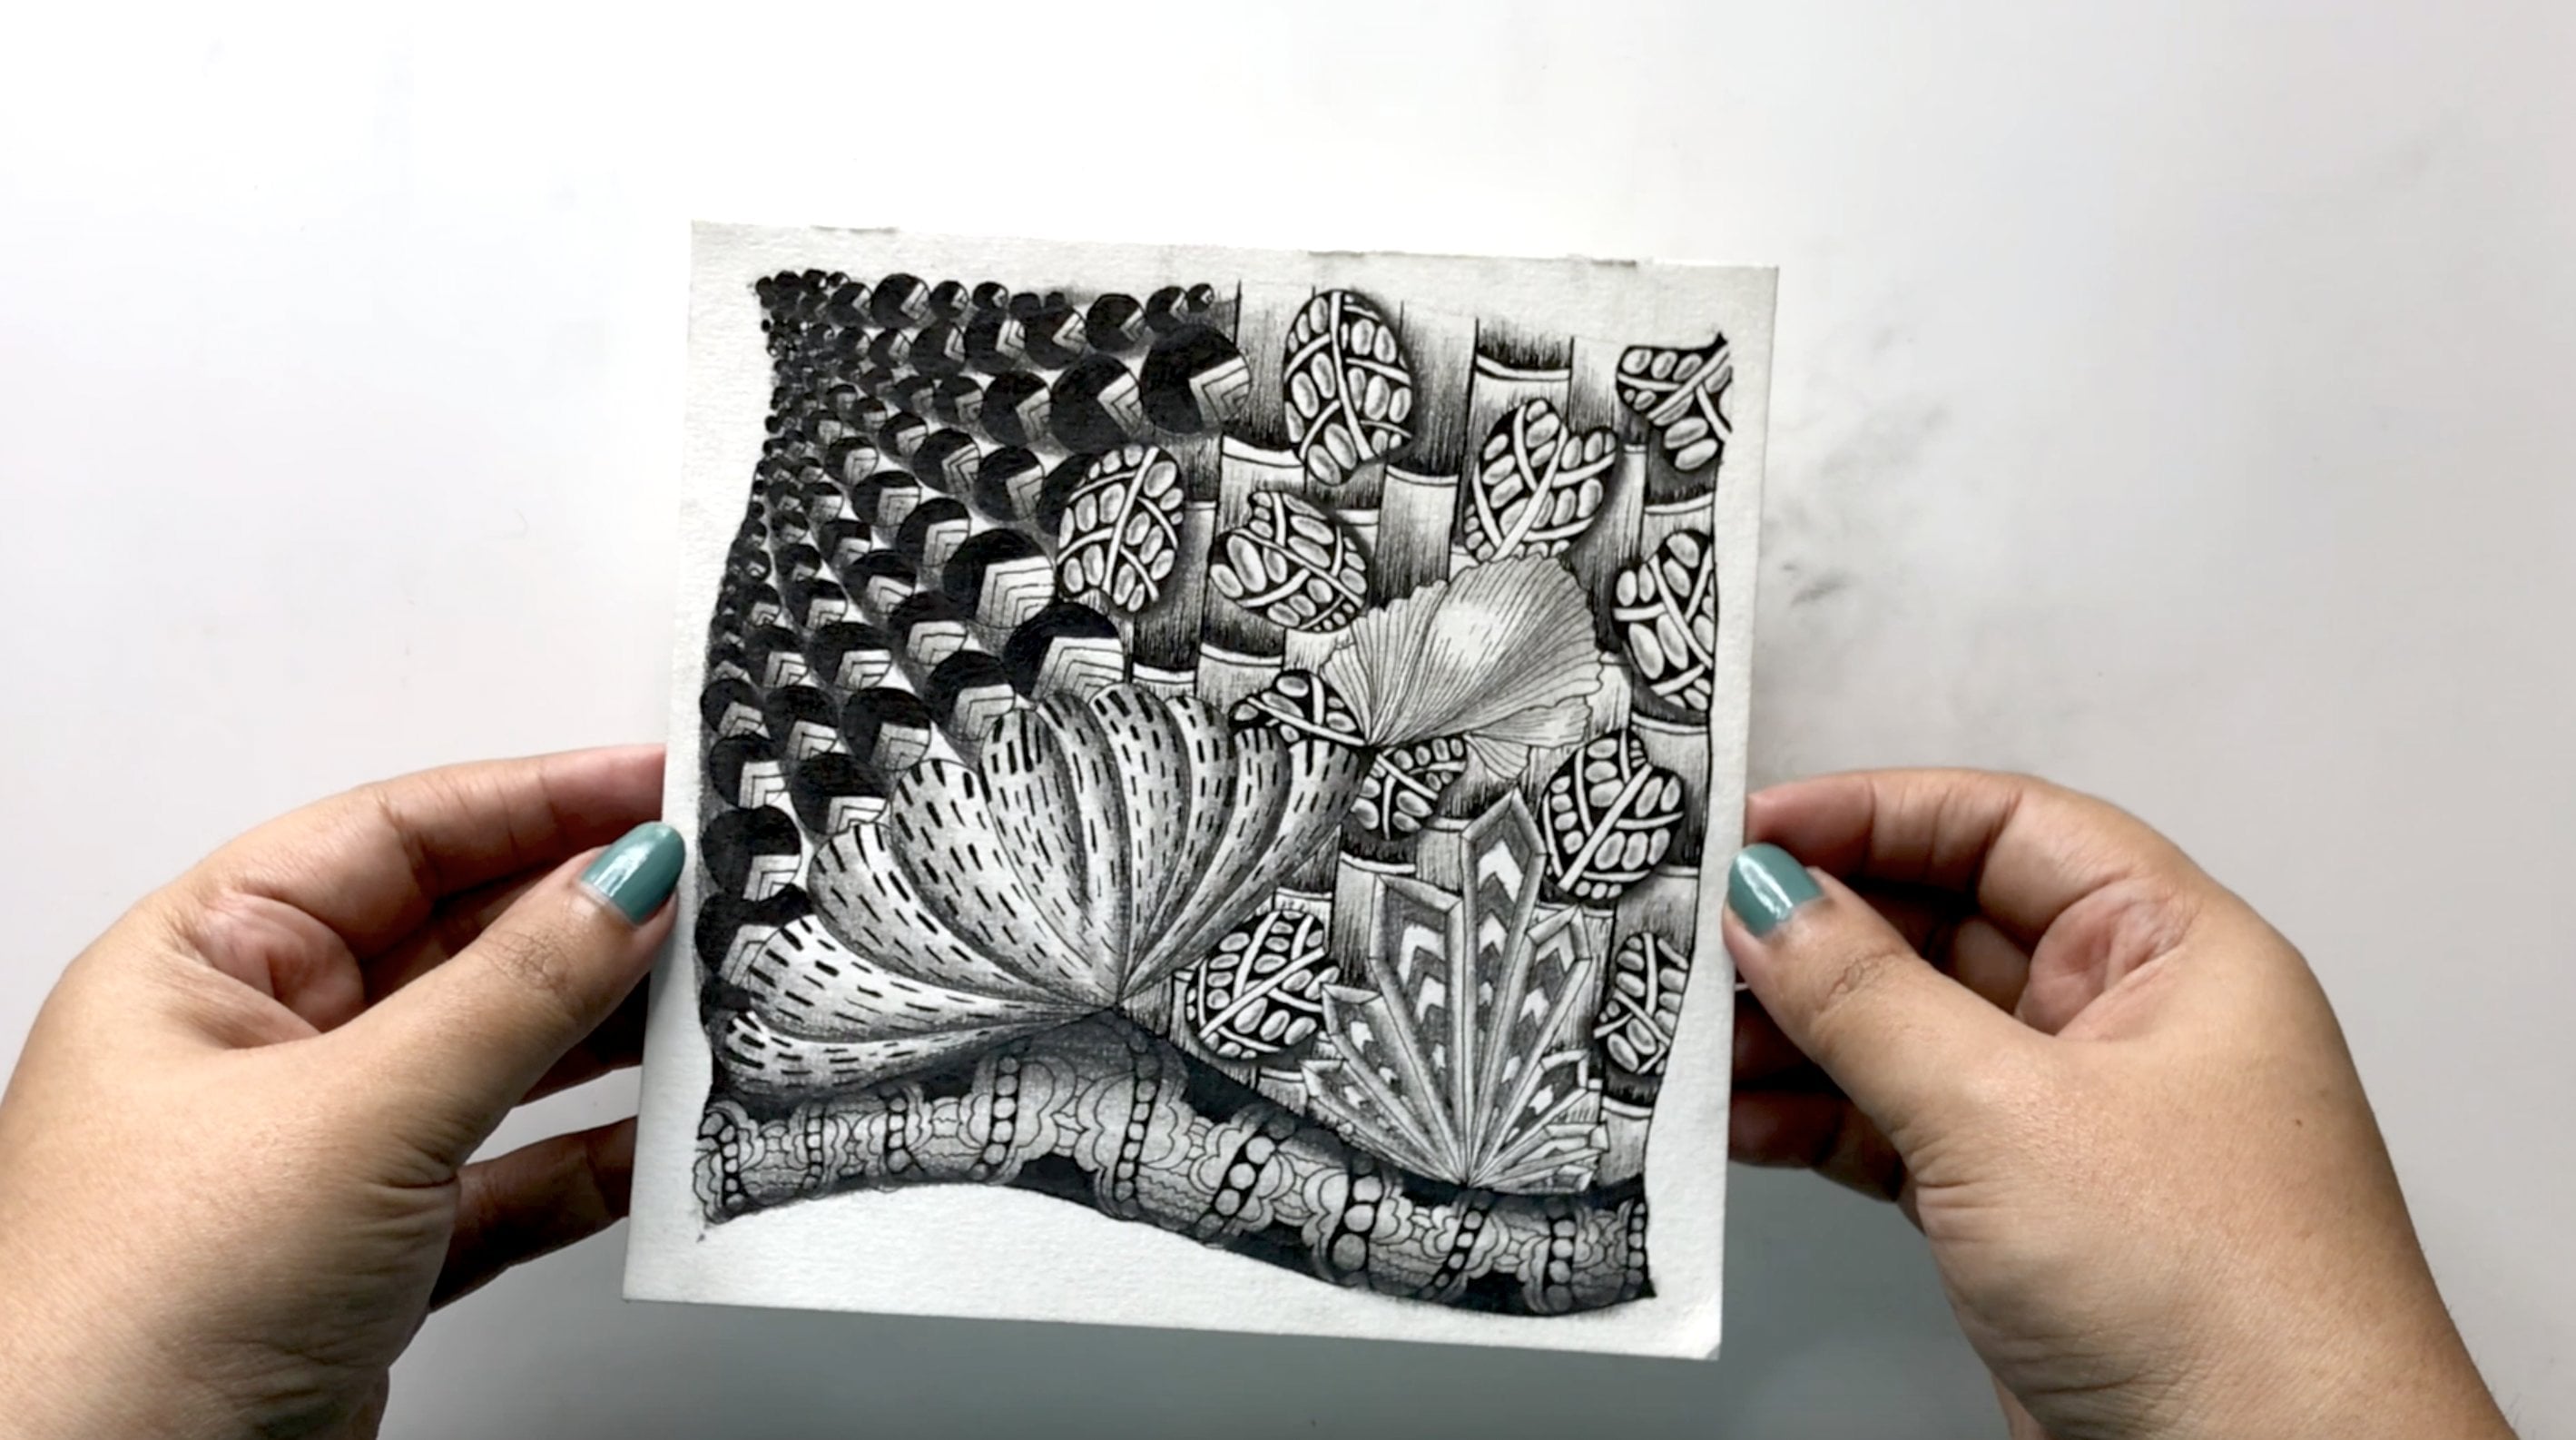
7. Anatomy of a Gemstone: Alright, so in this lesson, we're gonna be talking
about the anatomy of a shiny translucent gemstone. Now, as you can see in this
gemstone drawing over here, the transition from the dark to light colors
is quite visible. The topmost area is the darkest, which basically
indicates the shadows on the underside
of the gemstone. So since these gemstones
are almost glass-like, the underside is usually dark, while the top area catches
most of the light. You can also see that the
dark shadow effect becomes narrower as it comes down
the edges of the gemstone. Then in the middle area, we can see the brightest color, which is sometimes either
the lighter version of the color on the top, or it is completely different depending on the nature
of the gemstone. So in this case, while
the darkest area is almost like a brownish
or a maroonish-red, the middle area is a
brighter tomato-like red. But that's not going
to be the case always. Sometimes you might have a
really dark color on the top, let's say like a
purple or deep violet. And then in the middle you
might have something like a pink or blue or a completely different
color altogether. So it all depends on the
nature of the gemstone. Then we usually have the
lightest color at the bottom, which is basically the area from where the light
passes through. Pretty much like how
light passes through a prism or through
stained-glass windows. Even these glassy gemstones have a soft light which is passing
through from the bottom. So the light simply travels
through the other end. Now, this soft light, which is traveling through
the gemstone at the bottom, is usually on the opposite side of the highlight on the top. And the highlight is the
area where we can see a clear sharp reflection
of the light source. The light source can
be a natural one, such as the sun hitting
the gemstone directly or light coming in through
the windows in a room. And other times the light
source can be artificial, such as the lights that
we have in our house, which are run on electricity. And finally, this whole gemstone is placed inside a bezel. The outer bezel indicates the frame in which the
gemstone is sitting. Very similar to how we see gemstones in
real life jewelry, such as in pendants
and earrings. And there are no rules when it comes to making
these bezels. So you can make them as ornate
and detailed as you like. Or you can keep them
simple and minimal, like you see in the
example over here. Now the bezel and the
highlight are both optional, depending on how you plan to use the gemstone in your overall
drawing or composition. So for example, over here, I have a gemstone where we clearly don't have a
bezel on the outside. And we also don't have
the highlight on the top. But now in this example, since there is no bezel, we can actually create an outer shadow for
the gemstone itself. So imagine that this gemstone is placed on
a plain white surface. Then it will cast a
subtle gray shadow. And the shadow will be
opposite to the light source. And somewhere in that shadow, we can also see a subtle
colored glow. This is to show the light which is passing through the Gemstone. Then it's casting a glow on the surface on
which it is kept. Another thing to note
in this example is the light that is reflected
from the surrounding objects, which is also often
known as bounce light. This is also optional. And you can add one or
two of these around the edges to enhance the overall appearance of
your gem even further. So at the end of the day, it's really up to you on how you want to make
your gemstones and which aspects of
realism you want to keep or avoid
in your drawings. As we work on our class
projects later on, you will have plenty
of options to customize your projects
anyway you like. Alright, and with all that basic understanding
out of the way, let's move on to
our next lesson, where we will be discussing about gemstone colors and shapes
8. Gemstone Color Selection: Alright, so let's talk about
a gemstone color selection. Now, to make a smooth,
glassy gemstone, we will require six colors
for each of our projects. A dark color, a medium color, a light color, black,
white, and gray. To understand this better, we need to know how
color value works. So very simply put, Value refers to the darkness
or lightness of a color. You can change the value of
a color by adding white, which means you're
creating tints of a color. And you can also
change the value of a color by adding black, which means you are
creating shades of a color. Then you can also add
gray to your color, which means you are creating
tones of the same color. So in our color pencil box, we usually have a lot of these tints and shades
already available to us. And these are basically the lighter or darker
versions of the same color. So to understand this better, I will start by swatching out all the blues that I have with
me in my color pencil set. Then I'm going to
pick a dark color, a medium color,
and a light color. Sometimes it's really easy
to spot these colors. So we know that this one
is a light color for sure, and this one is a
dark color for sure. But there are other
times when picking the right values of colors
can be very confusing. So the easiest way to
simplify this process is to click a picture of your swatches and convert them into
black and white. Now, you can easily understand which ones are light,
medium, or dark. And you can rearrange
these swatches in different combinations to
pick the right colors. So for example, I can use
this one as my dark color, this one as medium, and this one as light. Or I can also do
this combination. But now it's not only
about the value. We also want colors that make the gemstone pop a little bit
and make it seem vibrant. So for example, if I go with this color combination, then my gemstone is going to
look a little bit dull. And that's because when
I use a white color pencil in combination
with these colors, it will flatten out my
drawing completely. This blue is already so light that if I add
more white to this, then it's going to
become even lighter. And that's gonna make my
gemstone really dull. So I prefer to use
combinations where my lightest color is a
bright, saturated color. Similarly here in this example, it's a great combination
going from dark to light. But again, my lightest
color is already so light that if I add
any more white to this, then it's just going to
make it even lighter. So my pro tip, is that
when you're looking for colors for your
gemstone projects, not only do you want
your lightest color to be in complete contrast
to the darkest color. But you also want
to make sure that your lightest color
is a bright hue. For that, you can also pick
neon colors if you'd like. Now, both of these examples that I have shown you over here, are of a monochromatic
color scheme. A monochromatic color scheme is a color palette that is made up of variations of a single color. This means that you can
use shades, tints and tones of the same color to create a cohesive and harmonious look. Using a monochromatic
color scheme can create a sense of simplicity and
elegance in your artwork, as well as a sense of
unity and harmony. Since all the colors are
derived from the same hue, they naturally
complement each other, making it easy to create a
cohesive and balanced design. But keep in mind that while a monochromatic color scheme
can be very effective, it can also be slightly
limiting or boring. So depending on the mood and the atmosphere you want to
create in your artwork, you can also try to make your gemstones with
analogous colors. Now, analogous colors
are colors that are located next to each
other on the color wheel. They share a similar hue,
and they too can create a harmonious and cohesive look when used together
in an artwork. For example, the colors
green, yellow-green, and yellow, are Analogous Colors because they are next to each
other on the color wheel. Similarly, the colors blue, blue-green and green are
also Analogous Colors. Now, using analogous colors in your artwork can
create a sense of unity and balance as the colors naturally
compliment each other. But again, the key here
to make a gemstone successfully is to use Analogous Colors in
decreasing value. For example, in one of
the projects ahead, I'm gonna be using Poppy
Red as my darkest color, Orange as my medium color, and Sunburst Yellow
as my light color. Now, by looking at these colors, you can easily make
out that red, orange, and yellow are Analogous Colors, but at the same time, they're also decreasing
in their value. When I convert these colors
into black and white, you can clearly see
that the yellow is a lighter value as compared
to the other two colors. The bottom line is
that whether you use a monochromatic color scheme or an analogous color scheme, you need to pick the colors
with decreasing value. Now, if you're planning to use your gemstones in a
larger piece of artwork, then another important
factor to consider is colors that will work together
in terms of temperature. Warm colors such as red, orange, and yellow can create a
sense of energy and warmth. While cool colors,
such as blue, green, and purple, can create a sense
of calmness and serenity. If you want to create
a specific mood or atmosphere in your artwork, then consider using the colors
that compliment that mood. And now, while we're talking
about warm and cool colors, let's also understand
the use of grey. So remember, a few minutes back, I said that we need six
colors to make our gemstones. Now that we've talked
about the dark, medium and light colors, let's also talk about the grey. To make gemstone shadows
and color tones, we need to use gray. Now, most times your color pencil set will have different
shades of grey in it. So you will have
50% greys, 30% greys, and so on. But you will notice that
within these colors, you also have options of
warm greys and cool greys. To pick the correct grey color, you will need to check whether your dark
and medium colors in the project are warm
colors or cool colors. For example, if I'm making a gemstone with shades
and tints of blue, then I will pick a
cool grey pencil, because blue is a cool color. But if I'm making orange
or red gemstones, then I will pick a warm
grey pencil because red and orange fall on the warmer side
of the color wheel. Now, let's say you have a small color pencil box that does not have a lot of
grey choices in it. Well, that's totally alright. Because most of the
small color pencils sets will have at least 1
grey Pencil in them, which is almost always
a neutral grey color, which means that
you can use this grey in all your projects. Now, here is an exact
list of colors that I will be using in all the
projects for this class. If you're using the
same brand as me, then feel free to follow along
with these combinations. Of course, you're
totally welcome to try other combinations too. Now, please keep in
mind that the colors on a computer screen always look different to
colors on paper. While I have done
my best to match these colors on the screen
to the original swatches, there might be
slight discrepancies based on your screen
settings and brightness. I also want to mention
that the body of the color pencil is not the same color
as the pigment inside. So when you're picking the
colors for any project, you should always swatch out the color pencils
and check the effect on paper rather than relying on the color
of the outer body, because most of the times the outer body colors
are not accurate. Another thing to note
is that all brands have a different system
for naming their colors. So for example, a color
that is called Poppy Red from the Prismacolor brand
might be called Red Orange or Tomato Red
in a different brand. So when you're using color
pencils from different brands, try and match them to the
swatches of the pigment, rather than trying to match them with the names of
the color pencils. Finally, it's also
important to remember that working with color
pencils is very intuitive. And something that might
be working for me in my drawing might not necessarily work for
you in your drawing, simply because each of us have a different way of
holding the pencil, and each of us have a
different style of applying pressure
to the pencil. So depending on the brand
that you're working with, as well as the colors
that you're working with, you might have to go back and forth on your drawing
several times. Sometimes you will be done much quicker as compared to me, especially if
your pencils have more pigment inside of them, and then there are gonna be other times when you will probably need a couple of extra layers
as compared to my artworks. And that will probably be
because your pencils are with slightly less pigment
inside or maybe they're not as saturated
as my pencils are. Make sure that you practice a lot and feel free to customize the process depending on the brand of color pencils
that you're working with. Here are some other practical
tips that will come in handy when you start working on your color
pencil projects. The first one is
to keep sharpening your pencils as
and when required. Now, depending on the brand of pencils that you're
working with, the type of pencils that
you're working with, and the pressure that you apply, you will have to
sharpen your pencils more or less number of
times as compared to me. So most of the
times you will hear me giving you a reminder
to sharpen your pencils, especially when you're getting into the small sections
of your drawing. But you might be working at
a different pace than me and you might have
a different scale of the project as
compared to me. So make sure that
you're constantly aware of your color pencil needs and keep sharpening
them as and when required. The second thing to
keep in mind is that we never leave paper white
on any of our drawings. Now you may have
certain occasions in your drawings where you want to leave certain sections white. But to do that, we always need
to cover the surface with the white pigment
of the white color pencil rather than relying
on the paper white. And that is simply because after a point your paper
may start to discolor or it may start to
gather dust on the surface. And in that case, we don't want to cause any inconsistencies in our artwork. And we don't want the
paper white to take away all the vibrancy and all the beautiful saturation
of our color pencil artwork. So to make sure that the whites are actually
looking like white, the best way to
secure them is by covering all the paper white
with white color pencil. And we will actually
see an example of this when we start working
on our second project, where we will have a
lot of paper white, but we will cover that up
with the white color pencil. Finally, it's important to remember that every time you're switching your
color pencils from dark to light sections
in your drawings, you need to keep cleaning them. So just like we did with
the colorless blender, every time you move from one section of your
drawing to another, you need to check
for the residue of the previous color on
your color Pencil tips. So this way, we can maintain pure colors all
across our drawing. So that's it. These are all the color pencil
tips you will need to get started
on your journey. And with this, we can move
forward to our next lesson.
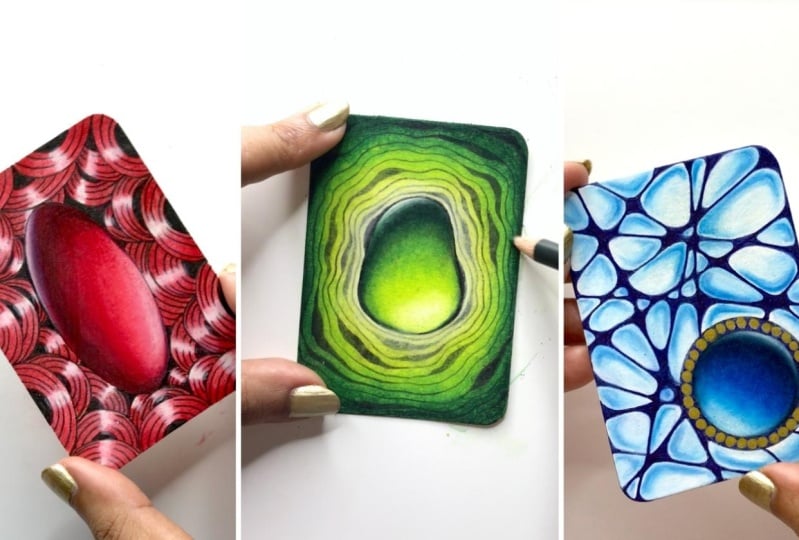
9. Gemstone Shape Selection: Smooth and glassy gemstones come in various
shapes and sizes. But when it comes to art, you can push the boundaries even further and get really
creative with the shapes. I use all kinds of everyday objects to make the
outlines for my gemstones. So here I have
some random bottle caps that I have taken
from sanitizer bottles, shampoo bottles,
moisturizer bottles, ketchup bottles, etcetera. These are really
fun to play with. Then I also have these
polymer clay cutters, which are used to make
handmade jewelry. And these also come in really fun and
interesting shapes. You can also use cookie
cutters in the same way. I also have these
random baubles from old jewelry making
projects that I kept with me because I found the
shapes to be interesting. So some of these resemble
real gemstone shapes, while the others are a
little bit more unique. But the point is that you can
play with different kinds of objects and create some really fun and
interesting shapes. Finally, I also use these washi tapes to draw
simple round bezels. So I can make an outer circle. Then an inner circle. Then I can use this space
in the middle over here to create a simple Bezel by
adding a few small details. Of course, last
but not the least, you can totally draw your
gemstones freehand as well. So you can get creative with all kinds of
polygonal shapes, curvy shapes,
doodle-like shapes, floral shapes and so much more. Basically, just have dun making these outlines and
don't overthink them. Now, I usually draw all my
shapes directly with a pen. But if you like, you can always draw the
shapes first with a pencil and then go back
on the outlines with a pen. So feel free to
do whatever seems easiest and most
convenient for you.
10. Project 1: Base Layer : Alright, so we're all set to begin working on
our first gemstone. For this project, I have chosen to go ahead
with the abstract bauble shape that I had
shown you earlier. But you're welcome to choose any other shape that you'd like. Now once we have
the shape ready, we can start working
with the color pencils. For this project, we're
going to pretend that the light source is on
the top-left corner. So using my black color pencil, I'm just going to create a
small crescent moon shape on the top-left corner, like so. I'm gonna leave that empty. Then using very light
pencil pressure, I'm going to create
small strokes under that crescent
moon, like so. I'm going to take it around
the edges of the shape. Take it all the way down. Just leaving a
little bit of gap empty towards the bottom. But covering most of the edges. Next, I'm going to move
on to my grey pencil. And I'm going to
start overlapping it a little bit on the black. But at the same time
taking it a little lower than the crescent moon
that I had made earlier. This pretty much covers the
top half of the gemstone. And I'm also going to use a little bit of that
grey around the edges, the same way we did
with the black earlier. Next, I'm going to bring
in my darkest green. And the darkest green is
going to be laid down in exactly the same way
we laid down the black. Which means I'm going to take it at exactly the same spots where I had put down
my black pencil. And I'm also going to overlap
that on the gray areas. Again, just like we
did with the black. I'm also going to take my
darkest green around the edges, leaving a little bit of
space empty at the bottom, but covering most of
the edges. Like so. This is us building the base layers and the
shadows of the Gemstone. Now once we have that done, we're going to move on
to our medium green, which in my case is
the apple green. And we're gonna put that at exactly the same spots
where we put the grey. Again, we want to make sure that we're overlapping
a little bit of the medium green
onto the dark green so that the blends are
seamless and smooth. And we're gonna take it
around the edges as well. Basically, the medium green
plays the same role as the grey and the
dark green plays the same role as the black. So we basically repeat
the same steps. Alright, now we're going to move on to our lightest green. And we're going to
leave a little bit of space empty towards the bottom. Pretty much in the shape of a kidney bean or
like a smiley face. And this is gonna
be the area where a light passes through
from the gemstone. So this is exactly
opposite the highlight. And we're going to
blend this in a bit. But for now, we're
just gonna go all around that white
area applying the lightest green and just sort of covering
the whole gemstone, making sure that the whole area is taken care of; that there are no huge white spots, except for the one that we have intentionally left
in the middle. And we're just going
to overlap that lightest green onto the
medium green as well. Again, we just want to make
sure that the layers are all blending nicely and that the transitions are
happening smoothly. Alright, with that, we have
completed our Base Layer. And in the next lesson, we're going to start with
the transitions.
11. Project 1: Adding More Color: Now in our first layer, we worked from top to bottom. But in this next layer, we're going to work
from bottom to top. So we're gonna start with
adding a little bit of white around the area
that we left empty. And you're going to instantly notice that the colors
start blending. This is because white
usually helps to blend and burnish the
colors very well. So automatically you will start noticing that the green is sort of fading into the white. And it's going to create this
little glow or halo effect. Then we're going to bring
in our lightest green. And we're going to start adding
a little bit more color. So we're going to place
the lightest green at exactly the same spots that
we did in the first layer. But at the same time, we're going to add a
little bit more pressure and try to get rid of that paper grain that
we can see right now. So we're again going to overlap it nicely into the medium green. Then we're going to bring in
our medium green and again start to overlap it onto the light green as well
as the dark green. By this second layer, you'll notice that most
of your paper grain is starting to melt under the
pressure of the pencils. And so all those white spots
are gradually vanishing. And we are going to do the exact same thing
with our darkest green. So we're basically
placing the colors at exactly the same spots that
we did in the first layer. Just that we're
going to make sure that we're adding a little
bit more pressure over here so that we have a little more saturation
of the color, so to say. And so that our
gemstone can look nice and bright. Now at this point, I have a lot of color
pencil dust over here. So I'm gonna get rid of
that using my soft brush. And the next thing
I'm gonna do is take my grey pencil and go over the edge of the
darkest green like so, leaving a little bit of
space empty on the top. So I'm just going to blend that grey nicely into the green. It won't get completely blended in right now, and that's okay because we still have a
couple more layers to go, but we just want to
make sure that we're putting down the grey
towards the edges a little bit; so that
it does eventually get blended in properly when
we work on the next layer. Then I'm quickly going to
get a scrap piece of paper. Make sure that my white is absolutely clean because
we just used it at the bottom with the
lightest green. So with a clean white pencil, I am going to go on the top and overlap it a little
bit on the grey like so. So we did have a little bit
of paper white over there, which was absolutely clean. And then we had a
little bit of grey. So the white is covering the empty spot as well as
a little bit of the grey. And with that, we are done
with our second layer.
12. Project 1: Blending: Now for our third layer, we're again going to start
working from bottom to top. So I'm going to start by
cleaning the white pencil on a scrap piece of paper because we just used it with the gray. Now we're going to use
that white pencil to start blending in the
area at the bottom. So we want to make
sure that we're not compromising or sacrificing
that little white spot. But at the same time, we want to blend it in nicely with the light
green around it. Once you feel that
all the hard lines have vanished and that the
blend is looking smooth, we can move on to the
lightest green color. And this time we're going to
blend the lightest green, not only with the
white at the bottom, but also with the medium
green on the top. Again, we're trying to get
rid of those harsh lines. Because in the previous layer, we could actually see exactly where each color was
starting and ending. But now, with these blends, we want to take away those
harsh lines and just sort of create a beautiful transition and a beautiful blended effect. So we're gonna do the same thing with the medium green as well. And not only are we going to blend it into the light green, but we're also going to blend it into the dark green on the top. Sometimes on this layer, you might have to
go back and forth. So for example, over here, I feel I need a
little bit more light green to blend in with
the medium green. So I'm gonna go back to
my light green pencil and just add that a little bit around the medium green to make sure that the
blend is looking smooth. Once again, I'm gonna get
rid of all that pencil dust. And now I'm going to bring
in my darkest green. And not only am I going to blend it with the medium
green at the bottom, but also with the
gray at the top. So we don't want to cover
up the gray completely, but we do want to
blend it in nicely. So you can see that we
can still make out that there's a little bit of
a grey rim at the top, but it's fused with the green. So it's not standing as a gray line separately
or independently. Once that is done, I'm
quickly going to sharpen my darkest green pencil and
bring it to a nice point. And that is because we want
to go around the edges. And for this we need a
little bit of precision. So we're just going
to go around and add a little bit of shadows
around the edge, like so. This is just going to help make the gemstone really
pop on the paper. Now of course, we also
want to blend that line. So we're going to bring in
our medium green pencil and just go around the edges. Pretty much like we did
in our first layer. But now we're just sort of
Blending it a little bit more. And now, depending
on how thick or how unnatural your outer
border is looking, you may have to go back with
your lightest green as well. So this is purely
subjective and there's a chance that you might not
need to do these steps. But for me, I feel like I need to go back to my
lightest green once more and sort of blend out those edges a
little bit better. And I also need to
add a little bit more white to make sure that the
edges are not looking harsh. So just sort of playing between white and light
green; going back and forth to make sure that that little kidney bean shape that we have at the bottom, it's not looking so
harsh as a kidney bean... and it should just be an
abstract halo effect over there. So it should just be like a glowing area in your gemstone, but not necessarily in the shape of a kidney
bean or a Smiley. I just want to blend that out and make it a little
bit more abstract. Alright, and once again, I'm gonna get rid of
all my pencil dust. And with that, we are done with this stage of our gemstone
13. Project 1: Burnishing: Alright, so we're
all set to work on the final layer of our gemstone. For this we're gonna be
using our colorless blender. So make sure that your
blender pencil is nicely sharpened and that
you have cleaned it nicely by taking away all the
residue on a scrap piece of paper so that you don't have any other color interfering
with your green gemstone. Once you have the pencil ready, we're gonna go once more on our gemstone from bottom to top. So we're going to
start blending out the white and the light green. And then gradually
we're going to move to the middle where we
have the medium green. And then from there we are going to move on
to our dark green. We also want to blend the
green and the grey once more. But we wanna be a
little bit careful while doing this so
that we don't go overboard and we
don't take too much of the green into the grey and
the white area on the top. So we wanna do this a
little bit carefully. And then we're going to
clean our colorless blender. And we're just going to focus on the top white and grey area. And we're going to
take that white and grey a little bit
into the green, creating a smooth blend. So we don't need to apply
more color over here because we already have
plenty of color on paper. We just want to smoothen this out. And we also want to go
around the bottom edges once more, just to make sure that the dark green is blending
into the light green nicely. At this stage, if you see any harsh lines or any
inconsistencies in your gem, then you can just sort of
smoothen those out and blend those out a little bit more with your
colorless blender. Alright, so I'm pretty happy and satisfied with my gemstone. So I'm just getting rid
of all of this dust. So for my final step, I'm just going to bring
in my precision eraser and I'm going to get rid
of any spots that I have accidentally caused
on the paper or if I have accidentally
colored outside the lines. So just getting rid
of those spots to make sure that the
gemstone looks neat. And that's it. We have finally finished our
first gemstone together. And in the next lesson,
we're going to start tangling
around this gemstone.
14. Project 1: Tangling: Now that we have a
beautiful gemstone with us, let's try to incorporate this in a Zentangle Inspired
Art project. For this project, I'm
gonna be working with this black Sakura
Pigma Micron pen. But you can work with any other drawing pen that's
easily available to you. And the tangle that
we're going to be working with is
called "Diva Dance." So to start the tangle, we are going to make
a bump somewhere on the outline of our gemstone. And if you have a
different shape than mine, it's totally okay. You can make the bump
literally anywhere on the edge or on the
periphery of the gemstone. And I'm going to make another
bump over here, like so. And I'm just going
to color that in. So basically we
just need a couple of bumps to start off with. But if you have a bigger shape or if you have a smaller shape, then you can totally increase or decrease the number of bumps. It doesn't have to be exact. So the beauty of
this tangle pattern is that you can
easily customize it. And at the same time,
it's very forgiving. So you can actually never go wrong when it comes
to drawing Diva Dance. Now, I'm just going
around the edges of my gemstone and just
giving it another outline, to just make it a little
more prominent. So I'm redrawing at the exact same spot where
the previous outline was. But just to give it a
little more line weight and to just make it
a little thicker. And I'm also sort of blending
it in with those bumps. Now once we have that done, we are simply going to
keep drawing auras. An aura in the
Zentangle terminology is basically drawing
around a given shape. So it's almost like giving an outline to an existing shape. But we're just going to
leave a little bit of a gap and then
make this outline. Now, once we have this outline, we are going to make a few
more bumps on this new line. And the process
remains the same. We're just going to
make a tiny extension, almost like drawing
a small hill. And then we're just
gonna color that in. And by doing this step, we have changed the shape of
the structure a little bit. So now when we draw the next
aura or the next outline, it's going to be traced around this new shape that
we have just created. So basically, with
each new aura, we're gonna keep creating
more bumps which are going to change the shape or the
structure of the shape. And then the next
line is just going to follow around that
previously drawn shape. Almost like tracing
the same steps or the same hand
movements that you've done with the previous line. So we just keep on
repeating this process. And with every new aura
and every new outline, we keep adding the bumps. And then the next line
is just going to follow the outline of the
newly formed shape. Now there are many
different ways to draw this tangle Diva Dance. And the version that
we're currently working with is called the
"Rock 'n' Roll" version. So in this one we're
basically just making these concentric shapes and
just going around each shape, giving it auras and outlines. But there are a couple
of other variations as well for this tangle. So for example, we can do
one with straight lines and that one is called the
Waltz version of this tangle. And then there's
another one in which we create triangular
formations with these lines. And that one is called
the Foxtrot version. So basically, as
is the case with all tangle patterns from
the Zentangle method, you can choose to draw them
any way that you like. There are no rules when it
comes to the Zentangle method. And there are no rules when it comes to drawing these tangles. So you can customize them and personalize them
depending on the project, as well as your own preferences. There is no right or
wrong way to draw this. Just that we try to
do this mindfully and with a little bit more focus so that you can enjoy
that Zen state of mind. And you can actually
enjoy each stroke, which is the core philosophy
behind the Zentangle method. So basically you just enjoy the process and draw this
slowly and not in a hurry. And just basically have fun! Alright, so now
that you've seen me draw a few of these auras, I'm just going to
fast-forward the video a little bit for you to
see the end result. And I encourage you to take your own time and do
this at your own pace. Because depending on the
scale of your project, you might need a little
bit more time than me. And I would encourage you
to really do this mindfully and enjoy the process and not go by the pace of
these video lessons. Once you're finished,
your end result is going to look
something like this. And when you're ready, meet me
back in the next lesson, where we're going to be adding some color into this background.
15. Project 1: Background Coloring: Welcome back. In the last lesson, we
finished Tangling on our tile. And you tie looks extremely
beautiful right now. So if you like, you can leave your tile the
way it is right now. But if you'd like to practice your color pencils
skills a little bit more and you want to enhance the overall
look of your tile, then we can add a little bit
of color in the background. So I'm going to start with my
darkest green Pencil and go around the edges of client
I'll like so putting very, very light pressure and
making gentle strokes. So we're going to
create a dark to light effect going from out to N. And it's going to create this fantasy doorway or a
fantasy portal, a look. So we're going to start with the darkest color on
the edges and then gradually make it lighter as we go inwards
towards the gym. Now of course, if
you've chosen to work on a bigger tile
as compared to me, then you will need a
little bit more time. So feel free to work
at your own pace. And you can always pause the
video and come back whenever you're ready to follow
along the next steps. But for me right now, I have placed enough
dark green on the edges. So I'm going to move on
to why medium green. And as was the case
with a Gemstone, we are going to overlap
the medium green onto the dark green over here
on the background as well. So anytime we are looking
at blending two colors, we always make sure
that we overlap them. And that just helps us to
create a smooth transition. And it just makes the blend look a little
bit more seamless. Again, I'm gonna go with
my lightest green next. So I'm purposely making light
strokes over here towards the inner edges so that I can overlap them later on
with the lightest screen. We're just working with
very light Pencil Pressure, making sure that we're keeping the base ready for the
next set of layers. And so now I've got my
lightest screen over here, which I'm going to overlap
into the medium green. And I'm going to
leave a little bit of space empty towards the middle, closer to the jam, where we're going to be bringing in the
white color Pencil. So it's almost the same steps that we did inside the Gemstone. Just that we're now going
around it with this new shape that we have created with the help of the dividends,
tangle patterns. And we are simply just sort
of creating a halo effect. Going around the
shape with very, very light pencil pressure. I'm just going to add a
smudge of this lightest green towards the
edges of the Gemstone. So that when I bring
in my white pencil, it can be blended in nicely and it's not completely white. So now that I moved
on to the white, you can see that the
lightest green over there is sort of blending it
with a white really nicely. And it's creating this
beautiful Halo like effect. This just goes to show how wonderful these
pencils are there. Absolutely buttery smooth. And you can achieve such great results with
the software pencils. So you can actually layer
to your heart's content and feel super relaxed and
super happy while doing this. And it's definitely
great FUN to infuse it in Zentangle
projects like this one. So now I'm just going back-and-forth with my white
and my lightest green. Just like we did
with the Gemstone, where we worked from top to bottom and then bottom to top. Similarly now we're
going to work outwards. So in the previous
layer we work inwards, going from out to end
towards the gemstone. But now we're doing
the opposite. And I'm just adding a little
bit more white around this to illuminate it
a little bit more. Now again, these kinds of steps are very subjective because they totally depend on the shape of your Gemstone as well as
the scale of your project. So if you're working on a
slightly larger tile than me, then you might have
to go back and forth a few more times
as compared to me. And really there are
no rules over here. And you just have to
eyeball this and go with your guard and make sure that the color application
is happening smoothly. So even though you might be following the same steps as me, duration or the length
of those steps, or the application of
your color pencils will vary slightly depending
on your project. So don't worry if you're taking
a little bit more time as compared to me or even if you've done it a
little bit sooner. Because maybe you've just
drawn your Gemstone a little smaller and maybe your
tile is a little smaller. So it's purely
subjective in that sense I think for me the intersection looks pretty good right now. And I'm going to start focusing on the medium green and
the dark green very soon. I'm just making sure that the
light green is blending in nicely into the medium
green as well as the white. And just making sure that all the white spots
are going away and that wax is smoothening out
the tooth of the paper. Now I have moved onto
my medium green. And I'm just basically
repeating the same steps, making sure it's all
blending in nicely. And that all those
white spots are going away so that you can't
see the paper green. So after I have finished
working with my medium green, I have switched to
the dark green. And basically I have done
the exact same steps, going all the way to
the edges and making sure that the darkest green as Blending into the
medium green nicely. So it's creating this
beautiful fantasy portals look almost like one of those magical
doorways and a forest. So something like that. Then once you're happy with
the application of the color, then you can move on to Burnishing gate with
the colorless blender. You again want to make sure that your blender is
absolutely clean. And you want to work from
white to darkest green. So you want to basically
go from the lightest color to the darkest color
so that you don't have any residue
of the dark color when you're working
on the intersections. And as is the case
with color pencils, always, sometimes you have
to go back and forth. So for example, over here, I'm just adding a
little bit more white and just illuminating that
area a little bit more. But probably this is something
that you might not need to do depending on what your
project is looking like. So just feel free to add a little bit of color
here and there. If you feel that some areas
are not blended and properly and then just continue to
burnish it from into out. And basically just get rid of
all that paper texture and the people green that is showing through the
color pencils right now, smoothing it out a
little bit more. And once this has done, then one of the things
that I like to do is go back on the edges of
my paper, like so. And I basically like
to add a little bit of dark green or whatever the color is towards
the edge of the paper. And just take it around
the corners like so, so that you can't really see the paper white
on the edges. And this is very similar to
how we work on canvases, where we take the Painting
towards the edges. You basically wrap
it around the edges. So I like to do that with
my color pencils as well. Just so that the edges
are connected to the illustration or design
that you have on your tile. So just an additional
little step that I like to do to make my designs look a little bit more polished and professional. With that, we're done
with our first style. So take a moment to congratulate yourself
and pat yourself on the back and take a quick
coffee or tea break. And I'm going to see you in
the next lesson where we will start working on
another exciting project.
16. Project 2: Base Layer: Alright, so we're now ready to start work on our
second project. For this project, I have chosen to go ahead with a circle shape. And I've also given
it an outline using my washi tape because
we're going to be creating a Bezel
in this project. So you can choose
any other shape that you like as long as you
give it an outline, because we're trying
to make a Bezel. What I've also done is that I've placed it off center this time more towards the
edge of the tile instead of keeping it
exactly in the middle. So I have chosen to do this on the bottom
right of my tile, but you can do this on
any of the corners. So feel free to play around with the placement as well as
the size of your Gemstone. For this project,
we're going to pretend that the source of light
is on the top right. We're again going to start
with the black color pencil. And we're going to apply
very light pencil pressure, making tiny little strokes. And then we'll go around
the edges like so. So we're again basically making a crescent moon shape
going around the edges. Just like we did with
the previous gemstone, we're not going to
take the black coloring or the black edges all
the way till the bottom. So I've left a little bit
of a gap in the middle, right opposite to
the source of light. And now I am going to
move on to my grey pencil and just overlap it
on the black a little bit. And just creating some light
strokes on the inside of that crescent moon shape so that we can
overlap other colors. I am now going to bring
in my darkest blue, which in my case is
the Indigo Blue. And I'm going to overlap
it on top of the black. So again, the darkest blue is going to play the same
role as the black. And so we're going to put it at exactly the same spots where we had the
black color pencil. So we're just going to
take it around the edges. And again, I'm going to
leave a little bit of gap empty over there in
the middle, at the bottom. Then I'm going to
bring in my medium blue and I'm going to overlap it on the gray as well as the dark blue that we
had just laid down. This is the medium blue, which means it's going to play
the same role as the gray. And once again, I'm going to
take it around the edges. And finally, I'm going to
bring in my lightest blue. And I'm going to
leave a little bit of space empty at the bottom where we are going to add
a little bit of a glow. So again, it's in the shape of a crescent moon
or a kidney bean, or almost like a Smiley shape
that we're leaving empty. And with that, we're done with the first layer
on this gemstone.
17. Project 2: Adding More Color: Alright, so we're all
set to add more color to our gemstone and make it a
little bit more vibrant. So just like we did with
the previous exercise, we're going to start
from bottom to top. Which means we're going to
take our white color Pencil and gently start to apply
some color at the bottom. And this is directly opposite to where our
highlight is going to be. So we gently blend that in
with the lightest blue. And then I'm going to bring
in my light blue pencil and start to blend that in with the medium blue
as well as the white. So again, we're applying
medium pressure right now and we don't want to burnish this
completely right away. We move on to our next color. And then we're going to
move on to the darkest blue and gently blend that
in with the medium blue. Again, we do this very
carefully so that we don't run into that empty space that we have left on the top, where we're going to bring
in the gray Pencil later on. We do this very, very carefully and try to do this
in a precise manner. And now I have a lot
of wax dust over here, so I'm just going to get
rid of that quickly. Some Colors time to leave a little bit more
wax than the others. And that's just the difference
in the manufacturing. So you will also probably
have some colors in your box which tend to give a little bit more
dust than the others. Okay, So now we move on to the grey pencil and we want
to make sure that this is a sharp grey pencil,
so that we can create this rim or an edge on top
of this dark blue area. And next we also want to bring in a scrap piece of
paper and make sure that our white pencil is absolutely clean because we just used
it to blend the light blue. And so we're going to bring
our clean white pencil and cover up that
paper white on top, as well as blend it a
little bit with the grey. Alright, and with
that, we're done with the second layer
of this gemstone.
18. Project 2: Blending: We're now ready for one
final round of blending. And again, we're going to
work from bottom to top. So I'm going to start with
my white color pencil. And I'm just going to blend
that area at the bottom, making sure that all the
harsh lines are vanishing. And we're creating an
abstract glow like effect or an abstract halo
effect at the bottom. So next, I'm going to move
on to my lightest blue. And I'm just going to lay
down a little bit more color. But at the same time, I'm going to blend it a little bit more into my medium blue
as well as my white. And so again, sometimes
we have to go back and forth depending on the colors
that we're working with. So I feel like I need to add a little bit more
white over here. So I'm just going to
bring that back here and add a little bit more
white towards the edges. Again, this is subjective, so maybe you don't need to bring in white on your gemstone, and maybe your gemstone is looking fine the way
it is right now. So just compare it to
the way you see mine and just see whatever works best for your
particular project, and then go back and
forth if required. So feel free to
customize the process depending on the colors
that you're working with, and of course, the size of the gemstone that
you're working with. So again, I'm just
trying to get rid of any harsh lines that
I can see over here. And just making everything
look a little bit smoother. Same way, I'm going to
bring in my darkest blue and blend that in
nicely with the medium blue. I'm also going to take
it around the edges. And if you feel that your pencil is not
sharp for this step, then you can always
take a quick break, sharpen it, and then
go around the edges. So I'm just going to blend
that in nicely into the grey. And just make sure that the grey rim is blending
in nicely with the darkest blue and is
not standing out or jutting out
independently, so to say. And yeah, I think now this
looks good. With this, we are done with this
step of the gemstone. And in the next lesson, we're going to
start burnishing it.
19. Project 2: Burnishing: Alright, so we're now all set to start burnishing our gemstone. And we want to make sure
that our blender pencil is absolutely clean and that
it's nicely sharpened. So I'm going to
bring this in and first I'm going to start
working on the edges. And I want to make sure
that the dark blue pencil is touching the edges properly and that it's coming
all the way to the bottom. So just refining
that a little bit. Then I want to clean my blender pencil and also
get rid of this dust. And with a clean pencil, I'm now going to start
burnishing the bottom area. So I'm just working on the
white and the light blue, and then gradually
building my way up. Now, by now you've probably understood that the
reason why I wanted to clean the pencil was because we first worked on
the darker edges. And so I didn't want that color to come
into the lighter area. So I cleaned that first before I moved into
the white section, and then I gradually made my way upwards towards
the darkest section. Now, once again, I'm
going to clean my pencil before I work on this
section over here. So I want to make
sure that the grey is blending in nicely
with the dark blue. And also at the same time, the white edge on the
top is not compromised. So we want to do this with
a little bit of precision. You can of course, keep
cleaning your pencil if you accidentally
touch the darker spots. But basically we
just don't want to sacrifice the grey and the
white area on the top. So if you feel like you need to clean the pencil
a couple more times, go ahead and do that. Alright, so now
I'm just blending out the middle area once again, just making sure that
there are no harsh lines and also getting
rid of the dust. So this looks good to me now. I think the only thing I need
to do right now is bring in my precision eraser and just clean out the
edges a little bit. There are a couple of spots over here where I've gone
outside the lines. I just want to clean that up and make sure that this is
looking like a proper circle and the shape has not been compromised because of me
coloring outside the lines. So just cleaning that
up and also cleaning some additional
spots that I have caused on the paper tile. And with that, we're
done with this gemstone. And in the next lesson, we're going to be
adding a Bezel to this.
20. Project 2: Bezel Drawing: Alright, so the next
step in our project is to add a bezel
to the gemstone. And for this, I'm gonna be using my blue colored Sakura
Pigma Micron pen in 05. But you can use any other
pen that's available to you. You can even continue using the black pen that you had
used for the outline earlier. So there are no rules over here when it comes to
creating the bezel. I just happened to have a blue pen with me and
I thought it might be nice to match it to the
color of the gemstone. So that's why I'm
using the blue one. So now I'm just going
around this entire outline, adding small little circles. But you can do all kinds of designs when it comes to bezels. You can take inspiration from real bezels which are
used in making jewelry. Or you can use imaginary
designs and just basically be creative
over here and use any kinds of
patterns that you like. So there are no rules when it comes to making
these bezels. And here are no rules
when it comes to making Zentangle
Inspired Art. So feel free to be
creative over here; you can make the bezel
thicker or thinner... with a different colored pen...
with different patterns... And you can just play around
with the placement of elements over here
on this outline. Alright, now once I'm
done adding these orbs, I'm just going to go around
the outline once more, filling in all the empty
gaps with my ink pen. And actually you can see that this is making a lot of difference because
the gemstone is, sort of popping out a
little bit more now. So every time we add a highly contrasting bezel or a thick outline
to the gemstone, it really helps to lift up the entire stone and make
it pop on the paper. So I'm just going to quickly add some color on all the
remaining spaces. And again, you're free to
work at your own pace. You can pause the video as
many times as you like. And you can come back and
resume whenever you're ready. Once the entire
bezel is colored in, it's going to look
something like this. And whenever you're
ready with your bezel, meet me in the next
lesson where we're going to be tangling
on the background.
21. Project 2: Tangling: Alright everyone,
so welcome back. We're now going to start
working on the background. For this, we're gonna be using our drawing pens once again. So I'll be using the blue micron pen that
I used for the bezel. But you're free to choose any
other color that you like. And you can even continue
using the black pen that you have used for the
outline of the gemstone. Now the tangle that we're
going to be working with in this particular project
is called N'Zeppel. And this is again an original
tangle introduced by the Zentangle headquarters
because it was created by one of the founders
of the Zentangle method, which is Maria Thomas. So the tangle basically
starts off with these crisscrossing lines that you can see me
drawing right now. We just keep rotating
our tile and keep adding more lines in different,
different directions. So they give this
crisscrossing web or mesh kind of an effect. Once you have a few of
these lines laid out, then we're gonna go back to each of those individual sections. And we're going to start adding roundings to each
of those shapes. So rounding is again a technique from the Zentangle method. In this technique
we basically go around polygonal shapes and try to remove the sharpness of those shapes by adding
small arcs like so. Then we connect those
arcs to the edges and create this
little shape inside, which is almost like a pebble, which is encased
or trapped inside that web or the mesh
that we have created. In each of these sections, we're basically
going to look for the points where the
lines are meeting, basically the corners of
these polygonal shapes. And then we're just going to add these small little
curvy lines like arches and just blend them or
merge them with the edges. It's basically a
very simple tangle. There are not a lot of
steps in this tangle, but the end result is
very, very beautiful. And it is definitely one of the most relaxing
tangles that I have come across in the Zentangle method. Because just the process of adding those
little curves and those little arcs around
the edges is so satisfying. You can get into those little
corners and color those up. And it's a very, very satisfying
and peaceful process. So I'm quite confident that you're going to like
working on this tangle too. And now I'm just
going to speed up the video a little
bit for you to see the process in a time-lapse because the process
is pretty repetitive. But I do want to mention that some other areas are going
to be very, very small. And you might not have
the scope to create a small orb or a small pebble
inside those little shapes. So you can always merge two or three shapes together
if they are very, very tiny. So feel free to color those
areas which are very, very small and just blend them
with the larger sections. I would definitely encourage
you to pause the video at this point and make this
tangle at your own pace, instead of trying to match up the speed to these
time-lapse videos. And you will definitely
enjoy the process a lot more and you
will definitely get into a zen state of mind if your eyes are away from your
screen for a little bit. You can pause the video, enjoy making this tangle. Have a cup of coffee or tea or some other
refreshing beverage. Relax for a bit and
then you can always come back and resume the
video once you're done. Once you're done, the end result is gonna look
something like this. Whenever you're ready, meet
me back in the next lesson, where we're going to
be adding some color pencil details to
this background.
22. Project 2: Background Coloring: Welcome back. In this lesson, we're
gonna be shading the tangle N'Zeppel that we
just drew on the background. So to do this, we're
gonna be following an abstract shading
method where there is no specific light source
for the background. This means that for each of
these pebbles that we have created using the N'Zeppel
tangle in the background, we're going to
pretend that there is a different light
source for each of them. So to give you an example
of what I'm saying, I'm going to start
with my medium blue, which is my Copenhagen blue. And I'm just going to
make a small arc or an outline over here on one of
the edges of the pebble. And then I'm going to
bring in my lightest blue, which is the True Blue color, and just take that
underneath the Copenhagen. Then I'm going to bring
in my white color pencil. And I'm just going to
lay that on top of these two colors and just
blend it out like so. So if you see, I've left a little bit of a gap between the color and the
outline of the pebble. And that is just to give it
an abstract shading effect. As I mentioned, there is no specific light source over
here that we're looking at. And we're doing an
abstract shading over here on each
of the pebbles. So I'm just using my white to color in the rest
of the spots as well, and just blending that
into the white space. Then once that's done, I'm just going to bring in
back my medium blue once again and just darken
that area a little bit. Just add hints of the medium blue. And then I'm just going
to blend this out with my colorless blender and also burnish it
at the same time. So basically, if we
were doing this in the traditional
Zentangle shading style, then we would be pretending that these are white pebbles or white stones that have a gray Shadow are a
great cast on them. And so instead of
using the gray color and instead of using
the graphite pencils, we are actually using blue color pencils and creating that shadow
effect over here. So it's an abstract
shading style where we're gonna be just
adding a certain amount of dimension to each
of these pebbles and then Coloring in like so. I'm also gonna do another
one over here as an example. So once again, I'll start
with my medium blue. Then I will go in with
my lightest blue. Then I will start blending
it with the white. As I had mentioned earlier, we never leave
paper white because after a point your paper
may start to discolor. So it's best to have white color pencil covering
the white spots of your paper so as
to make sure that the discoloration of the paper doesn't show through later on. And so that everything
is just looking of the same shade and
of the same family. And you can cover up
the entire tooth of the paper using a white
color Pencil as well. So basically just repeating
the same steps over here, going back and forth, adding a little blue
wherever it's required and then blending it and
Burnishing it as we go along. And if you feel
that you want to go back on a couple of your
previous stones that you have done and you
feel like you want to add a little bit more blue
or a little bit more white, you can always go a
little bit back and forth till the time your paper
is not entirely burnished. We're just adding little bit
of dimension here and there. And at this point, I'm also just going to speed up the video a little bit so
that you can see my progress. And if you'd like,
you can actually do multiple stones
at the same time. So you can apply medium blue at a lot of these
stones together, then go back with your lightest blue and basically just do it in an assembly line
manner, if you feel that's going to simplify
the process for you. So feel free to take your
time to do this exercise. Have fun while doing this. You can always come back
and refer to this video over here to see how I've
shaded specific shapes. Or if you just want
to go back and revisit all the
steps once again. So feel free to pause the video or rewatch it as many
times as you like. But I would encourage
you to take your eyes off the
screen for a bit and try to really
enjoy the process of coloring each of these
pebbles mindfully. Because I guarantee
it's definitely a very enjoyable and
very relaxing process. Once you're done, this is what your end result is
going to look like. And of course, if you've
chosen different colors, then it's gonna be in
a different color. But this is more or less
what it's going to look like. Once you have this ready, meet me in the next lesson, where we're going to be adding
some details to our bezel.
23. Project 2: Bezel Coloring: For the final step
of this project, we're going to be adding tiny metallic details
to the bezel. And for this, I'm going to be using this gold
marker that I have, but you're welcome to use any other tool that you
have available with you. So I'm gonna go inside these little orbs that we
had created on the outline. And I'm just going to fill
those in with this gold color. Now of course,
there are no rules when it comes to
creating these bezels. You can decorate them in
any way that you like. And you're free to use as many tools in as many
colors as you like. So feel free to have fun and play with your
creativity over here and decorate the bezel
in any way that you like. Alright, with that, we're
done with this project. And in the next lesson, we're going to start
work on a new gemstone.
24. Project 3: Gemstone Drawing: Alright, so in this lesson, we're gonna be working
on the next gemstone, which is a Ruby
Inspired Gemstone. And for this project, I have chosen to go ahead
with an oval shape, which I have traced using the polymer clay cutter that
I had shown you earlier. So by now you already know
how to make a Gemstone. So we're gonna be
treating this lesson as a quick summary and a recap for everything that we
have learned so far. So to start off, we're gonna be working
on the Base Layer, where we're going to be
using the black color pencil to make the shadows. And we're gonna do this
with light gentle strokes, making sure that we don't apply too much of pressure right away. We're also going to
take the black color pencil around the
edges a little bit. Then we're going to move on
to our grey color pencil. And in this case, I'm using the 50% warm grey pencil instead of the cool grey one, because red falls on the warmer
side of the color wheel. And so that is one small change that we always have
to make note of whenever we're working on warm
colors versus cool colors. Next, I'm moving on
to my Crimson Lake, which is my darkest
red color pencil. And I'm going to overlap
it on top of the black. So the darkest
color always plays the same role as the
black color pencil. Then we're going to
bring in our medium red, which is the Crimson
Red in this case, and overlap it on top of the darkest red as
well as the grey. And finally, we bring
in the lightest red, which is going to cover up
most of the remaining space, except for a little
crescent moon or kidney bean shape that we're going to leave at
the bottom right. So by looking at this, I'm sure you can make out that the source of light is
on the top-left corner, which is why the
light is going to pass through from
the bottom right. With that, we're done
with the first layer. Now, moving on to
the second layer, we always go from bottom to top. So with the white
color pencil, we'll just blend in that little area at the bottom and take it a little bit into
the lightest red. Then I'm just bringing
in my Crimson Lake, which is my darkest
red color pencil once more, to just extend the shadows a little
bit because I feel like I missed out on
that in the first step. So just accentuating
that a little bit more. Then I'm just going
back and forth between the different
shades of red and just adding them one-by-one and blending them
at the same time, making sure that there is another nice even
layer on the paper. Then as one of the final
steps for this layer, we're going to add
the grey rim on top. And that's going to be directly
above your darkest color, which is the darkest
red in this case. Plus, I'm going to add a
little bit of the white. And that instantly
makes it seem as if there's a light
source on the top-left. So that's been blended
in very nicely already. Now, moving on to
the third layer, we're again going to
go from bottom to top. So starting with the white, I'm just going to
refine the space at the bottom and then move
on to my lightest red. As is the case with
color pencils, you have to go back
and forth sometimes. So just going back
and forth between the white and the
lightest red to make sure that the area at the
bottom is nicely defined. And at the same time it's all blended with no harsh lines. Then we gradually
move on to the medium red and start to blend in
the area in the middle. And make sure that we remove all the harsh lines
that we can see. Just going in light, gentle strokes in
circular motion, and doing the same thing with
the darkest red as well. So as always, if
you still feel that there are some harsh
lines here and there or, if you feel like there is
some scope to add more color, you can always go
back and forth and keep on increasing
the number of layers. And just keep doing it with light pressure so that you don't flatten the tooth of the
paper altogether at once. Alright, and then after all your color application is done, the final step, of course, is to burnish it. So make sure that
you have a clean, colorless blender for this. And then again, we go
from bottom to top. So starting from the
white area at the bottom, we gradually make our way up and start to blend
out all the colors. At this stage too, if you feel like you need to add a little bit of color
here and there, you can totally do that. Just make sure that you keep applying pressure a
little by little, and only apply the
hardest amount of pressure right in the end. So if there are certain
spots where you feel that you could use
a little bit more color, you can totally go ahead and add that. And once you are satisfied with your burnishing, that finishes up your gemstone. So once you're ready with this, meet me in the next lesson
where we're going to be tangling on the
background of this gemstone.
25. Project 3: Tangling: Alright, so we're
now all set to start Tangling on the background of this beautiful Gemstone
that we have created. So the first thing
that I'm going to do is bring in my eraser. And I'm gonna get rid of all of these extra spots on the paper. All of these pencil marks
and little tiny specks of wax that I can see
around over here. So we are, of course, going to be tangling on the entire
background over here. And most of it will get covered with the color
pencils eventually. But it's always a good
idea to get rid of these spots in the beginning
because you never know, you might just be Layering it with a lighter
color later on. And so these might interfere
with smooth blending. So it's always a good idea to get rid of all of
these extra spots in the beginning and
have a clean slate for you to start Tangling. Alright, so once I'm done
cleaning all of these spots, I'm going to bring
in my micron pen. And the tangle that
we're gonna be working with is called crescent moon. This is again a very simple and beautiful and elegant tangle introduced by the
Zentangle headquarters. And it's very easy to draw. But the result is again,
absolutely stunning. And there are many
different variations and versions of the
crescent moon tangle. But the version that we're
going to be working with today is a stackable version. And so in this, we are basically just going to start with these little arcs or semi-circles around the edge
or the border of our tile. And once we have one such row done or once we have the border
completely finished, then we're going to
start working inwards and start stacking them
one after the other, all facing towards the Gemstone. Now of course, there are
no rules when it comes to the size and scale of
these crescent moons, as well as the number of crescent moons that
you want to draw. So each artist will draw it based on the proportions that they are comfortable with. And I have a tiny tile over here and I'm still
drawing pretty big moons. But maybe you have a similar sized tile and you're drawing very,
very small ones. And that's totally okay. So it totally depends on
what kind of repetition and what kind of scale
you like working with. So feel free to
customize the design. And now I'm just going to fit in a few more of these
over here on the inside. And with that, we are
done with the arcs. Now we're going to come
back inside the first row and we're going to start making these dark semi-circles inside. So these are gonna be like the inner orb or the
inner semicircle. Then we are going to start
creating auras around these, which I described previously as outlines to a given shape. So in this case, however, we're leaving a
little bit of gap in the middle of those outlines. This little effect that I'm creating is called a "sparkle." I do talk a lot about aura
and sparkles and other Zentangle Techniques
in the primer classes that I have done over
here on Skillshare. So you can always go
back and refer to those classes if you want to know more about
the Zentangle method. But for the purpose
of this class, I definitely want to give you a quick summary of
what sparkle is. So sparkle is basically a drawing technique in
the Zentangle method, in which we intentionally
break a stroke to give the effect of a light
beam falling over there. Or for it to look like there is a highlight or a
sparkle over there. So just like we see sunrays creating a sparkly
effect on ocean water. Similarly, we can create that
effect by breaking strokes and making it seem as if there is a little light beam or a little highlight
over there. This will get even more accentuated once we get
into the coloring process. But for now, we're just
going to try and maintain the sparkle somewhere in the middle of that
crescent moon. And we're just going to
create that empty space as we go along in all the
other crescent moon shapes over here as well. So now that you've seen
me draw a few of these, I'm going to speed up
the video for you to see my progress and the steps
are pretty repetitive. So once again, I encourage you to pause the
video and work at your own pace and really enjoy the process of making
these auras and sparkles. Because it is a very
meditative exercise when it's done mindfully. And this will also serve as a great opportunity for you
to take your eyes away from your screen for a little bit and focus more on your sketchbook
or your tile instead. Once you're done adding all the auras and sparkles
inside your crescent moon, your tile will look
something like this. And whenever you're ready, meet me in the next lesson where we'll start
coloring this tangle.
26. Project 3: Background Coloring: Alright, so we're all
set to start coloring the crescent moon tangle
that we have just created on the background
of this Gemstone. And for this, I'm
going to start with the medium red color
Pencil that I have. And I'm just going to add
a little bit of that on the edges of this
crescent moon over here. And I'm going to use very gentle strokes
because we're gonna be Blending this with
the lightest red pencil. Once I have a little bit
of this color laid down, I'm going to bring in
my lightest red and just going to add a little bit of that on the inside like so, leaving that little sparkle
in the middle empty. And then I'm just going to
bring in my white color pencil and cover
up that paper white. But at the same time blend it a little bit into the light red. Then I'm going to bring
in my colorless blender. And I'm just going to flatten the tooth and get rid
of all the white spots. For something as
small as this tangle, we don't need a lot of
color pencil layers. We can actually work
with a single layer, or probably just two layers. And we'd be good with that
because we can always use the colorless blender to flatten the tooth and create that
beautiful burnished effect. And we can still
maintain the vibrancy. And the same way now, we're going to
continue adding color to the rest of the
crescent moons as well. Now of course, if you've drawn the tangle very, very small, then you will need to sharpen your pencil regularly so
that you can get into those small corners
and really nicely cover up the details and
get into those tiny, tiny sections that we have
created with the tangle. A sharp pencil is definitely recommended when working on
tricky shapes like these. And apart from that, the steps are pretty repetitive. We just keep on adding
the medium red on the edges and the lightest
red on the inside sections, leaving the sparkle
white in the middle. You can see me doing these on the other crescent
moons as well. So with this demonstration, now, I think the
concept of sparkle is probably a lot
more clear because we intentionally left out
those little gaps and we intentionally broke our strokes so that we could
have paper white, which we're now covering
with the white color pencil. And that is the beauty
of sparkles because it can make any objects
seem shiny and metallic. And it can really create a lot of interest and drama
in your drawing. So this is a very easy, but a very effective
technique to create drama and visual interest in any tangle
that you're working with. Alright, so now that you've
seen me color a few of these, I'm going to
fast-forward the video a little bit because the
steps are fairly repetitive. As always, I would encourage
you to take your eyes away from your screen
for a little bit and work at your own pace. And really enjoy the
process of coloring this tangle mindfully and
in a relaxed state of mind. Whenever you feel like you can
always come back and enjoy this little time-lapse and see my progress
little by little. Towards the end of this video, you can actually see
my final result. So you also have
the option to skip ahead and watch that instead. But if you're someone who enjoys watching these satisfying
time-lapse videos, then, well, there are a few minutes of that
as well over here. I've recorded most of
it for you to see. Alright, so once
you're done coloring, your end result is going to
look something like this. And with this, we are done with our three main
class projects. In the next lesson, we're gonna be starting with our additional
practice exercises.
27. Additional Exercise 1: Patterned Gemstone: Alright everyone,
so welcome back. In this lesson, we're gonna be talking about patterned gemstones. Now, if you've come
across Zentangle Inspired Art with
beautiful Shiny Gemstones, then you've probably seen a few examples of patterned
gemstones already. So patterned gemstones, very simply put are gemstones
with a smooth, shiny surface where it
appears as if there is a pattern or a design which is trapped
inside the Gemstone. To give you an example of this, I'm going to start off with
the base layer over here. And this is gonna be
our first layer where we make a design or a
pattern inside the Gemstone. So I am doing Printemps
over here, which is a tangle from
the Zentangle method. And these are basically just simple spirals of
various different sizes. Now, if you feel
like you wanna do a different pattern
instead of this, you're totally free to do so. There is no limitation or
restriction when it comes to drawing designs and
patterns for these gemstones. Now unlike the
previous gemstones that we have drawn so far, the patterned gemstone usually starts with the design itself. So that becomes the
first layer for us, instead of adding the shadows. Once we have the Base Layer
completed with the pattern, we can move on to
the second layer, which is all about
color application. So once again, we're going
to skip the shadows for now. And we're straight away
going to go for the darkest color
that we have with us, which is the Poppy
Red in my case. And we're going to apply it
in pretty much the same way as we did it for the other
examples previously. So the darkest color
always goes on the top, like so, making a crescent moon
and then around the edges. And so for the purpose
of this example, I'm assuming that the source of light is on the top-left corner. Once you have the
darkest color laid down, then we can move on
to the medium color, which is orange in my case. So we overlap it with
the darkest color, and at the same time, we leave a little bit of space emoty for the lightest
color to come in. Then we bring in
the lightest color, which is the Sunburst
Yellow in my case. And again, we're going to leave a little bit of space
empty at the bottom, where we're going to bring
in the white later on. Now for our third layer, we're going to start
working from bottom to top. And so we're going to
bring in the white, then gradually start to blend it in with the lightest yellow. And we're going to pretty
much follow the same process. So after the white is done, we're going to do
the same thing with the lightest yellow
that I have over here. The sunburst yellow, and gradually blend
that into the orange. Then I'm going to bring in
the orange and blend that into the yellow as well
as the poppy red on top. Then of course finally we
bring in the poppy red, which is the darkest color. And we start to apply more color over here and
get rid of the paper grain. Now once this is done, we bring in the grey pencil. I'm using the 50%
warm gray because once again, red falls on the warmer
side of the color wheel. So using this grey, I'm actually going to
now create the shadows. And at the same time I'm creating this grey
rim on the top, which we used to do earlier
with all our gemstones. Then I'm going to bring
in my poppy red once again and just sort of blend
that gray into the red. So basically, we're not really looking at a lot of
gray color over here simply because we don't
want the shadows to be extremely dense
or extremely dark. Because if we make a
very, very dark shadow, that the entire pattern on the top is going
to get hidden. And the idea behind
a Patterned Gemstone is that the pattern
should show at all times. So we're actually skipping
the black over here completely and we're only going to work with different
shades of gray. Now, I'm going to bring in my 20% warm gray pencil. And I'm going to use that
to go around the edges. Basically whatever
we did with the black and the dark gray in the previous exercises
is exactly what we're doing with the dark gray and the light gray in this exercise. So we're replacing the black with the 50% warm gray. And we're replacing
the 50% gray with the 20% gray. So now I'm just basically
bringing the Poppy Red once again and blending
that gray in nicely, making sure that it's going
all around the edges. And it's blending in with
the other colors as well. I'm gonna do the same thing
with the medium color, which is the orange in my case. And you can actually see the subtle shadow which is
happening around the edges, which is just the right amount
of shadow that we need to make sure that the pattern shows through; and it's not stark. It's not very dense,
it's not very deep. And it's not hiding the
pattern for us in any way. So I'm gonna do the same thing
with the yellow as well. And if at any point you
feel that you need to add just a little bit
more of the shadows, you can always bring
in your grey pencil. And so over here I'm just
adding a little bit more of the 20% gray and then blending it in with the orange once more. Then at the bottom, I'm just polishing and fine-tuning this area
with a little bit more white and getting rid of all the harsh
lines that I can see. And maybe I just need to extend
that shadow a little bit more and then blend
it back once again. Let's get rid of this dust. Then I'm quickly going to
clean my white color Pencil so that we can work on
the rim on the top. And this process is
pretty much the same as what we've been doing with all
the other gemstones so far. So as always, once
the rim is done, you can bring in one more
layer of color, if required. So if you want to build up a
little bit more saturation, you can add one more layer, but it totally depends on what your gemstone is
looking like right now. Maybe your gemstone is
already quite bright and vibrant and so you don't
need another layer. But if you feel that it's looking a little
bit dull or if you feel that there are a few more harsh lines that
you can get rid of, then you can bring
in one more layer and blend all the colors nicely. Once you're satisfied with the application of
color on your Gemstone, you can bring in
the blender pencil and you can then start
Burnishing the Gemstone. Alright, so with that, we're
done with this exercise, and that's how we create
a Patterned Gemstone. There's literally no
limit when it comes to making creative variations
to these gemstones. So it's just a slight
deviation from what we've been doing with
the regular Gemstone so far. But as you can
see, the result is absolutely stunning
and beautiful. And there is literally no
limit when it comes to using these gemstones
creatively in your projects. So go ahead, give this a try and I'd love to see what
you all come up with.
28. Additional Exercise 2: Cracked Gemstone: Alright, so in this lesson, we're going to be making
a Gemstone with cracks. Now, if you observe
real gemstones, you will notice
that they all have small imperfections
and defects in them. And we can try to
replicate that effect by creating small cracks on the
first layer of our gemstone. Here, I'm using my
micron pen to make these abstract cracks
randomly across the Gemstone. And you can use a black pen or a really dark color that
matches your Gemstone. The pen that I'm using right now is a really dark blue pen. But you can totally do this
with a black pen as well. Now when you're
making these cracks, you can make some of them
a little thinner, while the others can be
a little bit more bold. And once we put in our color Pencil layers
on top of these cracks, they will only be
partially visible. But that's exactly
how we want it to be. We don't want the cracks to overpower the color
pencil layers. Now the rest of the
steps for making a Cracked Gemstone
are pretty much the same as making
a Patterned Gemstone, which we did in the
earlier exercise. So I have increased the speed
of the video over here for you to enjoy the time-lapse and then work at your own pace. Throughout the video, I have put the color pencil numbers
on the screen, in case you're using the
same brand as me and want to follow along
with the same colors. Just remember to take your
time and enjoy the process. Working with color pencils
can be extremely relaxing, especially when you're building
those layers gradually. So take your time. Maybe enjoy a nice
beverage on the side, and enjoy the video. Alright, so once you're
done adding all the layers, this is what the end
result will look like. So you can see all of these beautiful cracks showing through the color pencil layers. And they're not
exactly in your face. They look like they're submerged or encased inside the G=gemstone. And that's exactly how
we want them to be. Once you're done
with this exercise, don't forget to share
a picture with me in the Projects and Resources
section down below. Once you've done that, meet me in the next
lesson where we'll be working on another fun project.
29. Additional Exercise 3: Ring Shadow: Alright, so in this lesson, we're gonna be working
on the Ring Shadow. So when we were discussing
the anatomy of a Gemstone, I'd shown you this image with a Ring Shadow at the
bottom of the Gemstone. And that is basically the shadow that is cast by the Gemstone, assuming that light is
passing through it, and the gemstone is kept
on a flat white surface. Now this is a great
way to enhance the overall look of a
smooth, glassy looking gem. And it makes the drawing look a little bit more realistic. You might not necessarily
use this technique in all of your Zentangle
or Zen-Doodle projects. But at the same time, it's definitely good to know about this technique so that you can apply it creatively
in at least some of your projects
in the future. So for this exercise, you'll need to have a Gemstone Drawing ready and
completed with you. So I've used the
colors Dark Purple, Mulberry, and Process Red
for this one over here. But you're totally welcome
to make the Gemstone in any other color
combination that you like. And once you have that gemstone ready, then we can
begin our exercise. So to make this Ring Shadow, we need to start off with either the lightest color on our Gemstone or
the medium color. Basically we want to
pick a color that helps to describe
the Gemstone easily. So for example, if I show
this Gemstone to someone, they might not necessarily
call it a purple gemstone, but they would definitely lean
more towards calling it a magenta or a reddish
magenta Gemstone. So basically, we're
looking at a color that represents the
essence of the Gemstone. That can sometimes be your lightest color or it
can be your medium color. Now, another thing to
note over here is that my darkest color as well as my medium color
are very similar. There is not a lot of
difference between the dark purple
and the Mulberry, Which is why the majority
of the color pop that you'll see on my Gemstone is
because of the process red. So basically, this
is the color that is representing the
essence of my Gemstone. So I'm gonna go with
Process Red over here. And I'm going to make a small crescent moon
here at the bottom, right, opposite the highlight. And just under the
little white hazy area that we always leave at the
bottom of the Gemstone. So it's gonna be a small
light crescent moon like so. Then we don't want it to pop. So we're just going
to burnish this using our white color pencil. Exactly the same way in
which we did the pastel burnishing effect during one
of our practice exercises. Once we have that done, we're going to bring in
our 20% grey pencil. So in this case, I'm
using my 20% cool grey pencil because I've used cool greys inside the
Gemstone as well. So I'm just going around
the shadow, like so. Then I'm going to bring
in my 50% grey pencil. And I'm just going to darken the areas which are
touching the gemstone. So just the edges of the shadows which are
touching the gemstone. And we're just going to
darken them up a little bit. Once that's done,
we're going to bring in our white color
pencil once again. And we're just
going to blend out the edges going towards
the paper white. So we don't want to see
any harsh lines over here because shadows
are usually very soft. And we're trying to create
a very soft look over here. And we'll just burnish out the section in the
middle as well. And if you feel like
you require a few touch ups
here and there, you can always bring in
your light grey pencil once more and just increase the intensity of the
color in the middle. You can always go
back and forth. So I'm just adding a little
bit of white once again. And again, I'm darkening the edges. So this will require a
couple of layers going back-and-forth till the time you are fully satisfied with it. You just want to make
sure that the shadows are blending into the outline
of the Gemstone properly. So you don't want
the shadow to seem disconnected or not attached
to the body of the Gemstone. Because then that
just simply tends to take away the illusion that
we're trying to create. So that's something that we
need to pay attention to. Now sometimes it
does happen that your grey pencil tends to go inside the body
of your gemstone. And that's totally okay
because you can fix it quickly by taking
your darkest color or you medium color and just
going around the shadows on the body of the Gemstone and
Burnishing them once again. So a little bit of my grey had crept inside the
body of the gemstone. So I can fix that quickly
over here like so. Once again, I'm just going
to fix the section on the outside because I can
see some harsh lines. And I also think I need to accentuate the pink
a little bit more. The colored ring shadow
should almost be the same as the
white section inside. Now once again,
I'm just going to bring in my grey pencil. And I'm just going to do a
few touch-ups here and there. And I'm just going to refine the shape of the
shadow a little bit. So again, we'll just
go back and forth between our greys and
our white pencil. Now this is fairly subjective. If you're happy with the way
the shadow has turned out, then you can stop over here. But otherwise, you can
just take a moment to observe your drawing
and then do some fixes. For example, over here, I feel like I need to just take away the harsh
lines over here. On the bottom left. Sometimes these
irregularities are not so much visible on camera as
they are to the naked eye. So maybe it's not making a lot of difference
on the video right now. But I can definitely spot some harsh lines here
which I want to improve. So I'm just going
back-and-forth and observing my shadow very closely just to make sure that
everything is looking fine. Alright, with that, we've
completed this exercise. And this is what the
end result looks like.
30. Adding Highlights: Alright, so now that we've
completed all our projects, we can add highlights to them. And as I had explained
with this image earlier, the highlight is the section on the Gemstone where the light
source hits the hardest. So it can be natural light, which is coming
directly from the sun or through the
windows in a room. Or it can be an
artificial light source, such as ceiling lights or desk lamps or
studio lights, etc. which are reflecting
on the Gemstone. So in order to add
these Highlights, you will need something similar
to a white Jelly Roll pen. So for example, I also have another one over here
from a different brand. This is the Signo
from uni-ball. So you can use any white
gel pen that you have, or you can also use white acrylic paint or white
gouache or a paint pen, acrylic marker, basically
anything that is white and opaque and can be used to add highlights on the gemstones. Now, with the white gel pens, we usually need
to do a couple of strokes on a scrap
piece of paper first before we take the
pen on our final project. And that is just to make sure that the ink is running smoothly and that the nib is clean and smooth for us to
lay down the color. So for example, over here, you can see that the ink is
not flowing well right now. And that just means that
I need to take it back on the scrap piece of paper and warm up the
nib a little bit. The friction will cause
the ink to flow properly. And once I have that, I can come back on my project and add
the little highlight. Now when it comes to the
shapes of these Highlights, there are many different
ways to approach it. One of the easiest ways to
add a highlight is to make a sort of elongated
teardrop shape. And then make like a small rectangle or
squarish element next to it, which pretty much
resembles the kind of light we get from a window. We can also add another
small square next to it. Now, the only thing that we
need to make sure is that the highlight is
not going all the way down towards the edges. We want it to stay at the top exactly where we had marked the light source
in the beginning. And it has to be opposite to the little white area that
we have left at the bottom, which is basically the
section from where the light is traveling
through are passing through. So we just want to make sure
that the highlight stays on the top and doesn't go all
the way around the edges. Then similarly for this one, I'm going to add the
highlight over here, like so. You'll notice that
I'm making sure that my highlight doesn't
really touch the edges. And that's because we had made this little contour or that
edge bounce light on the top, which I want to retain. So I am putting my highlight
just a little bit under it. And at the same time,
it should not be very much inside the
Gemstone as well, because we don't want the
highlight to seem misplaced. So it should basically
be at the area where the transition of the dark to medium color
starts to happen. So just at the periphery or just at the edge
of that transition. And then if we want, we can also extend the
highlight a little bit in case you're feeling
it's a little too short. And then in this one over here, I'm going to do a slightly
thinner highlight and I'm going to have broken
little streaks or sections. This just basically gives it a slightly more naturalistic
or realistic effect, imagining that there
is some kind of dappled light which is
falling on the gemstone. So it's not very hard and it's slightly different from the one that we have done previously. So this is also an
approach that you can try. Now, it totally depends on
you whether you want to add highlights to all your projects
or just do a few of them, or you want to skip
them altogether. So this is completely optional and it's completely
based on your preference. And another thing that
you can do to make your gemstones dazzle and
shine a little bit more, is to add these little specks of white all over the
gemstone as well. Again, these are artistic
choices that you can make depending on the project
that you're working on. With these little white spots, we can imagine that there
are these little glinting, sparkling light sources
all around the gemstone, which are causing these
tiny little highlights. So that's also another
effect that you can try. And yeah, with that, we're done with highlights. Feel free to add
them to a few of your projects or to all of them, depending on your preferences.
31. Closing Thoughts: Alright, so congratulations on making it to the
end of the class. I truly hope that this
class was useful for you in building your
confidence with color pencils. Going forward, I
recommend that you continue to practice these exercises
learned in the class. And I promise, you
will continue to see improvement in your work.
For your convenience, I've also compiled a
document for you to download in the Projects
and Resources section, where I've included
supply recommendations along with some additional color palettes that you can try. I also invite you to leave
a review for this class, as it's super helpful
for me as a teacher, as well as for other
students looking for quality classes here
on the platform. If you'd like to keep the
conversations flowing, then I'd love to be connected
with you on social media. I've created a small
hashtag community on Instagram where you can find students from all my classes posting
their wonderful work. This way, we can all give and receive endless inspiration. So thank you so much for
joining me in today's class. Until next time, keep creating!
 Ridhi Rajpal, Artist + Film-Maker + Educator