Transcripts
1. Trailer: our practices. Air always made better and more enjoyable when you make yourself comfortable and treat yourself well, I always have a candle burning and a delicious coffee at the ready when I create. But what about using your favorite things in your art? In the skill share class, we're gonna be exploring the uniqueness of coffee as paint. Get ready to learn the ins and outs of what kind of coffee to use and techniques. Plus, we have a fun project that you can do with the end to test your newfound skills. Coffee is a great, unique medium that not only smells great but is extremely inexpensive, so it's a great way to play around. Plus, it creates some lovely textures and tones and could be used in so many ways. Let's get started.
2. Materials: so you don't need a lot of materials to paint with coffee. He will need a surface to paint on some coffee and a brush. Since coffee will be considered to be a very wet medium, you'll need some paper that will hold up to that level of my share. I used a heavy cold press watercolor paper with some nice texture. You will also need clean water, coffee grounds, instant coffee and, finally, some brushes. To apply the coffee, you will need some clean water to clean your brushes and create some texture. Coffee grounds are super versatile in the way that you can use them to create your actual coffee paint, and you can scatter them on the surface of the paper to add some texture and darkness. An instant coffee and espresso powder works great for creating very dark tones. Now there's a variety of ways that you can use a bird coffee. You can add instant coffee brewed or drip coffee coffee grounds. I usually start by making a strong brew and then mixing up another dark tone by adding a few drops of water to a scoop of instant coffee.
3. Techniques: so in this chapter will be looking at a variety of different techniques that we can use while painting with coffee. Starting with the basics, you can work wet onto dry and wet on toe wet. Starting with a dry surface, dip your brush into the coffee and apply it to the paper. This is called wet onto dry and can creates lovely, sharp edges that could be feathered out with more water if desired. Wet into wet is when you add more pain for coffee into an already wet area. This creates a much more diffuse effect but can leave some really nice subtle textures when it dries. Next technique involves a series of layers that dry and build up to create a darker shade. Start by loading a large brush with diluted coffee and covering a large area. You can brush in a bit more concentrated coffee into the wet areas where it will be darker if desired. Otherwise, let it dry completely. When coffee drives, it often leaves more pigment on the edge of the puddle, leaving a neat looking edge like you can see here at another layer of coffee and then letting a dry completely repeat this as many times as desired. This technique ends up create ingredients with some texture, thanks to those extra pigments left of the edges of the coffee puddles with drying. Now we're getting into more fun techniques to create rings like those that would be left by a coffee mug. Take something like a glass and dip the rim and coffee places on your paper and lifted out toe leave. Unendurable and organic looking coffee ring on your paper. Use different concentrations of coffee to change the level of darkness or lightness. You can also drip some coffee down the sides of the glass, allowing them to pool around the rim to creates variation in the rings drips air Superfund To create, simply grab a brash loaded with coffee and lightly Sprinkle it over your paper. It's helpful to knock the brush over your fingers to force a copy. Coffee from the Brussels. Okay. Finally splatters could be created again by loading your brush with coffee and then flicking the bristles over the paper by running your fingers over them. This can make a huge mess, so be careful. This next technique is usually applied. The whole sheets of paper and creates a really neat textured antique look. I like to rest the paper in a waterproof container. Here, I'm using an old metal baking dish that I've reserved for art projects. Drench your paper with coffee and add. Some are concentrated coffee for variation. Next, Sprinkle coffee grounds onto the wet surface. You can concentrate them in some areas to create a rougher, darker texture or Sprinkle them evenly over the surface. You can drink more coffee over the grounds if you'd like, but then set the paper aside to dry completely. Once dry, rush or rub the coffee grounds away from the paper to reveal an amazing texture. I love to use this textured paper at the back room for minimalistic paintings, but the possibilities are endless. It also looks great with washes of color on top created with watercolors or ink. But go wild, use your imagination. So those were a few techniques that you could use one painting with coffee in the next chapter. We'll be creating a project together, so get your coffee and Russia's ready
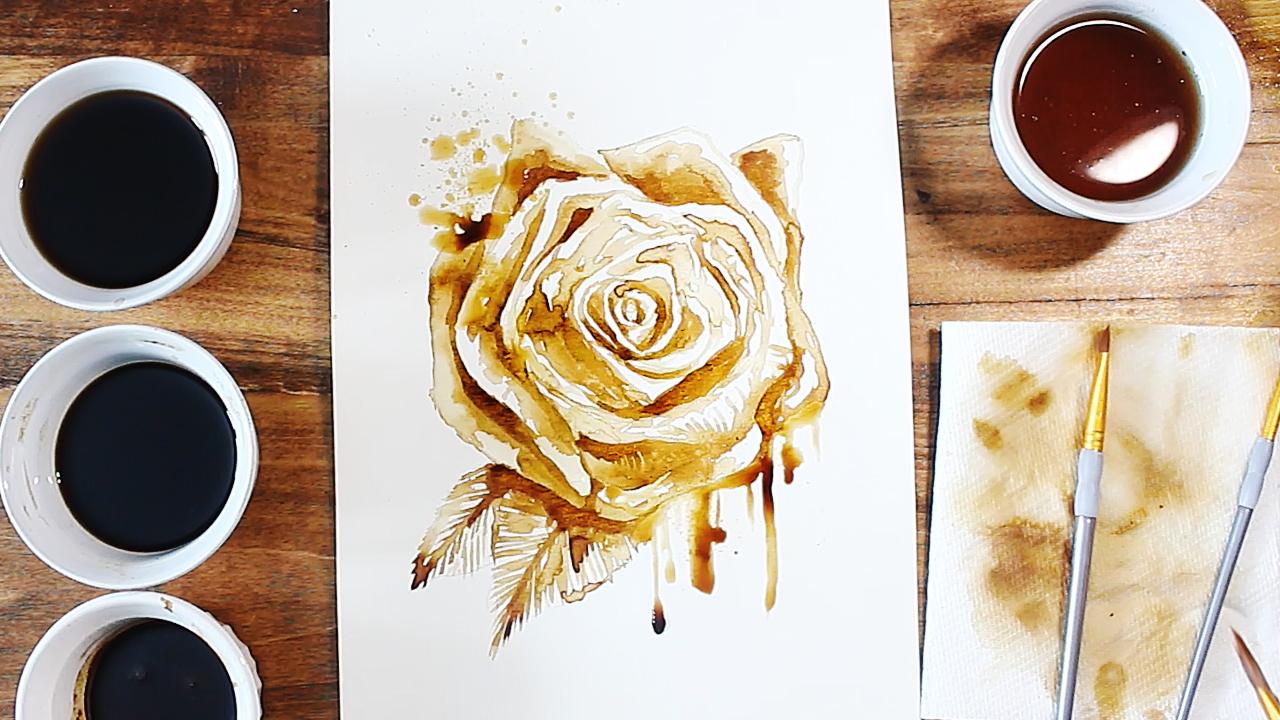
4. Project: So now it's time to put your new knowledge to use. Feel free to follow along with the subject of your choice. I'm gonna be painting a rose lightly sketched out what you will be painting. But be sure to use a very light hand with your pencil because coffee pain things are fairly pale. You don't want your pencil lines to be to a parent, and they're very hard to erase. Once you've painted over that, you can also pay the coffee directly onto the paper without a sketch. Now that our sketches done, it's time to jump in with the coffee. Painting with coffee is fairly similar to painting with watercolors, except coffee does not lift out nearly as easily when dried, which actually makes it behave more like ink than watercolors. Start with more dilute coffee and then build at the shadows with even more layers or more concentrated coffee or both. Worth you're painting with the different concentrations of coffee. The Create your art. Feel free to get a little crazy with your painting. Drop some clear water over the already wet coffee to create some inverse droplets or create some softer, diffused edges. That contrast nicely with the rest of the sharp edges Whenever you were switching from very concentrated toe, less concentrated coffee, wash your brush and water to avoid making areas to dark accidentally. Paper tall is a great thing to keep on hand to wipe excess water from your brush. - Once you have gone over all of the areas of your painting let it dry completely. In this next past, we can go through and dark in the shadows and adds some texture. I like to use a smaller brush here so that you can place those darker shadows more carefully. Okay, - I felt like some drips and splatters would complement this delicate rose well, so those will come next. I wanted some coffee drips to flow downward from the underside of the roads, so I pulled some coffee in one area and then tilted my paper so that gravity allowed the coffee to run down the paper. If you want to keep the drips from running off the paper, I recommend doing this in several steps, letting the layers dry in between. Next up, add some splatters by loading your brush with coffee and knocking the brush handle over your fingers to splatter the coffee on the paper. This could be a bit unpredictable, but I think that just makes it even more fun and special. - And we're done. There's so many things that you can do to continue to add to your art, like using White Acrylic Paint Inc or gel pens, tad some highlights or, at some coffee grounds, toe wet paper to add some texture. Possibilities are endless. Now that you have learned how to paint with coffee, I hope you have fun with it. Enjoy.
 Danielle Trudeau, Artist. Teacher. Lover of cats.