Transcripts
1. Classical & Flamenco Guitar Technique Mastery Promo: Would you like to play cleaner, faster, and with a better sound? Whether you are
just starting with classical or flamenco guitar or you have been a self taught
guitarist for many years, the real problem is usually
the same technique. In this course, I guide you
through step by step with over 60 lessons designed to build a strong reliable
technique in both hands. We will look at left hand
techniques like barre work, hammer on pull off exercises,
and finger independence. Classical guitar
techniques like peed go, Tirando or classical tremolo. And flamenco guitar
techniques like Picado, Alzapua, Spanish guitar,
drumming techniques, Pulgar, and many more. Strong technique
changes everything. When your hands work with you, instead of against you, music will become easier, more expressive,
and more enjoyable. And row now and start building the technique
your music deserves.
2. Introductiom: Hello guitaristas.
My name is Edina, and I will be your
instructor in this course. And in this course, we are going to
look at a series of classical and flamenco
guitar techniques to improve your
sound on the guitar. So hopefully, after this course, you will sound stronger,
smoother, and faster. We will look at the right hand
and the left hand as well. The left hand is pretty similar in classical and
flamenco guitar as well. And in the left hand techniques,
we will look at slur. So for example, Homer on
slide, vibrato, pull off, we will look at bay exercises, stretching and
flexibility exercises, and fixed finger and
position exercises as well. For example, the
spider exercise. And after we will go into
write and techniques, which is different in flamenco
and classical guitar. And in classical guitar, we will look at the arpeggios, we will also look
at the Tirando, which is playing melodies in classical guitar
and the tremolo. And in flamenco guitar, we will look at many
other techniques as well, for example, sguiados, Picado, strumming techniques
in Spanish guitar, Pulgar, Alzapua
among many others. Hopefully, after this course, you will find it easier
to learn new songs, and hopefully your sound will improve and it
will be cleaner, smoother, and you can
play more beautifully. So let's get into this course.
3. Using the Metronome as a Practice Aid with Exercises: In this course, we
are going to use the metronome to
improve or technique, and it is important to
know how to play with the metronome and how to
work with the metronome. Before when I started
to play the guitar, I didn't use the metronome, and my rhythm sense was
all over the place. But once I started
using the metronome, I became more punctual,
faster, cleaner. So it's a really amazing tool to make you a better guitarist. I'm going to show
you a few exercises, how to change ton
with the metronome because that's what we are going to do later in the course. We will play four notes per
beat, three notes per bit, six notes per bit
using the metronome, so then you can do these exercises with a certain
speed and punctuality. Let's have a look
at our exercises. Let's set our metronome to
60 BPM and let's start it. Our first exercise will be
just to clap with the B. How do you know if
you were on time? If you couldn't hear the matronom beep when
you were clapping, it means that you were on time. But if the matronom beep is somewhere in between your claps, you need to do a few
things to be more on time. One thing that you can do is to move your
leg with the beep. It will help you to
feel the rhythm much more because your whole body
is moving with the rhythm, or you can just move your feet. Now, this is very
common among musicians, and I'm pretty sure
when you went to a gig, you could see that some
people were moving the leg with the
rhythm because then it will help them to feel the whole music more
and be more on time. Our second exercise will be
clapping two notes per bit. If you were clapping like this, it means that you
were not on time because every clap should
be evenly distributed. So it will sound like this. Also, the second
clap needs to be exactly in the
middle of two beats, and it is also
called the offbeat. The third exercise will be
clapping three notes per bit. Again, if you were
clapping like this, it means that you
were not on time because everything should
be evenly distributed. Actually, when you
clap like this, it means that you are
clapping four claps per bit, but you are skipping
the last bit. So it should sound
more like this. There are one thing as
well that you can do here to be more on
time is to make oxens. So you can clap one lot
clap when you are on the metronome beat and everything else is a
little bit quieter. So it will sound like this. Exercise four will be switching between two claps per bit to three claps per bit. Now, this can be very
challenging at first, especially if you haven't done this before because there is a fine difference between two claps and three
claps per bit. So let's try to
do this at 60 PM. At first clapping twos and after switching to
clapping stres. Et's try to switch. Switch back. Great. Now we are going
to do an exercise. At first, we are
going to do four, two claps per bit and after
four, three claps per bit. One, two, three, four, Now, we will do,
two claps per bit, switching to two,
three claps per bit. Finally, we are going to
switch after every bit. It's good to do these
exercises at different BPMs. So I'm going to show you
how it sounds when we do it at 80 BPM and then
we do it at 40 BPM. Now, the slower you go, the more challenging
it will get. And at 40 BPM, even for me, this is quite hard. Exercise five will be clapping four notes per bit. Now you can do a few more
things to be on time, and it helps if you count
before you start clapping. So now you can count four
before you start clapping. One, two, three, four,
one, two, three, four, one, two, three, four,
one, two, three, four. One, two, three, four, one, two, three, four, one,
two, three, four. You can also do the
counting with algorithms. So let's count in
three. One, two, three, one, two, three, one, two, three,
one, two, three. Let's count in two, one, two, one, two, one, two, one, two, one, one, one, one, Our final exercise will be to switch
between these returns. So we are going to do for one clap for two claps,
for three claps, for four claps per beat, and after we will bring it
down to three, two, and one. It's good to practice the final exercise again
at different BPMs. So go ahead and try it at 80 BPM and try it
at 40 BPM as well.
4. Sitting Positions and Thumb Position: Before we start the course, let's have a look at the seating positions with the guitar. I am actually a classical
and a flamenco guitarist, so I play both of these ties, and there is a
difference between the seating position in classical guitar and
flamenco guitar. In classical guitar, they are a little bit more strict
how you need to sit. And it is basically that
you use a footstool, and then you place your
left leg to the footstool, and the guitar to the left leg, and then you play
the songs this way. In flamenco guitar, the rules are a little
bit more loose, so you can choose where
you place your guitar. You can just place your
guitar onto your right leg like a folk guitarist or
a finger style guitarist, or you can just cross your legs. I like to cross my legs
and place it on the top, so the guitar is a little bit higher and then
playing like this. Some male guitarists
like to cross the leg in a different
way and play it like this or crossing the other way around and
playing it like this. You can also use
the footstool as well for this one and play
it like a classical way, or you can just place the
guitar in a little bit in the middle to both of
the legs when you play. The other important
thing we need to have a look at is
the thumb position. The thumb in classical
and flamenco guitar is usually in the back of
the neck in the middle. So it's okay sometimes to
have the thumb on the top, but it will stop you
to play a lot of different things if you
have it too high up. For example, this
is one way to play an A major chord in classical
and flamenco guitar. And then if the
thumb is too high, you can't do the
chord variations. For example, this
is a ninth chord, an A major odd nine chord. It's very difficult. But once your thumb is in
the right position, then you can play it more easily because you have more
space with your fingers.
5. Nail Care: Today, I'm going to talk
about Nir ke in flamenco and Spanish guitar because
so many people were asking me about this one. Now, I just want to say that I'm super lucky because I'm
genetically gifted. I have very good hair and
I have very strong nails. So I don't have to do
so much with my nails, but I can tell you a few tips what you can do to make
your nails stronger. At first, let's have
a look at the length. As you can see, on my left hand, I have absolutely no nails. It is because if you
have some nails, it will stop you to
play certain chords, and it will also stop
you to transition smoothly on the guitar neck
from position to position. On the right hand, I have a little bit of nails. I know classical guitarists have longer nails, but in flamenco, for certain techniques,
you need to use the skin and
the nails together. So it needs to be exactly like
this if you can have them, and it will strengthen
your playing as well. Also, if you look at the side, it needs to be shaped down. Otherwise, it can stock into
the strings when you play, for example, flamenco triplet
or something like that, where you need to
turn your wrist. To strengthen your nails, you can use, like, a transparent nail polish. And I know it looks a
little bit bad on guys, and also guys don't
like that they have nail in one hand and
not in the other one. But think about yourself
that you are an artist, and this is part
of your identity. So this way, you can
accept it a little bit more to look a little bit
more girly on the right hand. If you don't want to use
transparent nail polish, you can take certain supplements
to strengthen your nail. I take a supplement
which is really amazing. It is called spirulina, and it is blue and green algae. And it has an octaive supplement called spermidin which
is a lot inside in this, but also it has, like,
a lot of vitamins. It's very beneficial, and it helps you to strengthen
the nails and hair. I have a student actually who started taking
this supplement, and she told me that she
saw some difference. But of course,
everybody is different. You can try it if you want to. Also, some people really go crazy with their nails and
they even use fake nails. I wouldn't recommend
it so much because the nails needs to breathe
and with the fake nail, you stop the nail to breathe
so you can ruin the quality.
6. Spider and Fixed Finger Exercises: Today, I'm going to show
you three spider or fixed finger exercises which
will help your position. After this lesson, you can
learn something like this. Why are these exercises
so good for you? If you have a bad technique, I'm always giving these
exercises to my students to correct their bad technique because with the first exercise, it is teaching you how to stay curved because that's
the only way to do it, how to move the
fingers independently, how to stay close
to the fretboard, and how to be straight instead of sideways when you
are playing this exercise. So let's have a look at it. In the first exercise, we can start anywhere, but in this case, we
will start on flat five, but of course, you can
start on fret one as well. On flat five, it will
be a little bit easier. We will place the fingers
one by one, index, middle, ring, little, and we need to
stay in this position. And after we will
move the fingers one by one to play the
string which is below, in this case, it
is the A string. This will be very difficult
for some of you because if you are not curved enough or
straight with your position, then you won't hear the sound. So you will hear this. In
this case, you need to stop. You need to curve the fingers more and find where
is the problem. You can do this exercise
going up as well. It will be much easier
because you need to be exactly curved
to make it sound. In the real life, you are not really playing like this because you are not staying in one position and moving
fingers one by one. But this exercise
is still amazing to improve how you
play in real life. The next exercise is an
other fixed finger exercise. And in this case, we will
just play the G string. We stay in this position, and after we will just move
the fingers one by one while we are still keeping the structure and the technique. So it will be index
finger up and down and then up two strings
and down two strings. And finally, up three strings. And we will do this with
every other finger. The final exercise will be that we will stay
in position again. So we play from the fifth
fret on the G string. And at first, we will move together the index
and middle finger, and we move one
string up and down, and then switch, and then two string up and
down, and then switch. Oh Probably the last one is the hardest. Well, for me, it's a little bit awkward position to play this together
and stay in position. And finally, you can do
some combinations with the fingers so you can
move together the index and ring finger and the middle and little finger and the index and
little finger as well.
7. Introduction to Slurs: In this course, we are going to learn with a series
of exercises, the hammer on, the pull off, the slide, and the
vibrato technique. And hopefully by the
end of the course, you will have a strong left
hand legato technique. Now, let's get into it.
8. Hammer-on and Pull-off Lesson: We are talking about legato
techniques in this course, which literally
means tie together. It means that one note smoothly transitioning to the second
note without any stop. And this can be achieved with few different ways that first, we are going to have a
look at the hammer on and pull off techniques
to achieve this sound. This will also mean that we
will only play once with or right hand and we will add the second note
with or left hand. And you can play with your right hand in
many different ways. If you want, you can
play with your thumb. Or you can do a picado, which means an alternate picking between the index
and middle finger, why you are pulling
up to the next ring. You can also play
with a plectrum. It is really up to you
because this course will be mainly about the
left hand technique. The first technique
will be a Hamron. Haron means that we will
play one note and we will add a second note with a different finger
on the left hand, why we are playing only
once on the right hand. And the reverse version of this technique
is called pull off. In this case, you
are going to pull it off one node to the next
one to create a sound, so it will sound like this. A lot of people have
very weak pull off, and it is because of the
technique they are using. Lot of people doing like a backward Tamron
instead of pulling off. So backward Tameron means
that you are not behind the finger that you need to
be but you just go like this. This is not strong
enough with the sound. You really need
to be behind with another finger to make it sound. The second thing that you need to do that a lot of people don't do is pulling it down. So they just, like,
play and lift it up. And it is just not
strong enough. You need to literally
pull it down and release. Some people can also achieve
a sound without releasing, but they still pull it down, and in the end, they end
up on the string below. So it will be like this. Maybe this works better
on an electric guitar, but in a classical or
an acoustic guitar, I always recommend that
you pull it down and then release it to the air to have
the best sound as possible. A lot of people are rushing
harans and pull offs. Now, this is just a
right hand technique and the way you play this
right hand technique. It's important to be still on time when you are
playing this technique. So that's why you
need to practice this slow as well and be
able to speed up later on. So instead of doing it like
This was very out of time. This is actually
in capricho Arab, which is Francisco Tarega song, and it's using a
lot of pull offs. But you need to
practice this slowly, and every note
should be the same. So then it will sound
much more even. So in this case, you
need to slow down the whole music
and make sure that every note is the same distance. Now, let's get into
the exercises.
9. Hammer-on Finger Exercise: Our first exercise will be a
Haron finger exercise where we will look at all the
different combinations that you can do to play Haron. And this will be at first, indexed to the middle finger, and then we will do it with
every different strings. A and then we will have
middle and ring finger. And finally, we will have
ring and little finger. And then we can do some
other combinations as well. And this will be from middle to the little finger and index
to the little finger. And finally, from the
index to the ring finger. Now, I'm going to show
you this exercise in two different speeds. Mm.
10. Pull-off Finger Exercise: Our next exercise will be very
similar to the one before, but now we are going to use this finger combination
to do pull offs. So at first, we will pull
off from the middle to the index finger and we will do it in every single string. And we will do it again from
the ring to the middle. And we will do from the
litter to the ring. After litter to the middle
and litter to the index, and finally ring to the index. Now, let's do this exercise
again in two different speed. Well, this exercise is considerably harder than
the exercise before. But the more you do it,
the easier it will get and the more strength you
will have in your hands.
11. Hammer-on Coordination Exercise: Our next exercise will be a
heron coordination exercise, and in this case, we will add herons again in a lot of different
ways with a lot of different fingers and combine them in all
the different strings. And it will look like
this in one string. Now, this exercise again, gets harder in a higher speed, but I suggest you to practice
this at a slow speed first, and I'm going to
show you and record you this exercise in
two different speeds.
12. Pull-off Coordination Exercise: Our next exercise is the pull off coordination
exercise, which is, again, very similar
to the hemron one, but we will do
everything in reverse. So it will sound like
this on one string. This will be, again, so much harder than the hemron exercise. And when you go higher
with the speed, it gets even more tricky. So practice this at slow
speed before you speed it up. Now I'm going to show you
again in two different speeds.
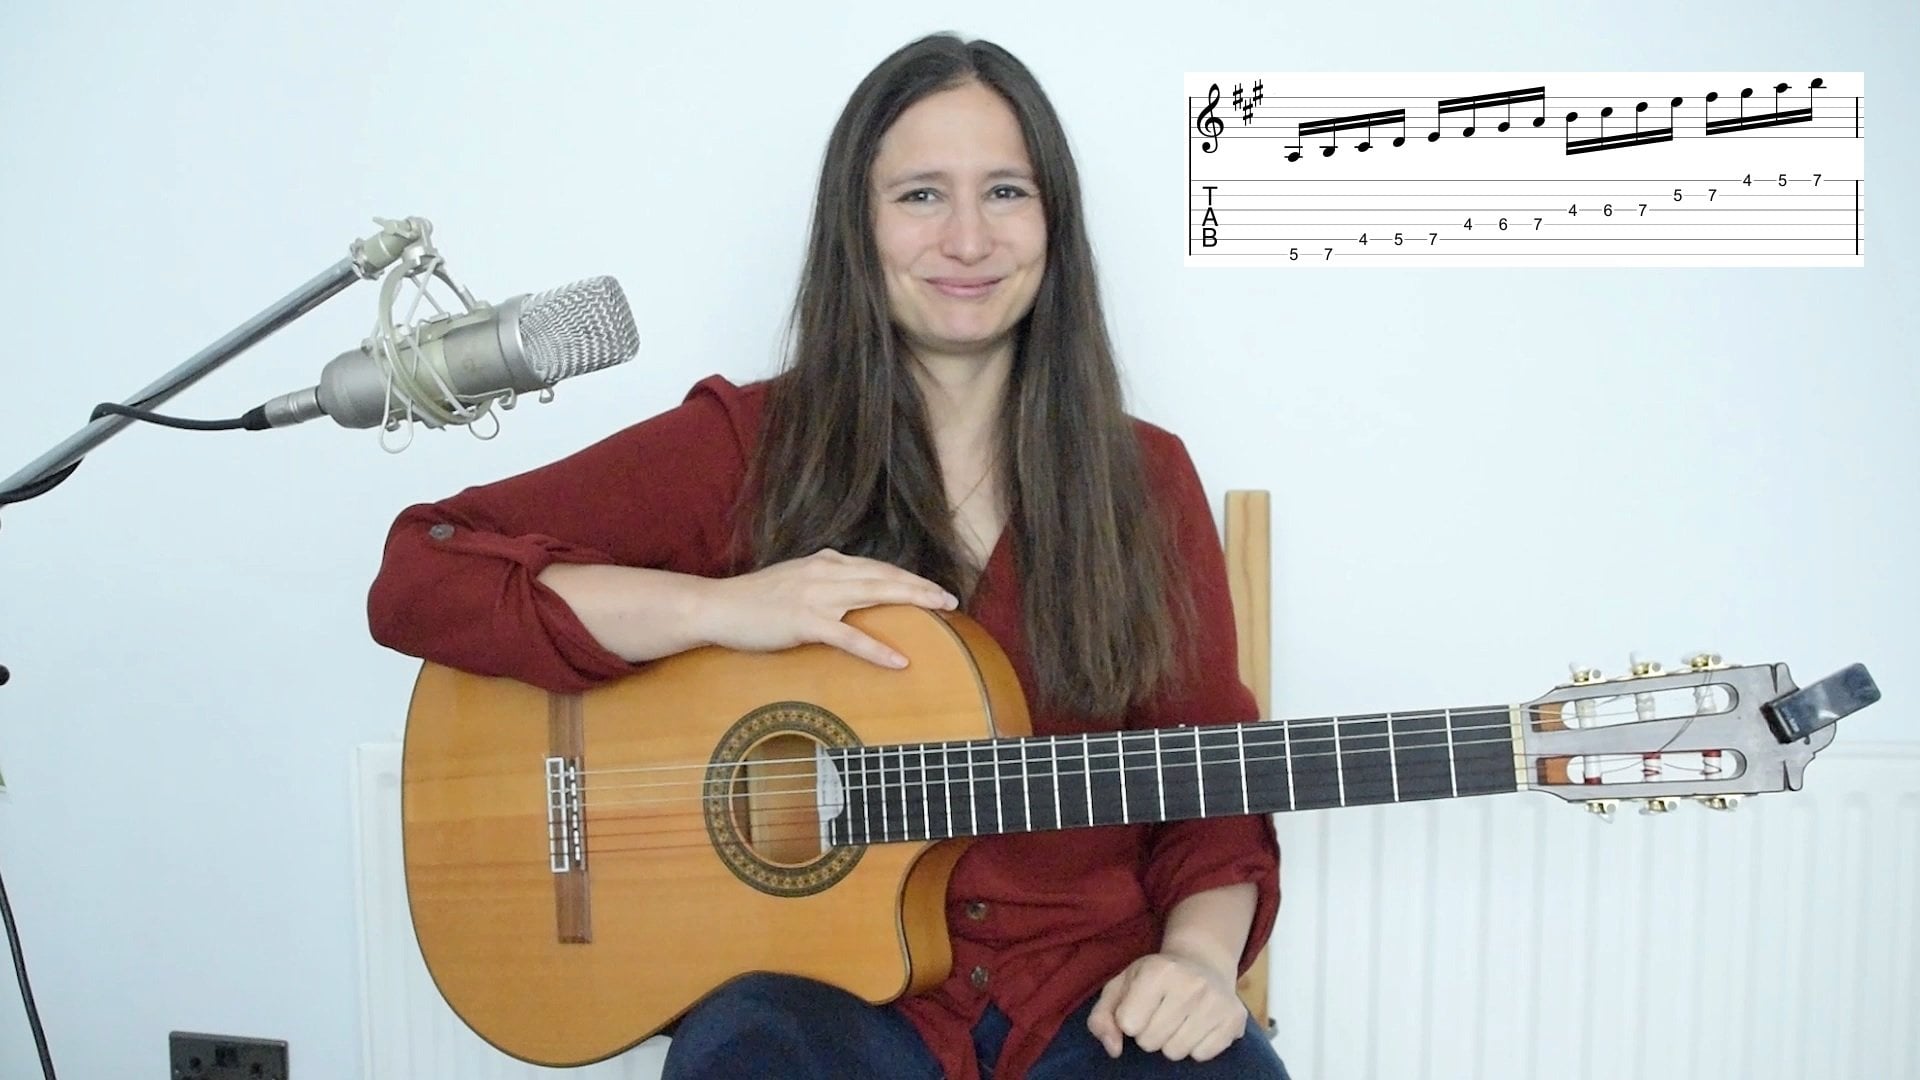
13. E Phrygian Scale: Now we will have a look
at how you can play these kind of techniques
when you use a scale. And we're going to learn
the E frigion scale, and we will do some
exercises on that one. We chose this scale because it's part of the C major scale. So it means there are no
sharps or flats in it. Now, let's see the
nodes of this scale. We have zero, one, three, zero, two, three, zero, three, zero, two, zero, one, three,
zero, one, three. Now we are going to play this scale on the way
down only with harons. It means that you only
play one string once. And when we go up, we will do it with pull offs. And again, we will only play the strings once
with one finger.
14. Four Notes per Beat Hammer-on Exercise: Next exercise will be again
on the E frigion scale. And this will be a four notes
per bit heron exercise. Now before we do this exercise, at first, you need to practice it without adding the herons. So this will be playing four notes from the
scale and after go to the second step
and then you play another four notes. So
it looks like this. One, two, three, four, one, two, three, four, one, two, three, four, one, two, three,
four, and so on. Now, let's see how does it
sound with the metronome. Now I'm going to do
the same exercises. The only difference
will be that I'm going to do hammerons
wherever I can. So it means that I'm going to play every string only once.
15. Four Notes per Beat Pull-off Exercise: The next exercise
will be very similar, but we will do the four notes
with pull off exercises. It will be at first, again, just playing the notes
before we do the pull offs. So it will be one,
two, three, four, one, two, three, four, one, two, three, four, and so on. Now let's do this
with a metronome, again at two different speed. Now, let's do the same
exercises with pull off. So it means we only
play one string once, and everything else will be
the same with the left hand.
16. Hard Flamenco Exercise: Our final exercise on
the Hameron and pull off will be a flamenco
guitar exercise. It is super hard, so don't be discouraged if you can't get
there straightaway. So the exercise will
be that we will play one chord and after
we will do hammer on, pull off, pull off, hammer on, hammer on, pull off, pull off. And then we will
play another chord and we will repeat this. Now, you can do this
hammer on and pull offs on a way that you use
your ring finger or you can use the
little finger. A lot of people use the
little finger because you can hammer on a little bit harder
with the little finger, but you can do the same exercise with
the ring finger as well. Now, let's do this
with a metronome.
17. Slide and Vibrato: We will have a look at two more techniques to
finish this course, and this will be the
slide and the vibrato. The slide is a part of legato technique because you are smoothly connecting two
nodes together with it. But there are two
types of slides. One of them is called the legato slide when you just play once between two nodes. And then there is
the shift slide when you play the node again, but you slide between
the two nodes. The vibrato is a technique
where you elongate a node. So you make it sound
a little bit nicer. The way to do it that you go very quickly on the
sideways with the finger. Et's look at some exercises to practice our
legato slide first, and after we will do a shift slide exercise
with some vibrato. In the first exercise, we will just use all the
different strings and the index finger to slide
from one to the third fret. And after we will do the
same with the middle finger, ring finger, and little finger. And so on and
middle is the same. Mm and drink and finally little. Now, let's do this
with a metronome. In our final exercise, we will add shift slide
with a vibrato with all the different fingers in all the different strings.
So it will look like this. Oh
18. Hand Warm-up Exercises: We will look at four
different exercises to improve your
finger flexibility. But before we go on
to these exercises, I would like you
to check where you are now with your
finger flexibility. To do that one, you just
hold the fifth fret of the top E string and
try to reach with your little finger on the bottom string
as far as possible. If it is the eighth fret, you note that this is the
one that you can reach. And then hopefully within the period of time
that you practice these exercises that
I'm sharing with you, you will improve
this flexibility. So for me, it is the 11th fret. Before you start
these exercises, it is great to warm
up your fingers, and then you will
be more ready to reach higher or
further on the guitar. Now, to do that one, at first, you can just
massage your fingers. Now we are
concentrating mainly on the left hand
because that's where we will improve the flexibility. But of course, you can
do it in both hands. And to massage, you just pull
the skin towards the end of each fingers and you just
go through them one by one. Also, it is good if you
have a good temperature in the room because if
your fingers are cold, they are not as
flexible when you are warm all over in your body. Great. Once you did this one, you can just push away with your other two
fingers on the other hand, and then try to, like, try to be more flexible
with each of the fingers. So just pushing it away and
opening up all the ligaments. Great. And then you
can also, like, massage everything
at the same time and then push
inside the fingers. Or trying to pull it outside. Some people can pull
this way more than me. I think that's a
genetical thing. But you don't have
to be so flexible to reach the flexibility
that you want to because everything
can be improved. Alright. Now, let's go
into our exercises.
19. First Exercise Stretching the Little Finger: The guitar neck is wider
towards the tuning keys, but narrower towards the bridge. And that's what we
will use to improve our flexibility and do
all of these exercises. So the first exercise will be that we will hold
a C major chord, but without the barry shape
with the E shape on the neck, so it will be eight,
ten, ten, nine, and we will play Tomb, index, middle ring finger. And in the next round, we will go one fret forward
with the little finger. We will reach a ord, which is called flat nine, which is a very beautiful cord. And we will go one more fret forward with the little
finger in the next round, and we will be reaching the ninth chord or add the
ninth chord and then back. And once we finish one round, so then we will go one flat down and repeat
the whole thing and it will get harder and
harder the more you go down towards the tuning keys. Now, this will be
very challenging when you do the same in
the first few frets. So don't be
discouraged if you are not having a good
sound when you do it, but work towards it
to reach it there.
20. Second Exercise Stretching the Index Finger: In our next exercise, we will work on the flexibility
with the index finger. And in this case, we will start the
exercise again on the eighth flat on
the C major chord. So this is the E barrel shape, but without holding a barrel, and then we are
going to reach back one flat forward
and one more fret forward once we do the
rounds with the thumb index, middle, and ring finger. Oh
21. Third Exercise Reverse Stretching: Our next exercise will be a
reverse stretching exercise. And in this exercise, we will start on seven
and then nine and 11. So we will be skipping one
fret in between each of the fingers and we will play
Tomb index middle ring. Once you did one round, you will switch over. So we will be at 1197. And then you will go down
towards the first few frets. So it will get harder and
harder the more you go down.
22. Fourth Exercise Barre Stretching: Our last exercise is super hard. So practice these
previous exercises first before you
go into that one. So we will do the little
finger stretching again. But this time, we are
going to hold a barry. So it means that you will
play all of the strings, and then in the next round, you move the little
finger forward one. For this exercise,
you need to have a really strong barry
to sound clean, and you also need to have
a good way of flexibility. Once you did one round, then you go down to a minor
chord in the A minor shape, and you repeat the same thing. Now, this exercise will be very difficult in
the first you frets, but, of course, work towards it. And once you are close
to it or able to do it, then you definitely have a strong body and a
good flexibility. Even for me, it's not
like exactly clean, but it is something that
I'm working on as well.
23. Top 5 Techniques to Hold a Better Barre: Today, I'm going to show you five tips to improve
your barry hood. After this lesson,
hopefully you will play smoother and nicer when you are changing in
between the barris. I know a lot of you have
this kind of issue, especially if you started just to play the guitar that you really want to hold the bay properly and nicely and clean, and this is something
that you really need to do if you would
like to play the guitar. Of course, you can go for a long time without
playing the vary, and it is possible to play
a lot of different pieces. But if you would like
to go really further and you would like to become
an advanced guitarist, it is really vital to
learn how to play bay. So how do you play a bar or what are the most
common bare cords? So there are two shapes
of the Brey cords, which are used a lot, and it is the E shape, which is the E major or E minor. And when you hold a barry, what you are doing
that you are holding your index finger straight
and everything else curved. And you hold the same shape. But now your index finger is replacing the
end of the neck. Yeah. And of course, there is one more shape
which is really common, and it is A shape, so it is A major or A minor. So then you just need
to push it forward and replace the bay with your index finger,
which is straight. And you can hold this anywhere. Okay, the first thing
that you need to do when you start learning the barry
is have the proper position. That is that you
have to be straight with your index finger and
everything else is curved. It doesn't matter which
shape you are holding, but your index finger is always straight and
everything else is curved. And you don't put so much
effort to push it down. Of course, at the beginning, it is quite tiring to push it down because you need
to develop the muscles. But you are pushing a
tiny bit and you are also placing your arm on a way that you don't have
to push too much. So your arm is not like there, but more like pulling
a little bit. So you are pushing a tiny bit, but not so much
that it is not that tiring and you are also pulling. Of course, the
type of guitar you play is influencing
this as well, because some guitars are
quite difficult to play, and the more you go
towards the 12 fret, the harder it is to hold the bar is because the strings
are quite far away. I have a flamenco guitar, so the strings are quite close. So that's why it is a
little bit less effort to play apart. The next thing that
a lot of people make as a mistake and
that's why they cannot change in between cords quite quickly is that when they
start to hold the bares, you start to put
bomb on the fingers, and it just takes so much time. You have to learn
to hold the shape already in the air and
then place it down. So how you do it, then you know that your index
finger is straight, everything else is curved. So you kind of holding
the shape in the air, and then you place it. But everything needs
to come together because if you place
every finger one by one, it just takes so
much time and you won't be able to change
quickly in between chords. And then you always like
pulling one by one, everything. It's just not possible to play any songs quickly
like this one. So you have to restart again and you have to learn to place every finger at the same time and forming the shape
in the air already. Okay, now you learned that
you don't need to put so much effort to push it down and you pull from your arm, and you also placing all the fingers together
to the frag board. The next tip that
you need to do, you need to check
if it is clean. So how do you check
if it is clean? That you basically hold any
vary that you are practicing, and then you go one by one
with the strings and you try to play everything. And if everything sounds
clean, then you are fine. But if you hear
this, for example, you know that
something is wrong, and in that particular string, you need to change the position. So if it is the last one, you need to push
from the last one. Sometimes people touch
with the little finger, the next string, so
this is not clean. So it means that you need to
push a little bit forward, the little finger, and
then you try again. And, of course, you can hold in many different
positions, this barring. And if you know that most
of your problems is, for example, on the E string, there is an exercise
that you can do. And the exercise will be
just to hold the barras, and you do like a picado, which means you
play an index and middle finger and you end
up on the next string. And you play, for example, four notes on each
of the positions and after you go one fret forwards
or one frat backward, and you play the next chord.
So it could be like this. Now that you were working on the three steps before
or three tips before, the next thing that
you need to do, you need to work on making very little movements
when you are changing. So it means when you wear
the bar, you don't, like, lift up your whole
hand and jump around. You need to be quite
advanced to jump around and play like
this, but rather pull. So you don't even
lift up your hand, and then you are changing
position, for example, here to here, then of
course, you need to, like, lift it up, but you still make
very little movements. So you need to practice without playing anything to change. As you can see, I'm like, hardly making any movement, and that's the reason why I can change in between
ballets quite quickly. There is one exercise actually
that you can do because a lot of people struggling
to change to this position, which is the A major position. I'm holding actually D major
in the A major position. And then what you
can do is to change from the A major
position to the A minor. So how do you do that one? At first, you need to learn
to move the fingers together. So it means that
your ring finger and little finger
moves together, and even you need to push them together, they
stuck together. They don't move separately. So the first thing that
you can practice is just to move these two fingers
in between strings. They don't move separately,
they move together. Once you can practice that one, you can add the middle finger. So they do the same
movement still, the index finger is
staying in the same place, but the middle
finger is changing. To make it even easier, you can move your arm a tiny
bit to have the movement. And the final tip that
I'm going to give you that you already learned
all of these tips before, then you shouldn't stop with your strumming when
you change chords. A lot of people do this mistake
that they play on chord. And then they need to change, so they stop and
after they change. I know this is quite
difficult because you need to separate the two hands
in between each other, but you shouldn't
really stop strumming. And even if you
don't sound clean, you should not stop strumming. Even if you don't go to
the next cord on time, if you keep strumming, it means that it sounds a
little bit more fluent and even if can see or
hear a little bit, it is not as noticeable
than when you just stop in between
each of the cords. So don't stop strumming.
24. Barre Exercise: Today, I would like to share
with you a barry exercise. We will hold the barry
on the E position, and step by step, we go through the neck
and in each steps, it gets harder and
harder the exercise. And we will use also a metronome
so we will be on time. And then let's just get into it. First step on the first step, we will only use
our index finger, and we can use the middle finger to support the index finger. The index finger has to be straight and just
behind the fret, and you can hold the middle
finger to support it. And we will need to play
each of the strings, and everything has to
have a clear sound. So it's supposed to sound
something like this. So this was a clear sound, but if you hear
something like this, you need to stop the technique and correct your
position and go back. And now we will use the
metronome which set 100 BPM and we will start
going through the neck. Second step. On the second step we start using or middle finger, which should be on the
third fret from the bottom. So it is on the D string. So then you place your
index finger straight, your middle finger curved, and then you will do
exactly the same exercise. But again, if you hear
a note like this, you need to stop,
correct your position, and then start again. And we will go through
again on the neck. You can go as high as you want, and then you can just turn back and go back to
the first spread. A third step. In the third step, we will use or barry hood
and ring and little finger, and then we will hold
the E minor position, which is this one. And then, of course, when we start using it, then it will become F minor. And then F sharp minor
and G minor and so on. And we will start doing
the same exercise. Fourth step. On the fourth step, we will hold the
E dominant cord, which is this one. So it's only with bare and
ring and middle finger. And we will do exactly
the same exercise, we are not using
the little finger, and we will go through
one by one on the neck. Mm. You can do these kind of
rounds up and down, up and down as much as you want. The main thing is that
don't go one step higher up until you can't
play the step properly. And finally, the fifth
step will be holding the proper E major
position on a barret hold. And again, we will do the
same exercise 100 BPM, playing string by
string, everything.
25. Introduction to Arpeggios: In this course, we are
going to learn the four basic finger
picking exercises or some people call it peedjo
and it is also more like an arpeggiated chord because the real pejo is when
you play on a scale, the first, the third
and the fifth note, or the first, third, fifth and seventh note. But these are mainly just finger picking exercises
to play on chords. We will do all of
these exercises on a way that we will
play open chords. So the first chord
will be E major. And after we will
have an F open chord, which means that we are
not holding a full barrel, we just hold the top of the F chord and after we
will go to F sharp open, and then G major
open, and so on. And you can go all the
way up and all the way down on your guitar when you are practicing these finger
picking exercises. Also, what we are going to do we will do a working bassline, which means that we will play with or tmp
first the E string, and then we are moving
down to the A string, and then we go to the D string
and back with the Astring. And then we will add the pattern to the
bottom of the string. There is one thing common
with these exercises that you will always place your
ring finger to the E string, your middle finger
to the B string, and your index finger
to the G string. Although the pattern
are going to change, it depends on which
one you are doing. The first two patterns will be four notes per bit exercises, and it just means that when you practice it and you
put on the metronome, you will play four notes and it will be Tomb and
these three fingers. And the second two exercises will be six notes
per bit exercises, which means that you
play the thumb once and you play six notes with
these three fingers. Now, let's have a
look at the first
26. First Pattern: In the first pattern, we will start with
an E major chord, and we will use the tomb
as the first finger, and then we will use the
ring middle index to go up. When you play with the
thumb, you can just, like, play away from the string, but try not to make too big movements because then it will slow
you down later on. It's the same thing
with these fingers. If you play with
little movements, you will have more chances to reach higher speed later on. The best way to practice these exercises is
having a metronome. And when you have a metronome, you can just place it to a particular speed where
you are comfortable with. And then you just need to
play four notes per bit. And then you can also start one note per bit if it
is more comfortable and when you feel comfortable
with one speed after you can speed up and you
can go to the next level. So I recorded this
exercises actually in two different speed at 50
BPM to show you how it sounds when it's
played a little bit slower and I played
it at 100 BPM as well to show you how it
suns when it is played faster. Now, let's have a look how
you can start this exercise just to put on the
metronome maybe at 100 BPM and playing
one note per bit, just to practice to
play with the metronome and play even when you
play this exercise. Oh once you do one
round in one chord, you go to the next chord. And so you can go as far as
you want to on the neck, and then you can
just try to push yourself and go to
four notes per bit. Actually, with this
particular pattern, I can go really fast and
it can sound really nice. I think I can do 130
BPM four notes per bit. H.
27. First Pattern with Metronome: [No Speech]
28. Second Pattern: In the second pattern, we will do very
similar exercises. We will have the same
chord progression. So we start on E major, and we go to F open, and then we will go all the
way up to A major open. And we will have the
working baseline as well. What is changing
that we will play Tom, index, middle ring. You can start practicing the exercise again
in the same way. So you put on your
metronome at 100 BPM, you play one note per bit, and slowly you are
transitioning to four notes per bit and try
to push your speed higher. H
29. Second Pattern with Metronome: [No Speech]
30. Third Pattern: Now we arrive to the six
notes per bit patterns. And in this case, we will play tomb index, middle, ring, middle, index. Now, let's do the same exercise with 100 BP and
one note per beat.
31. Third Pattern with Metronome: Oh
32. Fourth Pattern: Our final pattern will be a
six notes per bit exercise, but this time we are
going to play Tomb ring, middle, index, middle ring. Now, this can be a very
unnatural exercise, and it is not used
so much in songs. So for me, this is pretty hard, but it's worth to practice this with all the other
patterns as well. So let's see how does
it sound at 100 BPM. Now that we learn
the four basic ways of playing these finger
picking exercises, we are going to have
a look at some songs as an example and for
you to practice them.
33. Fourth Pattern with Metronome: [No Speech]
34. Spanish Romance: [No Speech]
35. Spanish Romance Tutorial: First heard this song in
a music festival when a guy was playing it
on a guitar for us, and I started playing
the guitar quite late. So that's why it was the first time when
I heard this song, and I just loved it so much. So I asked him so many
times to play it. So in the end, he actually was quite annoyed with me
and tried to avoid me, so he doesn't need to
play this song anymore. So then I decided to learn it. And when I was 24-years-old, I was a street musician
for one year in London, and this song was
the moneymaker. I think because everybody
loves this song so much, people donated more money
when I played this song, so I play this song quite a lot. And today we are going
to learn how to play this song and also how we
can make it sound nice. The composer is anonymous. I think this song is
like over 100-years-old. Some people try to claim
it that they wrote it, but nobody could prove it. And it's a really
beautiful song. It has a lot of different
names that it goes by. Some people call it Romance or Spanish Romance or
Romance de anonymous. So it's a beginner song. I highly recommend
you to learn it, and it's not that difficult, but there is one bay part which makes the song a
little bit challenging. When you play this song, you are playing like
an arpeggio movement. So it means you play with the
ring, middle index finger. And sometimes you add with
the top the bass note. Also the song has
two different parts. There is an A part,
and there is a B part. Usually, when people play it, they play it on a way
that they play A, A, B, B, and A. And people who don't play
very well on the guitar, they play the first part, the A part because
it's so much easier than the B part and
they skip the B part. But today, we will look at
the A and the B part as well. So let's have a look
how you can play the A part with a
tab and 60 BPM. Oh When you play classical guitar, you don't really
follow the metronome. I just put the metronome on for this particular song now because I could match it
with the tab this way. But in classical guitar, you speed up and slow down
the music and you add breaks in certain places
to express emotions. So let's see how we can
express emotions with this song because if you would just follow it
with the metronome, it would be too robotic. What you can do to
make it sound nicer, you can add oxens at the
beginning of the bars. So an oxen means
it's a louder note, but also you cannot a little
break after this note. So instead of playing this, you can play like this. So every time when
you start the bar, you add a little accent, and then you emphasize
the bar in that way. And you can also add some vibratos which will make it sound
really, really nice. Vibrato is a way to
elongate the note, and you do vibratos on classical guitar on a way
that you play a note and very quickly move your
finger sideways. Not in every place the
vibrato will sound nice, but it's definitely sound nice at the very beginning
on the seventh fret. You can also add a little
vibrato on the third fret, and you can definitely add vibrato when you are
on the 12th fret. The hardest beat in
the song is the bay. This can take a while
to make it sound clean. The best is to hold the barry on a way
that the neck is here. So you are kind of over barring. This way, you can push
a little bit more. But don't be discouraged
if you can't make it sound at
the very beginning. You just need to keep
trying because you need to develop a strength in
your hand to have, like, a really strong barry. Even you can see this muscle. This is like something
that the guitarist have just because of holding
so much bars in my life. You can always check
if your barry is clean on a way that you play
one by one, the note. But of course, this will be the hardest because you need to reach out with your
little finger and stretch while you are
holding the barry. It is also very nice to emphasize
when you finish a part. So when you are
finishing the a part, you need to slow down
the music so it will sound much nicer and it indicates
something is finishing. So in the end, it
will sound like this. When you are playing
the B part and you are changing from
position to position, it is good to go
from cord to cord. So basically, this
is the first ord, and this is the second chord. And then when you hold the bay, you need to go to
the chord, as well. So this will be the hardest
because then you need to jump from chord to chord when
you're playing this song. But you can also do the
same thing like before, so you cannot accent at
the beginning of the bar, so it will make it sound nicer. You can also emphasize
the ending of the bars on a way that you add an accent
at the very beginning, you play fast in the middle, and you are kind of
slowing down in the end. There is probably one more
hard bit in the second part, which is this stretch. But otherwise, it is
pretty straightforward. And, of course, this
particular barre
36. Purple Bird: [No Speech]
37. Purple Bird Tutorial: I wrote this song to
practice the second pattern, which is called Purple Bird. And it was like a variation of a song
that I wrote before. It was called Blue Bird, but now it has changed. I changed the chord, so I
changed the name of the song. The song starts at
A minor, and again, you play with the tomb and
the ring finger together, and you play the second shape. The pattern with the right
hand will be very similar, although sometimes I'm moving the three fingers up from
the bottom three strings, one string up, and that's why it's easier to play this way instead of
playing double bass. Also, the bass sometimes
changing in the song.
38. Every Second Week on Friday: The
39. Every Second Week on Friday Tutorial: The next composition is called Every Second
Week on Friday. And in this song, you have a mixed technique
or a mixed pattern. Although when you play
the bottom three strings, you are always placing the same finger to
the same string. So ring finger on E string, middle finger is on B and
index finger is on G string. And whenever you play
the base three strings, then you will need
to use a moving tub. This is very beautiful song. Although for this song, you need to be able to
play some Barre because you will have a G
major with a Barre, and also you will have a B minor as a Barre to be
able to play the song.
40. Spanish Mixed Technique: [No Speech]
41. Spanish Mixed Technique Tutorial: Our final song will be a
Spanish style Ope jo exercise. And in this song, we will have the Spanish
chord progression. So A minor to G, to F, to E. And the pattern
will be that you will have a moving baseline or changing baseline that
you play with the tub, and you will always place your other three fingers
to the bottom s string, and you will play the same
strings with the same fingers. And the pattern is so this
is the first pad joe. And then we go to
the cert type of pad job because it
will be thump, done, done, done, up, up, and we will have two more up
up from the bottom string. So first type SRType
and an extra two notes. And then we changechord.
42. Tirando: There are two types
of technique to use to play solos in
classical guitar. One of them is called apoyando, and it is to pull the strings up until you end up
on the next string. This technique is
also called Picado, and I have a lot of good lessons about this
in the flamenco section. So if you would like to
learn this technique, please go to that section
because in flamenco guitar, this is the technique to
use to sound more strong. But it is also used in
classical guitar in some songs. And the other technique
is called Tirando. Tirando is a free picking between the index
and middle finger. And here you don't end
up on the next string. This is an alternate picking, which means the index and middle finger is
always alternating, even when you change strings. At first, let's practice this technique only playing
two notes per string, so it will be easy to change. You don't have to hold
anything on the left hand, or you can hold a chord to
practice this at first. And the best is to play this over the sound hole
on the right hand. I started the playing
with the index finger. Let's do the same thing, but now we will start with
the middle finger and again, playing two notes per string. The hard bit will be when you start to
play three notes per string because you
need to change with a different finger each time
when you change string. So let's start to
practice that one. In the next exercise, we will start to
use our left hand, and we will start to play three notes per
string there as well. And this will be third, second, third on each string. So it will be one,
two, three, one, two, three, one, two, three, one, two, three. Once you are in the bottom, you push everything
forward once, so you don't repeat strings, and then you start
to go backwards. Let's do this with
the metronome. You can do the same exercise, but reversing the position. So this will be ring, middle, index, ring, middle
index, all the way down. And once you are in the bottom, you push everything forward, and it will be index middle
ring, index middle ring. You can also do an exercise, which will involve
four notes per string. So this will be index,
middle, ring, little, index, middle ring,
little, all the way down. And once you are in the bottom, you push everything forward and you start to go backwards. Finally, let's do this exercise
on the way backwards.
43. Classical Tremolo: Today, we are going to learn how to play the
classical tremolo. And after this lesson, you can learn
something like this. Now, the classical and the
flamenco tremolo are a little bit different from each other because in the
flamenco tremolo, you actually play five notes while in the classical tremolo, you only play four notes, and the Tomb doesn't end up on the next ring
but ends up freely. The first step to do
this practice will be to find the best way for
you to play this tremolo. Now, the official way is
Tom ring middle index. So it sounds
something like this. Well, there are some other
ways you can play it, and I think you need to
find the best way for you and the best technique
that you can speed up. For example, Anavdovic doesn't play this classical
way, the tremolo. She plays Recuerdo de
lambra beautifully, and her technique is actually
tamp middle, index, middle. So it sounds quite similar. Now, the first thing that
you need to do to practice this one is actually just getting ready
with the technique, which means that you
can hold any chord. And then at first, you just
practice it on the E string. So it means that you play
only the E string with the tremolo part and you play
the top like a moving base. It means that you go from
the top all the way to the bottom and you are changing base every time
you play this one. And the main thing is to
be really consistent. So it means that every note
should be the same distance. So the next step will be to practicing the tremolo
on the B string. So it means that you do exactly
the same with the tomb, so you make like a
moving bassline. You hold one chord and you just practice it
on the B string. And then you will do the
same on the G string. And lastly, you can do it on the D string as well
if you want to. Probably this one
is the hardest. It is very difficult to speed up this technique without the
use of the metronome because you don't know what is
your speed and you are not really forced to keep up
with one certain speed. So let's start using or metronome and set
up a speed for us, and let's practice this one with the same exercise
starting on the E string. So we start with 160 BPM, one note per beat. M The next step will be to start playing
four notes per bit, and we can do the same
speed like before. But now with the setup
or metronome to 40 BPM. If you feel like that you are sounding very clean
in one speed, that's the time to speed up. So I'm going to put up now 80 BPM and doing
the same exercise. Now, practicing the same
thing on the B string. 120 BPM, switching
from E to B to D. Of course, you can
go faster than 120 BPM with the metronome. But please only do that if
you sound very clean in one speed and you are ready to go further with the next speed. I just want to say
that this technique can take a while to muster, so don't be discouraged
if it doesn't happen for you after
one week or two weeks. Even for me to cares to sound quite nice when I'm
playing this technique, and I'm still working on. So what helped me actually the most is doing this
technique without thinking. So this meant that I
put on something on my laptop and I was watching my series or movies
or YouTube videos. I was muting my guitar, and I was just like, playing. This is actually the
great way to practice because you can
sometimes can be really daunting to do all of these technical exercises so you can do something fun
while you are doing it. But don't do it when your
family and friends are around, it looks a little bit silly, but this actually
helped me the most.
44. Flamenco Arpeggio: Today, we are going to
learn the flamenco ped jo. After this lesson, you can
learn something like this. The classical and the
flamenco rpedjo is a little bit different
because in the classical, you do a free picking
with your thumb. While in the flamenco, you end up with the thumb so you have a little bit
stronger sound. The direction that I
actually showed you was Tmp ring middle index. And then the tmp is
doing a baseline, which means it plays first the E string and then A
and then D and then A. Now, this technique
is pretty easy when the next string is coming and when
you are going down. But when you start to go
upwards with the thump, you need to be there already. Otherwise, you will be too late, and it will take you too
much time to speed up. This is easy because Tump up up up and the thumb is already on the string
where it needs to be. And after again, Tmp up up up, the thumb is on the string
where it needs to be. Here on the D string, you need to end up as a free picking because you
are playing the string below. So it's free picking, but you need to
place the thump to the A string in the
middle when you play. So a lot of people place the thump when they play
with the middle finger. So it will look like this. But for me, the
easiest is to place it after the ring finger already. So it
will be like this. It doesn't matter when
you place the tmp, but you need to place the thump when you play with the ring, middle, and index finger. And the best is to
practice this super, super slow and train your brain to place the thumb while you are playing with these
three strings. You can train the brain either with the middle finger
or the ring finger. It doesn't really matter. The main thing is that you place the tomb in the middle
when you are playing. The coord that I'm using
for this is E major, and then I go to
an open F major, which means I don't
hold the barry. I just hold the top E string, the base E string, and after I just push
the shape forward one, and I play an open
F short major. At the beginning, it's better to practice this very, very slow. So you can practice
it like one node per bit at 60 BPM and
slowly speed this up. Once you feel comfortable with the tomb changing
while you play with these fingers,
you can go faster. Now, let's do 60 BPM four notes, Barbie, two, three, four, one, two, three, four, one,
two, three, four. Now I'm going to
show you how this sounds when you actually
really speed up. You can do this technique in a lot of different
directions as well. This was just one direction. The second direction
will be thumb, index, middle ring, thump
index, middle ring. And then, again, when you change back to the
aString with the thumb, you can change on
the middle string. So it will be Tomb
index change ring, Tmp, index change ring. This direction is so much harder for me than
the direction before, but I can go up to 95 100
BPM with a lot of practice. So let's do this with the metronome at first at 60
BPM and let's speed this up. Now, let's do the
fastest that I can do. The third more
important direction, we'll be doing six
notes per bit, so it will be Tum index, middle ring, middle index. Now, here, you can change
in many different places. A lot of people change
on the ring finger, but you can also change in the middle or index
or wherever you want. The main thing is that you need to place the thumb before. So let's practice the change. So we will just go upwards, playing the D A and E
string with the thumb. And now I'm going to change
with the ring finger. Now, let's do this technique
with the macronom. Now, we go a little
bit lower 60 BPM because we are playing
six notes per bit. 12, three, four,
five, six, one, two, three, four, five, six, one,
two, three, four, five, six. This can take a while to muster, so don't be discouraged if it doesn't happen straightaway. I remember I spent a whole month in the
winter holiday and doing the hours and hours every day to train my tomb to go
to the right places.
45. Flamenco Arpeggio Study: I would like to share with you today an arch peture exercise, which is very, very beautiful, and it is a combination of several different picking that
I already did a lesson on. Let's see how this
exercise look like, and I do use my
metron on 80, 90, 100 BPM, so we will go
faster and faster and hopefully it will help you to gain a better speed
and be more punctual.
46. Fast Solea Arpeggios: Today, we are going to learn two fast flamenco
sola pad jo studies, and after this lesson, you can learn
something like this. Let's play the first
flamenco sola. At first, I'm going
to play it at 50 BPM, but we are going to speed it up to 100 BPM to sound like me at the
beginning of the video. Before we go onto the rhythm, let's look at the
techniques that you need to use in this exercise. So we have a six pedjo which means that we
play tomb index, middle ring, middle, index. We also have after a pull gar, so it means that you end up on the next string with the
thumb while you pull it down, and then you do like a free picking with
the index finger. And then we have a Gape. Gopa means that you add a
hat with your ring finger, and in this case, you just use the thump
to play one note. In the next bar, V will have another six pad jaws
and then a Hamron. I like to add the hmeron with my little finger because
I'm already in position, and this way, you will
add ringing everything. And you add the hemeron
again with the Pulgar. And again, you can
add another gold pa while you are adding a
hemron and the pull off. And finally, you finish
with an arpeggio. And this is like a pull gar and the index finger up as well. It's better to add the
pulgar a tiny bit earlier so you have a better sound.
Instead of doing this. Just a tiny bit earlier to have a little bit
more flamenco sound. And after you can add again
two gold paste what quartz. Let's have a look at the rhythm. Solar is in 12, although this time, we
divided the 12 to 4 bars, so we are in three, four, and it means we will play one, two, three, one, two, three, one, two, three,
one, two, three. And this way, you can
count the rhythm as well. And we are going to count
the rhythm with E endas. So it will be one E and two E, and three and one E and
two E, and three and. We need to change the
counting when we play the 60s because we
have triplets there. So instead of saying one i endo, we will say triplet, triplet. So let's count and
clap this exercise. Triplet, two, and three E
and triple triple, two, and three and triplet,
triplet, two, and three E, and one E and
the two and three, and. As you can see, you have a lot
of different rhythms here. You have six notes per
bit, two notes per bit, one note per bit, and on the second bar,
on the third bit, you have three notes, but one of them is an
eight note and 216 notes, so it will be ta da da ta da da. What helps me to
play flamenco a lot of times is to be able to sing the rhythm before I play it. So you can also practice
it, singing it. I can set up the
metronome at 50 BPM. And let's try to
sing this rhythm. Ta da, da, da, da, da, da, da, da ta, da, da, da, da, da, da, da, da, da, da, ta
da, da, da, da, da, da, da, da. When you sing rhythms, you know how the music
is supposed to sound. And actually, I'm teaching flamenco to my students as well, and I make them singing rhythms, and it helps them to play
what is written here. For me, the hardest part of this exercise is playing sixes, and I have to
practice this a lot. What I mean is six
notes per bit. So there is an
exercise that you can do to practice playing
six notes per bit. And this is just to do like
an alternate baseline, and then you play Tmp
index, middle ring, middle, index, tmp, index, middle, ring, middle index. You just switch the Tmp
with an alternate baseline. So at first, you
play E, A, D, A. And after you can change chord, so you can go to an
open F chord from E and then F short G, G sharp. So let's see how does that sound with the
metronome at 70 v. It is quite hard and very
tiring as well for the fingers. But the good thing about this exercise that
you don't have to do this all the time because you have a little
break after the 60s, so you can, you know, gather your strength for the next time when you
need to play fast. You can also practice
this on a way that you play the first bit
and you go to the second bit, but you just play
the first note, so you check if you are on time. So let's do this
with the first bar. In this case, I went
click to click. So it was click, click. You can do the same exercise
with the other bars as well. Let's see how does
it sound at 70 BPM. And let's see how does
it sound at 100 BPM. Et's have a look at
the second Solea, and I'm going to play it
for you again at 50 BPM. So you see how does it
sound and after we are going to analyze it and learn
the techniques to play it. Two. Oh, this solar is very
similar like the other one, except that now we will have another section on the third bar when we play four notes per bit. And the ending
will be different. This will be one of the
typical solar ending. So let's have a look at how
you can count this rhythm. Triple at triple at two, and three and triple
at triple at two, and three and one and two, and three, and one
E, triple at two, and three E and here, you can add a golpe again on the third beat in the
first and the second bar. So it will be arpeggio, Pulgar with a hammer on and then golpe with the
hammeron and pull off. Again, arpegoPull Pulgar
with the hammer on, Golpe hammeron and pull off. And then we will have
a four notes per beat. So this will be just an pego And I just use like a classical
finger picking technique. So it's just an
alternate picking between my index
and middle finger, but I'm not pulling up. I don't do like a pulgar. It's a little bit
of softer sound. And the very end will be Pulgar, Opa jom and TomTomp, Golpe with the thump
and index finger. Again, what we can do we can practice
singing this rhythm. So then we know how it sounds when you play
it on the guitar. I can put the metronome
again at 50 BPM, and let's try to sing it. Ta da, da, a, da, da, da, da ta da, da, a da, da, a da, da, da, da ta da, da, da, da, da, da, da, da, da, da, da, da, da, da, da, da, da, da, da, da, the the here probably the hardest is to switch
to the four from all of these rhythms and
also to be able to switch from one rhythm to the other one and still
staying within the beat. So let's play this a little
bit faster at 70 BPM. And after let's play
this at the final speed at 100 BPM. Mm
47. One-Stroke Rasgueado: Today, we are going to learn
the Rosgiado technique, and after this lesson, you can play
something like this. So the technique is basically using the index finger
and you are flicking, which means that you start from the bottom of the
thumb and then you flick and flick and you need to go back to
the bottom and you flick. Also, you place your
thumb on the E string, and you are not pushing
it down, place it there. And after you try to
hit the base nodes, especially trying to
hit the A string. How you can see that
you hit the A string, you just need to look at the
strings and you will see the A string buzzing if you were able to hit it
with your flick. Also, try to aim to have
this kind of basic sound. So don't hit all of the strings. Try to hit the top of the string so you
will sound better. So then when you go click and then you go
back to the bottom. Click back to the bottom. It is very important
to go back to the bottom because if you
don't go back to the bottom, you don't have enough power
to make it sound quite nice. So go back to the bottom always when you do
this technique. Also, when you go up, then you use mainly
the higher strings. So that's why when you
play this technique, you have this kind
of base sound, high sound, base, high sound. There are a few other things which can be nice to
pay attention to. For example, don't go too
far away from the guitar, but be close to the strings. And when you end
up on the string, you are still curd, and then you are ready to go back to the bottom
of the string. Now, to demonstrate
this technique, I use the flamenco side called Faruca because Faruca is in 44, so it's quite easy to make variations with this
technique on the Faruca. The chords are E seven A minor, E seven, A minor, D minor, A minor, E seven, A minor. And then I just audit
some variations. So to practice this technique, you can just practice it
on a way that whenever you are in the E seven
chord, you just go down. So it will be one,
two, three, four, and then on the A minor chord, then you can do do up, down up, down up, down. So it will be done down D down, down, down down down
down down down down. Now, you can do a few things to make it sound a
little bit nicer. For example, you
can add a golpe. Golpe means that you use your ring finger and you
add the hit on the guitar. Now, some of the guitar wood
can be quite sensitive. I'm using a god pader which is like a cover for my guitar, so then I'm not adding hose when I'm doing
this quite a lot. In my previous guitar, actually didn't have this cover, and in the end, I
almost had hose. I mean, it didn't
change the sounds, but it's nice to have
some kind of cover, so you're protecting
your guitar. This movement is a little
bit unnatural because your index finger and ring finger is moving to
different directions. While you flick with
the index finger, your ring finger is
going backwards. You need to have also
a little bit of nail. If you have two big nails, you can lose your nails doing
this kind of technique. But if you don't have a nail, then you won't have a
very, very nice sound. So with nails, it's like
this without nails. It's a little bit harder to make the right
sound with this. Okay, so now let's
practice this one. We will go down, down, down, down and after we will on the golpe each time
when we go down, done, up done, up done. Of course, you can make other
variations as well, so it will sound even
better when we do that one. For example, we can add
flavors to each of the cords. So then when we play an E seven chord, we
can add with two. And then we play A minor
d or for the D minor. Of course, there are other bits and pieces that you can do. For example, you
can add mutings. It is also called staccato. It means that you play a note, but you stop the sound. This is quite easy to do
when you play a barre chord, but it's a little bit harder
when you play open chord. Because when you play a
barre chord, for example, playing an A minor chord, you can stop the sound just
lifting up your left hand. You could see the
difference in the sound. Although when you
play open chords, you need to use with your left hand some different
fingers to do the muting. So in this case, we can
practice the mutings on the E seven chord andodding
it with the little finger. And also do the same with the ring finger using
the same technique. It's a little bit harder for me, but everybody's hand is
a tiny bit different, so you might find this a little bit easier than muting
with the little finger. You can also practice
this kind of technique using
the A major core, and I'm holding it in
a flaw and convey, which means that I'm
holding two strings with the index finger and one
string with the middle finger. I have these two fingers, three, so I can use
them to do other stuff. Now I'm going to mute it. So it is just adding a bit and then muting it or touching
it with the little finger. And you can also do the
same with the ring finger. So there is one more
thing that you can do, which can make the
sound nice and it is adding a kind of heat
and then going down. Basically, you do
the same technique, but you are kind of doing
it in the air and you aim the heat onto the guitar
wood above the strings. And then you can
add a little bit a little bit of string sound to your sound and it can
add some nice effects. So once you master
this technique, then you can go through the
three throw cross guiado, which is kind of in the
same theory like this one, so you need to flick. But at this time,
we are going to use three fingers to do
that one or we can use four fingers as well for the four throw cragiatom or three fingers for the
fourth throw crass giatom. But then we go back up
with the index finger. So it will be flick,
flick, flick, always flicking from the
ring, middle index finger. Or four stroke. Or
four stroke this way. Although I will do a
separate video on this one, and then I will make a lot of exercises for you to master
that kind of technique. But at first, you
need to go through this technique and
master this one.
48. Three-Stroke Rasgueado: Today we are going to learn the three and four
stroke ra iatom. After this lesson, you can
learn something like this. Now, to add a three
stroke cragiato or a four throw crasgiato, we can do it in a
few different ways. At first, let's look at how we do a three stroke cragiato. Then we are going to add ring, middle, and index finger, and we always start from
the bottom or we have fist position and we are touching the bottom
of the thumb. After we will click, click, click and Click. And also, we can do a three stroke crass guiado
on a way that we will just do a flick from the middle and the index finger and we go
back with the index finger. So it will be flick,
flick, flick, flick up. It is better to do a three
stroke cragiado when we're aiming to a more
continuous striplt to do it with the down
down up movement because when you do a
down down down movement, you always have to go back
to the bottom and it is like an extra movement which is very difficult to get rid of. The first step of practicing this one is
doing a separation. So how do you do a separation? Will use a different chord each time than we are doing
one hit on the guitar. We can do it on a way that we will do an E dominant seven, after E major, after
teenagor flat nine, which is a very fluencoch ord. Once you did this separation
exercise to reach speed, it is good to use or metronome, and then you can start
up with a speed and after you can speed up
with the metronome itself. So let's try to do this one. At first, we will do one hit per bit and after we will
start to raise or speed, we will start doing three
nodes per bit so we can hear the metronome
better 100 BPM. 180 BPM. It is the same as 60 BPM, so now we will do
three notes per bit. Three, two, three, one,
two, three, 80 BPM. So this is a lot harder to
speed up than the other one because there is always an extra movement when you
go back to your open fist. So let's try to speed
up or other stroke cross the do when we
are starting from the middle finger
and we go back. Two, three, two, three. So that was 110 BP. Let's look at how to do a
four throw cross diatom, and I will show you
two different methods to play a four throw
cross dado as well. At first, we are going to do it with the little
finger involved, so it will be one,
two, three, four. The same way you can
speed it up as well. So you use your metronome. At first, you do one
note per bit and after you will start to
do four notes per bit, so it will be easier
to go faster. And the other way to do a four throw crossiado
is doing one, two, three, up, so it's
starting from the ring finger. Let's see how does that
sound with the metronome. So now I run down to 40 BPM
and it is four notes per bit, so it will be exactly the same
speed like the one before. One, two, three, four, one, two, three, four. Again, this one was a little
bit hard to speed it up because you always
have an extra movement when you need to go
back to your fist. So I'm going to
use the other way, which will be ring,
middle, index, and back up, so
it will be easier to speed it up because
there is no extra movement. It will be one, two, three, and back up to the fist. So then you will be
able to go again.
49. Flamenco Bulerias Exercise: Today, we are going to learn a basic Bulerias
vastu and also we are going to learn how to
understand the rhythm and how to make melodies on
this particular rhythm. After this lesson, you will
learn something like this. So at first, we are going
to learn the rhythm of the Bulerias and it is in 12, and we will make oxens
in particular places. So it will be 12, one, two, three, four, five,
six, seven, eight, nine, ten, 11, 12,
one, two, three, four, five, six, seven,
eight, nine, 1011. So it is starting on the 12, and it has an oxen on the three, on the six, eight and ten. Or if you want, you
can count for me, that's easier like one, two, three, one, two, three, one, two, one, two, one, two, one, two, three, one, two, three, one, two,
one, two, one, two. Whatever is the easiest for you. To start to build up the faceas, we are going to choose
some chords which are quite common in this music, and this will be an A major
and also a B flat seven, but it will be an open seven. Now, we also need to
learn what kind of technique we need to
use to play the rhythm, and we are going to learn how to play Rasgueado and also Golpe. So asciado is a technique, which means that you will make a hit or a flick with
your index finger, which is starting from
the bottom of your thumb. And then you place your thumb on the top of the
Etring and you hit. And also, sometimes
you need to go back. And when you go back, you always go to the
bottom of the tomb. Some people just go to the
middle and then they don't have enough power to sound quite nice with this technique. So you always need to
go back to the bottom. The other technique
that you need for this one is a good pay, which means that we are going to make a hit with a ring finger. And sometimes it can be quite difficult as well
because sometimes we need to go with the oggiado
and make a hit as well. So it's run hit, done hit, done hit. By the way, I have a
guitar course which has 19 different lessons in all of these techniques and many others and lots of
different exercises. So if you would like to sign
up for my guitar course, please go to the
Amazon store under this video or to my website
and order your copy. Okay, so let's make and build
up a rhythm on this one. So we can do on a way that we will just do threes
on each of the chord, so it will be one, two, three, one, two, three,
one, two, three, one, two, three, as a
beginning of this exercise. So we need to break up
all these three as well, so then you need to go up, which is one, it's one
and two and three, one and two, and three. One and two, and three. One, three, one, three,
one, two, three, one, three, one, two, three, one, two, three,
one, three, one. Once you are comfortable
with this one, we will start adding opsons on different places to make a little bit more
variety of the rhythm. So the first one we can do when we change to
the second chord, which is B flat seven, open B flat seven, then we are going to
add or first Rasgueado, so it will be one
she on and she on. Two, three, three. Now, let's add even
more variations, and now when we are going to
go back for a major chord, we are going to
add a four through cross diatom on a way
that it will fit, that it will be one,
which is triplet, two is up, and three is ahead. So it's one, two, three, one, two, three. Strang. The next step of this exercise
will be to add oxens on the right places
because it is one, two, three, one, two, three, one, two, one, two, one, two. Then we need to add oxens
on the one, two, one, two, one, two, instead of one, two, three, one, two,
three, one, two, three. So how to do that one, we can add some extra
quartz for exercise, and then it could be a major. Go to the B at seven, open B at seven, and then we can add
C nine And then, again, a B flat chord, but without a ring finger. And let's go back to
the A major chord. So how it will sound. And fast. Okay. So once we
can do that one, we can also add, like a really typical
facet up to this one. And in this case, we are going to use
a diminished chord. This will start to play from the t. So how it will
sound very slowly. Well one. S six,
seven, eight, nine, 102 s, five, six, seven, eight, nine, 1011. Same and so on. So how do you play this fasta? You are going to play
it with an arpdju. So you hold a diminished chord, and after you start
playing very slowly, TumTump and index, middle, ring, and then you have a
pull off and after hit oh
50. Flamenco Golpe Exercises: I will show you a few
ways to do the Golpe, which is hits in flamenco
or Spanish guitar, and it will give you a great
accent on your playing. After this lesson, you will
learn something like this. This is one way, the second way. Third way. And then
the fourth way. At first, I will start
with the easiest one, which is using a flick
and you flick with your index finger and from the bottom of your thumb
and you hit the strings. But the best is when you hit in between the tar wood and
the strings, so it is like. And you can use, like, any chord that you want. I'm using an A minor chord. But I mute it and after it means that I hold the cord and suddenly
I release it. So it is a Some people do not flick quite strongly, so it is great to practice this with a coin or something
like this on the ground. And then you can if you can
flick a coin for, like, quite far away, it means
that your flick is strong enough and you can try the same thing
on the guitar. But there are few
things that you need to follow to have good power. And it is that your index is always in the
bottom of the top. So it's not from here, but from the bottom, and then you can go
with more power. Because if you start from
here, maybe it works, but it's better from the bottom because
you have more power. So this is the movement. It's great to move your hand
while you are doing this. And after you can incorporate it to your strumming techniques, for example, you
can click and after up and down string strums. So And then it sounds
something like this. You can do a lot of quite
fun stuff with this one. The most important thing
is to keep the written, and then it will be very
percussive playing. Going down with
your thumb and you make a hit with
your ring finger. I don't have so much nail actually with my ring
finger at the moment, so the sound is not so strong. But because I have literally
gigs every second day and I'm doing a lot of room
so I'm losing my nails. Although I show you would
weigh how to do this, it's better to have a little bit more nails than what I have. It is going down with your thumb and make the
heat at the same time, it slowly looks like this. So it is something like this. You need to move your
wrist at the same time. It's a bit difficult movement because it's a bit unnatural, but you can get into this one. Let's see how it
sounds it accord. Again, you can incorporate
this to your playing, and you can either mix it
together with the other one. So we will do, like, hit upend, up and done, and the other
go pay upendanUen done. It's difficult to keep
the turn with this one. I need to practice it
a little bit more, but it sounds really amazing to mix this kind of two
got paste together. And then you can cover somebody in a
very, very percosin way. The third way to do the Golpe is using the osgado technique. So basically, that's a
very unnatural movement. Again, you make the hit
with your ring finger, but at the same time, you are going down with
your index finger. So you have this
kind of movement. It doesn't matter what
the middle finger is doing at the same time, but these two should go to
the different direction. Your thumb is on the easing, not pushing it down, just resting, and then
you flip and you hit. Et's see how it
sounds with a cold. And then also you
can incorporate this to a playing so
you can go, like, up and down with your
index finger and you make oxens with
your gold by playing. You can follow a lot of different pattern with
this kind of playing. So you can do even kind of
glia rhythm with this one, and then you can follow
this kind of pattern, and it will sound
really, really amazing. And it is one, two, three, one, two, three,
one, two, one, two, one, two, one, two, three, one, two, three, one, two, one, two, So So what I'm playing here is Yan, of pendanUenn an, OpenanUenda, panda, O panda Open Dan. The fourth exercise will be goal pair on the
Alzapua technique, and it is basically your
thumb and you go done one string with the thumb and after you go all the
way down and go up, or you can just go down, do things round and up. The main thing that you
make this movement on the second make this technique
on the second movement. So it's done it pop. And it is quite similar to the second
technique that I showed you, except that you start
your thumb movement, not from the E string, but some of the other strings. So it is with a minor chord. It's done in De. Done. There is a great
exercise for this one, which was in EnterdosOqua, which is a Paco de Lucia song. And then he's using this technique if you
listen to this Ozapa part, which is So it is done on string.
51. Flamenco Triplet: Today, I'm going to
show you two ways or two methods to reach fast
speed in the flamenco triplet. After this lesson, you will
learn something like this. For this lesson, you
will need a metronome because we need the metronome
to get faster and faster. Without that one, it will be difficult to track or progress. So the flamenco triplet
contains three movements, and it is basically
going down with your middle finger or middle finger and ring
finger together as you wish. And after you turn your wrist and you use your thumb and
after you need to turn. So movement with the fingers, but do not move anything else, and after you turn, your wrist turn back. One, two, three, one, two, three, one, two, three. It's all coming from the wrist and it is
all the movement. So there are few tricks
that you need to do first to be able to
play this properly. I just would like to say
that flamenco players start the triplet in a different way because they start
up with the tomb, and I start done. But the reason why I
start down because I would like to add later on
the hits with few times. And the only way to add the
hit is starting down because it's long to see and
if you start up, then it is 13 and you are turning so
you can't put the heat. Okay, because everything
is coming from the wrist, this is the movement. So what you need to
be able to reach is play down and up with
your wrist and tongue, why everything is
coming from the wrist. And it turn turn, turn turn, turn turn, turn turn. And after you can add
the middle finger. So it is done, down down down turn. As you can see, I
do not move my arm. I'm only moving the wrist. And if you move your arm, you won't be able to go fast, and later on, you need
to reach high speed. So the only way to do
that one without getting tired as well to do everything from the
wrist because later on, it is like shaking movement. So there are a few
things that you need to do before you start using the metronome and the first
thing is to make oxens. So you can do, like
an accent on the down and after don't do any
oxensO the other ones, occent means that you
play a little bit louder the movement and after you will play a little bit quieter, the rest, so it will be. That's when you make an accent on the down and
after you can make an accent on the down
term, so this movement. So. And after you can make an
accent on the up movement. Once you can do all
of these things, the next thing that you
need to practice is use your wrist because
every movement have to come from the wrist. So you need to be able to
do a like a term Tara. One history. One
history. One history. You need to be able to hear three because if
you just hear two, that's not enough. You
need to hear three. So if you only hear two, it means that some movements are missing when you do that. And after this, we are going to the first method to
be able to play fast. Okay, now we know the movements. Now we know that it
comes from the brist and that we have to do it with
the turning movement, and we need to go fast. So we will start
using the metronome. I will put up my
metronome to 100 PN and then do one strum per beat and we will
start going faster. You can start slower as well. If you want even faster, it is up to you where you start, but you need to start slow. So then we will play one
movement with the metronome. Navi go faster, 140 BPM. And 180 BPM. Now we will go back to 60 BPM, which is exactly the same
speed like we did before, but we will start playing
three notes per beat. That will be the easier. So it means that you will know whenever you hear the beep, you just need to go down, and then when the beep is
then you know the down. And if you go faster, 90 BPM. If you feel like that you cannot keep up with the rhythm,
this is your speed, and you need to
practice it quite a lot every day until you reach
the speed that you want. If you feel like that you
won't be able to go faster, you need to look
at your technique because sometimes
you move your arm, sometimes you move too much, sometimes you are too far
away from the strings, sometimes you do not turn enough or you
don't use your wrist. So it could be your technique, the reason why it
cannot go fast. And also, it needs
to be like one, two, three, one, two,
three, one, two, three, Tara rah rah, one, two, three, one, two,
three, one, two, three. Some people do the triplet
and it's just like terra ram. That's not the right way. It needs to be floating and every movement is
the same speed. The next progression is 120 BPM. To keep the speed better, it is great to use the leg. I'm using my leg
with every beat. So it means that my whole body is moving. I'm more on time. Second method will be burst. Burst mean that you just
do one quick triplet, one, two, three, one, two, three, one, two, three. And now they use the metronome
to connect these triplets. And we need to reach,
again, 200 BPM. So it means that we
need to hear breaks in between the triplets until we reach or speed if we
do it fast enough. So let's start this speed
with 60 BPM and we will just do burst and burst
and burst and burst. Let's go faster 80 BPM. 100 m. 140 PM. 170 BPM, and we should still hear breaks in
between the strip plans. It's quite difficult in 170 BPM, but you know that you are fast
enough if you hear breaks in between your triplets
star at 170 BPM. And of course, you can go
up all the way to 200 BPM. Mmm. This is a quite fun technique, actually, and you can use it in a lot of different situation. You can progress
it more and then you can start adding the hits. Or you can use it with
the Rumba technique and it's quite nice to
audit on the end of the Rumba technique and
also it gives a burst in the end. Mm.
52. Learn the Rodrigo Y Gabriela Strumming: Today, we are going to learn the Rodrigo Gabriela
strumming technique, and after this lesson, you can learn
something like this. Or something like this. Okay, now let's start
adding the hat. So what Gabriela does that she adds a triplet and
she adds a hit. So it will be like this
triplat hit, trip plat, hit. Now you can practice this
with the metronome as well. And then one movement will be
one movement will be a hit. So I will show you how
it will sound or look. One, two, three hit,
one, two, three hit. Now you can add the
chords, as well. So for example, in Tamakun, we have A minor, G major, C major, and E major. Now, this is a very slow speed, so I'm going to speed up, and I will show you how it
sounds when you go faster. Now you can do few things
to practice this technique. One can be doing a quick turn, so it will be one,
two, three, and stop. Now, I'm doing it so fast that I really need
to pay attention to the sound instead
of the movements because you can hear if it
is three or if it is two. For example, this is
three. And this is two. So when you hear two, then you need to look
at your technique, maybe go a little bit slower
and try to add at plat. And the other one will be just going quickly and
then adding the heat. So Now, let's add some variations because then we will sound
a little bit better. And what we are going to do, it will be one, two, three, hit, one, hit, one, hit, one, two, three, hit,
one, hit, one, hit. Now, let's have a
look at another song, and this will be Dibojo and
the chords are A minor, C major, D minor, E major. Now, what happened
here that we are the two strums and after
flamenco replatment hit. But we accented
the second strum, so it sounds a
little bit better. So it means that you just play the second strum a
little bit louder. And of course, in the end, it is just triplahit
triplat hit. So Dam, d, trip plat, hit, d, d, trip plat, hit, dang done, trip plat hit, trip
lat, hit, triplet hit.
53. Five Ways to Play Flamenco Rumba: Today we are going to learn
the top five Rumba technique. After this lesson, you
can learn something like this. Or something like this. Okay. Before we start
these five techniques, we will use the Spanish
chord progression for all of these techniques. So we just played A minor, G major, F major, and E major. But you don't have
to hold vita Barre. You can just hold
it like normally. So A minor, G major,
major E major. So the first technique
that we are going to look at is the really basic
Rumba technique, and Rumba is in
eight or in four. So in this movement,
it will be like this. So in this one, the
first movement is a hit, and then you can go up
with the index finger. You go down with the
index finger where you turn your hand and
you go up with the tumb. So hit, up, down, up, hit, up, down, hit, up, turn, turn. You can also add
some variations with the sound because you cannot
hit in different places. So you can hit here or hit here, it will sound different. The next Rumba
technique that I'm going to show you is
like Park acid Rumba, and it sounds
something like this. So what we are going to
do in this technique, we are going to develop the
first basic Rumba technique, and we will add something in the beginning and then it will sound a
little bit different. Now, this one is in eight. So at the beginning,
we will add a golpe, which means you add a heat with your ring finger while you go down with your
thumb at the same time. So it is like this.
This will be the one. So two is waiting,
and then you can, silently come back
to the top and then three or the fingers
down with the nails, and four sump up. So go up, we, done. And after you can just add
the basic Rumba technique. So it will be go way, done up, hit up, done, up, go way, done, it up, down up. This is how it sounds
when it's faster. You can add some mutings and then it will sound
like very percussive. So how do you add the mutings? You can just, like, open
and release the chords. The third technique that we are going to look at is a little bit softer and I called this the
one note Rumba technique. Now, instead of playing a full
note or the full strings, we are going to play only one note with the Rumba,
so it will be like this. How do you play this technique? The first movement is a done. Done, wait, and
up hit, up, down. Here, there is one more
difference in the sound, which is the index finger does only the last
few movements. So it is up, down, up. Down, down it, up, down, down, down, up, down. With this technique, it's
quite nice because you can use like a moving
thumb as well, and it will sound really amazing just using
this technique. So for example,
you can play like an E dominant seventh chord or actually an E major
flat five chord. So it means that you put your little finger on the
third fret of the D string, and it sounds like very dark. And then you can just
use a moving thumb which means that you
play the E string, the A string, and the D string. Sounds quite nice. Number four, I will
call this weight Rumba. This will be very similar
to the one before. Although we are going to add
some breaks in this Rumba. This is actually, like, a very flamenco sounding Rumba. And it will be quite similar, but there will be some changes. So now we are going to
play not just one node but a full chord with a
Gape in the first one, and of the second and
third is waiting. And then on the fourth, you come back with the tumb. And then instead of
adding the heat, there will be a rest there, and then up down
up is the ending. So let's see how
does that sound. This Rumba has a little bit more
space in between, and then you can just
practice with the metronome. So it will be just
like one, wait, wait, wait, up done. And the final Rumba that
I'm going to show you, I call it the Catalan Rumba
or the Gabriela technique. And this sounds very different
from the ones before. I'm going to show you
how does that sound. So what do you do
in this technique? In this technique, you are going to play triplets and hats. And it is also in eight, but it's kind of on a way that you play like
one, two, three, four. So you play a triplet on the four and after
you add the heat. At first, you actually need to muster the flamenco
triplet to sound good. And to play the flamenco
triplet you use, especially with this one, you can't start in
any other ways. You use your middle and
ring finger, you order hit. And after you turn your thumb away and you
turn your thumb back. So it's hit, done. Heat, done. In this case, you will
just do one triplet, and then you add the heat. So one, two, three, hit, one, two, three, hit, one, two, three, hit. Try to do it like a fast turn, and then it will sound amazing.
54. Fast Spanish Strumming Exercise: This time, I will show you a hard cover somebody in
a fast and exciting way. So then the background
music doesn't sound so plain when you play it. After this lesson, you will
learn something like this. So this is one of my original composition
which is called journey. And I will show you how I do this fast kind
of background music. So your hand is in a fist. And after you go up and
down with your fingers, all of your fingers down and
your thumb up your nail, I mean, both cases. You have to make really
little movements because if you make
big movements, it will be really
difficult to go fast. But if you make little movement, you can fasten it up. So you can just tract d without playing any chords
or anything like that. And then when you
are fast enough, you can start
playing the chords. So now I'm playing a D minor. Second thing that you need
to know with this kind of playing that you
can make oxens. And what I usually
do, I make an oxen, which means that you go hardly done after
done up done up. And you can practice it
like De done up done, up. And first, it sounds like this. And you can make accent in a
lot of other ways as well. And you can use, for example, a Golpe to make an accent and after you can go
down, up, down up. Golpe means that you go
down with your thumb and you make a hit with your ring
finger. So it is like this. So basically, slowly,
it looks like this. Golpe down up, Dw up. Goopy down up, downp. And this is what I'm
using in the journey. And this is actually a
kind of rhythm as well, because it is go
pedane up, done, up, go pane, up, down, up and go pedanU. So it is like broken rhythm, and a lot of people
using this in tango, which is like And after the chords are
G is an open D minor. And after a short
major and G minor. And after D sharp
major, back to D minor. Only the D sharp Major
is not in the key. Owise everything
else is in D minor, but it's a nice
addition to the song. So I hope you enjoy this video and see you guys later
with Aor guitar lessons.
55. Mariachi Strumming: Today, I'm going to show you how to do the Mexican Mia
cheese strumming. And after this lesson, you will learn
something like this. This chord progression
is coming from Desperados Canson the mariachi, and there are two chords
that you need to use, and these are E
minor and B seven. And there is two parts
actually in the song. This was the first part. And in the chorus,
there is a second part, and the chords for
that one is A minor, E minor, and B
seven, and E minor. And then it sounds like this. The movements. When you practice this at first, I suggest you to touch the
strings because otherwise, it can get quite annoying. So you mute the strings with your left hand if you are
right handed guitarist, and then we start the movements. So the first one is like
a kind of osgiado but it's quite different from the flamencoras guiado because
in the flamencasGiado, you need to make accents
in every single movement, but it is more like the
fingers follow each other. So you use your ring, middle, and index finger, at first, your ring and then middle index. But it's more like
they are following each other and it's not so much like accent on
each of the movement, but they are all
together going down. So it is like It's like you turn your hand and you use these three fingers together
without so much accent. So that's the first movement. And after done with the tomb
and with the tomb. So it is And now we are getting to the next part of this strumming, which is basically kind
of mute or like a hit, and you do it on a way
that you use all of your fingers and you
hit the strings. So it is like This was so difficult for me because
I never used this before. If you guys were
using this before, maybe you can get this one a
little bit easier than me, but I needed to practice a lot. This particular
movement, use all of your fingers and you
hit the strings and you touch with your
palm the strings. Okay, so so far, Rasgueado done, up hit
Rasgueado done, up hit. And then to finish the
movement, its aggiado done, up, hit, done, up, aggiado do, up, hit, done. Mm hmm. It's quite nice one. And after you can use different chords to practice this one, you can make, like, one of these Maria
cheese strumming on each of the
cords, for example, in A minor E minor
B seven, A minor. And then you can just do
it very slowly at first. And of course, once you are confident with these movements,
you can speed it up. I practiced a lot actually while I was watching movies
and things like that, and I'm just to mute the
guitar and do the movements. Until it became familiar
with my right hand, and then you can go
with the right speed.
56. Playing with the Thumb on Flamenco Guitar: Pulgar means stump, so it
is playing with the thumb. So let's see how does this technique look
like and sound like? Okay, so at first,
we need to have a look at how you play Pulgar. The thumb is kind of
almost 90 degrees, and then you end up
on the next string. So it is kind of pulling down and ending up
on the next string. Now you can play it from the
tomb or moving the thumb, but it is better to
play it from the wrist, so you have a little
bit more power. So whenever you play, you kind of move
little movements with your wrist and then you
can have a better sound. So the first exercise that
you can do to practice Pulgar is playing four
notes per bit exercises. And then we are
only going to use, actually the top
four strings because Pulgar is not really used
in the bottom two strings, then you can use Picado. At first, you can just go up and down with four notes per bit,
so it will be like this. The next step of this exercise
will be string skipping. You play E, D A G. So it will be Now, the key to do this
exercise because you need to end up on
the next string, you have to lift
up again to go to the string that you need to
play and then play down. So it is like pulling down, lifting up a tiny bit, and go to the next string. Mm.
57. Picado Technique: Picado is an alternate picking between the index
and middle finger, and you are pulling up your
finger to the next string. You are always alternating with the index and
middle finger. And when you start
to go upwards, it is important to stay in
the same position so you can just lift up the whole
arm to keep the position. So it will look like this. Your thumb can be
on the E string, but once you start
going upwards, then you can use the
guitar body for a support, and then you can just, like, push the thumb onto
the guitar board and pull the whole hand up. When you play with Picado, it is important to do the
movements from the bottom. So you can be faster and
it won't be so exhausting, like when you just, like, move one part of your finger. Now, I'm going to show you a few exercises to practice
the alternate picking. This exercise is called three
note per string exercise, and everybody is doing them. All the guitarists that I know, all the guitarists that
I ever played with, it is a speed exercise, and some people can do
this really, really fast. The exercise will be that you play with your left hand index, middle, and ring finger, and then you go to
the next string. So you play three
notes per string. You play three notes per
string because you want to switch always with
a different finger. That's why when you
play three notes, then you always use the next finger to
play the next string. So if you start with the index, it will be index, middle, index, middle, index, middle, and then again, index, middle index. When you're going down,
you are going forward. Once you are in the bottom, you push everything up and
you start to go backwards. You can do this exercise
going all the way up on the fretboard or you can just go backwards after a while.
So once you are here, You can do few things to practice the switch because that's the most important thing. You need to make
sure that you are always doing an
alternate picking. So to practice the
switch between positions and going
forwards and backwards, you can practice it
only on two strings. So you can do this exercise. So only on the
bottom two strings, or you can do exactly
the same exercise on the base two strings. This can be quite difficult if you are not used to playing
an alternate picking. But it's very important to train your fingers for
alternate picking. Otherwise, it will be very
difficult to go fast later on. Before we put on the metronome
and play this exercise, we need to do a few things
to reduce the movements. On the left hand, when you play, don't lift up after you play, which means you play
with the index and stay and then middle
finger and you stay. Many people play like this. This is wrong and you add
too much extra movements. So the best is just to stay once you played and you move
when you need to move. When you are going upwards, you can do a reduced
movement exercise. So instead of moving one by one, you can move together with
the ring and middle finger, and then it will reduce the movements that you
do on your left hand. This will take a little
time to get used to, but it will really
improve your speed. Now, let's play this
with the metronome at 100 BPM one note per beat, and let's see how does it sound. Once you are comfortable with this and you can
follow the metronome, you can switch to three
notes per beat exercises. So you will have less cliques, but you need to
play three notes. So let's try to do
this at 60 BPM. You can also count in to know the speed, so it
will be like this. One, two, three, one, two, three, one, two, three,
one, two, three. To sound good in improvisation, it is important to
push the speed up and you should be
at least 130 BPM. But some people
can do this super, super fast, like 200 BPM. So I will show you how
it sounds at 130 BPM. This speed is not going to happen overnight and it will be quite hard
at the beginning. So I recommend that you
try to find your speed. And once you find your speed, you try to work it to go faster. So if your speed is 80 BPM, then try to practice it at that speed for a while and then try to push it up
a little bit more like 90 BPM and try to keep up. There are few tricks
that you can do. For example, try to go to 90
pm if your speed is 80 Pm, even if you cannot do it
and try to follow it. And even if you cannot do
it, it doesn't matter. But once you go back to 80 BPM, it will be a little bit
easier because you were pushing it so hard to
try to follow 90 pm. So, for example, I can put
my speed up to 150 BPM, and then it means that I
will be better at 140 PM. So this is quite, you know, challenging at this
speed, and even for me. So that's why I need to do quite a lot of exercise
to get to this one. But now, when I try at 140
BPM, it will be easier. You can do another exercise
for the alternate picking, which is very
similar to this one. But now we are going to
different directions. So instead of going forward, at the beginning, we
are going backwards, so it will look like this. And once we go to the next
fret, then we go forward. These two exercises
are quite important, so I recommend to
practice this every day or whenever you start
to play the guitar, at least five, 10 minutes
before you go onto the scales, it will help you to
train your brain for alternate picking exercise and also to train your
fingers to play faster. Now, let's go on to some other exercises to
practice the alternate picking.
58. Alternate Picking Exercises: Now let's have a look at the
alternate picking exercises which will help or technique, and it will involve
some string changing. One way to do that one, you can hold a third, which means that you play two notes in a third
apart in a scale. In this case, we can just hold the seventh fret of the E string and the eighth
fret of the B string, and then we can play three
notes on a way that we will start with B B. Let's do the same exercise
with the metronome. It is at 60 BPM. And we will play
three notes per bit. One, two, three, one, two, three, one, two, three,
one, two, three. We can play certs as well on a way that we will go down in the fretboard and
we will just add different type of certs and
after we will go back up. So this exercise
will look like this. And, of course, the
tabs are available, so you can download them
and have a look at them. Now let's do the same
thing with the metronome. The second exercise
will be quite similar, but we add some
melodies inside as well with desserts. Oh
59. Picado Zigzag Exercise: The next exercise is called
Picado zig zag exercise. I have to warn you this
is a difficult one, especially if you don't
do an alternate picking. So basically, with
this exercise, you are practicing
string changing with different fingers while you are going up and down with
a zig zag position. The easiest is to start this exercise with
the index finger, and you need to arrive back with the same finger to know that
you were doing it right. And the exercise
looks like this. One, four, one slide Ziag
once you are in the top, you zig zag back down. And I arrive with the
index finger again, and I repeat it again
and do the same. But now starting on
the second fret. And so on, you can work all
the way up on the fretboard, and you can work your
way down as well. If you want some
extra challenge, start it with your
middle finger, and then you need to finish
with the middle finger, but this will make
it even harder.
60. Picado Agility Exercise: Our final exercise will
be Picado AgidtEercise, and this will be playing certain pattern on
the B frigian scale, which is part of
the G major scale. At first, let's have a look at the frigion scale and after I'm going to
show you the exercise. Seven, eight, ten, seven, nine, ten, seven, nine, ten, seven, nine, seven, eight, ten, seven, eight, ten. And the pattern will be. We will start on the seventh
ft of the high E string, and we will play
three notes, fowards, five notes backward until we
go all the way to the top. Once we are on the
top, we will work our way down just playing
normally the scale, and we will come
back up inserts. And when we come back up, we change the scale in one
point because we will play here the harmonic minor or the frigian dominance scale
instead of the frigion scale. So this will be like this. Instead of The tab
anyway is available, so you can download it and
you can have a look at it. But let's have a look at
how this exercise sounds. One, two, three, one, two, three, four, five, one, two, three, one, two, three, four, five, one, two, three, one, two, three, four, five, one, two, three, one, two, three, four, five, one,
two, three, one, two, three, four, five, one, two, three, one, two,
three, four, five. Now we are going just go down. And then we will
come back inserts, which means we will skip one, forward, one, skip
one forward, one. Now I'm going to put
on the metronome, and I'm going to
play this scale.
61. Alzapua: Today, we are going to learn Alzapua and after this lesson, you can learn
something like this. As pos a flamenco
guitar technique. I don't think it appears
in any other music, and it is playing
triplets with the thumb. The thump plays at
first one note, so you go to the next string. And after you turn your wrist a little bit and playing two
or three strings down, and then you turn back
with the thumb while you go to the E string or the
string where you need to start. One, two strings back, one, two strings back, one, two strings back. This can take a while to muster, and it's very important
how you hold the hand, because if I am, completely opposite
to the camera, you shouldn't see my thumb because I'm 90 degrees
with the thumb. Or almost 90 degrees, which means that my poem
is away from the guitar. It's not like this.
It's like this. I also use my index finger
to stop the technique. So I have this kind of position, so I know when I need
to stop the thump. You can also practice
going up with the thumb on a way that you at first end up on the
E string and after the A string and
after the D string. This will help you to
change strings when you are doing the
ozapua technique and go back to the right string. It's very important to do the ozapua from the
wrist, not from the tomb. So it's not the thumb
that is moving, but the wrist is moving
when you do the triplet. A lot of people do
it from the tmp. And then they have a problem speeding this up or it's
not going to sound good. But if you do it from the wrist, you can do it a little bit
more smoother and more even. At first, when you
start practicing it, you can do some oxens which will help you to
master the position, which means at first
you add theocent on the first one and then quiet quiet. Then you add theocent
on the second one. It's a little bit harder. And then finally the third one. And then do this around
100 to 1,000 times. So you have it in your
hand when you practice it. Now, let's get into
some exercises so we can muster this one. The first exercise will be just holding an F short
minor position, but not with a barrel, it's like an open chord
and then we go down one swing S swing four times. And after we will add
the middle finger on the curt fret of the
earing and we repeat it. And finally, we open
up and repeat it. So four times on each position. And last time you can go
back to the index finger, and then we start doing the same thing with
the same position, moving everything,
one string down. And finally, again, repeat everything moving
the position down, one string, with the right hand and with the left hand as
well, and we repeat it. Let's do this exercise again, but using the metronome. The second exercise
will be playing a bassline on the E major chord, and it will look like this. Now, let's do this exercise
with the metronome. And the third
exercise is actually one of my original
songs in my guitar duo, which is called D fuego, and it is called
Ancient Woodland. And it sounds like this. And the second time,
you repeat it, but then the ending
will be different. 140 pm. The
62. Flamenco Tremolo Exercises: Today, I'm going to show you how to play the
flamenco tremolo. After this lesson, you will
learn something like this. Yeah. So the flamenco and the classical
tremolo is a little bit different because in
the classical tremolo, there is only four nodes. While in the flamenco tremolo, there are five nodes. In the classical, it is Tum and after index
middle ring finger. So it's one, two, three, four. While in the flamenco tremolo, it is Tum index, and then ring middle index. So it is one, two,
three, four, five. Also in the classical tremolo, the tamp is ending up freely, and in the flying code tremolo, the thumb ends up
on the next string, so there is a little bit
firmer baseline going on. So the first thing to do, to practice this technique is to really know the sequence. So what you need
to do is actually just go one, two, three, four, five, one, two, three, four, five, and do this a lot
until it is automatic. One, two, three, four, five, one, two, three, four, five. And after you can start
going down with the base. What I mean about that one
that the next string is coming all the time after
you play one string. So then it could be
one, two, three, four, five, next
string, next string. As you could see, in
the last movement, I didn't end up on
the next string. So this is the only time when you don't end up on
the next string, but end up freely because
you would interfere with that string because you are already playing
that with your fingers. So at first, you just need to repeat this kind of exercise fight a lot without using any metronome or
anything like that. And after you can start
using the metronome. Although it's good
to practice this on the E string and also on the B string and also on
the G string as well, because it will get harder and harder if you just practice
it on the E string. So it feels something
different when you practice it on the B string or when you practice
it on the G string. So there is one exercise that
you could do to practice. This one is just
mute the strings. It means that you
are just touching the strings and after you go through all the base
notes until you go down and you
play the E string, and after you swap and you start playing the B string
and you go all the way down with the baselines and after you start
playing the G string, and you go down
with the baselines, and then you go back to
the B string and E string. So how does this look like? Let's see with muted hands. So, one, two, three, four, five, one, two,
three, four, five, one, two, three, four,
five, one, two, three, four, five, one, two,
three, four, five, switch. Strengths. Okay, let's see how does it look like
when you hod a chord? So you can hod any
cord that you want. I will hod an E major, and I will do exactly
the same exercise. And after we start
using the metronome. Okay, let's start
using the metronome. The first thing that we need to learn that every note is even, so we will play one
note per bit and we will start to raise
up our speed after that. We can start in 100 BPM, and then we will start
raising our speed gradually. Okay, let's raise our
speed to 160 BPM, but you shouldn't
jump that much. You should just go
gradually and practice a lot in one speed
if you're not even. And 200 Pm. Now the next thing
that we need to start getting used to is
comting to five. And if we go down to 40 PM, it is five times 40 is 200, so then we will be
the same speed. So let's go down to 40 BPM
and do the same exercise. One, two, three,
four, five, one, two, three, four, five, one, two, three, four, five. So 90 BPM is a great
speed to play it, and it sounds very nice at 90, so I wouldn't go further, especially, I think
it is my speed. If I start to go further, it starts to sound quite messy. So the next thing is how you
can play a tremolo song. You can just put together some chords and play
just the bass lines. And that's why I put together
an exercise for you. And then it is just a bassline. And after we will
add a tremolo to the E string and to
the B string as well. So you can practice
that one separately, and it is a little
bit more exciting to practice this one than just
practicing on a chord. But also, you can just make a chord progression and
practice the same way, or you can just
make up any song. You can just make some kind of nice chord progression and then adding the tremoloi to
make it sound quite nice. Okay. So in the next song, I'm like, I put together
like a baseline. So we will play one, two, three, four, one,
two, three, four. And after we will practice the tremolo using the E string, and after we will practice the tremolo using the B string. So let's put on the
metronome, as well, and again, 90 BPM, and we will play the song. Mmm Mmm. Now, let's repeat
the same bassline. But now we will play the
tremolo on the B string, which will be so much
harder you will see. Just try it out, and then we will go back to
90 BP and so the same speed.
 Edina Balczó, Award-winning Guitarist