Transcripts
1. Intro To All Classes: Hello. My name is Kelly Chassis, and I'm a professional artist and instructor. And I've been teaching watercolor classes since about 2007 and in my classes. Really, Like I said at the beginning, it's about enjoyment. It's about being creative. It's for beginners and for hobbyists. For anybody that just wants toe. Sit down, relax for a couple hours and paint. And my scenes are usually fairly simple. Usually, they'll take you about Ripley two hours to paint from start to finish, and I'll go through everything step by step with you in my classes, and you can start, Stop pause. Um, you know there are no mistakes and it's really like I said just about having fun and enjoying yourself, so give it a try with me.
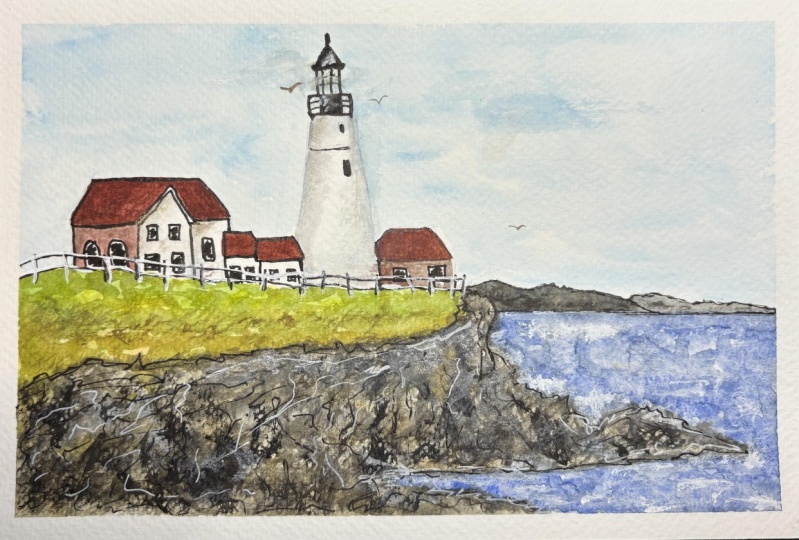
2. Introduction to Painting a lighthouse with watercolor: Hi, everyone. Kelly chassis here from Kelly Chassis Fine Art. And in today's course, we're gonna learn how to paint a lighthouse, and we're gonna be doing a lot of fabulous details in this one. We learn how to paint rocks and using a layered technique, and we're going to some buildings for the first time. Usually I'm doing landscapes, so this is a little different and so help to help you draw this out. I've added a pdf of the actual lighthouse sketch, and we'll go over lots of different things. How to paint the sky and nice, airy wash, and we'll get into a lot of little fine details on this month. We'll walk you through it step by step. If you have questions or concerns along the way, feel free to send me a note, and when you're finished, I would absolutely love to see your final results. You'd like to post your work. I'm on all the social media platforms Instagram, Twitter, Facebook, and you can find me on all of those in my profile page. I hope this is a five star course for you. If not, I would love to hear how I can make it better for you on the next one. So happy painting
3. Course Materials: So let's get started here for materials that will need for this course. I'm gonna be using arches brand watercolor paper. It's 100 £40 cold press, and it has a rough side in a smooth side, and we'll be painting on that rougher side. I also have a backer board, and you can use any kind of border either canvass, board, even cardboard to take your painting down. But it's just so that you'll be able to turn your painting as you're moving through the process so you don't to take it down to your table. And as I said, we're gonna have that rougher site up. And if I can center this into this eight by 10 foam backer board and put my mat, which is an opening of a five by seven directly on top, I'll be able to see in this area that I'll be painting in. So I'm gonna take my pencil on just Mark four Corners here with these four little dots, and that way I'll know what area to tape down. So when I'm completed with my painting, I'll have everything actually showing in my in my scene. So what will lead as well. Who put this aside? Will be using a number two pencil will be doing some light tracing for this for sketches. I also use a black Sharpie, and you don't have to have a black Sharpie. But I could. You could put birds, and with this you can do your signature with Issa's well, and I also use a polymer racer. This is if you have to do any type of erasing. I don't recommend using your number two pencil eraser because it can mark your paper. I'm also using a 3/4 inch oval wash. Brush something with some nice bristle so you could absorb the water well. And I have here in my little Windsor Newton Cotman kit, and in this kit comes a little sable detail brush, and this is a nice point on it, so you can get some really small details with this. We'll also be using for this course some white wash, and this is non transparent, and I'm using this to put in my white areas, and it's fairly thick. It's almost like toothpaste will be watering this down, and I'm using that really, in place of a masking fluids will be able to use this on top of our painting rather than leaving an area white now. Also be using two cups of water usually have one clean and one for dirty, and that way you're not always running to the sink, and plus your colors will get muddied. We also have a roll of paper towels. Won't be using this just to either wipe upper brushes or if we have some excess paint. And this is the Cotman kid up close. This is all of the paints that we usually use for most of my courses and opened the shows. You what The kit looks like my nice used kit. And so what we'll do next is tape down our our watercolor paper, and I'm just using a regular painter's tape. For this. You can use masking tape, but this works best cause you can lift it up and not have to worry about tearing your paper once you're completed. So what I'm doing now is I'm just taping those four sides down and you can see where my light pencil marks are. So I'm just gonna not make sure not covering those areas as I'm doing this, because that's gonna be the area is gonna show on your mat. I was gonna get off for these corners done and will be ready to paint.
4. Sketching the lighthouse: All right, so we're ready to sketch in our lighthouse area. And here's a close up of the painting that we're gonna be doing today. So I have my tape all on ready to go grab myself a nice number two pencil. It's not real sharp. It's got a little bit of a dull edge on it, and we're gonna lightly sketch. And just below that halfway mark on our paper And this is a five by seven paper, and I'm gonna come down on edge here cause this is the rocky coast of Maine, and I want to leave a little edge here for where water is gonna be. So this is gonna be the rock area here, and then it kind of slightly comes in and then back out here was like a little beach area still rocky, but the rocky beach we have lots of those here. And then this is my horizon. Line the water line. If you want to grab a ruler to make sure that this is straight, you can do that a lot of times. Once we put the islands in there, Uh, you can adjust that line, but you want to make sure it's It's a straight line. Usually Horizon offered a distance is gonna be a straight line. So now we're going to sketch in our little house. And if you want to watch this part through to so you can get the gist of where these things are, what I'm gonna try to do is add a pdf for you to print off. So if you want to have a picture of it right beside you, you can copy it there as well. I'm doing this very lightly and again if you want a ruler. If it's easier for you with a ruler, grab yourself a ruler. I'm not too concerned with my straight edges at this blanks. Usually when I paint them in, I straighten him out a lot of times as I'm painting. So this is just gives me a rough estimate as to where things are going to go. So we have that second house is kind of off in the front, but the roof line is basically straight across down both of these and then I'm gonna bring that one down in the front. Andi, we had some windows in here now, very lightly. When the well, sharpen up that a frame at the top here and this is the second roof line here. Never been bringing this down both sides here, and there's another window in here. And then there's this little tiny one beside and another one beside this. And I can't tell you what they are been here dio in real life Portland headlight. But I have still not sure what those little buildings are. So now we're going to start with Lighthouse, and the White House is a little bit more narrow up at the top than it is down the bottom. We can get those two lines parallel on the top. It's like a little box on the top. This is where the light is. On top of that is another little box. This one's a little bit taller at the top, and you're gonna put a little worth line on here who it helps you to fill it. And you can always just kind of pencil this in because it's all gonna be painted in and black. There's get your your shape in here. It's got a little fin eel on the top here and for the actual lighthouse area I'm gonna darkness up a little bit because I'm gonna actually go over this with a little bit of white wash when we gotta paint it in. So I'm not too concerned about those lines. If you do want to use a masking fluid for this, you can also do that for the lighthouse. But for this course, I just find it a little bit simple. Or it's a little less less steps than having to add the masking fluid by using the white wash. So I usually do that with my my life courses as well. So there's a last little house on the end there, and then Burgess going to draw in the islands in the back, and now we're just going to show you This is the line where the grassy area is and where the rock starts. I'm just gonna divide that up a little bit. You could do any little final touch ups as well as adding the railing. There's little railing that goes across here at the top, and the key to that is to make sure that it's curved. That line is a curved line there. We're gonna use a black Sharpie when we go toe to do this part so you'll be able to get a nice fine point on it. And then we also have a little section down here in the front where the rocks are and just kind of pencil in just a few of the larger rocks. This is like a little cliff over here. It's a jagged little cliff, and that looks to be about right, so we'll be ready to start. Our painting will be starting with our sky area first.
5. Painting the sky: All right, So now we're gonna get ready Teoh pain in our sky area. So I have my clean water here, and I'm gonna wet my brush, and I'm going to just cover the sky area here and there. I'm gonna leave a fuel spots that are gonna be bear, and that's to leave a natural cloud area in here. And then I'm gonna mix up a little bit of my ALTs marine blue. I'm gonna get a nice little puddle going in my little tray here. And to that, you can a little bit of cold ball blue or some other blues that you have just to kind of change up that color blue, but really can use any color blue that you like, And I'm just gonna tap this in, and I'm using this motion left to right. So it looks like the winds kind of blowing and the sky has got blue clouds, and they're kind of swirling around in here. So I'm not adding color everywhere. And I was gonna kind of fill in just a few little places. You could see what I have a little bit later. A little bit darker in some places and you can get around the lighthouse area here. Try not to get in there too much. If you can help it, I go around those on just fill in. So I'm okay. So I'm leaving some of this area white, and you want to make sure that you do go through the top part of your lighthouse because that actually is a glass area so you can see through that area. It could also be a cloud behind there if you forget. So no worries. Anything could be fixed. Little mistakes are a good thing. So I'm just gonna add it's a little bit of water to this and just kind of spreading it out . And the trick to this is not letting it dry before you finish. Because if it starts to dry and you try to go back in and add some more color to it, you'll get those blooms where the water just kind of blooms out. So you want to make sure this is really wet? Not so what? That it's gonna buckle your paper. But what? Enough so that it's it's still damp. And I'm adding just a little touch of that darker blue near the underneath of these here. And if you do get a little bit of the blue inside, that white area of your lighthouse just grabbed a little tissue and, well, that's still what you could just push down on that, and it will lift it right up. So now you could go ahead. And what you get that color in there that you like. You can take your blow dryer to it, and you want to make sure this is nice and dry before you want to our next step, and you can always add another layer to your sky if you feel it's too light. But you want to make sure it's completely dry before you do that, and what you could do is then at just clean water on top of your sky and do that same motion that we just had done the first time. And you can deep in those colors. Or you could even maybe add some purple in there or some other shades of color. But again, the key to that adding new color or anything darker would be to first dryer painting and then go back in with another thing of water and then add the color to that. So this is nice and dry will be moving on to our next step, which is going to be adding the water or the ocean.
6. Painting first Ocean layer: right. So let's get started with painting with our ocean on, making sure that that is completely dry the sky and the reason I do that is because if it is wet, your water, when we add that layer will bleed into your sky. So we don't want to do that, so we make sure it's nice and dry. So I'm grabbing my small detail brush here, and if you want to use a larger brush, you're welcome to do it. But it might be a little bit easier with a smaller one to be able to get in and around those rock areas. And I'm mixing up a nice bloom using the ultra marine blue and a little bit of the burn number that deepens. This water makes it nice, dark, dark, rich blue. And if it's too dark, you can add a little bit of water to it, which is what I did here and exacting. Blend this out so we could get a nice, dark, sharp edge up at the top here so you can have this is dark as you want. If you want a little darker pigment than you would use less water and more the pigment, and you could kind of change these colors up a little bitter. Add little shadows and depth in here is you kind of go along as long as it stays wet. You could add that that second shade of color. In here, you can see I have a little bit of variation. There's kind of going along the rocky edge here. You could also use masking fluid to cover up the rock areas if you want to. Lifetimes. I don't use the masking fluid. I just kind of maneuvering around there. I like masking fluid, but it's, ah, lot, much longer process, because you have to wait for it to dry in between and you have to actually pull the masking off. So I try to do everything in a short Virginia's most of my classes. I try to get done in a two hour time frame, so what I'm doing here is I could see him wiping off my brush, and I'm just kind of pulling out the paint here. And each time I dragged my brush across, you could see the white starts to show up a little bit, and then I wipe it off each time in between, because if you leave it on there, you're just gonna be depositing that paint right back in. So once I lifted out some areas, I'm just going back in and adding a little bit more darkness down here near the rock area. And then don't forget, down here in the very bottom. This is water area as well, and where the rocks are, we're just gonna had fill this all in. You could see I'm using this fine brush. The very tip of the brush. Even good. Quite a skinny little line in here with for these brushes and I try to use for most of the classes Just to brush is it makes it much easier, especially for beginners is you're first starting out, so don't have to buy all of these supplies on each of my classes. You learn well, a few little different techniques here and there. If you want to add some more colors to these of these shades of blue, you can do that while it's still wet. We're working in a very small area, so I'm adding just a little bit of straight ultra marine blue here. Really? It's just about getting that the different colors in there. So this it looks like the lights kind of hitting and reflecting off that water. And now we can just go ahead and blow dry that and make sure we're nice and dry before we go on to our next step.
7. Defining the grass : All right. So I'm gonna rinse off my brush really well, and I'm gonna make sure that you get the pigment from up in your fibers up top is while so make sure your brushes rinsed off really well. You can kind of pump it up banana in the water a little bit and that make sure that you get nice and clean and I'm gonna go into are lemon yellow. And it really shouldn't be using the dirty water here, But it's not that dirty. Could see that the pigments not really changed. But that's why I usually have two cups of water here. So I do these lighter shades, and I feel it's a little water a little bit too dirty. I go into the clean water next, but this is nice and bright, Nice, lemony yellow. And to that when I add a little bit of the yellow okra down in the bottom here, this will give it a nice variation of shade and now going to the sap green. And I'm gonna tap just a little bit of that up here on the top. This is where your grass area is, and these were all kind of just blending in. You don't want to overdo it so that it turns into one color, cause if you end up putting him on the paper while they're wet and if you mix them too much , you will get another color altogether and you'll lose the variations in there So you can still see the yellow. You could see the sap green, and you can also see the the Oakar I keep saying okra. It must be it's a main thing. What's yellow Oakar? I get that right so that I'm just gonna go ahead and blow dry This and it nicely turned out The sound of the blood are so you don't have to hear that while we're we're making this step to make sure it's nice and dry and you could see it didn't take very long to dry. That's not not a rial. Ah, a lot of water on there. So now we're gonna go ahead and mix a little of the burn number with the ultra Marine blue again, and I've got more water in here, So this is very light, very light shade that I'm that I'm mixing up here and we're gonna be doing our rock area. So the first wash is very light. And to that, I'm I'm adding again. A little bit of the, uh the yellow coker said it right that time. And this is the color that you're gonna get and we're just doing like I said, the first wash here. So this is a very light wash with water colors. You usually work from dark from light to dark. Um, I also work in oils, so I always have toe think that through because it's completely the opposite with oils. So we're gonna do our lighter shade here and just a very nice light wash of, ah, light like Ray. And now, if we want a deep in it a little bit, I'm adding a little bit more pigment of the for a number and the yellow ochre again. And I'm just happy that and kind of the same thing We did up above on the grass from getting that variation of color, and you could see where it's more wet above the tops. I'm getting more of a bloom and doubt the bottom. I didn't get a lot of pigment down there, so it's more brown. But that's great is we're gonna be adding some rocks and some darker colors. Right on top of that, we're gonna rinse, airbrush and move onto the next step, and we're gonna be drying. This is well.
8. Painting distant Islands: right, So we're gonna add to some islands, and then we're gonna be doing a second wash over our our rock area. And you could see here. I'm just adding to my blue that I had here. I don't like to waste paints. I'm always mixing. Incident can come up with some great colors, is by playing in here. But I had a little bit of Brown's when a dark in that just a little bit. And there's not a lot of water with this one, so you can see it's a fairly, really dark color, and we're just gonna go ahead and fill in those islands that we did in the back here. They're quite small. There's not a lot of detail with this. It's just Ah, a couple of dips, distant hills, and I have the 2nd 1 just a little bit lighter. So it looks like it's further away, and all I did was you saw me kind of add just a little bit of water to that same color that we had going there. You could get a nice straight line here on the bottom because your horizon line, remember, is always straight. Once you have your camera turned a little funny, but normally, always straight. And go ahead and grab your blow dryer or you composites. And wait a few minutes and make sure that this is nice and dry. And I'm gonna I'm just showing here how quick it is to drive this. It doesn't take a whole lot of time. And you could see I'm kind of holding my blow dryer at a distance a little bit and this is on low. He and I'm keeping it about six inches away from my paper. Don't want it to get really hot syllable head and dry this and then we're gonna add some more layers of wash. And I'm just happen that to make sure that this area is dry over here a multi tasking, my husband says, I don't do that very well. No, he's pretty good. So I'm gonna go ahead and mix up some sap green here, and I'm getting a nice little puddle because how much brighter this is? And I have a couple different greens here. There's a meridian green as well, which is this one, and it's got like, a little bit of a blue tint to it. and then to darken it a little bit, I was adding a little bit of the bird number again. Basil, the burn number to darken things a lot for my colors. So I have this nice rich green in here on it almost looks like a pine tree kind of green. And with my small brush, I'm just gonna tap in a little bit of this green in here a little bit darker color right over the yellow that we've that we've worked with. Let's add a little bit of the yellow car again. So I wanted again. Another shades. I've got a lot of different shades. It looks like the lights kind of reflecting and hitting back here. Remember, it's an illusion of grass. We're not actually gonna be putting grass in here. It's just color so that when you look at this hanging up on your wall, your eyes will naturally fill in. That this is grass is all we need and we'll go ahead and dry this move onto our next step
9. Adding More Layers to Rocks: okay, We're gonna add some layers on these rocks. Oh, I'm gonna show you a very easy way to do rocks. So have mixed up my pain. And I'm tapping off making a blacks, which is the ultra marine, blue and labour number again. And this is this first layer is gonna be fairly light. And you can see how each time I tap off my brush and doing that dry brush technique, There's not a lot of pain on here, and I'm trying to follow the direction that these rocks would be going. And I'm using, like, this scratching motions. I'm really pushing hard on my brush and I'm flattening that brush rate out. So you're following the directions of those rocks is if they were coming down and each time you put a layer in here, you want to make sure you're turning in the direction that those rocks would be going toe off the side here. They're kind of angling down to that right hand corner, and I'm just gonna dark in this little area here. Just this is gonna be where it's gonna be the the darkest, shadowed area of our rocks. And I've got a little bit darker black with this one, and I'm gonna do just a little bit of detail in here, just like a show. You were gonna be layering it like this. So this is just the very front area, and I'm gonna go back and go ahead and use that scratching motion it again and each time going to get a little darker. But make sure you tap off that extra now, adding some layers to this and again, I'm falling the same direction and coming off to the right hand side and putting lots of pressure. And using this scratching motion with my brush, he'd come up from the bottom and do the same things that's darker on the edge. Where you first put your paint is that's when you're gonna get your most paint. And as that brush kind of where's where's out the paint a little bit a little bit later. You know what again? Just taking that edge just kind of following the edge of Here's too deep in that color on. You could do the same thing on these rocks down here and now going up with my brush. It's all about layering and you could see It's really starting to look like rocks now. So I'm just kind of keep going and, you know, get frustrated. Just kind of put the paint where it lands. And don't worry about it too much, because remember, you're gonna have a little crevices in there. It's all about the shadows and the lights. I was gonna continue to kind of play around the rocks here, adding more paint here and there and against trying to follow the direction that the rocks would be going if you were looking at them a little bit darker on those edges. Usually your, um he always little crevices and things in here. So where it's really dark is, um where the where the sun's not hitting edge this out a little bit on the top here and now , starting to just kind of draw, just like the little squiggly lines. And again, I'm trying to follow that same pattern, same direction that I would see those rocks so they're kind of coming up from the bottom, left up on the left side, in the coming on the right side. They're leaning towards this bottom right hand corner, and it's like a little clip for little edge here adding mawr, that darker shade underneath here. Not too hard, huh? Takes a little practice. Just kind of again Squiggling. You know, I really thinking about it. I'm just kind of just throwing, throwing in some paint here and there, just adding shadows. And you worked with scratching motion a little bit more, But I like that. I think it looks pretty good. I'm gonna rinse off my brush here and will be moving on to our next section so you can go ahead and blow dry this and make sure it's nice and dry for our next step. We're gonna be starting on the building details.
10. Lighthouse Building Details : already for our lighthouse building details. So again we want to make sure brush is nice and clean and gonna be mixing up a nice deep red. So let's play with this color here. A little bit of that green in here. It's okay. It will deepen that. Read up a little bit, adding some yellow Oakar, adding some ah burn number and a little bit more that lizard crimson. So I'm getting a nice dark shade of red, almost like a burgundy color. And that's when he used to fill in this roof line here and a lot. If you work fast, don't have to worry about this, but a lot of people do or tend to do that you don't want to do is they want to outline everything so they'll usually outline the whole thing and then fill it in for this little section. It wouldn't be much of a big deal because you would be able to do it fairly quickly, but with larger sections. You really don't wanna outline things in the film in because what happens is those outer edges will start to dry on you, and then it will leave a line and it's really hard to blend that line. And once you've done that, so what I tend to do is I try to work in small sections and work my way down as I'm doing it in That way you don't get your sharp line dividing it. So this is the little roof line, so it's kind of shaped the house is facing facing you, and then the other one in the back is facing the back left corner there. So I've gone ahead and I'm lightning that same color just a little bit. We don't want that quite a dark on the underneath. Here. This is a little bit with light shining on the roof on this one is quite dark, and I'm leaving those little arch areas white and again. You could always use masking fluid if you so choose. And then the roofs on these other little buildings back here that I can't quite figure out what they are. They have a little bit of red on there as well. It was filling in that roof line, and we're gonna go ahead and do the same thing with little one, and we will be drying it and next will be adding some details with a Sharpie
11. Using Pen and Ink Details: right now, we're gonna be doing some pen and ink details, but first, I want to show you on the very edge. I have a little bit of gray put in the lighthouse area there, so I'm gonna go ahead, grab a black Sharpie now, and what I'm gonna do is just fill it in that you can use a black paint as well where you could mix up black paint using the ultra marine blue and the burn number again. But I just find this is a nice little shortcut. A lot. A lot of artists will use pen and ink together with watercolor. Makes a nice combo. So I'm just filling in this little area where a little box is, and then we're gonna go ahead and fill in this top section. Remember this top sex is just a little bit taller, and it kind of happens A little art to the very top. Fill in your rule over flying here, we're gonna be adding a little bit of wash on the top of this to give it some highlights. So, uh, just all you do is worry about just filling in the black at this point and getting the shape good. It was like a little Finney along the top here, a swell. And we've got our two little Braille ings on the side. And again this kind of arches around. It's slightly curved, and these come in underneath to give a nice little dark reflection on the underneath of that lighthouse. Then we have our little window area here so you can separate those little pains out with a little bit of black. I'm just coming out on the edges just a little bit. There's a little think it's that. I guess it's a little window area, little circular, one over the top, and then further down is a little rectangular one to get. Add that in there. And then there's a little black edge that comes around the tip of the lighthouse. Appear. So now what you can do is just take the black Sharpie and we're just gonna kind of outline some of these buildings and the roof area here around the window and to do the same thing here. This is optional. You don't have to this. See, I'm also gonna fill in the little windows with the black as well. Um, you don't have to, Like I said, outlined everything if you don't want to. But I think it's ah gives it a nice little looking Then you could fill in these little arch areas. Here is Well, I wouldn't leave just a little bit of white showing. So it against a little light in there, So not covering the entire things. It was just a little bit of white peeking out through here. I'm gonna go ahead and just do all of my edges around these riff lines here. This one has a double double edge. So it's got that little ridge that runs around the side of the house. Go ahead and fill that in. Um, do these windows as well up here and ones below? It was another one in this one of which I add that to it. It's dividing those up so you can see where the over the building edges are. I had a filling your windows again. Again. It could leave a little bit of white showing if you want, gives it the illusion of glass in the window on. I'm gonna put a fence in here, so just a very fine line that runs in front of all of these buildings. It comes right out to the edge, and it's a double fence. We're gonna add some white. On top of this is well, you get your little pickets in here and we didn't even draw this. So this is something Well, we're just adding, which is the black marker. I think we got it there. Ah, but still pen and eat pen detail in the rock area now. So again, this is very fine lines. If you had some wider lines with your brush, this gives you some nice little narrow lines. And again, I'm just kind of just scribbling here, just throwing in some pen marks to divide some of these rocks up to give it some more texture. In here, it's gonna follow. So edge here, you could play with this one. You don't have to worry about getting too much, because if you go overboard, you could always throw some, like wash over the top of it. And I think we might end up doing that just so I can show you how that's done.
12. Final Details to finish: right now already for our final steps will be using some white wash for this one. If you've taken my classes before you, you've probably abuse squash. But it's basically something that you use in place of a masking fluid. So instead of masking out an area to keep it white, were using the whitewash, which is a non transparent, more opaque type of paints a little bit thicker than what watercolor is. But it reactivates with water. So we're using that to put the ah highlights in the water. And what I've done here is I've escorted some that wash into a little container here, little white container with a cap on it so I can make it portable a ticket with me wherever I go. And what I'm doing now is I'm just kind of using again that scribbling motion. And I'm getting just a little bit of of water on the tip of my brush, going into a little bit of the paint and you don't want you wanted consistency of house paint. You don't want to think, but you don't want it very runny. And so now we're gonna go ahead and throw some of this rate on top of the rocks. And I'm doing the same motion night they used with the black. But now do it with white. And when I add some ripples in the water down here, so little highlights on top of the rocks. Andi, have fun. You could do the same thing. Like I said, you do with the the Black Sharpie except for your using the wash. This time we're gonna also go over this fence area, and this will make those Ah, black Sharpie marks the shadow area. So I'm just kind of basically covering the entire pen mark. And then we're gonna go over with Ah, squash for these little railings here to the picket fence is the fences white, the painted fence. We'll go ahead and add a little more will highlight here underneath where maybe the waves air kind of lapping up against the shore back here. And you could see where Mike Wash the first layer I put down this dried a little bit and it's become more transparent. So I'm gonna go ahead and pop a little bit more of the waves in here, and then we can add a little bit of reflection. A little highlight that sun shining on that top of that lighthouse and maybe a little bit in here. A swell. That's pretty good. Here. Go ahead and clean your brush off and we'll go ahead, grab a mat and see what this looks like. Hopefully, you're happy with yours. This was a little bit more detailed in some of the other watercolor classes I've had. So hopefully you're quite proud of yourself. Rock, sir. Fun to dio. Maybe a little challenging. But you can hopefully enjoy this. And it's a little bit simplified for you with the way that I did it today. So thanks again for painting along with me. And please don't forget to leave feedback. Hopefully, this was a five star class for you. How if No, I I would love to hear what I can do to make it better for you the next time. And I would love to see you tag some of your work on my social social pages. Facebook instagram, all those good ones. And they're all in my profile. So thanks for painting with me. Have a great day, folks.
 Kellie Chasse, Artist + Entrepreneur + Educator