Transcripts
1. Introduction to the Course: Hey, it's day from CG shortcuts. Welcome to our course. I'm a freelance three D in motion graphics artists based in London, where I've been working in teaching in the industry for over 10 years. In this course, I'll show you how to create amazing abstract art in Cinema four D. I'll be guiding you through the creation of 10 of my own artworks, each covering a different technique and tool set within cinema. 40 Abstracts E G. R. Is hugely popular at the moment, so it's gonna look great on your portfolio or Sheryl. By the end of this course, you'll level up your cinema 40 skills and be able to create your very earned three D abstract out. All you need is Maxim Cinema 40. But don't worry if you don't have it, because you can download a free demo to start learning straight away. We'll cover everything step by step so you can easily follow along, including out with the former's. With McGrath out with dynamics art with cloth and odds with free plug ins, Free plug ins will be discussing Jewell graph by in tag MMA and Easy Chesterfield by C 40 zone. There's also bonus lessons on rendering in cinema 40 Standard and Obtain Render and I've included to render template files you can use is a starting point to speed up your workflow . Just bring in your artwork and customize the pre built lighting and texture ring set up, and you'll be rendering your next masterpiece in no time. Plus, you'll also get access to project Falls for each outwork we create, as well as time saving presets and materials you can use in your own artwork. That's it, for now, let's get started.
2. Welcome to the Course: Welcome to Ultimate Abstract Art By C G Short Cuts Here's a few quick tips to help you get the most out of this course, so when you get started, you'll probably see something like this. It may or may not be this course, but the supplies for any courses on skill ship. The first thing you might want to do if you haven't already, is click the follow button here so you'll be notified every time we release a new CD Shortcuts Course. And you'll also get updates if we change anything or add to any of the courses. So the player window is pretty self explanatory. These are all the lessons. If you want to play one, you just need to click on one, and it will play in this window. This is the play button. You can also scroll through nice and easy, and you can even come down here and add a note, which looks like this so you can type in a note for everyone to read publicly. Or you could just make notes for yourself. Let's close that off and we'll take a look at the about section here. He is a well, the information about the course again. It's not necessarily this course, but this is pretty standard throughout skill share. And then we've got the reviews tab so you can write me a review in here. Hopefully a good one next, his community, and this one's a pretty important one. This is where you can have a conversation with myself or other students in the course. You can also ask any questions you might have here, and when you've completed the course, you can share your project here. It would be great to see what you create, so please do remember to share. Let's come up to the next tab, the Your Project tab. Here's where you'll find all the details of the course project, and you can also access the course resources down here. And these will change depending on the course you're looking at, and we've got another option here to upload your project. And then in our final tab, you'll be able to see all of the projects that have been uploaded. Although currently in this course, we don't have any yet, but unless you're looking at a brand new course, I'm sure they will be some projects in here, and that's pretty much it for the skill share interface. Each of our courses also comes with an exclusive Facebook group to make asking questions and sharing work a little bit easier. Sir. Let's take a quick look at that now. So to start with, you just need to find the Facebook group. For your course. You'll be able to find a link in the resources pdf document that comes with this course. We'll also put it on the screen down here. So when you follow that link, you'll come to a page that looks pretty similar to this. And in order to join, you just have to hit this joint group button. You'll get a pop up asking you a couple of questions, and if you just go through an answer days and hit submit. We should be able to confirm that you are a student and you will be accepted into the group very shortly. Now, Facebook groups are pretty similar to the normal Facebook groups. Out there. You'll be able to ask questions shut directly to the instructor and engage in conversations with other students. You can also upload your files in your artwork in one nice, easy place. We check the Facebook groups extremely often, so if you want a fast answer, this is definitely the place to go. Finally, for extra tutorials and resources, head to see ji shortcuts dot com, and you'll find loads of stuff to help you out with your C G and motion graphics. That's it for now. Let's stop the course.
3. Art with Deformers: Basic Deformers: Okay, so this artwork was completely done with the former's and simple primitive shapes. Now, if we go up here to filter and turn on deformities in our view port, you can see all these cages here where the deformations are happening. And if we go over here and take a look under art, you can see all the primitive shapes and their deformities. So to give you a bit of a before and after, if we grab this guy, we can see Sphere three over here has an f f d. The former applied to it and will be going through what all these deformity due shortly. But you should be able to see the effect of this two. Former. If we switch it off here, it just reverts back to a very simple sphere. And it's basically the same for all of these shapes. If we grab this guy, you'll see that it's just a boring old capture with a couple of deforms applied down here. If we switch off the bend, you can see that there, and we'll turn off the taper as well, and it's back to being a normal old catchall, so it's really easy to get some interesting shapes from very basic objects. So let's take a look at some of these deformities and how you can use them in your artwork . Okay, we've got a simple cube here that we'll use to demonstrate some of these deformities. If we click on him, we can take a look at these settings. Nothing too fancy. Here. We got 60 by 60 and it's 200 centimeters tour. So with our cube selected, let's apply our first performer. Now you can find the deformities in a few different places. Probably the quickest way is this menu here, and you can see the more laid out nicely here. But a few a version of Cinema 40 doesn't have this menu. You can also find it up here under the create tab and a former. And here's our list again now, because we want to go through a few of these. We don't want to be digging around in menus every time. So what we can do is rip this tag off here by clicking right here. Then we can position it wherever we want on the screen for easy access. Okay, so you might have noticed cinema 40 has loads of deformity. We won't be covering all of them in this lesson, but I'll run you through all of the deformities I used to create this particular artwork, so we might as well start at the top with the bender former So making sure you've got your object selected. We'll choose out of former and holding the shift key will click it, and that way it'll automatically be applied and become a child of our object. Performers need to be Children off objects for them to have an effect. And you can see here there's L Bend, although it doesn't look like it's had any effect just yet. If you look over here, you can faintly see what L Ben looks like in the View port. We've got this light purple box around the object, and if that's a bit hard to see in your seen like it is in mine, you can change the color of that. If we come over here to the basic tab, we can turn our use color to on and straight away. In the viewpoint, you can see how bendis gone white here. We can actually click this and change it to any color we like. Let's grab a nice, bright yellow OK, that's a bit easier to see. Let's go and take a look at some of the other options we've got on our end, a former so down here back under the object tab, we confined our main deformations settings. Let's start by cranking up this strength setting here so we can see this effect and we can see some bending going on. The Ben shape itself is bending quite nicely, but our cube doesn't seem to be keeping to that shape. So let's go and grab our cube and see what's going on. The issue is actually because of the segments down here, and it might be a bit easier to see if we come up to display and turn on the lines. Now we can see the geometry over Cube is pretty low. We don't have many divisions in here, so it's not able to bend with the bender former. So to fix this well we have to do is put in a few more segments. If we divide this up a bit more in the Y direction that say 10 segments that should hug to that shape quite nicely, and you can see how that geometry is now able to bend to that shape. So the more segments or subdivision you have, the smoother the deformations should be. We're going to be deforming this cube quite a bit, so we might just add some segments in the X and zed excess as well. Okay, let's take a look at some of these other settings. So now if we play with that strength, everything should be working as it should weaken. Get some pretty cool bends out of this. Although you might have noticed it's also stretching l mesh. If you don't want this stretch and you want it to keep its length. Well, we need to do is turn on, keep white excess length. And now, no matter how far we've been this, the Y axis should stay the same length. We can also play with the angle of the bend and get something like this, and you can even limit this effect to a certain part of the object. If we come over here with the MoD set to limited, we can shrink out, bend down in the Y axis and have only that bit affected by the bend, while the other parts stay nice and straight. But at any time, if we want the top and bottom to be affected by this bend where you don't actually need to scale it up again, we just need to change the mode to unlimited. And this gives you a nice type bend through your whole object. The final mode we have is the within box mode, which keeps the effect within the boundary off the D former. But sometimes you might get some pretty strange results from that. I can't say I use this feature too often, but it might work for you in the right situation, right? Let's put this mode vector limited for now. You can also move and rotate your performers if we grab the rotate tool and scoot this around 100 and 80 degrees, you can see we've easily go to bend the other way now so we can have that bending towards the bottom. Okay, let's undo that a few times and get it back to how it was. We want to try the next to former, so let's go on. Switch out. Bend off by unticketed here, then we'll grab our cube and head back over here and this time will grab the bulge. Figured to hold shift when you click it so it's automatically applied. And again, you can faintly see our new to former in here. But you can still see old Bender form a hell, which can be a bit distracting. You can actually hide that from the view on with these stop lights up here. So to hide the bend, we just need to come down here and we call this top stop like, twice until it goes red, and that turns off the visibility in the view port. But if we turn our Ben back on, it will still affect our geometry. The bounding box just won't be visible. Okay, let's turn that off and concentrate on our new bulged. A former you probably noticed it's gone back to that pale purple color, which is a bit hard to see. We want it to be that yellow color again. Now we could go back to the basic tab and select a color, but we don't want to do this every time, so I'll show you a little trick, how you can override the color off all the performers in your scene. We'll just go up to edit and down to preferences and his old house cinema 40 preferences. But if you scroll right to the bottom, there's a scheme colors tab. And if you put that open, we've got editor colors and you can see it's already selected here. We've got the former set to purple, and you can change pretty much anything in Cinema four D. But we just need to change this color. So let's grab a nice yellow color again, and you can see that update in our view port up here. So now that we can actually see how bulged a former let's go and see what settings we can play with So we'll go over to the object tab, and it's all looking pretty similar to the Bender former. So let's start with the strength sitting again, and it does pretty much what you'd expect with the positive value it bulges out, and with a negative value, it bulges in. You've also got a setting for curvature here. You could see if we bring that down, it straightens it out, and if we bring it back up, it Smoothes it out until we get to this point so you could use it to create some pretty wacky effects is also a fill it or fillet option, which softens the effect at the top and bottom again can give you some interesting results , and you can probably see that a bit easier with the positive value in here. That's kind of cool. And that's about it for the bulged, a former. It's also got some different modes here, which are more or less the same as the bend. So we'll switch that guy off and grab our cube and move on to our next performer. This time we'll bring in a Shia again holding shift and again, we can still see our previous two former here, so we want to hide that. So let's crank the strength up on our sheer and see what happens again exactly as we'd expect. It shares the object or tilts it over. And just like you know, Bender, former, we've got an angle option here so we can have that sheer any direction we like. We can also control the curvature so we can almost halve that, doing exactly what the bend was doing at 0% you can get it to just tilt more or less like this. We've also gotta fill adoption, which you can't really see when the curvature is set to zero. But if we turn that back up, you can see we have less of an effect at the top and bottom again, and you can create these cool wiggly effects. And that's pretty much it for the sheer the former. So play around with that. Let's take a look at the next one. We'll switch that guy off and do our little trick to hide it, and we'll grab our Cube. And this time we're gonna bring in the tape. Oh, so we'll come down and crank the strength up to see what this does, and I'm sure you would have guessed it. Just tape. Is it toe a point? And if we make our strength a negative number, we get the opposite effect. We've also got a nice curvature feature here, which gives our taper a bit of a curve, and we can always spin out a former around. So our tape, it goes the other way. That's just undo that, and we've also got the fill it effect again, so the top and bottom affected a bit different. So again you can get some interesting results. So play around with this guy. We'll turn him off and grab back. You begin, and now we'll grab the next going analyst. The twist. This one's one of my favorite performance. It only really does one thing, but it does it well. We crank that angle up. It's gonna twist our geometry. And without much, if it you can get some pretty cool looking shapes. Okay, before we go into the next one, I just want to show you how you can use multiple deformities to deform your objects. You can actually stack all these guys up just as we've done over here, and you'll find that they all affect the object. If we turn the bend on, you can see the bend has just affected it. But it's also kept the twist, but you just have to be careful. The order you put these in. If we move, the been up to the top here, you'll see we get a different result, and that's because it's supplying the ben first and then the twist. Their applied in order from top to bottom. And that's actually the way most things he calculated in cinema 40. So if you wanted this kid to be twisted and bent, I'd probably do the twisting first. So put that Ben back down here, and it might actually be better to bring in a fresh bend and not use the one we've been messing around with. So we'll turn that off, switch him back on. They want to grab our cube and holding shift will bring in a new bend. Okay, so I cubes already twisted. Now we'll just bring on you, Ben, below that, and we can bend the twisted geometry and you can also smooth out the result here. At any stage, we can come back to our Cube for whatever object do you have used just increased those segments. We put them all up to 20. We get a nice smooth result. Let's come back up to display and turn those lines off so we can see this better. So that's looking pretty cool, but we could take this a bit further. Let's make this a bit more extreme if we crank that twist angle right up and, in fact, to the bend. We can get a pretty cool effect like this, and I forget you could key frame all of this stuff and animate these deformities or just create some cool shapes for your abstract artwork. Okay, let's turn all those off and switch off the visibility as well. We'll grab our cube and we'll take a look at one final D. Former This time, we'll bring in the f f d d former. This guy works a little bit different to the other deforms we've looked at like the other deformities. You can see its cage around our object here, but with this one, we can actually subdivide this cage, and we can use these points to deform the mesh. If you've ever used the mesh warp in after effects for the warp in photo shop, this effect is pretty similar. Only it lets us to form things in three D space. Let's under those subdivisions, and I'll show you how this works. Without FFT to former selected, we'll come over here and switch to points mode. Now if we grab and move these points, weaken deformed the mesh within the cage and we can grab a few of these points at once. If we come up to our selection tools here, we can use the live selection or the rectangle selection. Let's grab that for now, and we'll click and drag to grab these points here, and we'll just drag them over here and you can see that de Formacion happening now. It's interpolated between those points to give us a nice round de formation here so you can see how powerful this to former is to get some quick abstract shapes. If we come back up here and switch over to the live selection, we can grab individual points and dragged them out and get some cool results. So just have a play and see what you can come up with. Okay, now that we've looked at a bunch of these different deformities, we'll start a new project, and I'll show you exactly how you can use them all together to create an abstract artwork. So this is pretty much how I started my artwork. We've just got a bunch of primitive shapes in here. I usually start with a pretty basic composition and then add the finer details as we go. Obviously, primitive objects can look a bit boring. So I did really is add deformities to each one of these objects, so let's do exactly that. But before we do, let's have a quick look at the geometry here. We'll turn on the lines and you can see all the objects are pretty dense, and that's the way to go if you want nice, smooth deformations. But you might notice the geometry on these three spheres is different to this guy. This is what the geometry looks like on a standard sphere, but you'll notice if we tell this forward, we get these nasty looking polls here, where the geometry is not evenly distributed. I try to avoid this if I'm using the former's. So I changed the spheres to a different type of geometry. You can find that over here under type. I like to set it to Icaza, he drawn, which gives us thes nice, even polygons. Okay, now that that's sorted, weaken, turn those lines off and we'll start adding some deformities. Let's start by deforming this cube here. To begin with, I think we'll use a twist. So remember holding shift will apply that, and we'll bring that twist angle up something like that that looks cool. Thats him done now will grab this capture all over here. And this time let's bring in a bulge and again we'll up the strength. We'll give it a negative value so it bulges in with, and now we might use another D former. On top of this, let's bring in a end. Then we'll play with strength again and the angle until we get something that looks kind of cool. And we could probably grab out capture again and apply 1/3 D former. Let's try a Taper again. We'll tweak that strength and we'll make out capture. Come into a point. And maybe we wanted the other way. So we'll grab this and rotate the Taper. And just like that, we've got a liquid splash kind of effect. Let's go and do a visibility trick on these three so we can see this a bit better. That's looking pretty cool. Then we can shock another two former on our current over here. Let's try the sheer this time, so strength up, play with that angle and reminded just that curvature as well. Just until we get a shape we like. So then We'll hide that guy and I'll show you what I did for these fears. Basically, I just wanted to deformed them in a way that it looked like they were interacting with each other. Right now, all of these guys are just intersecting each other, and it's not looking great. So let's grab the big guy and start with him first. Active former's This time, we'll use the F F D two former. We'll switch to point mode. We want to grab some of these points, and firstly, we want to make it look like it's actually resting on the ground. You can see if we have a look under the floor here. It's penetrating that. Ideally, when we're working on this, we want to be able to select these points easily, and we don't want anything in the way. So it might make our life easier if we can isolate just else fear and out of former. So if we look over here, I have used the layers to do exactly this. I've got each one of these objects on its own layer. You can see Sphere. One is on this pink layer here, which is this guy right? here. We just need to add the D former as well, so we'll drag that straight into that layer, and it goes pink as well. So now, to isolate these, to make it a bit easier for us to work on it or we need to do is click this little button here. And that's the solo mode, and that's gonna make selecting points a lot easier. Let's grab our rectangle selection, and I'll grab all of these bottom points that will drag that up and unsold or by heating that button again. Now we just want to drag these so they look like that touching the ground, and we could probably bring these guys down to give it a little bit of a bulge, and that looks a bit more realistic. All right, let's move onto the next one will hide that FFT. They don't grab this guy, and this will be pretty much the same. Workflow will use the FFT to former again the spheres on the yellow layer, so we'll bring that to former into that as well. Basically, we want this fear to look like it's wedged in between these other spheres, so let's solo that layer and grab our rectangle selection and switch on point mode. Then we'll grab these points and these ones at the bottom, and we can scale these as well. If we scale in the Y direction, you can see birth of those scale in wood and we get a nice little pinch here. We could probably move this section up a bit and make this poll jack a bit more and then a bit of overhang down here so well done. Solo that and see what we've got that's looking a bit more embedded into other objects. We could probably bring these up a little bit, so it's resting on top of our biggest fear. Then we can just carry on moving some of these around just so nothing's intersecting. Maybe something like that. Okay, I think you're getting the picture here. We'll just do one more quick sphere will grab this guy. It will hide the last one. This time we'll give it a taper will change that strength. We want this to fit a bit better into our composition, so we'll rotate that around and we've got a similar effect. Then we could just move that in a bit tighter, and that's pretty much the technique I used to create this out work. If you remember from my final renda, I also had a few more complicated objects in there, like a tourists. I'll quickly show you how to go about deforming that again. I use an F f d two former, and it's really just the same process of isolating the shape, selecting the points and tweaking them to fit better with the geometry within our composition. So have a go at creating your own artwork with reformers. I'm looking forward to seeing what you come up with before we get into the next class. There's one more little thing I want to cover in case you run into problems. If you intend to do for more complicated models that you've created or downloaded from the Web is a few things to keep in mind. If we take a look at our first phone here, we've got a twist to former down here, and if we pop this open, you can see how complicated this model is. It's made of loads of different pieces, but that's okay. We can still apply the former's to that as long as it's applied within the hierarchy, so it could be here or up here. It will affect our no within you know, and to prove that. Let's turn that strength of on our twist to former, and aside from the texture slipping on here, you can see that's twisting nicely. However, we've got the exact same set up on our second phone here, but if we start twisting it, you'll see we get all these crazy out effects. So what's going on? You might remember us talking about this a little bit earlier. If we turn the lines on, you can see how dense this meshes, whereas foreign to doesn't have much geometry at all. And it might be easier to see this if we turn those twists off again. Look at all those divisions in phone one and phone to has barely any. So just make sure anything you're performing has plenty of subdivisions and you can't get wrong. And that's it for this lesson. I'll catch you in the next one
4. Art with Deformers: Splinewrap: Okay, so here's a next artwork. So this was created with another two former called the Spine Wrap. If we come up here and take a look, it's pretty simple. We've got to nose and a couple of splitting reps and a few tubes. Not much to it, really. So let's start a new project, and I'll show you exactly how to go about creating this. Okay, so the first thing we want to do is create some nice wiggly spines to apply out spline rap to now. One way to do that could be to use the pen tool and just come down here and draw out of line manually. And if we just spend the view around, we could make this a bit more. Three D Put a few points out here something like that, but that can be pretty time consuming. There's actually a way to quickly generate this kind of shape automatically, so let's do that. Instead, we'll delete that spine, and we're actually going to bring in a no. Instead, Now we want to figure out a way to make this no wiggle all over the place in a random way to create a path for a splint. And to do that without Noel selected will come up to tags cinema four D tags and way down the bottom will apply a vibrate tag. So we've got a whole bunch of settings down here to control how l vibrate. Tag vibrates. How object. Let's start by enabling the position and you've got the X Y and Zed values here. At the moment, it's going to randomly move in the X axis only, and it will move up to a value of 100 centimeters from where it is and you put the frequency, and that kind of dictates the speed of which it's going to be moving. So that's hit, play and see where that looks like. And there he goes, back and forth along the X axis. Well, just zoom in a tad to create some nice three D curves. We want Donald traveling in every direction, so we'll add 100 centimeters to the Y and Zed value and give that a play. Why is he gone? Let's pull back out of it. Okay, that looks like he's making an interesting path. So now we want to trace this path and create a spine from it. So we'll come up to the murder graph menu here and we'll grab a tracer object. And because we had an old selected, it's automatically applied that to the tracer. You could see him in here, sir. If we hit play, there's outraced path. Now. We might want to come down here and stop that for a second so we can give ourselves a few more frames. Let's try 300 and we'll let this play out and hopefully build us a nice looking artwork. Okay, when we get to a frame we like, let's just hit pause frame to 50 looks pretty good, and now we want to give this path a bit of thickness, so you could come up here and grab a sweep. But this lesson is still all about D formers, so we're going to use a different reformer. So grab that menu that a former we want is the spur line rap. So let's bring that going in, and at first, if we zoom out a bit, it might look a little misleading. Got a big yellow box here, but let's ignore that. For now, we need to tell else blind rap which spine to use. And that's going to be the spine created by outrace up. So that's grabbed him and dragged him into this blind slot here, and nothing will happen yet. We need to tell our spline rap, which object to wrap around our spine so you can use pretty much anything. But for my example, I used a tube. So when we bring that guy in, it is huge. So the first thing we want to do is scale him down a bit. Let's bring that out of radius down to three, and if we zoom in, it's looking very thin on the inside. And that's because the inner radius is also at three. Let's make that, too, and we've got a nice looking tube now. So the next step is to apply this tube to our spine rap, and the way you do that is just like with the other performance. We just need to make him a child over object, and you might get a pretty funky result like I have, and I think that's to do with the access. If we switch out spline rap off for a second, you can see our tube is going along the Y axis here. So let's change our supply in rap access from positive X two positive way. And if we switch it back on that kind of worked, it's still looking a little bit funny, but this is another issue. Now It's to do with the subdivisions off our tube, So if we grab that guy, you'll see that our height segments are very low. In fact, they're just one at the moment. And again, this might be easier to see if we turn the spline rap off and head over to display to turn the lines on. You could see we've got no subdivisions up here. We've got a lot of rotation segments, and you can see those over here. We might even turn those down a bit, but we don't have any subdivision going this way, but we can fix that easily by turning this right up. Let's try 200 and now we've got loads of geometry weaken, deformed. So let's zoom out of it and turn our spline wrap back on, and now we're getting a result that's close to what we want. So to get an idea of what's actually happening here, we just turn that off again? Real quick. Thes spline rap is wrapping this whole shape from top to bottom all the way along this spine. Which is why when we turn it back on now, white segments have been stretched, which is why there's a lot more space between them now. But if we turn that up, they'll come closer and we'll actually get a smoother result. But we could also smooth this out with a subdivision surface, which we will do later. For now, let's just bring that back to 200. I want to talk you through some of the other settings in our Splain rap. Okay, Firstly, we don't need to worry about the rail for this example. We've talked about the excess. So now we've got the strength slider which just controls how strong out spline wrap effect is. And by playing with this, you can kind of see exactly how our tube is being stretched to fit this plane. And next we have the offset which just offsets our tube along the spine. And you can use this for animating. Although we've got this wacky bit out here. But I'll talk about that in just a second. Let's put this back to zero, and then you've got from so you can adjust the starting point and we've also got to so you can move the ending point. So this is great if you just want a section off l spine. And these two sittings were quite nicely with the offset. You can offset this section just by dragging this slider and again animated. However you like. This would probably work better if we bring these to back down here. And now we've got that full length of the spine to animate along. Okay, let's undo those. The next option we have is the mode. It's currently set to Fitz Blind, and that will actually stretch our object from end to end on our spine. But we have an option here to keep the length, and that'll make sure our object keeps its original length. So now we could control that by adjusting the height of our tube like so, let's undo that back to l spine rap. We'll put this back to fits fine, and our next sitting here is the end mode, which is currently set to extend if we bring that offset up again. This part is actually the extension. So if we were to switch this to clamp, object will no longer extend beyond the end of else plein. So that's that. Let's just put that back to extend and we'll have a look at the next section, which is the size. And as the name implies, this just allows you to scale your object over the length of the spine. So now our tube starts at zero and ends at 100% scale, and we get this nice tapering effect and you can really find Tune this. We bring that guy up and this guy down, we've got the opposite of that effect so you can create whatever kind of splitting you want in here. If we put him back in here, then holding control, we can add another point here. We can drag that wherever we want, So now it's tapering on both ends, so it's pretty customizable. Let's just undo that. So the next setting we have down here that might be useful for your abstract at is the rotation. So, with similar controllers here, we can change the rotation over the length of the spine again There might be a bit hard to see you without tube as its round. But if we bring the segments down and go back to our rotation, should be able to see that a bit clearer. So with this kind of spying were basically getting a twist all the way down. L Object is also have a strength control, so you can just bring down that effect if you wish. Let's just undo all of that, and that's it for the spine rap settings. The next thing we want to look at its smoothing out these weird looking Ben's, there's a few ways to fix this. We could come back here and add a bunch more segments or could come up here and add a subdivision surface. So just hold fold when you bring that in. So it's for automatically applied and you can see here it smoothed everything out. Let's come back to display and turn those lines off, and it's starting to come together. It's been still a little bit funny, but we'll fix that a bit later. We've got another issue at the moment. If we go to another frame, our spline wrap is still relying on the tracer to calculate this shape. So the next thing we want to do really is bake out tracer and turn it into a solid spine, and then we'll be able to go in there and make some final adjustments. So let's just play this forward to the frame we like again that was framed 250. Then we'll right click on out tracer and choose current state object. And if we look up here, that's created a nice new supply in force. It's also called Tracer, so the first thing we want to do is probably rename that so we don't get confused orders call. It's blind. So if we rewind and play this how spline wrap is still using the tracer, so we need to tell it to switch over to the spine. So we'll grab our splaine and put that down here where the trace of waas and that's given us out shaped back. And if we change the frame, we've now got that shaped locked in. So now we can come back to fixing this little bend up here. We'll go up here and take a look at our supplying, but first truth's gonna be in the way here, So let's turn that off and we'll also turn off the trace of for now. Now we've just got out supplying in the view port here. We'll make sure the points mode is activated, and we'll also make sure we've got a splint selected. Now we can see all the points along explain, and we can edit these and move them around nice and easy. If we quickly turn out you back on, we can see that these points are sticking outside of al geometry. So we'll grab the mirror tool and just tweak them a bit and see if we can smooth this out of it. Now you could do something like this button issue you'll probably have with this kind of spine. Let's just hide that again. Is this Sermanni points here. It's going to make tweaking this a bit hard to manage, So before we get too deep into editing this, we'll look at simplifying the spine so we don't have a big mess of points to deal with. So let's turn out, trace a and out shoot back on, and we can delete now Messi spline. Then we'll go back to explain wrap and put the trace it back in. We just need to rescind that, so we'll reward to the stunt. Now let's take a look at our trace. A. One thing we could do to simplify the path it creates is tweak the sample step. You'll notice if we hit play. And actually let's just hide the tube. For now, each one of these little Ben's will become a point generated on our spine. And right now we're getting a point every frame of our animation. So each one of these lines represents a single frame, so a good way to get less points. So now spine is to make a longer gap between each point. So if we bring the sample, step up to something like three and play that back, we're now getting a points after every third frame and therefore a lot less points. However, this is definitely not looking very smooth to fix that. We could come down here and change the type to easier, and then the intermediate points to natural. We get out nice, curved back, and if we play that, it'll be nice and smooth. But let's see what happens if we convert this to a spine. Let's right click on our tracer again and back down to current state object. And if we grab that spine that's been generated, you can see we're back to having loads and loads of points. So let's get rid of that guy. That's not the way to go. So we'll come back here and switches back to Linear and none. And if we play that, we're back to our very jagged e path. Okay, let's pause that we can actually smooth this out after we come up here and do a current state object. And if we grab that splitting that's been generated, you can see that's quite jagged. There's a point every three frames, so there's not too many, which is good. So how do we smooth this? Well, without supplying selected? We've got the same options as we did on the Tracer. So now let's change that to be Zia and instantly we've got a nice, smooth spine with a lot less points, and we can probably see that a bit clearer. If we hired that tracer and their Ugo, it's going to be a lot easier to tweak these points now, okay, Let's put our new spine into our spline rap so we'll grab that guy and drag him down here, and we should probably rename him again. Let's call him Split again. Then we could switch out Chavan. And here's our beautiful artwork. So we need to do now is go in and tweak some of these points. We might start with this guy up here. Let's just grab that and move these handles out of it. We just want to see if we can fix this kink. And if we turn that off for a second, it might be better to just delete this guy, and that's looking a bit smoother. Let's see how the geometry looks. We've still got a bit of a squishy bit there. Let's turn that off and maybe we'll just pull this out a little bit. What's that doing for us? Slightly better. If you can't seem to smooth your spine out, it's more than likely an issue with the geometry. If we turn that subdivision surface off, you can see the problem here. There's just not enough segments to get this nice and round, So back to our tube. Let's crank those heights segments up. I think 300 should do us all right. That's better. And if we put that subdivision service back on, it's looking a lot smoother. Okay, before we finish up, you might just want to go through and fix any intersecting geometry like this bit here. It's super easy to do now that we've got a lot less points on our spline. We'll grab that guy. We could even switch the truth back on so we can see this. Don't drag that out until it's looking good. All right, that's just about it for this lesson. One final thing I did for my artwork to give this a bit more volume was come up here and grab everything and then hit old G tick group everything. Then, if you grab it and hold control and drag it up here, you'll make it difficult. Then, without difficult selected will, grab the rotate and switch it back to object mode, and we can just spin this around, try to get an interesting composition. We wanted to look like their old intertwined. Maybe we'll just move it down here a bit. Then there you gay, so tweak as needed. I'm looking forward to seeing what you come up with, and I'll see you in the next lesson.
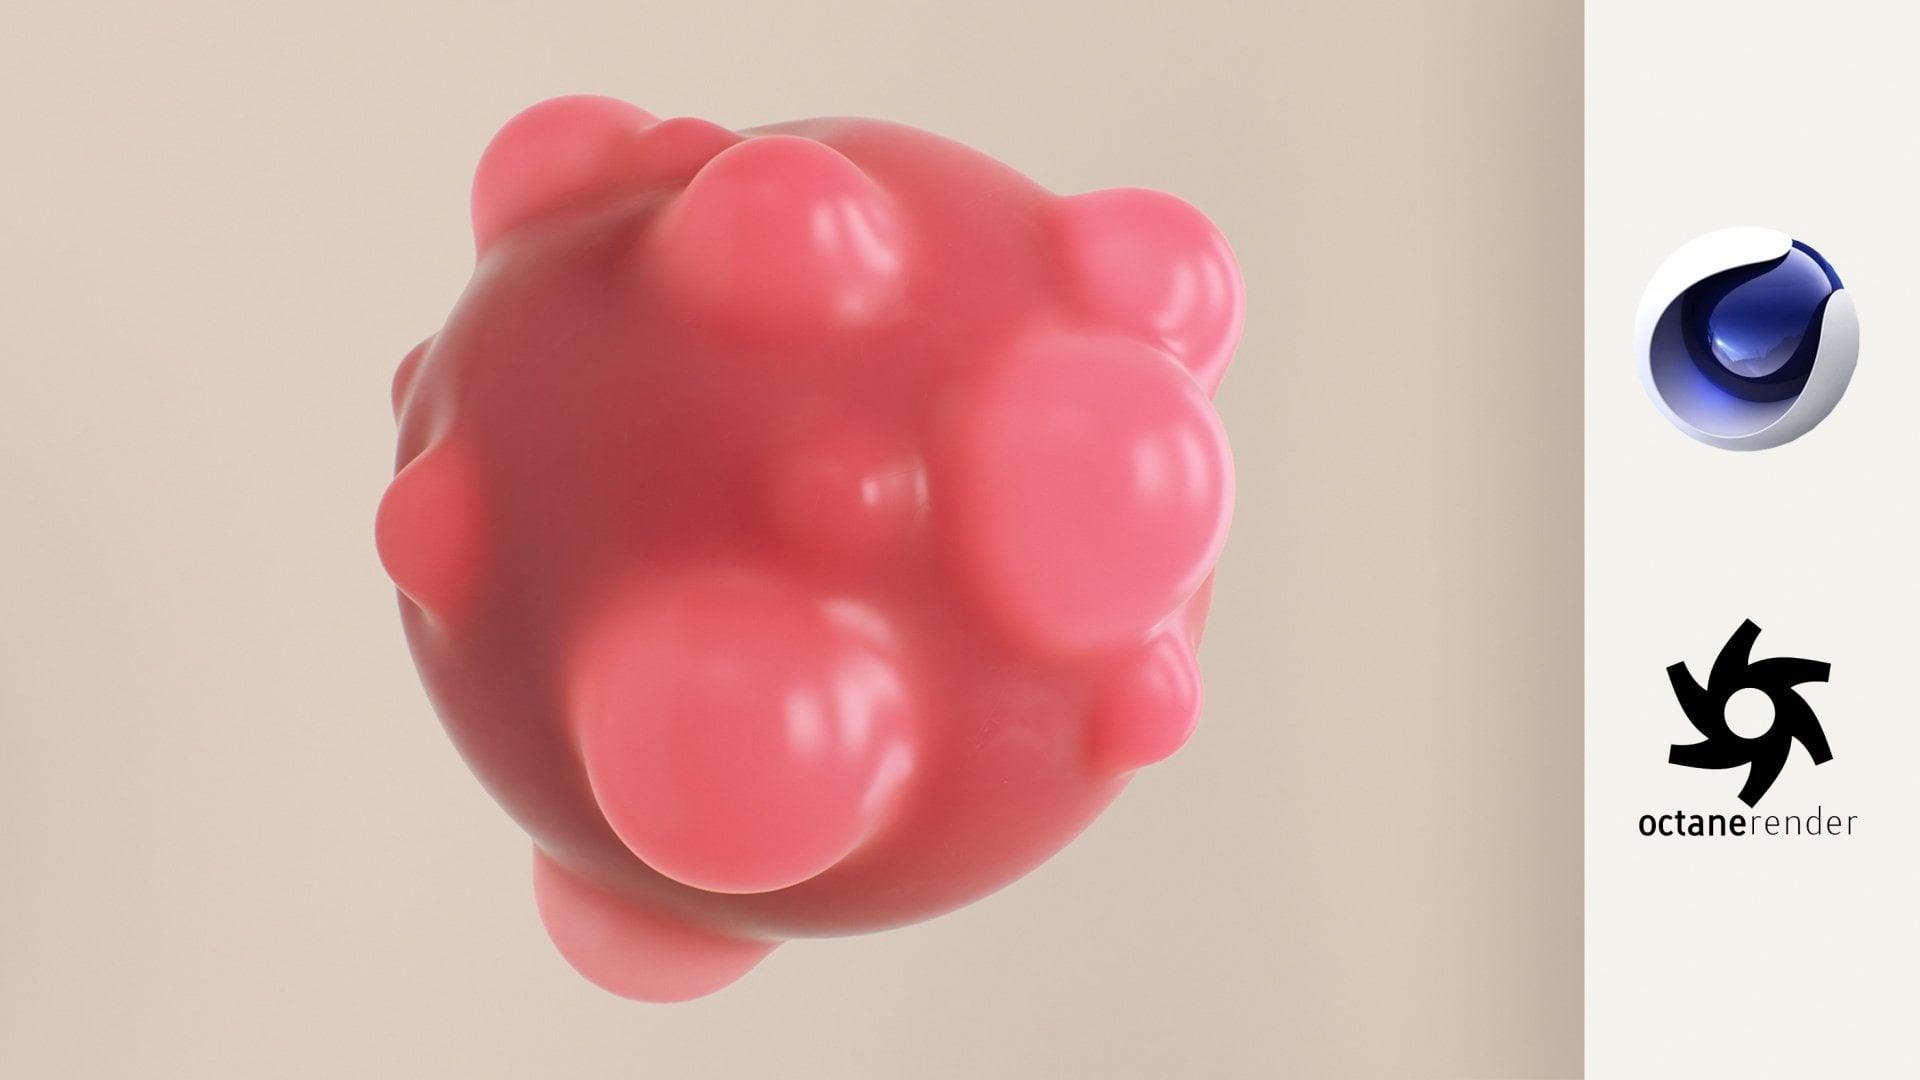
5. Art with Mograph: Cloner: Okay, so here's our next at work. We've got a big, slimy ball with alert of little balls growing over it. And if you look close, you can see how they're kind of embedded into the surface of our bigger ball. Let's take a quick look at our scene and see it. We've got up here. We've got a subdivision surface which is making this look nice and smooth. We've also got some new performance that will be looking at and down here. We have a monograph cloner object and we've also got a push a part of Fichter. So let's have a look and see how this is done. Okay, so the first thing we need is a big old sphere, so we can clone some spheres on top of it. So we'll come up here and grab one of those. Then we'll mosey up to the display and turn those lines on. You'll probably discover throughout these lessons that I'm not a big fan of this standard sphere because it's got these nasty polls at the top and bottom. It's always good to work with, even geometry, if possible. So I like to change the type to my Casa. He'd run and it's going to give us some nice even topology. Alright, we probably want this guy a little bit figure. So let's change its radius to 150 centimeters. And because we're going to be deforming this fear, we probably want a bit more subdivision in there. So let's bring those segments up to 50. All right, that's looking good. So now we want to get a whole bunch of smaller spheres and clone them all over the surface of this biggest fear. So let's grab a sphere and holding control will drag it up here to make a duplicate. And then we wanted much smaller. So let's change the radius to 20 centimeters and so we can see that Let's bring it out from behind the biggest fear because it's a duplicate. It's got loads of subdivision, and we probably don't need that much on these little guys. So we'll bring that down to 20. Okay, so now let's get a whole bunch of these guys and clone them all over the surface of this big sphere. The way we're gonna do that is with a monograph. Kelowna. So with their small sphere selected will come up to McGruff and Cloner, and if you hold old, it'll automatically apply itself. And you can see that working. Now we've got a bunch of clones going in the Y direction, and that's because our mode is set to linear, and you can change the amount of clones by tweaking the county. But we want these guys to clone across the surface of our big sphere, so we need to change the mode to object. And now we need to tell it which object to use. In our case, it will be this big sphere up here, and it might be a good idea to start renaming these. Let's call that one big sphere and this guy small sphere. So we'll grab our cloner again, and then we'll click and drag out Big Sphere into that object slot. And instantly we've got a bunch of clones fears on the surface of our big sphere, and that's because distribution is set to surface by default. So all these guys are sticking to the surface, and that's exactly what we want. We can also change how many clones there are by adjusting the countdown here. Let's bring this right up to 100. Okay, that's looking pretty good. We can probably get up to display and turn those lines off again. I don't like the way these clones air intersecting over here, but luckily there's a monograph defector that can help us sort this problem out. So without clone is selected, we'll come up to the McGruff menu defector and we'll grab a push apart effect. Er, it definitely does what it says. It's push those clients really fire a pot, but we can control the effect of that either over here with these strength control, like so let's just reset that. We can also use the radius here, so bringing that down will allow them to be closer together. Let's undo that, Fidel. We've got a few different birds to play with. Down here is the hide mode that will hide our Clarins when they come within a certain radius of each other. Or you could have them only push apart in a certain access. That's just pushing them apart in the X excess just like that. And then we've got the setting that will be using for this one the scale apart. So basically, to stop these guys from intersecting. If they come within a certain radius, they'll randomly scale down without any of the clones actually touching each other. We'll be doing something similar to this with dynamics later in the course. But a lot of the time you can get away with just using effective. I can still see a few slight intersections, So let's just bring this up to something like 20 and that's looking pretty good. Nothing touching. All right, we're almost there. The next thing we want to do is have these Clarence look like they're a bit more embedded into this. It'd be nice if we could have some slight de formation around the areas they touch, like restoring the example. So let's make a nice, dense mesh that weaken deformed. Let's grab our big sphere, and holding control will duplicate that. Let's rename on use fear to eggs feared deform or something along those lines. We can hide our big sphere for now by holding bolt and clicking these dots here until they get red. We need to take a look at the measure of our new sphere, so let's bring those lines back on. We gave it quite a few segments earlier. But you can see these triangle is still quite big. And if we want some fine detail in there, we're going to have to subdivide this a lot more. I think 200 segments might do us. We can always bring this value up again later if we need a bit more detail in there. So let's start performing with our big sphere. Deform selected will come over to the deforms menu, and this time we'll grab the collision. D former and I forget the hold shift, so it's automatically applied. Now it's become a child of our big sphere, and you can see down here. We've got quite a lot of options to play with in this deformed. Let's start over here in the Colliders tab. It's asking which objects will be colliding with Amish and causing the de Formacion. So for us, it's going to be our clones. So let's grab our Kelowna and drag that into here. Now that's kind of giving us the opposite effect of what we're after. Instead of deforming it inward, the clones of pushing the German tree out. It's still a pretty cool effect, though I'm sure you could make some pretty interesting abstract out with this technique, but we'll reverse this effect by coming over here, or we need to do is change the silver from Intersect to outside. And there we go. It's basically pushing that mesh in away from the clones, and if we turn the lines off again, you might be able to see this just a little bit better. Cool. So let's see what other options. We've got to tweak this effect. If we go back to our collision to former Let's go and take a look under the object tab. We can get some pretty interesting looks by tweaking these settings. Let's start with the fall off. If we said that to surface, nothing happens at first, but you'll notice we have this curve down here. And if we were to grab one of these points and bring it up, you can see that's made those indentations a lot deeper. It's kind of made the German tree puff out a little bit around those clones, depending on the density of your mesh. Tweaking some of these settings can be a bit slow, so we might just pop into another project so I can show you some more of these settings a little bit easier, so we've got a pretty similar set up here. But to make things run a bit faster, we've just got the one sphere and the one plane. And if we turn the lines on, you could see that plane is quite dense and our sphere is pretty simple. So let's turn those off again. Then back in our collision to former, we'll do the same thing, will change that fall off to surface. And now that we don't have a bunch of clones in here, we should get some pretty fast feedback if we tweak this curve. So let's just get a better angle here and now if we bring that up, you can see we get instant feedback and we can see exactly what it's doing. The point to the left is the point closest to our collision object, and we've got a fall off to the right. So if we bring this point back down, we can flatten that out, and if we move along holding control, we can make a new point. Then we can move that point up here, and we can start to build a bit of a mound. We could even add a few more points and really customize the look of this collision. So just play around with this until you get a look you're happy with and we'll go and apply this to our project. Let's tweak this curve just a bit. Something like that. You can also play around with these sliders to fine tune your look. But I'm pretty happy with what we've got. So there's some more options over under the advanced tab that we might wanna have a look at . These options are very similar to what you might find in soft body dynamics. The stiffness will make the Meshal of more or less elastic looking. Then lowering the structural will make it look a little bit stretch here, and the flex might also give you a bit more detail on. Unless you dramatically increase your subdivisions, these effects might be pretty subtle. If that's the case for you, or if you zoom in and you're getting a lot of our effects, it's usually best to just click back on your geometry and add in some more subdivisions. Let's try 300 and that seems to have smooth it out a little bit, but we're still getting a few of these artifacts in here. But there's another two former we could use to smooth this out. If we take a look up here, we've got the smoothing, the former. So that told Shift to make that a child of our big sphere and we want our collision toe happen first, so we need to move that above all, smooth, and now you can see that's done a pretty good job. It's looking a lot smoother now, and we can also tweak out smoothing down here. One mode that I like to use is the relax mode, and you can see that's given us a bit of extra detail in there, although it's also given us some more artifacts again. So one final thing you might want to do before you hit render is at a subdivision surface to this. So without Big Sphere selected, let's hold Colt and bring one of those in, and what work is pretty much complete. But if this looks a bit too intense to you, you can always come back to the collision D former and bring that strength down and tweak that curve. You could also switch off the subdivision surface and the smoothing so we can get faster updates where we mess with this and we can try tweaking the distance slider, and that gives you some pretty interesting results. It's all about experimenting until you get something you like. So have a play and see what interesting artworks you can come up with using this technique , and I will catch you in the next lesson.
6. Art with Mograph: Voronoi Fracture: Okay, so here's the next dot work. We've got a couple of shattered tourists is Let's take a look at how this was done. If we pop up in this art, No, we've got a sphere here which is actually shattering out tourists. I'll show you how to do that very shortly. We've also got some more. Push up our defectors. And if we have a look in here, we're introducing the foreign oil fracture and we've got a few other bits and bobs down here. So let's start a new project and see how this is done. So the first thing we need to do is bring in something that we can shatter and we are going to use the tourists so we'll grab one of those. Then it might be a tad big. Let's just bring the radius down to something like 150 centimeters, and we want to make the hole in the middle of it bigger, so we'll change the pipe radius to 40 centimeters. Let's go up to display and turn our lines on so we can get a look at this geometry now because we're going to be breaking this up. We want our tourist to be pretty heavily subdivided. So let's bring the ring segments up to something like 100. And we also want to add some subdivision around this way, so we'll increase the pipe segments to 50 and that's looking pretty good. Now we can turn those lines off and we'll grab the rotate tool and we'll move this around to get an interesting angle. And we want to sink in one of these. So we'll grab the first tourists and hold control and drag it up here to make a duplicate. And let's just position this one so that their interlinking something like that. Maybe we'll just frame this up a bit differently and just tweak that angle a little bit more. That looks pretty good to me. Okay, so we want to shutter these guys together as one object. So we'll come up here and we'll bring in a no. And we'll grab part about Tauruses and punk them in there and then, without null selected, will screech over to the McGrath menu, and we'll bring in a born oy fracture. Don't forget to hold bolt so it's automatically applied, and now our objects shouted each one of these colors represents different fragments. And you can probably see that a little bit easier if we come down here to the object tab. We've got this setting offset fragments. So if we put that up a little, it will separate these fragments for us so we can see those a bit easier. Okay, so let's have a look at some of the settings that are controlling this fracturing. If we go to the sources tab, we can find a list of fracture sources down here. At the moment, we've got a point generator in there and it's generating points over our mesh and telling l fracture. Where to fracture and you can see down here. We've got a few options we can play with to tweak the distribution. The distribution type is currently set to uniform. This is giving us a nice uniform or even distribution across Amish. But we can change this to something like exponential, which will allow us to position these points in the X y and zed access. You can see we currently have a positive value in the X axis, which is why all of our points have gathered over here. So for example, if we wanted to move them all down here, we could turn off our X axis. And this is the Y axis here, sir. If we hit the little plus icon here, that's gonna put them in the positive Y direction. And we can even change how they gather down here by tweaking the standard deviation down here. If we bring it to the left, they'll start gathering closer to each other. And if we pull it back that way, it'll spread them further apart in that y axis. Okay, let's switch back to uniform. So we've got a nice uniform distribution of points again. And then we've got options down here to increase the amount of points. Let's double that to 40. And that's obviously given us a lot more points and therefore a lot more fractures. And because this is randomly generated, sometimes you get bunching happening. It seems to be shuttering a bit more up here than anywhere else, but we can fix that easy by adjusting the seed value down here. So just change that until you happy with the result. Oh, I think that should do us for now. Another cool thing with these sources is you can lay them up. So if we were to add another distribution source on top of that, we can start shattering the shards that we already have. And you can easily turn these on and off and tweak them as you like. You can even add a shader source. You could then have your shattering driven by a shader. So, for example, we could click here and bring in a noise shade of. And now that's driving Al Fracture. Let's turn these girls off so we can just see that effect. And if we were to click into that noise, we can adjust this even further. Bring up that scale, and you can see how much control we can have over this. We could even get back and try something else. Let's bring in a Grady int, and you can see that effect. You could even get super creative with this. If we clear that out, we'll try surfaces and maybe tiles. And now we've got tiles generating a fracture. There's literally millions of possibilities. So have a play around with this and see what you can come up with for your at work. Okay, let's go back and we'll clear all these out and just leave our original one in there. Now we're gonna take a look at using an object to fracture. Amish will use a sphere to shatter this part of the mesh up a little bit more. So let's grab one of those. Then we'll just move it into position right there. Looks good. Then back to Al Fracture. We're going to use else fear as a source. And to do that, it's easy as grabbing it and dropping it in. And we're getting that effect straightaway. We've now got a lot more shards where else fear is intersecting without tourists. And if we click on our sphere, we've got some extra options down here. You can change the creation method. At the moment. It's set to Vertex, which is all these green points up here, where ever there intersecting, it's creating new shots. We could also use the edges or the polygons and get a slightly different result, or we'll just stick to Vergis ease. Okay, looking good. We could probably even hideouts fear for now. Let's just hold bolts and double click here to switch it off. And now we want to start pushing our shards away from each other, so we'll go back to the object tab and we'll turn off that offset. Fragments were actually going to use a monograph affected to do this instead. So without fracture selected will come up to Margraff effective. And we'll grab our old friend the push apart, effective and just like it did in our previous lesson. It's pushing everything way too far apart, so we'll bring that strength way down something like that. Well, though I don't really want them all drifting away like this. Maybe we'll try changing the mode to scale apart, and that's looking better. It's pretty similar to how we had it with the offset before we get a bit more control over it, using the push apart if Victor and we could scale these apart a bit more to reveal a bit more of the inside here. But I think I'll just leave this down at about seven. So the nice thing about using effective is that we can lay them. We can actually bring another one in and limit its effect to a certain area of l mesh. We want these shots up here to be flying away from the object. So without fracture selected will go back to the monograph menu, and we'll bring in another push a part of Victor, same deal again. We need to bring that strength way down. And now we want to limit it to just this section, and we're going to do that with the fall off. So we'll go to the full of tab, and the section might look a little bit different to you. If you're inversion 19 or older. This is the version 20 interface, but you can still do the same thing or you need to do is grab a spherical fall off or, in the case of version 20 a spherical field and you can see that guy over here and we can move this and wherever we do, anything within it will be affected by our pushing hot effective. So if we put it about there and go back to our fictive sittings, weaken, tweak the strength again and control this section independently of the rest of the object and you don't just have to use the push a part of Victor, you could switch this out for any other effective if we take a look, I think the random effective and the plane defector could give us some interesting results were to stick to the push apart, effective for now. And I might just move this just a tad. So it's not affecting it so much. Then we could even bring in a second full off. If we grab out, push apart again and back to the full of Tad will grab another spherical fall off, and we'll just move this guy over here so we can break this surface up a bit more as well. Okay, we're almost there. We might also want to come over here and turn off the clamping so we get a nice, smooth result. And if you wish, you can change the size here, so it affects more of these shots. And I'm still not too sure about these ones up here. Let's grab our sphere. And we can probably rename that to break out as we did in our original artwork. Let's just reposition this and see if we can get a bit more of an interesting break. I'm not a big fan of these little splintery bits here, so maybe if we go back to our fracture. We can tweak some of the settings of this sphere. Let's try sitting out method to volume, and that looks interesting. Let's turn this back on so we can see where our spears and we'll just move it a tad. So we get something kind of interesting and back to a fracture. Let's add a few more points in here and really smash this up. We'll try 50 and that's looking kind of cool. We can hide that guy again. Then we might just adjust out, push apart, effective I can be effected. Tab. We'll crank that strength up and stop pushing them out of it. And I'm liking that, although I don't want to affect these bottom one so much. So let's grab that spherical field and just move that out a little bit. And that's pretty much the look we're after. But the one final little thing I want to do before we move on to the next lesson is coming here in bevel. Some of these edges you'll see if we turn on the lines again with with these very sharp edges, but if we bevel that, it should catch the light a bit better and make everything look a bit more realistic. So we'll grab our fracture and we're going to use a new two former For this. We'll use the eval d former, and if we hold shift, it'll automatically apply as a child. And you can see that over here we don't actually want right there. We wanted under everything, so it's calculated last. Then we'll grab that guy and take a look at its settings. So the beveling mode is set to edges, which is what we want. But you can see it's giving us some kind of wacky looking edges here. So let's see if we can fix that. First thing we want to do is maybe give it a little bit more subdivision, and you can see that in there now. But it seems to be beveling every edge of our mesh instead of just the outside edges. But if we turn on use angle, it will only apply that affect two edges outside of a certain angle, and that usually fixes the problem. So edges are looking a bit clean and now, and they should look a little bit better in our final Rendah and When you're ready to texture this, you can get back to the fracture and under the object tab, you can turn the colors off now. Then we'll create a basic shader by double clicking over here, and we'll just change the color to a green, then will come up and open this. So we've got access to both of our tourists is and we can just drag that straight onto one of them. They will double click again and make another material, and we'll set this guy to yellow and we'll print that on the other one. And that's pretty much how artwork done. And the best thing about this is that it's fully procedural, so we can come back in here and make whatever tweaks we want, and it'll be updated on the fly. So see what you can create with the foreign Oy fracture, and I'll see you in the next lesson.
7. Art with Dynamics: Rigid Body: Okay, So here's our next out work. If we take a look in here, we've got lots of clones again. But if we look closely, none of these guys, they're touching each other. And this wasn't done entirely with the push apart. Effective this time, we're using a rigid body dynamics simulation to keep them apart. So let's have a quick look at what we've got up here. There's I'll make the push apart, effective. We've also got a new effect. Er in here, the shader effect, er and a few other newbies here. We've got some boules and also a clone up and a random effect. Er so let's see how this is done. Okay, so the first thing we're gonna do is create a shape for all of our clones to fit into. We're going to use a big old sphere, So let's bring one of those in. Then we'll come over here and bring the radius of it up something like 1 60 we'll head over to display and turn the lines on. We've put out dodgy standard sphere here with the polls at the top and bottom, so we'll change the type two I cost ahead run to give us some nice even geometry, and we'll subdivide this a bit. Let's just say 30 and we're ready to go. So let's fill this big sphere with loads of little spheres. Let's go up to the McGruff menu and bring in a cloner. Then we'll grab out Big Sphere and holding control will drag it up into the cloner to duplicate it. And now I've got some clones of our big sphere. We don't want this fear to be so big. Let's bring the radius down to 15 centimeters and we can't see it now because it's behind the big sphere. So let's just hired that guy for now. I will keep it active and ticked. Okay, so we've got our Clarins going up in the Y direction here because they were a difficult of our original sphere. They've probably got way too many subdivisions, so let's bring that down. Something like 12 should be good. You always want to keep your geometry low when you're doing dynamic simulations. So now we want to clone these guys into the shape within our big sphere. So maybe we'll rename this to something like Sphere Shell. Then we'll go and take a look at our clone up. You can see the modus set to linear at the moment, which is why they're all cloning in a straight line here. We want to clone them within our sphere, so we'll choose the object mode. It's asking for an object. He is a sphere. Let's plonk that in. And if we pull out of it, you can see these guys that cloning in the rough shape of our biggest fear. Right now the distribution is set to surface, so they're sticking to the surface of our sphere shell. But we want them to fill our shape, so we'll change the distribution to volume. Okay, so these guys, they're inside our shape now, but we're gonna need a lot more of these to fill up that empty space. So let's crank the count right up to something like 700. And now those guys are starting to take on the shape of our biggest fear. If your machine is suddenly running really slow right now with all these clones, just make sure you got your instance mode set to instance and it's going to run a lot smoother. Okay, let's have a look what we've got here. We could probably turn those lines off. Now we'll grab to display back to our normal shading. This is looking pretty good, but we could probably use a bit of variation in here all of all spheres of the same size, and it's kind of boring. Let's go and grab our clone up and see if we can bring in a factor into the mix. Let's try the random effect, er, and that certainly randomized things, but we don't want the position to be randomized, so we'll go over to the parameter tab will switch that off. We just want the scale to be random. You could see if I bring that up, it's gonna randomly scale in the X direction, but we want them to scale uniformly, so we'll switch that on. It would just change this value to something like 0.5, so that could be up to half assed Bigas. They are for half the size bigger. OK, so that's looking pretty cool, but it leads us to our next issue like we had in our cloners lesson. A lot of these clones are intersecting with each other now. We could grab out Kelowna and bring in another push apart, effective and bring that radius way down. But you're probably fine. No matter how much you tweet this, you'll never quite get it. So they're all just touching each other nice and snugly. We can play with all these settings, but we'll always get some degree off intersecting and will never quite be able to fill all of the empty space. So the best way to affect these guys in nice and tight is to get Cinema 40 to do a dynamic simulation, which can also be called a rigid body simulation. So let's delete our push apart effect, er, and we'll grab our cloner. We want to make this dynamic. To do that, we just need to come up to the tags and down to simulation tags will bring in a rigid body tag and straight away, if we hit play, everything dynamically drops to the ground. But we want to tell our simulation to stay within our big sphere and to collide with its surface. So all about clones are contained within that, so in theory, we could make our sphere shell a collider object to interact without dynamic clones. But if we turn that guy on, you can see our clones are actually intersecting with it. And intersecting geometry in a simulation doesn't fly usually, but let's try it and see what happens. We can hide outs, fear again and make sure it's selected. And we'll come to tags simulation tags and will make it a collider body. They will go on hit play and it wiggles around and disappears, which is not what we want, so we don't want to do it that way. We actually want to duplicate this guy. Let's turn it on, hold control and dragged here, and we'll rename this guy to sphere dynamic Shelf. And we don't want to Old Sphere to be dynamic anymore. So let's delete that tag and what Grab this guy and scale it so it encompasses all about clones about there should do. It will hide that guy, and we'll hide this one as well. And now, if we hit play, we still get a little bit of weakness. But we can fix that back to our tag. Under the collision tab, we need to change these shape from automatic, which is kind of guessing the shape of Al Qaeda. We need to tell it to be aesthetic mish, and this would give us a much more accurate result. So let's hit play and see what happens. Nice. You can see how big sphere is catching that. Now. If we turn it back on, you can see they're all inside their Let's pause that we don't want all these guys to be treated as one big lump. We want all of the clones to be treated individually so they can interact with each other. So if we grab the dynamics tag on our cloner down under the collision tab, we need to activate this individual elements by changing this to top level. Now, if we hit play, all of our clones will interact with each other, and it's filling up our big sphere and we're not getting any intersections and all of the empty spaces filling up nicely except up here. One way we could fix this is to stop gravity from pulling all of these clones downward self . We hit control de on the keyboard. It will bring up out project settings, and if we go to the dynamics tab, which has already open here, we can bring the gravity down to zero. And now, if we hit play clones is doing a much better job of filling up that space. And if you find you've still got a little bit of room like over here or we need to do is add more clones down in the object tab, let's just add in another 100 clones to out count and will rewind and Reese him and they're Ugo. We've got a big sphere packed full of clones. So now we want to take a slice out of this sphere so we can see all the clones on the inside here. If we go and have a look at this from the top view, we just want to cut a big chunk out like this. So I think the easiest way to do that if we just get this back into position and reset it is to just cover Big Chunk out of our dynamic shell. We want to bring in an object we can use to cut into this sphere, and a nice flat object I think would do nicely is a plain old cube, and then we just need to scale it up and position it where we want the cut to be, and it might be easier if we switch views. You can do that by hitting the middle mouse button, and we'll go to the top view over here and Middle mouse button click to get into that, Then we want the corner of a cube to be pointing in this way. So let's grab the rotate tool, and we can just spin this around just by eye. Then we'll go back to our perspective. You and we get something like that. Then we'll do a quick look around to make sure that's covering the area We want to cut out . Then we'll go on, grab our sphere dynamic shell, and we're going to bring in a boule. You confined him in this menu. That's the one right there. Just make sure you hold out when you bring that in, so it's automatically applied to else fear. Now Bull needs to objects for it to work, so our second object is going to be our cube. So let's grab him and drag him down here in our hierarchy. And just like that, we've got the result were after we've now taken a slice out of L Sphere and if we come over to the bull to see what's happening. Basically, the Boolean operation is a minus, bi with a being else fear and be being the Cube. So it's basically cutting the Cube out of this fear. We want our new shape to be a single object, so let's click that as well. And we also want our new shape to replace else fear as thes shell for our dynamics. So we'll take the dynamics tag off the sphere and put it on the bull. So now if we hit, play the clones outside of that shape shoot off into space. But if we hide this, you can see the clones inside the shape are fitting very nicely, sir, to stop any of the clones shooting off out there. We need to tell our cloner to only generate clones within our new shape instead of this false fear that it's using at the moment. So let's grab our bull and duplicate it. Then we'll rename our dynamic bull to bull dynamic shell and our new one to fool Shell. Then we'll grab our Kelowna, and we need to switch this object out to our new ball, then this guy doesn't need to be dynamic. It's driving a closeness, so we'll delete that tag. Then we'll rewind and hit play, and we're finally almost there. Ortho Veil Bulls are the exact same shape, which means if we unhygienic this, those two are intersecting. So we need to do is grab this guy and scale it down a tad So all the clones will be generated within our dynamic one on the outside. So if we hide out out of one, you can see that in there now. So again, let's hide that and we'll Reese him. And now we just get the one little ball shooting off their We're not too worried about him . So that's the basic set up for this artwork done. There's just one last little thing to do. If you remember from the example, we had a different material on the inside that gradually fades out to the outside. So how do we set that up? Let's go and grab our Kelowna, then up a theme. A graph menu. We'll bring in a new effective. This time we're going to use the Shader effective and let's just click out Kloner and make sure that's been applied. You can check if you go to the effect is tab, and you can see how clone is being affected by the random, effective and on you shader effective. So now we can go and check out some settings in this guy. You'll notice that our scale settings air active here, but nothing has been updated in our view port. And if we try to change any of these other settings position, for example, it's still not updating. And that's because of our dynamics tags. We won't be able to see those changes until we reset our simulation. We don't actually need to do that anyway. We're only interested in the color mode. We need to change this to custom color, and again, we're not getting any change because our custom color is white. But if we change this, let's make it black. Now we're starting to see something, so we want the middle of our clones to be black, transitioning to white out here, and we can do that with Fall off. We'll go to the full off tab, and this is new incident of 40 20 but you can still do something pretty similar with the older versions, but we're gonna do it with Fields. Let's bring in a spherical field in older versions. Just used the spherical fall off, and we've pretty much got the results straight away. But we can adjust this. Let's first turn off the clamping so we get a nice, smooth transition. Then we'll adjust the size here, something like that. And now we can use this as a mosque for any material we want. Let's double click down here to create a new material. Then we'll double click the material to bring up the options. Well, just make this a yellow color. Although in my final at work I went with a gold material, so we'll drag that onto our Kloner. And right now it's overridden our shader effect er and turned completely yellow. We want to use the black and white values of our shader effect er to mask which areas stay yellow. So we're going to pipe our shader effect er into L Alfa Channel. So let's switch that channel on and here in our texture, we want to put our shader effective, so we'll click on this little error and we'll go up to Myr graph and bring in a color shade off. So now anything that was black in our shader effect ER has become fully transparent, and anything that's white has become fully opaque, and there's a gradual fall off from black to white in there as well. So we have a nice transition, but we actually wanted the other way around. So we need to invert this and we can do that by just checking this box. Now black is fully visible, fading off to white. Now we just need to put another material under this so the gold color has something to fade off, too. So let's double quick down here and make another material. I think what will be a nice color to fade, too, So let's drag that material onto our cloner as well. And again it's overridden now yellow material. But what we need to do is switch these around, and now our yellow mask material is sitting on top of l white material, and a rigid body at work is just about done, and you can easily go back and tweak this if you like, just grab the spherical field all your full off and the move tool and reposition this hell ever you like. You can even grab the handles here and scale it up. So have a play and see what you can come up with one final tip before we move onto the next lesson. If you go to render this houses rendering fine. But an issue some people have had is that they've accidentally left their boules visible. So if you've only got one red dot ticked and you go to render, you'll end up with something like this. So just make sure you switch those both off. And if you've got them just like this, you can't get wrong. That's it for this lesson. Oh, catch you in the next one.
8. Art with Dynamics: Soft Body: Okay, so here's a next artwork you can see here. We've got a whole bunch of spherical clones. As in our last lesson, they're all interacting with each other. Only this time they also deforming instead of using rigid body dynamics. We're actually using soft body dynamics in this one. So let's take a quick look up here. This is our baked object here said. Let's just hide that and take a look at how this was created. Returning this one on got some dynamics tags in here. And if we hit play Paul of all spheres expand and squished into each other within a big cube, so this is pretty much the effect will be creating, so let's see how it's done. So the set up for this one is pretty similar to our rigid bodies. Lesson. Only this time we're going to fill up a cube instead of a sphere, so let's bring one of those in. Of course, you can use any shape you want for your artwork. It might also make a life a bit easier if this object was transparent so we can see what's happening when we're filling it up with clones. One easy way to do that is to come down here and create a new material just by double clicking and weaken. Double click into that material to bring up some of the options will turn on the Alfa Channel and then up here in the texture slip or we need to do is add a color that would just move this out of the way so you can see what's happening here. It defaults toe white, but if we click here, we can change that. Let's just apply that material to our cube first. So now white values in our Alfa Channel will be opaque and black values will be transparent . So you can think of this is kind of an opacity slider. If we drag it this way towards the black, we're actually adjusting the visibility of it. We don't want it to be completely invisible, so let's leave it like that. And now we need to bring in an object to fill it up with, and this time we'll use a sphere. Yes, again, if we turn on the display, you can see itself standard sphere. So let's change that to the Icaza. He'd run so you get a nice, even geometry, which is great for deforming and great for dynamics. Then, to keep things running nice and fast, we probably want to bring those segments down a bit. Let's try 16. That's probably low enough to keep that shape else. Fear is also pretty big, so let's bring that down to 26 centimeters. That looks pretty good. So now it's time to fill this Cuba with some clones, so Margraff will bring in a cloner. Don't forget to hold out so it's automatically applied and down here to change the murdered from linear to object, just like we did in the last lesson. We want one cube to be the shelf for the dynamics, so we'll rename that two cubes shell, then will duplicate that by holding control and dragging it down here. This will control our cloners, so let's call it cube closeness. Then we'll grab our Kelowna and drag out cube cloners into the object slot and straight to the distribution. We want to fill Al Cube so we'll choose volume. Then we want to make sure none of our clones there poking through our cube shell as they're doing right here. So without colonias, Cube selected will scale that down about there should do it. Next thing we want to do is add some variation to the size of these clones. So without clone, this selected will bring in a random effect. Er, then we'll go to the parameters tab. We'll turn of position, turn on scale and uniforms scale and will make that point to Okay, we could probably bring in a few more clones now. So back to our Kloner and over to the object tab will double that count to 40. Okay, that's looking good. So now we need to apply the dynamics So we'll come up here and make sure we've got our clone is selected, then tags, simulation tags and we'll bring in a rigid body for now. So we want our cloners to collide with our cube shell. So let's grab that. Then we'll get back to tags, simulation tags and we'll put a collider body on this one. And now if we hit play, it's probably going to go crazy. Yet we'll need to fix our collisions. I think so. Firstly, we want our clients to be treated as individual objects, so in this dynamics, tag will go to collision and will change individual elements to top level and will play that back there exploding. But they're doing what we want, so we'll just need to adjust this one as well. We'll need to change the collision shape to Static Miche. And now, if we hit play, we've got something very similar to what we had in the last lesson. And just like in the last lesson, we've got gravity affecting these and again, we don't want that. So we hit control de on the keyboard and bring up the project settings. Then, under the dynamics tab, let's bring that gravity down to zero and hit play again. And now our clones are filling up that cube nicely, but everything's very rigid at the moment. We want these clones to be soft in pliable, so when they collide with each other, they bend into form and take on that shape of our shell cube. So to do that, we're going to be using soft body dynamics instead off rigid body dynamics. But there's a few more steps to do before we get there. The first thing we want to do is come up here and grab our sphere and we'll right click and make it inevitable. And that will bake in the geometry, which tends to work a bit better with soft body dynamics. They will come forward to a frame where they've separated from each other. Frame 43 looks good, will set this as the new starting position for our simulation by right clicking on our Kloner and also making inevitable. So now, if we go back to the start of our simulation, they all begin in their current position. Which is great, because when we're dealing with soft body dynamics, we definitely don't want anything intersecting when the simulation starts. And if we take a look in our cloner, which has now become a null, all of our sphere clones have now become their own objects. So now we want to animate all of these guys so they grow and squish up against each other. So if we take a look at these spheres individually, you'll see that there scale values are all a bit different, and it's because of the random effective that we used earlier. I want to animate the scale values on these, but that'll be a lot easier if their values are all the same. So I want them all to keep their current size but have a default value of one in their scale and hopefully that'll make a lot more sense in just a minute. We want to grab them all and then we'll come to tools, coordinates and freeze transformation. And this is resettle the values down here for us, keeping it nice and tidy and everything has been left at the scale in position. It was. So let's put some key frames in at one, which is basically 100% of the current scale. There will come forward to say frame 25. That will scale these up to 1.5 and it doesn't look like it wants to do that, and that's because our dynamics tag is on there. That sneaky little quick fix we could do is just grab that and drag it onto another object . We can just put it on the random, effective for now. It won't actually have any effect on that, but it's just a temporary fix. Well, we change these values that will make sure we've got all these guys selected again, and now if we put 1.5 in here. It should work for us, and yet it looks like it has. So we'll do that for the X Y and Zed access. Then we'll keep frame all of that and give that a play. And there's our animation. Pretty simple, just scaling up nothing too fancy. We just want the animation to start with nothing touching each other so we don't have any intersecting points. And as it scales up, it should fill a power shell, and everything should start deforming and squishing into each other. So let's see if it's gonna work well, grab that dynamics tag and Plunkett back on our clonal and see what happens. Well, it did scale up, and they are interacting, but they're not squishing together. And that's because we forgot to do one very important thing. We need to turn our rigid body dynamics tag into a soft body dynamics tag, and you can do that over here under the soft body tab, Then to activate it. We just have to change the soft body here from off to made off polygons lines. Now, if we hit play, we'll get something quite different. It is calculating a bit slow, but you can see we're getting what we want. House fears, a growing and deforming and squishing to the sides of our shell, and that's pretty much to set up for this at work. To get a better look at this, we could always come up to the display and turn the lines off, and you'll notice that this isn't looking to smooth at the moment. But we can easily fix that. We'll grab our no here and we'll bring in a subdivision surface just told out, So that's automatically applied. And that's smoothed everything up quite nicely. We probably don't need to see that Big Cube anymore, So let's grab that material we put on there and we'll come over here and switch to the Alfa Channel, then go into the color and just bring this down to whatever we want. We don't need to see it. It'll really so let's just have it there And they're Ugo, although you will notice that these aren't quite touching in a lot of places. So to fix that or we need to do, is it control de on the keyboard to bring up our project settings again? Then, under the expert tab. Under dynamics, we can adjust the collision margin, which is basically the amount of space between each colliding object. So we'll bring that down 2.2 and re seem that and see what we get. It is looking a bit better, but I think we might need to bring this value down just a tad more. Let's try 0.1, and before we do a recent another thing you can do is make thes soft bodies even softer. If we come and take a look at the tag again, we've got a bunch of settings down here that defined the physical properties of our stuff body dynamic objects. I won't go through all of these in this lesson, but when you might want to check out is the structural. If we bring this down, the structure of our objects will be. It's softer and they'll be able to squish into each other a little bit more. So let's sim that and see how it looks. Okay, I think that's worked pretty nicely. Everything is looking a lot more squished up together, especially this guy down here, and that's pretty much it for this one. There's just a few little things you might want to have a look at before you hit. Render. Firstly, if you're happy with the look of your sim, just get to the frame that you like. And we can make this object so it doesn't need to be recent or you need to do. And if we just close, this is right, click on your Kelowna and say current state to object. And that's created this copy here, which no longer needs a dynamic stag so we can delete that. So that tell what one over here. And if we go back to the start, you'll see that one stays the same shape, but our old one. If we hide out new ones so we can see that has gone back to how it was before. We seemed so by baking it like this. Any frame we go to, it's going to look exactly the same. And actually, if you're happy with your at work the way it is, you could even come up and delete that one. And now based Kelowna is being affected by that subdivision surface. So it's nice and smooth now, so you could even tweak the position and get ready to start text a ring and rendering this thing one last little issue you might encounter when you do go up in Hit Rendah is that you might be able to see these big cubes rendering and fix that point. Need to do is hide these guys by clicking here and turning on the red dots. And if we try that again, we've just got out work in there Now, if you're not simulating anymore, you probably don't even need these in your scene, so you could even just delete them. And that's pretty much it for this artwork. Have a bit of fun with this technique and see what you can come up with, and I'll see you in the next lesson.
9. Art with Cloth: Basic Cloth: Okay, so we're onto creating artwork with cloth. Now let's take a look at what we've got up here. If we take a look under art, we've gotta tourists. We've got a few subdivision surfaces smoothing out. Cough out is one of our close, and it's also being twisted by a twister. Former. Then we've got a smoothing to former down here, and we got a few more bits of cloth. So let's take a look at how to do this. Okay, so the first thing we need to do is bring in an object that we can turn into cloth. Let's come up here and we'll grab a plane. And now we want this plane to be pointed in this direction. So we'll just change the orientation to Plus said, just like that. Then we'll come over here and will make the height a little bit bigger. Let's try 600 centimeters. Okay, let's go up to display and turn on the lines so we can see the subdivisions here. We'll need quite a bit of geometry in this so we can get some nice details in our cloth. So let's come down here and in the width. Let's make 40 segments, and we want to keep these nice and square, so it fell. Height is 600 centimeters. Let's make this 60 segments. So now we've got some nice even geometry to deform, So the next step is to turn this into cough. So without plane selected and what we're here, let's rename this will call it cloth, then will come up to tags and down to simulation tags will bring in a cloth tag, and we'll just frame that up a bit. What happens if we hit play? Nothing yet. And that's because the cloth tag doesn't work on any of our generator shapes. So we need to right click on our plane and shoes make creditable, and that'll bacon the geometry of airplane and give our cloth tag some points to simulate. And now, if we hit play, our costs should fall straight down, which is kind of boring. We want some nice folds and wrinkles in our cloth, and one way to do that is to pin this edge up here so we can get a nice draping effect without cloth. So with our cloth selected, we'll go to point mode so we can see how very Texas here. And we'll come up to our selection tools and grab our rectangle selector. And then we'll just click and drag and try to get these guys. We actually got pretty lucky here. This can be quite tricky. Sometimes, if you're finding it a little difficult to grab them like that, you can click the middle mouse button, then go to another view. Let's say the front view and hit that middle mouse button again, and it might be a little easier to select them in this view. Okay, let's switch back to our perspective, you. And now that we've got these guys selected, we'll click out Clough tag and down under the dresser tab. We want these points to stay put, and we can do that with the fixed points option down here. If we click set where we've got those selected and hit play, you can see they're not going anywhere, and that's giving your costs somewhere to drape from. Let's extend our timeline of it, so we've got a few more frames to simulate. I was dragged us out here, and now if we hit play that will carry on simulating and hopefully we'll be able to get some interesting looking results. We probably don't need to see all those points now, so we'll come up to display and switch back to our shading mode and will switch over the object mode. And we might even hide the scene greed here to make it a bit easier to see. If we come up to filter, we can just switch that off. Okay, so our cloth is still looking a little bit boring. We've got a few folds in here, but it's not all that exciting yet. One way we can spruce this up and add a bit more folding in here is to bring in some forces . So let's come up to the simulate menu and under particles. We've got a whole bunch of forces that we can use in here, but the one we want to bring in is the turbulence force, and here he is up here. If we hit play, you'll see that has started to affect our cloth. But if you look over here, the strength is quite low. But if we really crank that up, our cloth should start behaving a bit more sporadically, and we should start to get some more interesting looks. Let's pause on that frame, and it might be a bit easier to see this detailed. If we smooth it out, we'll grab that cloth and holding cult will bring in a subdivision surface so it's automatically applied. And now we're getting there. We've got some nice, smooth folding details in there. Now let's go and take it close to look at our turbulence field. I want to see if I can replace these little indentations of here with some or folding. One way to get rid of those and increase the size of our folds is to bring the scale of our turbulence up. Let's try bringing this up to 400% and we'll play that back, and this is giving us an interesting result. Let's pick a frame here. Maybe this one. And if we have a closer look, you can see we've got some nice swirling folds in there now, and there's a lot more detail. And if this is looking a bit too bunched up for your liking, we could just rewind and pick a different frame. Maybe this guy, when the simulation starts off, that's looking kind of interesting Well, maybe we'll go forward a little bit further, and actually, at this point, things are going a little bit crazy. We want some of these nice details, but we don't want to cough bouncing all over the place. So let's go and take a look at our cloth tag again. There's a few settings we could change down under the forces tab here. If we adjust the drag, for example, that should lessen the effect of our turbulence. Let's try putting this up to 10 and we'll play that back. I propose that there it's no longer bouncing all over the place like it was before, but we're keeping some of these nice, folded details. But with the higher drag setting, the details tend to soften out as we play through our simulation. As you can see up here, it is a nice effect if you want a softer look. But let's just reset that and I'll show you another way to stop your simulation bouncing all over the place. If we switch over to tag, we've got a bunch of options here that are pretty similar to what we saw in the soft body dynamics class. You might think that by reducing the bounce, it would actually make our cloth less bouncy. But if we do that and hit play, you'll notice absolutely no difference. This setting only comes into play. If you're cross is colliding with something, it's to do with how it bounces off other objects, but something that will be quite effective here is the mass. If we bring this up, we're basically telling the simulation that our cloth is made off a heavy up material and therefore forces will have less effect on it. So changing This can also give us some interesting results, as you can see here, so creating art from cloth is really just a process of trial and error. Just keep experimenting with these settings and with different forces and see what you can come up with and when you're happy with the particular simp, say this frame. For example, weaken bakehouse simulation into the mesh by just clicking the cloth and holding control. Drag it out to make a copy. Then all you have to do is delete the cloth tag from it, and it will retain its current de formacion. So why your experiment? You can save a bunch of these and keep the best looking measures for your final artwork. So let's have a look at two more quick techniques to get better looking measures, and we'll start putting these together into a single artwork. Let's come up here and hide this guy for now, and we'll grab out cloth tag again. Another sitting I like to mess with is the iterations. Let's just reset arm aspecto one, and to get an idea of what this does will do a before and after. If we play this back now it looks something like that. And if we rewind that and crank up those iterations to 10 and play that back, we get a very different simulation. The iterations controlled the overall elasticity off the fabric, and I really like this feature. It gives some really nice detail to the cloth, although you'll probably start to notice some intersecting geometry like here, where the cloth is passing through itself. We can easily fix that over in the expert tab. We just need to turn on self collisions so a cloth will collide with itself because it's having to calculate those collisions. The simulation will be a little bit slower, but that should get rid of most of the collisions and give you a better result. And you can get some really cool shapes out of that. If you do find that you're still getting some intersecting, you can always bring up the sub sampling that will again slow things down a tad. But you'll get a more accurate results. Okay, so I'm liking this shape. Let's convert this one to aesthetic measures. Well, we'll grab out cloth whole control and drag it down here and delete the Clough tag. And now we've got that guy will hide that one for later as well. So the one issue we have with this set up is that because we have these points constraint, the top part of our cloth tends to be a bit smooth. But ideally, we want the entire cloth to be covered in these nice folds. Let's just rewind this and play it through a bit. I'll show you a cool little trick, how you can bunch this all up and get some much deeper folds. Lets reset this and we'll come and turnout turbulence off for now. Then we'll grab our cloth tag and we're going to release that constraint that we made before where it says fixed points or we need to do is hit clear. And now if we play that back, it will drop straight down as we had it originally. Okay, so we want to set this up kind of like a curtain. We're going to animate a controller object up here. So when we scale it down, it will bring all of these points closer together and create some nice wrinkles up here. So we're going to use a different method to constrain our cloth well, quick on that guy and will come up to tags, simulation tags and we'll bring in a cloth belt tag. And now that's asking for an object to belt L cloth onto. So let's come over here and we'll bring in a cube. Then we just want to move this and scale it so that it just covers the topper of points on our cloth. Something like this. Then we'll go back to our belt tag and will drag out Cube into the belt on slot here and now we need to set some points that will attach to the Cube so we'll grab our cloth and you can't really see it. But our points are still selected behind this cube, and if we just turn that off, you can see those. If yours aren't selected anymore, just make sure you're in point mode and grab the top row like that and with those selected will go back to the belt tag and hit set. Now we can turn our Q back on, and if we hit play, it looks like it hasn't worked for us. These points are supposed to be attached to this cube. So what's going on? I'd say it's because our Cube hasn't been made. Edit herbal yet. We need to lock in that geometry so the court tag will work. So that's right. Click and make irritable. And now if we hit play, it still doesn't work. We just need to update L Belt tag, so we'll need to have our cloth selected and those points. Then we just need to set those again in our belt tag. And if we hit play again, you can see those points that's sticking to our cube now. And if we switch over to object mode and grab the move tool, we can actually move this while it's simulating, and you can get some pretty interesting shapes doing this, so keep experimenting, but we're going to try and punch this cloth up. You might get a little bit of an issue when you try to rewind this. If we play that back again, now course will snap into position. But again, if we go back, it will go back to that wrong position again. But we can fix that easily enough. If we grab the cloth tag under dresser, we've got an option to relax the cloth. So let's just press that a couple of times until it lines itself up where it should be. And then we can set the initial state, and now, if we rewind, it should stay exactly where it was. We might just put a material on this so we can see it a bit better if we double click here . We can drag that straight on there, and hopefully that's a bit clearer. So now we want to start punching our cloth up. So in theory or we need to do is scale L Cube in would. So let's give that a troy, we'll make sure we've got him selected and will come down here. The X axis is this excess. So if we scale that down, you can see all of these yellow lines are indicating that our cloth is still attached to our cube, which is a good sign. So let's set this back toe one and said a key frame. Then we'll go forward to say frame 40 and well, scale that in to about there and said another key frame. And now if we rewind and play this back, we are getting our cool, bunching effect, and that's sending some nice deep folds all the way down our cloth. And we could even Hideout Cube, And you can also hide the constraint points. If we go back to the belt tag. We just need to turn off the drawer here, and that's looking pretty cool. We could even turn out turbulence back on and carry on simulating that, and we've got ourselves another interesting cloth shape. So let's bake this cough. We'll grab him, duplicate him out of there. We can delete both of those tags, and now we've got a nice collection off different cloth measures that we can use in our artwork. So play around with these techniques and see if you can come up with some interesting close shapes. I'll jump into a new sane and show you how to put the finishing touches on. Okay, so these are the three cloth seems I ended up using. You can see them all up here. I've also added a subdivision surface to each one, so they're nice and smooth. So now I'll quickly show you a few ways you confined shoe in your cloth. Let's just fold these two up and we'll hide those and we'll just work on this guy. So the first thing we could do is select our cloth, and we could try coming up here and applying a D. Former. You could really try any one of these, But when I think might work quite nicely is the twist. So we'll bring that in. Just hold shift so it's automatically applied and you can see that's wrapped itself quite nicely to our cloth. It fuels, didn't you can always hit the fit to parent button, and it should do the same. Then we can bring the angle up. And just like that, you can get a very interesting looking shape on our cloth. You could even combine this with another D former. Let's Bring in the Bend. And before we tweak this, let's just make sure it's in the right spot in the hierarchy. We want it after the twist, and we'll bring up that strength and maybe we'll keep the Y axis length. We're making abstract dots, so don't be afraid to get a bit abstract here. We could use one of the other two forms we had from earlier in the course. Let's turn those guys off and hide them. Then, with a cloth selected. Let's bring in an F F D again. Don't forget the hold shift and we'll switch the point. Murdered. We'll grab some of these points. You can even rotate these so we could get something pretty similar to the twist or go free form Here. It's just a matter of playing around with it until you get a shape you like. Maybe something like that. We could even grab some of these points and scale them up. You really have a lot of flexibility with the former's, especially the FFT. Okay, let's turn that guy off and actually weaken. Grab the F F D and the Bend will delete. Those were just going to use the twist For now. I'll quickly show you how you can go about using the sculpting tools in cinema 40 to get the perfect look. Let's bake this twist into our geometry so we can sculpt on that. We'll right click on our cloth and say, current state toe object that'll make a duplicate here. We could just drag that going out, and we don't need this anymore, so we'll delete that. Then what? Grab on you cloth and switch back to object mode, and now we're going to use the sculpting tools to refine this shape. So let's come up to our layout sitting here and we'll go to the sculpting layout. Okay, so well, that's selected. We'll start subdividing this so we can get a bit more detail out of our sculpt. We'll do that a couple of times, but keep an eye on your polygon. Count up here. Don't go past anything your computer can't handle. So I think we might just go to Level three, which gives us about 100,000 polygons. And if we go back to display and turn on the lines. You can see just how dense that is. This will allow us to get a lot of very fine detail in there. Okay, so now we can start using these tools to sculpt al geometry. I want to go through all of these in this class. I'll just show you the ones I find work the best when sculpting cloth, first of which is the grab tool. If we grab that and hover over Amish, you can see we get a little orange mark up up up here and it's basically l brush, and we can enlarge a brushstroke the same way we would inferred a shop by clicking the open or close bracket on the keyboard. Or you can adjust it over here. And if we click and drag, you can see the grab tool will allow us to grab and move l mesh so we can quickly and easily reshape our entire cloth. However you might notice on one side of our mesh we lose l brush, you can see it disappears here, and it reappears here. And if we spin this around, it'll only let us sculpt on this side. And that's because our plain is flat and technically only a one sided object. But we can fix that easy enough. If we go back here where we can't sculpt, you'll find under the brush settings here. We can't see it at the moment. Let's just drag this over. We have an option called back face If we turn that on and try to sculpt again. Now we get a blue brushstroke indicating that this is the back face of airplane, and now we can sculpt on both sides of the surface. Okay, so that's the grab brush. Another brush I like to use is the wax brush. This one's great for adding some fine detail, so we actually might want to subdivide this one more time. Then we'll zoom in a bit to one of these folds in the fabric and bring out fresh size way down to something like two. And now, if we start sculpting in here and this works better with a tablet and pen, I'm actually using a wakame cen teke. Now weaken sculpt in some fine fold lines. If you hold control on the keyboard while you sculpt, you can cut into the mish instead of adding to it. So just carry on doing this along the main folds of our cloth. Don't worry too much right now that it's not looking so great. We're going to grab the smooth brush and smooth these out a little bit, and we'll just keep doing that until we've got something we're happy with. And just like that, you've added quite a lot of extra detail in there. Okay, so we'll take a look at one more brush before you wrap things up. We'll try the pinch brush. And basically, if we run that along some of the ridges here that will pinch the geometry together and we can make some of these details look a bit more pronounced. And again, I just use this with the smooth brush and you can get a pretty nice look. All right, we're done with the sculpting now, so let's go back to the standard layup and to finish this off. I just got the Kim review into a nice spot like that, and then you can come up here and bring in a tourist and just free position that and scale it a tad, and we'll put it down here and we'll shrink it down and make it a little bit thin up something like that. And I basically just have that going around it to make it look a little bit more interesting. And we can bring in our other cloth simulations. And it's just a matter of of positioning this to get a pleasing composition, and that's pretty much it for this artwork. See if you can come up with some interesting cloth simulations and I'll see you in the next lesson.
10. Art with Cloth: Inflation: Okay, So here's our next artwork. This is a pretty popular look at the moment. We've basically got a big sphere that's inflated, and it's bulging out of this metallic mesh here. So let's have a quick look up here. We've got some Boren oy fractures here and a subdivision surface. We've also got a smoothing the former and a beveled former, and we've even got a tractor in there this time. And if we come down here and hit play, we get this nice inflating effect, and this is what will be creating. So let's see how it's done. Okay, so the first thing we need to do is bring in something to inflate. So let's come up here and we'll bring in a sphere. And again we've got our standard sphere with the polls at the top and bottom. So let's change that. First we want the Casa. He'd run all right, we'll be converting this mesh into cloth, so we need quite a bit of geometry in there to deform. So let's add in a few more segments, but say 100 it looks pretty good. So the next thing we want to do is break out sphere up into pieces that we can inflate. We can probably turn those lines off. So let's do that first. Then, without Sphere selected will come up to the McGrath menu and we'll bring in a foreign oy fracture again. Don't forget told out. So it's automatically applied. And now we've got our colorful pieces in here. Then you could come over to sources and grab your point generator, add some more points and mess around with this, as we did back in the Vore annoy fracture class. We'll just leave these at their defaults for now. So let's just go over to the object tab. So now we want to make a bit of space between each one of these pieces. And again, if you remember back to our foreign oy fracture lesson. We did that by changing the offset fragments down here. So let's just put in two centimeters and now we've got our gaps. But if we zoom in, we don't want these pieces extruded. We just want the outside shell, really? So we can come down here and turn on whole only and now we've just got the outer surfaces and this is what we're going to use for l cloth, but before we do, we want to convert this into a single mish. So we'll right click on our foreign oil fracture and we'll choose current state to object, and it's made a duplicate for us here. Let's pop that open And here's all of our individual fractured pieces, but we want to combine all of these guys into one single object. So let's grab this one all the way down to here. And this time we'll right click and choose, connect objects and delete. And now we're just left with one piece here so we can grab him and pull the matter that no and we can delete that and then we don't need to see this go anymore. So let's hide that. And now we've got a single mish ready to be converted to cloth. But before we do that, let's just rename. This will quote something like Mesh. Then we'll come up to tags simulation tags and we'll add the cloth tag. And now if we zoom out and hit play, it just falls to the ground. So the cough simulation is definitely being applied to it, but we want all of these pieces to puff up and inflate. But before we do that, we need to add some constraint points around the edges of each piece so they're locked into place. And because we use the Vore annoy fracture, selecting the edges is actually super easy. When we converted this into a single object, it actually beg that information into Amish. And you can see that over here we've got a baked in edge selection here, as you can see down here. And we've also got these Vertex selections. This one here is the edge Verte sees, and that's the one we want. So if we switch to point mode, you can see these slightly yellow ones are the ones we've got here. And if we hit select points, they should highlight for us like so. And with those selected, we can constrain them back, you know, cough tag under the dresser tab. You might remember this part from our last cough lesson. We need to fix the points. So let's just hit set. And now if we hit play, all of those edges are now locked in place and we get this kind of sagging effect in our cloth so we don't need to see these pink dots anymore. You can turn them off by uncheck in the drawer option down here, then we'll switch over to object mode. And now we want these to inflate rather than sag. And in fact we don't want gravity to affect them at all. So let's come over to the Forces tab and he is our gravity weaken, just zero that out. And now hitting play should give us pretty much know effect. And now we need to figure out a way to inflate this. And the way we do that is back under the tag tab. And here's those options I'm sure you're very familiar with by now. The option we actually want is one we haven't talked about yet. It's thesis eyes, which basically makes the size of our cost surface bigger, which gives us the inflated look where after. So if we were to crank this up to say 140% and give that a play, we get our inflation and to get a better look at this, we might want to subdivide it a bit, so we'll grab a mesh and holding ALTs will bring in a subdivision surface, and that's looking better. We're getting some really nice details in our mesh now, but it's still looking a little bit saggy. Let's play that again without subdivision surface on and you can see what I mean. Ideally, we want these parts to really puff up and stretch, so what we can do is bring in a force. So let's go up to simulate particles and will bring in an attractor. So let's see if that's done anything. Well, rewind and play that back. That doesn't look like any difference at the moment. And I think that's because our tractor strength is pretty low. Let's crank that up to something like 2500. And now, if we give that a go aside from this weird dancing out here, how much is actually being pulled in on itself towards our tractor, which is this guy here and you can see we've got him selected. We're getting that weird bouncing effect when the cloth collides with itself at the center of the Attractor. But we don't need to worry about that. We actually want to invert this effect, so our tractor is actually pushing out rather than pulling in, and to do that it's actually pretty easy or we need to do is put a negative value in here. So we've got negative 2500. And now if we play that back where getting out more intense inflation, because they are a tractor is now pushing the cloth outward and weaken further, Refine this. If we come back to our cloth tag and tweak some of these settings down here, let's give ourselves a few more frames to play with first, maybe 500. Then we'll hit, play and tweak some of these while it simulates for you. Just the stiffness. We can loosen this cloth up a bit. Something like that. Well, we could bring the size up and inflate this a bit more, and now we're getting a bit more of this jiggly detail in here. Another one I like to play with is the iterations. This can give you a bit more extra detail as well, so feel free to play around with it and see what you can come up with. I think I went with all the default values for my final at work, so I'll just undo those and we'll play that back all rights. I'm pretty happy with this. Let's move on to the next step. We want to fill in all these gaps with a nice frame. So let's start by renaming this. We'll just call it inflated cloth. Then we can actually hide that for now, and we'll switch our born I fracture back on again, and we basically want the opposite of what we've got here. We want to turn this empty space into l frame and beckon. L've or annoy fracture. We've got an option to do exactly that. He is. The invert button will click that, and there's the base of our frame. You could potentially create all kinds of abstract out with this technique, but all we want to do here is figure out a way to extrude this, and it might be easier to see if we rewind this and turnout cloth mesh back on. We want to extrude this outward, so let's come down here and have a look at the thickness. If we turn this up, maybe to something like two centimeters, we can't see anything, and that's because if we hide that again, it's extruding inward. And if we turn that up a bit more. You can see that a bit clearer. So to make this extrude outward, we can turn that on again. And we just need to make our thickness a negative value. And there we go. Now we might just bring that down just a tad. Maybe negative three looking good. And now, if we play this back where almost there. One little touch I might add to the frame here if we zoom in thes edges air a bit Shop for my liking. Might be nice to add a bit of a devil in there. So now that we're happy without settings down here, we can convert this foreign oil fracture into a single measure as well. So the same dealers before we'll right click and current state to object, they will hideout, fracture. And here's an you copy. So we'll dragged that guy out of there. Believed the no. And then we can rename it to something like Cage. So now we need to bevel this So with it selected will come up to D formers and we'll grab a beveled. A former don't figure to hold shift so it's automatically applied and don't worry. If you always goes a little bit crazy at first, we can fix this nice and easily. But first, let's turn on the line so we can see what's going on here. So it looks like our bevel is beveling, all of our edges. But if we turn on use angle, it should only bevel the angled edges. And that seems to have done a pretty good job of cleaning this up. 40 degrees usually works pretty well, but sometimes you could bring this up a little bit to correct some of the artifacts. That doesn't seem to have made too much difference. I think our bevel might be a bit too wired as well, so let's bring the offset down 2.5, and that seems to have 20 things up a bit. But we've still got a few of these strange artifacts, and we've even got a big old spike thing happening down here. So another thing you can try, which I usually find fixes. The issue is turned on the limit, and that's looking nice and clean now so you could go ahead and slept some materials on there now, and you've got yourself another abstract artwork. But before we move on to the next lesson, there's a few other things you could try to get a slightly different look for this technique. Let's just turn those lines off for now. If you wanted to smooth this out a little bit more, you could always grab it and bring in a smoothing D former. You can get it super smooth like this. Or if we adjust the stiffness, I find values up towards 100 up pretty good. Another thing you could do is actually have your cloth interact with your cage by making it part of the simulation. If you grab it and head to tags simulation tags, you could grab a cloth Kaleida tag. And if you wouldn't play that back, the simulation will be quite a bit slower. But the cloth is now colliding with the cage, and it actually looks like it's really trying hard to avoid contact with it completely. It can be an interesting look, but it's a little hard to control the collisions with the club tag. If you did want to go this route, I would recommend setting this up with soft body dynamics instead of using cloth as that should give you a bit more control over the collisions, but we'll just delete that tag. I'm quite happy how we had it. And you can see it runs much faster like that. So one final thing if you wanted to get a whole bunch of extra detail in here and maybe some final folds in your cloth or you'd have to do is start with a sphere with a lot more segments. So you get a better idea of what I mean. We'll turn our subdivision surface off and come back to our lines. You can see our folding increasing is really limited to the segment size here. Although we subdivided our original sphere quite a bit, thes polygons are still pretty big. So if we hired this guy again, I've actually duplicated this set up on another layer down here. If we turn this going on, you can see this Fear started with 200 segments, which is double the amount we originally started with. And if we switch off the subdivision surface, you can see our segments are a lot smaller now, which means we're able to get a lot more detail in there. Let's put that back on and turn off the lines, and now you can see a lot more folding and wrinkling in there. The extra geometry we've got in there is allowing us to get a lot more detail out of this. We can rewind this and have a look how it simulates with this much geometry, we'll just disable our old one. We'll just go back to the attributes tab and under basic. We just need to click off. Enable you can see are sick and set up here has a cough tag on it as well. And now if we hit play with this many segments, the simulation is going to be quite a bit slower. But look at all this extra detail, so it really depends on the look that you're after. So play around with this and see what you can come up with when you're happy with your close simulation. Don't forget you can bake this out or you need to do as in. The last lesson is just grab your Clough tag and hit delete, and now if we go back to the start, that shape is locked in, so have some fun inflating cloth and I'll see you in the next lesson.
11. Art with Free Plugins: Dual Graph: Okay, So all of the elements in this outwork were created with a free plug in called Jewel graph . This guy here. So let's take a look at what we've got here. If we pop this guy open, you could see we've got five different sphere Knowles here and inside that we've got a subdivision surface and here's our geographic. Although this one has been converted to a single mesh and we've got pretty much a similar set up here, and we've got a couple of new effects in here. We've got the Adam Array. Then down here, we've got another newbie. Its theme. Oh, extrude. And here's our jeweler Graff object. Then we've got a bevel and a similar sort of set up in our final sphere here. So let's see how this is done. Okay, Before we get started, just make sure you've got the jeweler Graff plugging installed. If it's been installed correctly, you should be able to find it up here under plug ins. And there's hours right here. So for this Blufgan toe work, we need an object to apply it to. So that's come up here and grab a sphere. Then we'll come up here and turn on the lines. It's outstanding sphere as usual. So let's see what happens if we apply this plug in straight to this, with its selected will come up here and we'll bring this in. Just remember to hold out to automatically apply it and straight off the bat, that doesn't look like it's done too much. Let's do a before and after here's before, and here's after no much difference at all. Really. Let's just switch it off again. The way this plug in works without going too deeply into the science of it is it takes three sided polygons and turns them into six sided polygons. And if we take a look at our sphere, we don't really have any three sided polygons except up here, which is where we're not getting much of an effect. But as we saw in most of the other lessons in this course, we can easily change the geometry of our sphere. Two triangles. We just need to change the type of spear to the old Icaza, he drone, and now we've got our nice, evenly distributed triangles across all sphere. So let's turn on our jewel graph and see if it does anything now. Okay, Now we're in business. You can see all of those triangles have now been converted into six sided hexagons. And it's a pretty cool looking effect, so you can apply this to pretty much any triangulated miche. Let's try some of these other types down here. Let's give Octahedron ago, and that works pretty well as well. Except we're getting a little square in here. Let's just cycle through some of these other options. It doesn't work too well with the hex ahead run. But the tetrahedron gives us an interesting look. So just experiment with this until you get a look that you like and feel free to try it on any other objects or three D models you've got lying around. We'll just carry on using this sphere for this example. Well said it backed. I crossed that he'd run, So we've got some nice even geometry. So this effect alone is probably worthy of incorporating into your next abstract artwork. But we can tweak this a bit further if you wanted these to be smaller on the surface here or we need to do is increase the subdivision. So the more segments we have, the small of these will be. And if we were to render this, we get this kind of golf ball look. But you can see the edges of these hexagons a pretty shop. So I usually elected Bevel these so it doesn't have such a computer generated. Look, let's just reset out segments. So we've got some nice big hexagons. Then we'll come up here and collapse this. We want to put this into a group. We can do that by hitting Bolt N G on the keyboard. Then we'll head over to the D formers and bring in a devil to former and we need this in the right place in the hierarchy. Right at the end should work for us, and we can see that fiddling happening. Now let's do a rendah. Those edges look a little bit shop, but if we crank up the bevel subdivisions and do one more Rendah, we've got some nice, smooth, beveled edges in there now, So let's see what else we can do with this plug in. We could try extruding each one of these faces here. Let's come up here to the McGrath menu, and we'll bring in a mo extrude. Then we want the extrusion effect to take place before everything else. So let's move that into this position. And now we're getting a pretty interesting looking object, although our machine has slowed down quite a bit, and I think that's because our bevel is applying itself to every edge of this object. So let's just turn that off for a second. While we work on Elmo extrude, we can adjust the amount of extrusion we've got on him by coming to the object tab, and we just need to bring this value up so you can get some pretty interesting looks with that. And we'll want the bevel effect to effect just the edges of our object. So let's turn that guy back on and you can see it's a little bit slow. There we go. We don't want all these bubbles in their slowing things down. So, like we did in the last class, let's click out Bevel and we want to turn on use angle and you can see straightaway that works for us. I also like to put the limit on just to make sure there's no strange things happening in our geometry. Okay, let's give that Orender, and that's looking pretty cool. I'm sure you can have some fun with this effect, so we'll turn off theme OIC Street for now. The next effect I want to cover is turning these edges into kind of a wire frame, so we won't be needing the bevel for that one. Let's turn that off and we'll grab out Jewell graph and head over to this menu. This time we're going to bring in an atom array, so just hold out. So it's automatically applied. And now all of our edges have been converted to these little Adams, and you can adjust all of this. This controls thesis ill in the radius. This bit here, and you can also scale the spheres just like so. But I like to bring this all down together. So you're just left with the wire frame effect. Something like that. We can render that so there's a quick, easy shape to create for your abstract artwork. Another great thing about the setups we've seen so far is that they're all fully procedural . So at any time you could come back to your sphere and change our segments for example, and get a completely different look without breaking anything, so you really only limited by your creativity. You can also get some really interesting looks by using this plug in with cinema forties modelling tools. So let's give that a go. We'll come up here in turn off L. Adam Array. Then we'll come back to us, fear and reset the amount of segments. And rather than using a boring old spiel, let's deform this shape. So we've got something a little bit more interesting to work with. So without sphere selected, we're going to use a new two former that we haven't looked at. We're going to use the displaces two former, so we'll hold shift to automatically apply that nothing happens at first. But if we come over here, we can control the de formacion with a shader. So let's click this little arrow here and bring in a noise. Shader. And you might have noticed a very subtle de formacion happening up here. And if we go to the object tab, we can bring the strength of that de formacion up a bit and you can see that now. And if we go back to our shading tab and click into our noise. We can control this deformation with these settings here at the moment. It's being driven by this noise pattern here, but we can change that. As you can see, Cinema 40 has plenty of inbuilt noise generators. One of my favorites is the Lucas Shader. Let's give that a go, and that's given us a pretty cool look. And of course, we can change the scale or any of these other options. So, again, just experiments until you get something interesting. You could even animate the noise by putting a value in here. And if we play that, you get this blow. Be looking mess. But we're creating still artworks and not animations. So let's get rid of that. Good to know it's there there, so I'm pretty happy with this shape. So let's see what else we can do with this. To use their modelling tools on. This will need to convert it to a polygon mish. So we'll come up here to our Jewell graph and right click, and we'll do a current state to object, and that's created a new mesh force. So let's grab that and drag it out of there. Then we can hide this and collapse these guys. So the only thing we've got now is our deformed mesh here. So let's start remodeling. We'll make sure we're in our polygon mode so we can select these faces. We want to select all of them. So we'll hit control a on the keyboard and you can see they're all highlighted now. And now if we right click on one of our faces will bring up the modelling tools we can use , and we won't go through all of these in this course. But I'll show you some that I've used to get pretty cool results here. We'll start with the extrude inner, and we've got our tool options down here. We don't want to preserve groups. I want to apply this effect to each face individually, so we'll turn that off. And now if we click out here and drag out mouse, we can apply that effect, and it's basically extruded inward. So we get a nice gap between all of our faces and now what? We've got all of these faces selected. Still, I want to extrude them in would So let's right click and grab another tool. This time we'll describe the extrude, and now we'll click and drag this in something like that. And now we've got kind of a honey Karen look, which is kind of cool by itself. But we could make it look even more interesting if we add a subdivision surface. Several hold old when we bring that in, so it's automatically applied and check that out. Let's turn those lines off so we can see this a bit better. We've now got this pretty unique looking organic shape, and we could probably spare this out a little bit more if we bring those subdivisions up to , say four. That's looking a bit smoother, so you could definitely incorporate this into your abstract art. And if you wanted this to be even smoother than this, we can grab out Jewell graph and come up to the formers will bring in a smoothing the former don't figure to hold shift, and that's probably smoothed it out a bit too much. It looks like some creepy alien eggs Sacco something now so we can come down here and adjust the stiffness of our smoothing to former. That looks pretty good. Let's do a quick before and after I like it. So let's try some other modelling tools and see if we can come up with a different look. Let's undo a few times until we get back to when we used the extrude enough. So this point here, let's see what we get. If we extrude outward instead of inward and again, we'll add a subdivision surface. And now we get this look, which is pretty interesting again. We can smooth this out. So with just a few tweaks, you can get another pretty interesting looking abstract artwork. We could throw a smoothing to former on there as well, and there's our alien exact again. Let's tweak that something like that. You could even extrude these out even further, and now we've got a bit of a spiky thing going on. You can have loads of fun playing around with this. What if we turn off the smoothing that's looking pretty abstract? Cool. So I'm just going to show you one more technique I used in my artwork. Let's just undo to the same point again, and we'll take a look at one last modeling, too. Let's right click. And this time We're going to use the matrix extrude surf. We click and drag. It's definitely extruding. Let's pull back a bit. You can see it's created all of these cool, curvy extrusion, and we can adjust that curvature with the rotate down here. Sir, if we change this, it's changing that angle. Or we could just zero that out to create some nice spikes. I think I prefer the curly ones, so let's just undo that now. I think we've covered all of the looks that I had in my artwork. So play with these techniques and see what you can come up with with the jewel graph Plug in. I'm looking forward to seeing your abstract creations. That's it for this lesson. Oh, catch you in the next one.
12. Art with Free Plugins: Easy Chesterfield: So here we are in our final at work. We've got a couple of simple shapes here that have a lot of extra detail. And this is made possible very quickly and very easily with a plug in called Easy Chesterfield, which basically gives you that Chesterfield sofa Kinda. Look, you've probably seen this kind of effect quite a bit on social media these days. So let's see what we've got here. Let's pop this over. And we've got two spheres and a Cuban knoll in here. So we've got this sphere one, which is this big sphere here. And then we've got a cloner here which is cloning all the buttons onto the surface. Here. We've also got out easy Chesterfield object here, which uses a bull and a subdivision surface. Then we've got a pretty similar set up for our second sphere. And then our cube has a slightly different set up, as you can see over here. So let's see how it's done. Okay, Before we get started, just make sure you've got the easy Chesterfield plug in. Installed correctly, you can find a link to the free plug ins in the resources. Pdf When it's installed correctly, you should be able to find it under plug ins, and here it is. So again, we need an object to apply this plug in to and again we'll come up here and grab a sphere. Then we'll go up to display and turn the lines on. Then, as usual, we need to change the sphere. Type two i casa he'd run. So we get that nice, even geometry. So the way this works is every point that we select on our object. When we apply the plug in, it will be Chesterfield ized. Not that that's a real word or anything, but basically meaning each point will be pushed into the miche. Let's just give it a try so you can see what I mean. First will just bring the segments down a little bit, and now I want to select all of these points. But to do that I need to convert this to a single mesh. So let's right click on our sphere and will make it creditable. Then I'll switch over two point mode so we can select these verte sees. You can manually click on the ones you want. I'm going to select them all. So I'll just hit control a on the keyboard. And then we can come up to plug ins, easy Chesterfield and will create Chesterfield and you can see that's had an effect already . Let's go and turn those lines off and we'll switch over to object mode, and now you can see it's starting to look a little bit. Chesterfield E. Let's go and check this out. You can see it's created a subdivision surface up here and inside there. We've got a bull. Then we've got else fear. And here's our easy Chesterfield controls, so we'll grab that. And down here under properties, here's where we can mess with some settings. Firstly, we've got this radius here, which is to do with the radius of their whole. So we'll bring that up and you could see that spreads out of it. Something like that. Then we've got the height, which is more or less how deep this goes. So already we're getting a lot more detail in our sphere. The next option we have here is the height segments, which, to me, doesn't really work the way you'd expect it to. It tends to just break everything so I don't really use this option. The rotation segments, on the other hand, can give us some extra segments around their whole. So when we bring that up, we can get a lot more detail in there. And now that's starting to look pretty cool. Finally, we have the big percent, which kind of digs in the area around their whole, which can also give you some pretty interesting looking results. You probably don't want to go too crazy on this setting. I might just bring that back down a little bit. Something like that. Okay, that's pretty much the gist of this plug in. But like any good sofa, we can also put some buttons into these holes, so to do that will first need a button. So let's come up here and bring in a cylinder and it's come in way too big. So we should probably hired this guy where we work on this. Let's bring that radius way down to something like four, and we'll also bring the height way down to about three. Then we want around our cylinder out of it, so we'll go to the Caps tab and we'll turn on the Philips Let's zoom in so we can get a better look at this. We might bring the cap radius down a tad. Then I might hot back here and make it a tad thinner. That looks pretty button like to me. Then we might as well rename this guy. Let's cool it button. Then we can switch out Sphere back on, and our little button is inside our sphere at the moment. So this plug in has a handy little feature to help us distribute these buttons into all of these holes for us. So let's come up to plug ins, Easy Chesterfield. And we want to grab the button. Kelowna. And that's him. Here. Here's the settings down here. We need a point selection and an object to clone. We already know what the object is going to bay. We'll grab our button and drag it into that. And now we need a point selection, which is going to be each one of these guys. And lucky for us that point information has been saved into a sphere. This is the tag right here that the easy Chesterfield plug in has created for us from our original point selection. So that's grabbed that and drag it into here and straight away. You can see all of our button clones. They are pointing the wrong way and quite inside the holes. But we should be able to fix that. We'll adjust the offset first and get them where they need to bay about there. And now we can work on flipping these guys. We'll just grab out button. And it's just a case of changing the orientation. Plus said, Looks right to me. And if we go in for a closer look, they are still floating off the surface slightly. So we'll go back to our button Kloner and tweet that offset. And that looks about right, and that's pretty much all there is to it with this plug in. But the cool thing is, this works on pretty much any geometry, so quickly show you another example before we wrap this up. So we're back here in a fresh scene and this time will come up here and will be adventurous , will bring in a cube instead. Then we'll need to see our very disease so we'll come up to display and turn the lines on. We don't have any subdivisions in there yet, So let's bring all of these up to four. Cool. We also want these edges to be nice and round. So let's add a fill it and we probably don't need so much subdivision in here. Let's bring that down a tad. So our geometries nice and even something like that, then we want to be able to select some of these points. So we need to come up here right click and make creditable. And now I want to select a few points on every side to apply our effect, too. So we'll go over two point mode and we'll grab this one and this guy and maybe every second point going around. And sometimes these are a little tricky to grab, so you can just zoom in a bit. So we'll continue grabbing these guys, then one in the middle. So we've got a total of nine and we want to make this selection on all of the sides, so I'll just go ahead and do that super quickly. Now we can add out Chesterfield Effect, so plug ins, easy Chesterfield and create Chesterfield. Then we'll switch back to object mode, turn the lines off and this is what we've got now. So you want to dive into those settings? We'll bring that radius up. Probably dig in a little bit more until we've got something like this. And actually, we could probably do with a bit more detail in here. So let's get back to our settings and we'll bring those rotation segments up. So we've got a bit more creasing in there. So this time we're gonna put some spiky studs in there instead of buttons. So back up here this time we'll bring in a cone. We want to be able to see that. So we'll hide this guy, and now we can scale our cone down so we'll grab him and bring the bottom radius in. Then we'll bring that height way down around. That looks right now. This time we're going to do things a little bit different. Instead of coming up to plug ins, just a field and adding a button cloner, we're going to use a monograph Kelowna instead. So we've got a bit more flexibility. So let's bring one of those in McGrath off Kelowna and will hold out when we bring that in . So it's automatically applied to our cone like so then we'll set this up in a similar way to, well, button Kelowna. We just want to change the murder to object. Here's our objects lot. We need to put the Cube into that, and you can see that's cloned all of l cones onto the surface of a cube. It's probably easier to see if we turn that on. That's all well and good, but we want our clones to appear only on the Vertex is we've selected. So all we need to do is change the distribution from surface to Vertex. And now there's a clone on every vertex of acute. But we just wanted on those very Texas we grabbed earlier. So if you remember from before, we have our point selection tag generated by the plug in over here so we can just grab that and drag it into the selection down here, and we pretty much get the same effect again. We need to change the rotation so we'll grab Alcorn and switch the orientation to positive Zed. And now we've got a pretty gnarly looking studded cube. It's a pretty simple effect, but it can make your geometry look a little bit more interesting. Also, if you wanted to offset these, you can do it. Just Azizi in the Kelowna. Just go over to the Transform tab and adjust the transform settings here. I believe we need these that excess. So if we tweak that, there we go and we could swap the cone out with any other object we want. Let's just grab that and we'll bring in a tourists. If you hold old when you bring that in, it will become a parent off the current and automatically inherit its position settings. It's also come in huge. Let's move out cone out of their. And now our tourists and Conan are in the same position. So will come down here and shrink out tourists down a bit. And we'll make it a bit thinner with the pipe radius. Something like that. Now we've got two objects in our Kelowna, which is why we're seeing them like this. Let's fix the orientation of our tourists. That's better. And if you want to both of these objects to distribute randomly on the surface here or you need to do is go back to the cloner and this is another reason why the cloner is a bit more flexible. We just need to come down to the object tab and under clones, we need to change it from its right to random. And now you've got a random distribution and you can offset the seed to get a different result. But now you'll notice that our spike is embedded nicely. But our tourists is floating in the air. So you remember before we fix that under the transform here. But if we tweak that, it'll affect all of our clones. So the way to offset these individually is actually quite easy. We'll just grab our tourists and hit old G on the keyboard to put it into a null. And all we need to do is move this within. L know. And we can just position this where we want it without affecting l other object. So have a play with the easy Chesterfield. Plug in and see what you can come up with. That brings us to the end of this lesson. I'll see you in the next one
13. BONUS: Art with Cinema 4D: Render Template: Okay, so here's your cinema 40 Abstract, our template Project file that you can use as a starting point for your own abstract artworks. It's basically a scene that I've pre built for you to save a bit of time. I've applied some of the settings I use in my own work. So let's walk you through the set up and you can get straight into creating your next masterpiece. Firstly, you can see we've got one of the artworks from the course in here. This is just a placeholder. You can replace it with your own artwork or just tweak this one if you like. Let's turn the camera off and take a look at the rest of the scene. So this is a pretty standard studio set up. We've got our artwork in the center and a big infinity wall over here. This is the kind of thing you might find in a realigning studio, and apart from being a great backdrop, it also bounces the light around, are seen and gives it a more professional look. And if we take a look out here, we can see our scene is being left by a HDR image, which is basically a big light emitting image wrapped around the entire scene. Okay, so let's take a look at these elements under the scene. Knoll in our objects panel, he is our sky object and the HDR image that sliding out scene. The HDR image itself looks like this, and we've got out backdrop elements. And these are the objects that make up our infinity war. So feel free to go in and tweak some of these. But I've tried to make this set up as user friendly as possible. Sir, if we take a look up here now scene you can see we have this fancy controls tab over here that gives you easy access to some of the more important settings. Just by changing this, we can adjust thesis een light intensity. This just makes our hdr image lighter or darker. We can also rotate the lights in our scene with this control just like that and we can adjust the length of our backdrop as well if we need to. And we can also adjust the curve of our infinity war so you could even flatten this out and make it look like a normal room. Okay? that's that. Let's take a look at how this renders. Let's get back up here and turnout camera back on. And you might have noticed the colors change just a little bit when we turn that on and I'll show you why. If we click out camera, I've just turned the white balance up to warm the image up a little bit, and that gives us this slightly orangey look. Okay, so let's set up a render window will come up to panel, and we'll make a new view panel and then we get this little pop up. But let's grab it here, and that will allow us to reposition our window. Well, Plunkett, in here. So this is going to be our render window, and we'll keep this one open so we can interact without seen. So with our render, windows selected will come up here and hit Rendah. It should render in whatever window you have selected, and you'll get something like this, which should be a nice little starting point for your scene. You'll also notice that we have a bunch of materials down here included in the scene set up so you can use those or create your own. If you do plan to be re text oring, I'd recommend using the interactive Render Region. You confined that up here. This guy right here and that should be applied to your selected window. It's basically designed to give you more interactive feedback while you're lighting and texture ring, as you can see here. So, for example, if you wanted to apply another material, we'll grab this gold one and drag it onto here. We should get some pretty fast feedback, and there it is. This will become a lot faster than stopping and starting Orender. Every time you want to look at this and because it's fairly interactive, we can come back to our seeing controls and tweak some of these. Let's try rotating the light and you could see that update in the view port and then the render catches up. There we go. Okay, so that's the gist of that. Let's switch our interactive render region off and then we'll take a quick look at our Renda settings. Let's just move that down here. So at the moment we've got our scene set up to render for Instagram. So we're 10 80 by 10 80 we're rendering just the current frame. So no, I have a look under save. Here's where you can change the name of your output file at the moment that's set to open in Excel, which is great if you plan on doing any post production on your image. Otherwise, you could change this to something like JPEG. If you plan to export straight out to Instagram, we've also got global illumination enabled, which would give us some nice, realistic looking lighting. You can go in and change those settings if you like, but I've made a few presets for you down here or you're working in tweaking your materials . I'd keep it in the Instagram preview mode here and then when you're ready to render, switch it over to this one, and that will make the render a bit slower. But the quality will be much higher, and actually the only differences in these settings will be in the global illumination. These will be much higher settings, and our anti alias ing will also be set much higher to give us nice, smooth edges. And that's about it for this set up when you've got your artwork in there and you're ready to render. Just come up to the Render menu here and then down here. Render to picture viewer, and that's going to export your new abstract art masterpiece. And that's it for this lesson. Don't forget to upload your final image. I'm looking forward to seeing what you create.
14. BONUS: Art with Octane: Render Template: Okay, so here's your obtain abstract art template Project File that you can use as a starting point for your own abstract artworks. It's basically a scene that I've pre built for you to save a bit of time. I've applied some of the settings I use in my own work. So let's walk you through the set up and you can get straight into creating your next masterpiece. Firstly, you can see we've got one of the artworks from the course in here. This is just a placeholder. You can replace it with your own artwork or just tweak this one if you like. Let's turn the camera off and take a look at the rest of the scene. So this is a pretty standard studio set up. We've got our artwork in the center and a big infinity wall over here. This is the kind of thing you might find in a realigning studio, and apart from being a great backdrop, it also bounces the light around, are seen and gives it a more professional look. Okay, so let's take a look at these elements under the sea knoll in our Objects panel. You can see we've got an octane sky object here, lighting out seen. It's got an octane environment tag on it, which is piping in a HDR map. And if we click into this, we can see what the HDR looks like. Just a simple studio set up and we've got out backdrop elements, and these are the objects that make up our infinity war. So feel free to go in and tweak some of these. But I've tried to make this set up as user friendly as possible. So if we take a look up here now, a scene you can see, we have this fancy controls tab over here that gives you easy access to some of the more important settings. Just by changing this, we can adjust thesis een light intensity. But because this is an octane sky and not a native cinema four D sky, you won't see it update in the view port. But when we fire up the octane live viewer in just a second, you should be able to see that we can also rotate the light from these controls here. But again, because it's octane. You won't see that update in the view port again. We'll take a look at that in the live viewer. We've also got some controls for the backdrop here. We can adjust the length of it like that, and we've also got a setting to smooth the curve of the infinity wall out So you could set this to zero and make it look like a normal war. Let's just undo that, Okay? Let's fire up our octane live viewer and do Orender so we can play with some of these settings. Let's turn our camera back on, then will come up to plug ins Cinema 40 octane and we'll grab the live viewer. Let's just move this window up here. And if we grab it right here on these little dots, weaken dragged that and docket over here. Then we'll stop this up by clicking this button. And here is our beautiful abstract artwork, and this is pretty much ready to go and you can see down here. We've also got a whole bunch of octane materials included in this project Fall. Feel free to use these or create your own. If you want to change this, it's pretty easy. Just grab one of these and drag it onto the object you want to change, and that's going to update instantly in the live you are, which is what makes obtains so great. So bring in your own abstract art or tweak this one, and you're pretty much ready to export. Let's just pause the live view of female, and we'll take a look at some of the obtained sittings. These are pretty much the default settings for most of the work that I do feel free to tweet, thes as needed. Some of the settings you might want to tweak Ah, the max samples. You might want to bring this up for your final render, but generally I find 1000 samples is pretty good. In most cases. If you just want to get a quick render out, you might also want to tweak the diffuse step and speculative. This is basically to do with how many times the light bounces around your scene, so you may or may not want to crank those up. Obviously, the more samples in all of these thesis lower the final render, so let's leave everything else as it is. We'll close that and we'll take a look at our seen render settings. Let's move that down here. You can see rules set up for Instagram 10 80 by 10 80 we're just rendering the one frame under save. Here's where you can type the name of your amazing artwork. It's currently set to open the X R, which is great if you plan to do some post work. But if you want to render it straight into Instagram, you're probably better off choosing something else. Like JK. If we take a quick look at the octane render sittings, I've pretty much left these on default. We're not using any render passes for this, but you can set that up here if you like. Okay, let's just close that up. I think we're just about ready to render this. Let's just quickly fire up the lie viewer, and we'll have a quick look at some of these seen controls. Let's come down here and tweak the light intensity and you can see that's updating in our live viewer, but we've turned it off there. Let's undo that. Then we've got the light rotation so you can easily spend that around and get a different look. That looks kind of cool, actually. Well, I'll do that, and we'll also just play with the smoothing of our backdrop. Let's just make it a flat floor for this Renda. And you can see that in there now. All right. I think we're ready for our final output. Will pause our live You are and will come up to render and render to picture viewer. And that is going to spit out. You're finished Artwork. So tweet this at work Or bring in your own stuff. Hit, render and you are good to go. That's it for this lesson. I'll catch you in the next one.
15. BONUS: Art with Color Palettes: Extra Tip: Okay, so one final tip. When you come to texture in your abstract artwork, I'd recommend keeping the amount of materials you use to a minimum. If you go throwing on loads of different colors and styles, you'll end up with a pretty messy look, so you might want to come up with the color scheme and create a color palette for each artwork. There's some good color palette tools online, which are linked to in the resources pdf such as colors, a dot CO, a derby color and my color dot space. You could even do a search for color palettes on interest, or you can create a color palette from another artwork. Let me show you how to do that. So back in our scene, let's come down here and create a new material by double clicking in this space, and we'll double quick again into our new material. And up here in our color channel. Cinema 40 comes with a bunch of preset color palettes that we can use if we click on this little icon up here. This is the cinema, 40 color swatches and this colorful. It is the default one, and if we click here we can load in another one. Here's some more handy presets that come with Cinema 40 so you could choose one of those. But we want to generate a color palette from an image or an artwork that we already like. And this little button up here does exactly that. This is the color from picture, and if we click on that, it's asking us for an image. So I'll just grab an image from off the screen here. This could be an image of any artwork you like, or just an image where you like the color scheme. So we'll drag that into here. I'm just using one of the images from the course. This is a HD image, so it's pretty big. But if you double click on this window, it should scale to fit and that you go. So now we want to sample some colors out of here to add to our color palette. So if you look here, you can see this little ring icon. This is our color picker, and if we grab that and move it around, you can Plunkett on a color you like, and you can see that update up here and in our material preview over here, and you can also see it down here in our pellet. And if we're happy with that, color can come up here and hit the plus button and add in another one. Then we'll just move this over another color. Let's say the green this time, and now we've got two colors down in our palate so you could just repeat this process until you're happy with all your colors. But this can take a little while, and it's a little bit tricky to pinpoint the exact color you want. So there's actually another little feature that's gonna make our life a lot easier here. This little guy here is the mosaic mode, and if we turn that on, nothing much is gonna happen at first. But if we bring this detail slider down, it's going to blur all those colors together into big chunks, and that's gonna make it a lot easier to select the colors we want. So now we can add another color picker and just move that onto this color. You can even hold control and click on a color to automatically add a color picker. So you can very quickly just select a bunch of these colors to add to your color palette. And when you're happy with your selection here, you can just click this little icon and save it as a new palette. And if you stick to using colors from your palate that you know already work well together , you should end up with a beautiful abstract artwork. We went by the saving L palate because we've already used those colors. But let me quickly show you How do you apply these to your materials? So we've already made this material that brown color. Let's double click down here and make another material. And with that selected back, you know, color before we need to do is pick a different color. We'll go the green. Then we'll do one more double click down here. This time we'll go this color, and you can very quickly build up a bunch of materials or based on your nice color palette . Let's close that off. Then we can just start applying these, and that brings us to the end of this course. So good luck with your abstract artwork, and I'm really looking forward to seeing what you come up with. So hoping the Cinema four D and start creating your next masterpiece
16. Thank You: Thanks for watching. Don't forget to post your final render on our Facebook group. And if you share your creations on social media, you can tag me at C G Short cuts. It would be amazing if you could leave me a review. And if you need help with anything or have an idea for a future course, please get in touch. You can find us at all of these places. I'll catch you next time.
 Dave Bergin, CG Artist - CG Shortcuts