Transcripts
1. Welcome: Well, hi, friends.
Thanks for stopping by. Welcome on into my studio. My name is Kerrie Sanders, and I'm an artist and
teacher here in Utah. And today, I have for
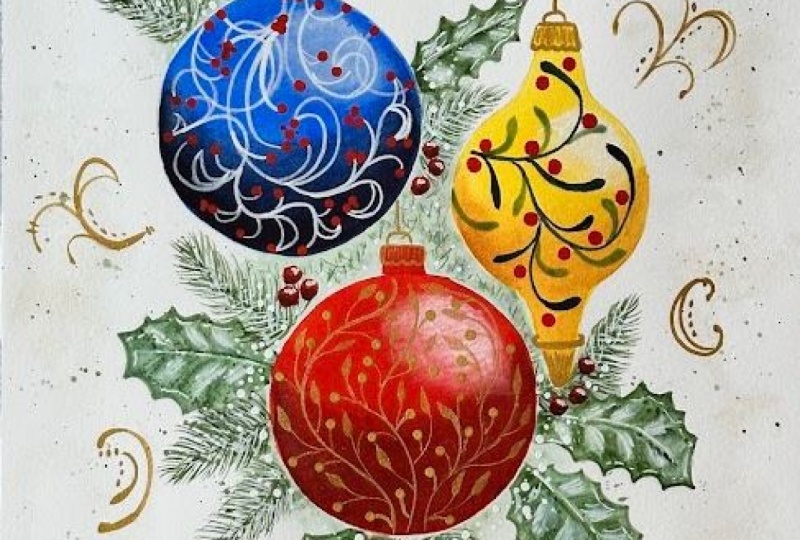
you this adorable set of ornaments that are covered in lacey scroll work
that's so fun to do. And this is a great class
for people of all abilities. I'm with you every
step of the way, and I post my classes
in real time, which means you're in control. You can speed them
up, slow them down, stop and start as needed
to make sure it's the most comfortable
experience for you personally. You know, I've been teaching
for many, many years. I have published an art
book that went across the nation and pattern packets that were sold in
a big box store. And I have learned over the years that
really, as a teacher, the most important thing
I can do for you is to make sure that I teach
you something valuable, and I help you
sharpen your skills and have a wonderful
experience in the process. And so I truly try to make that my goal as a teacher in
every class that I teach. If you would like to see
some of the classes that I have for you here
on Skillshare, well, here's a few that I
have posted here, some of the holiday classes that'll be fun for the season. But you can simply
go to the top of this page and type in my
name, Carrie Sanders, and all the classes
that I already have here on Skillshare
will populate, and maybe something
would be interesting and we could spend
more time together. That would be awesome. Also, if you would like to
give me a follow, then you'll just
get a little ping whenever I put out a new class, and you can see if that is
of interest to you as well. If you'd like to take a
look at my website to see what's happening in the world
of Carrie Sanders, well, I would love to see you
there, and it is Sanders art.com and Insta at
Carr Sanders art. I sure hope you'd like to join
me for this class, though. If you do, we'll be doing
some fun things like washing in, highlighting,
shading, glazing. And, of course, we'll be doing splattering, my favorite thing. And like I mentioned earlier, we'll be using Brusho. If you haven't used that before, it's really fun to use. And, of course, we're doing all this lacework
with our liner brush. And if you're not comfortable
free handing, that's okay. I provide for you a full pattern so that you can use that if
you would prefer to do that. Alright, guys, if you'd like to take this class,
then come join me. Let's go to the next video
and get started together.
2. Class Project: Okay, my fellow
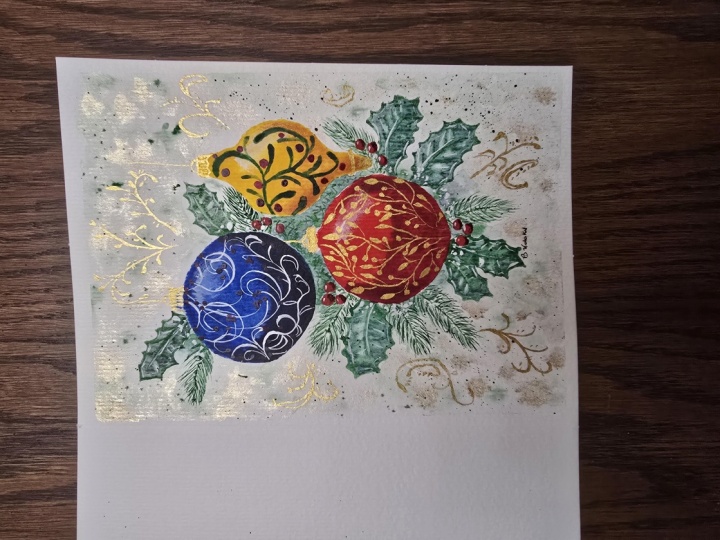
friends and artists, your class project today is to complete one set of ornaments, and you can do this by following
my video step by step. I'm with you all the way, beginning to end,
every little detail. And you have the ability to speed up videos, slow them down, stop and start them, do
whatever it takes to make it the best experience
for you individually. When you have finished, if you could take just a moment to snap a pick and upload that
into our class gallery, look for this button on
this page of Skillshare, and they make it real easy
for you to upload that. Don't be shy. It's so
fun for us to see what each other has accomplished and give each other some
praise and some love, nothing but love,
no judgments here. You know, we as
artists just don't get appreciated enough
for our artwork, and you are all
talented and creative. And I sincerely would love to see what you
have done and have the ability to go in and
communicate with you there. That gives me a
little notification, and then I can go in and
make comments on your piece. And also, that's also a
great platform for you to ask me questions or make
comments to me, as well. So please take a
moment to do that. It would be so fun to
see what you've done. All right, thank you for doing your class project and uploading it into our class gallery.
3. Supplies & Pattern: M let's let's do a quick
review of supplies. And first thing I
want to talk about is graphite paper that
I'm going to be using. I'll be using some trace down, but I noticed that the
price really went up, and so if you can't find it
or don't want to use it, that's fine. Use
whatever you have. I did find this brand Serrel, which is also wax free, and so I'll be using this,
and I bought some in white. So I'll be using the white
on our blue ornament, and I'll be using this
trace down on the others. But use whatever you have,
that's totally fine. I like to share what I'm using in case you
want to try it. I have provided for
you on this page of Skillshare a PDF of our pattern, as well as a color copy
of the finished product. I'll also post it on screen
so you have to refer to, but you need to
print out a copy of the pattern and then
get some tracing paper, and you will trace the pattern onto a sheet of tracing paper, and that's what we'll use to apply the pattern to our watercolor paper
using the graphite. And I'll go through
that with you later on. Today, I'm going to be
using a watercolor block. A block is just when your watercolor paper is
glued on all four sides. That way, I don't have
to tape it down to a board and take up extra
space in my filming area. But I am going to be
using 100% cotton paper, which I love because it
expands and contracts and absorbs the water and the paint and does a lot of the work for you,
which is great. And also, I'm using a hot
press versus a cold press. Hot Press is just a smoother
surface than the cold press, and either one's going to be fine, guys. It doesn't matter. So that's just what I'm
going to be using today. And then as far as let me
make this white for you. There we go. As
far as brushes go, this way, you can see the
tips a little bit easier. I'm going to be using
a variety of flats, so I would say you would
probably need something small and something in between and definitely
something on the larger side, a half inch or
three quarter inch. So use what you have. And
then same with some rounds. This is a number six
and a number four, and I'll be using both of those. And then you'll definitely want a liner brush. This
is a number one. And some type of detail
brush, you can see, it's also thin, but
it's just shorter, so you can do fine details. So you can do fine details, and that is a five ought. And then we'll be doing
lots of dots today. So I will be using a stylus. I have two different ones, and so it gives me four
different sizes to work with. And you might need a pencil
to do some scroll work with. And if you do any erasing, make sure you have
a needed eraser or a soft rubber eraser. I like to use a black wing if you haven't treated
yourself to a nice pencil. This is my favorite. I don't get paid
for saying that. I just like to share
what I like using. All right, you're
going to need a couple of things of water
to make sure you have to make sure you have a fresh water
and a dirty water. So clean your brush really well. And my favorite tool ever
and always is tissue. We're going to need lots of this because we're doing lots of splattering and wet on
wet technique today. So gather your supplies, and let's talk
about the palette. All right. Let's do a
review of our palette. I do have this on a supplies PDF form for
you that you can download. And it tells you the
brand of each type of paint I use in case
you want to follow that. But use what you
have. Guys, don't go out and buy a ton of paint. So one brand that I am going
to make a special note of is this first one TraverteOly because Traverte is
lighter or darker, depending on what brand you use. And I'm going to be
using Windsor Newton. So you can see it's
a light color green. So just use a light colour green or you can use this
Windsor Newton. And hookers green, cobalt blue, indigo, cad red medium,
they're all about the same. A lizard crimson,
cad yellow medium, they're all about
the same as well. Quinacrinin gold, and then for all the gold scrolling
that I'm going to be doing, I'll be using this kind
of a medium shade. There's all different golds, as you can see, and I
want it to show up. So I'm using kind a medium, not the darkest, but the medium. And then of course, you know, I love to use doctor Martin bleed proof white because
it's very opaque. You can use white gouache, but it's not quite as opaque. So I prefer this bleapof
white. It's very versatile. Then if you choose to do the
background the same as I do, I'm going to be
using this Brusho It's BRSHO Brusho sprinkle. Kind of it's a powder, and it's a really fun technique. It gives you a total
different look than splattering with gold. But if you don't want to
use this, that's fine. Just splatter with gold, and that'll look great. So go ahead and gather
your palette together, and we'll go ahead and
apply the pattern next. Okay, I've traced the pattern onto a piece of tracing paper, and I've just taxed that down
with a little bit of tape. I'm making sure I put the correct side down
against my watercolor paper. And just slide that
underneath. Like so. I'm going to use a stylus. You can use a pencil or pen. It doesn't matter. A stylus
just preserves my pattern, so I can use it over
and over again. And actually, the first thing
I'm going to do is now, you can just trace your circle. I'm going to use a stencil, just so I start off with
a nice beautiful circle. If you don't have a
stencil, that's okay. No, you can use the
bottom end of a jar, or, like I said, you can
just follow the pattern. That's right. Yeah,
I'm just gonna check that and make sure
that showed up. All right. That one, I'm just going
partially on the sides. Great. Okay. Now, I am not going to trace
any of the scrolls. So just do the outline
of the ornament, do the outline of your holly leaves and an
indicator where the pine bow is. I'm going to speed up the camera just for this
portion because it's really boring to watch
somebody who is tracing.
4. Holly: Four Okay, I have on
my palette era verte, bookers green, and indigo, and I'm going to be
using a medium flat, and my number four, we're going to go ahead and
start with our holly. So let's go ahead and pick
up some of this averte. This paint does not have
very much pigment to it, so I'm going to actually
use quite a bit of paint. I'll be using ratios
throughout this class so that you can try to match what
I'm doing with the paint. So this is probably
going to be about, oh, 80 20, 80% water, 20% paint. And we're going to go ahead and go ahead and basically
fill it in as a wash. Now, a wash is when you just fill something in all
one color value. So we're not gonna try and do anything fancy schmancy
right off the bat. It'd be a good way for us
to get warmed up, right? And don't try to make
it, like all even. I want those brush
strokes to show. It's gonna add texture
and some interest. The thing I want you
to be careful of is do not get it on your
ornament, please. If you need to leave
a gap, leave a gap. But green is kind of
hard to pull off, so we don't want to get
it on our ornament. Okay, so now we
have our era verte. Let's come into our
Hooker's green. This is going to be This
has a lot of pigment, as you can see,
it's a lot darker. This is going to be
more like a 982, 98% water, 2% paint. And we're gonna come in. When you see me touch my paper, I'm just pulling
some extra liquid off. And let's go ahead. Come up on a chisel
chiseled edge when you're straight up and down on
just that very thin edge. And let's just kind of put it indicate where that vein is. And then just kind of pull down a little bit
here and there. I know it's gonna look funny for a minute, so don't panic. It's okay. You're gonna be like, are, what are you doing to me? Trust me. It's gonna be fine. Now, let's go ahead
and pick up our round. So more of that Hooker's
green at a 982. And we had to kind of
almost outline it. Now that we have that
little bit of an outline, I'm just using
water on my brush. I rinsed out my brush,
water on my brush. And we're just gonna
what I call noodle it. We're just gonna noodle
it a little bit. I'm gonna leave parts of it with the light green,
that tera verte. We've got one kind of
a streaky veiny look. And rinse out your
brush frequently, so you're just
working with water. Now, guys, there's no
right or wrong to this. I know you're gonna feel
frustrated for a minute. You're gonna be pros by the
time we finish our holly. But the first one,
you're gonna be like, Oh, this looks weird. I'm frustrated. It's okay. Trust me, it's gonna be okay. We're gonna come in
and we're going to add more highlighting and
a little more detail, a little more shading, and you're gonna be,
Oh, I get it now. I see it now. So don't worry. Now, I'm just taking
water on my brush and I'm strengthening some of my
highlight by lifting off, so I'm touching and pressing. Let me see how that lifts off. I'm only doing that where
some of the tera verte was just to emphasize some
little highlighted areas. Touch and press. There's
no right or wrong. Wherever it works on
your paper is just fine. I like the tips to be
a little bit lighter. See how that water
just lifts it off. But we left some dark
areas. And that's perfect. That's beautiful. Good job. Okay, we're gonna leave
our pine for now. Let's come in and do our next holly picking
up Tera verte. I like doing these with my flat because I can see that nice point. You
can get on those. Again, be careful. Be careful of your ornament. Let's just fill that in, keep it nice and textured looking pick up a little
of this hooker's green, put in our veins so we
know where we're going. Always like it dark
down by the base. That would be more
of a shadow area. Good. Over to our round. I'm going to emphasize this
thing a little bit more. Just water on the brush. Streaky. Make it a
little bit streaky. Keep your highlighted areas. I'm only going to
remind you to talk you through a couple, and
then you'll be a pro so Now, let's lift off
some highlights. So just water on that brush. We'll come and press and lift. See how that
highlight comes out. Beautiful. Just here a
little there, a little. Great. How'd you do?
Was that one easier? Hopefully, it was. All right, back to our Terra
verte. Here we go. I love this color. I use this color for a lot
of sagebrush and greenery. Hey, be real gentle up
against your ornament there. I actually usually leave a little space and
then come in after. Okay, and I'm just texturing
it up a little bit, so it looks bumpy. Alright, Hooker's green. Just water on our brush, almost picked up
more green there. Oh Right now, I am going to pick up just a
tad of this hookers green, and I am going to do
a very light outline. Then I'm just gonna
have water on my brush. And I'm gonna come
over to this outline and just pull that
in a little bit. See how just tapping
that a little bit. Putting water on your brush and then touching a hard
edge will soften that. And I just want that
to be a little softer, but it defines that outer edge. I'm going to just
define this edge. I just really like a
sharp point on the holly. Picking up water
on my brush now, I'm just gonna soften that
hard edge a little bit. That feels better. Okay. Onward. Now, down here, we have this holly is on
top of the other one. And we're gonna curve our vein. Okay, do a little outline. I just water on my brush. How are we doing, guys? Doing okay. Getting
the knack of it. You might still think it
looks ugly, but trust me, it's gonna be great.
We're not done yet. Okay, so we're gonna
let that dry a little bit skip that one,
come over to this big one. Just so the two don't blend. This is a big one,
isn't it? There we go. Alright, let's put the vein in. And this one's gonna
curve a little bit, too. I'm just touching it with that chiseled edge.
Yeah, down it goes. Turn your paper if it's easier. I'm on a weird angle,
but I don't want to turn my board if I don't
have to cause of the camera. So Okay, let's switch to our round. Okay. And now just some water. All right. How you guys doing? Hey, this one's about done. Awesome. I'm going to make it a little
whiter at the base. It's better. Okay. Hooker's green.
Let's do vein. This one's gonna curve, as well. Okay. Just tap it
in at the bottom. Okay, let's outline. And now just some water. Great. Strengthen
some highlights. Wow, that was fun.
Okay. One more. Last one. It hooker's green. I need more. Yeah, let's put in our vein. No, I'm going to put this a lot of shading underneath
that other holly leaf. All right. Done with that stage. Now, that needs to dry completely before we
play with it anymore.
5. Pine & Filler: So obviously, there's
different types of pine. And when I'm doing these, you can do your pine needle.
Say that to your vein. You can either do pine
needles that come inward. Got a bendy board
here. Such as this, which is the way I'm going to
be doing these today, okay? Or if you prefer, let's say that's your vein, you can curve them the
other direction, which is how I do palm leaves. It feels backwards to me, but Alright, so you choose. You decide what feels
comfortable for you and what kind
of pine you like. That's fine. Whatever. I'm gonna be giving you
options throughout. That's how I teach
because I feel like you're very creative,
you're talented. You're an artist, and you should do what feels
comfortable for you. So now, make sure you don't
come up on your ornament. And they start whiter and they
get shorter as you come up to the top. Okay? And I'm just doing kind
of like a skeleton. I'm not filling
in at this point. We'll do some later,
but just now, we're looking for placement. This one. Now you've
got two ornaments to be careful with giving you a
little word of caution there. Alright. Again, we're just doing a little
skeleton right there. Okay. This is all
in Hookers Green, still with a 982. It's okay if it goes up
on top of the holly, or if you want it tucked behind, then don't go on top of the holly,
whatever you would like. We'll come back and
add more layers. We'll do some down the center, so it doesn't look like it's
just, you know, a palm tree. We want it to look
like it's dimensional. This is just getting
us going, right? Mm. This one's gonna be
tricky. So be careful. You can do it. I believe in you. This one's just
gonna have little I'm actually gonna put it
underneath the holly and, of course, underneath
the ornament. So just take your
time, little strokes. We did it. We did it. Okay. Now, we're going
to have some fun. You can take a deep
breath. If you're holding your breath,
take a deep breath. Now we're gonna have
a little bit of fun. So let's switch to our
number four. All right. We're going to start
with Traverte. This will be a little
more watery than before. So I would say this is
going to be a 9010, 90% water, 10% paint. And I'm building up a little bit of a well or a puddle here, so I have some ready to go. And what we're gonna
do is fill in some of our background
between the ornaments. That's why I'm using
my number four. And I'm just gonna start here starting in the
middle between them. And then I'm gently
going to push it out, being very aware of
the ornament lines. And if you're not comfortable going up to the ornament line, I would say go almost up to the ornament line
and leave a little space. Now, only do a small portion. We're gonna do small sections. We're not done with
this just yet. Now, on top of your pine, we're only going to go
about halfway about that. And we don't want to smear
your needles per se. So just kind of bounce
your brush up and down, and just let that
fill in a little bit. Don't worry about going
around the little hook, little round thing. That's okay. Kind of go around the cap there. Okay, now, while this is
still wet, this little area. First, we're going to take
just water on our brush and just kind of soften
this edge into nothingness. If you just kind of
put water on it, it will just kind of disappear. Just touch it with your tissue, see how it just disappears. And then while it's still wet, let's take the tiniest amount. This is a 991 on your
hooker's green and touch it, and it will kind of fill in. Mine's a little dry. Well,
it's filling in there. So over here where
it's a little dry, I'm going to add just a
touch of water, water brush. And just let it stay
kind of modeled, kind of lumpy, bumpy looking. We want a texture because this is gonna look
like something way, way in the background. Something indescribable,
but there. And now let's pick up the
tiniest amount of indigo. This is a 991 tiniest, tiniest amount and add a
little bit of that blue. Oh, yeah. That's gonna fill
in nicely for us. Okay, let's do this
next little section. So come over to your eraerte. I'm gonna stop at that pine. I'm gonna bring it up. We
can do a big area this time, right? You guys are with me. I'm not gonna go all
the way to the top of that pine, about three fourths. Okay? Just water
on my brush just to soften that outer edge that
you want it to disappear. And a little bit of
hooker's cream now. Just right down the
middle. Because it's wet, it should start to blend,
see it start to go. This is why wet on wet
is so fun because it just does the work for you and people think they
don't have control, but you have control because water paint flows
where the water goes. And so where you have
put that water with the tera verte is a boundary
for the hooker's green. So you do have control, but we're all going to have
a little different outcome, which is the beauty. I love it. Okay, I'm just bouncing a
little bit of a water brush on Here in Utah, the air is very dry and
so it dries quickly. So I have to help it
along a little bit. Okay, now I'm going to add
the tiniest amount of indigo. I like blue under the pine. Kind of almost a Is
this water on my brush? Alrighty. Let's keep going. Tara verte. I'm just gonna
put a teeny bit here. I'm gonna have that
fade to nothing. I'll just water on my brush. One touch with the
hooker's green. I don't think I'll even
put any indigo on it. I just want it nice and light. And let's come over here.
Bring it up a little bit. I'm not gonna come
three quarters like we did the others
just a little bit. Lakers green. Coming up I'm just coming up around the stem a little
bit right there. Fine stem, whatever you call it. What's it call on a pine. Alright, this is
water on my brush. I'm just bringing
this out to nothing, letting that fade and back
to TeraerteGa turn my Okay. And I'm gonna bring
this out to nothing. This is water on my brush. And the little hooker's green. I'm gonna add just a touch
Indigo, since it's on the pin. Remember Indigo. We
want 99 and one, so just a teeny tiny. Thank you. Wow, I like that. Okay, that looks
really cohesive. You need to go a
little bit up there. Let's show him some
love. Here we go. Okay. And then I'm gonna this is water. Gonna
let that fade out. Add some hookers
green on the bottom. Man, a touch with a blue. Great. Okay. Alright,
how did we do?
6. Pine Part 2: It's really important to
every once in a while, I'll have you step back
and take a look from a distance you see things differently than when you're
looking at it up close. I'm going to add
a touch of blue. Yeah. Oh, I like that.
Because that one's really tucked under everything under the holly, under the ornament. I like that depth.
Okay. I'm gonna add a little more blue on
this one for the same reason. Let's get a little
more shadow. Yep. Picking up my liner brush. Coming into Hooker's green
a little more strongly. It's probably 955. And we're going to
emphasize our pine. Okay, you can see how
that comes in darker now. It is gonna dry
one value lighter. But this is gonna
add another depth, another dimension to our pine. And it's up to you how full how thick you want
to have your pine bows. Sometimes I do
them really pushy. Sometimes I keep
them pretty sparse. Don't forget to do
some down the middle. I just do a little
bit of a crisscrossi We're still gonna come in
and do these with some white put some highlighted
areas, highlighted needles. Goes much faster with the
second layer, doesn't it? You don't have to be quite
so careful. It's all there. Okay, these are our tight spots, these little ones in the middle. All right. Good job. Okay. Our holly
should be dry now, and we're going to
pick up our flat, and we're gonna lift
out a highlight that goes down that
vein down the middle. And I actually do it to the side of where we
laid in the green. So I just stay up on
that chiseled edge and I lift out a highlight. This is water on my brush, and I'm not pushing hard because I don't want
it to be a thick line. But I'm just gently
pulling out some paint. There, can you see how that? Now we have that dimension. We have the dark and
the light side by side. If you have one that's
being stubborn, then once you get it wet,
touch it with your tissue. It will help lift it off. It's these little nuances that we're doing that really make a difference in giving your artwork that extra
finish and dimension. So it's worth taking the time. That pretty? If you want, I haven't been doing
it, but if you want, you can even just
do a few streaks. We're going to come
in with some white, so I'm not hugely
concerned about this, but you can see how you can
lift out a few white streaks. Okay. Last one. Okay, how'd you do with that? Okay, our center
should be dry now, and we're just gonna
pick up a little bit of Hooper's green about
a 982, so very light. I'm back to my liner brush, and we're gonna put in
just the lightest hint of some pine needles, just kind of every which way. See how I'm just kind of criss crossing and they're
just kind of coming from way far away somewhere. Super. We're not going to put any down around
here, in the middle there. Okay, now we're going
to take some white. Now, if you haven't
used this before, this bleed proof
white it can get quite thick in your
bottle, and that's okay. In fact, it can be really
thick where you think, Oh, my gosh, it's ruined. But it's not. Just
add a little bit of water or scoop some out and add water here in your
palette. It'll be fine. I'm sticking with
my liner brush, and I'm going to take this to this is going to
be about 50% paint, 50% water, 50 50. Now, we're just going to
add some highlighted pine. Yes. Look at that. So not many, but you can see the difference
it makes, right? It's one more dimension. And we're almost
done with our pine. You're like, Car, I'm
sick of the pine. Can we get to the
ornaments? Yes, we can. Just give me a minute. You're
gonna thank me. Trust me. O It gets kind of globby on your brush fast. It dries fast. I like wash, so rinse out your brush. I'm not going to go
down inside there because that would be
a dark area anyway. That looks great. Now we're going to
stick with our white, and we're just going to play
a little bit with the holly. So I'm going to put
a few highlights, just kind of a broken line down the center where we just
put those highlights in. And you see, I'm just going to bounce
the brush a little bit. I'm gonna add a little
bit, highlight. And I'm going to
add a few streaks. In some of the areas
that we pulled off a highlight, maybe
you're not there. That's our dark area,
so I won't do that. Okay, so this is where you're gonna free hand a
little bit, which is fun. And there's no right or wrong. So anywhere that you have
kind of a natural highlight from where you'd pulled out some of
that eraverteG for it. All right. It goes pretty fast. Okay, last one. Oh, it's too dark, touch it. You can even lift it off
with water quite easily. All right. How'd you do, guys? B
7. Gold & Green Background: Alright, we are going
to use our brusco. First, I'm going to use some tissue to just
cover up the ornaments. We don't want to get
it on our ornament. Now, this hook, I put
this hook in here. A lot of people will
put a thumb tack. You just need to puncture
a hole in your lid. But I hang it up,
so it's easy for me to put a thumb a hook in. But as you can see, if you
haven't used this before, it's a powder, and we just need to be able
to sprinkle it out. And with Brusho, you can either
spray your paper and then sprinkle or sprinkle and
then touch it with water. And I prefer to do the latter because that way I
have more control. Are you getting the feeling
that I'm a control freak? So I'm just lightly, very lightly sprinkling it, and then I'm going to
take clean clean water. This is very clean water, no paint in it whatsoever
on my number four brush, and I'm just going to touch. I'm going to start with
an up and down motion to kind of see where it spreads. And what this does is it
regenerates the gold powder, and then you can decide where you want to spread
it to, basically. So now that it's regenerated, I'm going to manipulate
it just a little bit. We're in there. And then it's going to dry with
this beautiful gold sheen. I'm going to bring some up here. Now, we are going to
splatter with green as well. There, I like that.
So you can see the difference between this
and splattering with gold. It's a total different
effect because this is like this
is basically giving you clouds of gold versus
splattering with gold. Does that make sense? You'll understand
more when it dries. It's basically gonna dry the way you see it,
I guess, really. So you have these clouds, these
billowing clouds of gold, which is just a
really fun effect. They have Brecha in all
different colors, even rainbow. So you could be doing this with, like, confetti colors, you know. Purples, pinks, reds,
blues, everything. Now, this is a little too
much for me right there. I'm gonna touch it with a
tissue and just lift a little. It won't come all the way off. Once it's on there,
it's kind of on there, but I can calm it down
a little bit, per se. See that. There. I
like that better. If it's on your ivy, you can lightly touch
it with your water, but I'm not going to. I choose not to because I
don't want to risk smearing all that beautiful work
we just did. Okay. Okay. Here we go. Are you having fun?
This is fun, isn't it? And here again, everybody's just gonna be a
little bit different. No one's gonna be the same. I really hope you'll
post your pictures. I would love to see her work. Awesome. Alright. All right. Um, Okay, kind of step back,
see how that feels. I'm happy with that. Are
you happy with yours? Let's let that dry,
and then we're going to come in and
do the same thing. Well, not the same
thing. We're going to do some splattering with our green. Okay, this is completely dry, and so I have made a
little puddle here of Hooker's green at a 982. So it's very watery. And I'm
using my number four brush, and I'm going to do
some splattering, so I'm just loading
it up real good. And I'm going to come over. I like to tap a few times over here to get rid
of the big splatters. And then I'm going to
start up in the corner. Now, I'm going to just do little sections because I
like to wipe some of it off. Now, when I say wipe, I mean, straight up and down,
so I don't have smears. And I'll just do here and there. So what this does,
if you look closely, it gives me some light
and some dark green. And I like that variated shade. So if you want it
all dark, do that. If you like that look and
it's all dark, great. But I like to have
a little variety, and I like it right on my leaves. So I'm
gonna leave that. I'm gonna leave it dark
right there on the pine. Okay, that's feeling
pretty good. This is dangerous, but I want
some more on this holly. And that's fine. There we go. Whew. Did it. All right. Let's look that dry completely. That's quite a transformation,
guys. Good job.
8. Ornaments Base Coat: All right, guys. I have
gotten out my large flat. This is a number 18, but it's like a half inch,
three quarter inch, whatever. And this is a cobalt blue and indigo are the two colors
that we're going to use. First, we're going to
fill in with water. Remember, always that paint
goes where the water flows. And so we're first going to put this water on our ornament and be very careful
where you put it because wherever you
put this is where your cobalt blue is
going to follow. So I'm using a nice big flat. I'm going to be really careful to bring it out to
my pencil line. I have to stop talking
so I can hold my breath. Now, this is a circle,
so just keep turning it. Taking our time with this. Your paper is gonna absorb
that water for the most part, but it will be wet enough
to give us a nice smooth, even coat when we
put down our blue. And we're gonna get that wet on wet effect that we
need when we put down here we go. So dip in the water, dip in your paint,
load your brush. I always start in the middle. Boom. See how it moves out? It's my favorite part of
Mou wet on wet. I love it. So I'm going to
start in the middle, and I'm gonna it's gonna
do its thing and push out. It won't go beyond where you put your water, so don't worry. However, because I live in Utah and it dries fast,
I am gonna help it. I'm gonna push it out
myself a little bit, so I'm just loading
up with more cobalt. Good, good. Now I'm going
to turn it sideways. And we're going to pick up
some of our indigo blue. And I'm gonna pick it up on
the bottom half of my brush. Not all the way to
the top. If you go all the way to top, it's
not the end of the world. I just work that into my
brush a little bit. It's dry. And I'm going to start
on a crescent crescent. We're gonna make
a crescent moon. I'm going to start up on the
chiseled edge about halfway. Okay, and bring it down. And then back up
to a chiseled edge and notice how I didn't go
all the way to the edge. I like to go almost to the edge, and then
I'll push it out. I'm gonna bring it up a
little bit higher first. I really want to be
about three quarter. But again, I start
low, push it up a tad. Now I'm going to go
ahead and push it down. Great. Okay. Now, because
it's wet, it's gonna blend. You can see it's got
that nice fuzzy edge, but I'm gonna help it
a little bit by just putting water on my
brush, mostly dry. I'm just going to soften
that edge a touch. And let's give that a minute. I'm gonna turn it the other
way. Work it the other way. Now, if you overwork
it like that, it's gonna come
off instead of on. So that tells me it's dry enough that I need to
just leave it alone, and I can come back in and put some more on top of
that. No problem. So I'm gonna leave that alone, and I'm gonna let
it dry. So pretty. Remember that we're gonna put, you know, lots of
design on top of this. We're gonna put a
highlight on top of it. So don't stress. Don't stress. Now, let's clean out our brush. Really, really good. This is why you've really got to have a clean water next to you or go to the sink before
we start our next color. All right. Here we go. Start with water. In the
middle, work our way out. Now, what happens if you goof with the water
and you're like, Oh my gosh, I went
out of the line. Okay, wait for it to
dry and start over. Let your paper dry.
I use a hair dryer. I'm just going right
over that gold band. Just go right over
it doesn't matter. All right. Ready? Here we
go with our cad yellow. Same thing. We're
gonna do a wash. This is probably 955. It's very strongly pigmentded. Now, if you need to
go to a smaller brush down here, don't hesitate. Alright, I am picking
up a smaller brush just to make sure I have the
shape I want at the bottom. And also, where my
circle comes down, I want to make sure they match. While that's still
wet, let's pick up some of our quinocratm gold. Turn our board. We're
gonna do the same thing, kind of a crescent.
Okay, here we go. All right. Now, this
is a smaller ornament, so I don't really
want it to go up. As high as the blue and the red. I'm gonna keep an eye on it. It's wanting to creep
up, which is great. But not too far. And I want kind of
a smoother edge, so this is just
water on my brush. Just gonna soften that. Yep, can you see how that
just smoothed it right out. That one's still wet. Too wet. I'm definitely gonna put a
second coat on that one. Just gonna smooth this
out on the bottom here. There we go. Good. Okay. You ready to go for the red?
Let's get our red out. Okay, cad red and
lizard crimson. And we're actually
going to use some of our indigo to give
it a deeper shadow. And first, I've got to go get some clean water if you
need clean water, as well. Let's take that opportunity. Alrighty. Clean
water, clean brush. Here we go. Okay. Ready for some red. Here we go. It's
gonna be about 955. Okay. Deep breath. Oh. Wow. We are done with
the hardest part, guys. Okay. Putting those
circles in is definitely the most
challenging, I think. Okay, so let's rinse out and
pick up some lizar crimson. And we're gonna make a little
puddle to the side here. I pick up some
indigo, mix with it. Makes a nice purply bluey
red. Turn our board. And we're going to do
like we did up here. We're gonna do a
nice crescent moon the pat in a little more, bring it up a little higher. Now, as I've painted
this a few times, sometimes I don't know why it
just shows more on the red. So sometimes I've
left that really cool look that you're seeing right now where
it's growing up. You can even encourage it to
grow by tilting your board. And that's a neat effect. And other times I've smoothed it out like I've
done on these two. On this version, I'm going to
go ahead and smooth it out. That's the version I like
best for me. But you do you. I'm just offering ideas, I guess, for what
you might like. So I'm just using water on my brush. I mean,
that is pretty cool. If I were doing, like, a
forest scene, you know, I would do moon
and stars up there and use that for treetops,
that would be really cool. But because the design
we're putting on here, which is a really
delicate gold filigree, I found it a little
distracting when I left it on one of my versions. I was like, h, not my fave. Great. Now we're gonna let
that blend and do its thing. While it's doing that, we can
move back up to our blue, and it'll be much easier this time because we've already
done the hard part. But it does need a
little attention because remember how watercolor
dries, one value lighter. And we want it to be
solid, full color. And so it needs a
little attention. We don't have to we don't
want to get it wet first. We don't want to overwork it 'cause we don't want
to lift off paint. So let's just come
into our cobalt blue. And add. We're adding color to it. This is probably a 955 still. And I'm staying
away from the edge. I don't want to have to
be, like, Uber careful. All right. And I'm
gonna bring that down into the indigo blue area a bit. Well, that looks nice. Now, I've got to pull out. Make sure your indigo is not mixed with the
Elazar and crimson. Now let's pick up a
little bit of the indigo. And again, I'm not going
all the way to the edge. There's no need to.
There's no need to be all careful like that. Again, we're okay. And I'm just gonna let that blend with
the blue we just put down. I got to turn it so I can
see it nicely. Oh, yeah. That looks good. Great. Did you feel
better about yours? Did it need it? Okay, I am happy with my yellow,
and I'll tell you why. Even though it's very light, I mean, the yellow is solid. So I'm happy with the
yellow, yellow is solid. And the quin gold is very light. But because of what we're
going to put on top of it, I don't want it to be dark. I don't want it to distract. And so I'm happy with
this level of quin gold. You decide if you want
a deeper shadow area. And if you do, great, go
ahead and layer in another, you know, wash of the quin gold there. But
I'm going to leave it. Okay, I've picked
up a smaller flat, and I'm going to
pick up some of this blue and fill in the cap. And I'm going to go all
the way to the top, even though the top portion
is going to be gold. Make sure my brush
is really clean, do the same thing
for the yellow. And the red. I've decided I'm going to leave
my red now that it's pretty much dry,
I'm happy with it. If you need to add
another layer, go ahead. Add another layer. It's fine. Bokedki. Now, while we have some red that's
still pliable, let's go ahead and
add in some berries, and you can add as many
berries as you want, really. But because there's
so much going on with our ornaments and really
they're the star of the show, I'm not going to add
a ton of berries. I'm just going to
add a few here. You there? Just put them
wherever you feel like it. I think I'll probably
put a few down here. And some people like
big juicy berries. Others I like mine kind
of medium to small. Just do whatever feels good to you. I'm gonna stop.
9. Highlight Ornaments: Okay, let's come back into
our Lizard crimson and our indigo mixture and pretty pretty watered
down, I'd say, 982. And I'm just going
to put a little on the bottom of these berries. It's kind of awkward to do
little berries like this, but even a little
bit of shading, you know, goes a
long way. It helps. Now, let's pick up a
little bit of white. Make sure you cleaned
out your brush really well with
your clean water. Yeah, we're just gonna touch
a little bit of a highlight. Mm. Cute. Cute. Alright, I've been waiting for these
to get 100% dry. I feel like they are, so
we can do our highlight on our ornaments before
we decorate them. So do you still have some white mixed up, you'll
need some white. And we're going to
use a flat brush. I'm going to use my medium flat, my number ten, and working with our clean
water, not our dirty water. Get your brush wet,
pick up some white. And then we're
going to dry brush. So if you haven't dry brush before, that's
picking up paint, and then wiping
most of it off to your brush is quite dry. And as you see, you
go over something, it gives you almost like, Oh, picture an old barn door, an old weathered fence. And it just goes on really dry. And let's start with the yellow because that'll
get us warmed up. And you're going to
want kind of a curved. Always follow the contour of
whatever you're painting. And you don't I guess
if you want a hard, if you want, like, a shine, then you want just one stroke. But I'm going for more of a modeled, kind of a globe look. So I'm going to I've kind of bounced it up and
down a little bit. You can see I've got almost
a round shape. Like that. Hey. Now we've got
our courage up. I'm gonna pick up more paint, wipe most of it off. Now, if you get too
much on your piece, you can come in with water on your brush and soften it out. So don't out. It's kind of scary right here. Like, Oh, my gosh,
it's really dark. What's happening? And
the more you work it, you're gonna start
lifting off your blue. So see you there. That's okay. I'm gonna clean off my brush so I'm
not lifting off blue. And now I'm just going
to bounce it a little. Just go to soften till I'm
happy with it. There we go. Now, remember we're
going to come in with a fabulous design
on top of this. So you're not gonna be
staring right at this shine. But trust me when I say it's gonna make it look really cool. Oh, yeah. That's great. Now, also, this white is going
to dry one value lighter. See how it's almost faded
away in the yellow. I almost feel like I need more. Alright, let's do the red. Make sure you cleaned out
your brush really well. This red wants to lift off more so than
the blue, even, I think. And, yep, see that. So I'm gonna pick up
a little more white. Yeah, I like that. Alright,
now I'm gonna soften it. Water on my brush. Alright, let's let that dry. I'm gonna put a little
more on my yellow now. Wiping it off. And just mostly
right in the middle. I'm just kind of
bouncing the brush. This water. Yes. Alright. How are you feeling
about the blue? Do you need to add more?
I think I'm going to. I'm gonna go for it.
Wiping most of it off. I just want a little spot
that says, Yeah, look at me. I had a little too much
water right there, and now it wants to lift
off instead of go on. And red. Okay. Now, after it's dry, if you want it to
look more smooth, wait till it's 100% dry, and then just put a little
water on your brush and lightly smooth that white, and you can do that. Alright. I'm going to let this
dry completely and then decide where to go from there as far as the white if
I need more or less. But get ready 'cause
we are about to do the final design work on the ornament, which
will be awesome.
11. Yellow Ornament Detail: Alright, I've got
my hookers green. This is about 955. And I'm back to my
number one liner, boating it up and pulling
it to a nice, fine tip. And I'm actually going
to turn my board sideways while we put in
our three main lines. And then the second one just
branches off from that, and it's gonna go
down and around. And then this one is going
to branch off of that one. So from there, I'm
going to add a few of our coma stroke
or petal stroke, whatever you want to call it,
where you touch and press, and then as you pull, you lift. So these can be angled. And if you want a
really nice round tip, you can come back and add to it. Or you could use
a thicker brush. I'm not going to use a
thicker brush because I want to keep this tail
end really fine, which I can't obtain
with a big thick brush. So I prefer to, in this case, I prefer to come back and
just add a little more to the top portion
because it's going to meet our fine vine line. For example, let's just
start with this top piece. And I'm actually going to
bring it up a little bit. I'm gonna touch and press, and I'm going to
meet up with the tip here. So touch and press. As I pull, I lift,
lift, lift, lift. And then let me take
a little off there. And then I'm just going
to enhance the tip. And it didn't go
on quite as smooth as I wanted to probably
because I went too slow. This is where speed is
really a good thing. So I'm going to just
smooth that a little bit. That feels better. This is
just water on my brush. Oh, much better. Okay. We're
gonna leave lots of space between the dark ones to come in and add some
with our lighter green. But while we're loaded up here, I'm going to add one that
kind of comes this direction. Yeah, I'm gonna do another one. Sorry, I keep turning my board, but I hope you're
turning yours as well. It's kind of easier
to work with. I'm gonna do one right here. Okay, let's pull one down that
comes from this direction. Follow that curve
of your ornament. This is a strong curve, so I think I'm going to add
quite a curvy one here. And I like that. And I'm going to
turn this into one. Good. Alright.
How'd you do, guys? That looks good. Let's switch
over to our era durte. Okay, I want this kind of thing. It's gonna be about a 50 50 mix. Pretty heavy.'s 'cause
it goes on so thin and we want it to make
a statement here. Okay. Gonna start up topping in. I'm gonna make a pretty
strong curve, I think. And I'm gonna pretend
like one is coming in from the other side. And it's like it's
wrapping around. So it's just going to
kind of disappear. I like that. Alright. And Alright. Let's see if I want any more. I think I will add
some down on this. Oh, sorry, I keep changing
my board around, guys. I'm gonna add one here. Maybe h How you doing? Alright, I think
that feels good. We're gonna have that
gold band that goes here. I didn't really gold
that goes down there. Yeah, I think I'm gonna
leave it at that. We're gonna come in
with some red berries. Okay, so let's let that dry. I'm gonna build up
a little well of some red while that is drying. Alright. Actually, before
we do our berries, let's put the gold caps on our ornaments
because the berries will take a little while to dry. So before we do those, let's come back to our gold. I'm using my five ought, and it's still a little bit wet, so I better be careful. I just saw the
shine. I went, Oh. Okay, so as far as the loop
goes, You know, no big deal. Don't be, like, super cautious. We are going to put a
touch of a string in a little bit later, but it's not, you know, B, this whole part, don't be, like, over
strenuous, got it. So I'm going to bring this
down just part of the way. And I am going to put
a little loop on it. You can go straight
across, if you want. And then I like to
do little lines. I like that blue
showing through. So that's what I'm
choosing to do. You do you, do what you enjoy. Okay. Same with the red. And the yellow. Okay. And then the yellow also
has this little gold band. It starts on the outer edge, comes across, and goes around. And then I'm going to
put some little stripes But again, I'm following the contour, so
there's slanting. All things point to
the bottom here, okay? And I'm going to go across the bottom pretty heavily. I
had a little bit of green. I'm covering that up. I want
the ornament to be on top. The ornament is the
focus, not the greenery. Okay, so let's let that dry.
12. Gold Filigree Scrollwork: No. Alright, friends, I've decided it's best to do the berries very last because they take forever to dry and we don't want
to risk Smerium. So let's go ahead, while we have our gold. It's
already generated. Let's go ahead and do our
beautiful scroll work around our design. And so I've pulled
out the pattern. I just want to make sure
I do the same thing that you're going
to be doing as far as if you decide to
use the pattern. I'm not going to put
in every detail of the scroll work that I've
indicated here for you, but I am going to
just lay in, like, my basic line 'cause I don't want to be
too far off of what I provided for you. Perfect. Okay. So if you need to lay
in those basic marks, you go ahead and do that as well and make sure your
gold is generated, and we're going to use our
number one liner brush. Oh, this is the fun part. I love, love, love doing this. Alright, make sure that your
gold is nice and workable. And I'm rolling I'm pulling
this to a fine tip. Awesome. I'm going to start
right here up at the top. A and then I'm gonna bring out some scrolls. A couple of them.
Okay, one more. What the heck? And I'm gonna
touch and press over here. And let me start out with a
little more paint for these. These are gonna be
little. Now notice I planted my finger. I'm gonna make this one a
little more hefty on the top. Like that better.
And same for this. I'm gonna make this
a little bigger. Again, you can just
use a bigger brush if you don't want
to come back in, but see, I like how refined and fine that detail
line is there. And I'm gonna come back in and just touch a little dot
of gold on the tip. Okay. And then sometimes
I like to just add, like, a little couple lines
and a few dots. Just have fun with
it. Just make it. Wonderfully, beautifully. Okay. I like that. All right. Let's come over here. Oh, yeah. I like that. Gonna do some dots. Pretty. Here we go. Let's keep it going. We're
on a roll with our scrolls. And I think I'll just
do some dots here. Okay. I think I
missed one up here. I mean I come up. I'm going to put
some dots here where Oh, yeah. Okay. I'm here. Let me make it like that. I like that one a lot. I have to turn my board upside down to do these bottom ones. Okay, make sure this
is dry and you don't smear if you're turning your
board upside down with me. Maybe I should follow
my own advice. Okay. Now, I think I just want to make these look
like they're wide. And I think this time, I'm gonna bring some this way. Yes. Alright. I like that. You gonna maybe some lines. Alright. Yeah, I like that. Alrighty. Let's focus on
this one in the corner here. You want to start so it looks
like it goes out this way. Go put a little beat
on the end of these. Okay, let's do these right here. I'm gonna do it
kind of like this. Looks like we got a couple. So this one's kind of bigger. The I'm gonna leave that, I think, hey. Guys, I'm gonna turn my board. This kind of matches.
I kind of want to do something a little
more like that, I think. So I'm going to start at
the bottom and pull up. And I ran out of paint. Okay. Alright. Just a little thick. That's why I ran out of paint. I think I'll do a
little double here. Oh, yeah. I like that. Okay. Couple on the bottom. All right. Let's step back and
take a good look, see if there's any more beautiful lacey scrolls
you want to add. This would be the
time to do that, but I think I'm pretty good. M
13. Details with Dots and Signature: Okay, I've taken my pencil
and just a little ruler and indicated just a very short
string for each ornament. I used a ruler so that I
made sure it was straight up because ornaments don't
hang sideways, right? Now, I'm going to turn
my board sideways. This is so that I can have an evenly width line by just pulling my arm and not
doing this with my hand. I'm pulling my arm. So I'm
using my detail brush, my five ought so that I can get a little thicker line
than using my liner brush. Notice how the hand
moves, not the fingers. I think it's time for
us to go ahead and mix up a little well of red, and we can do our berries. So let's get that mixed up. Alright, I've mixed
up some cad red, and this is going to This is about a 50
50 mix with water. And I'm going to use my stylus. You can use anything that
makes a nice round circle. And for those of you that
are beginner beginners, just a note that circles become smaller as you descend
using the same dip. If you want your circles
to be the same size, you have to dip, dot, wipe, dip, dot, wipe. Okay? So it's good to utilize both depending on what project you're doing,
but just note that. And then be very, very careful. I like to work from the top down basically because it's so easy to smear and make a mistake that's hard
to recover from. So, here we go. Let's
start with our blue, and let's have some fun. These, I don't feel compelled to have them be
exactly the same size. And if it goes too
small like that, you can just dip
you can just dot right on top of
it. It'll be fine. But have some tissue handy to even if you're not using a stylus, no matter
what you're using, you're gonna wipe
that tip off fairly frequently it gets all globby and then you don't have
a nice round circle. There's no right or wrong
to this, as you can tell. So just enjoy the process. Uh, Okay, I ran out of ends to do. I think I'm going to put so if I have kind of a blank area, just gonna group some
berries together. Oh Yeah, that feels good. Alright,
I'm going to leave that. Step back and look at it and
see if you want to add any. Okay. So these are still wet. You can either wait for
those to dry and then do this next step or we're going to continue I'm
gonna continue on. I've switched to a bigger brush. It has a fairly flat end, but I wanted to have
larger size berries. I'll do fewer
berries, but bigger. All right. Let's see if
there's anywhere else. I like the flow up. I think I'm good with
that. You're gonna stop. Alright, guys, I
have come back to my stylus and come
to the gold paint. I've mixed up a puddle.
I've got it on a slant, so it stays puddled. And we're going to
add our berries to our gold ornaments
here, our gold vines. Now, in one version
that I painted of this, I did the berries in white. And so if you like that
idea, you could do that. For me, the white
just was overbearing, because the gold
is so beautifully subtle and classy looking. And so I'm doing it in gold. That was my favorite. And
I'm also dipping each time, because I liked it best for this when they were
all the same size. Oh Oh, isn't it beautiful? It's just so classy and elegant. As you look at this, decide if you want to add
more dots somewhere. If you do, you'll need to come in and add a little attachment, which is fine, of course. I'm just wondering
if I need I feel like there's more dots on
this side than this side. I may add another dot here, and I'll need to
attach it and here. I'm there. So I am going to. Now, that feels more balanced. No, I lied. I need
something over here. Okay, I'm sticking
with my stylus, and I've made a puddle of white. It's about 50, 50 ratio. And I'm gonna come in
and be intentional about adding just some dots
on my holly and my pine. And I'm touching enough times to make it totally
run out of paint. In other words, I want
a variety of sizes. And so I'm just making
the most out of each dip, I'm gonna have it go
up the pin a bit. Alright, so now you
can see the difference with it without it. And you choose what
you'd like to do. Maybe you don't want it.
That's okay. Do what? You do you. I'm staying off my red berries. This just frames our
ornaments nicely and enhances our greenery, gives them one more
point of interest, which we've been
really good about. Now, that one's too
big. I don't like it, so I'm gonna take it off. Okay. I'm going to add some. I'm
using the smaller end now. I don't know if you noticed
I flipped mine over, but I'm just going to
add a few in here. But this is the back
back background. Okay. I'm gonna add
a few up there. And if you need to
flip your board, do it because everything's
wet. I think I'll be okay. Just gonna be really careful. Great. Okay, let's let everything dry. I've stood back six feet
and taken a close look, and I think I feel
like it's complete, like it's finished and I don't need to add
anything to it. Now, I know a lot of
you have taken some of my other classes where
we add some inking, and this would be the point where you could
go ahead and do that. I'm not going to do
it for this class, but you are more than welcome to pull out your
favorite pen and add some ink lines
around those holly leaves a little bit on the pine, and, of course, around
your ornaments, and it would look beautiful. So feel free to
make it your own, add some inking if you
would like to do that. For me, I feel like this
piece is a little more on the elegant side with all the fine filigree and
lace that we've added to it. And so I'm going to
leave it without ink. I think it's time
to sign our name. I want you to know I feel like you have risen to the challenge in
taking this class, which takes talent and courage and strength
and creativity, and I'm so proud
of you for taking this class and
completing your project. Good job, everyone. Always sign your artwork. Please claim your artwork. It's wonderful.
It's unique to you. So always take the time to sign your name and do it
proudly and say, Yes, I did this
beautiful piece of art. And so let's go ahead and
sign our name together. I'm going to sign
down here, I think. Wonderful. Thank you so much for spending
this time with me, and I will see you
in the next video where we wrap up with congratulations and
probably a few bloopers.
14. Congratulations & Bloopers: Well, congratulations.
You did it. You have finished
your ornaments, and I'm so proud of you. I'm so happy that
you took this class. Thank you for your time and
for spending it with me. I hope you enjoyed it. I hope
it was a benefit to you. And, you know, if you
found that it was a benefit and somebody else
you know might enjoy it, all you need to do is look for this link on Skillshare
on this page, and you can send
that link to them, and both you and your friend will benefit from Skillshare. Also, if you'd like to get some future notifications
now and then, whenever I pop out a new class, then all you need to do is
click the follow button, and you'll just
get a little pink whenever I send out a new class. And if you'd like to
see what other classes I have here on Skillshare, here's some of my holiday
classes, but there's more. Then all you need to do is go to the top of the page
and type in my name, Carrie Sanders, and everything I have here available,
we'll populate. You can take a peek and see if we can spend more time together.
That would be awesome. Alright. If you'd like to take a peek into the world
of Carrie Sanders, then all you need to do is
head on over to my website. It's carsandersart.com, and you can take a peek at
Insta at Carrie Sanders Art, and I'd love to see
you there as well. Okay, folks, thank you so
much for joining me today. I know your time is valuable, and there are some really
talented teachers here, so I truly am grateful that
you spent some time with me. I guess it's time for Bloopers. Who me? Bloopers? I'm saying the same thing
over and over and over, and I'm not keeping track. Santa. Me and Santa
were like this. Oh. Oh. Jingle tingle.
 Kerrie Sanders, Artist, Teacher, Creator.