Transcripts
1. Welcome: Okay. Well, hi, everyone. Welcome on into my studio. My name is Carrie Sanders, and I'm an artist, a
teacher, and a creative. And today, I have for
you this whimsical, darling little
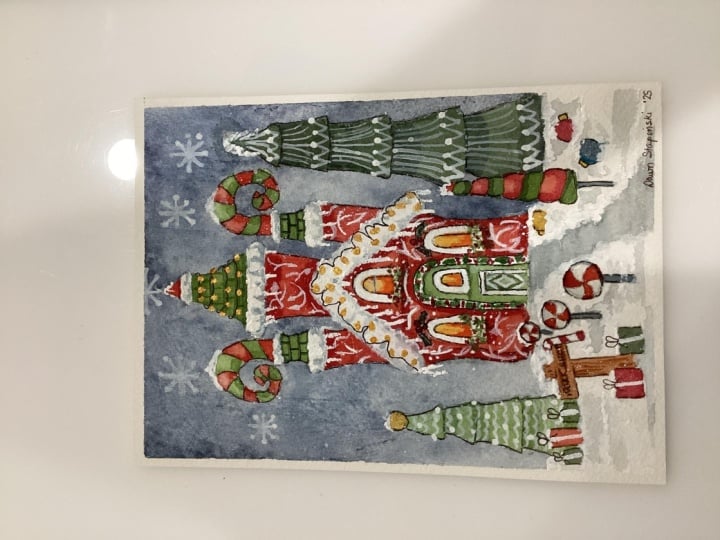
Christmas elf house. I had so much fun creating
it and painting it, and I hope that you'll join
me for this class today. You know, we're going
to be doing a lot of great techniques such as
wet on wet, splattering. We're gonna be using
salt to lift off paint and get some of this
snow effect on the background. We'll be doing shading and
highlighting and glazing and, of course, lots of inking. Lots of great things in
this class that you can use to learn new skills or sharpen the skills that
you currently have. You know, I've been
teaching for many, many years and probably
thousands of students by now, and I have really
come to know that my job as a teacher
is to, first of all, make sure you have a great
experience, but secondly, to teach you something new or to help you sharpen the skills
that you already have. And so that's what I strive to do in every
class that I have. I know that your time
is very valuable, and I appreciate
you stopping here, and I hope that you will
join me for this class. You know, if you
would like to see what other classes that I have for you here on Skillshare? Well, I've posted a few here. These are some holiday
classes that I have. You can also go to the
top of this page to the search bar and type in
my name, Carrie Sanders. And everything I have here
on Skillshare will populate, and maybe something interesting
would be there for you, and we could spend
more time together. That would be awesome. Also, if you would like to just get
a little notification, whenever I pop out a new class, you could click on
the follow button and follow me here
on Skillshare. And if you'd like to take a peek into the world of Car Sanders, you can. I have a website. It's carsandersart.com, and I also have Insta
at Carrie Sanders Art, so I'd love to have you join me. Okay, guys, if you would like
to join me in this class, then let's move on to the
next video and get started.
2. Class Project: Okay, my fellow
friends and artists, your class project today is to complete one
Christmas Elf house. And after you've finished that, if you could take just
a moment and look for this button on this
page of Skillshare and upload that into
our class gallery so that we can all
take a peek at what you've done and give
you a pat on the back. You know, we as
artists just don't get enough recognition and
nothing but love here, guys. No judgments, sharing the love and letting you know what
a great job that you did. What happens when you upload that is I get a little ping and notification and allows me to go in and see what you've done
and make some comments there. It's also a great place for us to make some comments
back and forth. If you have questions for me, then this is a great place for you to ask me
your questions. I'm happy to go in and
answer them for you. So take just a moment
and upload your project, and I will be talking
to you soon. Thank you. Okay.
3. Supplies & Pattern: Hi, everyone. Let's go
ahead and jump right in with the supplies
that we're going to need to complete
this project. I had provided for
you on this page of Skillshare a PDF of the pattern. This is a bare bones
pattern because I don't want you tracing a
bunch of details. So just follow this pattern when it comes time to do that. But print it out, and
then you're going to need some regular tracing
paper and just trace that pattern onto this
lightweight tracing paper, which we will use to apply
our pattern in just a moment. And to apply our pattern, I recommend using trace down because it's a transfer
paper like graphite paper, but it's wax free
and water soluble. So your lines disappear. You don't have to worry
about trying to erase them. And when you paint over
them, they just disappear. This is my new favorite
is trace down. And for paper today, I'm going to be using a block, which means that all
of the edges are sealed so I don't
have to tape it down. You can use a sheet of
watercolor paper, of course. Whatever you choose to use, I always recommend that you
use 140 pound or better. And I use a 100% cotton paper. And this is going to
expand and contract, utilizing the water in
the paint as it should. It will give you
the best result. I always recommend using a
high quality paper more so even than a high quality
paint or paint brush because the paper is going to make all the difference
in the world for you. All right. For brushes, I'm going to be using today a variety of rounds and flats, and just use what
you have, guys. But here's what I'm
going to use today. I'm going to use a six and a
ten flat and for my rounds, I'm going to be using my
handy dandy number four. You know, that's my favorite. And this one has
been well loved, but it's a number six, you
could use an eight or a ten. And for the background, I'm going to be using a
mop brush. This is a zero. I prefer using a mop for
this because we're going to be using some pretty heavy
wet on wet technique, and I want a lot of water. And then for detail work, I'm going to be using a long haired scrolling
brush or liner brush. It's a number one. And for more fine details and laying in, I'm going to be using a
five ought detail brush. As far as inking goes,
whatever you use, use your best choice,
but make sure that it's absolutely
waterproof. That is key. I mean, test it out before
you even touch your paper. It's going to be most important
that it's waterproof. Today I'm going to
be using a stdler and I'll be using
a 0.5 and a 0.2. So 0.5 is a little bit thicker. But where I want thinner lines, I'm going to be using a 0.2. I will also be using some detail work with
a ballpoint pen. It's a fine tip.
This is a Muji MUJI. It's my favorite. It
is also waterproof. So again, for your
ballpoint pen, make sure you're using
something that's waterproof so you don't
ruin your beautiful piece. There will be times that we
might be using a pencil, so just use a nice
artists pencil. If you haven't had
a chance to use a black wing, this
is my favorite. You can see it's well loved. But this is a black wing
palomino, my very favorite. We will be using a stylus today. I use it to apply my pattern, but we will be
doing some dots on our snowflakes and other areas. So I highly recommend a stylus. You can see it has two
different sizes or something similar that you can make consistent sized dots with. In addition, if you need to make any erasers on your
watercolor paper, be sure you have either
a soft needed eraser or you have a soft
rubber eraser. These will protect
the surface of your watercolor paper,
which is really important. And so I don't use any type of other eraser on my watercolor
paper than those two. We will be using lots of this. My favorite tool, the tissue, and it's inexpensive.
It's absorbent. It creates nice textures
when we need it to. And so we'll be using
lots of tissue. You'll need something to
keep your palette wet. I recommend two containers
for water, a clean water, and a dirty water because
the paints that we're using today have
very high pigment, so that will be helpful. And of course, you'll need a
clean palette to work from. So go ahead and
gather your supplies, and let's apply our pattern. I have taken the PDF from
the Skillshare page, printed it out, and traced it onto a piece
of tracing paper. So now I have just taped it down lightly onto my
watercolor paper block. I'm going to use my
trace down paper, and you can see it has
two different sides, just like your graphite paper,
and put the darker side. If you're using graphite paper, put the shiny side down. Just going to slide
that underneath. And we are ready to go. I'm going to use my stylus. I'm just going to use
the smallest side. And I'm going to go ahead
and just test it out. I always stop after I make
a small mark and make sure I have the correct side down because let me tell you, there's been a time
or two I have it. So go ahead and test that out. If you are good to go, then let's go ahead
and apply our pattern, just go over the lines that I
have provided for you here. I'm going to speed up the camera on this because let's face it, it's kind of boring to watch
somebody apply a pattern. But hopefully, you're applying
yours at the same time, so I'll see you
in just a moment. Now, one more thing that I
would like to point out is anytime you have a perfect
circle like these here, these gumballs and these candy sticks that
we're going to do, instead of drawing
in the circle, just put a little.in the
middle and we'll come back and draw a perfect
circle because you're not going to be able
to trace a perfect circle, and we want that
to be really nice. So no need to do it now. We need to do a quick review of our palette before we
can start painting. So here's what I'll be using. But, guys, go ahead and
substitute what you have at home. Don't go out and buy a
whole bunch of paint. So anything's gonna
work just fine, whatever you're happy with, I'm happy with. So here we go. Cadmium yellow,
quinacridin gold, cadmium orange,
transparent orange, cadmium red light,
lizard crimson, Hooker's green, Palo blue. Indigo blue, and
then metallic gold. And, of course,
bleedproof white. Now, you can use white guash, but I prefer the opacity that we get from
bleedproof white. And coming back to
our indigo blue, I wanted to paint this out
for you so that you see the variety that we're
going to use this for. We'll use it in
its natural form, just straight from the
tube for some dark areas. We'll lighten it up with water, but we're also going to add salt to it to get
this beautiful snow. So you are going to need
a little container that just has some fine
grain table salt. And we'll add that and get some of our snow
for the background. Go ahead, guys, and gather
up your palette supplies, and we'll go ahead
and get started painting in the next video.
4. Background: Who's ready to paint? Me. Let's go. All right. So I'm going to be using my
mop and my number four round. You can see that I have created a well of paint already with the indigo blue a well is
just when you have a puddle, so to speak, of paint prepared. Because once we start
this background, guys, we're going to want
to do it fairly quickly, just because we're going
to do it in sections, but we don't want
those sections to look like separate sections. We want it to look
like all one piece. So it helps to have
this already mixed up, and then we can just dip in. So I put the indigo blue here. I've mixed this up here.
It's probably about a oh, I'd say 95% water, 5% paint. The way I teach guys is
throughout the class, I'll be giving you the ratio
of paint to water that I use so that helps you understand the proper values
that I'm using. I also have my salt ready to go because you need to
put salt on your paint while it's wet in
order for it to absorb that pigment and create
the snow that we want. So we're going to go ahead
and start with just water. With wet on wet, we're going to just wet our paper and then we'll put the
paint on top of it. Now, always remember that paint flows where
the water goes. So that's why I
have two brushes. We don't want to get paint
or water on our tree or our candy cane because
then we'll end up with our sky color.
On those pieces. And so we want to
be really careful. Now, if you goof and you get
water on your candy cane, then go to a different area
on your background and let that dry really well before you put paint on it because
you won't be able to get indigo blue off
of white very well. You can have some success, but not great success. So and I'm not going to
do this area here yet. We'll come back and get these
tight areas afterwards. We're going to stick to
the bigger areas for now. So I'm just going to use my smaller brush to go carefully around some
of these small pieces, and then I'll switch
to my nice big brush. And you don't have to use a mop. You could be using a larger
round or a flat brush would be great. All right. And I'm just getting this wet, but I'm not creating
big puddles of water. If you're using 100% cotton, it's going to easily
soak into your paper. If you're not using 100% cotton, it's still going to
soak into your paper, but it's just going to
take a little bit longer. Be patient with it. That's okay. We're just going
to do one section. I'm not going to do
this tight area. Again, I'm just going around it. Same here. And I'm going to
do about this quadrant over. So I'm going to go ahead
and just let this get wet. Being careful around my spiral. Okay. Great. We're ready
for that section now. Let's go ahead and dip into
our water mixture again. This is 955. I just
gives us a fell. Yours may be a different
value than mine, even though you're doing
955 just because of the brush depends on how
much water is on your brush. But down towards
this bottom portion, we're going to do
it fairly light. Now, keep in mind,
watercolor always dries one value lighter than you
see it here when it's wet. If you don't like it, we
can always come in and add another glaze on top of
it to make it darker. Go easy on yourself. No stress. You just
love this color. I love indigo blue.
It's so pretty. Being careful around my spiral. Awesome. Now as we get to this higher up portion,
you don't have to be careful. Just laid in there. Feels
good, doesn't it? Dear. All right. Now I'm going to be a little more careful again. Great. Now, where
we have left edges? I'm coming in. This is
just water on my brush. I'm just ing it a little bit. See how that softens that edge? That's going to make
it easy for us to come in and do that smaller area. And this is going to
make it easy to meet up when we do this
next quadrant. But for now, you want to come in picking up some more of this indigo blue,
the heavier mixture. It's probably more
80 20, 80% paint. Sorry, 80% water, 20% paint. You see how much darker it is. I'm starting up in this corner. I like to have my corners
and my edges darker. It frames the piece. Now, this is a personal
preference of mine. You can choose to do it or not. And because it's wet on wet, it's going to blend nicely, but I am just going to add
a little water, get down. That's my technical term. Great. Now, while that's wet, I'm going to pick up
a little bit of salt, test how much is coming
out of my fingers. Now, the more you put on, the more it's going to take off. We are going to come
in with some of our white paint and add
more snow on top later. We don't need to
lift off a bunch, but this is going to add
a great texture to it. Now please don't get salt in your water because that's
going to impact your paint. I'm going to wipe off
any excess salt here. Now, we want a clean brush, and we can go ahead and start
adding in some water here. Again, I'm not going to go
down into that corner piece. We can add that later.
Add water here. Great. You ready to add
some paint? Let's do it? I'm gonna start dark up here. And then I can I
go to the light? Oh, that sounded funny.
Don't go to the light yet. Stay with us. Stay with us. Alright,
bring that up. No. Careful there. Great.
Let's do a little rinse. Now I'm going to use my
smaller brush because I can see that I didn't quite
get close enough. Good. I'm going to just use
a water brush to soften that edge and soften the edge and soften the sedge. Good. Now, I do want to darken
this just a little bit. While it's still wet.
Yeah, I like that better. Good. Who's ready
to add some snow? Look at that. Isn't that great? Again, I'm going to test it out. This helps me know
how much I have in my hands before I start
throwing it down. Because you can see even
just sprinkling a little bit takes off quite
a bit of paint. All right. And let's
keep on moving. We're just going to use water. No This is where having my big lights in the studio because I can really see the
shine of the water. So I know where
I've gone. I think that's the only time I like
having these big lights. All right, I'm just going
to do that small area. I'm going to use the lighter
wash of paint. Fill that in. Good. And salt there. B. Great. All right. Now I think I'm done with this
big brush, probably. I'm to switch to
my smaller brush. I'm going to start over here. No just being really
careful. I'm taking my time. Trying not to get it
on the candy cane. Okay, good. Now we can pick
up some of this lighter mix. I I'm going to start, if you touch in the middle,
it's going to spread out from there and
that's going to help us. Let the water help us. That way, you don't
have to worry about getting all the way
to the edge by yourself. You just nudge it along a
little bit and remember that water that paint flows
where the water goes, it's going to do the job for us. Which is great in these
tight areas. It's wonderful. I'm not going to worry about
putting any salt there. Stuff on that edge.
Great. Now let's move along over here. Everything tight area,
just go up the middle. Isn't wet on wet
fun? I just love it. Some people are afraid of it because they feel like
they don't have control, but really, you do. In that you know what to
expect and you're in charge. You just show it
who's in charge. All right, beautiful.
Let's do the next area. Over here. This teeny tiny spot. I'd be using a flat brush for
these straight edge areas. Do you have a favorite
brush? I imagine you do. Isn't that amazing how
it will not I will not go beyond the boundary
of where you put that water. That is how you are in control. No. Soften that edge a little bit. Great. Next. When you
see me touch my tissue, I'm just getting some of
that water off of my brush. Or if I have paint,
I'm just getting a little excess paint
off of my brush. But it's one more reason
to have a tissue in my hand as I paint. You'll notice that I always do. Now, I'm just softening
this edge a little bit. My my well has run dry. Good thing you're almost done. Great. We have
another area here. I'm going to break
this into two areas. I'm going to do this top part because this will still
be a little bit wet. We'll make it easy
to blend right here. Okay. I realized we didn't
do that right there, so we got to go over and
do the other spiral. So these spirals, you
definitely want a small brush. You could use your detail brush or a number four like I'm
using or something in between, whatever you're
comfortable with. Wonderful. Let's hop over and do this
little guy over here. Alright. We are almost paradis. Yeah. Honestly, I think this is probably the hardest
part of the whole piece. We're just hitting it right up front and the rest
is a piece of cake. But it's also the
funnest because you see such an amazing transformation take place right off the bat. It? Okay, so I went into
my piece a little too far. I'm just going to touch it
with tissue and lift that off. All right. I'm going to
go right up the middle. Yeah, that not doing its thing. Don't worry about getting
every edge exactly. You know, every
little indentation. We're not going to ink. We're gonna add snow. It's gonna be very forgiving. So you'd be forgiving
on yourself, too. Don't worry. Great. Okay. Now, this was a pretty big area. I'm gonna add just
a touch of snow. All right. We need
to let this dry completely so we can wipe
off the excess salt. I'll see you in just a moment
when this is totally dry.
5. Roof & Tree: Okay. I have wiped off all the salt. It didn't turn out great, guys. I hope you had fun with that.
It's such a fun process. I've taken a pencil and
I've just reiterated here where my spiral marks will be because mine
had disappeared. Make sure that you're happy with the marks on your upper spirals. We're going to dive into
some Hooker's green. I have hookers green out on my palette and I will be using my number six flat I made my number four because you know how
much I like that. But let's start with
just a wash. Now, a wash is when you just
use all one value. And that's what
we're going to start with up on this upper spiral. This is per green, and I'm going to use oh, I would say 95% water, 5% can, so a 955 mix. We're just going to go
ahead and put it in. Wash is so easy
because you don't have to worry about
shading and highlighting. We're just putting it all
in as one value from now. I'm going to switch over
to my number four round and let's stick
with the 955 mix. I'm going to let red be
the first one there. I'm going to go ahead and let's go ahead and
wash in the green. Now, again, we're going to have a little latitude when
we do our inking, don't get too hard on yourself. If you don't have a real
steady hand, that's okay. We're going to do some
outlining with the ink. I'm going to make
this one a little bit darker just because I made the
upper one a little darker. Always be kind to yourself
while you're painting. This is everything is
a learning process. I've been painting
for 100 years. I'm still learning new things, and I push myself to
learn new things. So don't be upset if you go outside of a
line or good grief. Sometimes I've even
applied the wrong color in the wrong spot. That's okay. This is a whimsical piece, which means there's no
wrong way to do it. It's just a fun
little holiday piece that whatever you do is right. And we learn and we grow and
experiment and have fun. So just enjoy the process. Now, actually, while it's almost dry but still
a little bit wet, let's just pick up
water on our brush, and we're going to lift
off some highlight right in the middle
towards the top. Is going to touch it with water and then I'm going to
touch it with my tissue. You can see how
that lifts off and it makes a light spot.
Let's do it again. Scrub it in a little bit. Nice. Sticking with our 955 on that side. Notice how I'm holding
my brush here. I've got tight control. I'm holding it pretty
much like a pencil. There are times when
you're panging loose that you'll hold it at
the end of your brush, but for tight control, hold it up close to the front. Okay. I'm going to Well,
I'm going to make a mess. And then. You never
got one of those days. Oh, my goodness. Okay.
So I'm going to come in with my flat and I'm going to side load.
Watch what I just did. I turned my brush on the side. That's what I love about flat. You can use all different edges. I just picked up
paint on the corner. Gonna work it in
just a little bit. Now, that side that has paint, I'm going to take it along
with this bottom edge. And look at that
gorgeous shadow. All right. Now, if yours
went in a little strong, this is just water on my brush, you can just go
along that top edge with water on your brush and
it will soften that edge. Beautiful. Let's do
it along the top. So again, I'm just picking up a little paint
on that corner, work it on my palette, and I'm going to just go
out of that top edge. Beautiful. Now, if you want
it to come down further, and bring it down
a little further. Yeah. Great. We're just adding
a little shading there. Just give it a little demth. Beautiful. Good job.
Continuing now. Let's add a little shading. Picking up on the
corner. Let's just do a little bit on
this inner edge. I'm trying to do this without putting my hand in the camera, so I'm gonna soften that edge because I got a
little hard edge there. Great. See that as shadow
on the underneath edge, and let's do the other candy
cane candy cane rooftop. Boy, I had fun
making this design. I to like four or five versions, but I just kept getting
more and more candy in it. Okay. Let's keep on mowing. Let's wash. 955. All in value. Here we go. And let's pick some up on
the corner of our brush. Now, this is going to have an actual roof line with tiles, which is going to be
really fun to ink. Across the bottom. Yeah, clean that up just a
little bit, soften out water. Great. I went out a
little bit into the sky, just getting some
water on my brush, cleaning it up a little bit. Okay, great. Let's
go down to the door. Again to our wash at 955. Great. Now, your lines were a little kittiwampus like
mine, even up your paint. I'm going to take this to a 982. We want it quite light
so that we can come in and add some shading
and whatnot to it. So 982 Notice where I'm holding the brush now. Almost to the end of my brush, gives me more range of motion, so I can just take
some nice big marks and smooth it all out. Also, did you notice I
made a well of water and paint over here so I didn't
have to stop and mix it. If you have to
wash a large area, have that well prepared. You don't have to stop,
and that keeps it all in value. Beautiful. All right. Now, let's come
over and do this candy tree. And we're going to take
it back to that 955. Okay, I am going to sex that
out. Switch to my four.
6. Tree & Shading: H. Okay, I've pulled out my larger
flat. I know it's flaps. I brought the indigo blue back over and I've mixed it
with Hooker's green. I would say it's
almost a 50 50 mix between the two paints, and then I've added
quite a bit of water, and I'm just going for
this beautiful blue green. That's probably I
would say I'm just going to Oh, yeah. I like that. Remember it's going to
dry one value lighter. I'm getting on the
chiseled edge. That means straight up and down, we get this tight point. And. We're going to do some fun designs on top
of this tree with white. So we need it to be a
little darker value. I wanted this one really light, and I wanted this one to
be on the darker side. Some of that beautiful
blue mixed in. When you're thinking of
doing an art project, you always want to
think of composition and tying all your
color values together. Could we have just
found a paint that's this color in our toolbox
somewhere instead of mixing it? Well, probably something
pretty close, but again, it falls back to using the palette as one cohesive
piece in your composition. So it wouldn't have been exactly the same color values
the same family. It's better to mix your
own paints when you can challenge yourself, too. Okay, beautiful. Let's that dry. For we put our green away.
This should be dry now. Picking up on the corner, I'm going to do a little
shadow underneath. So underneath the
top piece like that. Let's float some water on
top of that. D soften. Beautiful. I was emphasizing
the layers of the tree. Let's do another one here. It just water. Of course, we're gonna come on top of this with some fun design work. Yeah, I'm going to add a little bit just
across the bottom. Beautiful. Now, is it perfect? No. Does it matter? No. So again, don't
yourself up, guys. Now, I see one more thing that we need to do before
we move along. Since we have our green
out, let's pick up. I'm using my number four round, and this is that wash that 955. We're just going to
add a little shadow. It's gonna go all
the way around. I'm gonna start at the
top and pull down. And yes, it's going to look awkward for a
minute, and that's okay. Trust me, it's gonna be okay. But that's going to
be the shadow under the greenery around the door. And let's go ahead and put some just a little shadow here. So let's go ahead
and wash this in. Just this inner piece. Leave your white trim. It's
not the end of the world if you paint over your white trim because we can come and
add the white trim again. Just go to add some darker. Let's go ahead and
add a little bit of shading on our candy tree. I'm just going to keep using
my number four for a minute. So my bottom piece is
already pretty dark, but I'll just add a
teeny bit right there. And we're just going to do? This is where the
crease would be, right? Now, always follow the
contour of your piece. Picture this piece
being rounded. I'm just going to touch it
with water to soften there. Picture it being rounded. Great. So we have our
top and our bottom. Let's add one or two
lines in the middle. Just because these are our tile. This is our tile, right, so going to throw in. They don't have to be
measured, straight. Don't worry about
it. Okay, great. And while we are doing those,
let's do it up here, too. Good. Okay. Let's Is this dry? Yes. Let's do our indigo blue underneath the layers there. I'm going to use my large plat, and I'll probably just add a little indigo blue in with
our wash. Let's test it. You guys don't see this, but
I always have some spare. This is just some old
watercolor that I cut up, watercolor paint, that I cut up. And I always have something nearby that I can test
on. It's a good idea. It's a good practice.
There, that's darker. I like it. And this
is the one that we've actually painted with. So now I can see what shading would look
like on top of that. So, I'm going to No, I'm coming across this
as the underneath. And because it's such
an long gain of tree, I'm gonna bring it
down a little ways. Try really hard not to get
that on your candy tree. And now I'm gonna put
some along that bottom. Wonderful. Now, again, it
may look funny right now. Trust me, it's
gonna be just fine. This is just where we
want it to be right now. You're doing great, guys. You're doing great. Alright,
take a deep breath. And let's get some
other colors out.
7. Red House: Before we dive into
our cad red light, take a pencil and just
make sure that you're happy with all of your
lines, your outlines, the lines between your
red and white stripes, and the shape of your windows
and the shape of the spire, everything, make sure
it's tight the way you want it to be with your
pencil so you have a guide. And I went ahead and used a stencil and just added my
three round candy steaks. I didn't add the posts. I didn't add the detail work, but I just needed an indicator most specifically
on the house of where that candy
is going to be so that we can paint
around it with the red. So if you want to go ahead
and add that as well, just refer to I have the picture on screen here so you
can see what I mean, but I'll tell you
what I really needed tightening up was the
shape of my windows. It's really tricky to get a nice arch when you're
applying a pattern. It's much easier to
eyeball it afterwards. So just make sure
you're happy with everything before we
take this next step. All right. So I
have cad red light. It's on my palette, and you can see I've put it into my flower palette because
I'm going to make a well. We're going to do a lot of one color all value
washing with this, and I want it to be quite light so that we can come
in and shade it afterwards. Okay, I have my well mixed. This is about 9010, 90% water, 10% red light. And we're going to
go ahead and just wash it in. I'll win value. Let's go ahead and
start with the big spire just to get a feel for things and make sure it's
what we want it to be. I did a lot of
testing off camera. You need a good value to add to. I'm going to do some
white trims, white snow. Right. Okay. Let's
stop and come up to our Andy roof lying here. Not too much on my brush, so I'm gonna come up
to the bigger one. Oh, my gosh, this is so cute. It's really starting
to come together. The character Super cute. Okay, so this is not
totally dry yet. We can pull out a little
bit of that highlight. Yep. Oh, see how
nice that looks. Maybe a little bit
on this one, too. Just the upper ones. Oh, nice. Okay. And then we'll come put some shading in underneath
it, but that looks great. Yeah, let's do the other side. Again, remember
we're going to do inking, we're going to add snow. So be gentle with yourself. Just enjoy this process. Cute. This is just
a clean brush. I'm going to pull off
just a little bit of highlight here on this one. I'm going to add
just a little bit of shading down here
on this inner edge. To match the shading that
we did with the green. And soften with a little
water while it's still wet. Oh, nice guys. Hey, let's do tiny
little s fire up here. Okay, dipping into
this well 9010, using a flat, a large flat. I start at the top, it's
gonna work my way down. Just want to do win color. All one value, wash. I'm gonna I'm up on the chiseled edge, which means straight
up and down. Just getting through
that fin area. I'm going to switch to my round to help me get through
this little narrow spot. I'm not gonna go underneath it. Set brushes. Now, if it looks a little uneven
here and there, that's okay. We're going to put a lot
of stuff on top of it. It could just be
drying out earlier in some places and not others.
Let's let that dry.
8. Red Candy & Shading: Okay, we're gonna leave
our steaks alone, but we are gonna come over
to our big candy cane, our enormous candy cane. Rush to wet. That feels better. Remember, we want to follow the contour, which means it needs to
be a little rounded. That's rounded.
That feels better. How you doing? Almost
done with this. Okay, well, this is still
a little bit drill by now. Let's add let's lift out a
little bit of highlight. I don't think I need to
touch it with tissue. It's just coming off nice. Okay, and then I'm going to
come in and make it darker. This is more of a 955. I really like that one. Right in the creek there. And this may be totally covered with snow on the bottom,
I don't know yet. But larken it. Great. Okay. How'd you do, guys? I've
pulled out my smaller flat, my number six and
lazarn crimson. We're going to do some
shading on our red, and I'm just going
to pick up pick up. I have water on my brush, and I'm just going to pick up some straight lazarn crimson. It's quite transparent, even though it's
heavily pigmented, and I'm going to go right
underneath the top. And Now, if you need to, you can use water
on your brush and just soften that a bit. Don't struck it too hard, or you're going to lift off that cat bed light,
which we don't want to do. I'm trying to do
it without getting my hand in the camera, then I can't see what I'm doing. This snow is going to be lumpy, bumpy edge, even though it
looks smooth right now, it's not going to be, so
don't be too worried. If you get some lazar and
crimson on there, that's okay. Okay, let's get the other side. Nice. Now, it just a little bit and write down
this side of the house here, this little edge that shows it just gives some
dimension to our house. Now, I don't need to
soften that edge because it's kind of a hard
edge of shade. It's a shade line underneath
the eave, so to speak. A little bit under the windows. Okay. Now, we do want to do a little bit
around the window. What I'm going to
use my lounge for. And this is going to be kind
of like we did the door. It's gonna be a pretty
tight edged shadow. It'll be underneath. Hi leaves. I'm going to come
back to where flop. Okay, I drew my line
in pencil along that top edge where we're going to add some
beautiful scroll work. But if you want
some high lighting or something like
that to show up more, you got to put something
dark underneath it. So I'm just gonna add some of that crimson
there, softening it. Great. So that was going
upwards, not downwards. Okay. Let's do our candy
cane real fast, and then we're done with
our crimson, I think. We've already indicated
where we want to shade. Says, Oh, yeah. See how that just enhances that, gives it more
dimension and depth. Nice. Okay, let's want that try.
9. Windows & Shade Candy: Okay, I've picked up
my number four round and some cad yellow medium. I'm using a mix
that's about 85 15, it's pretty strong yellow. I have gone in with
my pencil and just make sure I was happy with
my lines for the windows, and we'll go ahead and
just fill them in. They're so small, that's why I'm just using a small brush, so I guess we're going to
continue on with this brush. Okay. Great. All right. Okay, I've picked up
some cad orange now, and this is going to be about 9010 using my number four round. And my yellow still
a little bit wet. Doesn't matter if
it's a little bit wet or if it's totally dry. Doesn't matter. We're
just going to add a little bit of
warmth, so to speak. I'm going to start on
these outer edges. Just add the tiniest amount. I'm going to wipe
most of it off, and then I'm going to just pull it up almost
like I don't know, like a fire but not a fire. Yeah, I'm going to rinse out and just kind of tap a
little soften that. I just want it to look kind
of modeled, so to speak, just kind of see
through and kind of here a little there
a little in the window. Kind of like that.
Let's do the next one. I'm not going all the way up, but maybe three
fourths of the way. Across the bottom, then up a
little, just some strokes. Great. How'd you do, guys? Okay, let's pull out
our transparent orange. I love this color. It just pops. Surprisingly.
You get it on the palette. It doesn't look like it's all
that much different, but. You get it on the orange pow. That's really fun. This is
going to be more like 95955. Not going to take
much. I'm going to keep it down low. See that? Powerful. Now, I've
tapped it in there, I'm just going to take some
water and tap some more. Just do it to your liking, guys. Make it as strong or as
soft as you want it to be. I just like that warm glow. Doesn't that look
inviting? Like, Oh, take me in with a warm
blanket and a fire. Hey, let's do our next one. Moving on. No. All right. Great. Let's let that dry. Using my number four and
coming in to our green here. This is going to be a 982
mix, so lots of water. We just want to put
just a gentle indicator on these roof tiles now
that these stripes are dry. Because we are going to
come in and ink these, but we still want to
have just a little indicator of a shadow. I will help us when we ink. You know it's like
even I can space out pretty far because we're gonna
have a lot going on there. And now let's come down and
put our red into our tree. And then we're going to start
with some white, I think. So let's come back
into our red wash. That is going on a
little too dark for me, so I'm going to just immediately take off a little bit of a
highlight in the center. I remember to follow the
contour of your shape. So literally every line
on this is curved. This tree. Lifting off a little highlight
on this one, too. Okay, now I am coming back into our Lizard Crimson sticking
with my number four. I'm just going to
add a little bit of shading like we did here. So a little along the crease. Okay, we're gonna let that dry. Let's do a teeny bit
of shading up here. It will mostly be
covered with snow. That's okay. Great. M
10. White Snow: Okay, I pulled out my
bleed proof white, and if you haven't used this before and you bought
it and you're like, Oh my gosh, it's thick. It's really thick like
jello. That's okay. Just add some water to it and stir it up
with a toothpick. Or what I like to do is just
put a little bit in the lid, and then I'll thin
that down and use that rather than thinning down
the whole jar every time. Also, before I finish using
it, before I cis it up, I'll just sprint a little
bit of water in there and just let a tiny bit of
water sit inside the jar. And that keeps it a
little bit more moist. But this jar will last
me almost a whole year. I'll go through two
jars in a year, but you have to understand
I paint every single day. Anyway, I'm going to start
with my number four. We're going to lay
in some light bulbs. And then we'll go over them
with gold, but more yellow. But we have to start with white because we're going over green. So if you can look
closely, you can see, I just drew in some lines, which will be the cord. And we won't do that until
last with our inking. But that's going to help us understand where to put
our little light bulbs. And I have a lot of white
on the tip of this brush, so I don't know if I
can get a really good Yeah, I guess that's gonna work. We just want, you know, a few. We don't need a whole
bunch of light bulbs. But just some Christmas lights, and they can be going
different directions. Um, they can even be
lying out in the air. They'll be attached
on the cord, right? Maybe I'll put one
over here, too. All right. So the key here is obviously to have fewer
and fewer as we go up. So I did one, two,
three, four, five. Okay, this one. Oh, my gosh, this gonna be so cute. Alright, so we're good there. And then, now that we have our
white, let's pretty it up. You know, let's
clean up our mess. Maybe you don't have
it, miss. But I do. So let's just make
this look nice. I'm gonna go ahead and have
a little bit of snow here. It's gonna coming down. We're still gonna
come in and add our big snowflake up here, so don't get carried away. But a little mat. That's
kind of cute. Okey doke. Let's come down here
and same thing. And make it lumpy bumpy. Oh. Almost like a santat, isn't it? This will cover up
any little drips, any pencil marks, any, you know, any flaws and make
it beautiful white. And of course, we'll come in and do a little shading
on top of that. And if you want to,
you can now make some little iclding Got. Oh my goodness, it's really
coming to life, guys. I hope you've had fun. I hope this has been a good
experience for you. Alright, let's come
over to side here. Keep in mind as you
fill this in that we want it as smooth
as you can get it because we're going to
be putting lights on it. So a smooth surface will make it easier to ink and paint over you want to be careful
about going over red that could pick up the red.
Then you'll have pink. Doesn't hurt to clean out
your brush every little bit. Just to make sure
you're not picking up any additional
color like this red or sometimes it
just starts kind of drying on your brush
and then it gets thick All right. And when
we put our lights on, they'll be on this upper edge, which allows us to
go ahead and hay some snow icicles if we
want. Which of course we do. Okay, great. Now, I'm gonna rinse out again
before I do the windows. Just to have a clean brush. I've probably emptied
out to, you know, I've probably emptied
out my water five times, at least during this process. I hope you have two, just to keep your brush
clean and your paps. True. T value. Alright. Let's keep going. We're gonna go
around the window, kind of working our
way down a bit. I'm not going to do these
window boxes because we're gonna fill them with greenery and I don't want it to
mix with the white. I'm not going to do
around the door, either. This white is a bit like guash in that it regenerates
when I get it wet. And it will mix with whatever
you're putting over it. All right, so not gonna
worry about those. While we have this out, I'm
gonna come up to the top. And I'm just gonna add
a little pile of snow. Okay. Is. Put a little on top of this dt. Great. Okay. Let's all that white dry thoroughly.
That's quite wet. Once your white is dry, pick up your smaller flat. Come into your well
of indigo and water. This is now I've made
it a 991, 99% water. Tiny, tiny amount of indigo. We just want to shade
our candy cane. So we want it to be quite
light, about like that. We're going to come in and just do both sides
of the candy cane. So we're going to
do both this side. Remember to follow the contour. The side. I want to soften out. I'm gonna make it a little
bit stronger there. I'm come in with my number four. It may feel strong right now. Remember, it's gonna
dry one value lighter, and then we're
gonna come in with other things all around it, which is gonna make it fade
to the background a bit, so it might feel
funny right now, but again, just
trust the process. It's going to work out great. While we're working
in our 991 mix, let's go ahead and just add the tiniest amount of
shading on our snow. This is going to be more
as kind of a modeled look kind of like we did
on our windows. Because this is white white. This is going to show up
a little more than you think. Here and there. Now, if you really
stroke this in, then it's gonna plant. And that's not what we want. So I'm using kind of
an up and down motion. Um, just kind of
more in keeping with our bouncing bounce snow. Texture snow. But
can you see that? Can you see how that just
adds a nice texture to it. It gives it some dimension. Knows I'm holding the brush
at the very back end just so, range of motion, and I don't
get too tight with it. I would be a little more generous on the
bottom on this eve, just 'cause it would be more
in the shade, so to speak. Good. Now, let's let that dry, and then we're gonna come
in and work on some lights.
11. Lights & Holly: I've picked up my five
out. Detail brush. Yeah, I'm going to come
into the cad yellow. Now, you could do multi
colored lights. Of course. We're using all the
beautiful colors that you could use for lighting. I'm going to stick with cad yellow so that I get
more of a glowy look, and we're just going
to softly go over. Keep in mind when you
go over this white, it tends to mix with it unless you just kind of
drop the paint onto it. Right. And once that's dry, we can take a look and see if it needs a second coat or
if it'll be good to go. Now, let's come into our green
and add some holly leaves. And I drew a few on here. We're going to do holly
leaves all around the door. But I'm not going to
draw them all in. Let's once you've done
a few holly leaves, you get it, so you don't
need to draw them all in. But if you're really
uncomfortable and you want to, then do that. That's fine. We're also going to put
let's make sure that's dry. We're also going to put a
couple above these two windows. I'm gonna leave room between
them for our berries. Cute. All right. Now, we don't want any
to go onto the door, but they can go beyond
the door frame. Remember, we didn't
paint white so that they should show up nicely. We shouldn't have to worry
about mixing with the white and just have them
go every which way. They can be on top
of each other. This is we're going to come
in and add some berries. Okay, we're gonna steer clear of our two window
sills, window boxes. We're gonna put pine in
those. I'll be so fine. How are you doing, guys? We're almost done with these. This is so relaxing to me. It's like I can just zone out. In my right brain and
I don't have to think about anything painting
for a minute. I love it. All right. Just
gonna come back up. See any bare spots. You can even do aptial leaf. It doesn't matter.
We're just filling in. Great. Let's let
that dry. All right. Let's keep up the good work, the momentum we have going
here with our green. And this is where
we're going to have some cute pine coming down. I usually start in the middle. That makes me darker. This is going to be
more of a 9010 mixture. I usually do a stem down
and then add the needles. And then sometimes we
just add some hokeoti. It doesn't necessarily
have to be a branch, but it's just kind of
a filler. I like that. Alright, let's do
the other side. I want to start with main two. Notice how I'm holding
my brush up close again. Now I'm using it
more like a pencil. I want some tight control. H All right. Now, let's go ahead. Now, if you need to draw
this in, draw it in first. Ok, Dokey. Let's put some
up here. Out that window. Okay. Coming into my
Alizarin crimson. This is probably, Oh, 85 15. So pretty pretty
thick on the paint. I'm using my detail brush. And I'm gonna go ahead
and add some berries. Oh, isn't this
getting cute, guys? No, I try to be kind
of random with these. I clump some together, and I string some out. Just a variety. But you do you? Whatever feels good,
whatever you like. Except sticking your finger Except sticking your finger in your berries? That's
not a good idea. In to step back and
take a look and see if you have your
berries where you'd like. Sometimes we get so focused in we're not really seeing
the bigger picture. Beautiful. All right. Let's let those berries
dry thoroughly. Sometimes depending on how
thick you put them on, they can dry on the surface, but they're not dried
completely through. So let's give those a
minute to really dry out before we move
on to the next step.
12. Lights & Scroll Detail: Alright, I'm picking up my
line of brush, my five at. Coming into the cad yellow. I am going to do a
second coat on knees, little guys up
here, these lights. And then I did add a line just a guideline to add some lights down on
the rooftop line. Just a little cap kind of
thing where they attach. They look kind of funny,
but we're going to put metallic paint on them to
make them really glow. Right now, they look
like lemons hanging. While those are
drying, we can go ahead and come back
into our white. I picked up my number
one liner brush and see how long that tip is. And, um, one tip guys to bringing this
to a nice fine tip. I do it in the cap. I don't know if you
can really see it. So I'm going to show
you here on paper is as you pull through
the pig you twist, watch my fingers
here, you twist, and you lift, and you can
bring it to a really nice, fine tip, a really
fine fine line. That's a great pro tip on
how to get a fine line, and we're going to do a lot
of nice scroll work here. Also make sure that your
paint is fairly thin. I'm pulling that. I'm twisting it.'s a little bit more
tricky to do in a cap. But I still have a
pretty fine tip there. Okay, so these are just random. If you're more comfortable, you can absolutely make
some marks on your paper. But I just like
to start out with a real narrow kind of triangle, almost an arrow, kind of. And then I'll just take
it down and curve it. And I'm starting to take
these every which way. Honestly. Maybe I'll
have one over here. They're just going
to be total random. And even the tops aren't
going to be the same. Okay? Isn't that pretty? So if you need to
practice a few of these on your scrap paper, do that so that you're
comfortable with it. That's probably enough. So just kind of do random like that, and just get into
that right brain. Don't overthink it and just
let your brush take you. Just go with it. Let's do that on all three of
these towers here. I'm gonna go right across
these icicles. It's okay. All right. I'm going
to come back and add some dots at the top
here, but not right now. On the bottom, I wanted to emphasize these
this diamond here. U smeared my beautiful diamond. All right. And I
wanted to just do a little bit of scroll work. I wanted to tie
in the diamond on the door with some
of this design work. Now, I'm not going to
put very many scrolls on the front of the house because we already
have a lot going on. Go fill these in.
Yeah, I like that. Yeah, I like that. Okay. Maybe
I'll put a hint of that. I'm not going to go
over that candy stick. Just a hint of that. I'm going to put dots. Dots it's surprising how dots just really
enhance a design. I am gonna use my stylus because then I can
get consistency. Smoking. Let's let those dots dry really well and
the white design dry. And I need to fix my
little green spot there. See you in just a second.
13. Snow & Foreground Candy: I'm going to put
one more coat of cad yellow on the
lower lights now. I think the upper
lights look great. Let's go ahead and do the shading on our
snow, our foreground. We're gonna use
our lightest wash. It's gonna be like a 982 of our incel blue,
using a wide flat. We'll start light,
we'll build up. Okay. First thing
we're gonna do is just add along the
end of the house. A kind of scissor
back and forth a bit and smear it here and
there. A little pathway. And it's not gonna
come straight out, 'cause we've got our
candy candy steaks there. It's just gonna
move to the side. And it gets bigger as
it comes towards you, always keep that perspective. And let's go ahead and
just add a little bit. Getting a little bit of texture by touching it with my tissue. Great. And same back here. What little texture. I'm
just gonna touch it. In the corner of my breast? No go on the balls. No, I might look a little bit funny right
now. That's okay. I've said that a number
of times today. Oh, dear. We're going to let's
add some white. So we're just gonna pile a
little up here and there. Maybe along the edge
of the sidewalk. We do have to put well, that's going to be
our candy tree. I kind of want to
do that as a stick. So I'm actually going
to smooth that down. There. But just kind of little piles of snow here and there. You can have some in
the back. Get rid of that straight line we've
got going across there. Definitely want some
across the candy cane. Bury that in. But leave
room for our sticks. Okay, good. Let's let
that dry and then we're going to work on our trees
and put in our candy sticks. I've gone ahead and
use the sensil to add our three little
ornaments that are on the ground and re emphasized if yours had faded, mine had
faded quite a bit. I re emphasized
the candy sticks, and I went ahead and put
in the design for those. I'm going to go ahead
and shade the outer edge with our indigo blue. This is our light mix. Okay. We're just going to do the outer edge and let that dry. This makes it look dimensional. Did it might look
funny for a minute. That's okay. Let me
outside the line there. Go outside the line pick
it up with some water. I'm soften up just to touch. By the way, I went and got some clean water. I
hope you are, too. Wow. I have too big
of a brush there. I'm gonna come in with my four. There we go. All right. Let's let those dry and
move over to our ornaments. And you can do these any
color that you want. I'm going to do one
in the Sal blue. Notice that I start
in the middle and I push the paint out to my line. When I'm doing a circle, that's what I like to do. Yeah, we are going to ink this. We're gonna throw
some snow on it, so don't be worried about
having an exact circle. Hey, I'm gonna pick
up some yellow. I'm gonna do yellow up here
next to the red house. I'm also going to do yellow on the top of this tree
while we're here. And then I'm going
to pick up red, maybe a little bit bigger. Good job, guys. Now. Let's come do the red over here.
These should be dry. This is our red mixture,
that's like a 955. Who isn't that cute? So cute. I should be using
my smaller brush. Much better. Notice how I start in the middle and then
I push the paint outward. I try to do that on
curved surfaces. And one more Wonderful. Let's let that dry. Well, we
have our liner brush out. Let's go ahead and put the
stick on our candy trees. Just using our indigo. We're basically just
gonna fill in that space. We're going to come
back and put some snow across the bottom so it doesn't look like it's just
sitting there. Now, this one, you could
actually not do a stem. It would look fine, it was
just sitting on the ground, but I wanted it to look
like a candy tree, so I'm going to give
it a little thicker. Trunk. Okay.
14. Tree Decorations: Mm. Let's go ahead and put
some gold on our lights. I just don't want to
I'm gonna turn upside down so I don't brush
anything that's wet. There we go. Oh, that's
gonna be pretty. Some of that up. I got
too much down there. Now, if you want, you can go ahead and add a little
shine around it, which I like to do. Just a little bit of. Let's not forget our
little ornaments here. I'd like to do this for you. H Okay, let's let those dry, and we're going to
work on our trees. I pulled out my liner brush, my number one liner,
and the white. And you can see that I have
finned it down quite a bit. And it's going to it's going
to dry lighter than it is. I just want a real
light light thing. Okay, so what I'm going to do is start by just doing a
little zig zag edge. Notice I'm rolling it to a fine tip in my
little cap here. I'm also making
my zigzag bigger, smaller, a little bit bigger, little bigger, little bigger. I'm good even bigger down here. All right. That was fun. This is probably a
cream consistency. If you were looking at milk
and cream. It's very clean. And I'm gonna start at the top. You know, I'm just
gonna pull down. I'm gonna start in the middle. Pull down. And that will help me know everything to the left
is gonna curve to the left. Everything to the right is
gonna curve to the right. And I'm not touching my zigzag. I'm gonna come in
with dots after that. Fun. Hey, one more. Nice. All right. Okay, I need you to find one of your brushes that
has a flat bottom. Surprisingly, not
very many of them do, but find your flattest bottom, test it out and see what
kind of a circle it makes. It makes a pretty good circle, you're in business, and if
it's the size you want. Also, keep in mind, if you want a consistent circle, you have to dip every time. If you want them to go smaller, you can just not dip each time. We're going to do
a design and we're gonna be wiping the
bottom of my brush clean frequently just to keep
it from coming up. So I have a little well.
I've cream consistency. Okay. And let's start
down here, I guess. Let's see. I don't
think I'm gonna try and do each V. I think
it will be too much. Oh, my cuteness. Now, make sure
you're carving this. Ooh. So cute. So cute. Alright, let's do
the next layer up. I better stop there. Okay. Now, I feel like these dots are getting too big
for this top part. So I'm going to do is touch
this first and then that. O here, here, there. Yeah. I like that size. And our last layer, I think I could use a stylus. Minis my largest stylus.
Use what you have. Even a pencil lead. I've used pencil lead before. If you have a thick pencil. All right. Now, we
need to be super careful and not
smear almost dots. Let's let that dry. Alright, so I'm coming back
into our cream mixture. Coming over to our next
little cutie here. And I'm going to
start on the top, le. Yeah. Like that. Alright. That was fun. Yeah, I'm gonna add
some dots to this one. Um, I'm just gonna be kind
of random with these. And then go back to
my large stylus. No, we can add a
little bit of snow. Worry I feel like
adding some snow? That's great. I'm gonna pick up just a smidge
of this quin gold. You could use a yellow ochre
or not even do this at all. I really just gonna pick up a little bit out of a tube and just a little bit of
shading down on this 1 ". Moving it up on sets. Okey doke. We need
to let our dots dry. And step back six feet,
take a good look. See if there's anything else
that you want to touch up. Um, and if there is, this is a good time to do
it before we start inking. So let's take a look at that.
15. Stars & Snow: Okay, I stood back six
feet and I didn't see any changes or additions that
I wanted to make on mine. Hopefully, you did
the same thing and got it where you
wanted it to be. I have gone ahead and just
added a little pencil mark where I wanted to add
my big stars in the sky and I guess stars is a loose term because they might look more
like giant snowflakes. Anyway, I'm just
going to go ahead and have thinned down
some white paint. Well, it would help if I
started painting it straight, so There we go. Alright, I am just
using my liner brush. Since this is an
enchanted elf house, I didn't really want to
put like a gold star. I wanted to be a little
less traditional. I think I'm gonna bring
this up a little higher. I'm going to add some dots,
but I'll do those last. Alright, I'm gonna move over to the next one now. I'm
gonna make these. That'll be the big
one. I'm gonna make these others a
little bit smaller. Do what makes you happy. Oh Okay, so I'm going to go. I'm going to keep
it simple as far as the number of snowflakes
that I'm putting up there. I'm just going to
play with these for a minute. Cool. All right. And how many years a stylus. Okay, I think I'm going
to leave it at that. Using my number four, I'm picking up a little
bit of azar and crimson. Just going to add a
touch of shading down towards the bottom
of this ornament. And I write deepen
the shading just a little bit on the
outer edge of candy. All right. And then
I'm going to pick up some white and put a
little bit of snow on those. Look, that was still wet there. That's turning pink. Uh,
that's still wet, too. I got to wait till that dries. Okay, while that red is drying, I'm just going to add the
little cap on our ornament. And maybe that one's
buried under the snow. Let's come back over
to our white again. We're about ready to ink, guys. This is gonna about do it. I Okay, let's let everything
dry completely and take one last one last
chance before we start inking. But this is why we
use a waterproof ink so that if once we're
finished inking, we go, Oh, I needed to do one
little piece of shading, it'll be fine because
our ink will not bleed. Let's go ahead and
clean up our paint a little bit and pull out our ink.
16. Inking : I've pulled out my fine
tip, BallpointPen. It's made by Muji MUJI. It's completely waterproof.
I've tested it. I've used it for
years, and I love it. I'm going to go fairly lightly with the inking
just so you know, but you feel free to add as much inking as
you would like. I'm going to start maybe
in the background, and when I go around objects, for the most part
in the background, I like to add several lines. Instead of being really
tight on the edge, it gives me flexibility, but I think it just keeps it
loose and carefree looking. Again, that's a
personal preference, and you do what you like, what you feel comfortable with. There will be some areas that I do a tight line
using these markers. If you've done any of my
other Christmas classes, my ornaments, for example, it really helps you to
do these random lines, kind of broken lines
and different widths. It helps you with those edges. You don't have to be so
perfect all the time. Kind of takes the
edge off, right? So I'm not going to
do these inner lines. You can if you want,
but I am going to come around these
cute little guys. Okay. Now, I'm not gonna go
up around that snow, but you can, if you would like. Just throwing it out
there. Sometimes your pen might get gummed up the white it's hard to
ink on top of it. Got it. Let's go around
these ornaments now. This is the cap. You could leave the cap
off and just have it look like a gumball or some kind
of a brightly colored ball. All right. Let's do a
little on this tree here. Great. Now, I might put
a little here and there, just between those layers. Yeah, just a little bit there. Okay. Great. That's all looking
great. I'm not gonna put any on
the sidewalk look. Let's come over
with this big guy. Great. Okay. Okay, I'm
going to pick up my 0.5. This again, this is a Stelar
completely waterproof, and I'm going to
just do tight line. Give the house a
little definition. And I'm going to go
along the door here. Okay. Okay, I'm gonna switch to
my point to smaller one. I think I'm going to
stick with the smaller one here for the windows because they're so Oh. Now, let's go ahead
and do our lights. So you can see I'm
putting a little cap on it and then shaping. A little Christmas light. Okay. I'm gonna
have to turn this. Great. Okay. Switching
back to my number five. Five. I'm going to
put in the cord. Awesome. Oh, that's
looking so cute, guys. Alright. Looking. Since
we have our number five, do the outer edge here. Then we can go ahead
and do our shingles. Notice I'm putting
a little notch. Like a little almost
a little triangle at the bottom of each shingle, just to give him a little
point of interest. If you wanted, you could do a little along top edge there
just behind that snow, but I'm not going to. I
don't think it needs it. Just pointing it out,
giving you options. I like to give you
options along the way. Okay, I have to really
take a minute and look at these little spires
that we put in because it looks like it's
been lined in black. But what that is is our red
and green have overlapped. But because of the way it looks, I'm going to go ahead
and add some pin to it. Oh, it's hard for me to see
with these big spotlights, so sorry if I get a little
wanky here and there. Now, here's where you may have noticed it on the
pattern. I'm not sure. I can't remember, but I'm
going to make them puffy like this 'cause I wanted them to
look like candy coming out. These were like candy spires. But when we were painting them, it was kind of didn't make sense to do it that
way to paint it that way, but I knew we could
do it with the ink. Very cute. That turned
out great guys. Let's stood up over here. All right. Now you do.
17. Window Trim & Signature: Can we back to my number two. Let's do some lights. Awesome. Okay, let's
use our number five and put in the wire. Awesome. Okay. Then we've got our cute little
spire up here. Good. I wanted to just test and see how this looks. I'm going
to use a number two. I wanted to get a
fill for throwing in some ink on a few of these Holileaves.
Maybe not all of them. Paint them in white.
I've done that before. We did my Christmas
house last year. I outlined them in white. But these are a lot smaller. I think the I will just pick up a little bit
of that definition. I think we're ready
to get our wiped out. Okay, I have pulled out my
five ought, my detail brush. And I've put some
guidelines on my windows. Let's go ahead and
put those lines in. We're not going to
ink around them, so this will just be
a simple process. Y. Eight. Thank God, my paint was a little thin, so my pencil line was showing. Yeah, I think we're ready
to splatter some snow. Alright, I have thinned
down the white quite a bit. We're back to that
cream consistency. And I don't want a ton on
my house, to be honest. So I'm going to unfold
some tissue here and So this will just come on a little
more pure white, as you can see, than
the salt that we did. So it's kind of more of
a dimensional effect. And I wouldn't mind
a few on my tree. And I don't mind a
few on the house. I just don't want a whole bunch. With my candy cane. Just
a few. It indicator. Hey, it's snowing. Like
you want Ray to want it. Just touch it while
it's still wet. All right. Step back, six feet, take a look and see if there's
anywhere else you want to add splattering. All right. When I stood back, six
feet and took a look, the only thing that
I did was I added a white door knob and a
white ornament on the top, just using the bottom edge
of a flat brush again. Now I feel like
it's complete and I hope that you have done
the same thing that you've stood back and really
examined your piece from a distance and determined if you felt like
it was complete. If so, then it's
time for us to sign our name and claim our artwork. I hope you understand just
how proud I am of you. I really appreciate
you taking this class, and I hope that you can
look in the mirror and tell yourself how talented
and gifted you are. Not everyone can tackle a piece
as intricate as this one, and it takes courage and
a lot of time and energy. I'm so proud of you
for taking this on and doing such a wonderful
job. I'm just thrilled. So let's go ahead and
sign our name together, and we will complete our piece. All right. I will see you in the next
video where we will wrap up.
18. Congratulations & Bloopers: Well, you did it. Congratulations. You have
finished your piece. I hope it was a benefit
to you and I hope that you'll learn something new or strengthen the skills
that you already had. You know, if you
found this to be beneficial and you know somebody else that
might enjoy it, all you need to do is look for this link on this page
and send that to them, and both you and
your friend will benefit from Skillshare,
which is pretty cool. Also, if you wouldn't mind
just taking a moment to snap a pick and look for this
button on Skillshare, upload that into
our class gallery, and we can share in the love and the joy and supporting
one another as artists. It would be so fun to see what you have
accomplished today. Thank you for doing
that. Again, I appreciate you spending
your time with me. I feel very honored. I know that there's
some really great teachers here on Skillshare, and so I do appreciate you
spending your time with me. I would love for you to take
some of my other classes. These are some holiday
classes that I have already posted
here on Skillshare. But you can also go to
the top of this page, type in my name Carrie Sanders, and all the classes that
I have in Skillshare will populate for you to take a peek and see if something's
interesting for you. Alright, guys, if you
would like to follow me, all you need to do is
click this button, and all that does is give you a little notification whenever
I pop out a new class, and it would be fun for us to spend some more time in
the future together. If you would like to take a peek into the world of
Carrie Sanders, well, you're welcome to take
a look at my website. It's carsandersart.com. And, of course, Insta
at Carrie Sanders Art. Okay. I hope you
have happy holidays, and until the next time, I
guess it's time for loopers. See you later. Take
care. Bye bye. Jingle bell, jingle
bell, jingle bell rock. I don't know any elf songs. Jingle, jingle, take four. And I'm so glad you stopped
here today because I have this adorable Christmas
Elf workshop. And this is done in I
said the wrong name. What you paint care? What is it? And I'm an artist and a teacher, and what am I? I don't know what I am anymore. We're doing shading and
highlighting and washing, and we'll be doing some And we'll be doing some splat. I already talked about that. I think I just need to be done. Done. Done, da da, done, da da, da, da, done. Done. I'm done. Jingle, jingle, jingle. Jingle, jingle, done.
 Kerrie Sanders, Artist, Teacher, Creator.