Transcripts
1. Intro: Hi, I'm ready.
Bouvier and artist, illustrator and surface
pattern designer. Welcome to my studio in Chicago. As my husband and
I are anxiously awaiting our rival
of our first child. I have been diving deep
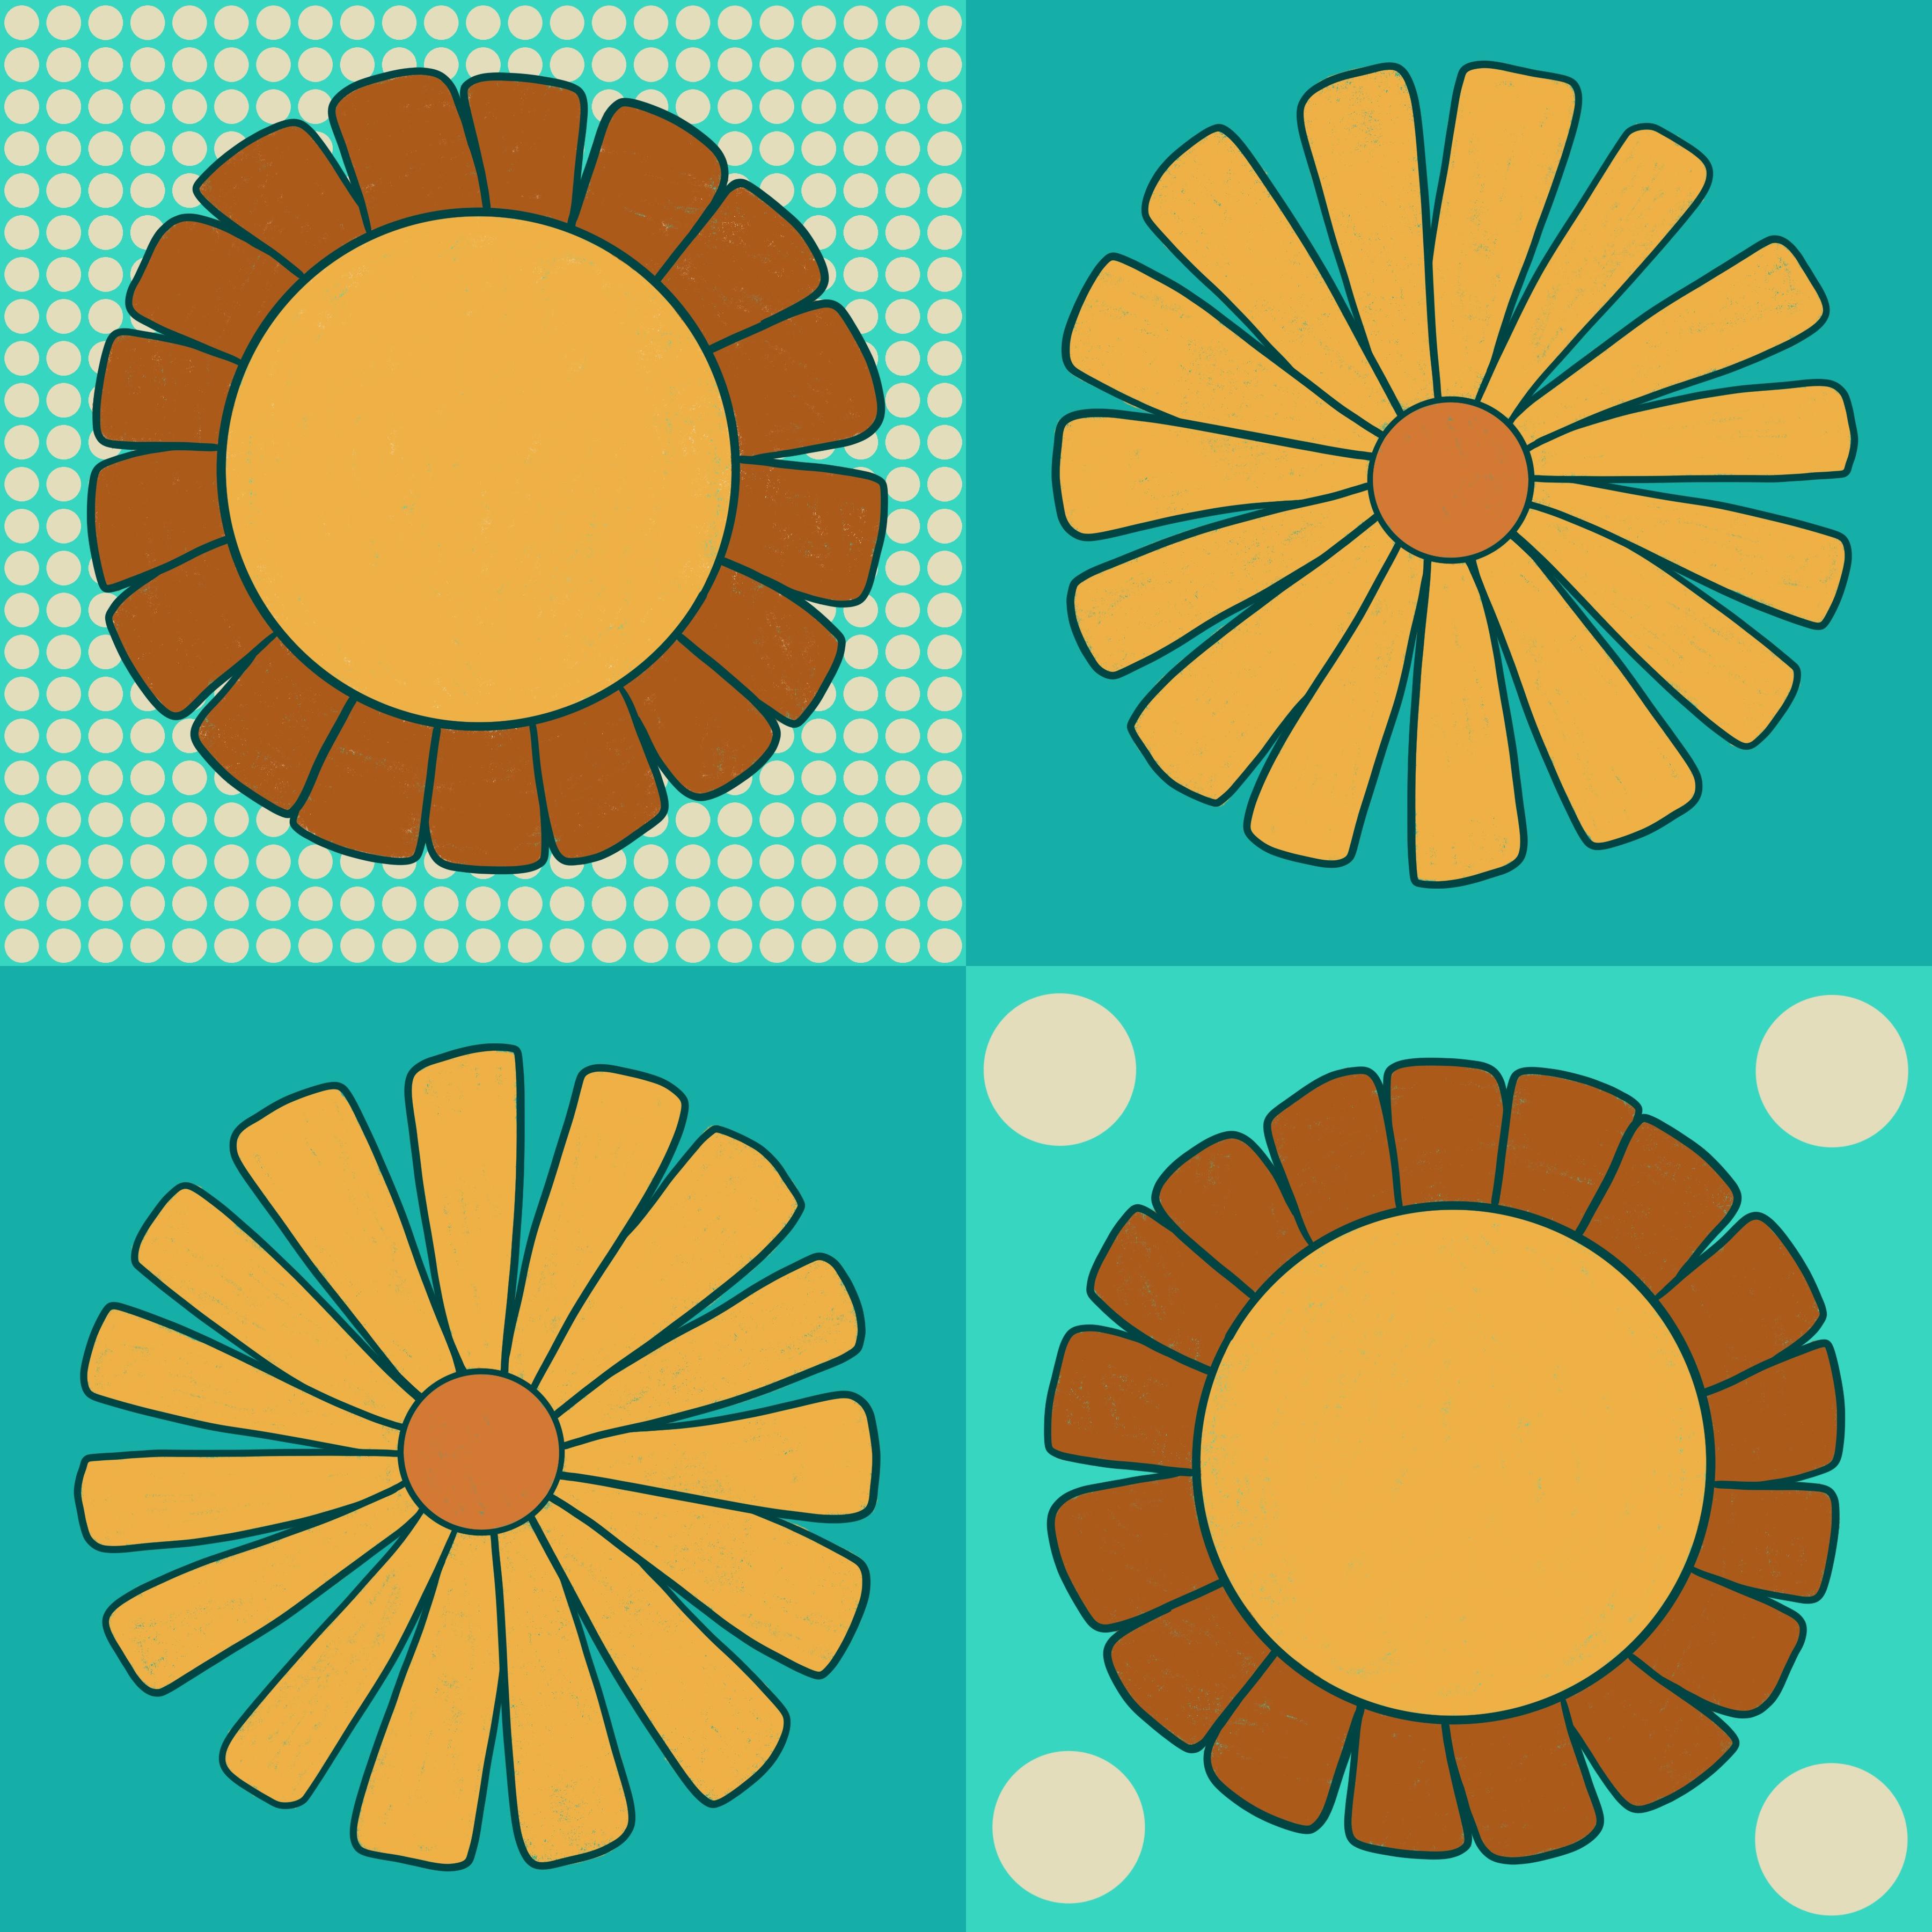
into some pattern creation, mostly inspired by
patterns in the 70s, bright colors with
lots of daisies. That's what's inspired
this entire class. So I hope that you'll
follow along and enjoy every moment and
every step along the way. In this class, I will
walk you through your first steps into
creating a pattern. These patterns are a
great starting point because we're working
with a simple grid. We're taking inspiration from the '70s Flower Power era and channeling our own creativity
to create truly unique, vibrant patterns that you
can use for anything. My goal with this class
is to introduce you to an intimidating subject
of pattern design with easy-to-follow steps that
will hopefully inspire you to keep your creativity
grilling afterwards. During our time together,
we'll gather inspiration, set up our workspace,
sketch ideas, and get to work so you can
create patterns in no time. If you've been wanting to
start creating patterns, but we're feeling intimidated by all the processes
that are out there. This class is the
perfect place to start. Nice and easy. I hope you'll come join me on this journey of
creativity together. So grab your iPad and I
hope to see you in class.
2. Class Project: I'm still having you
decided to join me and dive into creating the
70s grid patterns. Now let's go over exactly
what we'll be creating in this class so that you can move on and get your hands dirty. Well, not dirty, but
you know what I mean? For this class,
you'll be creating a checkered 70s pattern
using the Procreate app. We will start by creating a
custom canvas size that will make our lives simpler as we start working on our pattern. We'll move on to use the drawing guide and set up our grid with vibrant colors
inspired from the '70s era. From there we'll take
a peek at a variety of checkered patterns
in the Pinterest board I've created for you. Once that creative
we'll start turning. We'll move on to
the sketching phase where we take our inspiration and get to work bringing our own unique style into the pattern. After we've got a general
sketch for our repeat tile, will move on to refining
all the details with color, shape, and accents. Now that your
pattern is complete, you'll be able to set
yourself up to test it out and make sure that
everything is aligned. After you've passed your
repeat pattern tests, you can share your
repeat tile directly in the project section
of the class blog. Now that you've gotten
a sneak peek of exactly what will
create in this class. I hope you'll continue
onto the next lesson. I'll see you there.
3. Creating a Canvas: Let's go ahead and get
started and create our first Canvas for
this particular project, because we are creating
a grid pattern, it makes the most sense
to create a square. I like to create
a square that is 12 by 12 " here if
you're in the US. And the reason I do
that is because if I wanted to use this pattern in
the feature for wallpaper, wallpaper is
typically 24 " wide. So that would be able to
repeat the pattern two times across one strip of wallpaper. If you go up here to
the top right corner, you can hit the plus sign. Let's go to create a new canvas. Again, because we're
here in the US, I will use inches. But you can create any
equals square that you're comfortable with in any sizing or measurement that you choose. Tap 12 in the width section. Tab 12 in the height section. Because we will
most likely print this pattern on a
product in the future, I want to make sure
that our DPI or dots per inch is
at least at 300. This allows it to be
a slightly scalable and we'll print very clear
without being pixelated. And then you can also
see the bonus here that tells us we have 37 layers, which is plenty
for this project. If you want, you can
tap where it says untitled canvas and
you can re-size to square, grid pattern. Once you've renamed your Canvas, you can hit Create and it will populate
an open up directly. Before we move on to the
next lesson and get started, I want to remind you that this way I'm teaching
you to create a pattern is just one of the
very many ways you can create a pattern
within procreate. And there are tons of
classes that I highly suggest you take from many incredible
teachers throughout. I'll see you in the next lesson.
4. Setting Up The Grid: Welcome back. In this lesson, we will
work on setting up our grid to help our pattern
align easily. From here, let's go up to
the little wrench icon, tap Canvas under your actions. And then you'll hear,
you'll see a drawing guide. Toggled off. Let's turn that on and then hit
Edit Drawing Guide. From there we can come
over to symmetry, tap the options, and we will actually do the
quadrant option today. That is going to help us set
up for our Foursquare's and then test our repeat it
later in a later lesson. Once you've chosen those
options, you can hit Done. As we start to work on getting the colors for
each individual square, I want you to think about the color palette that
you want to use here. And this isn't permanent, you can always change
it at a later time. I just like to
clarify that here, that having a general
color palette in mind is always helpful, but you don't feel tethered
by it by any means either. Next, let's tap over here
on the Layers panel. And we will create
for new layers, one for each individual box or square that will set up the background of
our grid pattern. So since we already have one, Let's actually just turn off
the Drawing Assist here, which automatically toggles on when you create a drawing guide. But we're not going to use
that feature just yet. Let's rename that
layer top left. That way we know when
we're coloring later on that we will be working
with the top-left square. Move on and let's do a rename of the top-right. Add a new layer. Bottom-left. Add a new layer, rename
it bottom-right. What we'll do next
is actually fill in the entire grid on each
layer that we have, but we'll keep them separate so that we can move
them as we please. Come up here to
your color panel. And let's choose at
minimum two colors. So if you wanted to have two colors on the opposite
sides of your grid here, you can choose two colors
with the backgrounds. I will be using four
different colors, but I'm going to use all different kinds
of green for mine. So I know I want something
a little olivine and dark. So first up, I will actually make sure again
that I'm on that top left. Tap the color panel and drag the dot over here to
fill the entire square. Don't worry, we will work
this out later to resize it. Come back to your layers panel, hit the top right, choose your second color. Drag and drop. Fill the entire page. Same thing. Come back up to bottom-left. Tap and drag the color
that you'd like to choose or if you have it saved over here in your palettes, you can also do that. But when you're ready,
drag the color over and fill last one on the
bottom-right layer. You will re-color this one and drag it over
and fill the layer. Now, I'm assuming that at
this moment these might not actually be the colors
that I want to choose. And I did that on
purpose because I want to be able to
give you the option to change later on and show
you how to do that. Instead of trying to make
you do it right now, choose all of it at once. So if I was working on this pattern by
myself, not in a class, I would have created an entire color palette previously and had my
colors all set up. So from here, let's go back to the layer that says top-left. Hit the Transform
arrow at the top. Then I like to kinda bring my canvas a little smaller so that I can
see the entire thing. Over here. Let's make sure that
the uniform is on. That just means that the
square will keep its ratio. And let's turn the
snapping distance and velocity all the way up and
magnetics and snapping on. Tap out of the settings
and then take the, because I know that
we're going to bring this square to
be the top-left grid. I'm going to select it and then slowly dragging it
should snap into place. And you'll see those yellow
lines that bolted up there. Now the reason we can't see
it is because it is up there, but we can drag it up
just so you can see we can re-align our layers. Let's do that again. Let's just bring this up so we know which one
we're working on. So from the top right,
Let's tap this one. Hit the transform tool. Carefully, drag and let it snap into place
and lift your finger. Now before you touch
the canvas again, this is really important. Sometimes we can tap
or nudge and that will actually move the square, which means that your grade
will not be in line anymore. So be careful, I'm going to undo that so that when I
snap it in place again, I just come over here and turn the transform off so that I'm not touching a different part of the canvas that
creates that movement. Unwanted movement, should I say? Okay, let's tap the layer
called bottom-right. Tap the Transform tool, gently drag to the
bottom right corner, turn the transform off. And then we've got
our bottom-left. And of course it looks
like it's still here, but it's actually a full, it's still the full
size of our grid, so we want to make sure we
just resize that as well. So tap the Transform tool, drag and bring it down. Tap the Transform tool. And now we've got four
separate squares. So if I uncheck those, you can see they're all
exactly where we said they are by renaming them and
they're all the same size. What I like to do
next just to keep my layers panel it
nice and clean, is to actually tap on
each layer and then drag to the right to select all four. And then let's group those. Tap where it says new group. Rename the layer to
background squares. And now you're all set. And I will meet you
in the next lesson.
5. Gather Inspiration: In this lesson, we'll be
gathering some inspiration for our grid patterns below in the resource
section of this class, just below the video, you'll see a link to a Pinterest board that
I have created for you. Here you can click on the
link and it will bring you to this board that I have
created for a class. Just gather inspiration for
color palettes and other ways that other artists have used grids to create beautiful
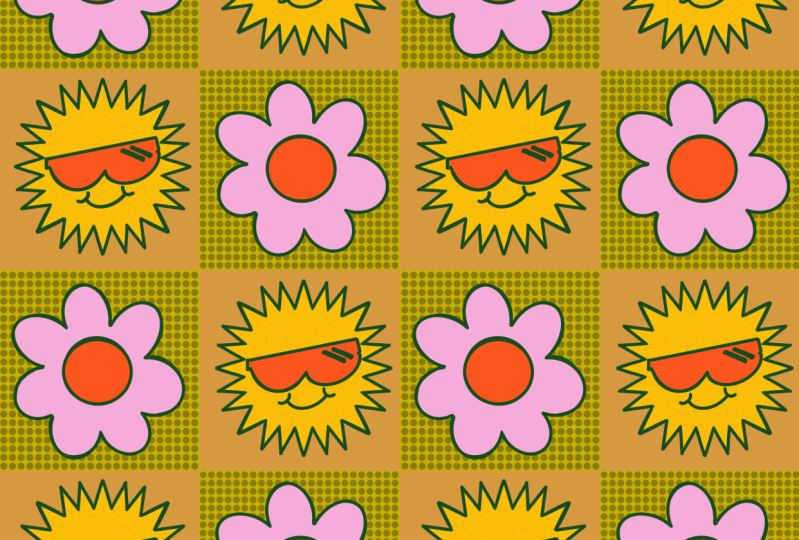
floral patterns, mostly inspired by the 70s. You can see there's a lot
of bright vibrant colors, a lot of Daisy shapes, and a variety of other symbols. You might see. Some Smiley
faces and rainbows. In a lot of other
things in-between. I refer to this pattern
a lot as the grid. As you can see here, it
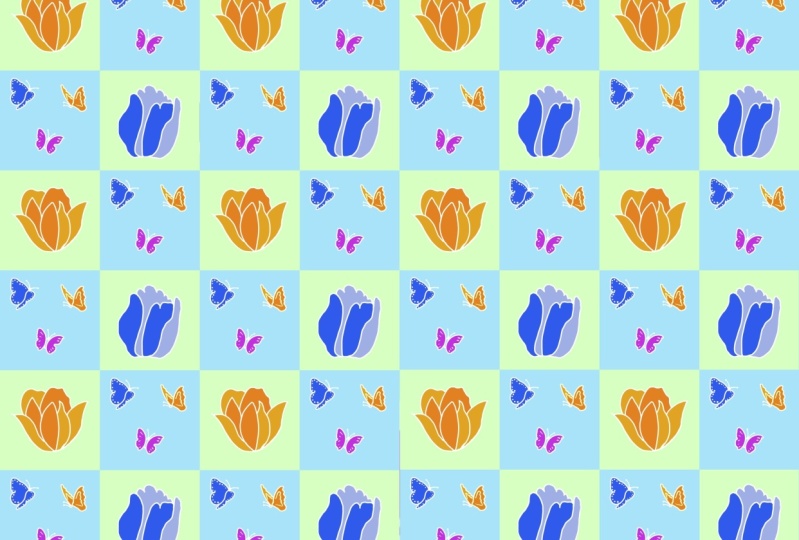
looks like a grid to me, but it's also a
checkered pattern which is or was super popular
in the '70s and has slowly started to come
back and give you an idea of what your
grid pattern would look like if you use the
exact same flower within all Foursquare's
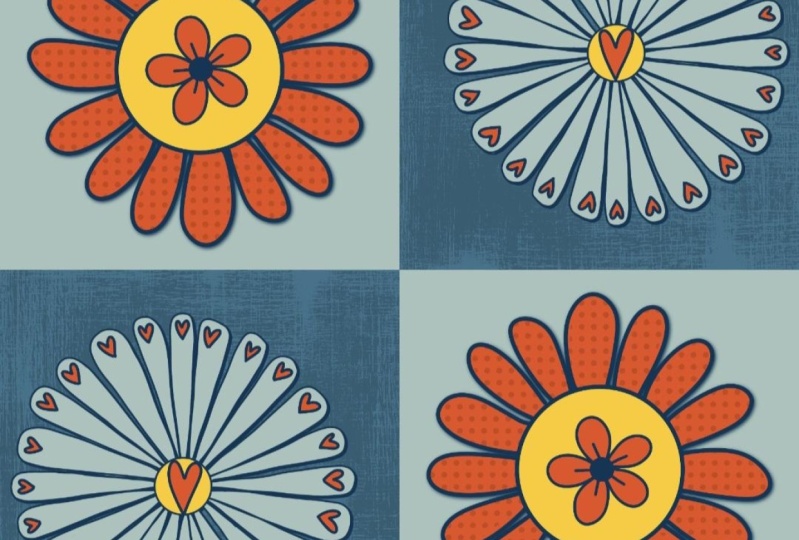
of your grid. This one here can show
you what it would be like if you use two
different shapes. So we have two flowers
here and then two hearts. So you could do
those diagonally and it creates a larger
grid pattern. This is another option, again with two different, two different patterns
within each square. Can see that two
of the flowers and the solid background and
then the checkered within, within a grid square as well. One thing I really liked
about the grid pattern is that it's simple enough that
you can create variation, but within each square
or within each grid, lots of variants, even
below lot of flour options. Now, you will typically see
this like DZ shape most often began because it was
like '70s Flower Power era. But you can totally use any
kind of flower that you want to use within each section. So you don't have to be
tied to that by any means. I just loved sharing ideas
on Pinterest because you can see collectively
how similar they are. But each artist has chosen
something totally different. Once you take some
time to look at these patterns and two, gather some ideas for your own. I can go back to procreate. Now that we're ready to
potentially re-color our grid squares or our original colors
that we had chosen. I want to show you
a little trick about how to quickly and easily change your colors
now that you might be inspired by what you've seen. So since we have
this group created, I duplicate it just to save those originals in
case we change our mind. I turn that off, come back to the new group
of background squares. And then from here, because we have them renamed, we can easily drag a new color
over and drop on each one, but by selecting the layers. So I'm coming back over to my color panel and I'm going to choose a different variation
of colors that I have here. I'm going to start
with this teal color. I have bottom-left selected,
so that means this. I need to drag my color all the way over to the bottom-left. Hold it, and then
when I fill it, I make sure that I have
the threshold at 100%. So that covers the entire
selection on the layer. Now, I've decided
that I want to have the two opposite
squares, the same color. So I'm going to come up here to my layer that's
labeled top-right. Drag the same color over. I've been hold and make sure
it's filled all the way. And then I will make sure I
choose the right box next. Bottom-right, grab my color, and then come back
up to top-left. Do the same thing. Wonderful. Now that I've got two groups
of background squares, I'm going to collapse it
and then tap and rename this one background squares blues because this is a
different palette. Now. Now again, I have this space with all these
layers at the moment, if I decide later on that
I'm not going to use these, I can delete them and give
myself a lot more layers. We all know how precious
the amount of layers you can use on an artwork is. Okay. Now that we've got your
creative wheels turning, and hopefully if you
decided to recolor, you've had a chance to do that. We will hop over to the next
lesson and start our sketch.
6. Sketching: Welcome to the next lesson
where we can start sketching our flowers that will
put within our grid. First thing we wanna do is come over and start a new layer. Let's rename this
layer just to keep ourselves organized as sketches. One, turn on the Drawing
Assist by tapping the selected layer and come over here and turn the
drawing assist on. What this drawing assist means, because we have
the quad set grid, means that anything I
draw in one square will automatically
happen in all four. Come to the color
panel and select a different color
that will stand out on top of your grid. Just going to select
a neutral white. And then I have my six B pencil, which is found in
the sketching tools. For this first option, we will have four of
the same exact flower, which you might be
able to change later. But I just wanted
to show you how you can use the Drawing Assist
to your benefit here. A quick tip here is if
you are interested in using some of your
Pinterest inspiration, you can tap and
drag the Pinterest over here so you can
have a split-screen. I like to only have mine at three-quarters just because
I have more space to draw. If you decide that you would
like to have for flowers. But all different, you
can do the same thing, but you would just turn the
drawing assist off and you withdraw all of your flower
sketches separately. And then you would have
different flowers to ink later. For my pattern, I
do want to have all the flowers
the same at first. If you decide you don't
want all your flowers to be the same or you don't want
all of them different. You want to different
selections of flowers to show some variety
in your pattern. I will show you how to
do that diagonally next. So this is my first sketch. You can see that
everything I'm doing on one square is
happening on all for one little trick I like to do here is to actually bring in a new layer with a different color and just
draw a perfect circle. Just to help guide me when I'm drawing my flower
petals because sometimes they go
a little wonky. And so I'm hoping that this
will help me keep everything in alignment with
the other petals. So then I can come back
up here to my sketches. My lighter color again, and then start over a little bit about all four flowers drawn
and they're identical. I want to show you an
option on how to have two different variants on
each diagonal selection here. So in order to show you that, I'm going to toggle
off my little circle. And then I want to actually
duplicate this sketches one. Turn off the first original. And then let's go to rename this sketches
to two sketches. Sketches. One, rename it to sketches to. Then what we'll do
here is actually, as we have sketches
to select, it, will take that selection
tool and use our free hand. So we'll draw around two of our flowers that are
diagonal from each other. Swipe three fingers down
and hit Cut and Paste. Now if you look over
at your Layers panel, you see that there is two selections here where I have split the
flower elements. I'm going to turn off
a firm selection just to save it in case we need it. And then I'm going
to also toggle off or if you don't like to
toggle it all the way off, you can actually just
lower the opacity. I think it's easier
for the next selection to turn it totally off. We'll create a new layer, rename this sketches three. Tap the layer and turn
the drawing assist on. So what this is going
to do is going to actually draw again four of the same at the same time because we have that
drawing grid on. So we will be able
to select and remove elements and then
combine the two that we decide we want
to include together. Do the same thing
where you are using. If you used a guy like
me, you can turn it on. And you can prepare yourself for the other variation of the
flowers you want to include. Once you've taken a few moments or however much
time you've needed. Hopefully you've used
the pause button below to draw your
second sketch layer. Now, as you can see here on
my first sketches to version, I have these two selected. Now I know that on this layer, I need to choose the ones
that are in the lighter blue. So I'll come to select
my sketches three-layer, use that same variation of this selection
tool and free hand. Those two diagonals. I'll take my fingers
and swipe down three fingers and swipe
down and hit Cut and Paste. Now, again, I have this
split into two layers. So I want to actually take
sketch three and sketch too. Now that I've
removed the pieces. Now you can see over here in these little windows in
the layers panel that these two flowers in each section are
opposite each other. So now I want to tap each
layer and pinch them together. And now you can see we turn
off my little circle guide. You can see that I have two different flowers
available here now. So now my options are the one
with two different flowers, or if you decided to add
a different element, like a bug or a heart door. I know we saw some
rainbows over here. Those, or you can turn that off and go with your option with the four different flower or
four of the same flowers. For the sake of cleanliness over here on my layers section, I'm actually going to take these and delete any layers that
I'm not using anymore. If you want to keep them,
you're totally welcome to save them until you
run out of space. But I really like to keep
myself organized over here. So I will take both of these sketch layers and swipe to the right and
group them together. Just rename it. So I know that I have all of
my sketches in one section. Again, if you want to toggle and see which one you're
leaning towards, you've got those options here. If you'd like to work
a little bit more on finalizing how you want
the colors to lay out. I suggest adding a new layer underneath your sketches group. You can decide which one
you're going to work on first. So I think I'm going
to turn off and do all of the flowers
that are the same. So I'm going to rename
color sketch one. Now I want to make sure
my drawing assist is on. And then thinking about
what colors I want to use within these flowers. And I really love the
contrast between this orange. So when to come up
to my brushes and just grab one that's
a little bit bigger. I usually try to
grab some paint. Down here in the paint section. We'll try this acrylic one. Haven't used this one in awhile. So play with the, how big the brush is. And then you can just fill in. Just to see what this
might look like. Thinking I actually might
want a little bit of a gold for the petals. And I'm gonna make my brush
a little bit smaller. Just to give you a general idea of what your color
palette could be. You might decide that you want your flowers to be a little bit more painterly and you
can use a paintbrush. You don't have to worry about outlines or anything like that. I do use a lot of
outlines in my work, so I think I will
continue to do that. You can see even this paintbrush
has some transparency. So I'm just going
back over so I can see the boldness of the color
contrast a little bit more. If you're deciding to
sketch and play with the colors within that diagonal
version of your sketches. I would just turn off your drawing assist
for that color sketch. And I will do a color
sketch to add a new layer. Turn my drawing assist on, and then make sure I
have that layer on. And then in this color, I think I would keep
the same center. So this is going to
draw on all four again, but we'll just remove the
parts that we aren't using. So I'm going to come back
to this yellowish color. Okay, so in order to do the
other flower variation here, I'm just going to
use that selection. Remove these two and I'm
actually just going to cut this time and then
start a new layer. And then I'm just going
to make sure that drawing assist is on
and I'm not going to rename it because I'm
going to combine these two in just a minute. So I'm coming back
to the colors. So now we're doing the same
thing except this time we're going to cut the
opposite diagonals. Swipe three fingers
down and hit Cut. Now you can see that the
color sketch two and the one we just did version
is now ready to be combined. Now you can tap and
drag and bring those into your sketches group. So now you can see
this variation. Turn those two off and
see this variation. Now that we've got our
flower grid ready, our main repeat ready, we will go into the
next lesson and refine and add details to
our flowers and any other elements you've
drawn on your grid. And then we will go from there and test our repeat and
just a few short lessons. I'll see you there.
7. Refining Your Pattern: Now on to the next lesson
where we will refine the flowers and finalize
all of our floral ideas. What I like to do next
is to create outlines. That's just because
that's integral in the type of work
that I typically do. So if you are not someone that likes to do any
kind of outlining, then you can keep your style
with the painterly flowers. Maybe you just use a texture
brush instead of outlines. That's totally up
to you. For mine. Or if you'd like to
have clean outlines, I'll come up here, turn
my drawing assist on. I will rename this as
my flower ink one. And then I'm going to
choose my outline color. And then I'm going to come
to some of my ink brushes. So you have lots of choices down here and inking, calligraphy. I often suggest using
mono line if you don't want to have variation in
your outlines with pressure. I also really loved
the script brush. And then what I will
do is start with these two larger daisy
flowers I have up here. And I have the Assisted on. So it's actually going to
draw all four of this flower, but that's okay because
I can remove them. I will take my time and refine the outlines
of this flower. Now that I've got my first
set of outlines completed, I'll come over to
the selection tool. Use that free hand
option, cut and paste. The only reason I'm
cutting and pasting is keeping them for a later moment just in case I want to use them
for something else. Again, because I have space
and enough layers to do so, turn off the selection, come back up here with a
new layer and rename it flower ink to turn my
drawing assist on. Now I'm done outlining
my second flower set. And I'm going to do the exact
same thing where I come through and I select the
opposite to flowers. Swipe down with three fingers and then I'm going
to cut and paste, just going to group them
together and name them extras just so I know
that I have them here. If I decide to use them, since I have my outlines ready, I think what I'll do
next is to create a new layer, rename it. I always like to name it fill because I'm
filling in the color. So we'll name this
fill one and then I'm going to turn on that
drawing assist again. So what I wanna do
next is actually come down to this sketches
layer because I'm going to use this as a reference for the colors that I
want to create, my flower fill color. So I'm just going to tap
and hold because I want to use this yellow mustard color. And then I'm going to turn
the sketches group off. I don't really need them, I'm just using it
for the color now. For this first fill, I
know I'm going to work on this thinner petaled flower
and I'm going to use, There's two different ways that I typically like
to work on this. And I would typically
do a textured flower. I might actually come back
and use that six B pencil. And I will turn, I'm just double-checking to
make sure my emphasis is on and I will actually come in. And manually. I guess manually is not
necessarily the right word, but I would just draw
and sketch in or fill in and color in that texture
that I want to achieve here. When I usually fill
in using this pencil, I usually do a really
loose drawing. It don't worry about the
anything that goes over the edges because I will come through and
clean that up later. So I like this option because it does leave
a little bit of texture and it helps add some
depth to the final pattern. This is one option
for you if you choose to use more of
a painterly effect, or if you would rather have
more of a flat color fill. What I can do next is show you a great shortcut
and how to do that. Let's say that you do want to
use the flat color option. What you can actually do is
you come to your flower ink. One, just like to toggle it off to make sure
I'm using the right layer. And we'll turn that
into a reference layer. Now, anything that is under that layer will be
referencing those outlines. If you decide you want
to fill in your petals, are your elements with
full or flat color. You can do the
drag-and-drop option here, but you actually have
to make sure that you turn off the assisted. Especially if you are
using a variation like myself where I have two
different flower options. Because if you do something
on this layer and there's no closed shape
on the other layers, it's going to fill in the
entire background as well. So from here, you can actually go and you can drop in each one, then you can actually
continue filling. If you don't have the
option of the Assisted on, it still does go pretty fast when you can call
her job so quickly. So if you're going for
the Font Color option, this is great choice for you. Now I'm going to just undo all of those actions so
I can go back to using my textured brush. If you followed along
with that and you are not using that option. Let's make sure that we turn off the reference
layer so that it doesn't mess with
our current drawing. Some coming back
making sure I have my pencil selected
and I'm going to continue to fill in with
texture here on my petals. And I will meet you here
in just a few minutes. Now that I've colored
in those petals, I'm going to come
back to this layer, select those two that are
obviously not the right flower. And I'm going to cut
and paste again. I'm going to move this down to the selection or the group that I had created
called extras, and drop them in there
until maybe I need them. I'm going to turn them off. And now I will come up too. While I have actually
this one selected, I'm going to create a new layer. Fill 1.5 or 1.2, I guess we should do. And then I'll turn the
drawing assist on. So if you've ever taken
any of my classes, I always suggest that
anytime you use a new color, makes sure that you also
create a new layer. You can always combine things, but it's more difficult
to remove after the fact. It's a good habit to create. I'm going to come to the sketches and then just
get that color drop again, that orange that I liked. Turn off the sketches and then fill in this
circle in the center. Come back to the same thing, remove those diagonals that
are not the correct flower. Cut and paste. Move that down to
my extras group. Next step, I'm turning
back on my sketches. I'm thinking I do
like the colors here, so I'm going to keep those and I will make sure that my
orange matches correctly. And I will come back up
again, create a new layer. This time I'm doing, I
renamed this one wrong, so I'm going to fix that real quick and do fill one
point to not full. And now I'm doing this time, I'm filling the second
round of layers, so I will call this fill too. Turn my drawing assist on, turn those sketches off, and then come over here and
spend a few minutes just coloring in the center of
the next set of problems. Okay, I finished
with one selection. Now I will come back
over and remove, cut and paste that selection. That down to my extras. Then I'm creating a
new layer. Fill 2.2. As I work on the petals here
with my drawing assist. Now that I've finished coloring in my second set of flowers, I'm going to come over here, use that selection tool to remove the ones that don't
align with the outlines. Swipe down, hit Cut and Paste. Take that selection, move
it down to my extras. And now you can see I've got
a pattern unfolding here. Before I move on to the
next lesson where we'll talk about adding some details and maybe even some texture. I want to group
together these layers. And I forgot to also
include the ink. So we'll group those, rename the group
to flower finals. Once those are all in a
group, collapse your grip. And then I will see
you in the next lesson where we talk about how to add in some extra
details and texture.
8. Adding Details: In this lesson, you'll
get a chance to add any additional
textures or shading, or even any elements that you want to add
within each box. To just add a little bit
more visual interest. I'll show you how you can do that and keep it refined
within each square. Now, in order to keep
things refined within each square or selection, this top plus selection,
I have the box. If I came back down to
my background squares, what I want to do is actually
hit select on that layer. Now that I have that
square selected, you can see if you zoom
in those diagonal lines, show that everything else
is essentially grayed out. What I want to do next
is to add a new layer. I'm going to bring it
up above that group, so it's not included there. And I was thinking
of adding some dots, an option down here in
textures called decimals. So the reason I'm selecting
this square is that so nothing will ever
go over the edge. Which means when we go
to repeat our grid, everything will still line up. If anything goes over the ledge, then that means that the line, the lines will not
aligned properly later. So that's why these grid
patterns are really important to keep everything
within the square. You are considering
a background. You can play with a
few of these options. Tap my brush. Then I'm going to color this in and see if I liked the idea. And I actually do. I might change the
color a little bit, which I can show you
how I would do that. What you can do
to quickly change color of everything
selected on a layer is actually swipe to the right with two fingers and you can see
my alpha lock is now on. You can also tap and select it. And then choose the
different color that you were considering. I'm gonna bring
this down a little bit and then tap the
layer and hit Fill. So you can see it
changed everything that was on that layer. Another option you
might consider, It's filling in multiple layers
or even all four layers, which you can do
by just creating an entire layer
within the square. Again, making sure nothing
goes over the edges. If I zoom in, I might actually end up having
a problem here. So we will have to test
that with our grid repeat. And if that's the case
and it doesn't repeat, I can always turn it off. The beauty of having all
of these extra layers. A few other options
of things you can do is to create a new layer. I will turn the drawing assist
on and I'm just going to call this details for now. This is where you can really
play with your style. Maybe we're considering
adding a few extra details. Let me change the color here. I think I want to actually
add something that wouldn't necessarily be on
all of the squares. Instead, I'm going to turn
that drawing assist off. In order to keep
things cohesive. I'm thinking I want to select that same color I have for
the dots on this grid. And I want to actually
bring in that dot. Look on the corners over here. So I think for me my details
are probably done here. And that means that if
you are still working, please continue to add details. Again, just focusing
on keeping everything within those smaller squares. I will find out soon if
this is going to cause any issues in my
repeat pretty quickly, but I actually have
a solution for that. My solution for that
was actually just to turn on the transform tool. I just tapped the
layer up a few pixels, which then made sure that every circle or dot
selection here, it was inside that square. So that was really helpful. Now we should be to test the
repeat in the next lesson. Please continue working on any details you'd
like to add into, integrate your style completely into our checkered pattern. I will see you in the
next lesson where we test the repeat and see how our pattern comes together
in a larger setting.
9. Test Your Pattern!: Now that you've finished
your grid tile here, which is the main tile, repeat, you'll
hear that a lot in the surface pattern
type industry. And so that means
in order to make sure that everything here
stays saved and safe, we'll come over here
to the actions and actually export this as a
JPEG to test our repeat. We will hit Save Image. Then before we move on, I actually want to go to Canvas and go to Canvas information and save this as Skillshare, grid, pattern and hit done. Now we go to our main gallery and we'll come over to where
we created that Canvas. Then we have our
Skillshare class, 12 by 12 saved or whichever same-size that you use at
the beginning of class. Now we have a grid
that's where we have a canvas that is the same size as the tile we have already created and saved into
our photos library. From here we'll set it up the same by turning the
drawing guide on. Editing the Drawing Guide, turning that symmetry on, changing the options
to quadrant. Hit Done when you're
all finished. Then from here,
you can go to Add, Insert a Photo, tap your photo. And now you have that JPEG image over here. As you can see. One thing we can
do before we test our grid repeat is to tap on the layer and hit
Drawing Assist off. Again because you turn that
Canvas drawing guide on, it's going to automatically
populate on your first layer. From this section, we'll
go to our Transform tool. You'll see that we
still have uniform selected and all of our
snapping is turned on. Again, one thing I like
to repeat is as soon as we transform this into
the top-left corner. Keep in mind to try to
transform tool off before you touch or nudge anything
because that will add, that will add problems to
your repeat test here. We'll grab tap out
of the settings. Will grab that
bottom right corner and bring it up to the left. C, it will move slow enough, it will snap into place and
you'll see the yellow bars. Pick up your finger
or your pencil. Then turn the
transform tool off. Because we have already resized this and we're actually using it as a JPEG file
that's inserted. We're going to test it simply by duplicating the
layer three times. First we'll start with this one. I like to drag over to the right and it will
snap into place. Release gently,
turn the transform off, duplicate that layer. Turn the transform
tool, unselect it and then this time
we can drag it down. Wait till it snaps
gently release, turn the transform tool off. Come to your layers
panel. Duplicate again. Turn the transform tool off, then slide that grid
over to the left. Now you can see a very large repeat and you can get an idea of what your
pattern will look like. What I like to do next to
make sure that the repeat is in perfect condition. There's no space
between each grid or anything that will cause any issues once you
see it at a printer, the best way to do this is to turn off your
Canvas guide for now. Then I actually like to just start a new
layer just in case I make any marks
or anything with my hand or happened
to nudge anything. I'm not nudging any any
other layers or anything. And then I can come in
and I can actually zoom in to where the repeat
of the pattern is, which is obviously right
here in the center. Then I just kind of look
around and zoom and pinch to see if there's anything that might
cause an issue. Sometimes you might
see marks from your hand or your pencil
where it had tapped. And then we know
that if we see that, we can actually go back to our original tile where we have all the layers and
make adjustments. If everything is lined up, you have created your
very first 70s grid or checkered floral patterns.
10. Share Your Work: I truly can't tell
you how much it means to me that you've made
it this far in class, and I hope you've taken
the time to share your work in the project
gallery below the class today, it's a great place
for you to connect with other people that
have taken the class. And it even allows me
to see what you've created as a Skillshare teacher, it truly makes my heart
flutter to see it when someone completes an entire project and decides to share it with me. That means that all
this hard work I went through creating
this class for you. Something that you've
actually enjoyed. Thank you for choosing this class to take you
on a journey through the '70s and creating some
checkered and grid patterns. Thank you again for taking the time and I hope to
connect with you in the project gallery and in the discussion portion
of this class below. If you're interested in finding other ways to connect
with me and my work, you can always follow
me on Instagram, follow me here on Skillshare or check anything out on my
website at Britney blue.com. I look forward to
hearing from you. Thanks again.
 Brittany Bouyer, artist + illustrator