Transcripts
1. Introduction: Animation to me is
all about getting out of the world of reality and going into the deep imaginative
worlds of our minds. My name is OP. I'm an anime
in the video games industry. I worked on a range of AAA titles on Heavenly
Sword, motor stoma, apocalypse, Harry Potter,
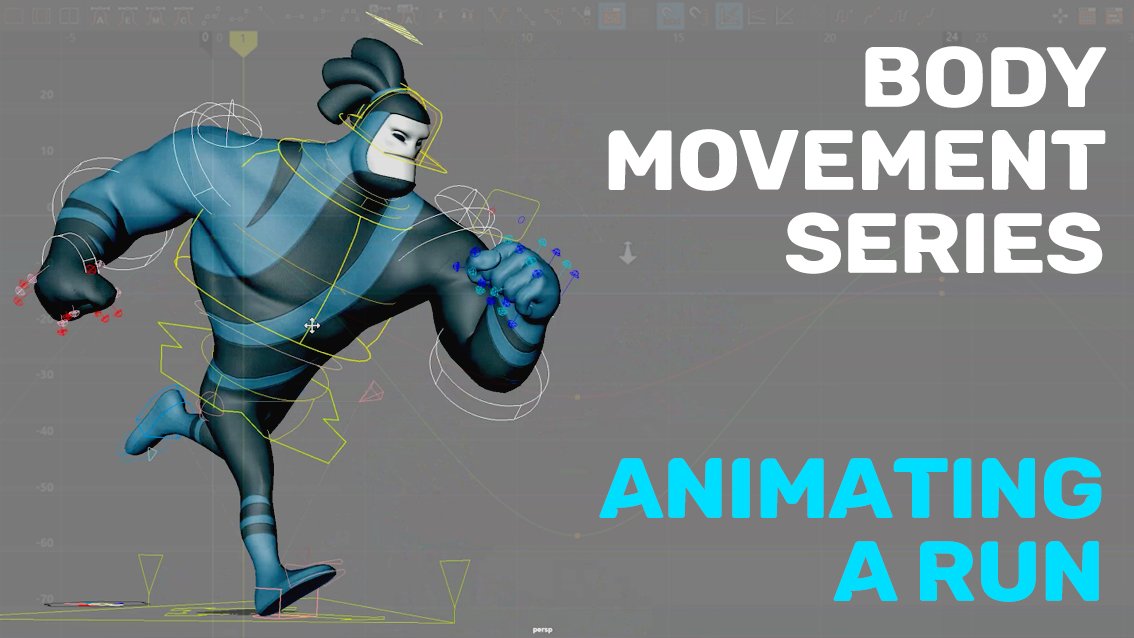
the Born conspiracy, and a series of lego games. And this class is all about animating a walk
cycle on the spot. And we're going to
be using these gear for eggs by pro rigs, which I've spoken about before. We were doing a whole
lot of animation series with these rigs. And we're going to have a lot of fun doing these animations. So it doesn't matter
if you're a beginner or experienced, like we say, we can all learn from
everyone and take something out of
it that would help us in our animation journey, our workflow, and any other
techniques we want to learn. This class will cover
a vanilla walk, which we'll do on the spot. And this can then be edited and played around with the
timing to how you want. It will do the same as always. We'll contact poses, parsing position's high positions,
those positions. And then we'll show
how to cite for everything and make
it look all seamless. Will also play around
with the face a little, just to get a bit
of a face animated, just bring a little bit of life. And then we'll use
the hair to add secondary motion just to give the character a
bit more alive with. So get your maya Blender max, whatever you're comfortable
with it does allow. Principles are the same. And let's get these models
and less start animating. So here we go. Let's start animating
all the mess that up.
2. Where To Download ProRigs: Guys, this is a quick video or where you can
get your ribs from. So I'm using these bricks. Now, there is a fee to
this as $20 a month, which is about 16 per month. But for that much, and the characters
you're getting, all the characters are getting, again, all of these characters
with the right support. Even get pickers
like for the rig. You get the scripts, everything
license is well-worth it. All of these characters look
heavy, light, athletic, bigger, fatter
characters, robots. It's definitely worth it. I'm going to be animating
with these now, the feature film rigs. So they're really good to invest in 16 pound a
month, $20 a month. There's nothing really got you get older support you want, you can cancel the
subscription when you want. All right, guys, this
is a quick video where you can get
the rigs or you can just go to free rigs
and use any other rig. But I just for you anatomy along with the civil irregular
can go and get these rigs. So great rigs. And I'll see you in the course.
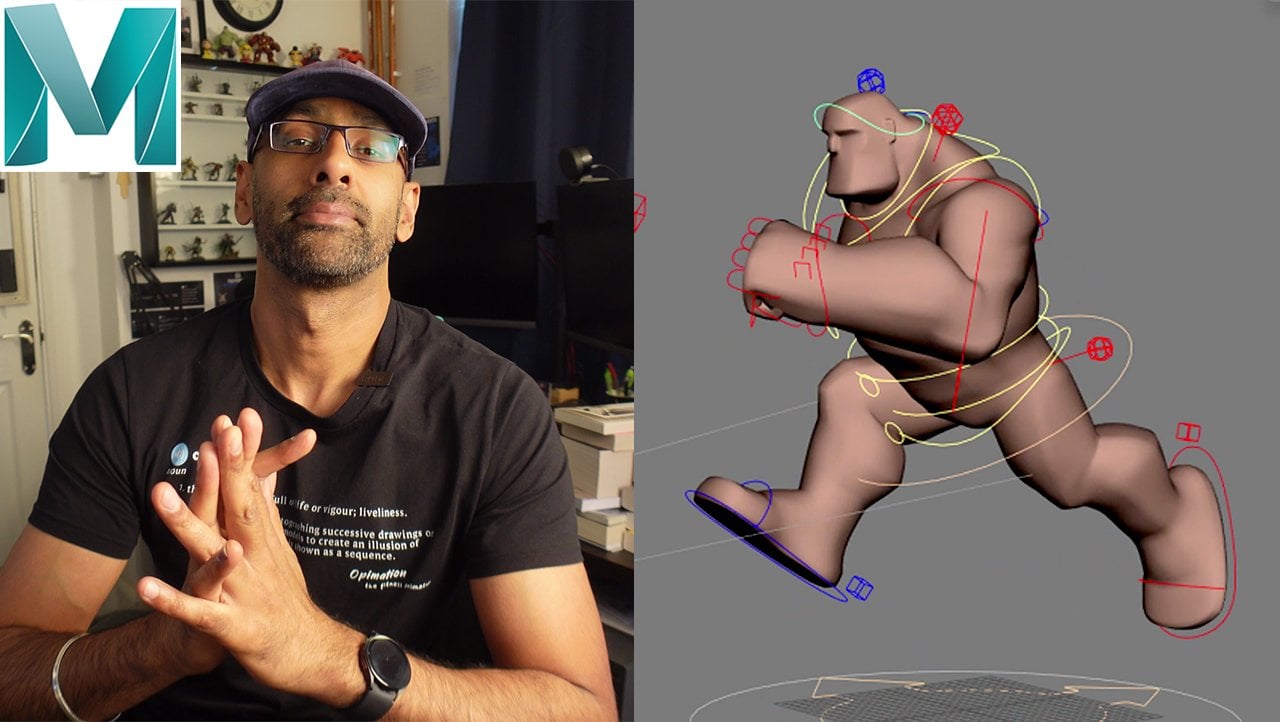
3. First Pass Blocking Poses: Okay, Okay, What's up, guys? Let's do this new rig here. So first I'm going to do is get to these controls and change the arms to FK. They should move with school. Alright guys, so let's
get this book reference. This one area. So contact,
step down, frame. So basically every free, free friends were doing it. We're going to follow this more or less similar to
what we're looking for. All right guys, so first
things, first, contact pose. So this will be back. And then we'll have
a foot roll here, which is kind of a little bit. And then we want to use
this inside controls and bring it down a bit. If we bring the
character down a bit and move it back a bit, and move that one forward
with a road going up. Okay. We don't lock it out. We
want to keep your bit bent. Okay, so that's
the starting pose. Normally I do it in
the sidebar there. So that looks pretty cool to me. Then I could move
this back a bit, move it back a bit, then I might roll it a little bit more. Okay, so I just select
all the keys and key. Then we'll go to number 44
is going to have a step. So this is going to be zero. And then what else
is going to happen? We'll move it to call
a duty on the spot. Will move it back. So the foot is perpendicular line or the
leg is at a right angle. And then we'll come down. Because obviously
it's coming down. And then the next foot, it's starting to
come off the ground. So we'll just roll
it a bit more. Notice. And then I'll just
select everything in here. The other thing we need to do is we might want to do now
is just select the hips. And we obviously
want to rotate it, leaning fluid like that. Because that's going forward. The leading for It's gonna be the one where the hips are going to be
going forward as well. When you when you're when your left leg over your
right leg is going forward, that the hips are going
towards that way as well. And then that way
you're going to list leading that actual foot
That's going forward. So what we'll do now for the sake of just
blocking and stuff, delete these keys here. So we'll just put
it in constant. So it's like there's
this pose to pose. So we can clearly get them specifically sculpted
by all these poses. Then we've got the passing pose. So the passing pose is basically this foot comes
back in the middle. And I haven't got a picker, which I should have put us. Alright. And then
this comes straight but not it's not locked. Not like that. Yeah. So
there's a little bend. And the passing position
here comes forward up. Here. Here is kind of like
kind of like this. I guess we could
rotate the toe is low to report that coming up. So we'll do this key
everything here. And then number ten will
be slightly higher hips. And this comes back. As it comes back. There'll be a slight list, add a slight, slight
rotation to that. And this foot coming forward, that will be more like this. Looking at the reference. And the toe is more
coming down as well. Just kill that. Then we can also come in here, make sure everything's constant. Sometimes it doesn't
go constant. Meyer just plays
around like that. So we come here. Now what I do here
is I normally copy. If we go to those of
us who are doing this, but I just get the legs. Basically duplicate
the legs unparallel. So it's outside. And then I'll get everything. And then unselect.
Let's get the legs, put it in a layer
just for temporary. So I don't select it. Basically, I'll just copy
and paste the first pose. And I know it's wrong. In terms of position. They're all you're
doing now is you get in that leg and you're
moving it here. Also the foot role is the other way is just roughly kinda match up.
That's all you're doing. Then you get the
other the other leg and just move it back. So you just roughly
trying to turn to move it back here and you can move the hips
down just to match. It doesn't have to be
exact, just roughly. Then you can delete
that little guide. And then you got a
little cycle there. So what I'll do here, this
is all step here, step. So you've got that. Now. The same thing again,
all we're doing is the other side will get the hair and then will
zero out, bring it back. Bring the weight down
on the character. Foot roll. Just coming up. Key everything there. Move to the next one. The next one is gonna be
the policy positions. So he'll be up. Should come in the middle. Player, hey, can we just rotate? Rotate this. So this is a positive position, which we could have like that. You started to see
it's kind of moving. We're getting the
poses in there, sorry. So it's free. Free. Okay. Again, it's going to be slightly higher
head policy position. This leg comes back. So we're going to pass
the pass in position. And we're just going to
add a little bit of a low enough that the dust ben, Ben's, they're a bit
because we don't want it to lock out than we
could with policy layer. And the same here, we just bringing this back here. Then we'll just add a little
bit with TO flop, to flop. And then at the
end is quite easy. All you have to do is copy and paste the first pose
to the last place. Then you can step it
all that was blind. And then yeah, we got
a little cycle there. You've got the older main steps in and then obviously
we're going to have to polish this a lot more. But at least we've
got the steps in. No. So now what we can do,
we can come in here, put the rotation
here in wire eight, and we can do that
at the end as well. And in the middle,
we'll do it to minus eight because we need that. Then if we come into
the graph editor here, you can see in the middle here. So what we can, if we start
moving these points down to just so we can get a little idea of how
the rotations would work. This is a smooths out
and stepped a bit more. You might have to
polish that the mobile least we've
got that happening. Okay, And the other thing
we can do is while we're here is when we
step memo misstep, come up, the weight
goes on the side. Naturally. It goes naturally the way it's gonna
go on this leg because all the way
is on this leg. So we move, we just
move the x slightly, then we come back the other way. So if we go here, we can
see the x value is minus. Let's put minus three
just to make it easier. On the other side,
we can put three. And then if we go to
the translation here, we can see the ordinate. We can just stop, stop moving these and trying to start smoothing it out in blocked. And you'll see here, just
start going like side-to-side. So that's a good kind
of a good practice because if I didn't
bring this all down, what happens is then we're going to start splitting so we flatten them succeed. So it's this easy. And then we can go
into middle and Spline them. So I'll press Alt. Alt F is a shortcut I
have for flattening or lever script or link
for script for that. So it's a shortcuts I use. You can go right into here, spline and flat book. Normally I move the keys down
so that when I do spline, It's not as much work. It's like it's just basically
this flattening exploding. But it will put it back to here. And that's it. So we've
got our basic blocking. And I would say the only thing I would say is
you see this pole vectors. You just want to make sure
these are always straight. So we can go through each one. Just making sure
that they're facing straight because that will
cause a lot of snapping. Okay. All right. Let's do that the
same as the first. Alright. Okay. Or I guess we blocked
out and then we'll start we'll start doing the OH, what we can do is
also block out. So we've got this. So each time it comes up, there's a C-shape in the
character that you want, and I'll show you what I mean. Let's do this now. So
it's kinda like this, okay, they will
come the other way. And we'll do the same thing because it's taken the weight. And then we can always
turn this down. See each, each time
there's a step. The overall body, there's
gonna be a C. And this way, this is what, this shape is. What's going to show the, whoops, it's going to
show the weight change. So we put them in.
Now also while we're here, we go to the style. And what we can do is we'll
have the shoulders opposing. So it's this way. Not too
much. We don't want too much. So let's see what
does that minus, minus tenure, just
to make it easier. And in the middle
it will be ten. Again, we go into the
graph editor you can see. So if I look now, if you look
now at the animation and you play it blocky. So what does blocky? Because these are smoothed out. We could just start
moving these out. That is then the solid. But you can do it in supply
and you'd have to do it. You don't have to do it now. Same thing here, you see here. So we'll just quickly, let's quickly to smooth
this out there find. And then we've got quickly save this before we lose it. We got that and then that one. Actually let me just zoom out. So I'd have to keep bringing. So if we look here, same
thing or we're doing this smoothing out slowly will leave the middle
one where it is. We just roughly it's not like
we're just roughly do it. That one is and then this one is all of the words is roughly
roughly getting them ready. And then the last one here, we'll just get this. It will just make it look
smoothly and blocking. So there's a bit of a movement. So we can always tweak that the C-shaped hips or
in the chest surgery. Then we could ahead
layer probably. Right guys. I'll see
you in the next video. We're going to be spliting,
flattening out, explaining, just working on the legs a bit more time to get
it a bit more smooth. And then we'll start doing
the normal stuff, polishing, adding the little fun
details right at the end of this little mini course
on how to do a book. All right guys. See you in the next video.
4. Second Pass Splining: Alright, alright,
my lovely friend. So now we are going
to be planning. So we'll do we'll
just grab everything. I'm just grabbing everything. And I'm ready to come in here. Let's get all the keys inside, but not the outside one's right. And let's just go to, I'll use these keys are now
got my shortcut, but is this has got two flat. Okay, now we go to flat and then what I
want I normally do is select I don't
select the fee. I just liked the top area. And then I'll select
everything in-between. And I go to spline because
we want that we want the feet to be flat because they are
on the ground, right? So that's an easy way off. So that does to
avoid the floating. So if we look now, so you can
see the feet are just flat, is flat on the floor. The knife I did spline
look over happened. If I supply and all this result. Given example. You can see us
moving up. It's moving up. It's just all a bit
flatten this works. He's not too bad. It's
not too bad. Not too bad. No money supply. They can
go through the ground, but I take that back. But we're going to end up
flattening these anyway. So what we'll do, we'll
just undo that, flatten it. Okay, so you can see
it's not too bad. Not too bad. All right. So we'll do that. First thing I like to do is just come in here.
When you cycle. I like to actually know what let's bring
it all under cycle. Yeah, that's fine. It
doesn't matter me. Okay. So let me see
if we look here. We can see the cycle
here is pretty cool. So we can just
start just matching these upper layer or have
to spend too much time. But we're just going
through the ups and downs of the hips. And we'll sort this out later. So all the values up
as cool rotations, then we can go to
the rotation bit. Let me select
everything here again. Because this sector all again. Let's display any old line. Yeah, and then we'll cycle, cycle these two icons. There are two psychologic can see cycling this
way and that way. All right, so we've got a cycle. Now we can go down in
e.g. get the hips. You can see here, flatten these because we want it to be a nice cycle
coming in and out. Okay? And then we can
just clean it up a bit, but we can always
play around with the later rotation there. Then we get the
rotation underneath. Just get them slightly lined up. It's all lined up. Then we're going to be
playing around with these values more and more
as we start refining. But we're just
trying to clean up. So we just cleaning
up these values. So this looks me. Alright, same hair.
Got all this. Alright. We've got
this one. Yes, fine. Cool to us, which is roughly
trying to just clean up. Get it all a little
bit smoother. Okay, now you see
we're starting to see this data happening. Smooth this out. This
is the pole vectors. As you can see, your cycle, this one is all nice and smooth. Smooth this out too. Just want to start
matching the tangent seen as important in games cycling, you have to match the tangents. Otherwise it's not gonna be. Alright. We've got all that happening. Let's check out the feet.
Let's flatten these. So let's check the fee out. All right, For some reason, Let's delete these keys here. Yeah, we don't need x yet. We could do that
later. And of course, we can select tool in between
the spline that out S, but you can go here
and press Play and we just wanted to come
in and smooth this out. Let's check out the foot roll. All right. Let's just move that and
the toe area as well. So when you get these
all smoothed out, spline, again, that'll why
those values are coming there. We can flatten that
because that's going to be on the floor. Cycle. This flattened these
n keys so it's moved. Goes smoothly. As
fine foot roll again, we can flat, flat and this, we can play around
with that cycle. There's, Let's make sure these
cycles are smooth there. Okay? So we've got that all smooth. And you can immediately see the fee bit more
smoother there. You see that as a few things
we can start playing with. You will gain they're
getting this slowly. Yeah. Okay. Now, let's
have a look at this. We've got the feet here. Alright, and that's
the foot roll. So when the foot comes down, we want it to snap. So here we want it to go
down, snap and embark. And even here we might want
to put it down a little bit. Then it goes up. Then it bows. We might want to
push that up a bit. This bit here in my wallet, just smooth that out. Yeah, so we're getting a
bit more smoother then I'll see we can see a
little bit of a stock. Actually that one's mood.
We're looking at this one. This one is coming back
as cycling, quite nice. Academic get the toes. And the toes we're
going to rotate in x. So let's have a look
as it comes in. We'll put the top.
So I'll just copy that to the end because
that's going to match them. And then as it comes down,
we'll keep it there, but we're going to slap it
on the next one because the heel comes down
first and then the toes. But in fact, now we'll
leave it like that, which is designed like that. In fact, we can go down flat, completely flat.
Let's copy that. Let's make it completely
flat, completely flat. And then what we can do is here, we'll just copy this value all the way across
here because this part here is when it's on it's on the floor and we
want it to stay the same. So we've got a little bit of
a flop on it as it comes up. Hey, we want it to go already, going back, back. Yes, fine. You get that little floppy. See that? That first
seems alright. So what we'll do, we'll go back here to the other
foot. And same thing. If we look here, Come here. It comes up. Okay, That's fine. Fine. And then when you
come check this out, When you come here, it goes up. And then we wanna do, we wanna get that? It's got the foot control. So this top first. So we worry about
the foot layer. Can you see it's going
up and then down. So we want to come here. And let's check out the full row there. Okay, So what we'll do,
let's make the ends. We're gonna make them
a bit higher right now this because this loss per se. Okay, It's a bit of a
lot there. I reckon. We should have done,
sorry, rookie mistake. Let's check out the hips first. Gotta make sure. Stupid me. The hips have to be right. Alright, silly me. Let's check on our hips values. Okay, So here we go. Once we get this right, then
we can work on the feet. Apologies for that.
So let's see. Let's do the hips first. Comes down, then up, down. Okay, I see what it
is. So what we'll do, we'll copy this value. And we want to make
it the same here. So make sure that's
the same value. Because we got it as I said. Okay. I don't know
what's happened there. Copy Man, maya doesn't copy
from Panther. This next one. I think we bought it
up a bit too much, so we want to bring
that down as well. Cycle, nice cycle going there. This is the start position. And this has to be the
same as the middle pose. The opposite way. Down
positions need to be the same. Exact cycle. Yeah,
that's better. All right, so we've got
that working as fine. Cycling. Okay, that
last foot is cool. So you can see that this
foot here is topping. So what we'll do is have a
look at that one. Right? You see what's happening here? So what we wanna do is
just lift this up a bit. And then we can a little
bit of a stop there. We'll work that out. I think
that's the x, this one yet. So we'll do keys
dot, dot moving. We move this up. Move
this up slightly so it's moving. Getting there slowly. But is a little bit more. Cycling. Cycling.
Gain this slowly. Now, let's check out the
foot room, foot road. Coming back. We can
bring this down a bit. It hey, cyclists. That's fine. Check out the
foot roll now so called this isn't an easy Nazi,
that's what's happening. It does, it does.
What is a slow? If you see here, does it
ease in and ease out? So we want to cycle this. Move this up a bit.
Move this down a bit. Now the star into starting
to cycle a bit more, right? That's what it was
trying to match these tangents up nicely. So there isn't a little delay. Just move this down. Let's see. Is there
a stretch there? Yeah, there's a bit
of a stretch there. So what we wanna do is
just slightly bend. Bending. You get into more of a
cycle then I'll see. Yeah, that's it. So you're
getting that hips working. You go. That's better, isn't it? Then we can start working from the hips and the
shoulders and the arms. Then we can start adding
the other mechanics. Okay? So that's what we'll do. So we've dealt with sorted
out the hips and the legs. And we can do a bit more
detail to the legs as to later on when we polish, but at least, at least as smooth as cycling
smoothly, right? It's moving nicely
as what we want. And then the knees are fine. And his hips and his hip
controls here we can always, we have this nice Control Z
that we can use to control. Don't think we'll need them,
but we'll see we can always try and finish
them. Alright guys. So the next video we'll
start working on the arms. And then we will
work on the head. So bit by bit, we'll
break it down slowly. So a step-by-step guide. So I'll see you in
the next video.
5. Animating Arms And Head Part 1: Alright, alright
guys, so we've got it all working pretty clean white. Then we can stop policy
in the legs a bit more. Let's go in now and do a bit. So if we go to Animation, visualize quite
editable motion trail and let's check this trailer. But look, when we get here, straightens a little bit of a pop their assets, we just need to
pose a little bit. Okay, that's fine. So let's check out the
overall trajectory. Kami, we couldn't even lift
the hair a bit, to be honest. Just to get a nice curve. I would even rotate this down
a bit just on the floor. Well, one thing we need to do is when it hits the
floor, zero that out. In fact, we need to
push it in a bit more. And then what we'll
do, we'll come here. We'll just copy
this to the rest of the keys because
that's going to be on the floor remaining fluoride. So it should stay flat. Yeah. You see it stays flat. And then we'd get their copy that to the stock.
So it's the same. Okay. So now you can do, you can come in one by one here. And just each frame, you can just try and line up. It's coming off the floor. Yeah, that's it. Okay. So we've got that
work in which is cool, we can do the same. So let's, let's delete that motion trail and do
the same for the other one. Just doing it as we go this
one look for outbound. Know maybe we could
have it coming up tonight. This down. To be honest, that was
the right now that it's getting a bit
straight there, isn't it? Here? We can do it
lists like this. If you notice that
leg straightening. My roll it a little. Yeah, that's better.
Okay. So we've wrapped around their cool that all we're gonna do
now. Go to the Start. We'll just bring this
up and let's bring the x-axis down
to say what, -75. And then let's bring this one
down as well to minus five, okay, So we've got
it all down there. Now what you notice is going
to pop because your kid, you just need to
select select those. And as you can see here, it's going to delete
everything in-between. The end frame is
will select the hip, the risks, and the forearms
and do the same thing. Just delete everything.
Except for the first key. Select all the controls. Just delete everything.
So it's all clean. You're working with
something clean and the shoulders cleaner. Now. We've got rotation
in the shoulders. What we're doing,
we're just pulling these back a bit so that it rotates bit later. Yeah. Rotates later. I would the hips as well. Even the hips. Now
we'll come back here. I'm just putting this back, pointer back. So slightly more. Taking a bit more time. That's fine. Feels better. Then what we do, the arm, this controller. This is Omega symbol, right? Okay, You can use that.
Awesome. So what we'll do, we'll just do a simple
forward here, which is 12. So let's do minus ten. Then copy that to the end. And then we come to the middle. And then we just did ten here. And if we look at
our graph editor, will just flatten
everything can cycle. Yeah, it's very simple here. Alright, so if we
look at this now, is called a simple. What we can do is just add a little bit of rotation in the shoulders does
not be too much, let's say minus five. Again, middle, click to 25, go into middle,
and then do five. And again in the graph, we're just going to
flatten everything. So we select everything, go to flatten and makes
recycling, which it is. We got a little bit of movement. Then we can also turn down
the blue axis, this one. So we just come up here,
select everything. Go to the middle hip, press R for scale and press
middle, middle. Click this scale down. If we look here, it's not moving as much so we can
scale that down a bit more. So we'll just scale down. And also, you know what,
let's scale it down. So we've got a middle
here and scale down. If you don't go to the middle. So I'll show you if you don't
go to the middle and scale. Now roughly here, you all scared equally if you go
here to this point here, it's going to scale
from that point, but we don't want that. We want to scale it evenly. If we scale in, we
always dotted around the middle and then you can
sue other points later. Okay. Now you've done that. Yeah, that's better. Maybe that's a bit too much to so let's get it back up the scale
it back up slowly. We can always play with that. However you want it,
you can play with that. But again, coming back here, Let's start with rotations. Again, minus ten, which is ten. Copy to the middle, minus ten. And make sure you just
flatten and cycle. Okay? So we've got
both arms working. And then I'll add the shoulders or which will be minus five. It will be five. And then minus five. At the end, we will put five
and then we just keyed up. And then we'll cycle that in the graph editor planning cycle. Again, flatten cycle
on the other screen. Sorry guys. So we've got a good timing
happening there right now. What we're gonna do, you've
got these hands here.
6. Animating Arms And Head Part 2: So what we'll do, we'll just get these
hands and go to curl. Because we just
want to relax them. That one. Then we want to bring the terms and slightly and just have
them a bit more relaxed. Here. We just want them inside
more relaxed, the better. This feels a bit more
natural like that. Then what we'll do,
we'll get the forearm. And we'll just move
this up a bit. Middle click X equals
minus ten, minus ten. And then let's copy
that to the end. And obviously the
middle, we've got ten. We can extend that
if we want it. Alright, that's cool. And then we'll, we'll
do the same thing, the graph editor, cycle it. And then what we're gonna
do is offset in these, but we're just getting the keys. And at the moment, same
thing with the hand. The hand will, the risks, the risk goes forward slightly. We'll try not to
over-exaggerate. It will just make
it a bit subtle. We don't want to
over-exaggerate. Again, same thing in
the graph editor. Select everything,
flatten it, cycle it. Then what we can do is, okay, what we'll do now, we will offset this by one
and then the rest by two. So second everything 12. Now we'll have a look. Have
a look without the controls. Much loose, right? It's loose, which
is what we want. Okay. Now I'm just thinking about maybe rotating,
bringing it closer. It intersecting the trousers. Okay, that's fine. You could even in the
little hair coming out and then coming in, see how that looks as an
intersecting lowest seems fine. Okay, now what you can do, we can probably offset
this a little bit more. So if we come reflect the wrist, the forearm, maybe move
it another another frame. Okay. It's made this little frame. And then maybe the wrist. We can do with the wrist
is choose the wrist. We could even move this
up, see how it looks. So we're moving it up and just trying to get a bit
more of the graph, you see that there's a bit
more drug happening there. So that feels a
bit better, right? And now what you can do, you can click on that down all the way to the fingers and the thumb. And the finger and extension of the hand, which I'll show you. So there's really
good control there. So if we check out base,
because this base, or see this one, this is really good
because you can add drags. Show you what I mean. To click Go here. We
can drag it forward, middle click to the end, and then drag it back. You see that happening?
Now all you have to do is go into your graph editor. Same thing, flattened. We can go 1234. Let's see how much four is. Yeah, we can do one more. Start creating that.
Maybe even more and more. And if you really want
to go more into it, you could slip the
fingers and drag those, but we can keep it like this. And then the thumb,
the thumb is the same. We can get the farmer here. Actually, let's see, is there a thumb control to the thumb? We can use this instead. So we see this. We can just rotate, maybe rotate it going up. Now that middle click
that and then go back. And then we can also, again in the graph editor, I think we offset that by six, so we can go 123456 and that
will follow with the pump. Then if it doesn't show as much, we can lift this, lift these up. Communist shared because it
will lift these up as much. So it will look now,
C is a bit more. We can drag this down, maybe tone it down, so you can always turn it down. So that's okay, that will work. But we can tell it that we can also use the other controls is all down copying. Use that output for this. You can do that in access
to much is too much. We don't want that much. So what we'll do with
tone that down here, because I've done doesn't
move that much. Okay. Maybe animation is different, you know, same thing
on the other side. Yeah, so we do we've
got we've got that. We've got the form.
Again. We want to move it back slightly right? Keyframe that. And in food, this is minus ten. That is 1010. The same thing with the wrist. Combat with the wrist. Are we adding five? Copy that to the end, then go to the
middle minus five. And then you could even do the base metal clip to
the end and then forward. And then the thumb is the same. In the middle, is gonna
be forward slightly, and then back on the base. So we've got everything there. So all we got to do now, it's coming to the golf
editor and move this by one. Move this by one to
flattening them. Then we've got a control
here for the base, base way that one now 123. And then the thumb is that 123. Starting to get it done. And then you can start
offset in a bit more. Might want to offset
the wrist and the hand. Then this another two. The thumb and other to gain a little bit of
a drag their hands. Then you can start playing
more with the fingers. That's the arms done.
So you've got the arm. What we'll do here, we'll
add up the rotation. We'll add a rotation. Well, let's see here. We could add it in. Here. We can have it
come out slightly. So at least it's
not intersection intersecting the
trousers, Diego. We've got a bit of a
cycle. They're going. Then. Now that we've got
the arms all working. Well, just do the
head. Excuse me. So we'll do the head now. Yeah. So you've
got the neck here. So when you walk has
the head comes down, bring the head down slightly. And then the high point. We'll just slightly
rotate the head up, just creating that. And then down here. So it's a bit
exaggerated the right. But we can always turn
that now that would do. This is all zeros. So we can get rid of
these middle ones. Copy this over here. Copy these values. So they both equal opened down. And then we'll flatten that. Then we can just have a look. Right now what we can
do it just tone that. We can just scale
that down a bit. Because we want the head to
be moving, but very subtle. If you look at their head
hair, same thing, right? We want, we want
it to be moving. But let's keep it subtle. So let's copy these
values. Same thing. Those inner values, because the descender flatten
everything out. Make sure the tangents
are matching. Scale that down a bit. Neck is alright, let's
offset, offset 12. So it's starting to get a little bit of a
movement in the head. And then what we can do here is we look at the overall
posture of the, of the walk is going down there, right? Let's let's try and polish
this, oversee this. Going down. Maybe he
doesn't have to go as down. See that? Alright. And then what we could
do is you can start. We've got our happening
in the next next video, we'll just start working on polishing a slightly
changing the pose. And then we'll do a bit of
the volume on the face. What we'll do, we'll add a
bit more volume, you see? And on the head here, we will add a bit of overlap to all this just to bring it alive. Bit of movement in the
air, eyes as well. All right guys. So that's this
planning and getting all the arms working. Yeah. Alright. We'll see you in the next video.
7. Polishing Part 1: Alright guys, so now
in the next video, we're going to polish.
So let's check this out. So what we'll do now, I might even pose them
a bit differently. So if we look at
the lower rotation to select the free
Control Z rotations. And let's go to
all the rotations. So we've got all
the rotations here. I just want to lean him. Fluids, rotate him just
a little bit lighter. So it's a little bit
of an arch. Also. See this, okay? This control, and then
we've got this one. This one. Okay, what's this? This is moving. If we needed that control. Yeah, we didn't
need that. That was an extra control put in there. That's alright, That's what
a rotation which is fine. What we need now is
rotation in this one, okay? So we can rotate
this torso as well. Slightly forward. Because remember the
walkers are controlled for. So we want to do even the head. If we got the head x's, x is in the head,
which are these? We want these to lean
in. Food is low. Okay, now we can
just maybe slightly move this a bit more. I just wanted to be
a bit more balanced. Okay? Okay, that's cool. And we just wanted to
look slightly down. And then we can delete
the rest of the keys that it's kinda looking down. Okay, now let's polish this. So let's look at
these, this volume. Okay, so we've got this. This is just going to add a little bit of
movement to give that volume. As it comes down. Slightly. Let's delete everything
in the middle air. As it comes down. Impact, then compress, impact, then backup. Okay, Let's check that out. If we look at this.
Okay, That's fine. So we can do, we can zero these out and add that value here. We want to equal distribution. We can delete these middle bits. Copy this value here again with just equal in
everything out. Make us all the
tangents are matched. So there's a little bit there. Can you see a little
bit of movement there? We can always turn that
down. There is too much. And then what we're gonna do,
we can go to the same one. Well really what we
can do, we can go to the first one is what? The translation too,
Let's get this. So let's zero this out. Copy that. So the values
are similar actually. Let's make a lesser value
equals the most subtle. A bits match the tangents. Okay? Let's have a look. Yeah, very subtle there, right? So what we can do,
we can more or less a play blast.
Don't want that. Not bad. Play blast. We wanna do is
copy. Let's try and copy this to the top one. Let's see if that works. Doesn't spell it out.
Okay, that does it. And then let's copy
that to the top one. Now we wanna do want
to offset these. What we'll do. Again,
the graph editor, we've got the second one. And we'll just
offset this by 12. And then we'll offset
the top one by 1234. Yeah, So we wanna, wanna get
that bit of volume there. Can you see that? It's a bit
of a volume there right now? It's a bit I think we can do what we can do is
maybe offset it by one. So let's bring it back one. And it's been that back by one. So I'm just bringing it back
into the graph editor by one like this. Okay? Okay. Okay, It's a bit too
much. So that's fine. All we're doing there now, now that we've got
all the movement in, this is the beauty of it. What we can do now, we can just come in here, select these two because
they're starting at zero. We can just select
them all, go to hair, scale in this area
and scale it down. Same thing with the top one. Get the parameters that
I've animation on it. Select everything,
scale it down middle, click and press the button. And scale this down. I selected everything present
on the keyboard. Sorry, I'm selecting
just these two. Select everything,
all the key back, press Shift and
middle mouse button. Find a spot. Then press
Shift, middle button. You can press shift as all. It's the middle button and
then drag it downwards. Then that will create. Okay, that's too much. You're going to just
go to play around. I'll go back and I will
scale it up slowly. That's what it is.
It's just going up and down, getting a feel. Okay. Getting a feel for it. Then you go from
there. All right. That feels a little bit better. A little bit better. I might add some
more on the top one. The top one. Okay. A little bit there, right? Yeah, I can feel a bit there. Okay. I said it too much. Right there, right. You can see a little bit there.
What else we can? The other thing we can do is maybe slightly open
the mouth for a bit.
8. Polishing Part 2: Too much. And then in the middle, have it have it cleared? So slightly. So what
we can do with habit, slightly open but it's moving. So if we go here, we can slightly
moving a little bit. Maybe, maybe have it where I want it to be
really subtle easily. I'm just bringing this all in. I've got that working and then you can start
in the middle. We can start doing
is let me come here. We can just add a blink. Yeah, Just to make
it interesting. And then these cheek, again, these two is we can select
the actually we can do, we can select these. And then we can just go
down and back up. Hi point. And then down. In backup. Then we have that there. Make sure these are matching. We can go in and really polished he's but you've got that
little bit of movement then. We can offset that to
you can, it's endless. You can go in and place
all these little things. All we're doing now with
the ears will grab this. Would be like impact. And then impact. A bit too much oily will delete. Let's delete this whole thing is neutral and we'll just
fine to Al-Qaeda. And here we'll just add a little bit of movement
and it will copy that to 19. So there's a little
bit of movement. Doesn't have to be
too much. Okay? And then we've got
this here, here. So what happens when
there's an impact? Moves forward? Delete that, will delete all of this have to
do straight ahead. So impact and then back
and then impact food. So we just got a simple thing like this here
and then we can always turn it down,
flattened out. And to be honest,
we could do this. We could basically
key all of it. So if we delete
it, delete these, select this to select the bottom one and this key where you keep
all the first one. So you know, you've
got an indicator. If we come in, we can
be like, alright, comes forward and
then forward again. Same thing with
this one. Forward. Food. So you've
already got that. Now what you can do is
just select all of these. Go into your graph
editor flattened cycle. If you want to tone down, you can turn down this offset. So let's do 12.1, 234. You got that happening. And then you can come in
here and just tone it down. You can turn it
out from zero here because that's where
it's starting at zero. So you can do it from
the tone dispelled. You got that happening.
The movement. And then last but not least, the main hair so we can delete everything. Same thing here. You're impact. Impact. Then it's
the same position as the same as the
first impact pack. And then impact.
You've got that. And then you can just
tell him that down. Down. Couldn't even offset it one to one. Then you can try and tone it up. See, move it back. Okay. Okay. Let's see, we can do it by one school
and then tone it up. Turn it down a bit. Das better. You're going a little bit
of movement in their head. They're little bit. If you really want
to go to town, you can start working
with the face. You know, like even
here with the face, we had those keyframes
we put here. We have a look in the Gulf area. Again, the bottom ones
air to zero them out. And then the top one
you could match these. And of course the bottom
you can match this. Delete these middle ones match anymore,
yeah, translations. So we can just
roughly match these. Dilute the middle ones
roughly match these. You can go back and add
the values if you want. This one to. This one is fine. We can just add this add values. So you just go in and
add in the values. Same thing here. This matching kind of
match the tangents. Then you can just save is
going up and down too much. You can offset these. What we can do here is
offset it by one too, because the top ones are moving. The top one there. Again, you can play around
with this as much as you want. Make sure that tangent, and then you can go in and all its detail and
just get it right. How you want to, so
many things you can do. You might even want
to do the nose. But all in all, that's how you
animate characters. The head a bit more
volume than it. But that's how you animate
a character on the spot. So yeah. Hope you
enjoyed this tutorial. I'm gonna be doing
another one with the other characters because I find these characters
really fun. You can actually drag, then you can start editing
the torso, timing. You can stretch everything's
make it slower, faster, however you
want. All right guys. I'll see you in next video and next
tutorial. See you later.
9. Conclusion: All right guys, congratulations, you've made it to the end of the course and you
have learned how to do an animated walk on the spot and cycle that seamlessly
added a bit of overlap, bit of facial
animation just to get more aliveness and believability
into the character. We use the fingers, we
add a little offset to the arm just to get that
nice looseness in the arms. So hopefully you can
take these techniques and put them in
your other works. Whether it's cartoony,
whether it's realistic, the principles are the same, okay, Now, if you
want to see more, just check out my Fundamentals. I've got a whole lot of classes on Skillshare or categorized. You've got the
fundamentals section, then you have the cartoony
than the video game series. And then there's also editing as well as miniature
painting as well. I do but a miniature paintings, so I use the airbrush so
you can check them all out. It's great. You guys are supported me. I'm going to keep putting out these videos with this pro rigs. We're gonna do
other ones as well, like exercises of
getting off a chair, just basic principle exercises
which are very important. Weight shift and stuff which
you can put into your work. And we'll move on to more
creative stuff as well, which later on the
year will do as well. I also got a YouTube
channel where I share a lot of my
fitness journey, my book reviews, I share
tutorials on there, but I also do critiques
for animation in a review animation
TV shows and games, video games, what have you
so you can check me out. There's a lot of
content on there. You can check me out on there
as well and support me. Okay, guys, remember
most importantly, have fun, enjoy the process. Get out, do some exercise,
get out in nature. Look after your body,
look off to your mind to come back to the
screen and animate. And most of all, stay healthy.
10. Maya Animation Mastery: Hi, everyone. Congratulations. This
is just something after the conclusion
that I just wanted to put into all my courses. If you're really serious about leveling up
your animations, I have a brand new course
that you can enroll in. It's called Maya
Animation Master. This course, I've redone
it with four K Good Audio, came out in January 2024. And this course is
designed in a way how I would have liked to be taught animation when I started. So It basically gets rid of all the pain pain
pressure points that I had when I
started animation. So I want to get rid of those
frustrations and give you a direct line to what that aha moment was for me when my mentor Steve Gagnon Kati taught
me about animation. Something just clicked, and
I teach that in the course. So if you're interested
in enrolling, you can go to the about
me page where I'll have a link there called
My Animation Mastery, and you can go
through the webinar. Then the course breakdown.
You can check that out. And then if you decide, you can enroll, if
not, that's fine. There's a private
Facebook group. There's a link in there
about me for that as well. You can join that
where we get feedback, and there's a nice
community there. And also, when you enroll, there's a private
Myers Mya animation Mastery inner circle
group where it's just exclusive for students
where we give feedback. So, have a look at that webinar and let me know your
thoughts as well. If not, you can join the Facebook group to
the private group. Obviously, the inner Coco group is for people who have enrolled, students who have enrolled,
but check it out, and it's just for
leveling up, and really, it's got all the
theory and practical, heavy on the practical
stuff, video game stuff. If you want to learn
about how to get a shot from reference to
blocking to splinding, to polished, show real level. It goes
through all of that. And also, I talk a lot about networking and
how to get jobs and context that I have within the industry that I can
ph your work out there so at least it's in the right
hands and people can see and at least consider
you for applications. F of my students who
have already got jobs in the industry going
through the course, so have a look at it. And yeah, let me
know your thoughts. So enjoy your animation journey, stay healthy, and
I'll see you around. I'll be around on the
Internet on YouTube and a giving tutorials as
usual. I'll see you later.
 Opi Chaggar, Senior Animator + YouTuber