Transcripts
1. Introduction: Animation to me is all
about getting out of the world of reality and
going into the deep, imaginative worlds of our minds. Welcome guys, my name is OP. I'm a Senior Animator in
the video games industry. I worked on a range
of AAA titles, Heavenly Sword, motor storm, apocalypse, Harry Potter,
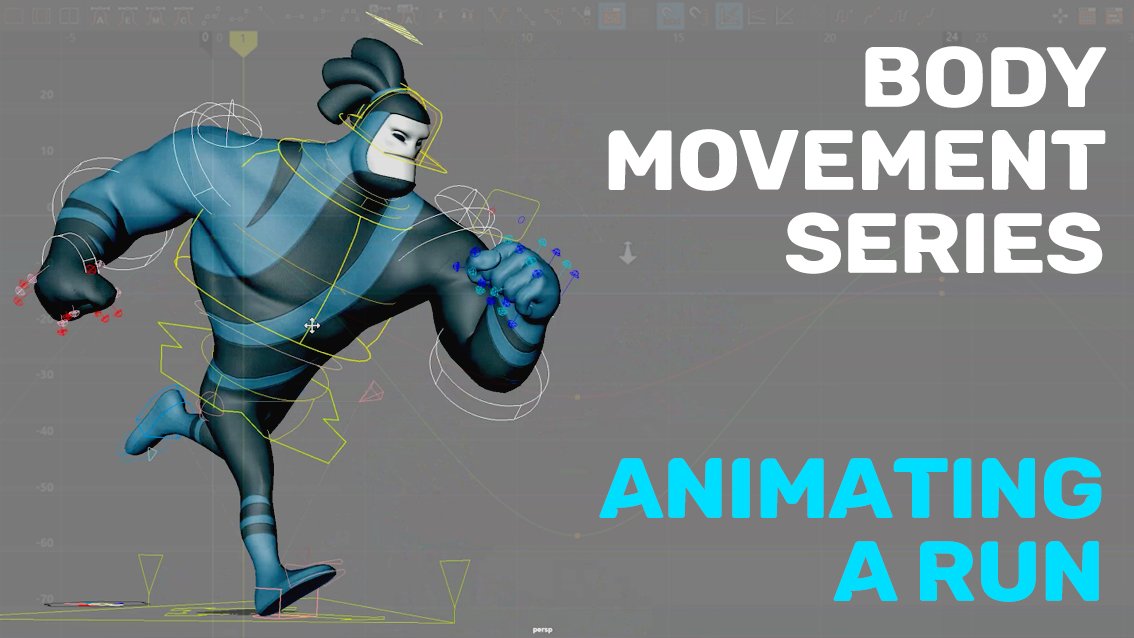
the bone conspiracy, and a series of lego games. And in this class we're gonna be continuing the body
movement series. We'll be animating a run, particularly different
kind of run, a heavy run. So we have this giant character
from pro rigs, great rig. We'll be using that to
just show a bit of white. And again, I'll be using
pro rigs which are great, absolutely brilliant order
body series, cartoony series. We'll be done with these.
So it doesn't matter if you're a beginner,
intermediate or advanced. Hopefully we can all learn
something from each other. I take away something that we
can put into our workflow. This class, we'll
cover a heavy run and we will start with
blocking, then what spline. And then we'll start polishing. And then when we start using the extra controls
are on the rig, e.g. the squash and
stretch on the head, the body to give that actually jiggle extra weight
that we can put on a little squash
and stretch on the head to just give it
that bit more volume. So I'm very excited to
start this heavy run. It's been a while
since I've done one of these. So it's exciting. New rig. So get your maya Blender
max wherever you use it. Again, as I've stressed, it doesn't matter what it is, what software the
concepts are the same, the principles of
animation. So I'm excited. I hope you're excited. So come along and
animate with me. And let's start animating.
2. Blocking Part 1: We will start the run and m. So I've got some
references always. We're going to use this run
as a reference or disorder. Now this is going
to be a heavy one, so we'll stop blocking this out one by one. Okay, first pose, we're
just going to block. Let's check out the first
put the grid on hammer. First pose. Is alright, this leg is forward. This one is back. We will roll it to pivot. We'll roll it back like
this and move it up. Toes, pretty
background is higher. And obviously this
one, the foot control. This is the contact pose. Is easily see this miss want
to have it exactly straight, but we want it also to be
leaning forward slightly. Bring this back one
that overall shape. Now we're going to make
this one a little bit, going to be a little bit slower. So let's check out
the side view here. Key everything within it. We did it to 40 frames
here, so we'll do it. We'll do it on the spot as well. Then we'll come to four. Again. We'll bring this down. We can see the next
pose is contact. Zero that out. Then we'll bring it back
Here. It comes down. The bend is what we want, right? The bend will happen calmed down a bit because
it's quite heavy. And then that last one comes
forward will kill that. One thing we'll do here
is let's get the hips. Let's go back to frame one. Let's lead with the hips. So what is that? 30 here? Which means we need to move this forward a bit
because the hips are leading. And also we want to, because the last, the leg
at the back is in the air, want to rotate in the z. So we can put that at ten. Okay? Then next pose is fine. We'll just kill that contact. And then they're going to
have to pass in position. The contact pose. You can move them. Then
the next pose it comes up. Oh, actually axis
is, you see it? It's referencing why this says, take fat man running on six. Well, he's not, he's
an athletic man. So what we'll do,
let's check out. No, I will go for normal. We'll do we'll go
for normal run. So what we'll do, we'll go for
something like this. Then we'll work with
that. Let's get this one cycle and
this one here. So we'll use this key pose, comes down and then pushes off. So it's coming down
there. Than this. This leg comes back, foot roll. This one goes forward. Obviously the foot roll. So now we can start bringing
this foot roll back. 00 the terms have
this coming forward. Foot roll it. This is
the total area here. We can bring that down. Bring this up, bring this one back. After passing out
there, isn't it? Well, I think we'll
do zero that out. And that full-grown
can go wrong here. Or we can do this
TO spin toe pivot. Let's try that. You know
what that is, right? Pole vector since tip. To come out and delete the next two frames.
Still doing it. Alright, let's keep it
simple with zero these out. Zero this out. Bring this back, rotate it like this. This is use this as a rotator. Just make more sense to just
do like this. Zero this out. Basically zero the
foot rolls out. And then pass in
position that you go. And zero this out. We'll do it this way.
Get more smoother than this control will just
keep it a bit more down. As it is in here. It's going down the push,
Mexico, clear everything. Then the next one is the
most important one, right? Two comes up and it both
feet off the ground. Sudden that's way here. Then we can rotate that back. Might even take the foot roll of that that goes back. In this goes forward. I caught that shape. You want that nice shape? Too much stress, stretch
slowly but it goes down, it goes down, up, up. And then this is
the highest point. So we can go a bit higher. Yeah, that's fine. Also, while we're here,
let's change this. Let's go back to zero. Get both of these zeros. The IK go into
your graph editor. Just delete the T is after that. Otherwise going to switch
back to IK, least as moon. So we've got that
first bit going. And I'm going to block this. Go into here and
just go to stepped. So we block it all.
We've got that. And then we want to put
basically want to do it. One way I do this, which is a bit, we go to Mesh. I duplicate that mesh, take it out Control P is
out of the hierarchy. Then just select that for now, let me select that mesh. Quite a layer, put it in the
layer, just get rid of it. For now. What I do is select everything. Make sure these are all keyed. Middle click, bring it to 17. And then what you wanna do
is if you reveal the mesh, you want to do it the
opposite way, right? So just use it as
a guide, really. Excuse me. But just use
that poses a guide. Put it in here that is not
going to be exactly the same, but you can refine it
after it and bring it up. Was it for you? Then delete that mesh so
you've got like a guide. And then remember, we're talking about rotation in the hips. We want to do it the other
way now because it's leading. And we want the back hips to
be up because that leg is up in the air. K. And then we can go. That's
fine. There's a contact there. But we want y to be zero.
I want it to be down. And we want to
move this leg down just so that that front
leg starts bending. This seems cool. Okay, and then what
we'll do is select everything here.
And then again, 21. Same thing we're doing. We're coming in here. We're going to impact position. So what we'll do with
zero out, bring it back. E comes down, pass
in position, down. Everything here. Next, next pose is the
one way pushes off. So it comes back here. The foot roll here pushes off. Obviously it's gonna go higher. And then bring this forward. The foot roll off, then bring it forward. Rotate. So it's kind
of getting ready. Just either we look
at the other one too. So it does come out a bit more. Look at that pose. And also the back is cool. We can see all that. Then we go to that key
pose where we come up, we get rid of the role here. Comes up. There's a push there. You know what? I think this one could be
a bit down a bit. Then it comes up. So we've got that. And obviously we want to go
higher. The highest point. I'm grabbing everything or does it go back and
make sure everything is Quito, every control. That's just an old
habit. I have. An arc can go back and delete. And I'll also come in here and make sure
everything's blocked. So now if we look now, That's it and a way to
just get that first pose, copy it to the next four frames. If you go to 3033 and
if we have a look, should cycle, you got yourselves a blocked
in slow pace. But we want it like that. Right. So we're getting
that legs blocked in. So that's the legs done. Then we'll move on to
I'll do the torso, the side-to-side movement
in the next video. And then we'll keep
breaking it down just systematically so it's
a bit more clearer. So we do one thing at a time. All right, guys. I'll see
you in the next video.
3. Blocking Part 2: All right guys, next
step, next step. Let's do this. So we've got
this blocking going on here. Now, what we'll do as we know, we go to the front view here. Now, when the foot lands, land, take the weight. So the body is going to
naturally go that way, right? Land take the weight. Then we come up land,
take the weight. Now we're going to
go this way, right? Okay, You can see that
side-to-side now, we can smooth that
side-to-side out. Weird if we go in there, you see that these
are all stepped. So if we move this down like this with just basically creating a more
smoother stepped e.g. because if I supplying this, if you look now
for supplying it, see, it's going like that. And that's all you're doing
is just smooth it out by equally trying to
space these out. The spacing, ok. Now if we look now, be a bit more smooth. Alright, It's blocky,
but Let's move on. So if we come back here,
let's look at the value of x. Let's do that as minus three, just to make it easier and
then do that as three. And now we can play. We can always reduce that. Excuse me. We could
always reduced, actually, let's reduce
it to minus two. Should be a bit more. Yeah, that's better. But also omega here. The body has a spine, sorry, that goes like that. And then, then obviously
on the other side, you got that C shape, very subtle going like that.
So we can add those in. So if you come in here,
this is the bottom control. Become a good start to rotate, rotate, rotate, right? And then the other two
mechanisms become a omega two. So let's put in five here just to simplify things and
put in, what's this one? Minus three, minus three, and then a cop one minus five. So now if we go here, we go back the opposing side. So what's that gonna be?
It's gonna be minus five. Minus five, and then
the next one is going to be minus three.
So we go back here. Minus three. And then I
think the last one was five. Yeah, so that's minus
five will put five there. Okay, So then we've got that
kind of happening there. But also look at the top. We look at this shoulders, we want it opposite way yet. So we're going to
do it that way. And just for the
simplicity will be -20. And then we'll go to the
last and obviously -20 and the last and the
middle, we'll do 20. And now if we look
at that, again, what we can do is we
can come in here, joined in it as far as
we can come in here. As you can see, we'll do
the same thing we did with the x-axis to smooth
this stuff out. Just to give it that smoothness. We could do the same
here with the y. Bring this down. So it just gives that bit of a smooth smoothness in the
blocking as we say, right? And then we'll go down
here on the hips, will do the same thing here. I believe this year. We took out the other
axis is all fine. And then we'll move
on to the next one. Next controller. You can do the same thing here too. You can lift these up. I believe. Something like that. Because we've got
that also couldn't play this system moving
now they're nicely. Okay. And then then just noticed something on
this blocking hair. To see the second part. Okay, this pulse in position. Let's check out the up and down. On here, we want to
copy this value. This is for the hips. Copy these values,
make sure they equal top ones to just a cycle is, and it's being equal. No, real cycles in
real life are equal. This is just you do it. There's always a
minute difference. Okay, We'll have a
little bit of a then. This one none too
happy with this. Better. The knee was mesial up. When we come up here. You see this bit high up. That's better actually
because the news, and then I want
the knee to week, we can do this later at the end. But dinosaur, these
nice outlets. So these Neizha first, let's check, Let's go
through each frame. And we basically want
the knee to follow. The toe does more or less to the rule that
I don't like rules. I don't like saying
rules, but it works, I guess you could say along
this side. Let's take a look. The knees out facing. Yes. Okay. We can always readjust that. But we'll get into that. Feel. And that's what we're looking
for. We're just doing that. So we've just added
the torso area. We're just trying to get that
twist opposing to the legs. Yeah. We're getting the we've
got the Zeldin and we've got the y likeness of the Alaska is the
wise and is it going? Yeah. Why? Because sometime
the X is contained in Maya. But yeah, we're trying
to get that twist happening in the torso. Omega, this omega, the
hips going one way and the square root we automatically the
bone in the middle. We'll create that twist. But you want to just refine it and we just gained as little C shapes each time
there's a step in. So step, remember land, which shift will land first, you learn first and
you shift the weight. The weight shifts this way
because that's the leg is just stepped on and Danny is transferring the energy
to the other side. It's all about energy
transfer rate. Okay guys, so this is a simple
step. For the next stage. Step-by-step, we'll start
doing the arms Next and everything else to the policy. So I'll see you in
the next video.
4. Blocking Arms: All right guys, let's get
those arms blocked in. So what we'll do here, it's called Bill shoulder
control element. So let's move this a bit. Let's bring this in. Also. Lets current leaves
all the way. And the thumb. Yes, Let's do that.
On this slide too. Could thumb curve, bring it in. That's fine. It's
intersect in a bit, but it doesn't keep
it out. Bring it in. Bring this down. This may be narrower. Keep it a bit down the road. Okay. And then this one, move the shoulder back. Get this thing down. Alright. Good to me. Maybe go back a bit more too much. Okay, I will do what
is key everything. Go to the end frame here. So both sides. This is going to happen
because excuse me, going to happen because we had the arms out and
we can get everything. We just select all the controls. Then you just delete
everything in between. There you see, and
it's all constant. So now it will just color. Then we will do contact
and contact here. And in here we're just
flipping it going back. So we bring this back, also, will bring this back. Bring this one forward. So we just bringing
this up a bit. Okay. Alright. Now what we'll
do, we'll just keep it up. And I'm here with just
a block, press block. Just call those basic poses
and you can see there these are blocked. Blocked. The shoulders moving.
Alright, might be the IK. Let's have a look at the icky. This middle bit. Yeah, it was happening or not, right? Is it this yeah, that's better. You want to refine this more. You can just come in here. Can be alright. Come in. As it's coming back. Comes forward. And
dragging. Comes forward. Maybe knew what drag. Then you've got
more. We can do it, you need to block
this. We block it. And obviously we'll
work on that. This is just a little guide getting all these little things that I don't know what these are because go to Mr. key there. So you're getting the arm's
going the other side. We still have to do that side,
but you've got one side. You don't have to block
in loudest. You could. That's just one side is showing you the other side what I'll do. I'll leave it how it is and
we'll just plan it later. But that's just one way you can just block it in if you want. We'll probably
adjust that anyway. But that's how you
blocked the arms. And I'll see you
in the next video.
5. Splining: Okay guys, So let's try and
let's clean this up a bit. Let's see what's happening.
We're getting that impact coming in on the feet. I take this. If we go back to the rotation, you can rotate it a bit low. Evenness, grabbed everything. Even. Make it a little quicker. Okay. That's not much in it. Let's see. We could add a little rotation. We go here on the Y ten. Then we could add minus ten, sorry ten at the end modelling. And then minus ten
in the middle. Let's check that out in a graph. So we can go a little bit of rotation there. Maybe we can turn that
down a little bit. Bring it down a little bit. Yeah, so there's a little
bit of rotation in there. And then of course there's
took out the shoulders. Naturally. This has flattened, this all I just go feeling we
can push this back over. This. We can also flatten. You can even rotate this back. Delete this, move this a bit back. Officer layer. I would keep
this backup still like that. Yeah. And even on the other arm, control f, sorry, f
or flattened here. And even here I would
delete everything. Here, just have a carry on. We can, once we offset
that, add a bit more. You gain that. You get a heavy feeling. We don't need that. We can copy that to the
n so it matches this. This matches as fine
shoulder is, we'll do this. How can we get that? Okay. Now what would the arms, what we can do is we can, we can start offset into
becoming an artist, offset this by one
and the wrist by 12. And then even could even move that down as losses
given that little bit of a UK in that little wave. Now, you might not want to
do too much, but still nice. There is the same with this. We can offset this by one. Offset young one too
little bit happening. Move this back a bit. Thump. She got that. You've got a long straight
and that's why you feel that impact in their head down. And then really this
should be down. So if we go to zero, now you get also we could, you know, the down pose here. We have a bit more down. Creating that bouncing
bouncing ball. Yeah, okay. So we got that working. So let's take a look. You know what this one
does form could be backup that could
come in a bit more. The other one. So we could bring that in and rest bring this
rest in a bit more. I was going to bring it down. There's better.
Then we can change. Coupled with heavy jogged is. But you see it's, the
timing is a bit more and is less space in the impact
is more on the legs. And then we'll start
working with the lead. And the other stuff would
post up polishing a bit more. So in the meantime, yeah. I'll see you in the next video with probably some other stuff.
6. Polishing Part 1: All right guys, we're
going to polish now yet. So we'll select this
control and we'll go to our normal emotional
control. Emotion trail. It's not showing that
because we have to go to show and motion trails
and they equal. Alright, so let's set this up. So now we can start
going frame by frame and really just
trying to get the arcs right because we've done all the older Polish
in the other pods. Okay, So comes down here. We could even move
this back a bit. Spacing seems alright. Pretty evil. Comes up. It comes up. Let's try and get this
shape a bit more nice. Triangular shape we want
is the overall body. Comes back down. Here. I was
thinking more like this. Then here would be
a bit more back. Here. We could even have it come up. Maybe. We just want to
get these nice arcs. You go coming down. And an air you might want to. Let's see how that looks in this move. Now also, you can check out six. From the arc is light
here on the front. You can bring it in
a bit straighter. Sometimes you can have a bit
of an arc of him coming up. We've got that one done. So let's then I'll just go into my Explorer here and
I can delete that handle. If you have too many handles on, and it's a complex move, it can slow down meiosis. Good to delete these
motion trails. Let's check the other one. Same thing. This one looks cool. Need to clean up a little
comeback here again, we can break this down. Basically do similar to what
we did in the last one. Come back here. Put this up a bit of the ground. Then the low bit on COVID. Push this back. Middle of it, get
the spacing a bit. Or even. Oh, okay. Maybe there actually it was the
highest and we want it. We think get away with that. Let's try and move this here a bit and copy
that to the end. We want that. We want it to be. Nice curve, right? You've filled up
push off the back. You can really stretch there. You can feel that push. I don't know if we see as
much on the other side. Yes, You see we could put try and put it in
on the other side. Maybe have it down a bit more. Let's see. Yeah. It
is more of a push. Yeah, yeah, that's cool. Alright, so we've got that
word that impact going. Then the next thing could
do is select the wrist. Same thing, checkout.
Is it a figure-eight? Mainly you want to you want
a bit of a figure-eight, the c. So that's cool. I mean, a lot of this is offset. So we can clean
up the front bit, but set these at the moment so we don't have
to really clean those cool. We could bring it back a
bit more. It's pretty cool. Ok, now, we don't have to
really worry about that. But yeah, that's it. That's in a nutshell. How you do how you
do a heavy ish run. You can play around
with the timing. You can make it longer,
select everything, make it longer or shorter. But here's just, the main
thing was when the hips land, there's that real fall. Then I recover and is sharp
four because like we said, like I was mentioning
with a heavy characters is less time in the air. Like characters, more time near. The idea to sell the
weight is impact when it lands and the feeling that
is carrying a lot of mass, heavy-duty, pulling
all that energy. I would see an excuse.
7. Polishing Part 2: Okay guys, so we've
got this working. Let's check out the, okay, So what we can do, we've got these controls
and we can play with these. Let's delete this. And you know what?
Let's have a look. These controls because
every little helps, right? Alright, we'll just
leave it in a bit more. Copy that to the end. Lean this way here. Checkout. Flatten that in cyclic K. Can we translate? Okay? So we can do here. When it comes down. It can compress a little bit. And then we can do
here is come up, impact, then comes down. We'll look it up. We'll
just give it that little bit more. If you want. Go hire. Excuse me. Hi, it's great in that
little bit of more volume, which is pretty cool weather. And also we might do is we
could go down and move it, rotate it down as well. And it comes up, go up, then down, then up. What we might do here with
the app in the Gulf area. Much this okay,
Let's check that. Yes, he's adding more. You're getting more of their
involvement in the upper. Which is cool. And then we can
start using this. Okay, That's the
second one, right? Doesn't rotate or rotate. That's going to be
more translates. Okay, what we'll do, we'll
delete everything in-between. Again, impact slightly down. Up. Impact Theory is slightly down. And we can check that out. The x. Okay, that's cool. And then the head, of
course, with the head, what we'll do is delete this, will start up a bit. And then obviously lands impact. And then it comes up land impact. Okay. Just tone it down a bit
because it was a bit too much to look at it. Now, we told you to or just want a
little movement right? Now what we'll do is when
that first one we did. So we can do, we've
got a second one. Just select everything, move
it by one, this offset it. Then we'll go to this one, select everything,
move it by one. Oh sorry, I moved
up by another one. That moved up by two. Then this one will
move that by 3123. Oh, yes, of course, we don't want that one too. Okay. So it is set
in a little offset. Just makes the head have
a little bit more weight. The neck and everything
is a bit more. Then you can turn that down
if it was too much for you, but I think that adds
a bit of weight to it. Other things you can do is e.g. you've got the knees here. Okay? Now what we can do
with these needs, we can bring them in like this. Just line them up. Let's leave this,
whatever we're going to do when there's an
impact like this key, key before and then our
key with the impact. Then I will move
it, move it back. You'd get a bit of a G2. See, you get a jitter. And you can kind of tone it down however you want in here. But that's what you're looking
for because any land is like we want that
jitter to sell, sell the way out. So this one was in, in there. You see again that
little weight. I'll just save this number. Save your work. Always. I'm saving this for you guys. Please excuse my cough. It's been going
around everywhere. Lord help. Getting
that movement. Then other policy and
things you can do. Let me just take this off. There is a bit of a
heavy Ban. Ben. Ben. Yeah. So what we could do,
you see these you see here and you've got this control their
stomach and lower area. Now, what we can do,
we can select all because a cycle we can
select all of them. And we can delete
everything in between. We can do the same
thing. We find out where the impact is intact. Then down slightly, not too
much because I do too much. Then halfway is up here. So we'll just put
a keyframe there. We know it's halfway and then
just copy the first cadet up, again, down, up. And then we can go
into our graph, flattened the
entities, cycle it. Then. Let's play it out. Okay? Now what we can do is try and scale it
to say if the scalar, scalar a block, that's too
much, you could do shoulders. That's even too much lira. We got out that yet. Now, the bottom one, the top is going to stay at. Here's the second one. We can move it. One, whoops, one. And
then the top one, we can move it free. So we'll go 123. And then we can go back into
this first value below. Alright, learns
their races there. We can manually raise it down. And then we can just get
we can just do that. Let's have a look now. We could do the same
for the bottom one. Scala. Have a look at a little
bit more fleshiness to it. If we check this out. This adds a bit more volume. Then if you want, you
could you could offset. There, you see you'll
get a bit of a chest, offset them so you
can move it back a little bit of a chest. There. You can see the SEC is
just landing as he learns. So yeah, that's,
that's how you do a walk with a weight,
variable weight. And snapping onto the
other thing we can do, which I don't know how I forgot. Yeah, make sure is that
weight transfer happening on the side to the other
thing we can do, which I didn't do
is debit the feet. So we call this the toe control. Can't forget this. Man. Here. You
could even have it slightly back, even
slightly back. And it comes up land. And then the hero
lines first here, first, this right here,
first, hinterlands. Then you come here, you can make those minor
changes where like this. Come here, we can
make that zero. So it's going along flat. As you can see, it pushes off. Then you can start. Then you can maybe push
it back like that. Then then you see you get
that flop. To flop too much. You could do a little bit. Depends on your liking. Again, other to
delete everything. So come up and zero that out. Up to there. Keep that
toe on the floor still. It comes up. And then
drag drag that back. Drag it back slightly. And then you can copy
that N1 to distort the c. That should
be all right, Mr. Yeah, that's just walk with a bill weight playing
with a Tommie Moore. 26 frames. You could put it
into iframes if you want, depending on the character. But this is just like trying to show that it's
a bit of effort. And then as you can see when
the character is running, the important things, we
will look at the back. This model is pretty
good, but you can see. And then obviously
the other way, you're getting that nice, you get that nice line
coming through the body. As we are looking for
before the twist. You know, it's just
a twist. Cope. Well, gardener is Coke's
group with a twist. But yeah, I hope you
enjoyed this one. I enjoyed this volume,
so I'm indifferent, nice character in a pro rigs congruent with prolegs.
They are amazing. I just got an email from
them for a grid updates, so they regularly update,
which is brilliant. So check check him out. Definitely definitely worth
that 18 or do I pay what, 16 pound a month for them? Definitely worth it when you get older support everything, great models to
whole load of moles. Alright guys, so I will
see you in the next video.
8. Squash And Stretch on the Head : The other thing we
can do is if we look at the head control, you can see here
there's a head size, boring, different control there. But we're going to look at
this squash and stretch, squash and stretch
it just to add a little bit more
volume to the head. So pick go into hair
squash and stretch. There's no keys area. We're just going to
come in and be like, Let's do a sly stretch
at number one. And then when you land, still a bit of a stretch and
then squash, not too much. I don't know why it flips
locked up. That's fine. Squash and then hold it there and then
squash, squash it down. There is backup. We'll get to that low 0.93 at
the end for him. Okay? Okay, so we've got this question of
course is structured here. Now we can play around with
just cycle these nicely. So you can see a little bit
of volume there is covered. So we can kind of play
around with these values. Make it bigger.
Let's always try to exaggerate before you know, that's too much, but maybe
a little bit higher. Okay. For some reason
it doesn't like it. Okay, What we could do,
concentrate on the stretch that will leave the squash. How is it going
to cost too much? So let's see this. You can actually add a bit of volume there. That's too much. So we do it, We just tone
it down a little bit more. Because still see the
volume, okay, there. Now what you can do
now is you could also offset it by one. So it just happened. Let's try to make
it a bit higher. Just happens after the
land was happening anyway, I have to learn, but we are just delaying a little bit more. So you can play around
with that control. See how that looks. See there's a little bit that wouldn't that wouldn't
necessarily be there. And that's when you
start polishing, when you just try to add a little bit more
extra breathing, extra heads scores for
volume and weight. Sorry, volume and weight. And it's just given that extra that wouldn't be
there if you just animate it and left it at that
last part you did before, obviously doing
this polish pass. It just brings it up a notch little bit, these
little details. And then we could go
even further and start animating slightly the fingers. If you want to go
into more detail, just have them moving a bit. But normally they're
quiet, dropped anyway. In a fist when
you're when you're doing when you do the run. This green. Anyway,
just wanted to show you that you can add a little bit more
squashing their head. Just to give the
animation that little bit of something else that
would have been otherwise.
9. Conclusion: All right guys, congratulations. You now know how
to do a run with adding a bit of weight to
the character and volume. We also learned about how
to block each pose mix. We've got the solid poses and first time we played
around with the timing, obviously with the Run being
heaviest a bit longer. And then we looked at the
extra controls that could enhance the way or give
the illusion of weight, which would be a bit of squash
and stretch in their head, as well as the chest. The overlap of the chest
secondary motion, if you like, it is continuing after
the character falls down, looking at the hips,
the hips impact. And we'll use the
trajectories and spacing, breaking the handles
and the graph editor, how to make basically using the bouncing ball
concept of coming in and really like hitting an impacting and also the feet
as they come down, same as the bouncing
ball in a snap. Got that nice arc, going quickly down,
slapping down, and then coming back to getting that stump and weight really. The other thing on the rig
that could have helped would have been a bit more squash
and stretch controls. Because as you land, there
could have been a bit of squash and then
they're released. So that adds the illusion
of weight as well, but some are exam
them, some rigs note. And again, we can
take this vanilla run and we can edit here, we can start using
different emotional states. We can see if a character
is heavy and happy or sad, or excited or surprise
or running from something I personality
to the run. So you can play around
with the timing as well. So you can take
this rig and take this animation and
really just push it to other different
types of states that the character might be and that you want
to be in writing. Because after all, you
are animating and don't forget put your projects
on in the project section. We're all together as a community
to help each other out. And I'm trying to uplift
each other and get better at animating
together all on the rise. In the meantime,
after this course, you could check out
the other courses. Our goal as Co-Chair,
my fundamentals, which is absolute route to
animation, the root teachings. Once you grasp those delicate, start doing the video games, cartoony series, the
body movements series, as well as a couple
of classes in there. This one including getting
up from the chair. So there's loads
you can learn from there and also implemented to your actual projects
wherever you're doing in your animation field, studying or even in your
professional field. And also I have a
YouTube channel where I share my tutorials. I also share my fitness journey
on there where I've done an update on where
I'm at with that, as well as also giving
feedback to TV series, TV shows, animations,
animation films out there, breaking down the scenes. And also, I am avid war
hammer Games Workshop fan. So I also paint miniatures and airbrush and as
a side hobby for me. Alright guys, lastly and
most importantly, have fun. Be kind, enjoy animating. Don't just sit on
the screen, get out, walk liver bit, and then put it back into work as
we do as data matrix. Alright guys, so take care and I'll see you
in the next class.
10. Maya Animation Mastery: Hi, everyone. Congratulations. This
is just something after the conclusion
that I just wanted to put into all my courses. If you're really serious about leveling up
your animations, I have a brand new course
that you can enroll in. It's called Maya
Animation Master. This course, I've redone
it with four K Good Audio, came out in January 2024. And this course is
designed in a way how I would have liked to be taught animation when I started. So It basically gets rid of all the pain pain
pressure points that I had when I
started animation. So I want to get rid of those
frustrations and give you a direct line to what that aha moment was for me when my mentor Steve Gagnon Kati taught
me about animation. Something just clicked, and
I teach that in the course. So if you're interested
in enrolling, you can go to the about
me page where I'll have a link there called
My Animation Mastery, and you can go
through the webinar. Then the course breakdown.
You can check that out. And then if you decide, you can enroll, if
not, that's fine. There's a private
Facebook group. There's a link in there
about me for that as well. You can join that
where we get feedback, and there's a nice
community there. And also, when you enroll, there's a private
Myers Mya animation Mastery inner circle
group where it's just exclusive for students
where we give feedback. So, have a look at that webinar and let me know your
thoughts as well. If not, you can join the Facebook group to
the private group. Obviously, the inner Coco group is for people who have enrolled, students who have enrolled,
but check it out, and it's just for
leveling up, and really, it's got all the
theory and practical, heavy on the practical
stuff, video game stuff. If you want to learn
about how to get a shot from reference to
blocking to splinding, to polished, show real level. It goes
through all of that. And also, I talk a lot about networking and
how to get jobs and context that I have within the industry that I can
ph your work out there so at least it's in the right
hands and people can see and at least consider
you for applications. F of my students who
have already got jobs in the industry going
through the course, so have a look at it. And yeah, let me
know your thoughts. So enjoy your animation journey, stay healthy, and
I'll see you around. I'll be around on the
Internet on YouTube and a giving tutorials as
usual. I'll see you later.
 Opi Chaggar, Senior Animator + YouTuber