Transcripts
1. Welcome: What if you could
bottle up the memories, lessons, and key moments
from the past year? What if by reflecting
on the past, you could bring a stronger
foundation for your future? Well, in this class, that's just what
we're going to do. We're going to create your
own personal time capsule. This is a powerful tool
for reflection and growth. I'm Jamie Smith, and I'm
an artist and teacher, and welcome to my class. Capturing your year, make a time capsule for
reflection and growth. I am so excited to guide you through this time capsule
journey together. Reflection is one of
the most powerful tools for personal development, and creating a time capsule
allows you to honor the past while making
space for the future. And that's what we
need sometimes. This class actually
pairs perfectly with another class I made
inspiration to reality, make a vision board
for your goals. In that class, we explore
how to turn your dreams into a reality by
envisioning the future. The vision board
class is all about setting future goals
and focusing on that, visualizing what we want to
manifest in our own lives. In this class, we are all about looking back
for our time capsule, reflecting on the lessons and the experiences
of the past year. The end of the
class, you'll have a personal time capsule
filled with memories, insights, and all
things that kind of relate to this future
that we're looking forward. It's a complimentary way to do this and the vision
board class together. In this class, it's
for anyone that wants to deep reflect
on the journey, honor your growth and create something meaningful
to revisit later. We're going to look back and capture the essence
of your year. We're going to create
that space for intentional so we'll begin
by celebrating our wins. We're going to reflect
on how you spent your time this last year, the lessons that you've learned, but we're also going to take
the time to say goodbye. Let go of anything
we don't need. So let's jump in
and get started.
2. Your Project: Your project for
this class is to make your personal time capsule. This is a reflection, a
collection of reflection, thoughts, symbols, and that all represent this past
year that you had. This is your own keepsake
to revisit in the future, and it's filled with
memories and intentions. So why a time capsule? Well, I wanted to create a tangible way for us
to honor this journey. Often don't take the time
to pause and reflect and think about what we have just gone through and give
ourselves space for that. So it's not just a fun
project, an art project, but it's actually a tool for
self awareness and growth. So all you're going
to need is a jar, a shoe box, a container, some sort of capsule. And you can figure that out now or you can wait and do it later. It's totally up to you,
but you want to jump into the exercises that I'm
going to walk you through. So for that, you're going
to need a paper and pen and any other small
items, mementos, anything that you want to
put into this time capsule, as well as any art supplies because we're going to
decorate it, as well. I did make a time capsule PDF, and that is for all of
our reflection exercises. You are, of course,
welcome to just use a journal and write
on whatever you like. You want to think
about the size of your time capsule because that will depend on what
you're going to write on. So it's important to not really worry about it too much,
but as you're doing it, think through your
reflection and remember that you're going to put those
into your time capsule. So we are going to use this as a guide. There's
no wrong answers. This is your reflection,
your time capsule. So we are going to get started
doing exercises together, and the first thing
we're going to do is celebrate our wins. That certainly sounds fun.
3. Brag Box: So before we dive
deeper into reflection, let's take a moment
to celebrate. Let's celebrate our wins. Sometimes we forget
to acknowledge all the good things
that happen to us, especially those
small victories. So grab your time capsule
PDF or a piece of paper and start filling in
your brag box exercise. I want you to write down all of the wins you've
had in the past year. These could be
huge achievements, like a work promotion or
something that you really wanted to happen happen
or small victories, like a new habit you started or something you really wanted
to get done and you did. Anything that you're
actually proud of yourself for from
personal growth, big milestones or
huge challenges, it could be a very
unique year for you. We want to take the
time to acknowledge the big and small wins to really think about the growth
that we've actually made. So taking this time, it's not all about just
moving forward. Remember, don't worry
how small the win is, write it down anyways. Sometimes the smallest
victories have the biggest impact on
our overall journey. So your only job in this exercise is to
fill the entire box. Once you've written down all of your wins, let's set it aside, and this will go into
your time capsule as a reminder for the future of everything that you did
get done that year. So let's dive in. Let's think about
this year together as an important asset
to move forward. In the next lesson, we're
going to think about how we've spent our time this year,
so I'll see you there.
4. Time Pie: Let's reflect on how you spent your time
over the past year. This is something we
don't talk about a lot, but time is actually one is our most valuable
resource, in my opinion. And it's kind of important sometimes to take that
inventory and think, how did we invest this
valuable resource? So pull out that time capsule
PDF or a piece of paper, and we're going to go to
the time Pie exercise. What you're going
to see is a circle. That circle is what
we're going to use to create a pie chart, and we're going to use it in different categories
of our life. There's a whole list there. You can change, you can add, you can put in new
categories if you want, but start to kind of estimate how did you spend
your time this year. And you're going to make
this into a pie chart. So, for example, think about the things you spend
a lot of time on, and those are kind of be
the bigger slices of pie. I find this this easiest way
to do it and then kind of build out with the other areas of your life in smaller ways. It's kind of a good way to see that guestimate and
see if it works out. Keep in mind, there
are no wrong answers. This is for you. This is to see just a reflection
on where this time went. So you're going to
fill in your pie, and you're going to reflect
on these questions with me. What areas did you spend
most time tending to? And how did this
affect your past year? What area did you spend maybe
not enough time tending to, and how did this affect you? So we're going to
think about that and then move on to
the second circle. That second circle I left
for you as a way to kind of think about how you want your
time divided for next year. And this is really important
because we want to think, do we want to grow and
learn from this exercise? So you're going to make a visual representation
of what this looks like for your future and then answer some
reflection below. Once you fill this in, I want you to think about
these questions. If your time was
divided in this way, how would it affect
your life and why? And what is going to be that key focus for next
year with your time? Having these questions in mind is going to really
help you take more of an inventory of the hours that you're putting
and where and why, and if you want that
to be that way. So this one was a
hard one. I'm so impressed that you're
sticking with me. We're going to jump
into the next lesson, and we're going to
talk to our past self, so I will see you there.
5. Dear Self, Thank You: Now it's time to show some love to your past
self. Isn't that lovely? This is one of my favorite exercises because it's all about acknowledging the resilience and wisdom you've shown
over the past year. And it's easy to
forget sometimes. So take a moment and write
a letter to your past self. Grab your time capsule
PDF or a piece of paper and just start
filling in the ideas. Dear self, thank you. That's the activity sheet. Start by thinking about
what you've learned this year and what you want
to thank yourself for. Maybe you made it through
a tough situation, learned a new skill or simply stay the strong when
things got hard. Your letter can be
short and sweet or as long and
poetic as you like. There are a lot of lines there. You don't need to
fill them all in, and it could be as simple as, thank you for staying strong
through a difficult time. I'm proud of you for pushing through and learning to
take care of yourself. Or it could be a long letter to yourself, and both are great. You are going to be the
person to read this. But we don't take
that time often to just take a moment and
acknowledge our growth. That's what you're doing by
taking the time to do this. So don't worry about
being perfect. Just right from the heart. Your future self is who's
going to read this, and I think you'll be so
thankful that you did this when you read back and
see the kind of year you had. So it's a gift to
your future self. Aren't you nice? Once
you're done, set it aside. This is going to go
into our time capsule, and we are almost ready to
make that time capsule. We just have a few more
activities to go. See you there.
6. Word Of The Year: We're now going to capture the essence of our
year in a single word. I know it sounds
hard, but words can offer us a symbol of the
journey that we've been on. So I want you to think about
the past the past year and a word to describe it. We're gonna put
that into our time capsule PDF or on
a piece of paper. Your word could be growth,
resilience, transformation. There's some big fancy words
that you can put to it, or it could be
simple, like breathe, calmness, whatever
your year was like. But take a moment to sort of think through and look
back at the writing you've already done to really choose that word that
summarizes that year. We are going to use this
time to reflect as a whole, about how this word
represents our journey. You're also going to write why so that your future self
can kind of remember why. You might have forgotten
in a few years. But don't overthink it, choose a word that feels right. Have some free writing about it, and I know your future self is going to be so
excited to kind of see that word and everything that is symbolized to you now. This word you might also use as you decorate your time cap, so later, it's something that is going to
come up for you. So what is the essence of
the last year you've had? Write that down, don't overthink it and get
it all into one place. I'll see you in
the next exercise.
7. Saying Goodbye: Before we create our
actual time capsule, it is time to say goodbye. We are going to leave the
things that no longer serve us. So I have created a space
for you to do that. It's in our time capsule PDF, and we're on a piece of paper. And sometimes this
is a challenge, and it's time to let
go of those things. Maybe it was a year
that was really tricky, and it's time to say goodbye. Maybe it was a great year,
and you just want to kind of close it off and
have that closure. So you're going to get writing. You're going to dig
in. We're going to let go of anything
that you need to. And it's all about
this exercise is, how do we learn from
this last year? How do we gain lessons for
the year that we've had? Let's let go of the things
that don't serve us, opportunities that
we no longer need. So it's a chance
for you to release. You're going to release any
lingering thoughts, emotions. You don't want to hold them
in as you move forward. You are the only person
that's gonna read this, so enjoy the time
to just let it go. Say goodbye. And this piece is going to go right into that time capsule, and your future self is going to see those hard
lessons you learned, which is really,
really exciting. So I'll see you in
the next lesson, and we're just about there.
8. Your Secret Wish : Alright. We've said goodbye. This is our last one,
and I love this one. This one's a secret
little one I put in. So this exercise is your secret
wish for the coming year. It's really fun to look back on. You're going you can use
your PDF or grab a journal, and you are going to
use the little box provided to write down
that secret wish. Don't overthink it.
Go with your gut. What would be so exciting
if it happened next year? So this is directly
focused on next year. It's could be something small. It could be something
big, but what's a hope? It's an exciting thing
that could happen. Maybe it's about making
more space for yourself. Maybe it's something that
you want, a big promotion. This wish is for you. You don't have to tell anyone. So don't feel
undeserving or unsure. This is the way that
you're gonna put it out there into the universe. Especially if you go on
to make a vision board, this is that secret wish
you can put in there. It's like a small whisper
to the future self, to the universe to say,
This is what I truly want. Don't overthink it. I
can't emphasize it enough. So get that written down your secret wish and take the time to kind
of write out why. Let your future
self know what you are thinking and
get that on paper. And the next lesson, it's all
going in the time capsule, and we're going to talk through
all the things to think about when creating your
art project. See you there.
9. Creating Your Time Capsule: You've done all the
important reflection work. Now it's time to
put it together. Now is the art project. I'm going to walk
you through how to assemble your time capsule. This is going to be a
meaningful art project, a keepsake that you get to revisit in the future,
which is really exciting. So step one, choose
your container. First, let's start
with selecting a container for
your time capsule. You want something
that feels special, but also is practical for storing the memories
and reflections. There are many options, so pick one that
resonates with you. A couple ideas that I
have had and ones that I've made myself
is a typical jar. So a mason jar that can be decorated or you
can just simple, put a tag on it and
leave it in glass. But it's an easy storage way. A shoe box, a nice
free shoe box. But you can decorate it,
add patterns, stickers. Again, it depends
how much you're putting into it and what
kind of size you need. A custom container
is also kind of fun. Maybe you see something crafty or want to create
something upcycled. And another one that is an underdog of containers
is a large envelope, and this one's
kind of nice cause you actually can stick
it on the back of your vision board
if you want to keep those two things together. The one that I made for
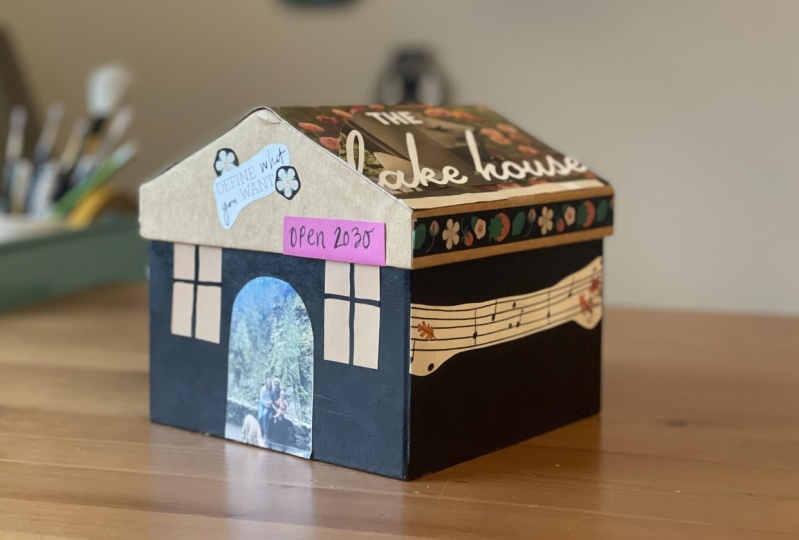
this year is actually a custom box that I
got at a craft store, and it's made into
the shape of a home, which I thought was really
fun because my whole year was about moving house and kind
of setting up in a new place. So the vessel really became part of the meeting for me and very symbolic, which I really like. So you might find
something like that, but you also might
just find a container. So don't overthink it, grab what you have
handy and make it your own because there's
lots of way to do that. You also want to think
about where you're going to put it and how much
you're going to put inside. So if you wanted to go old school and bury
this in the backyard, make sure you have a container
that it would do that. Or if you're going to
store it for many years, make sure that it's reasonable, that it's something that you
will tote around and have. So our step two is we're going to personalize
the outside. So all our reflection
is going in. We're going to add some
other things inside, but we also can make
it fun on the outside. So I really enjoyed
this process. I used all the
things I learned in my reflection to create symbols, cut out magazines,
and kind of put it all on the outside to
create this time capsule. I'm really excited for
later because I will have that also as
this arty memento. So some ideas that you can for personalizing is I
did use some paint, which I really liked,
washy tape patterns, but really making your
own with paint, collage. So magazines I already had out because I was working
on my vision board, and I found some
quotes and photos. I even printed some
photos with my family. So that is a really
fun way to do it. The other thing that
you can do is add the date of the year or even when you're going to
open it could be on there. Quotes and words you can add, especially that you know
your word of the year, and that can all go on there. Stickers, ribbon, how are you going to make this really
uniquely your own? So step three,
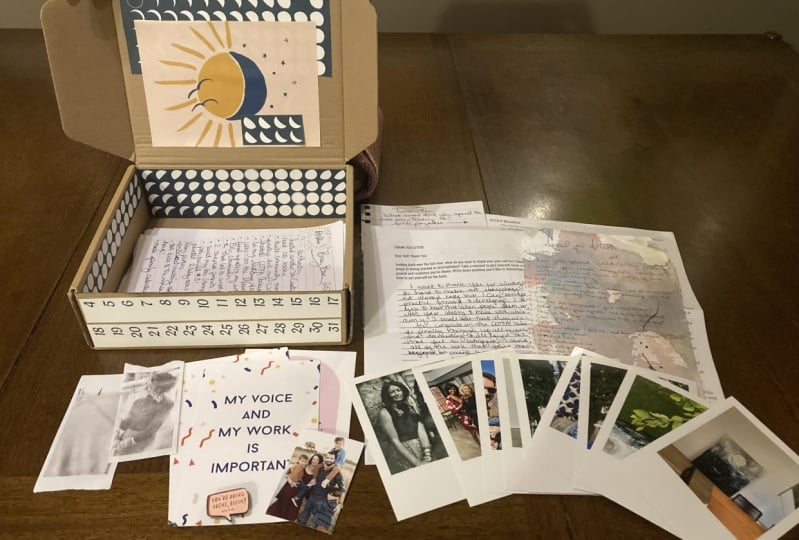
we're going to add your reflections
and some mementos. So you have your container, and you can fill it with everything you've
written in this class. You can take some
of those words out. You can make them
in different forms. But it's a great way to preserve all of this reflection
into one place. So some things that
you want to include, of course, is the time
capsule PDF writings. Any reflections maybe from an older journal or something from the year
you want to put in, letters, gratitude list,
goals that you've had. Again, my writing that we did
together was just a start. Great things to put in
there are mementos, so this could be photos, ticket stubs, small trinkets. I have some of my
daughter's toys in there just to remember the
things that she loved. You could add
drawings, sketches, elements of an old
vision board could all be packed in and put
in there. Make it fun. Step four, set a
future date to open. This is one of the
exciting parts of this whole experience and the
fun part of a time capsule. So your future self is
going to open this up. This adds anticipation and fun. So when to open it. Maybe choose a meaningful
date if you want. So it could be just a
year from now to make it, you know, a short term time, could be five to
ten years from now. If you're really
excited about this really into the future, it could be a
specific milestone, a birthday, a special
event that's coming up. And that's kind of a fun way to set a time that you're
going to open it. Write the date that
you're supposed to open the container
and don't forget. You could also set a reminder
in your calendar or phone or put it somewhere that you see it and kind of build
that excitement. So enjoy that future self time when you're
going to open it. Step five is seal and
store your time capsule. So make this a
little ceremonial, and you want to seal this up so that you cannot touch
it. It's more fun. You don't have to, but
I thought it was fun. So you're going to you could tie a ribbon
around it, tape. You could do a wax seal. You could really seal
it up and bury it. It's just about making it fun. So it's all about kind of
taking that moment to seal it is also about kind of
closing off that year. So, you know, think of this
as sort of the sacred time. And then when you're thinking about where you're
going to store it, just remember that
you want to have it easy to move around somewhere that you're
not gonna by accident, open it when you get curious. So just kind of thinking about where you want to
put it in your home. And your step six, post your project.
I want to see this. I want to see this
beautiful art creation. So in the next lesson, I'm going to show you kind
of how to post that. But I would really
love to see it. I'd love to hear you talk about this experience and
what you kind of learn from remembering
your year. So post that in the
project session below. I would love to see it. And
now you're ready to go. So you have this time capsule and whether you open
it a year from now, ten years from now, your future self is
going to be really excited by the experiences and everything that you went
through that is going to all lead to who you
are in the future, which is really exciting. Well done. Thank you.
10. Uploading Your Project: What I love so much about skill share is that students are able to share their
finished projects with one another.
It's really unique. And I have taken a number of
skill share classes myself, and I find the classes that
I push myself to actually post my project are where
I truly learn the most. So please take time to
share your project with me. I can't wait to see it. I'm going to give you a little
demo of how to do this. So you want to take a
picture of your work. I always do this just on
my iPhone or my iPad, and you want to then
go into projects. So on your screen
here, this is a class. This is my vision board class. And there's projects
and resources here, and you're going to
click this green button that says Create Project. So here, you're going to see
a place to upload a photo. So I just have this
in my photo library. It's going to upload,
and this is going to become my cover image
that people will see. I can then put in my title, so my vision board. And audio correct is the best. And then I just wrote a little description of what my focus is for the
year with my vision board. You can write what you
like about your project, what you found difficult. You can always make
your project private, but I do love being able to
share and see other people's. And then you're just going to press the green
button is publish. So publishing takes
a couple minutes for this photo to show up, but you're going to
see it right under your projects. We'll be there. One thing I love
is if I go back to my profile and I scroll down, you can actually see where
all of your projects live. And I find this really exciting. I'm really proud of the projects I've done and the
classes I've taken. People can like it,
people can comment, and it's a great way to have community within Skill Share. So I find the creative life can be a little hard sometimes. It can feel a little lonely. But remember that you're part of the skill share community, and it's a creative one,
and it's an important one. So I know that I am
a better artist when I'm working in community
and I'm participating, and it can feel scary, but it's worth doing. It's so easy with online
classes to start them, get distracted, and
just not finish them. So push yourself, get
that project up up, and I can't wait to see
what you have created.
11. Next Steps: Congrats. You made it.
I'm so proud of you. Thank you so much
for being here. This time capsule is a
powerful tool for reflection. It gives you the
opportunity to look back with gratitude and closure, while making space for this
new future year and growth. And when you revisit
this in the future, it will serve as a reminder
of how much you have learned really helped you become the person that
you're going to be. So if you're looking to kind of what is the next
step after this, I encourage you to do a vision
board. And I have a class. It's on skill share,
inspiration to reality, make a vision board
for your goals. And in this class, it's all about thinking about how
we're moving forward. It's envisioning,
it's manifesting the life and the
year you want ahead. Now that you've done
the reflection part, let's move into the
goal setting part. So the two classes sort of make this full cycle
of personal growth, which I'm really,
really excited about. So thank you for taking
the time of looking backwards so that you
can move forward. Remember, personal growth
is an ongoing journey. It is ever moving and ebbing, and by you being here
is just a step in all of those forward
moving directions. So thank you so much. Congratulations. I'm making
something meaningful today. And when the time comes,
I can't wait for you to see all of your fun
reflections there, all the growth you've made, and all the little
victories you're gonna totally forget that you
actually accomplish. So, well done.
Thank you so much.
 Jamie Smith, Artist, Teacher & Community Builder