Transcripts
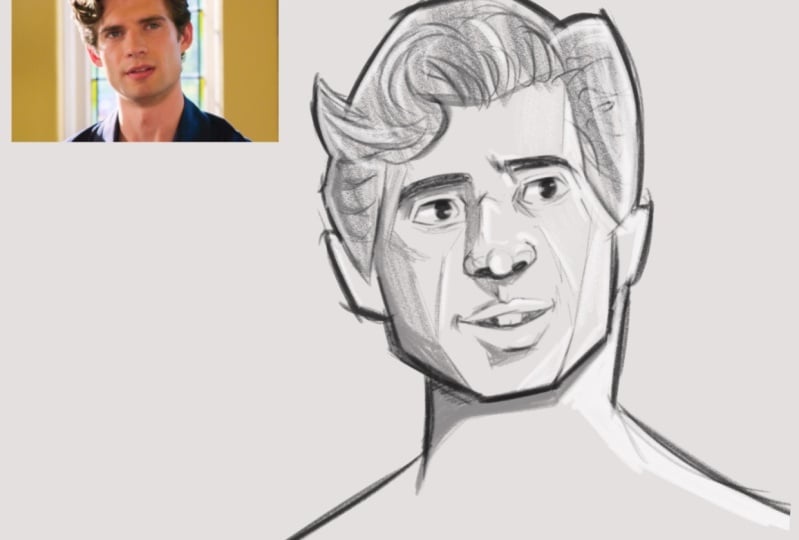
1. Course Intro: Hey there, how's it go? And I was just about to start drawing, but before I do, let me ask you this. Are you a beginner or intermediate artist who's looking to improve in the area of capturing the lightness of a vase in your artwork. If you answer yes to that question, then this class is for you. I'm cloud had shot and today I'm going to be your instructor walking you through my entire artistic process, accurately capturing the lateness of a base without necessarily having to copy the reference photo exactly as it is. I'm a freelance illustrator who is trained in product design, but my main specialty is illustration and comic book art. So drawing an accurate likeness is definitely tricky. And it took me quite a bit to be able to get it down to the point where I can now look at any face and capture the features in an accurate way. And here in this course, I'm going to show you my entire process and break it all down step-by-step. So that way you can do it too. I'll be covering the entire course with six video lessons, each diving into capturing a different feature, the base. And those will be capturing the overall shape of the head, the shape of the eyes and the eyebrows, the nose, the mouth, the hair and orofacial hair. And then in the final lesson, I'm gonna take all of that and titled together to capture the complete likeness and addition in the final video lesson, I'm also going to show you some other examples of likenesses that I've sketched up that way you can see how I take everything covered in the video lessons and apply it to any face. But you can pick up. And in the video lessons, my main subject is going the toaster consult, aka Ironman star, Robert Downey junior. Then at the very end of the course, I'm going to have a little class project for you guys to work on, which will be to take what you learned in the video lessons and use it to capture the lightness of any phase of your choice. It can be a favorite celebrity of yours, or it can be a portrait of a friend or even a self portrait. But the choice is totally up to you. Thank you guys again so much for choosing this course. I'm very grateful for the support is always, and I know you won't be disappointed. So with that said, why don't we get started?
2. Lesson 1: Drawing The Head Shape: Hey everybody, what's going on? In this first lesson? I'm going to be walking you through my process or sketching the overall shape of the head in order to accurately capture the lateness of Robert Downey junior. Now I'm going to be showing you how I take a reference photo and isolate the overall shape of the head. That way, we can recreate a shape without necessarily having to copy the reference photo exactly as it appears. So in other words, we're going to be sketching a blank template head based on the shape of the head that we determined from the reference photo. With that being said, what do we get to it? Okay, guys, welcome to Lesson one here on capturing the overall shape of the head in order to accurately draw the likeness of rubber Downey junior. So for this lesson and the rest of the lessons in this course, we're going to be using this reference photo here of RT J. And what I'm gonna do is first take this layer and lower the opacity of it. So that way it's pretty faded out. And I'm doing this so that way we can trace over the image and capture the head shaped. So that way we can redraw it next to the reference photo without necessarily copying the reference exactly as it appears. Alright, so now what I'm gonna do is create a new layer above the reference motive layer. And I'm going to take some red pencil and draw over the reference image and basically traced the overall outline of the head. And what I'm doing here is I'm basically simplifying the form down instead of tracing the actual contour on his head exactly as it appears. And the reason for this is because basically in the end we're going for a more cartoony, stylized appearance. So therefore, that's why I'm simplifying the form down. That way. It will be easier to recreate next to the photo. In addition, just sketching the outer contour lines of the head, I'm also going to construct the center line, the line, nose line, and a quick line for the mouth. As well as building out the beginning structures on the cheekbones, forehead, and the eye sockets. Now that we've been able to identify the overall shape of the head here. Now we're going to recreate the shape next to the photo. So when you're trying to capture the likeness of Robert Downey junior here, or really any base you can think of. I actually highly recommend that you start out by tracing over reference photos like this. That way over time you'll get better and better to the point when you won't even need to trace over references anymore. You'll have the keen eye to just be able to observe the photo and pinpoint the exact shape of the head right off the bat. Okay, now that we've constructed the overall head shape, I'm going to just quickly throw in the ears as well as the neck. Now when we're doing this and recreating a lightness from a reference photo. As I've said, we're not copying the photo Exactly. So unless the ears or the neck or a really specific sheep that pertain to the overall likeness. You don't really need to capture exactly how they went from the photo because they're not really going to affect the likeness of Raul. Unless, like I said, they have a really specific shape. Alright, that concludes Lesson one. Fantastic work. When you're practicing this, see if you can get to the point when you no longer need to trace over the reference photo in order to identify the sheep up ahead. See if you can observe the photo and be able to identify the shape just by looking at it. It might take a little time, but trust me, you'll get there. Thank you guys again so much. And I'll see you in lesson two.
3. Lesson 2: Drawing the Eyes / Eye Brows: Everybody in this second video lesson, I'm going to be discussing how I go about drawing the eyes and eyebrows in order to accurately capture the lightness of rubber gonna do you're a lot like we did in lesson one. We're going to isolate the Isenheim rose in the reference photo. And using our keen sense of observation, we're going to pinpoint the overall shape of both of these features. And then we're going to draw them on their own nests and reference photo. And then later on at the end in the final video lesson to take we cover here and sketch the eyes and the eyebrows on the template head with the rest of the facial features. So with that said, why don't we dive right into it? Alright guys, welcome to lesson two, where we're going to be taking the same reference photo from lesson one. And we're going to trace over it in order to identify the shape and angles of the eyes and eyebrows. Okay, so I'm going to create a new layer above the reference photo. And this is spirometry tracing over the image with red pencil. And i'm going to start by constructing a T-shape in order to act as a set of guidelines to show the proper placement and position of the eyes, as well as were the nose is going to be placed in the next video. Okay, now we'll start drawing the eyes themselves. Anytime I'm drawing iss, I like to start with a couple of circles to represent the entire sphere because that's what the eyeball is after all. Then after that's been done, I'll go and start drawing the eyelids and the pupils. A lot like we did in lesson one, with simplifying the overall shape of the head. Here we're going to be doing the same thing with the eyes. We're not going to be tracing the exact contour line, but we're going to be more so simplifying the overall shape. So that way we can achieve a more cartoony stylized appearance. And then after we've done that, we're going to sketch the eyebrows. Keep in mind that they're not super thin, but also they're not overly thick either. There's somewhere right in between, two thick and thin. Okay. Now that we're done identifying the overall shape and placement of the eyes and eyebrows. It's time to sketch these shapes right next to the reference photo, a lot like we did in lesson number one. So let's begin by drawing that T-shape. And this again acts as a set of guidelines to place the eyes correctly. And according to this method, the space right between both eyes is approximately the width of one eyeball. So that's a good way to know how to place both eyes correctly. And before I even start sketching the eyes, I'm just gonna quickly rough out the angles and placement of the eyebrows. After that, we're going to start sketching the eyes first, starting with a couple of circles to represent the eyeballs as a whole. And then we're going to construct the islands over top of them. And next, we will sketch a couple of smaller circles for the pupils, as well as building up the eyebrows. And as I stated before, the eyebrows here are not going to be too thick, but also not too, then they're gonna pull somewhere right in the middle. Now when you're practicing this, it is highly encouraged that you trace over the reference. It may be as much as possible in order to identify the proper placement and shapes of these features until you reach the point when you no longer have to trace, you'll just be able to look at the photo and recreate the features and placements in your sketch without having to trace over it. Okay, so this wraps up lesson two on drawing the eyes and eyebrows in order to capture the likeness of Robert Downey junior. Great work. And I will see you guys in lesson three, where we'll talk about drawing the shape of the nose.
4. Lesson 3: Drawing the Nose: Hey everybody. In this third lesson, I'm going to be discussing how I go about capturing the shape of the nose in order to accurately capture the lightness of Robert Downey junior, like we've been doing. We're going to take that same reference photo and isolate the overall shape of the nose. We're gonna do this by tracing over the reference and seeing exactly what that looks like. Then we're going to take that knowledge and recreate the shape of the nose next to the reference photo on its own. Then later on in the final lesson, you take will be covered here and sketch the nose on the head with the rest of the facial features to tie it all together. Alright, so with that said, let's get started. Okay guys, welcome to lesson three, where we're going to discuss how to capture the shape of the nose here and the reference photo, or d j. And then we're gonna take that shape and we're going to redraw it next to the photo. As you can see here, I've already lower the opacity of the reference image layer, and that's so we can trace over it with red pencil. So I'm going to just create a new layer over the reference photo for this sketching. First, what I'm gonna do here is I'm going to start sketching that T-shaped that we covered in lesson two. But this time we're going to be only focusing on the nose. I think it's helpful to just sketch the entire shape of that way. We can unify everything together later on. And if you notice here, sketching this shape will create three different sections. And the section where the nose is, is going to be about the same width as one of the eyeballs or one of the sections containing each eye. Ok, now we're going to actually move on to sketching the nose shape. And if you notice here, the bridge of his nose is very steep down to the ball of the nose, which appears to be more of an oval shape. Now, it's not going to be too big or too wide, but very moderately sized, I would say is the best way to go here. And as I've been doing, we're not going to be tracing the contour exactly as it appears in the photo. We're merely going to be simplifying the shape. That way. We can recreate it on the side in more of a simple stylized appearance. Okay, now that we've identified the shape of the nose from the reference photo, we're now going to sketch it on its own next to the image. So I'm going to create a new layer and start sketching out that T-shaped that we started with. So this time we're only going to be focusing on the nose and not the Eisen's. We did that in the previous lesson. And as I've mentioned before, I highly encourage you to trace over the reference photo as much as possible when you're practicing this, whether it's with this image or any other image of Robert Downey junior or an image of any base. It's always helpful to start by tracing over the photo. That way you can get a clear idea of what the shapes look like. Then you can go and more easily recreate them next to the image until you get good enough, where you'll only have to look at the image and you'll be able to observe and identify the sheep without having to trace over it. So when you're drawing the node is one thing to keep in mind is to imagine the ball of the nose as a single oval shape. And then once that's done, sketch in the nostrils and any other details. That way you've got that simple shape as a base and you can slowly and gradually build upon that. All right, you guys awesome job. This concludes lesson three. So keep on practicing. And I'll see you in lesson four, where we'll discuss how to capture the shape of the mouth.
5. Lesson 4: Drawing the Mouth: Hey guys, what's up? In this fourth lesson, I'm going to be showing you how I go about capturing the shape of the mouth in order to accurately drove lightness of rubber Downey junior. So we're gonna take that same reference photo that we've been using in the previous lessons. And we're going to trace over that photo, the shape of the mouth. Then we're going to repeat that, except this time we're going to sketch them out by itself next to the reference photo and basically recreate that same shape. Then later on in the final lesson, we're going to take what we covered here and draw them out on the head with the rest of the facial features to tie the whole likeness together. So that being said, let's get right to it. Alright guys, welcome to lesson four, where we're going to be discussing how to capture the shape or DJs melt using the same reference photo that we've been using for the past couple of lessons. As you can see, the opacity of the photo is already lowered. So I'm just gonna go and create a new layer above the reference. And this is where we're going to trace over the photo with red pencil. So I can show you guys exactly what to look for when you're capturing the shape of the mouth. While it's a little more simple than features such as the eyes or the nose. Capturing the shape of the mouth correctly is essential in capturing an overall likeness. Because Everyone's Malte is differently sized and shaped. So it definitely important to capture an accurately. Okay, now let's create a new layer above the photo and start tracing with red pencil. First, sketch a line to represent the entire width of the mouth. And then we're going to sketch the upper lip. And have you noticed the upper lip can be thought of as the shape of the letter M, except just very stretched out. And then the lower lip is pretty simple. So I'm going to throw that in there, rope-like. But you can see that there is a specific shape to the angles and the way the mouth whoops. Even though it's an arresting position, it's still like distinguishable. And so you wanna make sure that you capture the look of this accurately when you're going to trace over the photo. Okay, now that we've done that, let's go ahead and sketch the shape of the mouth on its own next to the image. First, start with a line to show the entire length of the mouth. And then sketch that strict out letter m, the upper lip, and then the bottom lip. Okay, and that wraps up Lesson Four. Great job guys. Again, this is a pretty simple part of the process, but no less important than capturing the rest of the features accurately. So, once again, great job, and I will see you in lesson five.
6. Lesson 5: Drawing the Hair / Facial Hair: Everybody in this fifth video lesson, I want to be covering how I go about sketching the hair and facial hair. So that way we can capture the accurate lightness of rubber W junior. So we'll be taking that same reference photo we've been using in the previous lessons. And I'm going to show you how I have for the overall contour shape of the hair and then gradually build it up with details little by little, rather than trying to draw each individual piece of hair. So in other words, we're going for a more simple and stylized appearance in this sketch. And then after we've traced that shape over the reference photo, we're going to recreate it again next to the image, and we're going to sketch it over that template that I drew in lesson number one. Then later on in lesson six, I'm going to take what we cover here and sketch the hair and facial hair with the rest of the official features to tie it all together. So without further ado, let's get started. Alright guys, welcome to lesson five, where we're going to trace over that same reference photo we've been using and capture the overall contour shape of Robert W. Juniors hair and visual here. Now as I explained in the intro, we're not going to be sketching each piece of hair individually. We're not going for a photorealistic appearance here would be final sketch, but we're going through more stylized look. Okay, so on a new layer above the reference image, I'm going to start tracing the outermost contour of the hair. And I'm using straight angled lines here as you can see, because we're going to be simplifying the overall shape and not worrying about details or drawing any hair details just yet. That'll come in a bit. But first we want to just capture the overall shape. And the same thing goes for his facial hair as well. We're going to be using a lot of straight lines to get the overall shape without going into details. Ok, now that we've determined this, we're now going to take the same head templates sketch that I drew in lesson one. We're going to lower the opacity, that layer. And then on a new layer, we're going to redraw that shape of the hair and facial hair that we determined from the reference signal. Okay, now that we've gone and recreated those simple shapes that make up the hair And Vishal here, I'm just going to fill these in with a shade of gray and then rushing, not going to move into details just yet. In the final video lesson when we titled together, then that's when I'll go and add some more hair details to the top of his head and really tie the likeness together. Alright, that concludes this lesson on capturing the hair and facial hair. So great job guys, keep on practicing. And I'll see you in the final lesson where we're going to take everything that we've covered so far and tied together to capture his Bull likeness.
7. Lesson 6: Bringing It All Together! : Hey guys, what's going on? In this sixth and final video lesson, I'm going to be taking everything that we just covered in the previous five lessons and titled together to capture the complete likeness of rubber janitor junior. This is the fun part. Will also revisit that same reference photo during this video just to make sure everything still, it's accurate. And towards the end, I'm going to show you a couple other examples of lightness that I've sketched previously. That way you can see how I take everything that we have covered in the previous lessons and apply it to any different type of face, any shape, any size, you name it. So with that said, let's get right to it. Okay guys, welcome to lesson six and final video lesson in my capturing whiteness is course where we're now going to take everything that we covered in the previous five lessons and titled together to capture the full likeness in a sketch. And as you can see here, we're going to have the same reference photo displayed to the left, just in case so we can reference it every now and then. But we're basically going to be taking all of our observations from the previous lessons. And, and taking each facial feature, including the shape of the head and bring it all together into one sketch. So without further ado, why don't we get started with this? Okay, so first we're going to take that head shape that we determined from less than one. And we're going to sketch that here to the right side of the photo. And then step two is the sketch that T-shaped that we determined from lessons 23 to show the accurate placement of where the eyes are gonna go as well as the nose. And we're going to sketch a line for the mouse. And then once that's done, I'm going to start building out the cheekbones in the lines around the cheeks. And then I'm going to add the ears as well as the neck. After that, I'm gonna go and sketch the hair. Remember that overall simplified shape that we determined from lesson number five? Well, I'm going to take that and I'm going to add it here. Not adding details just yet, but we're just going to be sketching the overall contour sheep, keeping it really simple when a lot of street angled lines. And then the next step is going to be moving on to the eyes and eyebrows. And as I started to listen to. And as I stated in lesson two, I always start drawing the eyes with a couple of circles to show the overall spheres when the eyeballs. And then after that, I'm gonna sketch in the upper and lower eyelids as well as e pupils, followed by the eyebrows. Okay, next, we're going to move down to the nose. And remember from the previous lesson, when we observed the shape of the bridge of his nose and the ball of the nose. So the bridge of his nose is going to be very steep, almost straight in angle. And then the ball of the nose is going to be more of an oval shape. All right, and the next we're gonna move down to the mouth. And remember from the previous lesson, we talked about his upper lip resembling the shape of the letter M, except a bit stretched out. And then when we go to Sketch his mustache, we could actually use this shape for his upper lip as the bottom part of his mustache shape. And a lot like we did with his hair up top. We're gonna keep his goatee and mustache more simplified as well, using a lot of straight and angled lines. Now that we've got all of his facial features in place, taking everything we discussed in the previous lessons and putting it together. Now we can start adding more details and tying it all together further. So I'm going to detail the ears a bit here, and I'm going to add some details to the hair. Now when I draw hair in a stylized appearance like this, I don't draw each individual piece of hair because one that would take too long and too that's, we're on a realistic appearance, but here we are going for more symbol and stylized look. And now I'm just going to go and fill in his hair, eyebrows, and facial hair with a darker shade of gray to show that he has darker hair. And then also, I'm just going to continue to tweak and refine the wind art to get it ready for when I trace over it and do the final details. Now that we've got the rough sketch looking just how we want it, it's time to lay over the final clean liner. So I'm gonna take this layer and lower the opacity and then create a new layer above the rough sketch where I'm going to apply the clean line or this stage is always the best part of any drawing because it allows you to really hit it all home and add in as many details as you'd like. Technology changes? No. Ok. Technology changes. And that was good. Okay, that wraps up this lesson on tying it all together to capture the complete likeness or rubber Downey junior. Great job guys. I'm very proud of you. And next, I'm going to show you some other examples of likenesses that I've sketched up previously. And I'm going to show you how I apply these same steps to draw the lightness of any face. Alrighty, now that we've completed all the main aspects of the course, time for some bonus content here. I've drawn up several different likenesses here. And I'm going to show you exactly how I went about doing so by following the same exact steps that were covered in the previous video lessons. So here from left to right, we have Hannah Baker from the 13 reasons why Netflix series, Dwayne, the Rock Johnson. In the middle we have Dockery from thorax, Iraq. Up top on the right is Jack Bauer from the popular series 24. And then on the bottom right is Chris Pine. So what I'm gonna do here is lower the opacity of the spinal sketches. Then overlay some rough guideline is that I sketched over these pencils in red and show you guys basically how I go about simplifying the forms such as the shape of the head and the shapes and placements of the rest of the facial features. Ok, so starting with Hannah Baker in the upper left corner, you'll see how the overall shape of her head is very soft and round. It's not as angled or muscular, are chiseled looking as the rocks is below her. And you notice with the placement of the eyes and the nose, I used that same T-shaped that we discussed in the previous lessons. And this all comes from observing reference photos. But as I explained earlier, I didn't actually sketch this image from the photo exactly. I basically just took the shapes and placements of everything and I created a new sketch completely separate from the reference him. And even with the hair, her hair is very long in Wadi. But, but here I basically simplified her hair as one shape, one solid shape. I haven't gone and added details just yet. So this is how I always start when I'm drawing longer hair like this. Next we'll go down below her to the rock. And you notice he has a very different head shapes then Pennebaker. And if you notice, the top of his head starts out very thin, narrow, and tall. But then you move down towards his jaw line in his chin and it gets a lot wider. And because he's a big macho guy, he's gonna have a lot more masculine features. And his nose is also going to be a little bit larger and wider down towards the bottom. And once again, I use that same T-shape. And he's also going to have a very wide chin as well. And he's going to have a very wide and thick neck, which is going to add to this overall likeness. Next, we're gonna move to the middle to mockery. And you notice that her overall head shape is actually very boxy, but at the same time, I've gone and softened and a lot of the features. And then her nose is actually going to be a little bit wider than, say, hana bakers knows, but it's not gonna be as big as the rocks. In addition, she's going to have larger shaped lips as well as a very soft bridge of the nose. It's not gonna be as defined or chiseled as any of the male faces that are shown here. It's going to be a lot softer to the point where from the front you, it's really not even noticeable. Once again, like I did with the first example, I took the hair and I basically simplified it into solid shapes. And this is only what I do to start the sketch, but later on, as I did with our many examples in the video lessons, I added more details towards the end, but starting out, it's best to simplify the hair into solid shapes. Next, we'll move to Jack Bauer in the upper right. His head shape is very elongated compared to the others. And he has a very big forehead and chin. And note, there's also a lot of space between the top of his mouth and the bottom of his nose. That's also something important to keep in mind is to observe the amount of space that certain areas of the head have. And his nose is a little bit shorter, but down towards the ball of the nose, it gets very oval-shaped. And another thing to note is he also has very wide ears. And then last we'll move down to chris pine in the lower right. So his base is quite distinguishable, I think because big bushy eyebrows. And he also has a lot of cheekbone space on either side of his eyes. And his eyes appear to be a little bit smaller. And most of the time they'll appear to be squinting. But of course, as I've done, I always start the eyes with a couple of circles to represent the whole eyeball. And then I'll go and sketch the upper and lower eyelids around that. A lot like Jack Bauer and the rock. He's going to have a very masculine jaw line and a bit of a larger chin as well. And same thing with the hair. Instead of sketching each individual strand of hair, I'm just going to basically block it out and create one solid shape. Then later on when I go to add details, I have that solid base and the guidelines in order to add some stylized details that show a density of hair without having to draw each piece of hair individually. And what I love about this method that I've described to you guys in this course is that you can basically use it to take any reference photo and recreate the lightness of the person in a completely new way. You can even grab a reference where the person is facing a certain way. But let's say you want to draw the person facing the other way or draw the person from a different angle completely. All you need to do is observe the shapes and placements of all of the facial features, as well as the shape of the head. And you'll be able to recreate those same shapes from any angle. And of course, as with any area of drawing, it's gonna take some time and practice to really get the hang of it. But I truly believe that if you believe in yourself enough, you'll take the action required and putting the work needed to be able to learn how to do it better and better each time. So with that said, that concludes the bonus content of less than six. So congratulations, and I hope you guys learned a lot here. Now, stay tuned for the end of the video where I'll describe the class project. Also work, guys, congratulations for completing this course. I'm very proud of you and I hope you learned a lot here about capturing the likeness of a face accurately. So with that said, I have a little project for you to do. I want you to take everything that you learned here on the course and apply it to sketch a lightness of your choice. And can be anyone you like. It can be a self portrait, or it can be a portrait of a friend or family member, or it can be a portrait of your favorite celebrity. That choice is up to you, but just have fun with it and see what you can do. Then after you completed your work, be sure to upload it to the class project gallery. So that way I can leave feedback and tips for a permanent research or upload your file as a high resolution jpeg. Or you're working digitally or traditionally, make sure it's a high-quality photo. Again, thank you guys very, very much for watching this course. I truly appreciate the support and until next time, keep persevering.
 Kyle Petchock, Kyle Petchock Art