Transcripts
1. Camera Basic Intro: Hi, my name is
Bill and I've been film-making and teaching
for over 30 years. Beam where you are. It can be confusing
and frustrating, trying to understand all
the elements of a camera. You leave it on auto, you put it in an
aperture control. Do you put it in
shutter priority? And it goes on and on. Even with phones watching
those Apple adverts, I buy the latest iPhone. Then I always wondered why
this stuff looks so fantastic. And mine didn't. I'd shoot some video and
it looks grainy and noisy, even though I had the latest
and greatest equipment, whether it was a Sony
mirrorless camera or the latest iPhone, just go into YouTube, just makes it more confusing. There's nothing that
actually connects the dots. She just watching a bunch of different videos that just
gets you more confused. My golf you in this course is
to give you the five items that you'll take your photo is in video to the next level, understanding shutter
speed, aperture, ISO, frame rates, white balance. These are the key items
of photography and videography that I'll take your photos and video
to the next level. And it doesn't matter
whether you shoot on a DSLR or mirrorless camera, an iPhone and Android. The principles are all the same. These five principles of the key pillars of
photography and videography. I want you to be able to look at a picture or video clip and understand it and be able to see what you
would do to fix it, fix white balance or fixed What's shutter
speed did they use? What type of aperture
that they use? And you'd understand
what went on. Take white balance for example, maybe you come in at night, There's nothing on but lamps. And then when you go to put
your phone, for example, and go to take some
footage or a picture. Everything looks totally orange. What would you do to fix it? You could hit the
White Balance Control, scroll over at the tungsten and then your iPhone or
a camera will then add cool tones to neutralize that image and then
bring it back to normal. That's what white
balance is trying to do. Or you could have the opposite where you go outside and it's an overcast cloudy day or late at night and everything
has a blue tone to it. You could choose cloudy
or outdoor, and again, then your phone or camera without warm
tones to that scene. Again, trying to
neutralize the blue. And the examples that
I use in this course, I'll be using an iPhone. But again, as I said, the principles are the same no matter what camera you use. Now even though the
native app on the phones, whether it's Android
or an iPhone, a great having manual
control is vital to getting the very best footage
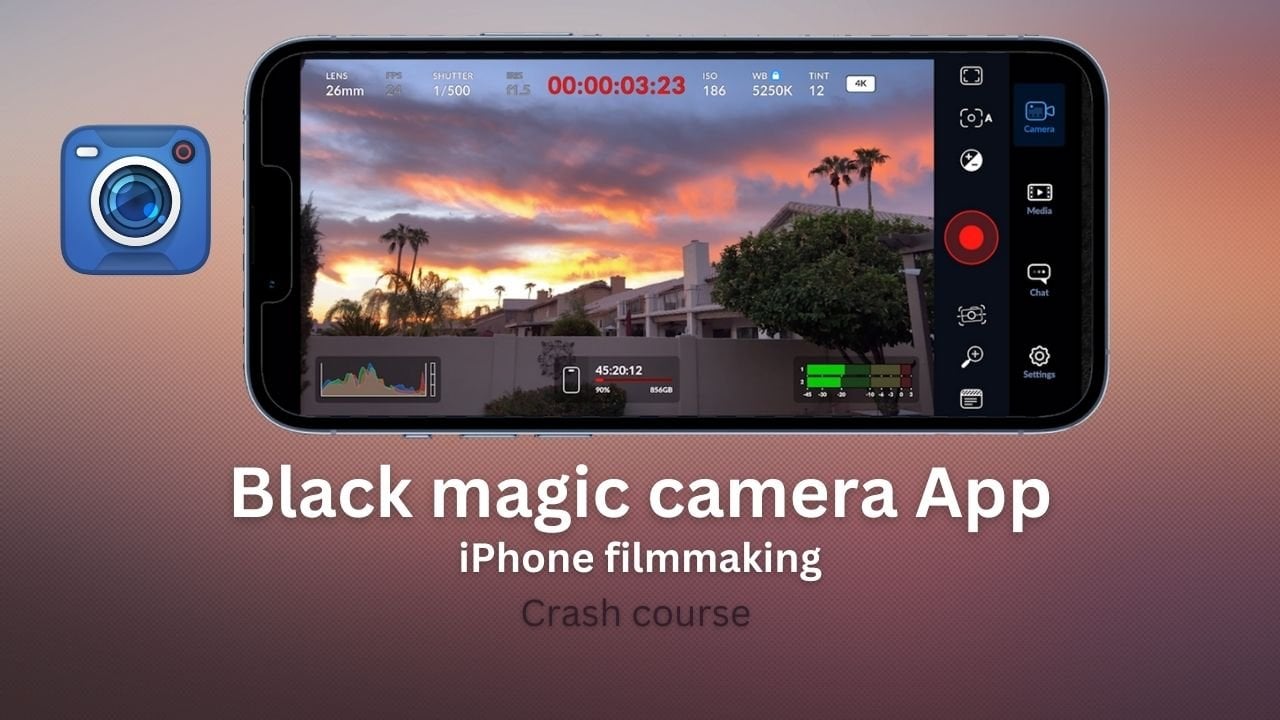
or picture that you can, especially in video, I'll be using an app called filmic pro for some of the item, but any app will do
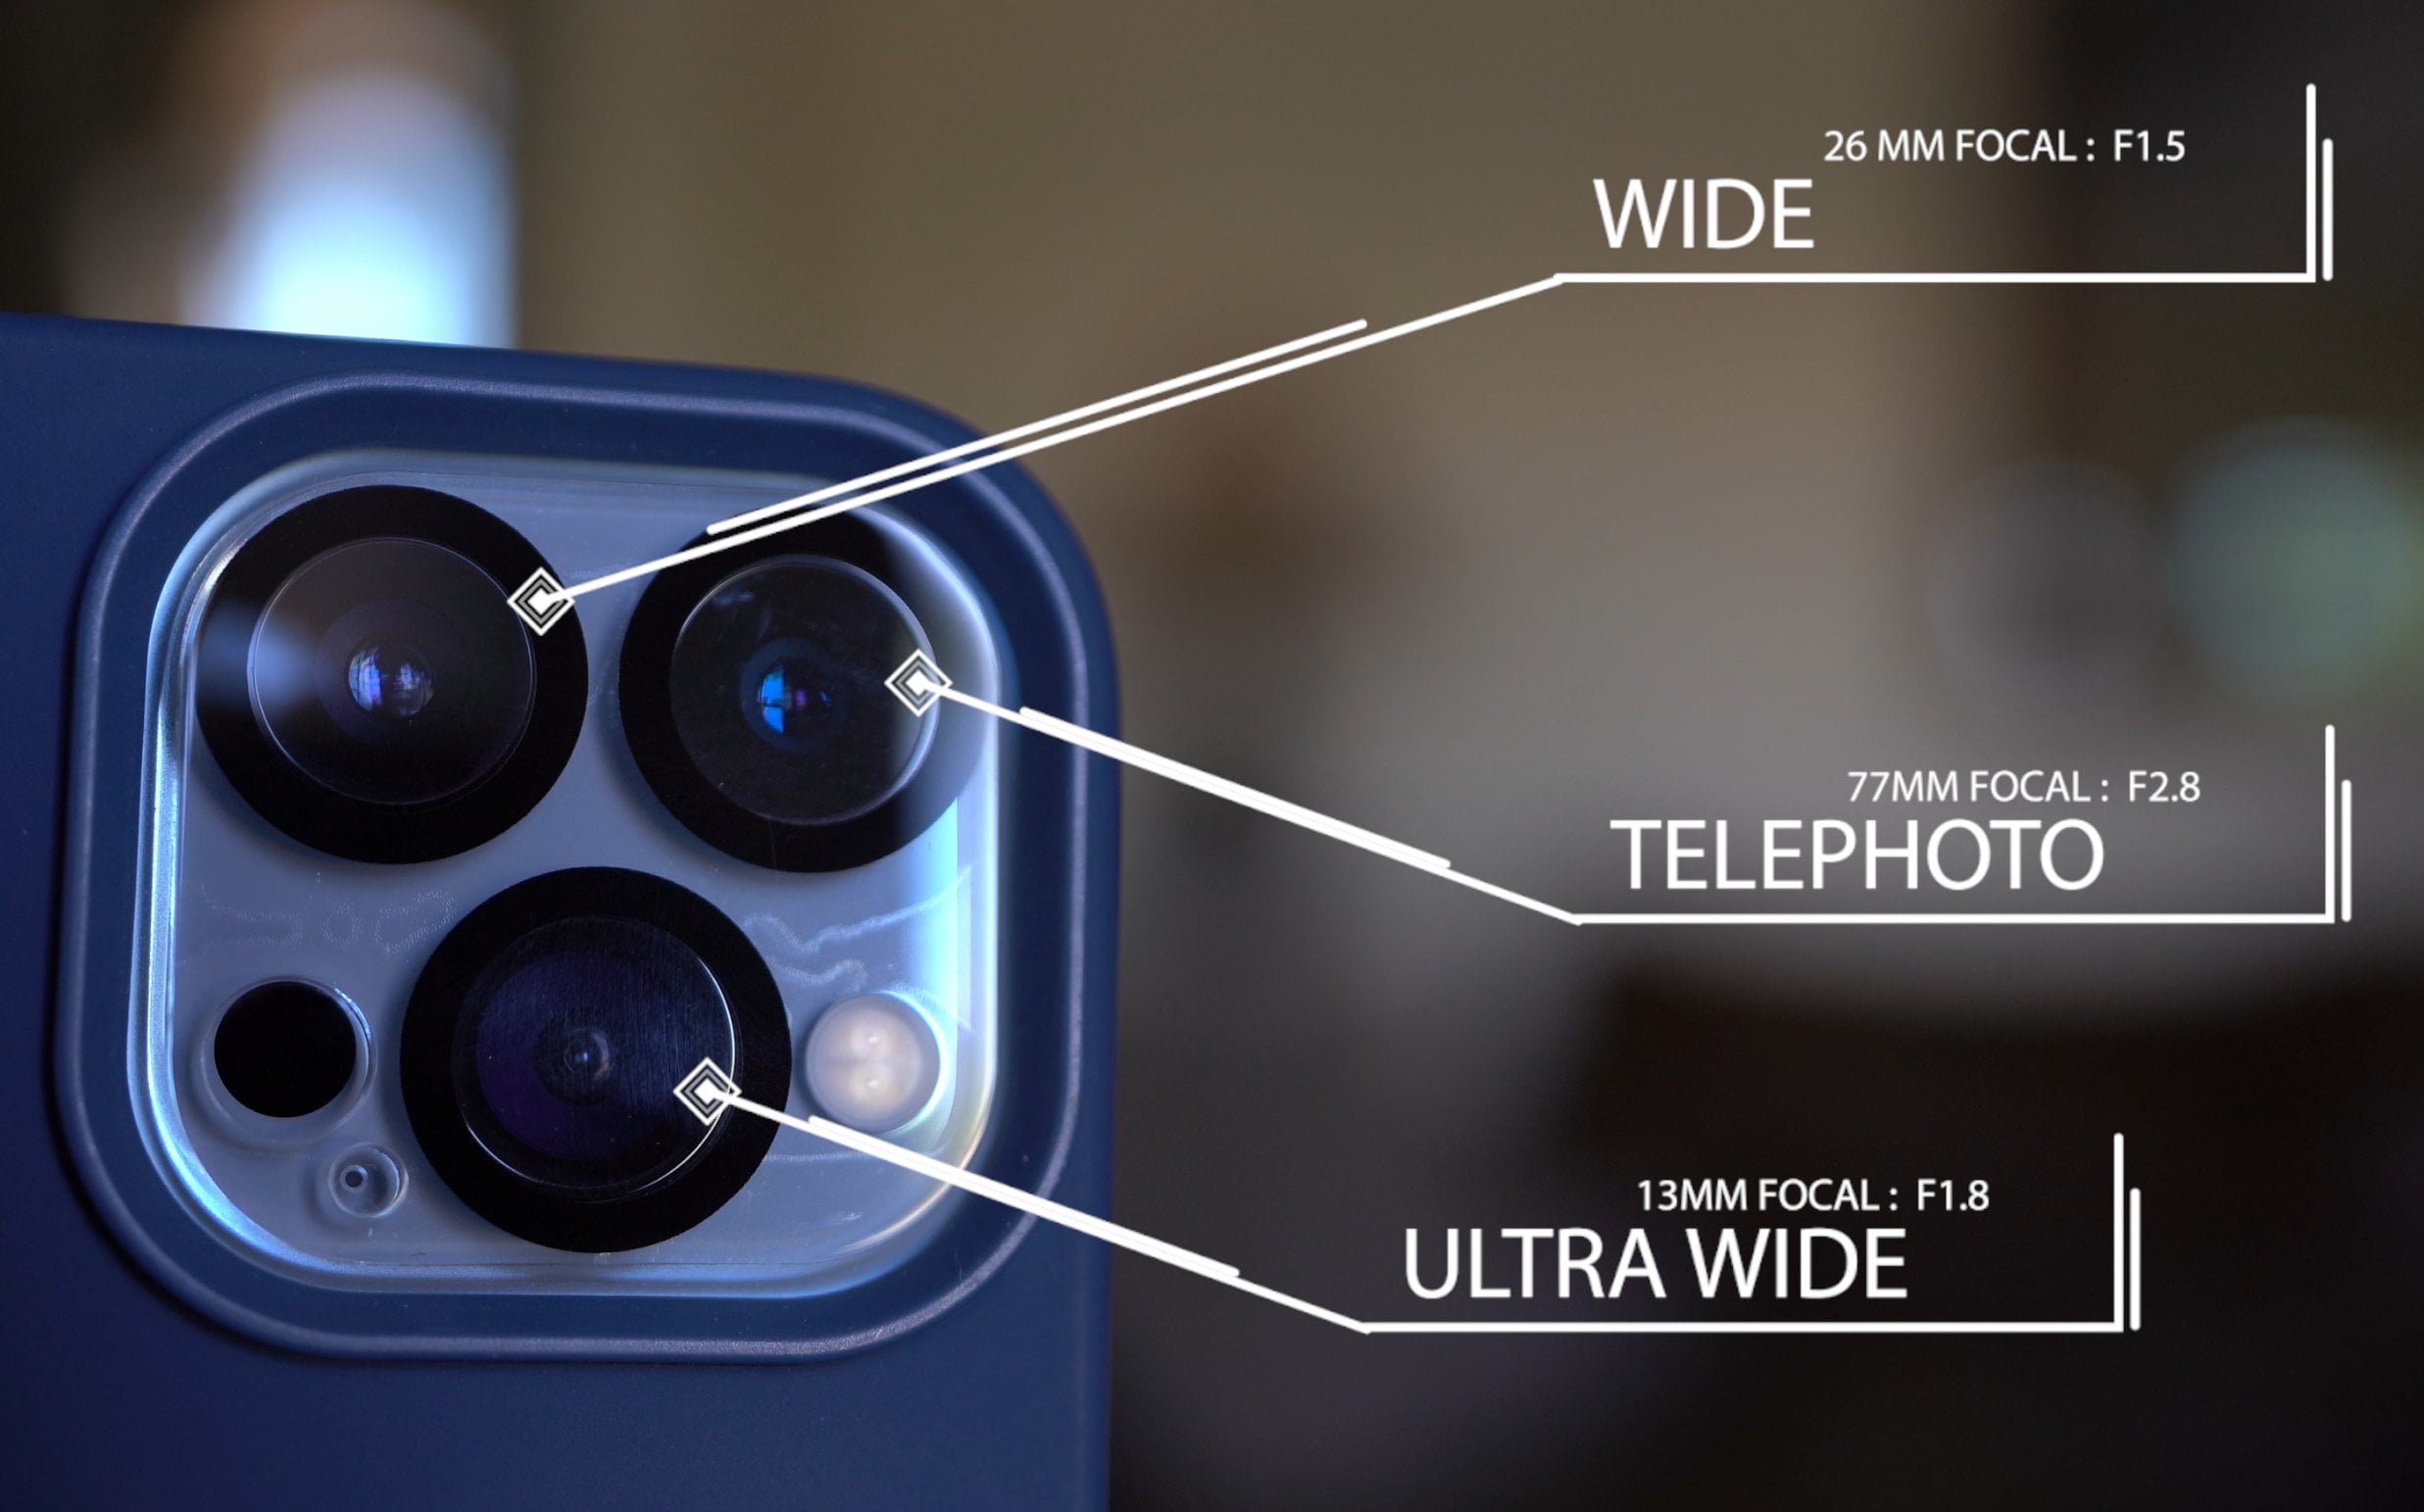
as long as it allows manual controls if you're using a phone like the one shown here. There's also to cheat sheets for you to access in
the project area. Down below somewhere. One is on aperture. What is aperture and
how to understand it. And one is the Kelvin range. What does that mean? Because I know that it's really difficult to remember all
this technical stuff. We've made some cheat sheets
to make life easier for you. The project for this
course is for you to shoot a picture or some video and then write a short summary on what you did, the process that you did
to get to where it was, what shutter speed did you use? Why did he use it? What was your white
balance set at? What was your aperture, and why you chose
that type of thing. And we can all take advantage of that and learn
from each other. So with all that said, let's jump into our first costs. And I'll see you in there.
2. Frame rates: In this video, we're
gonna take a look at frame rates and why
they're important. Frame rate refers to how many frames are
shouting 1 second of time. For example, every shoot
at 24 frames per second, there'll be 24 individual
frames captured in 1 second. If you capture in 25
frames per second, Empower regions, for example, there were 2530306060 frames
per second and so on. The reason why this is
important to understand is this will affect the
feel or look of your video. The standard frame rate for cinematic video at the moment
is 24 frames per second. This is what Hollywood
films are shot in, gives us that natural blur motion effect that
the human eye, if you remember the
movie, The Hobbit, they filmed that in
48 frames per second. But no one liked the effect that look more like a video clip versus what we're used to seeing in a Hollywood
film on the big screen, shot at 24 frames per
second, as we said, which has more
natural motion blur that we're used to seeing. And that looks good. And that's what we
became used to. 30 frames per second is about daytime TV on news
programs is shot in. This has less motion blur
that a little bit more sharp, but again has a different look. If you're looking for
that cinematic look, shoot in 24 frames per second. If you want to shoot
in slow motion, you need to shoot at a
higher frame rates such as 60 or 120 or 240. This means that you have
a lot more information in frames in 1 second. This footage can then
be slowed down later in post to give you a
really slow motion. Slow motion effect is quite
dramatic and it's what a lot of YouTubers and
filmmakers do all of the time. Note if you shoot in
24 frames per second, you can't slow it
down because around as much information
in at 1 second. And they'll just look choppy. Here we see 24 frames per
second and playback normally. But then this is the
same 24 frames per second and slowed down by 50%. And if you look at the
water coming off the rocks, it's very choppy and doesn't
look natural. In this one. We've shot it at 120 frames per second and playing
it back at 24. Then we've slowed
this ten to 20%. And as you can see, you get that nice tree me
slow motion effect. Note. If you shoot in 24
frames per second, you can slow that down later as it doesn't have
enough information. If you want to slow it
down, like we said, shoot in a higher frame
rates such as 60 or a 120. Now let's take a look
at where these settings are on your iPhone
and how to set them. So the first thing
you want to do is just tip of the day really
as goto, your settings, turn airplane mode
on and turn off notifications so
that you don't get notifications popping
up while you're filming while
you're in settings. Now, let's go down to camera. The very first thing
we're going to do here is look at formats. Format you have high efficiency. And this basically
tries to save space so that it doesn't fill up your iPhone or your
most compatible. But it'll tell you later on
here if you can read the text underneath here that for
kids 60 frames per second, ten ADP it to 40 requires
high efficiency. First thing you're gonna do for recording your normal video. You can see these are your
options here. For K at 24. Mike, my tip is **** shoot with a purpose that if you're going to shoot
24 frames per second, set your phone to that. Then when you want
to shoot B-roll, Let's slow motion
shoot that separately. Not jumping between
settings all the time. What I always do actually is
I set mine to four kids, 60. That gives me a little
bit of wiggle room so that I can slow it
down and it's in four K. The other thing, if
you're in Europe, you see here it says
show power formats. You can shoot it Twenty-five
frames per second. In Europe and Asia. You can turn that back
off if you don't need it. So I set my net for k 60 and
then I go from my slow mo, I set minus ten ADP and
a 120 frames per second. And for me that's perfectly
fine for what we need to do. What happens if you set your
format to most compatible? And then you want to set
this to record video. See it says down here. And if I went for k at
60 frames per second, then I have to set it
to high efficiency. But I can go back here
and set that up here. If I go back in. It's now normal. Okay, so let's see, I've got my slow-mo is set
at 120 frames per second, and my video is set at
60 frames per second. I'm good to go. That's our
frame rates completed. So in summary, for
a cinematic look, shoot in 24 frames per second. For talking heads such as
this, as a talking head, you can shoot at 2425 or
30 frames per second. But for slow motion, you need to shoot in
a higher frame rate, like sixty one hundred and
twenty, two hundred and forty. And then slow it
down. Post editing. What we're gonna do to test out when you shoot slow motion. The same hs and usable. Because when you slow it down, so does the sound, it goes at a different speed. In posts where you can do is save out the
sound separately. And then you can play that a normal speed over the
top of it later on. But we just tried to take it as a normal file and just
slow it old name, the sound gets
distorted as well. Third party apps
normally don't let you record sound in slow motion. So that high frame rates. We're going to turn
this waterfall on. Now. We're gonna capture
some slow motion using a native app
and see where we get. I'm just going to go
and open this up. Now I'm going to
go into my camera. I'm gonna go too slow motion. Here. I'm gonna click on the screen to set
exposure and focus. Turn this on now. Then record. I'm gonna press record. Let's see what that gives us. While doing this video. When I was filming the
waterfall earlier, we talked about high
efficiency and most compatible in the
camera setting format. In the first clip, you'll see
next is in high efficiency. I did ten ADP with a
120 frames per second. I'll just play it back. But it had a lot
of glitches in it. Playing it back. It was glitchy, almost
like an artifacts. Now in this second clip, all I did was change it from high efficiency
to compatible. In the format setting, I left all of a sudden the same. So it's ten ADP, 120 frames per second. Just re-shot it and no
glitches whatsoever. Just keep that in
mind if you start getting some glitchy
effects with the video. The tip of the day for
this is don't just fill the whole day worth of video and then check
it when you get home. Just make sure you take some quiet time and
actually go and check it through some test checks like shoot a couple of frames. Thirty-seconds a minute,
check the audio, check the video quality. Now we understand frame rates. What else do we need to know
to get cinematic video? Well, let's go take a look.
3. What is ISO ?: In this section we're gonna
talk about what is ISO. Iso basically is a sensitivity of light hitting the
sensor, the camera sensor. The rule of thumb here
is you want to get, use a low ISO value. To get a low ISO value. You need a lot more light, whether it's outside
or false lights inside a room with lamps
and what have you, um, because if you go
very high with the ISOS, You get a lot of grain and
image in your footage. So let's jump into it
and see what I saw with shutter speed
and aperture control, the physical amount of the
light hitting the sensor. On phone cameras, normally there is not any physical moving
parts for the aperture. The aperture is fixed. We can see here these
are some results of some camera aperture. Iso controls the
amount of light, the sense and needs and is a
digital game for the sensor. As the ISO increases, the amount of shutter
light it needs decreases. For example, changing
the ISO from 400 to 800 results in the
camera needing half as much light to
get the same exposure. This is why indoor photographers pump up their isovalue
is in low light, especially at low
lead sporting events or shooting wildlife, but tried to capture
fast movement action. They need a fast shutter. This in turn will lower the amount of light
hitting the camera sensor. In turn, they increase
the isovalue. Some mirrorless and
DLSR cameras can have an high ISO value without
causing too much image grain. Phone camera sensors,
on the other hand, are much smaller than
mirrorless cameras, and usually they have
a fixed aperture. So the physical size of the
sensor is a lot smaller and lets in less light I so
does come with drawbacks. However, take a
microphone as an example. The microphone inputs
are audio waves, just like a camera
gathers lightwaves each convert the inputs into
electrical signals and output, in a case of a
microphone, a sound file, and an image for a camera, if you'd recorded a sound
file but is really low, such as somewhat
speaking reading now, pick up a lot of the background. We'll need to increase the
amplitude of the recording. But along with the sound, you'll also increase the hiss
and the background noise. The same is true in the camera. Increasing the sensitivity or the ISO increases
everything else. From lighting artifacts,
electrical grain. This is known as noise. This also affects dynamic range and color accuracy
and the image. It's always a good rule to the smallest ISO that you
can to get the best image. Note that terrible
small ISO value means having more
external ambient light to expose the scene where the
right side or you have more lamps and overhead
lighting in an indoor scene. Legit DLSR mirrors cameras have a known bias or iso
level for the sensors. So this means having the
same ISO setting for different cameras will not produce the same
image across them. Lower ISO values as suited
for outside daylight videos. With his plenty
of ambient light. And also this can be used as
fastest shutter speeds in small apertures, mid range ISOS. It can be used Indoor as always as enough lighting
to light the scene, such as lamps, external
lighting, etc. Like that. If your subject is not moving
in an indoor light scene, you can actually lower your
shutter speed slightly, which means that the sensor
will get more light. High range iso, you'll
use in a dark lit room and outside night photography
needs higher ISO values. This is where you'll
need to experiment to see how far you can push your ISO value without degrading the image
or the video footage. Let's summarize that again. So it makes some sense to you. Iso is the amount of light that hits the sensor in the phone camera or
a mirrorless camera. On a mirrorless camera. On a mirrorless camera, you can see right here, this is the sensor. It's quite large. Lot more light can come in and actually hit the sensor and
the light will collect on it. Now what that means is the more light that
the sensor gets, the slower the shutter. It's not a physical shadow or a mirrorless cameras of phones, it's electronically turning
the shutter on and off. Basically it controls
the shutter speed. The more light that comes in, the faster the
shutter speed can be. Or if it's less light than the shutter speed is
a lot slower to try to get them more light
into that sensor. You can see the difference
between a mirrorless camera. And then on your normal
phone that these guys, the cameras, there are a lot
smaller to gather light. That's why you might hear that phones don't do
well in low light. The reason being is that the sensors are a lot smaller
than a mirrorless camera. And so what happens there is they have to try
to get more light in. The phone electronically
increases the ISO to try to
brighten the image. By doing that, the trade-off is, you can get a grainy image as we just saw in the
previous little video clip. Hopefully that explains
it a little bit more. And we'll move on
to the next lesson.
4. Shutter speed : Next we have shutter speed. So why do we need a shutter? Well, the shutters job is to
control the length of time. The outside light gets
exposed onto the sensor. Back in the day when they use film stock to create movies, they'd have a physical
metal shutter in front of the film. This was a semicircular
shape or 180 degrees. And it would move in a
circle around the film, would block the light for half the time in the
film were to move up. Then it would move around, unexposed the next frame. And it will continually do
this all the time as I move the film stock through
in front of the shutter. In today's cameras and phones, we have a mirror type of
camera known as a DSLR. This basically has a
mirror in front of the shutter and sensor
that allows an image of what the lens sees
to be reflected up to the eyepiece that you can
see what the lens sees. When the shoulders pressed, the mirror flips up in
front of the shutter, and the shutter is opened and closed for a
certain length of time. And when it's opened, obviously the sensor inside gets
exposed to the light. The longer the shutter is open, the more light it gets. And the brighter the image, the quicker the shutter
moves up and down, the less light the sensor gets, and the darker the image. In mirrorless cameras, they have a mechanical shutter as well
as an electronic sensor. Electronic sensor is turned on and off for the
camera processor. So basically it's an
electronic shutter and it's also silent. This is used when shooting video or when
shooting photographs, and you put the camera
in silent mode. The mechanical shutter is used
mainly for taking photos. It's very fast and it can
help prevent banding, as well as rolling
shutter effects. So there's no need for flipping mirror mechanism because there's an
electronic viewfinder, which always allows you to see what the lens sees in real time. It's exactly the
same for the iPhone. It's shutter is
electronic and it simply turns a center
on and off as needed. Shutter speed is measured in seconds and fractions
of a second. Shutter on an iPhone
has a range of one over Twenty-four
thousandths of a second. So that's really fast. It's very quick, up to
approximately three seconds. So imagine that shutter
opening or an iPhone's case. The sensor turns on for up to three seconds,
that's really slow. They capture as much more
light in photography terms. The slower the shutter speed, the longer it stays open, and the more light is
exposed on the sensor. Sorry, if open too long, the image is too bright
and overexposed. The faster the shutter speed, the quicker it opens and closes. So less light is
exposed on the sensor, making the image darker
or underexposed. Invideo, it acts
exactly the same way. For example, if you shoot
at 24 frames per second, the electronic shutter is
exposed in each frame, in our case, for 24
frames in 1 second. So the slower the shutter speed, the light of the image, and the faster the
shutter speed, the darker the image. So let's take a look at this now on the native app on the iPhone. So we'll go into video. And here we can see we are in 24 frames per
second. Then for k. Now if you press and
hold the screen, you'll get a0b0 AF lock, which is automatic exposure
and automatic focus lock. I just click on the screen and drag this little sun icon down. And this will affect the
ISO and shutter together. And it'll make it darker. If you drag it up, it will go brighter and lighter. So the ISO and the shutter
as being affected. So this is the only adjustment you have in the native app. Let's look at a third party
app to do the same thing. Here we can see I'm in
24 frames per second. And for K Again, this is a histogram which has shown me that my
exposure is fine. Now here, I can see that I met one over 48 for 24
frames per seconds. So that's good. As
I move this dial, I'm adjusting the ISO, so I wanted to get that down with the
histogram. Looks good. Like a lock that. So now when I move the dial, it's affecting the shutter. So here I can see my values. And as I move up and down, this is showing me
my shutter speed. And the lowest I can
go to is one over 24th because it's 24
frames per second. However, shutter speed not only affects light and dark exposure, but also affects something
called motion blur. If you think of
normal photography, if something is
moving really fast, when either shoot at a
higher shutter speed to capture the moment. A faster shutter speed like one over a thousands of a second, has the effect of
freezing motion. While a slower shutter speed, like one over 60th of a second, will blur motion in the scene. Invideo, the shutter speed can be used for a specific effect. A slow shutter speed is usually unusable in normal situations, unless you're trying to
portray someone fainting or they're spaced out or
dreamy feeling effect. On the other hand,
in action movies, they can use a
high shutter speed along with a handheld
camera effect, which gives them more
choppy look to the action. There's nothing special,
no extra lenses used. They just simply increase the shutter speed to
achieve this effect. So what does all this mean? There's a rule that
we need to follow for what the eye sees isn't
natural motion blur. It's known as the 180
degrees shutter rule. The rule is simply as
whatever your frame rate is, you double that for
the shutter speed. Remember that shutter speed
is measured in fractions. So for example, if your film
in 24 frames per second, your shutter speed
is one over 48. Some cameras will not have
settings such as one over 48. They just go up in
increments of five or ten. So you get it to as
near as you can. So if you have 24 frames per second and your nearest
value on your phone, or your camera is 50, for example. Just
set it to that. To keep it simple, forget the fractions
and just remember, take the frame rate you
shoot and double it. So here we can see a range of frame rates and shutter values. So for 24 frames per second,
shoot 48, Twenty-five, fifty, thirty, sixty, sixty one, twenty, and so on. This allows you to have
the most natural look in cinematic motion blur. The native app on the phone doesn't allow you to
manually set your shutter. But third-party apps like filmic pro does let you have full control
of your cameras. To show this effect, I will set my iPhone
to 24 frames per second and set my shutter
speed to one over 48. Now if you look at
me waving my hands, emotion looks normal to the eye. If you pause the video, you can see motion blur. In this next example. I'll shoot again at
24 frames per second. But this time I'm going to
increase my shutter speed. So in this example,
it's one over 768. Very fast. Now that you can see what
I'm waving my hands, it looks more choppy
and unnatural. If we pause the video, you can see there's very
little motion blur. Let's do a little recap. So here we can see that
ISO changes exposure. So that means it gets
lighter or darker and it's done electronically. It's nothing like a
mechanical shutter. It's just a game value
on the camera sensor. Caution if it gets too high, it's going to introduce noise
and grain in the video. And the good idea is to
keep it as low as you can. For shutter speed, that
also changes exposure. So lightened dark again. But the added effect of shutter speed is it causes
and effects motion blur. If you want cinematic
video and you've set your frame rate to whatever values such as
24 frames per second, always double your frame rate to the shutter speed if you can. You can't really do this
on the iPhone native app. You'd have to use a third
party app to do this. The next thing
we're going to talk about is aperture and how that affects also
changes in exposure, but also something else
known as depth of field. So let's move on
to the next video.
5. Aperture: Now that we've covered
ISO and shutter speed, the final part of exposure
control is aperture. The aperture is just like
the human eyes pupil. It's responsible for just
how much light is lighting. Just like the pupil, it responds to
light. For example. There's a lot of light. The pupil contracts or closes down when there's less light and expands and
lets more light in. Aperture works in the same way. The aperture refers to the opening that's
not in the camera, but it's in the lens itself. It's a physical diaphragm
through which light passes. And it's measured in f-stops. The smaller the f-stop number, like 1.4, for example, means the aperture is
wider and it's fully open, letting in more light. The larger the
f-stop number like F22 means the hole
is a lot smaller, letting in less light. Just like the shutter and ISO. It affects how much light
is seen on the sensor. But larger the hole, the more light, the smaller
the hole, the less light. However, this not only affects the brightness
of the image, but also affects the area of
the image that's in focus. This is known as depth of field. White aperture like F 1.8, meaning the aperture
hole is open wide, gives us small depth of field. This is where you'll have
someone or something in focus. The background is blurry or
out of focus, known as Boca. This is very popular with
filmmakers and cinematic video. Let's take a look
at this diagram, which hopefully will explain aperture a little
bit easier for you. To. At the top we have a
range of apertures. Math 16, it can be F22, but in this case it's F6 stain. You can see the
aperture is fully closed and without means just the minimum
amount of the light. This pinhole is what
is letting light then. So it's very dark as we
go down in the numbers. So F11, F8, F5, 0.6, and so on, all the way down to F14, you'll see that the
numbers get smaller, the hole gets bigger. Put F1 point for its very large, lets him the most amount
of light and you can't actually get lenses that are F1 point to and
things like that. What does this mean
for depth of field? If we look down here
at depth of field, we have three scenarios here. In this case is the
aperture gets larger, the hole gets larger, the depth of field, the stuff in blue here
actually shrinks. It gets narrower. So in this case, if
we have a depth of field 2.8 or if we were using 1.81 for the depth
of field is very narrow, so it means everything in blue. So this tree, these
flowers in the foreground, would be in focus. But beyond that, so the
stag and the border and the other tree and the mountains would
all be out of focus. If we go to a slightly
larger F-stop here, this is 5.6, is getting a lot smaller than
this lets in less light. But it increases the
depth of field scenario, the tree and the stagger
both in focus here. But everything from the stag, it forward will be
in focus this tree, the flowers and the
stag, but beyond it, for the other tree
in the mountains in the Lake will be blurry, be out of focus. Then finally we get
down to F 16 or F22. And what this means is the
aperture is the smallest. It lets in less light, but the depth of
field is the most. Everything in the scene is
in focus from the maintains, the trees, the flowers, the stag, the river, everything. This is what if
you want to shoot landscapes so wide open places, you want to go with a
higher f-stop number. The smaller the hole, the more depth of focus, the larger the hole, the lower the number. The minimum depth of focus or the shallower depth of focus. This focus range
is very shallow, meaning if the person walks
back and forth a foot or two, then they too will
be out of focus because they've stepped in
at the depth of focus area. Now if your aperture is set
to a high value like F6, meaning that the
hole is very small, is a large depth of field and everything will be in focus. This is used for landscapes, scenes where you want
everything in focus or used in movies to tell a story where you see everything behind
the main characters. This was done in
this movie scene. We get a sense that these
soldiers have been here for awhile because the people
in the background, they're doing day-to-day tasks, such as washing or
getting haircuts. This was shot on a small
aperture, something like F22. The people behind the main
characters are also in focus. If they've used the
large aperture like F 1.8 and a small depth of field. The soldiers in the
background would be blurry and the story
wouldn't be so obvious. But what about medium
aperture like F eight? This, unlike the other two, gives you a larger
depth of field, but still has some blur
in the background. But not so blurry that you
can't see what's there. This draws the eye again
to the multiple things in the foreground
being in focus. And again helps with the story. Let's look at this thing. This was shot with
an F2 0.8 aperture. The hole in the aperture
is quite large, so the depth of field
should be quite shallow. It's very bright. This was shot at F6, which means the whole was very small and lets in less light. You can see here,
even though bright, the background is blurry. The same goes with
the one-shot on F6. Even though it's dark, more focus in the
background is obvious. To compensate for this
on the bright image, I can dial down the ISO to
help get exposure correct. On the dark one, I can increase the ISO to make the
exposure lighter. But what about iPhones in your iPhone and most
other androids, other than some Samsung's of a fixed aperture
for each camera. This means that it
is not variable. You can't change it
in the normal way. Unlike in a mirrorless
camera where you have three elements that you
can adjust for exposure, which is ISO shutter
speed and aperture. On an iPhone, you only have two. Because the aperture is fixed. To adjust exposure, we can only really use ISO and
shutter speed. One other trick for aperture, if we want to get a
blurry background, we can move closer or
further away from it. Because your aperture is fixed. You'll know what your
depth of focus is. From the iPhone 13 series. Apple has introduced
cinema mode for video. This allows you to change
the f-stop using software. Basically it's portrait
mode for video. In iPhone 1112 Pro, you can get the same effect
using a third party app like focused live pro take. Let's go as psi now
and see how we can get that bokeh or effect
using cinema mode. While we're talking
about aperture from the phone 13 series, they have a thing
called cinematic mode that Apple introduced. In the native app. You're able to use this. We can keep this
bush here and focus. And anything beyond that
will be out of focus. And it will use software to
mimic an aperture change. Even though the iPhone
has a fixed aperture, it's going to use software to mimic that blurred background.
Let me show you how. Wherein photo mode. Now we're going to head
over to cinematic mode. Once we're in cinematic, we're going to hit this F at the top left cell and bringing up that
were in 0.8 f-stop. I can do is I can track that. The background isn't quite
as blurry like this. We're in the one times camera. All right. I can hold
and press on the bush. I wanted to be in focus
to focus lock cameras on. And then what I want to
do then is I can make the background even more blurry by going the
other way here. Some people say that
during video recording, the f-stop is too low. You might get out of
fact around edges, especially with people moving. So they suggest going
a little bit higher. F5 or something. It's still quite blurry
in the background. Before what I'm gonna do here, I'm going to go all
the way down to 2.82. I'm gonna hit just
hit the focus area I want hold it so I had
locks onto there. And then record some video. Then he got that nice
blurry bokeh feeling. Even if you shop, the cinematic mode doesn't
matter what your f-stop was, really because this is
later on in editing, you just add it to the video. Click on the F, the F stop here. Then you can change
your aperture. Here we are 2. We can go down to where it was shot
around 4.5 or five. And we can go all
the way up to 16. And we can see the
background getting clearer. If you don't like a certain pot, Let's say we shot it, like
we said, way down low. You're able to edit
it out and then bring the f-stop backup a little
bit to the depth of field is a little bit more
deeper and then you may not get that out
of fact image that blurriness around the
edge of the bush there, where it gets right at 2. So again, it's great idea
that you can shoot it like that or you can actually
edit it later on in post. Okay. So I just wanted to
let you know that it doesn't matter if you
don't have the latest iPhone. So this is a model eight. So the eight plus, I think
this is it has two cameras and wide and normal. So I think the normal
camera is an F1 0.8 and the tally is it is 2.8. So we're going to use the
1.81 time is magnification, which is the best quality
camera on all the iPhones. If you don't have cinematic
mode, there is no problem. If you can get that
same blurring effect. What you have to do
is get as near as you can to the object that you
want to keep in focus. And that will blur
the background. So I'm just going
to put the phone in here on this tripod, lightweight tripod
just because it makes it easier for me. Then what I'm gonna do is get this as close to
the object that I want to keep in focus and that will automatically
blur the background. So let's take a look
and see what we can do. So I'm in the video app. What I've got here is
I've got this near to this top of this
Langton as I can. So I click over here, you can see it's going to
affect the sky, which were just an exposure
and that's what I want. So moving that too
much now I'm going to just click on focus onto the lantern and you'll see automatically that the Lemon
Tree in the back is blurry. So I click on the lemon tree, it goes into focus. But if I don't like the sky
over on this side here, so I'm just going to click
on that to bring that back. And then I'm not
too far away there. That's the video that
I'm going to capture. The one times magnifier. So the main camera and the image of the land
in front of us is in focus. The tree and everything else
behind this slightly blurry. Even with this older
iPhone camera, you can still get
the same effect. Let's summarize what we've
learned here with aperture. Aperture also can
change exposure to make the exposure
lighter or darker. It affects depth of
field as we've seen. And also just a
reminder that the lower the f-stop number
or the f-number, the more background blur, the lower the
number like 1.41.8, you'll get more
shallower depth of field and more background blur. The higher the f number, like f 16 or F22, you'll get everything in focus throughout the whole
scene like a landscape. With that, let's move
on to the next video.
6. White balance part 1: The final piece of the
puzzle for gradebook in video and photographs
is white balance. This sometimes gets
misunderstood. It confused with color grading. White balance is used
to color, correct? And color grading is a look or feel that you can put
on top using a lot. For example, white
balance is basically making sure that white looks white in your picture or video. The idea of white balance
system and colors look as real and natural
looking as possible. If white balance is correct, then all the other
colors in the spectrum will also show
themselves as correct. Meaning they all
look on film the same way they look
to you in real life. For example, getting the
white balance correct is very important so that
skin tones look natural. Your eye sees colors of light in a spectrum and then transmits
that to your brain. We interpret the colors. You can tell if something is white and bright daylight
in shade, or even at night. If your white balance is off, all other colors
will also be off. You may have noticed a
scene where everything has an orange cast or
a blue cast to it. Each light source has a color temperature range
measured in Kelvin. Low color temperatures shift
towards the orange colors, and it's known as a
warm color spectrum. High color temperatures shift towards the blue color range, then known as cool temperatures. The goal of the
color spectrum is to neutralize different
color casts. Back to neutral. Meaning. If the cast has a
blue tone to it, the camera will add warm tones to bring it back
to a neutral tone. Or if it's too orange or warm, then a blue color range can be added to it to bring
it back to neutral. The iPhone uses
auto white balance in auto mode on the phone, exposure and white bonds to
read by the camera's sensor. The phone software tries to
compensate from what it sees. So if the scene is dark,
it will lighten it. If you're at a bright window, it will try to dock in it. This is especially
bad if you say film across a really light
area like a window, and then move into a
dark area of a room. The phone camera will shift
exposure for the change in light. Brand video. And we're in the native
app, we're on video. If I'm in front of a bright
image like a window, it will expose for that. But if I move towards
the inside of the room, which is dock, it will change color and exposure and
compensate for the dark. But if I move back
to the window, to the other side of the
room, which is dark. You can see that
it keeps changing. What we can do is press and
hold and do AF AE lock. Now when I move to
the other side, this side of the room will be darker because when I
come back to the window, That's what I'm exposed him for. When you're filming. Keep that in mind. That exposed for the right
parts like the windows. But try not the
crossbreeding bright parts where the really dark areas. And we can increases a little
bit so we can see what it is that's still shows
the window as exposed. We could see it and we don't
get such a drastic change. But normally you would
expose for a bright area like the windows or a
dark area of the room. But it's really difficult
to expose for both. Like changes in your scene. So while the white balance for photography outside and
a bright environment, this may be perfectly fine. But in high contrast areas, contrast meaning lots of dark areas and lots
of bright areas, the auto white balance
might be a problem. Let's take a look at the
native app to see how the auto white balance
and exposure is handled. Here is an example
of white balance. Your phones in
older white bonds. Now my screen on my
computer is white. But look at the
color of the doors, almost a yellow or green. But if I move around to
them, they turn white. Go back where the screen
is the most dominant. But those almost like Gallo. Then just for skin
tone, if I look, if it's mostly on the screen, my legs almost green or yellow, but if I move the camera
towards my legs, they change. Color. Near the
door looks white. Right leg's skin tone look
a little bit more natural. But again, looking at
the dominant screen, the DOAS look almost
yellow and green. But if I move over to them, they turn white so you
can see what will happen depending on if you move your
camera around the video. The setup here is that. I have gray, dark walls with the dominant image
on the computer screen. It makes everything in green. I move up and then it
focuses over to that. So that's what's goes
on and why we went to lock exposure and white balance. But it doesn't keep changing. These multi, multi colors. Imagine that too, on
someone's skin tone, my legs, kinda green. Some other color is
not natural looking. Now let's see how we can
lock the exposure and white balance so the color
won't change as much. Here we can see that talking about white
balance in the native app. Whether we're in video or photo. You look at the white screen
here compared to the door. It looks yellow
like we've shown. By about I move over towards
the door. It turns white. What happens if we
come over here, press and hold the
screen to AEA AF lock. Then as we move over
back to the screen, we don't get such a change
at all with white balance. Using a native app. We can get more control the
set, the white balance. It's better to use an app. We can set and locked the
white balance to stop it changing as we move
the camera around. Apps also have built-in presets. Let's take a quick
look at one of these. It was going to
use an app called filmic pro in auto mode. We can see here that it
sees in the scene as a temperature of 4,587 Kelvin. We also placed the color
reference card so that we get a good visual of all the colors and see
if they look natural. So far the colors
are correct and this color temp falls
here on the Kelvin shot. You can also choose
a preset by telling the camera won't lighting was used for where
you're filming. Along the bottom we see full
presets that we can choose. Each represents a position
on the Kelvin scale. The first is incandescent light, which has an incandescent bulb, which has a temperature
of 2900 Kelvin. So we're telling the camera that although it's a temperature of 4,500, maybe seven Kelvin, its actual color for the lighting is the same
as an incandescent light, which falls in a warm
tone of 2900 Kelvin. The camera thinks, Wow, I was way off for 4500. So I need to cool
it down and also change the tint down
towards the green. We can see here what
it did to the image. It did this because we've
given it false information. This image was actually indoors with a large
window nearby, and it was sunshine outside. But we told it that it was lit with incandescent
bulb lighting. The camera doesn't know
it doesn't have a brain. It's just worth telling it. Even though you sorted it 4500, I'm telling you that it should
be incandescent, the 2900. Next we choose sunshine, which has a value
of 5200 Kelvin. We can see the effect. You could use this
if you're reading, I'd cite in sunshine. Next we choose cloudy and it sets a white balance
to 6500 Kelvin. Again, do this if you're
citing cloudy conditions. Finally, we tell the camera was shooting under
fluorescent tubes. It sets the temperature
to 4300 Kelvin. Now we go back to auto mode. Actually it's pretty accurate to what it looked
like in real life. And we can tell that by
looking at the color chart. You have the option of
using auto or one of the presets depending upon the actual lighting condition
they filming under. Choose the one that makes the image look the most natural. And his close to what you
really are shooting at.
7. White balance part 2: Absolutely you to have
more manual control. This means we can lock our white balance to
what the camera sees and stopped it changing as we move the camera
around the scene. Actually to get the
perfect white balance every time is not all that difficult and can easily be
set using a reference card. The ideal thing we can use as something that's
non-reflective. They say team percent gray
card can be bought for about $8 online and is used by all filmmakers to
set the white balance. I realize it's not white, but that's a discussion
for another day. The mid gray or 18% gray card is also used a set exposure. Because exposure is
nothing more than really dark and really liked shades. And if we can get
everything to the centre, that's a neutral gray. And that will help us
set our white balance. If you're really stuck some kitchen roll or white handkerchief
could also be used. Anything, as long as
it's not reflective. The key here is
to place the card in the same light as a subject. For example, don't put the
great caught in shadow. If the subject you go into
film is indirect sunlight. Put the card in direct
sunlight NEA to the subject. Then we want to
fill the frame with the calibration
card by zooming in. Don't take the car to
the camera, either. Zoom in to fill the frame. I'll move the camera
nearer to the subject so that the great CAD is in the frame as
much as possible. Set your white balance, and then move your camera back
to it's shooting position. The reason for this is the
iPhone uses the entire frame, calculate the white balance. Now we're locked the auto
white balance button and then zoom back out again. White bonds will be
sad for the same. Let's go outside now
and we'll use an app. It gets some
real-world examples. If you're stuck, your white balance is
extremely off like this. You can do if you
have a gray card. We tried to put it. You try not to put it right up in front of the entire
screen if possible. If you want to get it towards the area that you're looking at. So I've got some
double-sided tape on here. What I'll do is just
come down here. Just take this to this tree which is more
near where I need it to be. What I'm gonna do
now is I'm going to zoom in and try to fill as
much of the frame as I can. I might have to change. What I'm looking at. That card is not fully
fill in the screen, but it's in the area. Then I hit my white balance that it adjusts to that and
we can see we're at 50 to 26. I can lock that then, so it's not gonna change. Then I can zoom back out again. And I want to be,
and I can even, can even set up my composition. Exactly like that. Let's say I want to move
it a little bit over here. Then I would be able to record. We've stuck because
chances are you will not have this gray card with you and especially
the sticky tape. What you can do. Like we said, Don't try to
bring it to the camera, but try to put it
in the composition. I'm not right back
where the trees are. Where you can't do this.
Move it in the frame. Again. Let's see. Let's pretend that this guy had a blue tone to it and I'm
not totally in the frame, but I'm at arm's length. Now what I can do is
click on the auto. It's going to look at this. Then I can lock it. Again. We're at like 5246. That's what you can do there. Now, if you're at a total pinch, just to show you if you add some kitchen roll or white handkerchief or a
piece of white paper. As always, it's not reflective. Let's do the same thing again. I'm gonna make it blue. All I'm gonna do is use a
piece of white paper and this thing bring it near to
see it's filling the frame, even though this is right up next to the camera, we
don't really want that. But it's filling the frame of this scene that
we're looking at. Then I can just
hit auto on here. Click lock. We can see we're at 5291. Even a piece of white paper, tissue paper because it's
normal reflected will do just if you're in the sun and that's
what this is doing. Keep your paper or
gray cat in the sun. If it's very sunny, don't put your Greek
had in the shade. You want to get a
good representation of what you're trying to film. That's how you would set your white balance
using a gray card. To get the best results, we should start to take control
of your iPhone in manual. That way we'll have
full control of ISO, shutter speed and exposure. We can also take full advantage of focus and white balance. The only thing that
we don't or can't change is an aperture because the iPhone as fixed apertures. But we can work around this.
8. Real life 1 No ND filter: Looking at this screen, we can see that eye color is off and the sky is really blown out. So let's see what's
going on here was set at 24 frames per second. I've taped a white
card to a tree, so it's in the same. If we look at our settings, we can see that ISO
is really high. So is the shutter. If I bring down ISO, I'm moving this rocker. Sky looks okay. But what happens now is that if we lock the ISO and we
move our shutter down, try to get one over 41 over 48. We're still blown out. It doesn't really help us. So the only option that we have, this is where an ND filter
would come in handy. So we would use an ND filter somewhere
in the way here to put, would think having sunglasses on this thing as
what would help. But let's say we don't
have one of these. What we're going to do, we're going to lock ISO, but we're going to turn
on your exposure of either increase
our shutter speed, then we can be okay here and
that's good for exposure. Temperatures off. So what we can do is zoom in to get this somewhere
in the same here, hit our temperature on. Then lock that saying it's like around six hours and hit Okay. And then drop thing back. That would give us a way
to do our recording.
9. Real life 2 with an ND filter: This is take to win the
ND filter on this time. So we're looking
at this scenario. We have bright sky,
the colors off. Again, let's look at where
we are for shutter speed. Shutter speed is 1288 and
our ISO is at 15 something. So let's first of all drop the ISO all the way down as far as we can go. Lock that. And then I want to do things. My shutter speed to one over 48. Okay? Not too bad there, but now I have an ND filter on. I can adjust my ND filter
to get my classes spreader. Then what I can do then is, let's zoom in as far as we can to that white cat or gray
cod temperature control. Lock that and then hit zoom and then we have everything. Looks good. Thing is that
one over 48 where a low ISO. We can record. Sorry.
10. Real life 3 outside settings inside: Let's take the settings
that we added side. The one where there
was no ND filter, will take those same settings, bring them inside and
see what that looks like and how we can get good
exposure and white balance. So we brought this one
back in and we left the settings as it
was set up outside. So because of that, you
can see it's really, really dark because we
had a high shutter speed. Let's take a look at
what we have here. We can see that the
ISO is low at 34, but the shutter speed
is one over 576, just really, really fast and that's why it is spoken so dark. We want the ISO to look low. Let's lock that at 34. First of all, let's
change our shutter speed. We're shooting at 24
frames per second. So ideally we want the
shutter at went over 48. But we can still see
that it's really dark because we're indoors. It happens to be dark. What can we do? One of the things you can
do is add lighting. We can't go any slower
with a shutter. We don't want to bring up
the ISO if we can help it, possibly at the moment. I shouldn't. Speed is 148. So let's turn on this lamp and it looks really,
really orange. Obviously our white
balance is off and it wouldn't be inside
versus outside. That's sending any other
lights that we can around. I'm going to turn up the
ISO little bit here. I'm going to turn it up to 769, brightens up the image here. Shutter speed is
good, one over 48. But our colors are off. Now this is where we
can bring in something white or the 18% gray card. Again, we can calibrate these colors balances here as best I can without
it falling off. There we go. Now, I'm going to click on a color wheels
down and bottom-left. I'm going to zoom in and just hit the auto white balance
so it sees the color card, which is filling up the screen. Now once I've done that, the colors have changed
and I can zoom back. Then that shows us ISO is good, shutter speed is good. The colors now calibrated
to the white balance. Now let's move that
kind of the way. Now we're ready to record.
11. Real life 4 inside settings outside: Now one last time, let's take the settings
that we just took for the inside and go back
outside and readjust. This is where we are. This is taken the image from inside and bring
it to the right side. We have to increase our ISO
on the inside, turbine 768. And I should've speed is at 148, shooting at 24
frames per second. As we can see, it's
totally blown. Aired shadow is
where we want it. So let's try to
decrease the ISO. Even at 34 is the
lowest I can get it. We still can't get any Docker. What we could use
as an ND filter. And as we know, this
will block the light and allow us to get a low ISO
and the shutter speed. Let's lock the ISO and
increase the shutter speed. The shutter speed. Go and hire will decrease
the light coming in. If I open it right up, you'll see that histogram
go to the right side. And if I read it,
get really dark. It's the grandma
move to the left. The perfect exposure is when that histogram is
even in the center. I'm looking at the sky is to see what type of when the
blue and the clouds look. Okay, ran 768. The histogram looks even. Now we can see our
white balance is off. We can get our gray cod. I'm holding it out
as far as I can with the arm's length so it's filling the actual frame of
the composition. Then I'm going to do auto
adjust on it for white balance. And I'll lock it
when it goes red. And our colors a change
there, 5,817 Kelvin. The explosion looks good. And this is where I can record.
12. Summary & wrap up: Nice. You finish the course. For those of you that
want to take it further, you can check out my
other Skillshare courses, like the 4.5 hour course on film in your video with
a mobile phone. Or my five-hour understanding color course and Adobe Premier, as well as these other courses. I really hope you enjoyed the course and I'll see
you in the next class.
 William Buckley