Transcripts
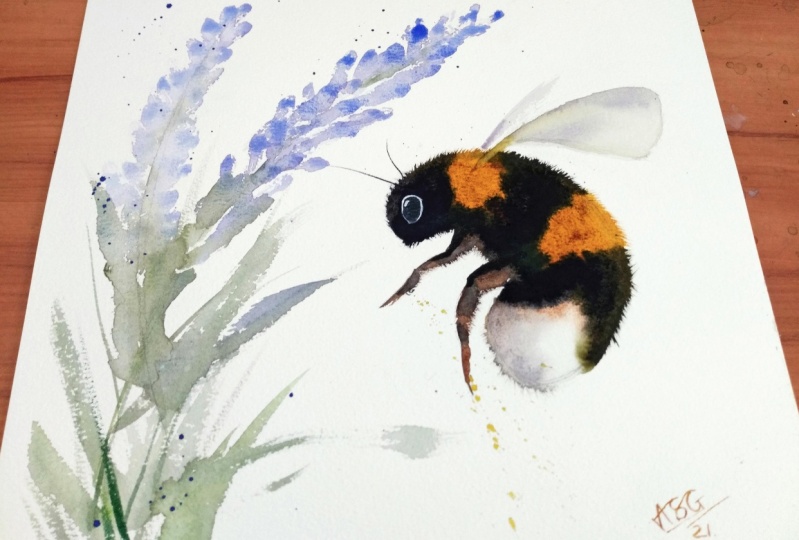
1. Introduction: Hello, welcome to this all
levels watercolor class. I'm going to show
you how to paint this fuzzy bumblebee
and his lavender. Now, I've taught this class
in person for many years, and I can't wait to
share him with you. Even if you're new
to watercolor, this bumblebee is a
lovely introduction into wet and wet and
my style painting. Though if you'd like
something a little easier, have a look at my
beginner classes. These can be found over on
my channel. I'm Jane Davis. I live, paint, teach, and walk my lovely spaniel in the beautiful South Downs
National Park, England. Over the last ten years, I've taught myself
the watercolor techniques that you see today. Not having been to art school, finding my own way has been
fun and sometimes daunting, but has allowed me to
develop my own style. This has led me to
teaching others, either on a one to one
basis or as part of a group in a wonderful studio in the heart of the South Downs. I also run a successful
commission based business, painting pet portraits and wildlife art in my
own home studio. In all my classes, you will
follow along in real time, where I can guide you to keeping your work loose and fresh
without over fussing. I'll be sharing lots of tips and tricks along the way, too. I provided you with some
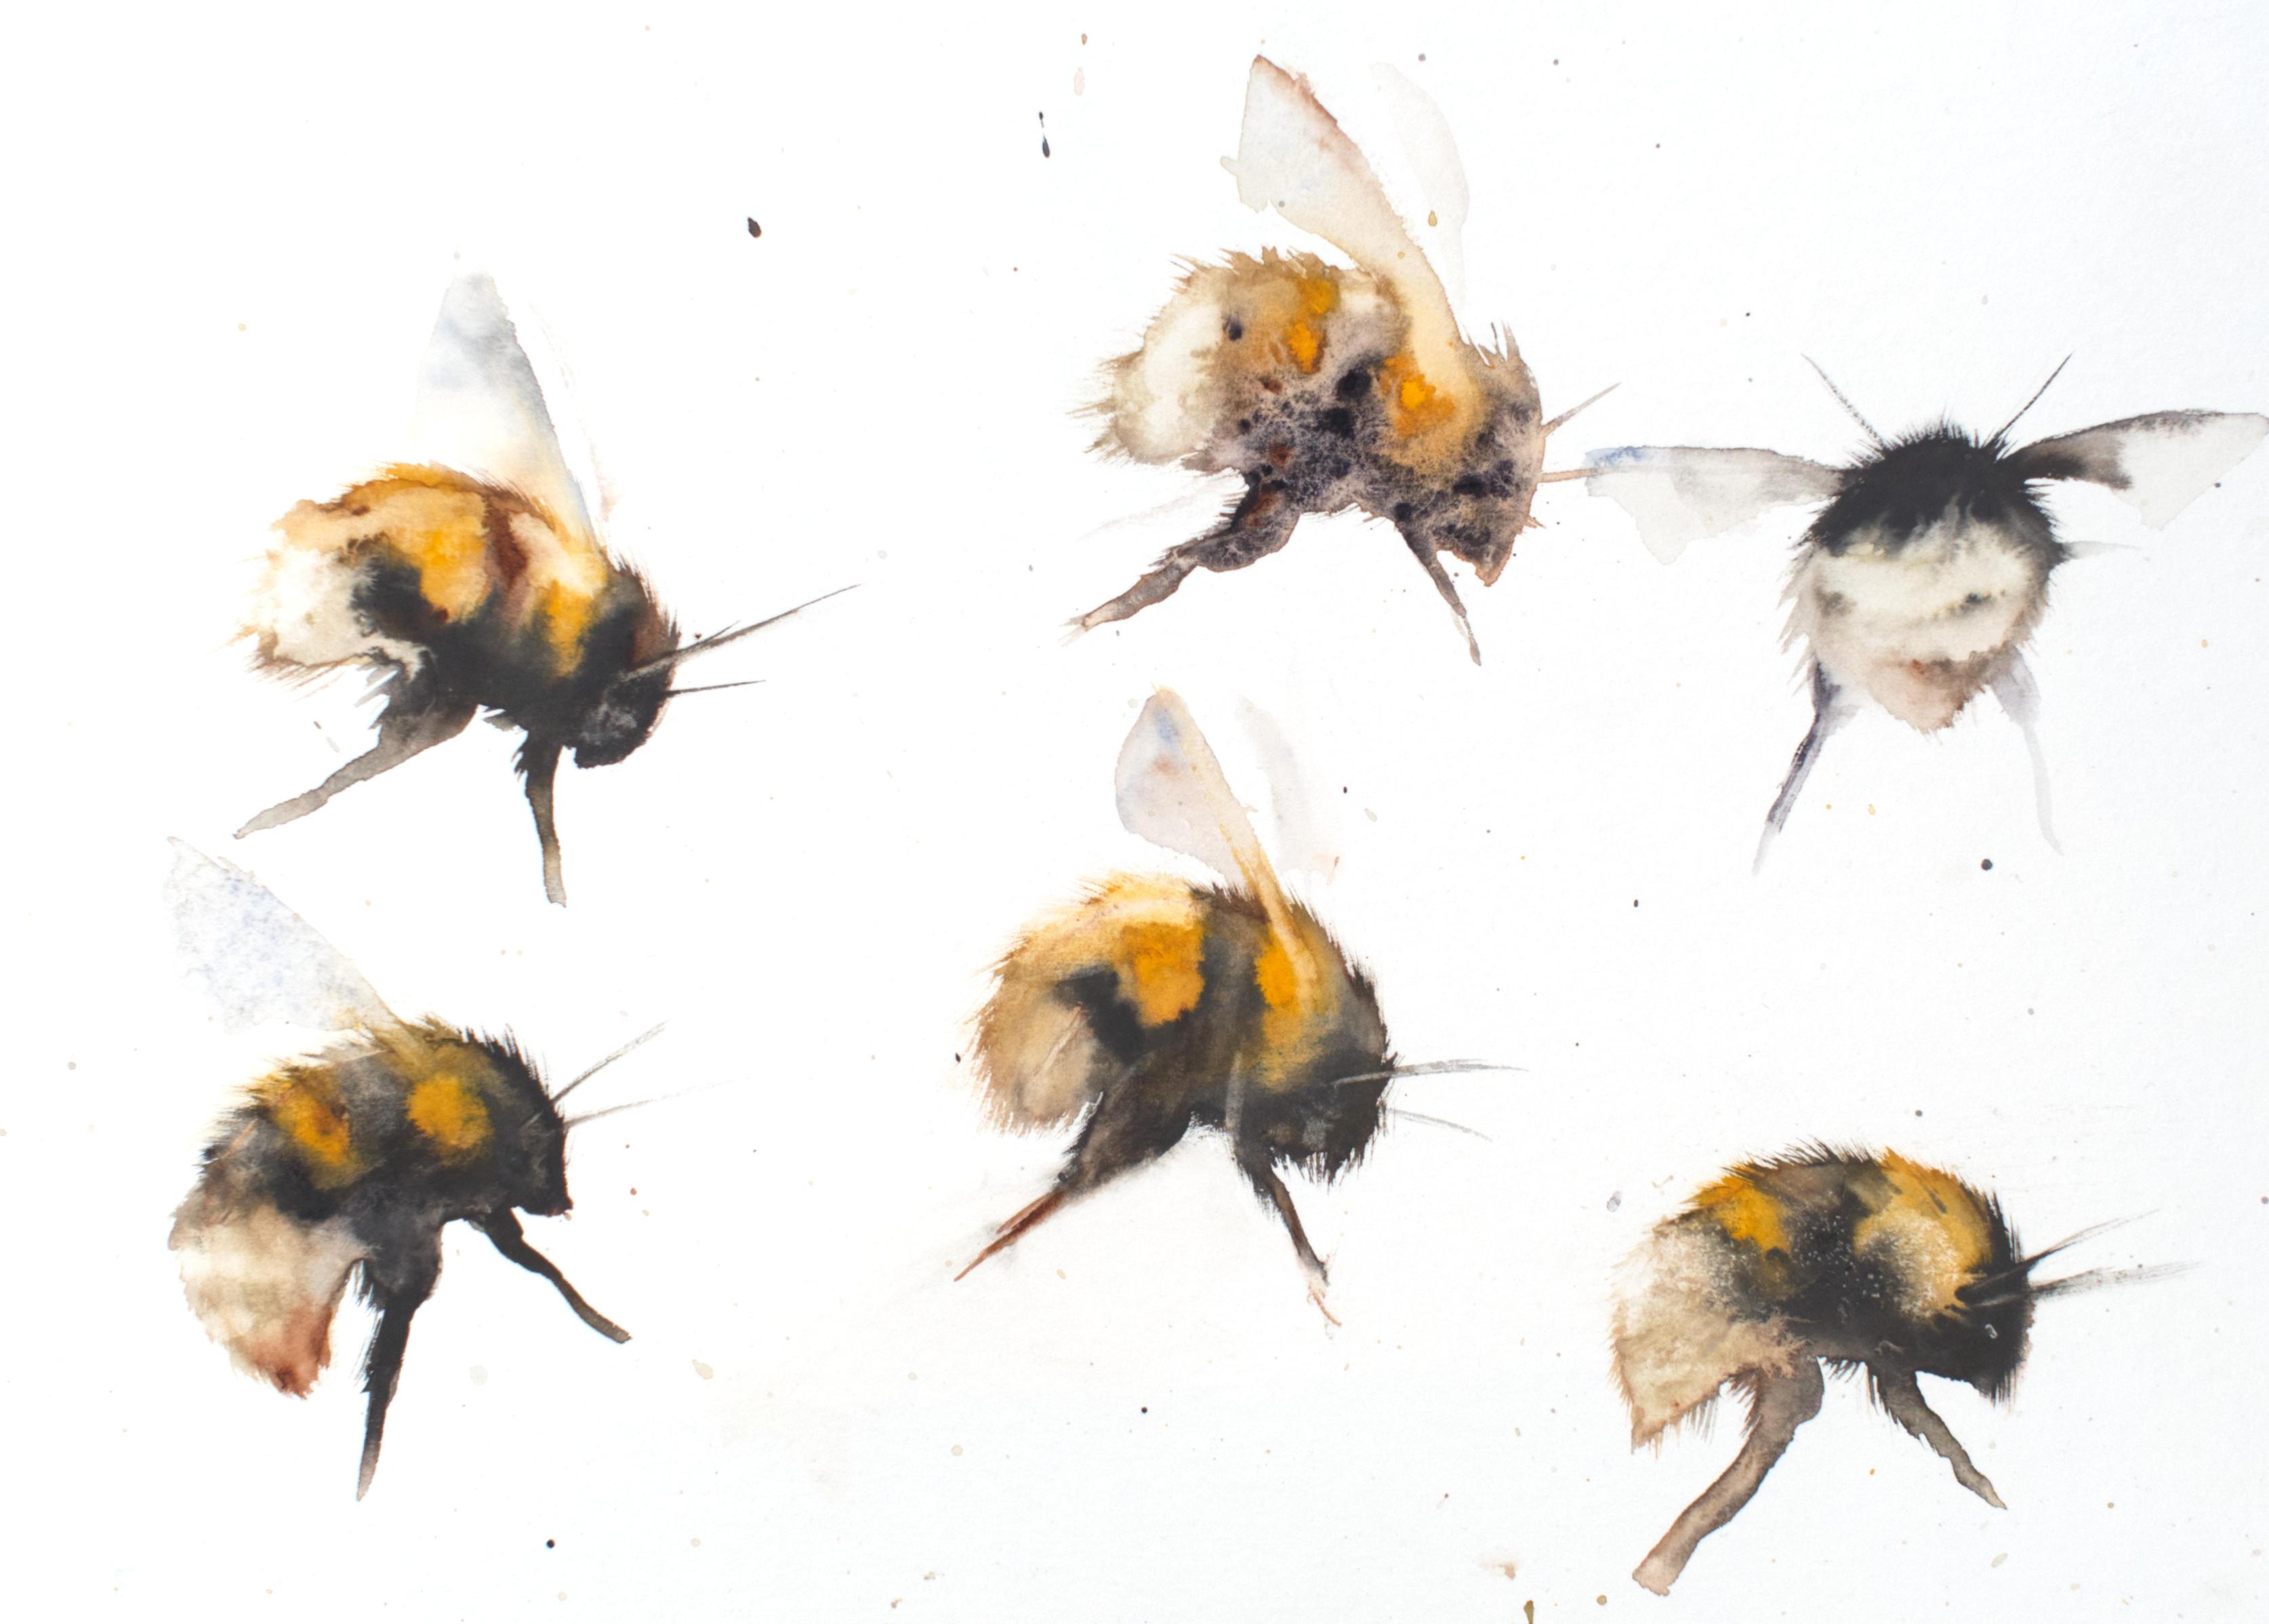
beautiful reference photos of some bumblebees and lavenders in the projects and
resources pages. These will help guide you, but try not to be drawn
in by that detail. I'll be showing you how to paint a lavender using
several colors at once and a really lovely,
easy, brush technique. We'll learn how to add
color on top of one another and to work
quickly and confidently, which will allow the
paint to work its magic. With just one layer, our bumblebee will
almost be done. Hughout I will be sharing
some of my thoughts, tips and tricks that
will help bring this wonderful bumblebee
and avener to life. There's also an extra
bonus bumblebee for you. If you'd like to learn
more about me or my work, please pop over to my website at Jane Davis watercolors do co UK. This can be found on my profile, along with links to my
Instagram and Facebook pages. I'm very active on my
social media pages, I love sharing my art, especially on stories
with many ideas, works in progress, and
tales of studio life. I really hope you will
share all your paintings on the projects pages as I love
seeing your masterpieces, and don't forget
I'm here to help if you get stuck or
have any questions. I want you to experience that buzz of painting
in this liberating, wet on wet, loose style. So come and join me.
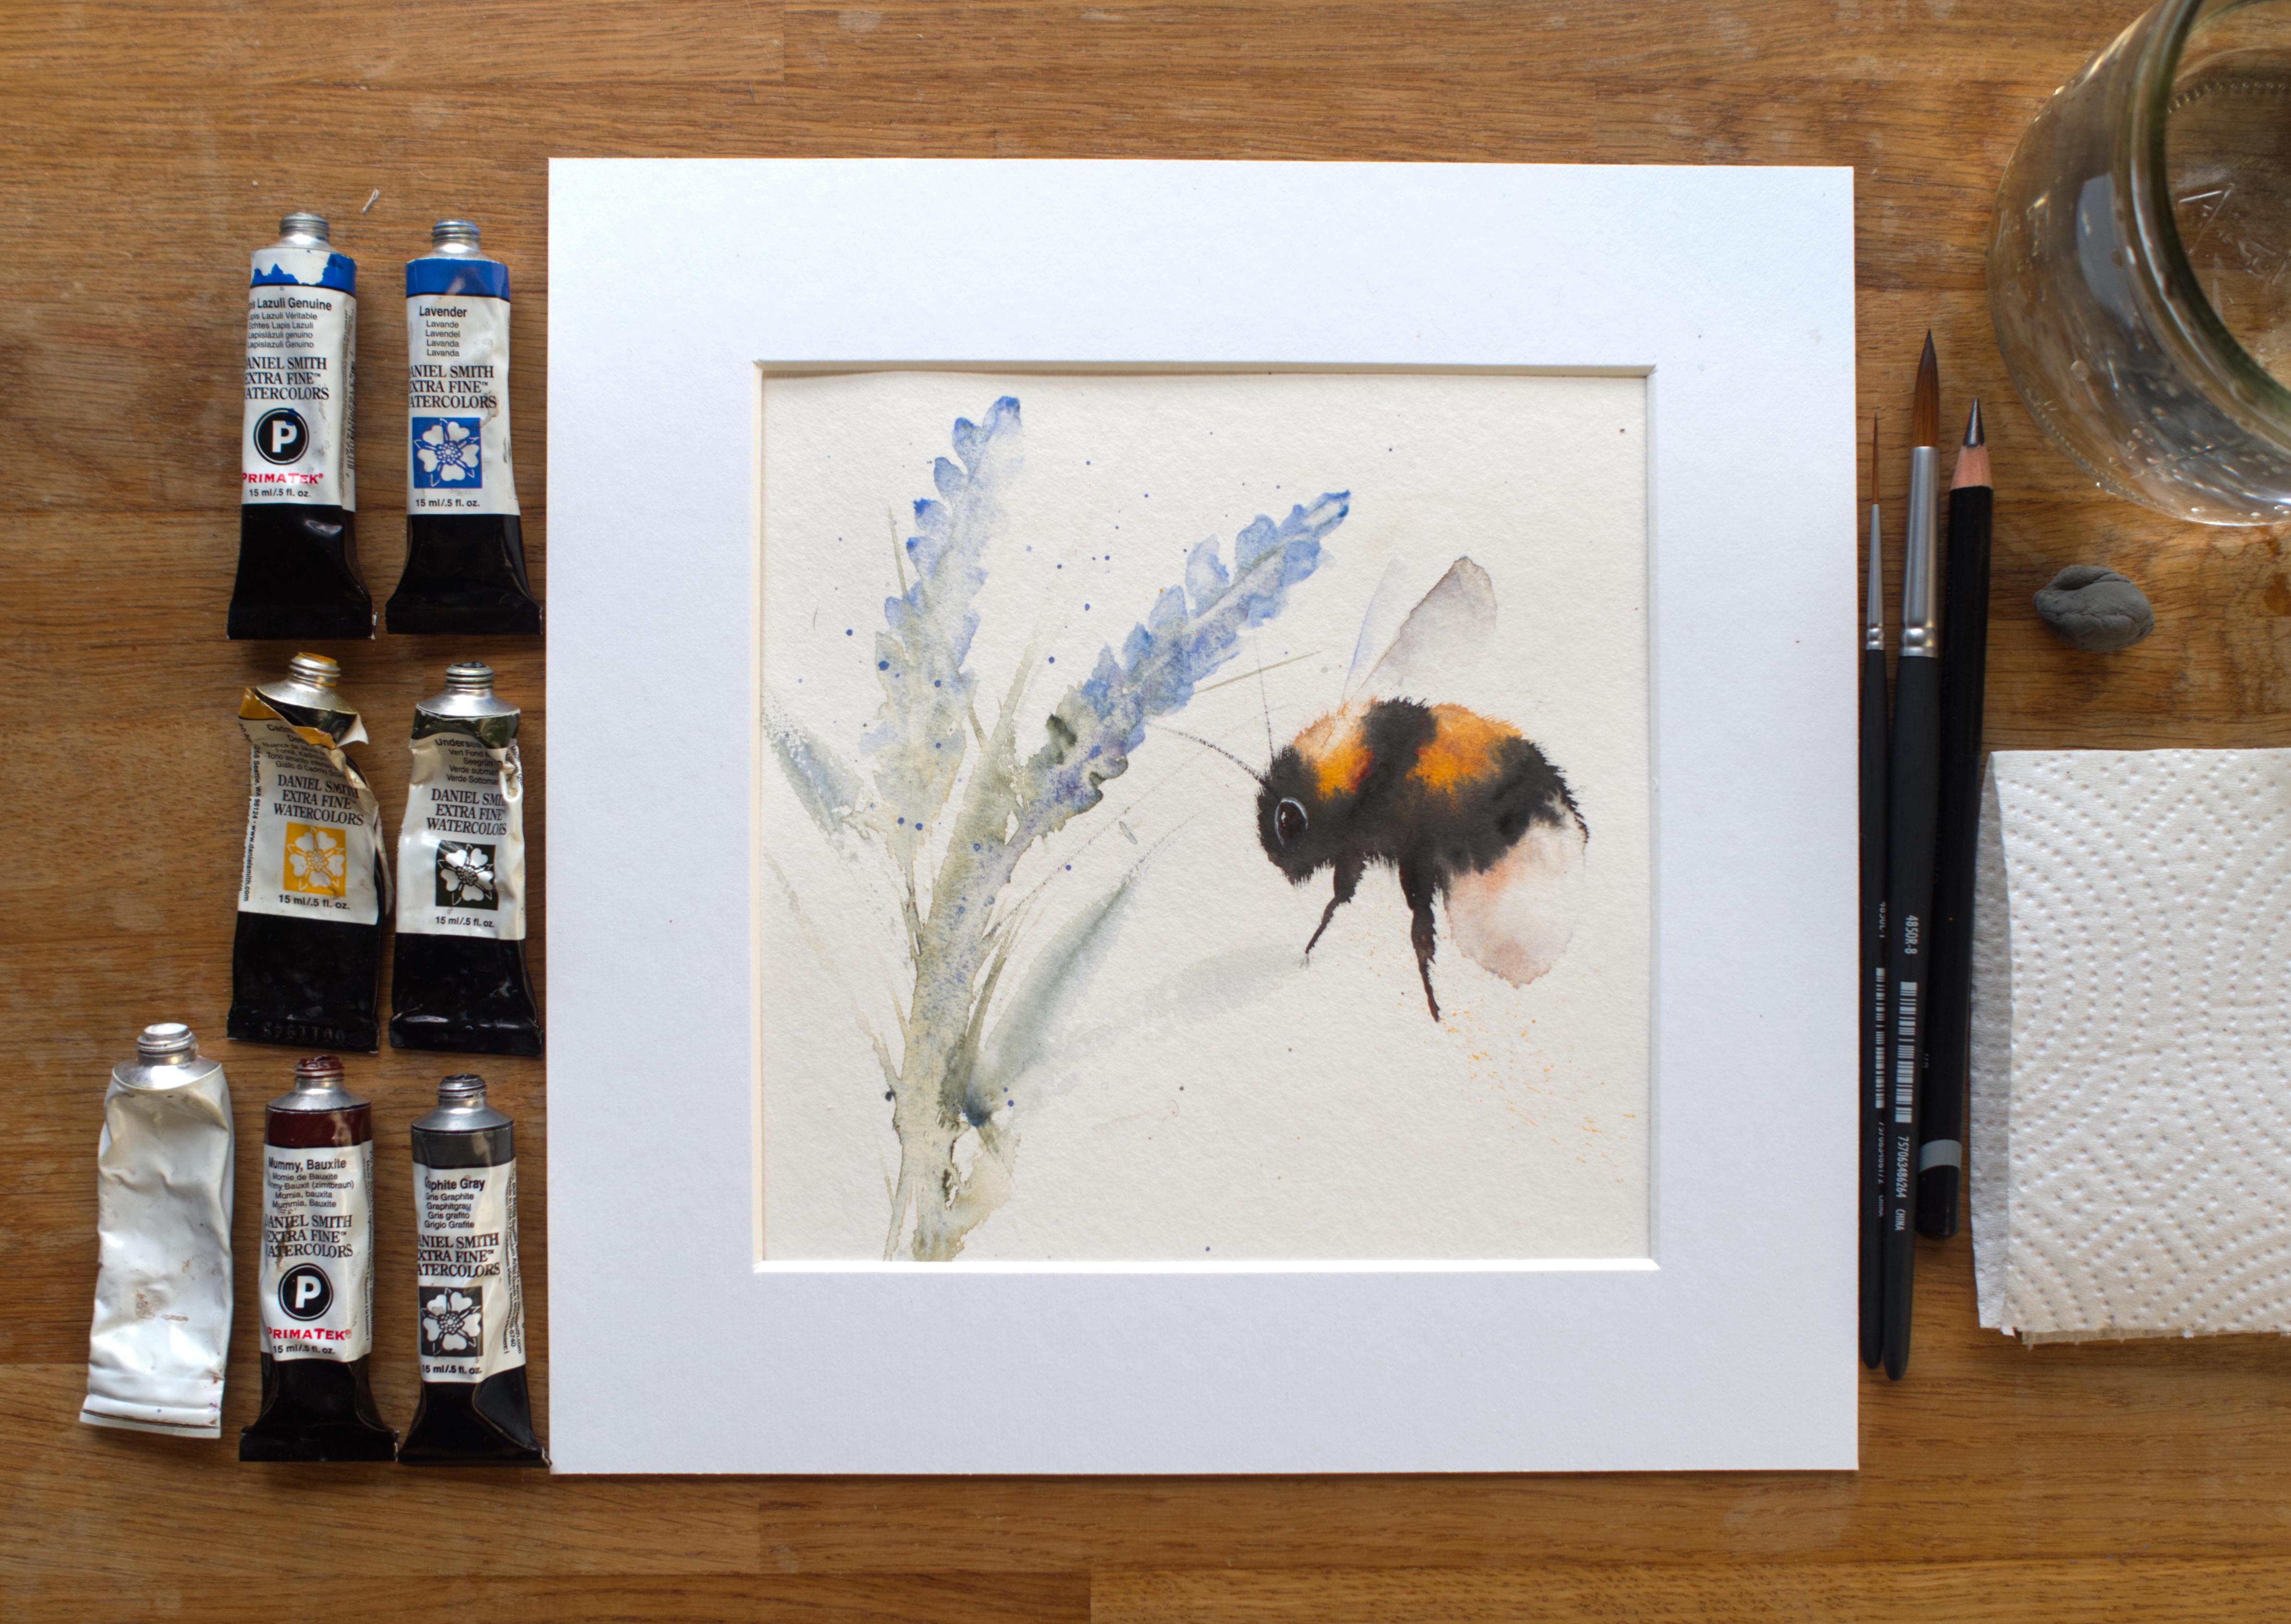
2. Materials: So welcome along to this little fuzzy bumblebee
and his lavender. I've wanted to teach
this class for so long, so I'm really looking forward to showing you all
the techniques. Now, I shall run through all the materials that
we're going to use today, and I shall start
with my paints. Again, a lovely selection
of Daniel Smith paints, I shall go from the top. I've got the lapsisGenuin, a really yummy color. Okay. I've got lavender. It seem rude not to put a lavender in there as
we're painting lavender. And again, it's a lovely
sort of soft color. I've got cabin,
yellow, deep hue, a little bit of a tatty tube, but it's still works. I've got undersea green, which is a lovely color. And if you haven't got that, it's a nice one to add
to your collection. Not one I sadly use as I don't get to paint
too many green dogs. A little bit of white
gouache, again for the eye. I've got a mummy bulk site, which is a nice
yummy, rich brown. And lastly, by no means least, I've got graphite gray, which is new to me and has worked really well
with these bumble bees. So regarding colors and
your choices, the lavender, for the lavender or lavender
shades entirely up to you, go some blues, some purple, moves, it really doesn't matter. The yellow, I found this
a nice color to use. It's nice rich and mixes quite well with a mummy bulk site, but another yellow would be
equally as good, I'm sure. Undersea green, again,
that doesn't matter. Another nice green
that you like. Obviously, the white
gas doesn't matter. The mummy bxite Burna is nice. I did used to use
that quite a lot, so that's an easy substitute. Now, the graphite gray, I've really enjoyed using
that for these bumble beds. It's really nice and strong. It's like a liquid pencil. It's great. I wouldn't choose. If you've got a
lot of granulating colors, don't choose those. You want something
that's quite punchy and bold and strong. We do one layer, so it's got to be It's got to have a nice
bit of body to it. If it's too granulated, he just looks a
little washed out and a little too grainy. Indio is lovely. A pains gray would work well, neutral tint, anything that's
got a bit of umph to it. That's really the colors. I've put a little
mount round my piece. That's not necessary. You
obviously don't need that, but it's a ten by ten mount. The paper I'm using today
is Hannah Malus bamboo. Now, I was given this
as a bit of a trial, and I like it. It's really nice for
doing this bumblebee. But again, any paper you have, but that's I had to tear off the front cover because it was getting in the way
of doing the filming, but this is a
gummed pad as well. So it's it's obviously not
as good as stretching, but we don't louse
a lot of water, so you can get away
with a gummed piece rather than having to stretcher piece or
even a heavy weight piece of paper will be equally fine. And we got today, the brushes. I've only got two today. We don't need the little
one we just use for the eyes and tiny
little bits of detail, so a small brush will be fine. A nice I've got a nice
size eight round brush. We use this a lot
for It's nice round. We use lots of different
techniques and different waves of
using this one brush. So if you got yourself
a nice round, I know I love my riggers, but they're not ideal
for doing this one. Doesn't have to be size eight. Obviously, the bigger the brush, the bigger your painting
can be and vice versa. Obviously got myself a
little bit of rubber, a little putty rubber, a
little bit of paper towel. Now, I use a hair dryer quite
a lot in other classes. That's really not
necessary in this one. We don't need to
be adding layers, so you can put your hair
dryer away for this one. And lastly, I think it is just the photos on
the resourced pages. There's some really
lovely photos that will help guide you, and they really are
only just a guide. Don't be too hung up with
the detail and sort of get the segments and the little legs because it can all get
a little bit tight. And this little chap's
got to be quite quickly. So you just use them
as a guide, and again, in the lavender,
we'll just give you a nice sort of sense. Now, I'm just running through my list to make sure I haven't
forgotten to tell you. I think that is it. So I think we should go
and sketch them out.
3. Sketching Out: Okeke then, let's
sketch him out. I've got a old tatty
mount, which I'm going to. Go around if I can
locate my pencil. Now, all the pencil
marks I'm going to make are going to be a bit stronger than I would advise you doing because ultimately, you don't want to see
the pencil marks, so you can rub them
out and lose them. So if you do them too strong, you find you can't
get rid of them, which is sometimes
a bit of a shame. So my lines might be a bit stronger just so you
can see what I'm doing. Okay. Okay, so we're
going to put one stem to keep everything all your motion or your wrist or your
drawing as loose as you can. I'm going to have one
piece of stem up here. I think I'm going
to put another one to bending all this way. But how you can figure
is up to you really, so I'll leave that for
your creative imagination. Now, the little bumblebee, now I've taught
this class a lot. And I always say to people, he's like a little cashew nut. Okay. So if you can imagine
drawing a cashew nut, we're not going to
be too worried about doing segments of bodies. It gets a little bit too detailed and you lose that nice flowy look when
you come to paint him. So it's got a nice round tail. Yeah, he looks like
a cashew nut really. We do that little there. So we're not going to
put too much detail in, but we'll put roughly
where his wing is going to be there's something like this. What a lot of people
used to do is make this little area too fat. It's only a strand really. It's worth drawing that in so you're not tempted
to make that too thick. Then another line here, which is all we're going to do actually for that bit of wing. In these little ggs almost like little sausage
first little bits like sausages and then
a longer piece. Just something like that. Going to separate this tail area off. That is all you need to do. Don't get too involved
with doing eyes. We're not going to put
where the yellow is, we're just going
to pop that down, keep it nice and simple. Okay
4. Lavender: Now, now for the fun bit. Pick up your nice round brush. Grab your two colors. Again, I'm going to be working
straight out of tubes, but that's just me. If you haven't done it, it's worth having a play, but if you're not comfortable,
then don't worry. But I find I can get a nice
lot of paint on my brush. P two colors on
at the same time, and we're going to
start this one. I'm going to have this
one a little bit softer, so I'm going to try and add a little bit more
water to this one. Just so it looks
like this one is going receding a
little bit. Okay. And all I'm going to do,
so it's a brush movement. So I'm just laying it along
and following the line, that pens line going back and
forth. I'll turn it side. Try not to get too
precise about it. Work your waist down,
make it as random. Sometimes you work down, your paint brush
run out of paint. So yeah, don't worry too much about that. Just
keep going down. I'm going to make
mine a little watery. Obviously, the more paint
you have in your brush. The stronger it's
obviously going to be, so you're going
to make that look like it's quite prominent, so I'm going to make this
one a little bit more. Okay. Receding, so I'm going
to just pop those two down. I'm going to pick up
my undersea green. I'm just going to pop a t going to add a
little bit there. Grab a bit lavender, that's
not blending very well. I'm just going to encourage
that to blend a bit more. Keep hold of green. I'm just again, all
nice loose movements. I'm just going to
put stem in there. A more than that. She says
she starts to fiddle. I'm going to put the green down and we're going to
do the next one. Now, I would swizzle
my pad around. If I were you and
get a nice angle, but I'm going to I don't
really want to do that. So I'm just working
a funny angle. You obviously can't see that. I'm going to start the top
again and do exactly the same. It's worth probably
practicing these on a scrappy piece
of paper just so you can get confident
with that movement. But it's just laying going either side of that
stem back and forth. Add a little bit more paint. I want this one to
be a bit stronger. Pick up that green as well. I start incorporating
that green as I go down. Bush is getting a little
bit too dry for me. I keep that nice
little loose look. I touch there. Keep that point. It's a nice nice and sharp. I think that probably do. Put those down. I grab the laven
directly see green. Okay. And we're going to have to go at
doing those leaves. So again, probably
something you want to practice on a scrappy piece
of paper, start with. But again, it's just
a brush movement. We're going to lay the brush
really flat almost fan it out and then just
draw it out and lift. If you have the two colors on your brush at the same time, you should get a mixture. Again, just the same. Sometimes they'll be
a bit dry like that. You kind you're given sometimes. Another one up there
a little bit more. Then we can do a few
little bits like this. Don't get carried away,
they can go through. So you don't think that Just pick up my little brush
if we can find a little bit, just a different size really. Okay. I think you can run
it off this I've done a little pencil mark
where my mount will go. So if you run it off that, then your mount will obviously
go over the top of that. But I think that's looking okay. Green just pop a
little bit water. Green bit stuck, I think. I like that to have
blended a little bit more. I think that's going to look
nice once that's dried, so to pop those down. That's your lavender done.
5. Bee Body: Okay, so it's onto our bumblebee. So what
we're going to do. Grab. Grab your brush. Give your shoulders a little
shake make between us and relaxed because we're going to have to work
quite quickly here. Again, before you
start your main piece, I would probably
practice him separately, even if you just practice the
body and not worry too much about the other little bits and pieces just to get
the confidence. Right. So what we're going
to do is wet it all down. We're going to stay obviously within the lines
we've sketched out, we're going to wet
his tail down. But we're not going
to do the legs, so we're just wetting
the whole body. Make sure you go
quite carefully and make sure it's all nice
and wet and as I say, probably in other classes if you bbble bobble your
head up and down, you can see whether
it's nice and wet. Now you want this
you don't want it puddling important part is make sure you it's
nice and saturated, but it's not pooling
because of what you'll find is the paint will
just sit on the top of it. Pick up the brown you've chosen. What we're going to do. We're going to
paint. It's going to drop color in all work ground. We're going to just encourage
it a little bit too much. Scoop back in. We're going to encourage it
all way around the body. We're going to will seep
into the tail area, but we're not going
to encourage it down there, just keep an eye on it. That's just perfect there. You don't want to do any
more than that long as it's covered the whole area.
Pop your brown down. Quickly pick up your yellow, and we're going to put
those spges Roughly here, don't get too worried about it, but the yellow by adding
this at this stage, so Just push out
other color brown. The brown just gives
you a nice under coolor really just gives
another sort of depth. So I've just found
it that's helped. Pop that down. This is where you hope you haven't put down. Yeah, it is where you
want to make sure you haven't made it too
wet you'll find it starts puddling and getting into all sorts of problems. Then we pick up the graphite
gray and we work from the bottom almost Just
keep adding that. It's quite strong. You want to his body. You suddenly start to see
him appear, can't you? Again, you're not going
into the tail area. You're just placing. Hopefully, all start to
look a little bit messy. You're probably thinking,
Oh, my goodness. This is never going to work.
This is looking horrible. Just have faith.
Because this paint got to go down the legs
and make a fluffiness. You just want it looking like
that. That looks perfect. You're going to pop that
down quite quickly, dry your brush, and you're
going to fan it out. S want it. You can see
that against your body. It's also fan out and dried. Quite quickly,
especially if you're in a warm climate or a warm room. You're going to
start on the yellow. I see this. You're just
going to just very carefully and this
is where you want to make sure it isn't sopping wet. It's getting the timing right. I can see mine's
just about right. You're just going to pull out. Don't start right on the edge, start a little bit
into the body, and that will stop you
going too far where you're fluffiness that
looks quite nice. Now, I can see the body the yellow is dried
a bit quicker. And the black or the gray, so I should say is
still quite wet. I'm just going to
hang on a minute because I pull that out now, it's not going to be fluffy. It's going to How explain it? It's just going to
come out too chunky it's not going to
give that fluffiness. I just need to be as
much as I can. Patient. Just keep an eye on this
little bottom. This is fine. This is lovely how
it's developing. It's just softened here and it's left a nice
white bit up there. That's just perfect. They
all every single bumblebee, and I must have done hundreds
by now will be slightly different and you'll find things work out a
little bit differently. So some of the black might dry a little bit quicker
than this is drying now. So you may want to do something
a little bit different. At that stage, you may want to what we could do, actually. I'm going to draw out the legs. Again, you'll have to
gauge your own piece. But while this is
lovely and wet, I'm going to pick up my gray. I'm also going to
pick up my brown, we're just going
to use those legs use legs. Pull out those legs. If you've got a
lot of black here, you can almost use that as your reservoir to
do the legs with. Papenhli bit of brown
right at the end. So Again, I'm going to use this paint I've
already got on the body here for that leg. To say every single b is a bit different and will work
a little bit differently. I think it's beginning.
I'm going to do his legs because I can see that's about
the right tacking Again, I've dried my brush.
It's nice fluffiness. So it's a nice. Yeah,
the edges nice fluffy. I'm very carefully
going to draw out some fluff down his legs and go. I would only do one
side and always try to go into the motion.
He's flying this way. So if you were to do the fluff, like the wind would
be blowing it in the right direction.
Just very carefully. Just pull out. I'm going to
start to go around that. Just see that's starting
to look ready to pull out. I'm going to go.
Head. Very carefully. You can keep drying
your brush if you can get too saturated with the
paint you're pulling out. I did you to do this
with a toothbrush because a toothbrush
doesn't absorb the paint. So if you're doing a little
bit bigger, that might work. You could have a go
at that. I've tried lots of different ways of
doing these little bees. I think because everyone turned out a little
bit differently, you never quite work out
which was the best method. Okay. But he's in
want to work quickly, but try not to work panicked. Easier said than done, I know. Then you can almost sculpt him. So I'm just pulled out his
little nose a little bit. And if you've got an area maybe looks need a
little bit thicker, you can vary gently to the teaser out and make
it a little bit thicker. Okay. That makes sense. So you can if I wanted this area to be
a little bit thicker, I could just pull it
out a little bit more. And then you just
need it to dry. Don't do anything else. It's really important
not to fiddle on this one or rewet it. You just need to let the paint kind of do its magic as it were. While this little
bombs just starting to dry or going nice and sort of tacky, what
I'm going to do. You can add. Yeah, I will. I'm going to put a little
bit of tiny bit of lavender and the brown on the
brush at the same time. Just put in at the
tip of his tail. And that would just give him I think they have a
little bit there. There's a little knob
sometimes and give you a idea of shadow underneath
him. Ideas lovely. If you can keep
that almost clear. That will give you
a nice sense of light as well, and
what we can do. Drive for bush again,
and we can very carefully tease
that out as well. So you can give them
a little fluffy bum. Okay. Judge, Judge, have a look at your paper if you paint if it's too
wet, just go careful. I'm not going to do
anymore. It never works. I try to fiddle always
always goes to pair shape fiddle to do your best not to put a
little bit more there. I've lost that a little bit. Colors out of Ater heli. I know they haven't
got a lavender tail. But it sort of marries
in the lavender. I quite like that a
little bit more brown. This is if I'm not careful. I will overfill. Okay. Just about making sure
you've got the right wetness if that's if I put
too much water in there now, it would pull and then push up and this will all
start going a little bit. You have to when you're putting
this paint on his bottom, just make sure your
brush and your paint is almost the same wetness as
the area you're working into. That I think will do
me because if I know, if I do anymore,
I will ruin him. So the next little bit will do his wing and other
bits and pieces, but I think he's
worked out okay. Okay. Okay.
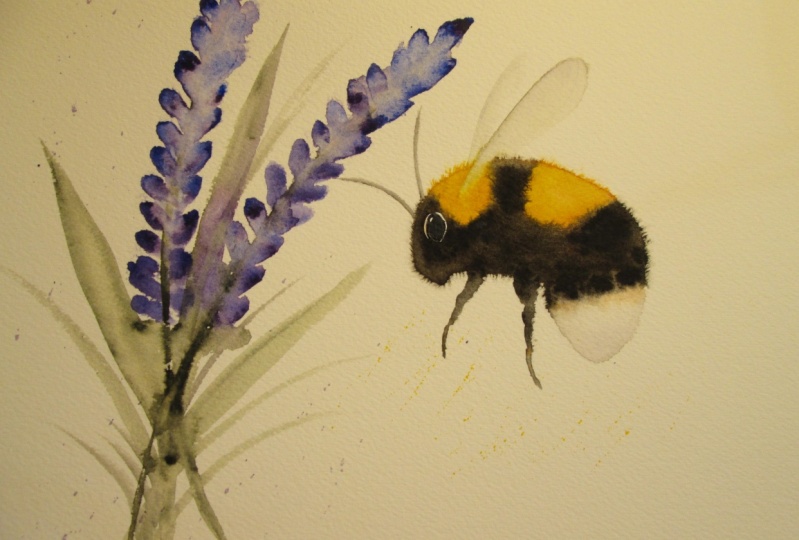
6. Wing and Antennae: Okay. As you can see,
he's tried really lovely. I'm really pleased
with him almost a little bit too heavy, so it hasn't allowed some of
the brown to come through. I'll show you I'll pop
in the resources pages, but there's another
little chap I painted. You can probably see little
bits of brown from underneath that the under brown we put
underneath comes through. But as I say, they're all
going to be different. So you will never get the
same bumblebee twice. Sadly. What we're going to do, we're going to pop
his little wing on, so we're going to
use the bigger brush again and what
we're going to do. They usually probably
place this a little bit. Slightly in the
wrong place if I'm e. So what I actually
going to do? I'm actually going to just
gently rub that one out. You need to come out of
the yellow very roughly. It's me saying, don't worry
about placing the yellow. It might have been helpful. Okay. What we're going to do? I'll sketch it in
for you, actually, you can see, come up
somewhere like that. They're not huge. Come
somewhere like that. I say a real good point is not to make this
area too thick way I'm just going to wet
all that little wing down. This is all nice and wet. And just going to squeeze my brush so it's got into a
little chisel shape there. Hope you can see
that. I'm just going to take a little bit of color. Dry a little bit too much.
Your brush needs to be damp. You're taking a little
bit of color out. Just go gently There's
no hurry at this stage. There's nothing
Nothing that needs any pressing attention
to just take your time. Just gently rub that out. I make sure your bumblebees lovely and dry before you start. You could have had dried him. But to be honest with
you, it's probably best to particularly him to
leave him to dry and to leave that paint just to
gently blend together on its own without the help of
hair dryer blowing around. What we're going to
do. Now, this is up to you what color you
kind of pop on his wing. I'm going to go just a
little bit of lavender. But just a little bit on that
corner. Don't do too much. Just let that blend gently
work its way round. Because obviously, they're quite translucent and we're
not going to put veins and bits and pieces
in there because it gets a little bit too much. I pop a tiny tiny little bit of brown to blend a bit more. That's all we're going to do do anymore for that second wing, which I've obviously lost now
because I've opted it out, we're just going to do a stroke
like that. Nothing more. It's just so that's a
blob from an earlier. A droplet of water,
hopefully you can see it just gives an illusion of another wing there if you
don't want to do anymore, really nice soft edges. And that is your wing. Make
sure that color comes out. This is where you want to
make sure as I was saying, you can see my pencil
mark underneath there, and I won't be able
to rub that out. So it's really important
when you draw him not to do a very strong pencil mark. Hopefully, I'll be
able to rub this out, but Yeah, that's the trouble we're doing
very strong pencil marks. Okay, we're going
to do the antenna. Now, Aten I are quite
nice if they're going in the direction
he's sort of headed up. I don't wear off
to if I'm honest, but he's probably
headed off that way. So again, I'm going to practice actually a
little bit further down here on my piece of paper. I'm just checking
you can see that in the camera. Up a little bit. It's just a little
mark like that. You could do a pencil if you're feeling if you're not
feeling confident, you can do this in pencil, then you can obviously rub that out. But at that hopefully
that shows on the camera. Getting that right.
That's a nice one. Let's just go for it. It's the simplest
thing, isn't it? I always seem the
most scariest to me. Hold your brush
right at the end, so you can keep everything
nice and loose and start. I'll start somewhere
in the middle, particularly there's
one on each side. I'm going to go. That's probably
not quite thick enough, but back over that. That's better. And
another one there. That will do me.
That's his anti.
7. Eye: Okay, so I'm going to
pop this little eye in, so it's quite a
simple little eye. I'm going to get a little brush, a little bit of white gosh. Give rustle round. The eyes if you do the eyes a little bit bigger, always makes them a bit cuter. It depends if you want a
cute bumblebee or not, but we're going to go
somewhere like this, doesn't matter if this white
line gets a bit chunky, it doesn't matter because
what we're going to do, we're going to fill it, so we're going to fill it from inside once
this white lines dry can be quite big. Los a bit nasty at the
moment, but don't worry. Just make sure it's
nice white rim. Of, we've got to let
that Completely dry. If you've got a hair dryer
and you want to with that, where you could use
your hair dryer, but it will only take
a few minutes as well, I'm just going to
allow that to dry. Okay, that's nice and dry. What we're going to do,
pick up gray or your do, whichever color you did the body with and
then your brown. And we're going to
just fill it in. Now, I quite like it when you don't have the white
rim all the way around. So I'm going to lose it. Maybe down the bottom there. The white only shows at the top. I will give you a nice sense of where the light
catches and it doesn't. I'm going to do is also pop a
little bit of brown on top, just to give them a little
bit of a variation in color. I probably haven't got
brown eyes at all, but I like the color of it. We're not doing textbook
bumblebee identification here, so don't worry. Okay. It's probably a
good job as well. Take your time. I think it. Okay. Then you need
to allow this to dry as well before we put
that little catch light in dibble of white
just brings into life. So, I like that. Soon pop that down. Again, allow that
to dry and then we can put that little white.in. Right. I'm going to pop
that little catch light a little bit that makes
all the difference. So again, a little
brush with your white. G I would go in
where he's looking, so I'd go to and at
the front. Okay. Makes all the
difference, doesn't it? And that's his eye.
8. Finishing Off: This is a nice little bit. We're just going to
go round him and do a little king up
bits and pieces. So what we're going to do first. We're going to rub
out any pencil marks, so I'm going to see
if I can get rid of that pencil mark round
he's a little bottom, so I'm going to again, make sure any stages like this, that the paint is
really lovely and dry. You can say you can't get
that lovely lost and found. Look, I know I'm not
going to get that out. That paints too thick up there, so there's no point in
trying to rub it out. Um Unfortunately, that's
going to have to stay. But you see this is where
the waters just run up, and this is what's so
beautiful about not fiddling and just leaving
it to do its own thing. So that's worked really well
on that this little chap. So what we're going
to do. If you'd like some sort of splatters, it's quite fun to do looks like little pollens
maybe come off his legs. If you grab your yellow, and you might want to practice, I'm going to practice down here a little bit at the bottom here. See that you're
just going to get your finger and you're
going to flick back. That's just the right
cac. It's worth having a go on a practice pefore
you've got the right cactes. I'm just going to do it around his legs and it's going
in that direction, so it's as if it's flying off his legs. It's not very obvious. It's a bit of fun. You might decide you don't
like the idea of that. Again, you can do that
around the lavender, as I've seem to have made
a few splatters anyway. I might as well continue
with a few more. Again, I'll there. We can do a little
bit bigger this one. If I get a little
bit of my brush, if I can practice down here
if I just tack my brush. Hopefully get some bigger marks. I'm going to do
the same up here. Way you can see a bit
more paint on my brush. Okay. Just going to dis tap, should leave you
some bigger marks. That do. Don't get too mad. Can your brush off again? I got that dot
there, so I'm going to see if I can get rid of that, which is just a paint mark. This is where you can
go round and tidy. That's gone. I might actually go back over this wing again just a bit boring if I'm honest. So I'm going to make it
a little bit larger, so I'm just re
wetting that again. I wouldn't ever avid re wetting this body
and trying it again because I've tried that many times thinking,
surely must work. It doesn't trust me. Have a go. You find a better
technique than me, but it ended up very muddy
and you've lost that lovely. Hopefully, these
lovely sort of marks. So what I want to do. It a little bit
of gray up there. I just looked a
bit boring to me. Hadn't done any unusual marks. I did have a little play with
putting salt on the wings, and that was actually
quite effective, but it's always not so easy on a class then to have
to wait for salt to dry. But that's worth a go. If you haven't done any salt, I've used salt and
a few my classes, you just sprinkle any table salt and you just sprinkle it on top. That looks like it a little
bit more exciting to me. Hopefully, that
drive a bit more. Yes, that looks a bit better. I put tiny bit of blue there. Okay. Okay. Now, little
bottom has got well, my bumblebees bottom, has got a ice little bit of light there. But if yours has gone
a little bit heavy. If I just show you
this little chap here, which one I worked on to try not to smudge anything.
Can you see him? No, he had his bottom
had more color on. So what I did was
take color out. So I just rubbed very
gently with my soft brush, rubbed a bit out there. Dabbed it with the kitchen
with my paper towel, and it just took a
little bit of color out and it just
gave him the idea of I think they have if you have a look
on the reference photos, it's just the shape
of the abdomen. Again, I wouldn't try to
take any color out of here. It can go pear shaped
very, very quickly. Can I show you on another piece? I have another few
here you can see. Many practice bublebes
take him out and Okay. I'm fiddling on the mean. Just get him out the
way for a minute. Put him in his place. I move up. I'm just
going to show you what I mean about trying
to take color out because I think it
should be a nice idea. I'm trying to get a
little bit of light. This is probably where it's
going to work very well. But you find it gets
patchy very quickly. It just doesn't look very good, because you've pulled
that fluff out as well. So I wouldn't try and take any color out
which we have done in other classes is to go back pop him back
in there again. Se him. So, I'm pleased with him. I think our little
bumblebees just about done. There's no other aspect
that could be fiddled with. What we're going to do. I'm
going to take a little bit of line of color out out of that lavender so wet
brush down again. Sorry, I it off camera. It doesn't dribble,
but I've made a little mark brush there. I'm just going to scrub a little if you've got
a little flat brush, you could use that, but
this little class can be all done just
one two brushes. They don't go all the way down. You just want just
a little bit of idea maybe a little bit of
light touching some stems. I see my pencil mark up there
as well, which is a shame. That may come out if I try to
wp it out, but it may not, that's why it's important
to try and keep your pencil marks as
light as possible. I might even take a little bit of color out of that side there. Idea if it's a
little bit lighter. I've just wet one half and then just take a little
bit out of the kitchen roll. I think that has worked well. I'm going to pop that
little mount round. Which looks nice when you put
mount Mound, isn't it, sir. I hope you enjoy
painting me with me.
9. Final Thoughts: So I hope you enjoy painting the bumblebee and the lavender. It's one of my all
time favorites. Did you enjoy painting the bee? It can be a case of trusting the paints to create you a
unique little bumblebee. Remember to try
and work quickly. The more you fiddle,
the muddy he will get. He can take a little practice, but once you get
it, you'll be off. Hope my tips at the end
help to bring him to life. This is probably one
of the few times that fiddling at the end
doesn't help the painting. So we look forward to seeing
you in the next class.
10. Bumblebee Bonus Extra: I thought I would just do
another bumblebee for you. This was This was probably
take take two, if I'm honest. Take one had a rather
dodgy lavender. This one worked out
k, but a distractor decided to do some mowing right
beside the studio window. So I had to abandon that halfway through
because of the noise. So I thought I would repaint him for you and
you could have a We, you can have another look
at how I go about painting. Yeah, this little bumblebee. I thought it would
be interesting just to see how they vary even considering I've probably done many of these little chaps. What I've done, I've picked
up my brush. Nice and wet. I'm going to wet the
whole whole body down. Auding that tail is exactly the same methods
as the main piece. Absolutely no different. Okay. We're just going to bent my head a little bit so I can
see how wet that is, like I said, and the main piece. You don't want it sopping wet. You just about right. But sitting water sitting on top and it's just
beginning to soak in. So what we do we
pick up the brown. Again, just paint it in. Don't get too worried. It's all going to be lovely and flowy. We don't go into
this area at all, but by default, it will
just gently blend down. It's just a case of working
as quickly as you can. The more you fiddle. Sadly,
particularly this chat, the worse it gets.
Pick up the yellow. Pop that down. I just in two places. The good thing with
this dam yellow I found it pushes the other color. You can see that. It pushes
the other color out the way. That's it. Just when you
think that's enough. It's just nice and blending probably further than you
would have liked to have done. It's always worth. Keep
an eye on this tail. Don't let it get too
covered in paint. You want a bit. That's about perfect. Keep
be mindful of that tail. So then we pick up the This
graphite gray is brilliant. If you use a very granulating dark color, it's interesting. You get a quite a lot
of texture on it, but you find you don't
get a lot of body. So this graphite gray I found really helpful
for giving me a nice solid dent body rather than anything too
light and too grainy, it just doesn't
work very well for the bublebee all I'm doing is just generally working
underneath the body and just allowing that to go up. Okay. And that is basically again it and you just want to allow and just to watch
just keep monitoring it. You don't want any too much coming down here, very gently. Try it's really
hard not to panic, but just try not to panic. Breeze. Fairly quickly because I find this yellow and if you may be working
in a warmer studio, it's a bit chilly here today. You'll find that yellow
dries quite quickly, so you want to clean
your brush, fan it out. You got a nice. Okay. Nice. Fan like that very
carefully. Just have a look. It needs to be tacky
and just wet but not soaking because I can see the black it's sitting quire
lot of paint sitting there. If I did that, if I tried
to pull it out now, it would come out very solid. I'm just going to do the yellow. I'm going to go
in the direction. He's flying very carefully. Come from a little bit
further down. Very gently. You'd be surprised
how easy it is to make this too fluffy, or you end up with a giant be because you
keep pulling it out. Okay. Very gently. You see the
paint has to obviously, we put quite a lot
of paint here, but it has to go
into quite a lot of different areas.
I'm going to do. I'm going to use this
paint from the body, which I didn't quite
do on the other ones. I actually added some I be interesting for
you to see that. I'm going to be drawing a lot of this paint around the
body down the leg. The paint then having to
travel a bit further. That's Okay. I just
encouraging it down. Again, I will do the
same with this leg here. You can see that by doing that, how much grainier this has gone actually than
the other other one. They just vary so much, they are quite
unpredictable. Okay. Okay. Now because I've
done that, obviously drawn some of the paint down, that's beginning
to dry on top now, so I'm going to fan
my brush out again. I'm just going to go
very carefully around that black underneath.
Down the little leg. A bit of a greeny
color, hasn't it? But what we could do. Really likes the green in the yellow mixing a
little bit too much, I think the the back. I haven't had quite
enough paint. I didn't put enough
paint here to start with for it to be able to come all
the way down here as well. Add a little bit more if we can add a bit of
strength to that. Okay. That's quite wet. I can see that because if you did work on very
nice stretched paper, which is not always necessary
with the little beads, but I probably wouldn't
have this puddle here. It would have been
nice and flat. Put a little bit out there now it's beginning to dry up there. Okay. I'll start to do some a little bit
of the tail, actually? I'll probably put that color in. Put a little bit of lavender
in the bottom there. A little tip there. Tiny little bit of Brown. Careful not to add too much
water as I said before here because you don't want that all pushing up into the body again. It's still quite wet there. I start to fiddle too much. It might be helpful
for you to see. So this is actually quite
wet around his head, you'll probably see that it doesn't go so well
when it's very wet. And this time it goes perfectly. Quite often, if I do
this one it's very wet, it goes very chunky. At this stage, I do not
want to do anymore. It's starting to dry. This is almost dry here, and this is going quite tacky, so I'm really difficult stage. So if I was to do any more, it would definitely ruin it. You can see already that's a lot lighter than
that other piece. The first one I did in the main piece that
you watched with me. I'm going to let that
dry because it would be interesting me to actually
finish him so you can see him. I'm going to let that
say thoroughly dry and you can see what it looks like when I
do the rest of it. Okay, that's nice and dry again, but you can see how much
lighter this one's dried and the yellow
hasn't been quite as prominent has it say there. I consciously didn't
do anything different. It's just the way the
paints have gone. But I've got a little
bit more brown, I feel that's come
out from underneath. I like his tail, so that's what I will do. I'm going to rub out that Okay. What about the bits of
on bottom my light. It's that lovely where you lose the color lovely
lost and found look. I'm going to do his wing I've probably done
the same thing as I did on the main piece. I've left the a little
bit too far down. I'm just going to put
it out from here. You could almost use the color
just from the body alone. Probably not quite
strong enough. Let's have. I'm going to have the lavender and the
graphite gray on here. That was a little
bit insipid before. Okay. Just an idea of a second wing there just soften it,
run your brush down. Softens the edge.
Sometimes with these, just let it dry
and just leave it to do its own on its own magic. Okay. I need a little bit of
color here it lands down. It's a bit strong. Take
it back out again. I have a panic if you
put any too strong, it can quite easily
come back up again. Most of these
Daniel Smith paints are lift nice and easily again. Okay. Okay. I shall do a little. I've done the ten heavy. Let's quickly pop those in. Again, same thing, a little. See that up there. Just a little. A little swoop. It's nice thick and
if he's nice thick, you'll get these
disjointed lines. Again, just place
it in the middle and work out just like that. Again, you can do a pencil mark. Then you can rub them out there. It doesn't go quite right. Clean my brush again. Do that little white line, the white round rounds. Okay. Make sure it's nice and thick. So you get a nice strong line when you back fill it again. It looks a bit awful
at the moment, but soon comes right. That just needs to dry
before we fill it. Now I'm filling. Is that
lavender, hasn't it? I'm going to let that dry. Okay, that's nice and dry. So granda grab my
graphite gray in the brown. Oh, my goodness. Go inside, would have been easier with a smaller
bush? Pop back down. Bush. A bit better. Very carefully go round
I like losing some of that white rim don't want
it all to be showing. I'm painting as much as
probably I ever do paint, that's I'm just painting in the two colors a little bit
of damp brush it just blends. Ideally I want the graphite gray down here and the
brown at the top. Then we need to let
that dry as well. Again, that's nice and dry. Do we need to get our
little brush again. Make sure this is nice and
thick because you don't want a watery white catch light because it can make them look
like they've got cataracts. I'm not sure if a bumblebee
can get cataracts, but you want it
nice bright white, and we're just going
to be at the top. Towards the edge front. Perfect. You can see
how different he is. But hopefully, I'm
still pleaded with him. He still looks still looks
nice little Bublebe. So I hope that's helped you had to have to explain
a second time. So, I hope that was helpful.
 Jane Davies, Professional Artist and Teacher