Transcripts
1. Introduction: Are you ready to unlock the
power of conversational AI? This course is your
way to creating your own GPT chocolate
IN many alone. What I'll be your guide through this exciting journey
in this course, we will learn
step-by-step how to create a fully
functional GPT chatbots. We start by diving
into post-modern, a powerful API testing tool. We will test our APIs
and we will understand the key parameters needed for interacting with a GPT model. We'll walk through the process of preparing these parameters in order to be able to send
a request to a GPT model. Then we will create
the chocolate itself using HTML, CSS, and JavaScript. We will not stop there. I'll show you how to take your chatbot life by hosting it. By the end of this course, you will have your own custom
chocolate based on GPT. This jackpot will put you at the forefront of AI technology. And you can actually use this knowledge to
improve your business.
2. Introduction to OpenAI models: Hi there, Welcome to the
first lesson in this course. Before we jump up
to talking about the steps of how to
build our own top. What we need to understand the origin of those
chatbots to build our job. But we will depend on a pre-trained chatbot
that was done by OpenAI. So let's dive deeper into OpenAI and get to know its own
platforms and services. Open AI is an artificial
intelligent organisation. It's a tech company
that is focused on developing a friendly surfaces. It developed very
advanced language models. Those models are used for
various applications, such as chatbots,
creating images, changing audio to
text, coding and more. Our best reference to
know that Open AI is its own documentation to preview that we can go to
Open AI's platform. So to preview open
AI's platform, we should go and train
new Internet page and go with platform in pin AI. Just calm. This. Can you take us to the main
page of opening its company? This is where you
can actually read about its services and models. I'm gonna go click on the
Documentation tab at the top and around to every detail I need is to be
presented over here. We're going to scroll down
and click on Modules. This is where you can
find every single detail about every modal
that OpenAI created. There are very small
bowl is done by OpenAI and as you guys can see, some of them are for natural
language processing. Others are for
generating images, changing audio to text, or creating numerical
forms or an, or coding and so on. So these are open AI models, and from these models be will depend on one mode is
only which is GPT-3 and goes this is the
model that was trained on generating natural language
to create a chatbot. You're actually talking about natural
language processing. To know more about
GPT-3 and a half, all those you can
scroll down and you can focus on each model by itself. So as you guys can see, it's gives an overview of this
model and what does it do? And here it shows the latest
updates on this model. So it shows the first
model that was generated for the tokenization and
when was it updated? And finally, the last
one that the one that we will depend on the GPT-3
and a half terrible model. And this model is
actually amazingly capable of generating
natural language. It also is one-tenth the coast, the previous update of it. So this is amazing. It will
not cost you anything. It has a high number
of tokenization and it was the
latest one updated. So scrolling down, you can
review whatever data you need. And we will preview other's stuff that we
need from this page, such as the input to build our own chatbot to
be the end point of each model in order
to be able to send a request to this
model and receivers. So as you guys can
see, this is opening. This is their documentation
section where you can find any answer to any
question you have in life.
3. What is API: When you spend time
with programmers, you may have come across
the term APIs and their purpose in performing specific
tasks or accessing data. But what exactly are APIs? And Wally, where they developed? When you go to a restaurant
and order some food, you interact with a waiter. You can order food and drinks, ask questions about the menu, request and pay the
bill and much more. In this example, the waiter
is shielding you from all the complicated stuff that
happens behind the scenes. You don't have to
worry about stoves, ovens, dishes, managing stock. He is the interface
between new and all the services that
the restaurant offers, giving you a way to interact
with the restaurant while shielding you from
all the complexity behind. In a way, the waiter can be seen as the API of
the restaurant. And through this example, you must understand
why they are useful. The term API stands for Application
Programmable Interface. And it's a way for different programs to work
together in various ways. In the next couple of lessons, we will start using open the eyes APIs in order to connect
with Open AI models, to use them to build
our own chatbots.
4. Introduction to Postman and OpenAI API: Setting Up the Environment: Hi there. To start
creating our own top. The first thing to
do is that we have to get introduced to Postman. Just go to your web browser and type WWE adult Postman to come. Once this finishes on, you have to login
to your account. Okay? So there it says, this is the homepage
of postmodern. And we want to start by creating our own workspace and our own collection
to test our APIs. So I'm going to go to
the top left corner to click on workspaces. And then I can use my previous workspaces or I can actually just
create a new workspace. You have to write the
name of the workspace. So as you can see, chatbox or GPT talk Bob, whatever you want to write, choose a suitable name for it. Here you can decide the
visibility of your expertise. You can make it public personnel or share it with the team. Because it's only a test. I'm gonna go with personnel and create when we first whitespace. Good. So as you guys can see, this is the interface
inside the workspace. Inside every workspace you
get to add collections at variables and
configure a group of parameters to be able to
use it to destroy a VIP, to integrate your only be IKE with other
websites and so on. Good. So now we're
inside over here, I'm gonna go and
click on collections. If this is the first
time to you as you're not gonna have
any connections, but we are actually inside
the GPD chat bot we created. So we can come to
the left over here, clicking on collections,
clicking on adding and adding
a new collection. First of all, you have
to name this collection, let's call the test. Good. Injure. The first thing to do is to
add our API key as very book, we're gonna go to Open AI. Let's go to another top and
right, Many Eyes playground. Or we're gonna go to the Open AI speech that
provides us with our API keys. As you guys can see, here are the ABI gaze
I used previously. I can actually have a copy of one of them saved
somewhere else. We close, I can't preview them. Or I can actually create a
new one, give it a name, or just leave it and
create the secret key, copy it, and that's it. Now I'm gonna go back to
my page and pulsed mode. I'm gonna go to click on variables and add
my first variable, which is my API. This is the name
of the variable. But first of all, you have to give it the value, the actual value of the icky or aren't vesicles can see here. And then we can also
add the initial value. The initial value is
the value that is going to appear to people if I shared this
collection with them. So I can just try to
fix me around this. We'll actually a beer
for them instead of showing them what API key in order for them to know that
this is where they have to their own API key to
use it instead of falling. So I'm done with adding
my first variable. I can go and click on Save. Now let's go to
authorization section. In the authorization section
I'll have to add a barrier token that allows
rule to use my API. I'm gonna go click on this drop-down list over
here and pick barrier token. To add a token, you just
have to add a curly bracket and just pick API
key that sit good. So we configured our
API key, we added it, and we added a configured our authorization to be able to use this API key inside a recollection that
tip for this lesson. And in the next lesson we're
going to start preparing some parameters in
order to test the EBIT.
5. Building a Chatbot with OpenAI APIs: Model Integration and Rule: Hi there. Welcome back. In our lesson today we're
going to complete what we started after the reconfigured. We're works based on Postman. We want to configure an alert, some parameters in order
to test our API keys. So how are we going to do that? First of all, you will start
like creating a new request. We're gonna go to collections
on the left side. We're going to go to the
collection recreated, the one that we call test. Clicking on the
options over here, we're going to
pick add a request inside this new window
that appeared over here. It says our new request. We can name the request. Now we need to decide what
type of request is this. We're using our API to do what? To get data to post, to put two parts to lead. And there are many other
options that we can do. I'm gonna go with post. Now we have to enter our URL. The URL is the URL. We're going to
send a request to. This URL is actually
from open EI. So we're going to
talk default https slash slash api Urban II. To come. That is not enough because we're sending this request to a
specific Open AI model. We have to go to Open AI and get the endpoint of that
specific model. So I'm gonna go back to open a high-speed to the
documentation section, going to the left
to click on models. I can scroll down. And as you guys can see, the endpoints of each model, which models are willing to use, we want to use to GPT
three-and-a-half turbo model. So this is the endpoint that we will need
to add to our URL. I'm going to copy it. Going back to learn earned, adding it over here. That's it. Good. I'll save it. So first of all, I
prepared my URL and then now I have to start
preparing their branches. Let's start by e.g. sending this request and look at their request we
received first of all, this request has a
status that is called 400 because this
is a bad request. While he's dead bad request, look at the message
received over here. It says that we must provide
a model parameter. Good. To add these parameters
we're gonna do a little. Default will go to the
authorization part. Remember we haven't
authorization. So I'm going to add my API key. Remember the barrier token, that was the API key. I'm going to add it over here. Good. Now I'm gonna go to
the body section. In the body section, I'll have to create a
JSON format cooked. What is Jason? Jason
format is structure of code that actually is
used with with application. So we're gonna go
and click on row, and it's not taxed. We want this text to
be in the JSON format, and let's start preparing
our parameters. First of all, we want
to prepare the model. The name of the model we're
sending Nic district was two. And then we're going
to add the message inside these messages, the ones that we will
send our request, we need to clarify
different things. What are those things? First of all, we
want to know what is the role of that GPT model. What is it going
to be giving me? I want that model to play
a specific role, e.g. to be an instructor in a specific fields such
as Python language. So I'm going to send this
role inside my request. I also want to send a
message from the user. What do you want the
chocolate to give you? So let's go. I'll start with typing
curly brackets. Inside those curly brackets, I'm going to start
with typing the model. So double quotation,
model and semicolon. Again, which model is it? Let's go back to the modals. Our model is GPT-3
and-a-half durable. So just type it or copy it
and paste it over here. Good. We're done with giving
the name of that. Now, I'm going to go with designing the
messages on Sunday. So I'm gonna go with messages. And what are those messages? I'm going to open
square bracket. And because I'm sending
actually different messages, the first one is the role and the content of the
system itself. I'm gonna go roll. And which role is this? This is the role of the
system, good and narrow. Let's give it the continents. But this has to be
between double quotation. What is the content? You are a Python instructor. So by preparing this request, I'm actually asking GPT-3 and a half terrible model to
act as a Python instructor, send me a response back to whatever sentence I'll
sending as a user. Good. So we're done with this. We're going to close my
curly bracket over here. These has to be inside
of curly bracket. And then I'm going to copy
this and paste it again. But this time is to decide
the role of the user. So I'm going to replace
this word over here system with the word
user bounded below. I'm going to write whatever they user needs the Python
instructor to do. E.g. provided me with a plan to study pie for good. That's it. So I prepared the model,
the model's name. I prepared the messages I
want to send to the model. First of all,
remember this has to be between curly brackets. Add a column over here. These two has to be between
curly brackets are, and I suppose we're ready. Just make sure I
indent everything. I have a curly bracket here. I have to close it on this
side and I'm ready to go. I can click on beautify. It actually makes
my code look nicer. Now, let's go again, send our request and
see what's going on. And it's taking some time to use my API key to communicate
with open AIs, GPT-2, three-and-a-half turbo
modal, and respond back with a response sent
from Copenhagen. There it is. It's gave an ID to this
request or and it's sending me a completion block by the help of GPT-3 and
a half turbo model. And if we scroll down, you guys can see that
the content we received is sure he was a general
fund to study partner. You can start with the
basics on blah, blah, blah. This is the whole
response received. So why this we actually tested our API key by
sending a request to open EI and previewing the response received
back from it.
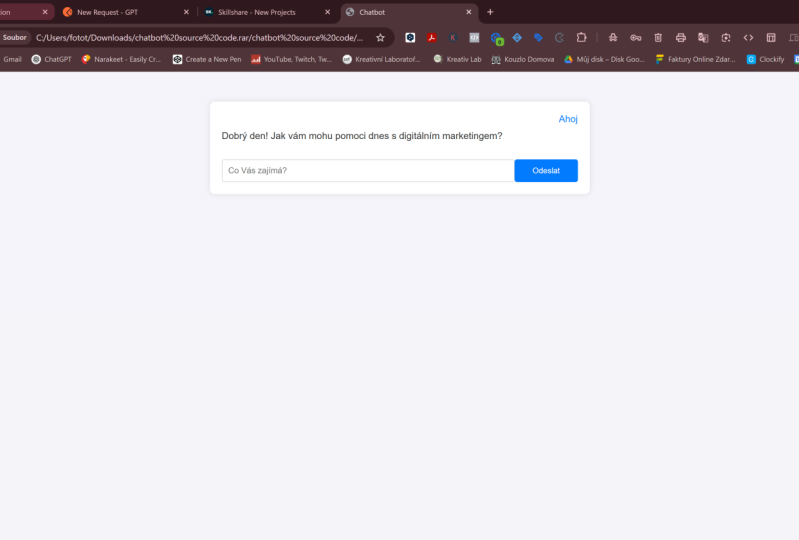
6. Building a Simple Chatbot Web Page with OpenAI API Integration: Hi there and welcome again. In our lesson today, we're going to start doing the first step to create
our own chocolates. First of all, we need to
think about our chalkboard. Where is it going to be? If it was going to
be on a webpage, then we're going to
need an HTML code to build that webpage. If it was going to be added
to a mobile application, then that's a different story. So let's imagine that
we want to build our chatbots in a webpage, and we don't have any basic
knowledge in HTML language, we can actually use
the help of chat to BT to construct our code. So let me show you how to do. I'm going to go into a chat
to PT and send the following. So as you guys can
see on don't write me a simple HTML code
to create a chat bot, which output is to allow
the user to send a prompt, to receive our
response to it using the following parameters
are included. The parameters we prepared
or Postman, first of all, my endpoint URL, he retires, and then my API key. And finally the JSON code
we prepared on Postman. You can go back to
Postman and go to the request and take the
EBIT from here, copy it. You can get the JSON
row code from here. And you also can take the
URL, include them inside. You are typically bronchi. Once I sent this product, I received an HTML code. Remember it's not always
perfect with jot GPT. Sometimes it may add
some other stuff to the code that we don't need
in order to be more creative. Or sometimes it may respond back with a very weird response. So you have to work
on your problems in a good way in order to
get the best response. A verb, remember to include
the word sind bowed because this is actually
not just an HTML code. It can actually add some other Java or
PHP statements of which are actually used
to build real chatbots. I'm going to copy
the code over here. Goldbach, start a new route, but each earned look for
an HTML online runner. This is a tool that actually
helps us test our HTML code. So as costs can see, there is an HDL code over here. It shows what does this code do on the
right side over here. So I'll delete this,
paste from my gold. And as you guys can see, I'm gonna go to the
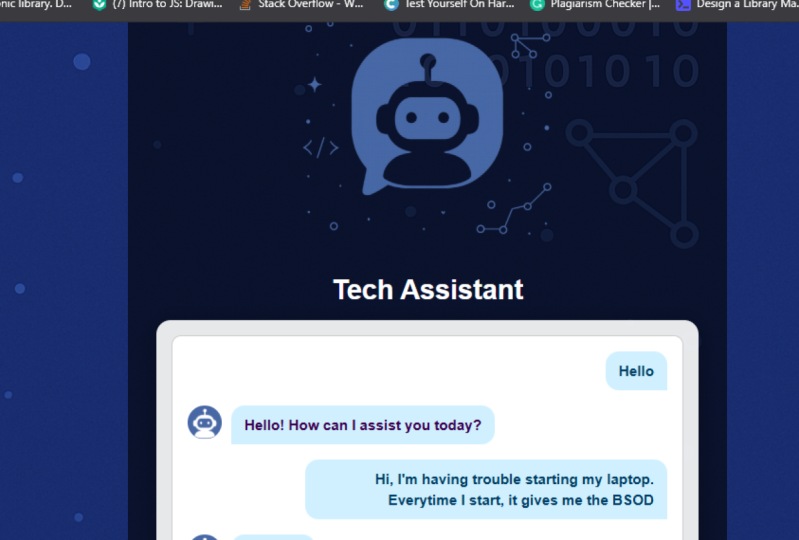
right side over here and the one-way code. So there it is. This is a chat bot. This is text box
where I can send any statement that I want
for the Python instructor. And it start and say, hi, found, we wait for law in order to
see what's going to happen. Again, I'm going to send toy. There you go. Hello, How can I
assist you with white? And so by going back to our HTML code and changing
the role of the system, we can actually receive
different responses. Again, it's go with proving line tool where
you plan to study Python. Now I'm going to send it and wait to see what
response do we get. So it may take some time
to respond back because it's actually going to
open a LIHEAP tool models, sending them this
prompt and using my EBIT is actually receiving their spouse Bach,
as you guys can see here. Sure, he is a blind you could follow to start
learning by Fern. First of all, study
the basics are sold. So that's it for today, we prepared an HTML code
with the help of GPT. Remember, adding your own
parameters to this chalkboard. And we tested it using this
on-line HTML codes Runner. Thank you for watching.
7. Deploying and Testing Chatbot on 000webhost : Free Hosting for Project: Hello and welcome back.
In the previous lesson, we learned how to
build our own talk. In this lesson, we're
going to get it hosted online at create,
our first website. To do that, we're
gonna be using zeros, zeros, zero, we post. That is actually an
online app hosting provider that is
easy to use free. And it is amazing for
learning purposes. So let's get started. First of all, I'm going
to go to a new web page, go to triple zero,
we posted skull. Remember you have to create your account and login
to your account, and it's totally free. So to create a new website, I'll click on Create
a new website. Let's name our website. I'll name it Mary. Mary. Go with chatbots. This is just a name for
testing with the password. I'm gonna go with
this and create. It may take some time to
create the new website, but after that, it's
an easy to do process. So as you can see, mine website has been
created here it is, Mary Mary chat bot. Now I can actually managed to
the files of this website, add my HTML code to
it, and test it. So I'm gonna go Jewel manage. And once I'm inside my website, you can see that I can actually create a WordPress website, manage, configure
lots of things, but I'll scroll down and I
work on fine manager insight. The file manager
is the place where we will add our HTML code. I'm gonna go to the public
HTML section over here. And we're going to
add a new file. That file, I'll name
it index dot HTML. I can actually drag and drop
my file over here as well. And I'll create it
and I'll access it. There it is. I'll go back to our
chat bot copyright code and come back to my manager, paste it, and save
it and close it. Once it's already saved, I can close this, go back to my dashboard. And as you guys
can see here is to link or this is how I
can enter my chocolate. So I'm going to click on it. And here it says, let's test our chatbot
by sending high. And let's see if it works. There you go. It's responding. But by saying Keller, how can I assist you today? So as you guys can see, we use to the previous SEM of
code and we did so hosting. We created our own website and it's already there,
ready to use.
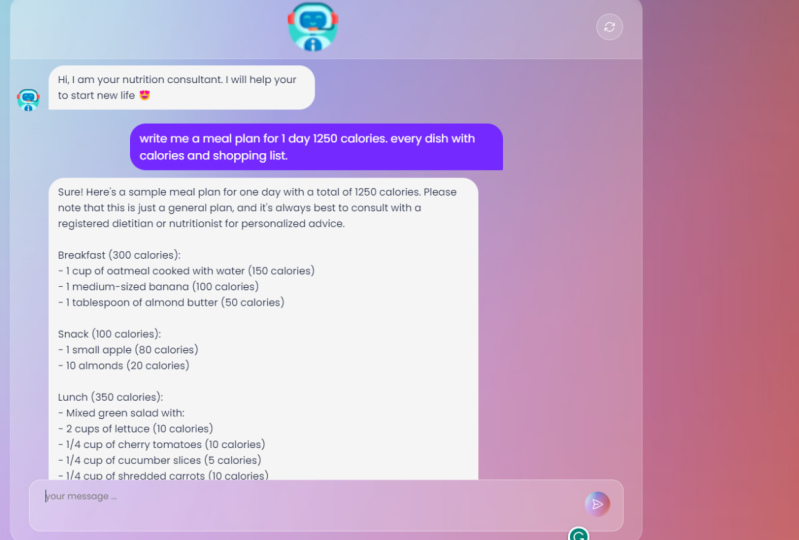
8. Configuring and Deploying Your Custom Chatbot: Uploading to Live Servers: Hello and welcome
back to a new lesson. In our lesson today we're going to finish what we
started in this course. And that is actually
to use the chatbot rebuilt and add it to
an online website. But that is not just by adding
a very simple job board, we will actually work on a
nice style that chatbot. To do that, I prepared for
you three files over here. And these clause, we
have the HTML code, the JavaScript, the CSS. For these three files, you can actually do
some configuration. You will have your own chatbot ready to you is then
shared with others. First of all, as
you guys can see, I have this assets file. Inside the assets file, I just added the images, the ones that I'm going to
use to build my workshop. In order to check how
does that look like, I'm going to go back to my files and click on the HTML code. Once I click on it, as you guys can see, I have this style to chocolate with the
images at it two ways. And it's actually expecting
me to write my message over here and send it in order
to receive gland response. I'm gonna go with
sending high e.g. clicking on this icon over here and waiting to see
what's going to happen. I also saw a new message
appearing, right? You are thinking message here. So all of these are adjustable. You can change the icons, the images, whatever you want to write here and still work with. As you guys can see, there is no response
because we also have to add our API key and make
sure that they say is an active
functioning chat bot. To do that, we're gonna
go back to the fine we prepare it and start
working with our codes. To do that, I'm going to
start with my HTML code. I'm going to right-click on it, open it as a Notepad. Inside this text file, I'm going to change
two things, e.g. the welcoming message and the hint message that
appears to the users below. So let's search for
the word Welcome. And as the glass can see here, it says, instead of flow com, you can say, Hi, how can I help you? Good, That's it. And we can also search
for the hint message. The message below is the message that threaten to the user
inside the textbook. So I could go write
your question here. Good. That's it. So this actually is the
HTML code dot structures our width page and its content. So I'm going to save it, Control S, close this, and go back to my website, look at this message over here, get this message over here, and I'm going to
refresh the page. See how I, how can I help you and write your questions here? You also can change whatever you want or
write whatever you want. So the next thing to do is
to work on our next file, which is the JavaScript. I'll go and open
it, sticks tied. And some other adjustments
has to be done over here. The first one is to write
them System school, remember we want our system to be a Python instructor,
so I'll get it right. You are a quiet then instructor. This will actually
make our chocolate understand its role
very in a very good. Then I'm going to scroll down, look here, Roger,
thinking message here. So whenever we are waiting for our response to receive it, we can actually write
for the user e.g. or even just giving you some
time or something like this. I'll just draw it I'm
thinking, and that's it. Good. Another thing to change
is to add our API key. And when you search, you're going to
find this API key. Here. I'm going to
add my API key. So here it is. I copied as you can just
copy and paste it over here or go to open AIR
and generate a new one. So I'm going to paste
my API over here. And I believe I'm ready to go. I'm going to save
this by clicking Control S or just creaking file. Save and close this file. Let's go back to our page and test if
it's functioning now. So I'm going to go
with the following. Hi, sin my prompt and see
if it actually works. Okay, I need to refresh
the page first. Know it can go and send
minus the chicken. It says on thinking as
we're out and here you go. It responded back
by saying hello, how can I assist you today
with Python console one? Good. Now the third
adjustment file is, or the third adjustment
is to work on this tire. So this is our CSS file. We don't need to adjust it, but in order to
change the shape or anything that we want
in styling our website, we can actually work on
this file over here. E.g. literary. Remove this CSS code, get back to our page
and refresh it. And as you can see, the whole style changed. So these are the three
basic files that you will need in order to create a good style and
good-looking chocolate. Now I have my files
ready over here. Let's go and add them
to our hosted website. So I'm gonna go back to my
website on treble zero. We posting here it says this
is my previous website, the one I did before. I can go to the Manage section, go to the File Manager, and inside the file
manager, upload my files. It's good to the
Baltic HTML section. Delete the previous
files over here. That new waters. Now we're gonna go here, drag my files, go
back and edit them. Once they are uploaded. I believe I'll have it ready to use website with a chat bot. Good, There it is. Let's go back to our website. Going fun to clicking on
the websites page earned. As the vice can see here it is an online chatbot that you
can share with your friends, but it's trusted also. Why? It is still thinking, hello, how can I
assist you today? Are in need. Three, let's say
Poisson commerce. What do they do? And then we're going
to send this to the chalkboard and see what would they
respond back to us. Now, okay. There we go. It said, Sure, Here are three button commands
and what they do, Mrs. the first one
brand name put on. So this is our online
textbook operating properly. I hope you enjoyed the lesson.
 Mariam Omar, Skilled in AI, Chatbots, Robotics