Transcripts
1. Hello & Welcome: Lovely creatives. Welcome to this class. If you've ever opened ChatGPT and
thought something like, why does this feel so generic or what am I supposed
to do with this? Then please know you are not alone and you are definitely
in the right place. Hi, I'm Nici, and I'm obsessed with tools that
make creative life easier. I'm a pattern designer
and illustrator, but before I chose to
try a creative business, I worked as an IT manager. So I have both the creative
and the technical side. Today we are going to
talk about custom GPTs and about the difference between them and the basic GPT. Custom GPTs don't
guess your context. They start with it. They become more
predictable and reliable. They feel less like a robot, more like a creative partner. You don't need to be technical
to build a great GPT. If you can describe
your creative work, you can build an AI
that reflects it, and I'll guide you
through every step. Throughout this course, I'll use my Color Palette Muse
as an example, but you'll build
your own assistant tailored to your creative needs. To create your own custom GPT, you currently need a
paid ChatGPT plan. Free accounts can use many GPTs but creating
them requires an upgrade. Which exact plan is
available to you can vary slightly
depending on your region. So I recommend checking what ChatGPT offers in your
country directly. Personally, I'm using
the ChatGPT Plus Plan, which costs around
23 euros per month. You don't need the
most expensive option, just a plan that allows
you to build custom GPTs. I recommend try it for one
month, build your GPT, see if it supports your
creative workflow, and then decide if
it's worth keeping. I promise I'll explain all in a super cozy,
creative friendly way. No tech jargon, no overwhelm, just clarity, and a few. Oh, now I get it moments. So let's meet in class.
2. Your Project: Throughout this course, I will use my Color Palette Muse
as a reference, but you can build
your own assistant tailored to your creative needs. Build your first small
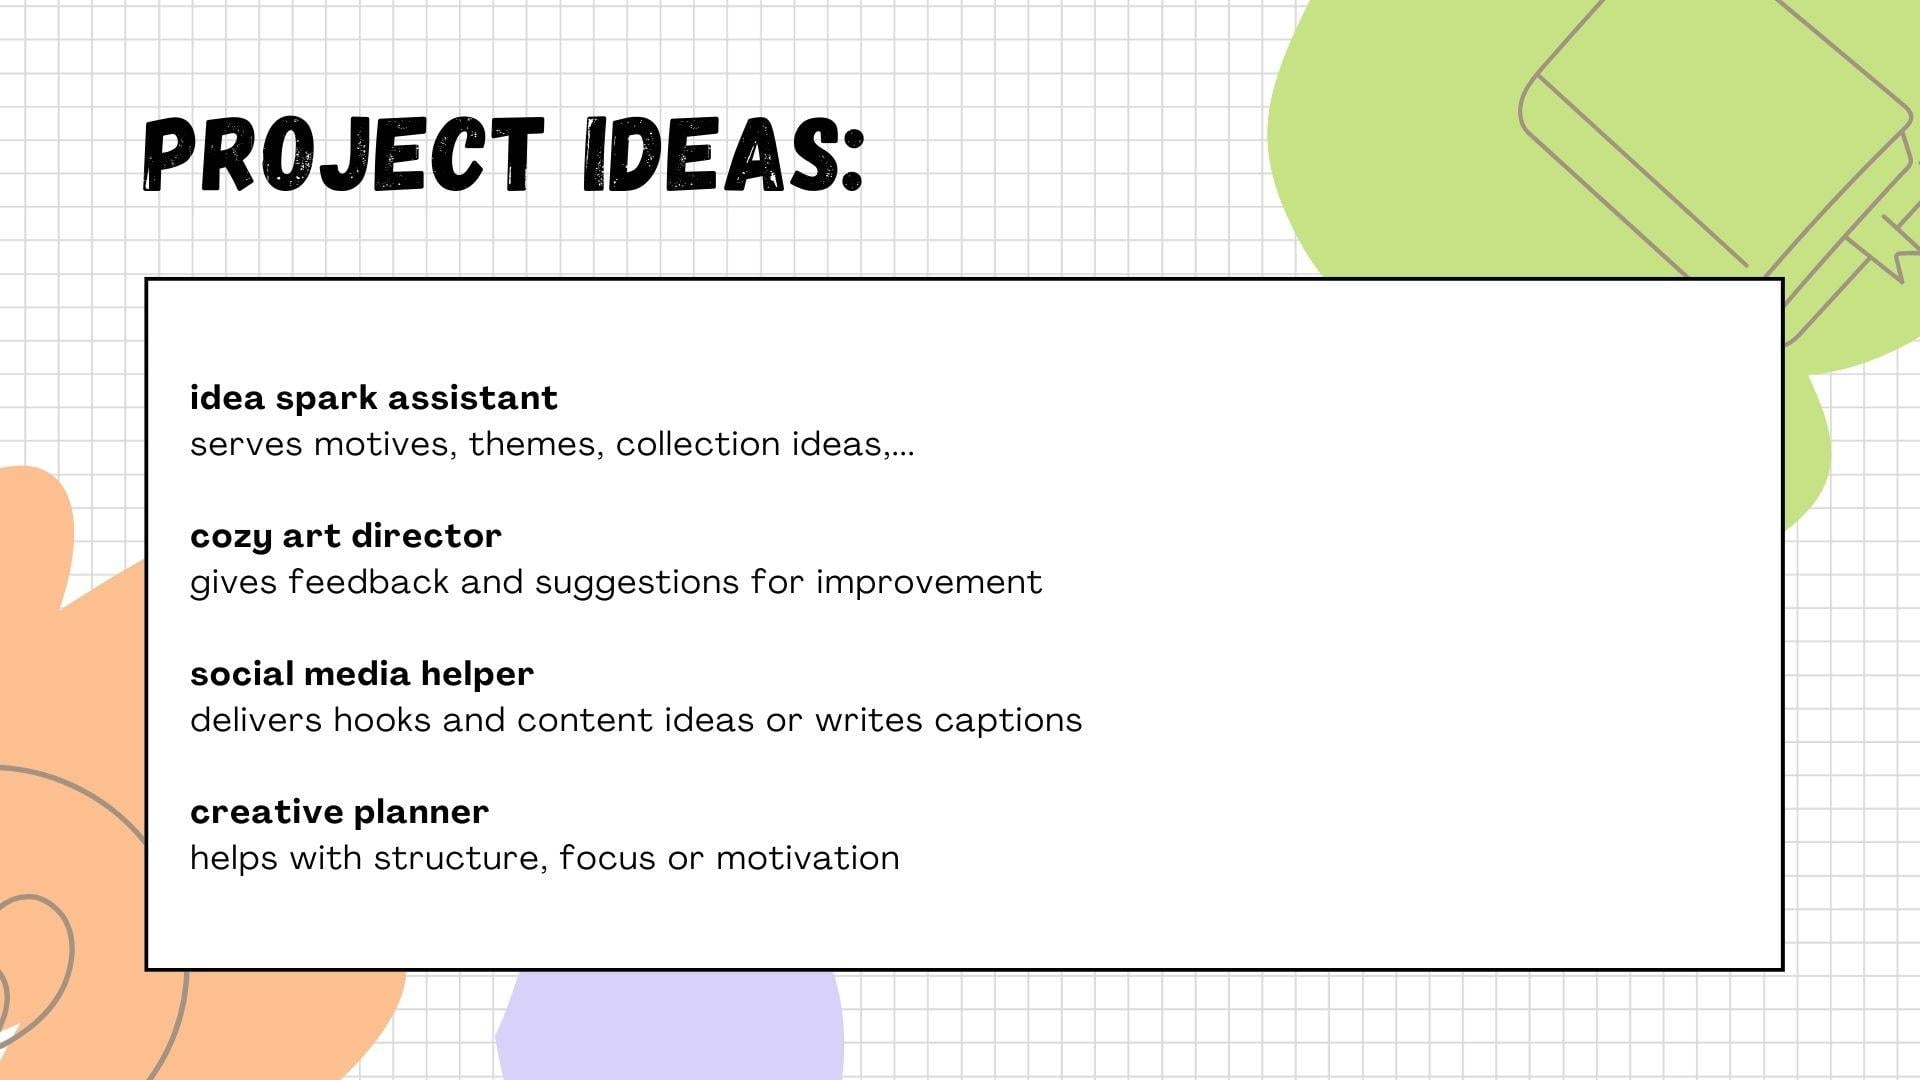
and useful custom GPT for your own creative workflow. For instance, you could build an idea spark assistant
that serves you motives, themes, collection ideas
or creative prompts. A cozy art director
that gives you feedback and suggestions
for improvement, a social media helper
that delivers hooks and content ideas or
writes your captions. A creative planner
that helps you with weekly structure or
focus and motivates you. Or just follow my custom
color palette examples and create your own
color companion. Whatever you choose,
you will have a relevant assistant afterwards that will improve your
creative workflow. You can share a screenshot of your GPT instructions
in the gallery to get some feedback from me or show us a conversation
with your finished GPT. I can't wait to see
what you create.
3. What's a GPT?: What is a GPT? Usually, it looks like this. You open ChatGPT,
type something in, and then either the
answer is too vague, it sounds like a corporate email or it has nothing to do
with you and your style. That's totally normal. The default GPT
doesn't know you. It doesn't know your aesthetic, your workflow, your vibe, your industry, or your goals. If your results so far
felt boring, it's not you. It's the tool being too general. Okay. Here is the real
definition of GPT. GPT is the short form for generative pre-trained
transformer. That sounds technical,
but that simply means that a GPT is a tool that
works with language. Just like Photoshop
works with pixels, a GPT works with words. It reads what you write,
interprets the intention and generates something new. A GPT adapts to the
instructions you give it. If the instructions are general, the results are general. If the instructions
are creative, specific, warm, cozy, the
results become your style. So what is a custom GPT? This is where things get fun. A custom GPT is
simply ChatGPT with a personality and
purpose that you designed. One who already knows your vibe, your preferences, and the
way you like to work. A custom GPTs knows things like
who it is, who it's helping, what tasks it should do, how it should speak, how creative it should be, what tone to use and what to avoid. In other words, it becomes your special creative
assistant, if you like. Custom GPTs are a game
changer for creatives. Let me give you some examples. A default GPT might give you
ten generic pattern ideas. While a custom GPT can give you ten ideas that
match your style, your market, your aesthetic, and your skill level. That is a massive
difference. Or here. The default GPT might give you "Here's a color palette",
very random. The custom GPT could
say something like, here is a warm Scandinavian
inspired palette, dah dah dah, perfect
for your style. A custom GPT works better
because it knows you. This is what happens
when you teach the AI to understand your world.
And the best part of it, you don't need to be technical
to install a custom GPTs. You don't need any coding and you don't need
special skills. If you can tell someone
what kind of help you want, you can create an assistant
that actually gives you that. One last thing before we
move to the practical part. If you wonder whether
there's really a difference between a long ChatGPT
conversation and a custom GPT, here's the simplest
way to understand it. When you have a long chat
in which you explain your style and all your
personal preferences, ChatGPT remembers everything
inside that conversation. The answers can get better over the time, in
this conversation. But the moment you
open a new chat, all of that context
and information is gone and you start at zero. A custom GPT is like taking everything you
would normally explain over and over again and saving it permanently in
your instructions. Instead of starting from zero, every time, your assistant
shows up already knowing you. Think of it like this. A normal chat is a
good conversation. A custom GPT is a trained
studio assistant. Both can help, but only
one is consistent, reliable, and designed for
your everyday creative work. That's why custom GPTs feel so much easier,
especially for creatives. In the next lesson, we'll look at the four pillars that make a GPT truly great. This is where your assistant
starts to come alive. I can't wait to
build it with you.
4. The 4 Pillars: After this lesson, you'll know exactly what you need to
define a good custom GPT. But first, please go to the Resources tab and
download my short workbook. Here you can brainstorm your
ideas and define your GPT. A GPT doesn't need to be smart. It needs to be clear and here
are four pillars to define. Number one is identity. Who is your GPT? Is it your assistant, a coach, a helper, you name it. How is your GPT? Do you like answers
in a gentle tone or should it be
playful or minimal? An example for the
identity might be, "You are the color palette muse, a cozy, intuitive and
friendly color companion." Number two is the audience. Who is it for? Beginners or professionals? Completely
different answers. Your GPT needs to know
who it's talking to. An example is: "This GPT is for surface pattern designers and illustrators who
value aesthetics." Number three is tasks. GPTs fail when tasks are vague. Clear tasks lead
to useful outputs. What do you want your GPT to do? Start with a maximum of
three to five tasks. Examples for tasks are: "Generate color palettes" or "Offer
variations" or "Plan my week". Number four of the
pillars is boundaries. What should your GPT not do? Boundaries prevent chaos. They keep your GPT focused. For example: "Avoid overly
technical explanations" or "Don't overwhelm
with long lists". Before we move on, pause this video for a moment and answer the questions
in the workbook. If you can answer these, you are more than ready for the practical part,
which is next.
5. The Surface: Okay, let's actually do this. To create your custom GPT, you don't need the app. It's sometimes not working
correctly in the app. Just open ChatGPT in your web browser and
log into your account. As mentioned in the intro video, you need a paid plan of ChatGPT to be able to create
a custom GPT. Which special one is working for you depends
on your region, and please check that
out by yourself. I have ChatGPT plus and it
costs me 23 euros per month. At the moment, January 26. Here you see the general chat that you probably often use. Down here is the list of
the history of your chats. Above that, you find the GPTs. If you've never used
or created GPTs, this section is empty. Click on Explore GPTs and here you see a bunch of public GPTs that
others have created. On the top right corner,
you find Create. Let's click that. Don't panic. You don't need to know everything here for now. We'll focus on what actually matters and go through
it step by step. I don't want you to
feel overwhelmed. The left side here with
the white background is where your assistant
lives and on the right side, you get a preview of your GPT. At the moment, it's quite sparse because we don't have
defined anything here. Let's concentrate
on the left side. Here on the top, you can choose between
Create and Configure. Under Create, you can have a chat and your GPT will be built based
on that conversation. But I prefer to go to the
configure tab where you have the full control of the whole GPT and the
building process. I'd say let's start with the most important
part, the instructions. This is the core of your GPT. Here, you type everything in what we've talked about
in the previous lessons. Remember, the four pillars. Now it's time to fill in all your answers
from the worksheet.
6. Basic GPT: Okay. Now you can type all
your instructions in as you have defined
it in your workbook. The more precise you
are, the better. You have 8,000
letters space here, so it should be enough
to define a great GPT. I have, of course, prepared my GPT details, so I simply paste it in. Try to keep it organized so it's easier for you to
update or change later. By clicking these two
arrows at the bottom right, you can have a bigger window, bigger sight of
your instructions. And I have divided
my instructions into the four pillars from the workbook to have a nice overview and
keep all organized. Okay. Let's start with the identity. I have: "You are color companion, a friendly and inspiring
color companion for pattern designers. Your tone is warm, encouraging, aesthetic,
and easy to understand. Your job is to generate beautiful usable modern
color palettes in seconds." You can choose any
identity that fits to your style and your
needs and your workflow. The audience. "This GPT is designed for surface pattern designers
and illustrators who want to create patterns and
illustrations with aesthetic color
palettes". And the tasks. So that's the most
important thing here. I would like to have
a GPT that is able to create color palettes
just by choosing one word. I would like to type
in, for instance, "summer cocktail"
and the GPT should give me five colors
that fits this theme. For that, I write: "When
the user gives a theme, vibe, season or
even a single word, you create firstly,
a five color palette, each color with a
name and a hex code." So it's not enough to
say use green or red. I would like to have
a specific hex code. And the name is also
helpful and nice. I would like to
add a second task. I'd like to have a
short mood description for this color palette, which could also
be inspiring for new illustration
and pattern ideas. Okay, so second: "Short
mood descriptions. One or two sentences are enough." Okay, and the boundaries. This is also important. You don't want to have
very technical answers, for instance, if you are not
a technical person at all, and if you need some
motivating words, you don't need to get
teachers answers. Okay. My boundaries are: "Never
ask too many questions, never explain color
theory unless asked. Keep everything simple,
aesthetic, and helpful. Always give hex codes and every palette must feel
intentional and cozy." Okay. When you are finished
with these four pillars, you can close this
window again and let's make a first test in the preview window
on the right side. Without defining the other
options here, the name, the description, I would like to make a short test with
the instructions. I type in summer cocktail. Thinking. Oh, okay. Great that this happens. On the top, we have
three pictures to the defined theme
summer cocktail. I got no pictures when I prepared for this
class and here you can clearly see that AI is changing and
evolving constantly. I didn't have to say that I
don't need pictures earlier, but now it seems we
have to define it. I don't need pictures here because I think without
image generation, the request will run
much more faster. But the rest is looking nice. I have five colors with the hex codes and a mood
description. That's very nice. Let's define this image thing. Go to the instructions again. I think the boundaries, we need one more boundary. And I type "Don't
generate any images." Because we have changed
some thing here in the instructions on the
left side of the GPT, the history of the
preview has gone. Every time you change
something here on the left, the preview starts from zero. Your test starts from zero. Let's type again.
Summer cocktail. It's looking good now. The colors with the hex codes, a name for the palette, and a mood description. It's looking good now. I would like to go now and check these hex codes if I
like the color palette. I do this on the "Coolers" website
where I can copy and paste the hex codes
for a visual output. Okay, here's the result. It feels like Summer, so the output depending
the theme is okay. I like to ask for
alternatives now. Give me an alternative. Of course. Okay. So I go and check this
on Coolers again.
7. Variation Rules: This on the bottom is
the second palette, and the top is the
first palette, which we created first. I like it both, but I think some colors
are very similar. So these two oranges or
the pinks or these two. So I think we have to
add some more rules, and I have to define this
in the instructions again. When the user types
give me alternatives, the GPT should define a totally different
palette the second time. Okay, I go back. To the instructions. The four pillars are
the core of the GPT, but you can always add more and other instructions
as many as you like to. So you don't have to stick
only to these four pillars. They are essential, but
you can always add more. I go to the bottom and type "variation rules." Keep it organized. I have prepared some, so I paste them in. I have: "Absolutely avoid
monochromatic palettes, never give five
colors that are just different saturations
or value levels of the same hue unless the user explicitly says monochrome,
tonal, et cetera. Otherwise, always mix at
least three different hues. The second point is, "Alternative palettes
must be truly different. If the user asks for variations
like three alternatives, each version should feel like a distinctly different
creative direction." I close this and I make
the test, summer cocktail, and ask for
alternatives and come back to you after
checking at Coolers. Okay, these are my results, and I think for now, it's okay. Maybe I come back later
to my GPT and fine tune some instructions after using it for a certain
time in real life. But I like the result, and I think the
alternatives are different. That's okay for me for now. And the core of your GPT is
finished at this stadium. But you can go a step further. For instance, if you like to share your GPT to other people, you probably like to
have a short onboarding, so they or you don't have
to start with a blank GPT. Let's make the onboarding
in the next video.
8. Onboarding: With the onboarding, you say the GPT what to do when a
new conversation is started, and we define this also
in the instructions. For my GPT, I have, if the user is new or
the request is unclear, ask only one question, so we try to make
it nice and simple. What vibe or theme would you
like your palette to have? Examples are allowed. Cozy botanical, et cetera, then
start immediately. Additionally to the
onboarding, close this window. You can set a
conversation starter, which is a small button
that triggers an action. For example, you could say, give me a random color palette. You have additionally
to the chat box, a button that
triggers this action. You can Click here, and the system creates
a random color palette. In the other case, if you don't click the
random button, moment. If you only type, for example, hello, the GPT starts
with the onboarding. I'm so happy you are
here, et cetera. We are done with
the onboarding and the conversation starter.
In the next video, we talk about the
final settings. We are nearly there.
9. Final Settings: Additional to the onboarding
and the nice random button, I'd like to have a
welcome text for users, and you can type that in
the description here. This GPT creates color palettes. Just type in your style, mood or theme and you get a five color palette or click the random
button below. Do you see on the right, the preview. here is
the welcome text. And knowledge you could upload any paper or
special knowledge. Or if you write blog
posts, for example, you could upload examples of your work so the GPT gets
to know your writing style. That's very useful and will make the output much
more in your words. Recommended model. You can leave this on no recommended model if you
use it only for yourself. If you are planning
to share this GPT to other users that are
not in a paid plan, you can select the GPT 40. That's working for all plans. If you leave on
recommended model, the free version will have
a problem with your GPT. Finally, on the top, you can upload a logo or a small illustration for
your GPT, if you like. Lastly, choose a name. I name my GPT color palette muse. That's it. You can always come back later and update your GPT. So you can click on the
top right corner, Create. Here you get different options to save and share your GPT. If you like it only for you, for yourself, you
can select only me. So this is your GPT and
it's not shared anywhere. Or you could select
anyone with the link. You could send out the
link to other users too. Or you can upload it to the
GPT store and sell it there. For now, let's click
only Me and say safe. Okay. And here you have your GPT
on the left side under GPTs. When you use your GPT for the first time, let's say hello. A new chat starts
down here where your custom GPT is working in the background,
and that's it. You can always come back
and update your GPT. If you like to update or change any instructions or
the logo or whatever, you can go back to GPTs. Explore GPTs, on the top
right, my GPTs. Here I have a bunch of GPTs. This one on the top is
the right that we have created today together.
To update the GPT, simply click the pencil button and you are back at
your instructions. That's it. That's all the magic. Congrats. You have
built your first GPT. It was not as difficult as you
thought, right? I know I'm right.
10. What's next?: Before you go, I
just want to say, thank you for taking this class and for spending
your time with me. I hope this course helped you see AI a little differently, not as something overwhelming
or intimidating, but as a tool that can gently support your
creative process. If you have any questions, thoughts or reflections, please feel free to use the
discussion section below. I read along and I'm always happy to continue the
conversation there. If you'd like to explore
this topic further, you are very welcome to visit
my website, museflow.co. That's where I share blog
posts about AI for creatives, calm workflows, and
creative thinking. You'll also find my free
color palette muse, a similar one that we've
created in this class, and my cozy pattern muse, a more in depth
creative assistant for surface pattern designers
and creative thinkers. Thank you so much for
watching and listening. I really appreciate you being here and I wish
you lots of calm, clarity and creative
flow. Take care. Bye.
 Nicole Gabriel, Procreate Artist