Transcripts
1. Hello & Welcome: In this short class, I'm going to show you
how to draw ribbons and banners with different
twists and folds. I do all the work in
procreate on my iPad, but you can absolutely follow
with any medium you like. I'm going to draw
with only one brush, the 6B pencil. So if you're drawing on paper, you're good to go with any
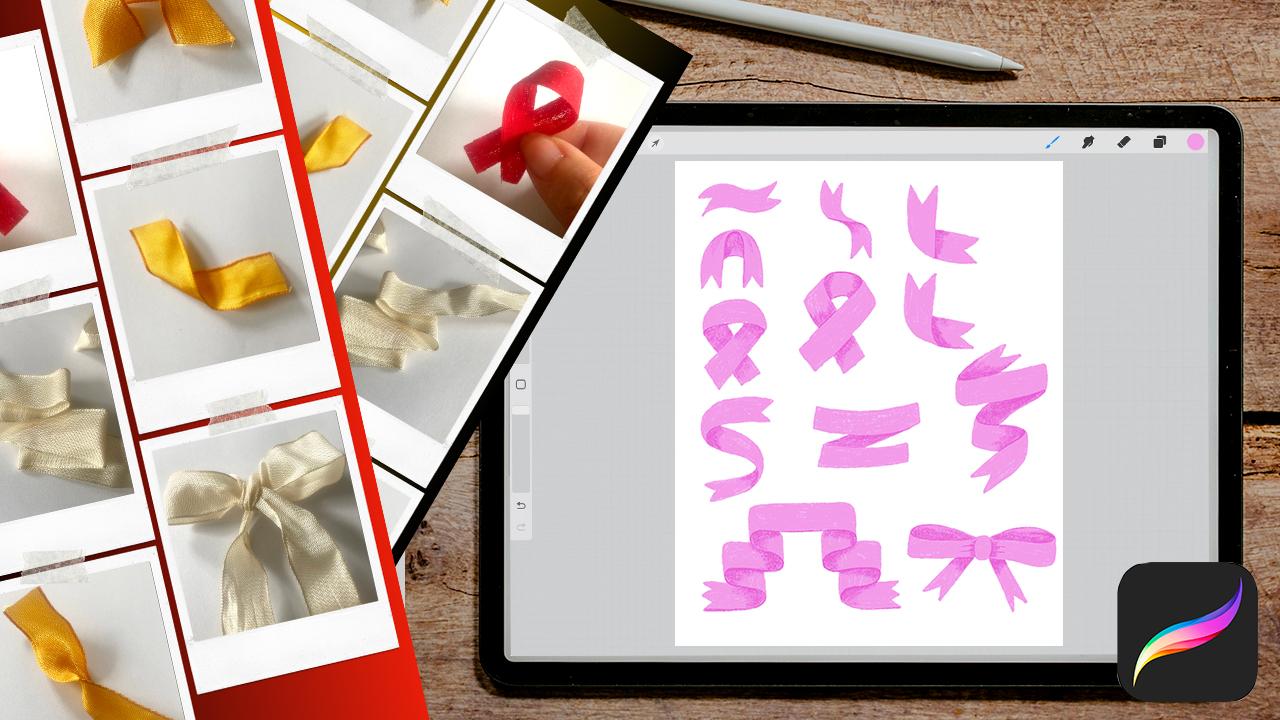
pencils or colored pencils. I provide you with some picks that I've made
of ribbons and bows. You can download the PDF
from the resources section. We are going to use the PDF as a starting point to study how
ribbons can twist and fall. Before we get started, Hi. My name is Nici. I'm an illustrator
and pattern designer based in the middle of Europe. Now that you know me,
let's get started.
2. Your Project: Your project in this class
is to draw a collection of ribbons and banners with
different twists and folds. Please upload your case
study to the gallery. I'd love to see your
different ideas and styles.
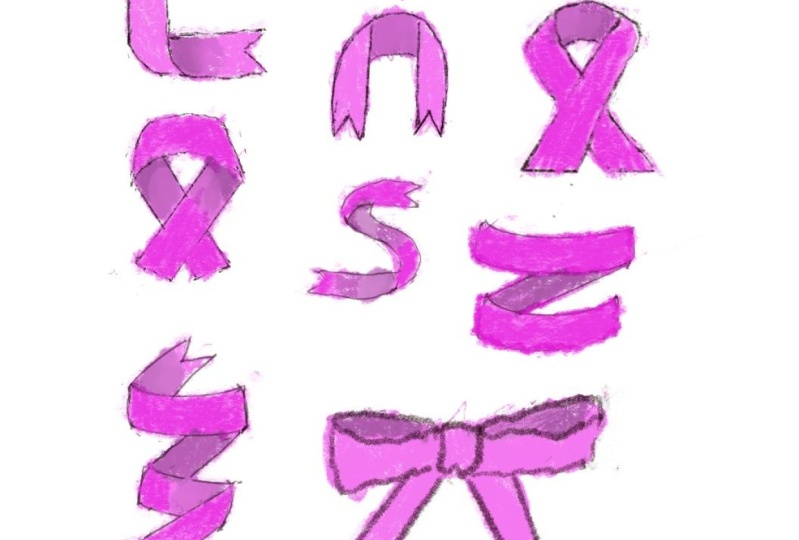
3. Sketching Basics: I have created a new
canvas with the size of 8“ by 10 " and
sRGB color mode. With ribbons and banners, I have greeting cards in mind, so I thought 8 by 10 "
might be a good size for that. I split my screen and open also the PDF with
the ribbon pics. But you can also print them out. For this class, I've chosen to take the 6B pencil only. I like the texture and the
variety of this brush, and I've picked this
nice pink color, but you can choose
your favorite brush and color and make
it in your style. Let's start with a
simple curved ribbon. I draw one line on the top, a curvy line and duplicate this one and shift it down till I have…
I turn off the snapping tool… till I have a nice
size of the ribbon. And now you can connect these two lines together
and you have the ribbon. You can make it in one
simple downstroke, or I'd like to make it in this zigzag line to make it
a bit more interesting. That's the first one. Now let's
make something like that. Make a shape and
also duplicate. In this way so that the two
lines connect to each other. Or maybe make it a bit brighter. Sorry. And now you can make this
kind of line in the middle to to imitate that let me show you this kind of line, this line here. So you see that this is the front side and
down that line, you have the back
side of the ribbon. Okay, Let's try this one next. In this time, you have to draw the both sides and
not copy a line. So I make a curve and
then a stroke. This one. Then here, to the side, the simple one, and then
make the zigzag to connect. You can also make it, I have
these two similar picks here. In this case, there is a fold. It's folded on the corner
and here it's more round. So you can make it. Let's try this one. I duplicate it. And you can make it more like this. Maybe it's a nicer twist than this downstroke,
this strong line. Next one. Let's draw this one. So we can start
with the bow. And then make this line to the top a second bow. And then the line behind a bit curvy. Okay. And in the next video, we are going to draw
the cancer ribbon.
4. Sketching Cancer Ribbons: Now let's make this kind of ribbon that is known
for the cancer disease. Let's try the outer line. Down stroke, then
a bit of a corner here and a bow. And this down stroke. Here, the corners are in the
same height, and then go. Then here is, it's a
bit of a tricky one. Make it a bit more round here. Try to draw what you
see here in this pic. But don't trace the image. Try to make it your own to train your muscles,
your drawing muscles. Now you have to connect these two lines to make
the back side. Okay. And now we can erase either
these two lines or these two. It's up to you. Okay. And here is a second one
where the, from the back side, the same one from the back side. So let's try again. A stroke a bit of a
corner, a bit of a corner. You could duplicate this
one and erase these edges, but let's try it again to
train our drawing muscles. Here from the corners,
from these corners. A bit of a curvy line. Okay. Make it a bit. Here. And there. And erase these two lines. It's important to
draw the lines first and then erase them to make sure that the lines connect
to the right place. Okay, there's another one, but it's up to you
to try this one with the very thin bow
on the top here. And in the next video, we are going to draw
a complex ribbon.
5. Sketching a Complex Ribbon: Let's make a last
one with curvy shape with this position and twist it in between
here and there. So make two. Here is a
twist and here is a twist. That means here is the twist. And this is the front side. And that's the back side. And the front side again. So not just make a direct line, but make a little curve to connect these two
parts to make it more natural. I don't want to draw this
super realistic. But so that the
illustration makes sense. Let's talk about banners next.
6. Sketching Banners: I think I have made
it a bit too big. So I reduce the size. It's just a training sheet. And the banner is pretty simple. You can make it, start
with a simple ribbon. I make it with straight edges and make a second one. And now let's connect
these two together. When you think the
ribbon is here, and there it’s a bit too short. The connection is
this ribbon behind. It starts from that top edge corner to this corner behind. Then in the same way
connect this corner with this one. Okay. Now let's erase the parts. So this line is behind
the two ribbons, let's erase this again. But you should make the line from this corner to
that and then erase that, to make it, to make sure that the edges, that the corners really
connect to each other. Then erase. These are rough
sketches so you can correct them in the, in the
next step and make it detailed. This is the back. Let's make another banner, but this time a
bit more complex. I shifted a bit to the side. I tend to draw very big. I always have to
reduce the size. Let's make this ribbon, where it starts behind and
then make the ribbon on top and the fold is behind
and make a complexer one. I start with the top one. Reduce this again. Okay. So let's start with this. Then make, the ribbon behind. I like to make it a bit curvy, so it's not strong folded, but it's in a nice twist. Okay. Then here. It's that kind. That direction. Erase that again. And make it back or this line. Me some, not corners, but some nice round corners. And then let's make it. Let's make a fold
that's in front. Okay. From here to the, let's make another
banner like this one, but with the folds on both
sides of this middle banner, and now make it a bit
different from this one. I show you. I start with the bottom line
of the ribbon and then make this curvy shapes. So this one in that kind. Then we can duplicate it and flip it horizontally. And now, let's duplicate
the whole thing. Shift it to the top. Till you have a nice size
of the ribbon, nice height. Now, a bit complex, but an effective method. Let's connect all
these two edges here and here and also here, and also in the, on
the inner side, here this two, and here the two. And let's also make
it on the other side, here and here and here, these two and these two. Now, the only thing
you have to do now is to delete the
lines that are too much. This is the tile in front delete this
line and this one. And now it makes folds
and twists in this kind. You have to erase that line. Okay. Then this one is
also in the back. Erase, this one. Erase. This one. Now you have a nice ribbon, and let's erase the lines
also that are too much. You erase the same lines then on this side to make it balanced. You can make the edge
zigzag if you like. Okay. And the last one I'd
like to do with you is shift it a bit to the side. Let's make a nice bow here.
7. Sketching a Bow: Make the center in this one. I keep it simple, not make the knots or
the twists in this band. And I'd like to make the bow
a bit from the top view. This is from the bottom view, you can see here in. But I'd like to see the back
of the ribbon from the top. Let me show you. Make it here. I make a curve to see the top. In this way and the
same on the other side. For sure you can
duplicate this side. But I'd like to draw it to make it more hand drawn and
not duplicate too much. Okay, and now the ends of the ribbon here and there. For sure, you can make it
more complex than this one. But I think this is a nice start to create
a, to draw a bow. It’s too short here. I don't like it here. It’s a bit longer. Okay. Nice. And now we have a collection of
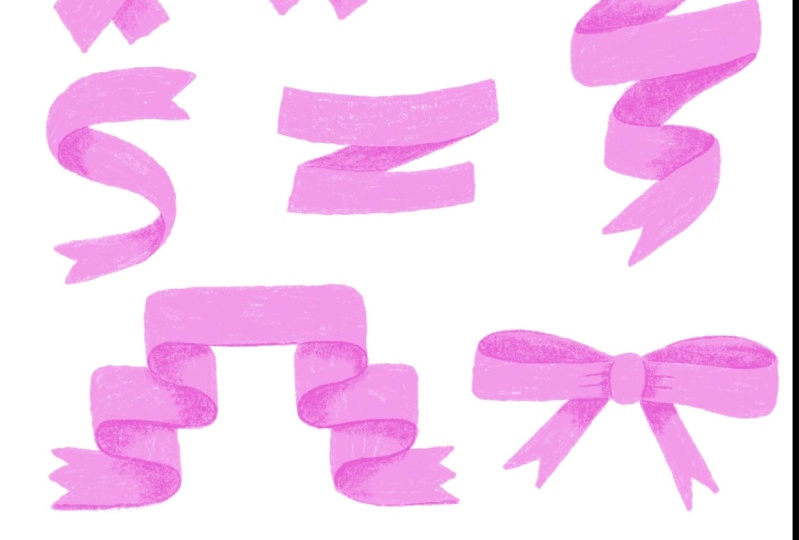
ribbons and banners, and you can train this further
with the help of my pics. Try to be creative and explore. And in the next video, I'd like to color these ribbons and add some shadows
to make it even nicer.
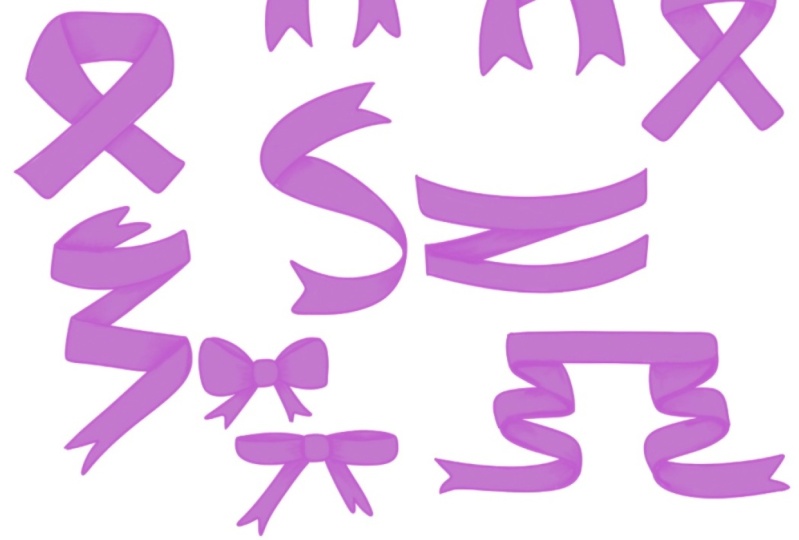
8. Adding Color and Details: Okay, we have finished
all our sketches, and now let's add some color. For that, I reduce
the opacity of my sketching layer and
turn it to multiply. And I always like to lock
my sketching layer, so I can't draw on
that by mistake. Take another layer underneath the sketching layer, and now
let's draw all the shapes. I stay with my 6B pencil. I stay with it during
the whole class. You can of course, take a solid brush so that
you only have to draw the outline and fill the
color in with the color drop. But I like the texture
of this brush. I like to draw this out. And of course,
there's no need to follow exactly your sketching. Now it's time to
refine the sketches. But I like a hand
draw style here. So I try not to be too exact. Okay. And no matter
if there is a fold or shape
behind or in front, in this stage, I color all the
elements on one layer. And I speed this up for you. Okay. We are done
with the coloring. And now let's add the shadows. I create another layer on top of our colored layer
and make it multiply. I stay with that color. I think I'd like to have it
smaller on this side because this might be the front side, the front side, and then here
is the twist. Then you see the back side. So I try to delete some parts of
here to make it smaller, and I erase with the studio pen, which is a solid one. And to get my rough edge, again, I go back to the 6B pencil and draw over the edge again. Now it's nice. Go back
to the multiply layer and create the edge, and then blend it out. Okay, that's fine. Let's turn on the sketching layer again and go to my next drawing. This is an easy one, so
you only have to make this down stroke
and blend it out. Maybe here on the top
a bit more and less to the bottom. Turn off. Hm. I don't like
how it twist here. So I go to the drawing layer and erase and then draw in the edge. Okay. It shouldn't be too perfect, but I can't let it go without at least a bit
of a perfectionism. Okay. And now this
curvy shape. I draw. Not till the very top, but very close. And blend it out. Turn it off. So in this case, now, it's a bit too much here. Okay. I think I'd like to make a small bit of
a subtle line here. And also on this edge a bit of a shadow. No too much. Okay. And also here to add more interest. Okay, I think it's nice now. Let's go to the cancer ribbons. So here is the ribbon
from the back side. Let's draw this in. Here is a bit of a
curved line on the end. Because this is the The bow makes a curve
and not a harsh corner. Okay, now make the decision which tile is in front
and which is in the back. So I stay with the
variation from the sketch and make a line here and the line there
and blend it a bit. I don't like it. I think I like to have it full,
totally in shadow. This one also a bit more. And it's the same
principle for the rest. And so I speed this up for you. Turn off the sketching. And that's it.
You can now take my PDF and play around further with this
kind of ribbons and banners. And I'm curious
about your results. Let me see it in
the gallery.
9. Thank You: Thank you so much for watching. I hope that you are now thinking that it's so easy to draw
ribbons and banners. Please share your project
in the gallery and post your questions in the
discussion section. I'm here for you. If you liked this class
and would do me a favor, then please leave a review. That's the teacher's gold. I'd also appreciate if you click the follow button by my name or check out my other classes. That's all for now. Thanks again and see you next time. Bye.
 Nicole Gabriel, Procreate Artist