Transcripts
1. Introduction: Hello and welcome to our
hands on course built mega responsive website with
HTML, CSS, and Javascript. I want to thank you for choosing to enroll in this course. If you are excited about
diving straight into the creation of a real
world multi page website, then you've come to
the right place. Throughout this
course, I will be your guide as we
build a complete, modern and adaptable
website from scratch using HTML,
CSS, and chavscript. Here you won't find lengthy
theoretical discussions. Instead you will receive practical step by
step instructions to equip you with the skills required to
develop impressive websites. In this introductory video, I will provide an overview of our project and detail what
we're going to accomplish. Our project is designed to be a multi page website and it will adapt to different
screen sizes and devices. We will start by creating a
website header followed by the navigation bar complete with user friendly drop down menus for each navigation item. Next, we will delve into
the Services section, which will be followed by the project section featuring a dynamic filter for
project categories. Clicking any of the links will display the
corresponding projects. Moving forward, we will develop a template section
consisting of two parts. The first part is visible here, and the second
part comes to life with the click of a Play button. The video player is
fully functional. It offers control
over volume playback. You can skip backward
and forward. Also, we can choose speed. Also, you can find
here picture in picture mode and full
screen playback. After the template section, we will build a contact section, which will be followed by a footer to wrap up the website. As I said, our website
is multi page and you can navigate to different pages by clicking the links
in the navigation bar, You will discover
a client's page with customer testimonials. Then we will have a project page featuring an engaging wat. Then the next page
is going to be a contact page which is equipped with forms
and chat options. Also, we have here an
account page for logging in, and finally, a pricing page. As I mentioned earlier, the website is responsive
to various screen sizes. If you inspect the page, switch to responsive
mode and preview it on different screen
sizes and devices, then you will find that it is adaptable and it
looks pretty nice. All right, I'd like to note that this project
is designed for extra large screens
with a resolution of 1920 pixels with and
1080 pixels height. If you're using a
smaller screen, I recommend switching to
responsive mode during lectures and specifying the
width and height accordingly. This will ensure that the
project looks its best on smaller screens until we
make it fully responsive. Okay, I hope you will enjoy working on this project
as much as I do. Without further ado,
let's get started.
2. Setup: Hello and welcome to the course. We're delighted
to have you here, and we're confident you'll
find this course enjoyable. Before we start diving
into our project, let's first prepare our
working environment. If you're already set up
and ready to write code, you can skip this video and jump straight into the project. However, if you are not prepared yet, that's perfectly fine. We'll guide you
through setting up some essential tools
throughout this course. There are two main
tools you will need, A modern web browser
and a text editor. For our web browser, I'll be using Google Chrome, but I also recommend
Mozilla, Firefox. You likely already
have these browsers, but let's quickly go over
how to download them, just in case to
get Google Chrome, simply visit this URL and
download the browser. The installation process
is straightforward, so we won't spend
much time on it. For Mozilla, Firefox, you
can obtain it from this URL. Both links will be included with this lecture for
your convenience. All right, now let's talk
about the text editor. We will be using
visual studio code which is one of the best text
editors available today. However, you're welcome to use your preferred text
editor if you have one. It's entirely up to you still. I recommend giving
Visual Studio code a. Try to download
Visual Studio code, Visit this website and select the version for
your operating system, Windows, Mac or Linux. The installation process for Visual studio code is
also straightforward. You should not
encounter any issues. Once you've installed
both of these tools, you'll be all set to get
started with the course. Let's dive right in.
3. Getting Started: Hi and welcome to
our new section in which we're going to start
to build our project. I have created a new
folder on the desktop. It's called responsive website. If I open it up, you'll find here two
different folders. The first one is
images in which I have all the different images which we're going to use
throughout the project. As for the second folder,
it's called videos. I have here one single video. Okay, let's go ahead and
open this folder in VS code. Besides those two folders, I'm going to create other
folders as well As you know, our project is a
multi page website, so we'll have a couple of different HTM and
CSS, and Jas files. I'm going to store them
in separate folders. The first folder is going to be, actually we need here
folder and the file. The first folder is
going to be HTML, in which I'm going to
create index dot HTML file. Then the next folder
is going to be, actually we need to create it
outside of the HTML folder. The second folder
is going to be CSS. I'm going to create
here style SS file. Next we need to create
folder for v script, which I'm going to
insert script file. All right, let's open e HTML file and create
the basic HTML document. For that, I'm going to use a built in package of the VS
code. It's called Amet. If I insert an exclamation
mark and hit Enter, then we'll get here
the basic HTML tax. The first thing that I'm
going to do here is to change the title instead of document. I'm going to insert
responsive website. Next thing that I'm
going to do is to link CSS and Jovscp files. For that, we have to open
link tag in the head element. Then in the H
reference attribute, we have to specify
the path of the file. First of all, we have to exit the current folder,
which is HTML. For that, I'm going to
institute two dots. Then forward now we can
choose the needed folder. It's going to be CSS and
then we need style SS. All right, in the same way I'm going to link the Jovsc file. First of all, we have to open script tag right above
the closing body tag. Then I'm going to insert your source attribute in which we have to specify
the part of the file. Again, we need to exit
the current folder. We need here two dots
followed by the forward. Then we have to choose JS folder and select
script or JS file. All right, all three
files are connected. Now I'm going to open the folder in browser
using live Server. As you can see, the project
is running in the browser. Actually, if you're not familiar with live server package, you can find it in VS code. Let's close those messages. You can search for live
server here in the packages. You can install this package and run the project in the browser. When you're using
live server package and you're making some changes and updates to the project, then you don't have to refresh page each time it automatically reloads the page and runs the changes and
updates of your project. All right, next thing that
I'm going to do is to place the editor and the browser
side by side, like so. In order to make
our working process more convenient and simple, you can switch browser
and the editor like. So next thing that I'm
going to do is to bring in some other CDN links as
well throughout the project. We're going to use
phone, some icons. In order to use them we
have to go ahead and search for phones CDN JS. Then we have to copy the
first link from here. Next, we need to open link tag in the head
element and paste the CDN link here in the
H reference attribute. Besides that, I'm going to use Google phones
throughout the project. Let's go ahead and visit
the Google Phones website. I'm going to search
for phones here. The first phone that I'm
going to use throughout the project is going
to be Croson One. Let's go ahead and
select this style. Next, I'm going to search
for phone called Uli. I don't know if I'm
pronouncing it correctly, that phon, Let's
select this style. The last phone that I'm
use is going to be Ta. Let's go ahead and select a
couple of different styles. Next, I'm going to
grab this link from here and paste it in
the head element. All right, so that's it. Our working environment is
prepared and now we have to go ahead and start to create
the HT mark up for that. Let's move on to
the next lecture.
4. Header HTML: Crafting the Markup Structure: All right, in the
previous lecture we have prepared our
working environment. We have created different
files and folders. Also, we have created the basic
Html document in which we have the links for
the phonosomics, also for the Google phones. Now it's time to
start to create the Html markup of our
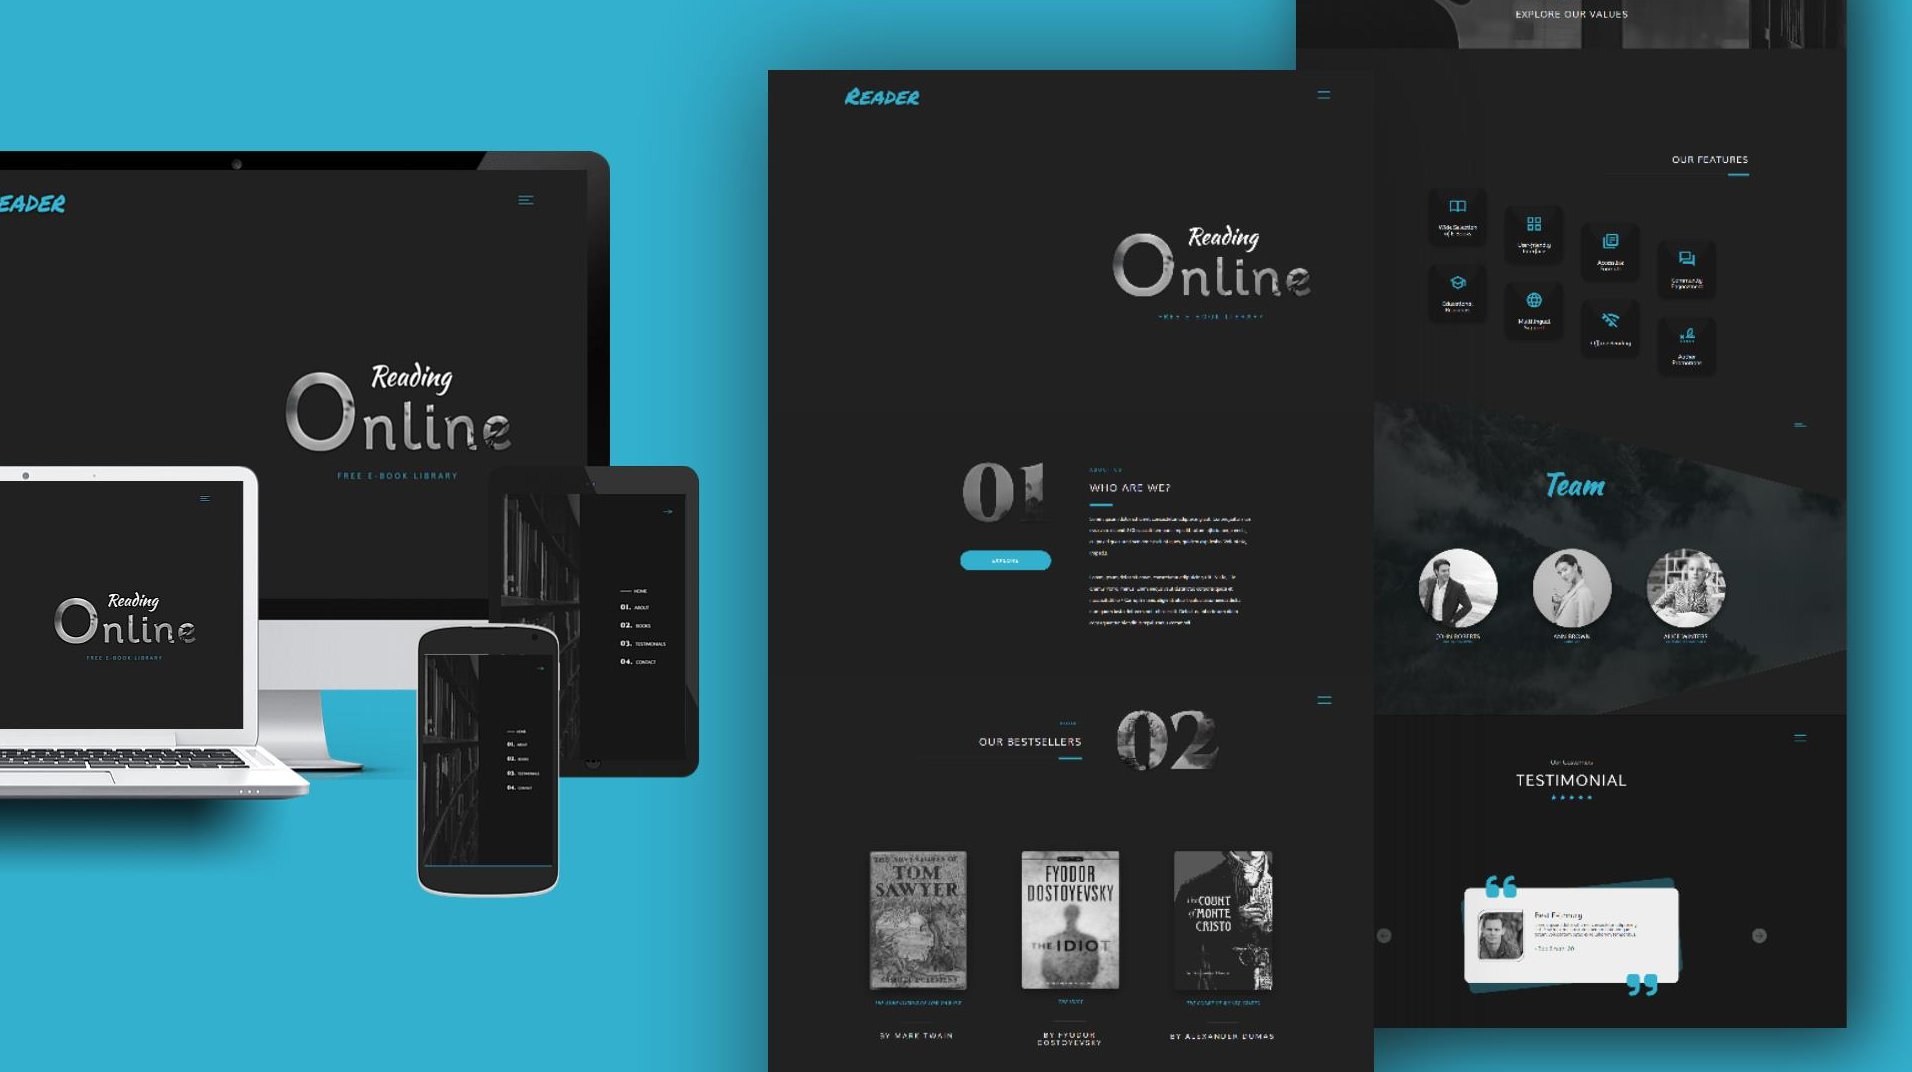
first section. If we take a look at
the finished project, you will see here the header of the website with
the navigation. In this lecture, we're going
to create the HTML markup. Markup for the banner and
also for the backgrounds. As for the navigation, we will take care of
it a little bit later. Let's go ahead and start
to create the HTM mark up. Actually, I'm going to zoom
in little bit the code. The first thing that I'm
going to do is to create the comments for the
container we need here, end of container, I'm
going to separate all the sections and parts from each other
with the comments. Let's open tag with
the class container. Next we're going to
create the header. But before that I'm
going to insert here again the comments
for the header. Let's insert here
HTML five header tag. Next, we need to
create the banner. But again, let's insert
here the comment for the banner we need here. End of banner. Let's open p tag with
the class name banner. The banner will include
three different files. We will have two headings
and also the bottom, the first one is going to be H one heading elements
with the text Create. Next we need three
heading elements. The text is going to be
modern and beautiful themes. Now the bottom, I'm going to wrap button with
the link element because at the end of the day, once we click the button, we have to move to
the different page. We need a elements. Right now I'm going
to in pound sign. Then let's create the type of the button is
going to be button. Then I'm going to join today. Right, That's, it's
about the banner. Next we have to take
care of the backgrounds. I'm going to insert your
comments for the backgrounds. Then I'm going to open tag with the class
name backgrounds. Overall, we'll have three
different backgrounds. The first one is going
to be main background. I'm going to open
tag the BG main. Let's duplicate this
line of code twice. Change the class
names we need here, G one and then G two. All right, I think
that's it about the table markup of the
header. Let's take a look. We have here just three
elements which are visible, the headings and the button. Those backgrounds are
not visible because we have here just the
empty, deep elements. All right, now it's time
to style those elements. And for that, let's move
on to the next lecture.
5. Creating Default CSS Styles: Okay, in the last lecture, we have created the HTM mark
up for our first section, which is going to be the
header of the website, this part of the website. Now we have to start
to write some CSS. I'm going to open
the style CSS file. Actually, I'm going
to place the file on the right side of
the code editor. In this case, both files are visible and it's more
convenient for us. In this lecture,
we're going to create some default styles
which will be used for every element we need here. End of default styles, Then I'm going to
select every element, and for that we have
to use an asterisk. In this case, all the
elements are selected. The first thing that I'm
going to do is to get rid of default margin and padding
from the elements. If we check the browser, you can see here the space
between the elements. So it means that the elements
have some default margin. Let's set margin to zero. Also, I'm going to set
padding to zero as well. Now if we check the elements, you can see that the
space is removed. Okay, Next I'm going to set
box sizing to border box. Actually, border box is a way to tell the web
browser to make sizing the elements on a web page easier when you set the
within height of an element. Border box makes
the browser include the border and padding
in those measurements. If you say an element
should be 100 pixels wide, that 100 pixels includes
the border and padding, and the actual content inside the box adjusts to fit
within that space. This helps you control the size of an element more conveniently. Okay, next I'm going to
set decoration to N. In this case we remove
underline from the links. Next I'm going to use and
set it to non as well. With this code we remove
default outlines from the elements like
inputs or buttons. Finally, I'm going to set phone
family for every element. As you know, we grab a couple of different phones from
Google phones website. I'm going to use one of the
phones, Let's call it Ut. All right. So as you can see, the font is changed
for every element. After that, I'm going to set the font size of
the H mal element to 62.5% What this code
does is that it sets the font size for the
entire HTML document to 62.5% of the default size. By default, most browsers have a standard font size for text, which is typically
around 16 pixels. When you set the phone size
to 62.5% it means that all text on your
web page will be 62.5% of the default size. This is often used as
a tweak in web design. 62.5% of 16 pixels
is ten pixels, which is a nice round number. It makes it easier to work
with the relative units like M. We're going to use Ram as the measurement
unit throughout the project. That's why I set font size of the HTML to 62.5% For example, if you set something
to be two Ram wide, it will be 20 pixels wide
because each Ram is ten pixels. This makes it more convenient
and straightforward to work with the sizes
in your web design. If we check the results, you can see that the
elements became smaller. That's because of the font
size of the HTML element, which now is set to 62.5% That's it about
the default styles. Let's move on to
the next lecture.
6. Styling Backgrounds in the Header: All right, in the last lecture we started to write some CSS. We created some default styles, and now we have to move on
and take care of the header. First of all, I'm going to insecure comments
for the container, then I'm going to
select the container. Let's go ahead and
define within height. Width is going to be 100% As for the height is
going to be 100% as well. Also, I'm going to change
the background color. Let's set background
color to white. Right now, nothing
is changed here. Next, let's move on and
take care of the header. I'm going to institute
comments for the header. Then let's go ahead and select
Header with a tag name. I'm going to define with height. The width is going
to be 100% As for the height I'm going to study
to 100 viewport height. It means that the
header will take up 100% of the view
port as the height. All right, now I'm going to style the backgrounds and then we'll move on and
take care of the banner. Let's go ahead and insert here new comments
for the backgrounds. Then I'm going to select
developments inside the backgrounds I those three
developments we need here, backgrounds, followed by
the selector and I'm going to set the position for all three developments
to absolute. First of all, we need
to position elements, in this case I'm going to position elements according
to the parent elements, which in this case is header. In order to position element according to its parent element, we have to assign to the parent element position
but with a relative value. After that I'm going to select the first background
which in our case is background main I ground, which you see here, this one. Let's go ahead and
select background mean. First of all, as
defined within heights, I'm going to set with
150% for the heights, it's going to be 150% as well. In this case, the
element will take up 150% of with height of
its parent element. In this case, the parent
element is backgrounds. But as you can see, backgrounds doesn't have any within height. The background main will take up 150% of the w and height
of the header element. Right right now we have
here the same results. Nothing is visible, I
mean the background. Now I'm going to set the background with
linear gradient function. The direction is
going to be to right. Then we need three
different colors. The first one is actually we need here two left
and not two rights. The first color is going
to be transparent. Then we need second colors
going to be purple color. The dark one, we
need here 4400 pi. Also, we need here
the second color, it will be purple again. But the lighter one, I'm going to use here 4400b. Let me explain what
this code does here. As you can see, this code creates a background for header. It uses a gradient that starts on the left
side and goes from transparent to dark purple to
a slightly lighter purple. It gives the background a smooth color transition
from left to right, going from dark purple to lighter purple and
then transparent. All right, next I'm going to set the position
of the elements to position is going to be -95% Also I'm going to
define left position, it's going to be -10%
Let's check the browser. The element is positioned
and now we have to rotate this element using
transform property. I'm going to use
here two functions, rotate z and skew x. I will explain each
of them separately. The rotate Z function will
have the value -15 degrees. Also, we need here skew x
with the value 30 degrees. The first function, I mean
the rotate Z function, makes an element on
the web page rotate or tilt counter clockwise
by 15 degrees. It gives the element
a slight slant to the left as if you're turning a picture frame
slightly to the side. As for the second
function skew, x, it makes an element on
a web page slant or skew to the right by 30 degrees. It's like tilting the
element to one side, making it look like
a parallel ground. As you can see, we have
here such results. Now we have to make the corner
of the background rounded, and for that I'm going to use property called for the radius, it will have four
different values. The first three values
be zero as well. The last value which indicates the bottom left corner
of the element, it's going to be ten m. Now, as can see, the corner of
the element is rounded. Lastly, I'm going to
decrease slightly opacity. Let's say 2.9 All right. As you can see, we have
here a scroll bar. Actually we don't need it. In order to get rid
of the scroll bar, I'm going to assign to the container property
called overflow hidden, which allows us to
hide the scroll bar. Okay, so everything looks good. Next I'm going to take care
of the second background, I mean the background one. This one which is placed
under the main background. Let's go ahead and
select background one. Define within heights. In this case I'm going to set
with 50% then the height is going to be 100% Again, I'm going to use background with linear gradient function. In this case, we need
here default direction. I'm not going to insert here two left or two
right or anything. The first color is going
to be transparent. Then I'm going to add
here the percentage value which I'm going to
explain very soon. Let's insert here
the second color. It's going to be F 26 C. Then we need here
the third color. It's going to be F724b. Here, the percentage value, I mean 60% specifies
the position where the color transition occurs
within the linear gradient. Simple terms, it means that the background will
start as transparent, then change to the first color when 60% of the gradient is complete and continue
transitioning to the second color for the
remaining 40% of the gradient. In this code, 60%
of the gradient will be transparent and then it will smoothly change
to the first color, creating a smooth color
transition on the background. Okay, let's take care
of the position. I'm going to set to position to -40% Also we need
right position. It's going to be -10% the
element is positioned. Now as a guess, we need to rotate it like the first background
I'm going to use. Actually, we need here the
same properties and values. Let's copy this
code, paste here. Background is rotated
and it looks nice. Let's make the corner of the background rounded using a border radius in this case. We need here 000.5 ran. The background
looks pretty nice, but we have here a tiny problem. We need to place this background under the main background. For that, I'm going to
use Z index property. By default, each element has a Z index property
with the value zero. But if we add here
index with the value, let's say one which
is greater than zero, then the background will end up behind me under
the background in. All right, about the
second background, now we have to take care
of the third background, which in our case
is background two. Actually, I think will be better if we duplicate
this code here. Let's change the class name. The width and height
will be similar, 50% and 100% As for
the linear gradient, I'm going to change it slightly. We need here 70% Also, we need here different colors. The second color is
going to be a 5995. As for the third color, I'm going to institute E.
Then we need here 9458. As for the positions, I'm going to set two position to 60% The right position will be 10% We need the same
transform property here. Border radius will
be again same. Let's check the results now. As you can see, the
background ended up behind the main background. In order to fix that, we need, again, Z index property. But in this case, the value of the z index property should be greater than z index one. Let's set it to two. Now the background
should be visible, and yes, it's visible. The only thing that I'm going
to do is to add opacity. I mean to decrease
opacity 2.4 Also, I'm going to add to the background some shadow
effects we need here. Box shadow with the
values seven an four Ram. The six Ram, and the color
is going to be RGBA 000 and the opacity 0.9 This code adds a shadow to an
element on the web page. Let me explain what
those values do. The first number seven Ram, determines how far the shadow is horizontally
from the element. The second value, four Ram, determines how far the shadow is vertically from the element. The third number six Ram, controls the size or
bar of the shadow. As for the color, it specifies
the color of the shadow. In this case, it's a very dark, almost black shadow because
we have three zeros here, which indicates the black color. But we have here
opacity 0.9 which makes the dark black color
slightly lighter. Eventually, we have
here this nice and cool shadow effect. All right, actually that
sits about the backgrounds. I'm going to stop here and
move on to the next lecture, in which we will style
the banner of the header.
7. Designing Banner in the Header: All right, in the
last lecture we have styled the
backgrounds of the header. As you can see, we have here three different
backgrounds which are positioned and
look pretty nice. Now we have to take
care of the banner, which right now is placed at the top left
corner of the page. Actually, it is placed
behind the background. Maine. Let's go ahead and insert new commons
for the banner. Then I'm going to select Banner
and define its position, which is going to be absolute. As you know, when we
use position absolute, we need position relative
for the parent element. As you can see, header lady
has position relative. Next I'm going to set
the two position to 18% Then we'll have
here left position. It's going to be
20% As you can see, the banner changed its position. It's placed under
the background main. So we have to fix that
using the index property. I'm going to set the index 24. Now as can see, the
problem is fixed. All right, now it's time to customize each of the
elements separately. I'm going to start with
the first heading element, which is H one. So let's go ahead
and select Banner, followed by the H
one heading element. First of all, I'm going to
change the phone family. In this case, let's
use phone called mull. It's going to be cursive. Then I'm going to
increase the phone size, make it 13 Ram. Let's check the browser. The phone size is changed, and also we have here
different phone family. Next I'm going to
change the color, it's going to be white. I'm going to add here
some shadow effect. In this case, let's
use text shadow. It works in a similar way
as the box shadow does. I'm going to interfere
values 01 Ram, then we will have three Ram. As for the color I'm going to use are to be a black color, but in this case with
a lower opacity, or it's going to be
0.3 As you can see, the header looks pretty nice. Next, I'm going to take you of the second heading
element, which is three. Let's go ahead and
select Bender, followed by the H three
heading elements. I'm going to change
the font size, in this case it's
going to be three Ram. Then I'm going to
change the font weight. Let's make font weights
lighter and set it to 300. Then I'm going to transform
text into upper case. Now I'm going to change
the color of the heading. It's going to be white. Again, use tech shadow. Let's grab this line of code. The only thing that
I'm going to do here is to decrease the opacity. It's going to be 0.1 Finally, I'm going to create some
space using margin. The margin at the top
is going to be zero. Then we'll have zero
on the right side. Next we have bottom, it's going to be three Ram. As for the left side, I'm
going to set it to one Ram. All right, that's it, about the second heading. Now it's time to
customize the bottom. Let's go ahead and select
Banner followed by button. First of all, I'm going
to set with in height. Let's set with 215 Ram. Then the height is
going to be five fram. Also I'm going to
change the background. Let's use again
linear gradients. The direction of
color transition is going to be two, right? Then we need here the first
color which is going to be A three EC, it's a purple color. Then we need another
purple color, which is going to
be 84, then 30. It's again a purple color, but the darker one. Let's check the
button we have here. Nice and cool background
with gradient. Next I'm going to get
rid of default border. Let's set it to none, as I'm going to make the button rounded
using border radius. Let's send it to
the Ram and check the browser step
by step or button. Looks great. Next I'm going to set the
phone size to 1.6 Ram. Also, I'm going to make
the phone weight bolt. Then let's transform
text into upper case. The text looks pretty nice, but we need to add
some more style to it. We need to create
some space between the letters using
letter spacing. It's going to be a 0.1 Ram
and also change the color. We need lighter color. I'm going to set
the color to white. Now the button looks
pretty nice and cool. Next, I'm going to add
shadow effect to the element using pox shadow with the
value of 01 Ram, three Ram. And the color is going
to be RTB A with the lower opacity
0.1 As you can see, the button has the
shadow effect. Then I'm going to create some space on the left
side using margin left. It's going to be one ramp. And also change the type of
the cursor, make it pointer. Okay, Before we
finish this lecture, I want to add one more
thing to our button. I'm going to create
hover effect. Once we hover over the button, we need to move it up using
transform translate function. Let's go ahead and select
Banner, followed by button. And we need here
pseudoclass hover. Let's use transform
translate y function. It allows us to move the
elements according to y axis. I mean vertically. I'm going to add
here negative value. It's going to be -0.2 Ram. If I check the browser,
as you can see, once we hover over the button, then it will move up slightly. Let's make this effect
smoother using transition. I'm going to add here transform. And the duration of the effect is going
to be a 0.3 second. Now if I hover over the button, then we'll get this
nice and cool effect. All right, actually that
sits about the banner. Next we're going to take
care of the navigation, the logo and the of bar, those navigation items
with their dropdown menus. Let's move on and
take care of that.
8. Creating the HTML Markup of the Navigation: Hi and welcome to
your new section, in which we're going to be creating a navigation
bar for our project. In the last section, we have created the header
of the website, which consists of a banner. It is placed on the
left side of the page. And also we have here three different
backgrounds which I think look pretty nice. Let's take a look at
the finished project. The navigation bar will
consist of a logo. It is placed at the top
left corner of the page. And also, we will have
those navigation items which are placed
horizontally in a row. Each navigation item has a drop down menu,
except the button. In this lecture, we're
going to be creating HTML markup for the logo and
also the navigation items. As for the dropdowns, we will take care of
them a bit later. Okay, let's go ahead and open the VS code and start to
create the HTML markup. First of all, I'm
going to insert here comments for
the navigation. Then I'm going to open HTML Five Novelment with
the class name offer. Next, we need to
create the logo. At first, I'm going to insert
the comments for the logo. Then I'm going to
open link Elements. We use here Link element, because when we click the logo, we have to move to the
main page, the index HTML. If I go to any of the pages
here and then click the logo, we should go back
to the main page I, the index of HTM file. In the H reference attribute, I'm going to
indicate index HTML. Then we need here development
with the class logo. The logo will consist of a couple of different
span elements. Let's open span tag
and insert code. And then we need again, span elements with
the text Create. Next, I'm going to
open another span tag. I'm going to insert
your templates. Okay, that's it, about the logo. Next we need to create
the navigation items. I'm going to insert your
comments for items. And then I'm going
to open list I ll elements with the
class name, no items. The list will consist of
six different list items. We need here LI elements and it will have the class no item. Then inside the LI element, I'm going to open
link like the logo, we need to specify here
the names of the pages. At first I'm ins here class, it's going to be no link and then the first item
is going to be home. Once we click the first item, we should go back
to the main page. I mean the index of HTML file. Let's take a look at
the finished version. If I go any of the pages
and then click Home, then we'll go back
to the main page. I'm going to institute
again, index HTML overall. We'll have six
different list items. Therefore, I'm going to
duplicate LI element five times, then change the items. The second item is
going to be clients. We need to change the
name of the HTML file. Actually, those files
are not created yet. We will take care of them
in the coming sections. In this case, I'm
just specifying the names of the HTML files. We'll create them later. Okay, the third item is
going to be products. Change the HTML file, we need to hear products next. We'll have contact, then I'm going to
insite your accounts. Finally, we need
to hear pricing. As I said, it's going to be
button and not the link. I'm going to change the class
name we need here now, PTN. Also change the name
of the HL file. It's going to be
pricing the HTML. All right. I think that's
it about the HTML markup. Let's take a look
at the projects. As you can see, the
navigation items and also the logo are placed
behind the background. And also the layout of the backgrounds
are changed slightly. We need to take care of them
and fix those problems. Let's go ahead and move
on to the next lecture.
9. Designing the Logo of the Website: All right, in the last
lecture we have created the HDMl markup for the
navigation bar of our project. And now it's time to
style this element. In this lecture, we're going
to be styling the logo. Let's go back to the CSS file and start to write the CSS code. We need to add here new
comments for the navigation. I'm going to select
nav elements, which has class name. No, first of all, I'm going to define
its position. It's going to be fixed. Also, we need to define the
top and left properties. Both of them is going
to be zero right now, nothing is changed here. As you can see, the elements
of the navigation are placed behind the background
and we have to fix that. In order to fix that problem, we need to use z index
property and I'm going to assign to it a higher
value. Let's say ten. Now as you can see,
elements are no longer placed behind
the background. Next I'm going to set width and height of the navigation
that's defined with, it's going to be 100%
As for the height, I'm going to set it to 12 Ram. Also, I'm going to add here a temporary background
color in order to see better where the
navbar is position. Let's set color.
Let's say light gray. It's going to be CC
Here we have our nap. It's placed at the top
side of the web page. Next, I'm going to create
some space using padding. The padding on top and
bottom is going to be zero. As for the left
hand right sides, I'm going to set it to 15 rapid. As you can see, we have here some space on the left
hand right sides. Next, I'm going to use flex box in order to
align the elements. As you know now, part consists
of two different parts. We have logo and the
navigation items. We need to place both elements in a row horizontally on
the left and right sides. For that, we need to
use Display Flex. As you can see, the logo and the navigation items are
placed side by side. In order to place them on
the left and right sides, I'm going to use justify content with the value space between. Now, as you can see, the logo
is placed on the left side. As for the navigation items, they are placed on the
right side of the No. Okay. Next I'm going
to place items, I mean, the elements of the nav bar in the
center vertically. And for that I'm going to
use another property of CSS, Flexbox, and it's
called Align Items. And I'm going to
set it to center. Now the elements are placed
in the center vertically. All right, that's it about
the now bar right Now. Next I'm going to take
care of the logo. We need to insitu new
comments for the logo. Then I'm going to select Developments which has
the class name logo. Again, I'm going to use Flex
books to align the elements. Let's set display to flex. In this case, I'm going to place the items vertically
on top of each other. For that, we have to
change the direction of flex book and it's
going to be column. Now as you can see, the
elements are placed vertically. Next I'm going to select the first span
element in the logo. I mean this one. For
that we need here logo. Then span elements. Now we have to use one
of the pseudo classes called nth child selector. Here we have to
specify the number. As I said, we need to select
the first span element. Therefore, I'm going
to sit you one. First of all, I'm going to
change the phone family. Let's use here phone
called the moles. Also, let's increase
the phone size. I'm going to set
it to three Ram. Let's take a look here we
have the first span elements. Let's change the font weight. I'm going to make it bold. Let's transform text into upper case and change the color. I'm going to use white color. Here we have the first
span element of the logo. Actually, let's go ahead and get rid of this
temporary background. I think we no
longer need it now. The logo looks much better. Next, I'm going to select the span element which is placed inside the
first pane element, this one the text create. For that we need
logo followed by the span element with
chart selector first. And then again we
need span element. Let's change the phone size. It's going to be 1.8 Ram. The size of this part, this pan element, is changed now the text
becomes smaller. We have to move the element
up like the text here. For that, I'm going
to use transform. With translate y function, it moves the element
according to y axis. I mean it moves
element vertically. In order to move the
element upwards, we need to use negative value. In this case it's going
to be 0.8 As you can see, the element hasn't moved up. The problem is that Spanelon
is an inline element. And once you have
the inline element, then transform property
is not applied. So we need to transform elements from in line to inline block in order to
apply transform property. Now, the problem
should be fixed. All right, as you can see,
the element is placed up and the transform
property works fine. Next I'm going to select
the second span element. I mean this one templates actually let's copy this
selector from here. And change the ni selector. We need two. Let's change the font family. It's going to be
croson one Cosi. Then we need font size, it's going to be 1.5 Rams. I'm going to change the color. Let's add it to DDT, which is a light gray color. Here we have the
second spanlement. Next, I'm going to create
some space between the letters using
letter spacing, and it's going to be 0.1 Ram. Also, I'm going to place the
elements on the right side. And for that let's use line
property with the value, right, the text is placed
on the right side. But actually that's
not what we need here. If we take a look at
the finished version, you see that the
second spin element is placed nicely
on the right side. We have to move it slightly to the right side and
also upwards again, I'm going to use
transform property. We need here to translate function as the values I'm
going to pass here to. 0.2 Ram, also line
here, minus one Ram. The first value, 2.2 Ram, moves the element to the right
horizontally by 22 pixels. As for the second
value, minus one Ram, it moves the element up
vertically by ten pixels. The negative sign in the case
the direction, is upwards. As for the positive values, they would move it downwards. Now we have the
same problem here. Let's assign display
inline block to the second element as well. Now as you can see,
the problem is fixed. We have here nice
and cool results. Finally, I want to add a little shadow
effect to the logo. I mean the span elements. Let's go ahead and select
all the span elements in the logo text shadow property with the values
0.5 Ram, one Ram. Then the color is
going to be RGBA, black color with lower opacity, and it's going to
be 0.2 All right, so here we have the logo. It looks pretty
nice with the logo. We are done now,
it's time to move on and customize the
navigation items. Let's go ahead and do
that in the next lecture.
10. Styling Navigation Items: All right, in the
last lecture we have designed the logo
of the website. Now it's time to move on and continue styling
the navigation bar. In this lecture, I'm going to
style the navigation items. Let's go to the VS code. First of all, before we start to style the
navigation items, I want to move the
navigation up. I mean outside of the header. Let's cut the code from
here and paste it here. Okay, after the logo, I'm going to ser new comments
for navigation items. Then I'm going to select UL element which has the
class name Now items. First of all, I'm going
to define the width. It's going to be 50% Then I'm going to place the navigation
items side by side, horizontally in a row. Because right now they
are placed vertically. In order to do that, I'm
going to use Flex box. We need Display Flex. Now if we check the results, you will see that the items are placed
horizontally in a row. Next, I'm going to
create some space between the items and
for that I'm going to use one of the flex box properties
called justify content. And I'm going to assign to
it value called space even. It will create even
space between the items. All right, after that, let's go ahead and select the LI elements which
has class name of item. I'm going to get rid of the
default bullets for that. Let's use list style and
assigned to it value none. As you can see, the
bullets are gone. Next I'm going to select the link elements we
need here. No link. Let's increase the phone size. I'm going to make it to Ram, then I'm going to transform
text into upper case. Actually we need
here text transform and the value appl case. And also change the color. The color is going to be white. Let's check the result. As you can see, the navigation
items look pretty nice. Next, I'm going to create some
space between the letters. Let's make it 0.1 Ram. After that, I'm going to add
a little shadow effect to the link elements
using tech shadow. The values will be
0.5 gram one Ram. And the RGBA black color with
the opacity 0.2 All right, so I think the knob
items look pretty nice. Now we have to take care of the last item which is
going to be the button, I mean the pricing button. Let's go ahead and select this element using
class name now, PTN. Let's define within height. I'm going to set
width to 13 Ram. As for the height, I'm
going to make it five Ram. Also change the
background color. Let's set it to white. As you can see, the
with heights are not applied to the elements and we have here
the same problem. I mean the link
element by default is an inline element and therefore within heights are not
applied to the element, we have to change it. In this case I'm going to use Display Flex because we will need other flex
box properties as well. That's why I use here flax and
not inline block or block. Now if I check the result, you will see that the within
height are applied to the element going to place the content in the
center of the box. And for that I'm going to use justify content
with the value center. And also we need
line items center, justify content center. Align the element in the
center horizontally. As for the Line item center, it places the element in
the center vertically. Now we have here the perfect
centering. Actually. Going to place link elements and also the bottom in the
center vertically. For that, we can add here line items center and the
problem will be fixed. Now the link elements
and the button are placed nicely in the center. Let's move on and add here
a couple of more styles. Next, I'm going to make the button rounded
using for the radius, it's going to be form, now the button is rounded. Also, I'm going to add to the bottom little
shadow effect using box shadow with values 01 Ram. Then we'll have here three Ram. The color is going to be
RTP A with the opacity 0.1 We have here
nice shadow effect. After that I'm going
to take of the phone. Let's increase the phone size. It's going to be two rams. I'm going to use letter spacing. It's going to be a 0.1 Ram.
Let's change the color. I'm going to use color F88 344. It's going to be an orange
color like the knob items. I'm going to make
the text upper case. Let's use Texans
form upper case. All right, the knob items with the button
look pretty nice. I'm going to add a hover
effect to the button. Actually, I'm going to use
the similar hover effect. Let's select knob PTN. With hover, we
need to transform. Translate Y value
is going to be -0.2 n. If I hover over the
button, it will move up. But as you see, we need
smooth transition. Use transition property we
need here to transform. The duration of the effect
is going to be 0.3 second. Now we have here nice
and cool hover effect. All right, actually
that's about the n items. Now we have to add to each navigation item
the drop down menu, like it we have in
the finished project. For that, let's go ahead and
move on to the next lecture.
11. Creating the HTML Markup of the First Dropdown: All right, in the
last lecture we have customized the navigation
items and also the button. And now it's time to
move on and start to create the drop down menu. I mean the drop down menu for
the first navigation item. Let's take a look at
the finished project. If I hover over the
first navigation item, then the drop down
menu will appear. As you can see, the
first drop down menu consists of two main parts. We have the left side and
also we have the right side. On the left side, we have
the list of the features. As you can see,
once we hover over the list items,
little hover effect. The right side is more complex. We have here the phones
icons with hover effect. Also, we have some
textual elements with different colors. And down below you
can see the buttom. All right, that's
it. What we're going to create in this lecture. I'm going to create the
HTML markup and then we will design the
top town menu. All right, let's go
to the VS code and start to create the HTML markup. We have to insert the comments right
after the link element, inside the LI element. Let's insert your comments
for the drop down menu. It's going to be the first drop down we need here,
Drop down one. Then of drop down one, I'm going to open deep elements which will have two
different classes. The first one is going to be a common class name, drop down. Besides that, we need
here, drop down one. Next I'm going to insert here another
deep element which is going to be the left side of
the drop down we need here. Drop down one left. Also, let's create
the right side. Let's duplicate this line of code and change the class name. We need you drop
down one, right. All right, At first, let's
take care of the left side. I'm going to insert here H, three heading elements
with the text features. Then after heading, we need another development which
is going to be the least, I mean the wrapper
inside the development. I'm going to create another which is going to be
the features item. So I'm going to add here
class name, features item. Each list item will
consist of two elements. The first one is going
to be a phonosomicons. For the second one,
we'll have here sanelement if we take a look at the finished project and
check the left side. So as you can see we have the phonosomicons and also the
panelement with some text. Let's insecure I elements
with the classes FA solid A star and then instead
here span element, the text is going
to be all features. All right, overall we'll have
11 different list items. Therefore I'm going to duplicate feature
list item ten times. Then we have to change
the class names of the phons and also the
content of the span elements. The second elements
is going to be a solid, A boxes stacked. As for this fan element, it's going to be
100 plus elements. Then the third
phonosomicon is going to be a solid, A file. As for this fan element, I'm going to insert
1,000 plus layouts. The next phonosomicon will
be a solid, a pen nib. Also, we need to
change this panelment. I'm going to insert
your no code design. Then after that the phones micon is going to be a solid wrench. As for this panelment, I'm going to insert
your theme builder. Then the next icon
is going to be a solid, a car shopping. As we need to change this panelment which is
going to be E Commerce. Then we will have a network wired also change
this panelments. We'll have here workflow. Then the next one is going
to be a solid, a light bulb. As for this panelment, let's insert here marketing. Next we will have here a
phase solid Code developers. The next icon is going
to be a solid desktop. As for this panelmentI'm going
to insert side examples. Finally, we need
here last icon which solids the spanelment
will be integration. Okay, let's it about
the first part, I mean the left side
of the drop down menu. Here we have all the
phonomicons and the spanlments. Next we have to take
here of the right side. First of all, we need here the heading three which
going to be services. Then after heading I'm
going to open this going to be drop down services. Then inside the development, I'm going to open another
D which is going to be drop down service itself. It will include elements and also development which will include itself,
two span elements. Let's insert here I element, which is going to be
a Aa solida wrench. Then as I said, we need
here development with the class name
drop down service. I'm going to institute
two span elements. The first one is going
to be thin builder. Let's duplicate
this line of code. The second span
element will be the number one, thin builder. Now I'm going to duplicate
drop down service. Overall, we will have
seven drop down services. Let's duplicate this
code six times. Now we need to change the phonics and also the
content of the span elements. The second phonsomicon
is going to be a solid. Actually, we need here
to remove this T, otherwise the icon
won't display. Let's get rid of it. As I said, the phonoomicon is going to
be a solid, a light bulb. As for the panelmentse
market place. As for the second panelement, I'm going to insert here
modules, layouts and themes. Then the next phonosomicon
will be a solid, a cloud. As for these panelements,
let's inside cloud. And then the second
one is going to be cloud storage for designers. The next phosmicon will
be a solid, a brain. We'll change the panelmentse. Ai Spanel is going to be build websites with AI. Then the next icon is going
to be a solid people group. As for the panelements,
we need teams. Then the second one is going to be collaboration for agencies. Then we need a solid a globe. As for the
panelmentseed hosting, the second one is going to be fast hosting of the websites. Now we have to change the
last top down service. We need a solid a crown. As for the span elements, let's interfere IP and the
second one is going to be 2047 support and these counts. All right, all dropdown
services are prepared. The last thing that we
have to do is to create the button which
should be placed here. Let's open the button type
is going to be button. As for the content, I'm going to ins join today. All right. I hope
everything is correct. We will see that in
the next lectures. Let's check the
results we have here. Services, all the
icons are displayed. Now we have to move on and style the first
dropdown for that. Let's move on to
the next lecture.
12. Styling Features in the First Dropdown: All right, so in the last
lecture we have created the HTML markup for our
first drop down menu. I mean the drop down
menu of home link. Now it's time to start to
customize the drop down menu. Let's go to the CSS file
and right after navlink, insert new comments for
the drop down menu. It's going to be the first
drop down menu we need here. Drop down one, then
of drop down one. All right, let's go ahead
and select drop down one. First of all, I'm going to
set its position to absolute. We're going to position this element according
to the parent element, which is no item. I'm going to assign to no
item, position relative. We need it in order to
position child elements. In this case, drop
down one according to the parent element,
which is no item. All right, let's define
top and let properties. The top position is going to be 4.9 m. As for the left position, I'm going to make it -24
m. Let's check the result. As you can see, the drop
down menu is positioned. Now I'm going to define the background color and
it's going to be white. All right, here we have
the dropdown menu. Now we need to define the,
with height of the element. I'm going to set with 96 Ram. As for the height, it's
going to be 60 Ram. Next I'm going to place features and services side
by side, horizontally. And for that I'm going
to use Flex box, we need to display Flex. If we check the result, you will see that
features and services, I mean left and right side of the top down menu are placed
side by side horizontally. All right, after that, I'm going to make
the top down menu a little bit rounded
using border radius. I'm going to set it to one Ram. Also, I'm going to create a little shadow effect
using Po shadow. The values are
going to be 01 Ram, then three Ram as the color. I'm going to use RGBA value. The color is going to be
black with lower opacity, 0.2 as you can see the corners of the
drop down menu around it. And also we have here nice
and cool shadow effects. Next, I'm going to
create some space inside the dropdown menu for
that. Let's use pudding. I'm going to set it to two ram. All right, that's it. About the drop one, I mean the wrapper element. Next I'm going to take care
of the left and right sides. I'm going to select to drop down one left
and define its width. It's going to be 30% Also, I'm going to create some
space on the right side of the element using
padding, right? The value is going to be four m. Now the first part I'm in, the left side has the width, and also we have some
space after the left side. Next, I'm going to duplicate this code and do the same
for the right side as well. The width of the right side
is going to be 70% Also, we need here padding left. And it's going to be to run. All right, next I'm
going to take care of the headings of both sides. We need the same styles
for both headings. I'm going to select
both of them. We need to drop down
one left, H three. Let's duplicate code and
change the left into right. Let's add here styles
for the heading. First of all, I'm going to
change the phone family. It's going to be Molly cursive. Then I'm going to set
phone size to 1.8 Ram. We need color. It's
going to be color 86987. So as you can see, the
headings look nice. Next I'm going to create some space at the
bottom using padding. Bottom it's going to be one Ram. Also, we need margin. At the bottom, it's
going to be three Ram and create border
at the bottom. We need here bottom, the width is going
to be 0.2 Ram. Then we need solid as the color I'm going
to use here, RGBA, 134-15-2167 and the opacity is going to be 0.5 I
used here gray color. Let's check. As you can see, we have here nice and cool
border at the bottom. And actually the headings of the left and right
sides look pretty nice. All right. Next
let's go ahead and select features list item. This part those two elements which are placed inside
the features list item. I'm going to select features
list item, let's set margin. We need 1.5 fram at the top and bottom and zero on
the left and right sides. Then I'm going to place
the elements horizontally, side by side using flex box. Also we need a line item. It will align the elements
in the center vertically and then change the type of
the cursor, make it pointer. Okay, now we have
some space between the items and also the
cursor is changed. After that, I'm going to customize icons and
then the span elements. Let's start with the icons. I'm going to select features item followed
by the elements. Let's font size is
going to be two Rams. I'm going to set width to four Ram and then
change the color. The color is going
to be grey color, which we used
recently. Let's check. As you can see, the
icons look pretty nice. Let's go ahead and
customize the fan elements. I'm going to select again, features list item followed
by the fan elements. I'm going to increase
the phone size, It's going to be 1.8 Ram. As for the color, I'm going
to use the same color. I mean the gray color. As you can see, the
panelements look pretty nice. The only thing that we have
to do in this lecture is to create little hover effect. Once we hover over the
icon or the span element, they should change their color. Let's go ahead and do that. I'm going to select Features, a list item with hover. We need her elements also. We have to select span elements. Once we hover over the elements, we need to change the color. The color is going
to be two to two. It's dark gray color. Now, if I hover over the, you see that the
color is changed. But we need smooth transition. Let's add to both elements
transition property. We need your color. And the duration is going
to be a 0.3 seconds. Now, if I hover over the items, they will change
their color smoothly. I think it looks pretty nice. Next, we have to take
care of the right side. And for that, I'm going to
move on to the next lecture.
13. Styling Services in the First Dropdown: Okay, in the last
lecture we have styled the left side
of the dropdown menu, I mean the features list. And now we have to take care of the second part of
our dropdown menu. I mean, the services
part, the right side. Let's go to the VS code and
select Dropdown Services. I'm going to define the height, it's going to be 45 pram. Also, I'm going to align the elements using
again S flax book. We need display flex. We have to change the
direction because we have to align
elements vertically. So we need flex
direction to be column. All right, now I'm going
to select the drop down service itself again. Let's use flex box. We need display flex. Then we have to create
a space at the bottom of the element using
margin bottom. It's going to be a 3.5 Ram. Next, I'm going to change the
cursor and make it point. All right, now I'm going to align elements in the
center vertically. I'm going to add here
a line items center. As you can see, the icons and the textual elements
are placed in the center. After that, I'm going
to customize the icons. Let's go ahead and select
drop down service, followed by the element. I'm going to increase
within height. I'm going to set both
of them to 5.5 Ram. That's the same for
the height as well. Then let's change
the background. Let's change the background. Going to use linear
gradient function. The direction of
color transition is going to be two, right? As for the colors, the first
color is going to be B1501. As for the second color, I'm going to use 723. Those are the purple colors. The lighter one and the darker
ones can see the phonics. I mean those boxes have
the linear gradient. Next I'm going to
the flex items. We have to place
them in two columns. I'm going to use
flex wrap the value p. Now the items are
placed in two columns. We have here much
better results. After that, I'm add here
a couple of more styles. We need to make
the boxes rounded, and for that let's use border
radius with the value of 50% Now the elements are rounded and we have to place the icons in the center
of those circles. For that I'm going
to use X book. We need display flax, then justify conference center
and a line items center. Now as you can see, the icons
are centered perfectly. After that, let's
customize the icons. We need to increase
the phone size. It's going to be 2.5 Ram. Then I'm going to
change the color. Let's make it white. Also, I'm going to set Po
Shadow to 0.5 m, two Ram. Actually we need here
m. As for the color, I'm going to use RGBA value, but in this case we need
to use purple color. The first value is
going to be one to six. Then we will have here 35. Then the next one is going
to be 218 as the opacity. I'm going to say 2.3 Okay, the icons look pretty nice. Next I'm add a little space on the right side of each icon. Let's add here margin. Right and make it to ramp. Okay, after that, I'm going to create a
little hover effect. Once we hover over the services, we should increase the
size of the icons. I'm going to select drop
down service With hover. Then we need elements. In order to increase the
size of the element, I'm going to use scale function. We need transform, we
need transform scale. And I'm going to insert here 1.1 Now if I hover
over the icons, they will increase, I mean
the size of the icon. Let's make this effect
smoother. Use transition. We need here transform. And the duration is
going to be 0.3 second. Now we have here
much better results. Size of the icon increases
with smooth effect. All right, next
I'm going to take care of the drop
down service item. I mean those textual
elements we have here two different
elements and we have to place them vertically. Let's go ahead and select
drop down service item. Use Flex box. We need display flax. Then we have to
change the direction. It's going to be column. Now as you can see
the textual elements, the span elements are
placed vertically. As you can see right now, all the icons have the
same background color. If we take a look at
the finished project, you will see that each item has different background color. We need to take care of that. I'm going to select the first drop down service we need here, child selector. And we have to specify
here the number one. Then we need elements. Let's corra the background also, we need to grab box
shadow from here. Now as you can see on the first phomicon has the
purple background color. Actually, I'm going to duplicate this code six times because
overall we have seven icons. We have here seven elements. Let's change the
chart selectors. We need to hear numbers 1-7 Now we have to change
the background colors. The second icon is going to
be the background colors. 31 DCA. One. As for the second color, I'm going to institute 23683 and also change the box shadow we need here. 35214131. Let's check the browser. So as you can see,
the second phonic has now a green color. I mean the background color. Let's take care of
the third item. We need here, colors, 351, EC. For the second caller, it's going to be 22 DCF. Also change the box
shadow we need here, 45, then again, 45207. The third phonemic is ready. Let's move on and take
care of the fourth item. The color is going to be 0030. That's second one
we need here, 03. 48. Next, I'm going to change the box
shadow we need here. 3180216. Let's check the browser. The fourth phone,
Atomican is customized. Let's move on to the fifth one. We need here F9625. As for the second caller, it's going to be FA 751. And then change the
box shadow we need here, 250, then 11728. We have here the orange
background color. Let's move on to
the next phone mic, which is the sixth one here. Three to 93f. Then the second color
is going to be 2371f, as shadow is going to be 35, then 113255. Here we have the sixth icon, and now we have to take care
of the last fonts icon. The first color is
going to be 28235. As for the second color
we need here, 202, 52c, a box shadow. Let's insert here 32, then 3744. Okay, so all the phone
omics are prepared. They look pretty nice. And now we have to take
care of the span elements. I mean, those textual elements. First of all, I'm going to take care of the
first span element. Let's select drop
down service item, then we need span
the child select. We need the first span element. Let's change the phone family. It's going to be Molly Cursive. Then I'm going to set
font. Way to bold. The color is going to be 150f1. Then I'm going to set the
letter spacing to 0.1 m. Let's transform
text to upper case. We need here text transform and not rendering the value is
going to be upper case. As you can see, the styles are applied to the
first pan element. Right now they have the same color, we
have to change that. And also we need to increase the size of the pan elements. Let's select here, drop down service item,
follow the panelement. Set the phone size to 1.6 Ram. Now the font is increased
of both spin elements. As for the colors, I'm going
to select first service. Then we need to drop down service item followed
by the spin elements. Again, we need here
and chi selector. We need the first spin element. Let's grab color from here
and inserted down below. Now only first span element
has the purple color. Next, we need to do the same for the rest
of the elements. I'm going to duplicate
this code six times. Let's change the selectors. We need numbers from one
through seven like we did it for the phono mics,
the second color. Is going to be 31c1. It's a green color. Then the third spannelment
is going to be 3f51c. Let's change all the colors
and then check the browser. Next, we need 0030. Then the fifth item
is going to be f9625. Then we need 3293 FF. As for the last span elements
we need here, 28 to 35. All right, let's
check the browser. As you can see, all span
elements have the proper calls. Now we have to customize
the second span elements. For that, let's select drop
down Service Item Span, and we need here and chat
selector with the number two. I'm going to set
the phone way to 300 and also change the color. Let's use here 66, we need here pound
sign, then 6672. It's a gray color. As you can see, the colors are changed for the
second span elements. Lastly, we have to
customize the button. Let's go ahead and select
drop down one right button. First of all, let's
define width. It's going to be 100% and
the height will be four Ram. And also change the
background color. Let's use here color 3776. Here we have the bottom. We need to get rid of the fold border. Let's set it to
nine and also make the corners rounded
using border radius. It's going to be two Ram. Now the bottom
looks much better. Let's take care of the font. I'm going to set font
size to one point forum. Then the font weight
is going to be bold. As I'm going to transform
text to uppercase, change the colors, the
color is going to be white. Then I'm add some space
between the letters. And finally change the
cursor, make it point. All right, so the second part of the drop down menu is
prepared and styled. It looks pretty nice. Now we have to make the
drop down menu work. I mean, we have to
hide it by default and then display it once we
hover over the noveling, I mean, the first noveling home, also we need to create
this triangle here. For that. Let's move on
to the next lecture.
14. Making the Dropdown Menu Work: All right, in the last lecture, we have finished styling
the drop down menu. And now we have to make it work. By default, the drop
down should be hidden, and once we hover over
the navigation item, then it should appear
with smooth transition. Let's take a look at
the finished project. As you can see, the drop
down is hidden by default. Once I hover over the navigation item,
then it will appear. You can see here this triangle which we need to create
in this lecture as well. Let's go ahead and go
back to the VS code. First of all, I'm
going to create the triangle for that I'm going to use after
pseudo element. The triangle will be a
part of navigation item, therefore we need here no item followed by
the child selector. We need the first
navigation item. And then I'm going to use
after pseudo element, the content is
going to be empty. Then I'm going to
define the position. It's going to be absolute. I'm going to position the element according
to the parent element. In this case, the parent
element is no item. But right now as you can see, it already has the
position relative. Next I'm going to define
top and left properties. The two position is
going to be 2.9 Ram. As for the left position, I'm going to make it
50% The triangle should be placed in the center
of navigation item. In order to center the element, I'm going to use transform translate x function
with the value -50% The triangle will be created with a little
trick using borders. I'm going to use
border left with the values solid and the color is going
to be transparent. Then I'm going to
duplicate this code twice. Let's change for the
left to border right, the values will be the same. Then we need border bottom. Instead of transparent, I'm
going to use white color. As you can see, the triangle
is created and it's placed in the center of
the navigation light. Now I'm going to hide this element and also
the drop down menu. In order to hide the element, I'm going to use opacity
zero and visibility hidden. We need the same thing for
the drop down as well. Now as you can see, both
elements are hidden. And now we have to appeal them. Once we hover over
the no item I here, no item with hover followed
by the F to see the elements, we need those two properties in order to display the element. We need opacity to be one
and visibility visible. Also, I'm going to add here for the drop
down menu as well. Let's place here opacity one
and visibility feasible. Now if I hover over the no
item on the triangle is yeah, we need here to drop down one. Now both elements
are displaying. The only thing that I
have to do is to make this appearance a
little bit smoother. And for that I'm going
to use transition. The values will be
all 0.3 second. Now if I hover over
the knob item, then we'll get this
nice and cool, smoother appearance of drop
down menu and the triangle. All right, that's it about
the first drop down menu. Now we have to take
care of the second one. And for that, let's move
on to the next lecture.
15. Creating the HTML Markup for the Second Dropdown: Okay, in the last lecture, we have finished working on
the first drop down menu, which works fine and looks
pretty nice and cool. Now it's time to move on to take care of the
second drop down menu. Let's go ahead and take a
look at the finished project. If we hover over
the second item, which is clients, then the second drop down
menu will appear. As you can see, it consists
of four different parts. Each of them has nice and cool
background color with some linear gradient effects. Also, each part consists of a P. Then we have here the
heading and some text. Okay, so that's it about
the second drop down menu. As usual, we're going to
create the HTM markup, and then we will take
care of the styling. We need to find the second navigation item
which is clients. Right after the link elements, I'm going to insert comments
for second drop down menu. Then I'm going to open
developments with classes. Drop down also, we
need drop down two. Then I'm going to Open
Development which will have class name clients item. As I said, each item will
consist of a phone asomicon. Then we'll have heading
and the paragraph. Let's open I elements, which will have classes a
regular, then A envelope. After that, we need here
H, three heading elements. The text is going to be
web design agencies. Also, we need here
paragraph with some damit in order to
put here some dame, I'm going to type loam. Then we have to specify
here the number of words. In this case, I'm going to
insert your 15 dummy words. Now I'm going to hit Enter. As you can see, we have here some dummy text with 15 words. All right, let's sit
about the first item. As you know, we will
have overall four items. I'm going to duplicate this
development three times. And then we have to change here the icons and also the headings. The second item, I mean
the second icon is going to be a solid. Then we need FA Earth America. As for the heading,
I'm going to insert here, online store owners. Then we need to change
the third item. Actually, we have here little
mistake here, regular. Let's change the classes
of the third icon. It's going to be FA
brands, then A sketch. As for the heading element, I'm going to institute
web design, free lancers. Now we have to take
care of the last item. We need to change the classes of the icon we need
FA solid FA store. As for the heading element, I'm going to insert your
small business owners. All right, so I think
that sits about the H tel markup.
Let's take a look. As you can see we have here
the second dropdown menu. I mean, the H Tl markup. And now it's time to
style those elements. And for that, let's move
on to the next lecture.
16. Styling the Second Dropdown: All right, in the previous
lecture we have created the HTML markup for our
second dropdown menu. And now it's time to style
it and then make it work. Let's go back to the VS
code and I'm going to suit new commons for the second
drop down menu we need here. Drop down two and then
end of drop down two. As you know, we will have five different drop
downs and all of them will have the
common styles. Instead of writing the same
styles over and over again, I'm going to select all of
them using common class name, which we assigned
to the drop downs. This class name here, drop down. I'm going to select all of them. Grab some of these styles from
here in the common styles. Well, those two lines of code, I position, absolute
and top position. Also we will have here
background color. Then those three lines of code, border radius, box
shuttle, and padding. Also, I'm going to grab those styles and add
them here as well. Next I'm going to change here
came instead of drop down, one we need here, drop down. Actually I'm going to grab
this code and paste it here. Besides that, I'm going to remove the child
select from here because we need triangle
for every navigation item. Actually, I that
everything is ready. Let's go to the browser and check if
everything works fine. As you can see, some of these styles are applied
to the drop down, the second drop down already. Let's go to the VS code
and select the second drop down and add to it
some styles as well. We need here to define
width as 90 Ram. Then we need height, it's going to be 37 Rams. I'm going to define
the left position, it's going to be -27 Ram. And then we need
to use flex books. Let's set display to flex
and check the results. As you can see, now we
have much better results. The items are placed
horizontally in a row nicely. Now we have to select them. Customize. Let's select clients item I'm going to set with to 100% Then we need here
margin to be zero. And then 0.5 Ram. We need here 0.5 Ram. Also, I'm going to
define padding, Let's set it to 0.7 Ram. Now we have some space
between the items. Next, I'm again flex books, in order to align the elements inside of the client's item. Let's set display to flex. Then we need to change
the direction because we have to align
elements vertically. And for that we have to set
flex direction to column. Also, I'm going to use
Align Items center. Okay? As you can see, the
elements inside the items are placed in the
center using flex books. Let's set cursor to pointer. Okay, next thing that
I'm going to do is to change the background color
for each client item. As you remember, each item has different background
color with linear gradient. So let's go ahead and
do that for each item. I'm going to select the first
one using child selector. I'm going to specify
here number one. As for the background, as I said, we need to
use linear gradient. The first thing
that we have to do here is to define the direction. I'm going to set
it to 135 degrees. Next, I'm going to
define the first color, which is going to be a seven. As for the second color, it's going to be a seven. Let's check the results. As you can see, the first
item has background color. I'm going to make the
corners of the item rounded. For that, let's use here border radius with
the value one ramp. Now we have nice
border radius here. Let's change the color for the
rest of the items as well. I'm going to duplicate
this code three times, then I'm going to
change the numbers. We need numbers from
one through four. As for the colors, I'm
going to change them. The first color for
the second item is going to be F 2f6ff. As for the second one, it's going to be CAD
nine F. Let's check the second item we have
here in sky blue color. Next we need to change the
colors for the third item. The first color is going
to be F1fd, F seven. As for the second color, let's make it F, F, F. It's green color. And now we have to change the
colors for the last item, we're going to insert
here FFF four ED. For the second color,
let's add here 87c5. All right, so all
four items have nice and cool background color with linear gradient effect. Now we have to take care of the elements
inside the items. Let's go ahead and start
with the phone atoms. First of all, I'm
going to increase the size of the items. Let's select here elements and
set phone size to ten Ram. As you can see, the size
of the icons is bigger. Now we have to change the colors for each item separately. We need to select the first item followed
by the phone icon. Let's set color to AC 63 A. As consider the first phone
icon has changed its color, let's do the same for
the rest of the icons. I'm going to duplicate this
code three times and change the numbers of chart selector
and also change the colors. The second color is
going to be 15f3. Then we will have
here one F C F 77. As for the last
icon I'm going to use here, color FF 8645. As you can see, the
icons look pretty nice, they have different colors. Now we have to take
care of the headings, so let's go ahead
and select headings. We need your client's item followed by H three
heading element. I'm going to increase
the phone size. It's going to be 2.5 fram. Then we will have
here phone weight. I'm going to set it to 300. Next, we need to transform
text to upper case. Also, I'm going to
set a line to center. Next thing that I'm going to do is to change the line height. Let's set it to 3.5 Ram. And also create some
space at the bottom is in margin bottom with
the value 0.7 Ram. Now the headings
look much better. As a guest, we have to change
the colors of the headings, and the colors should match
to the colors of the icons. I'm going to do that
in a simple way. I'm going to add here
selector for the heading, we need your client's item. Then we need chart selector. We need to specify here one. We have to add here H
three heading elements. Let's copy the selector and add it for the rest of the elements. I'm going to change the
numbers of chart selector. We need here numbers
from one through four. Let's go to the browser. As you can see, the headings have the proper colors and
they look pretty nice. The only thing that
I have to do is to customize the power graph. Let's go ahead and
select client's item, followed by the elements. Let's set font size to 1.6 Ram. Then font weight is
going to be 300. And also I'm going to center
the using text line center. Now everything looks
pretty nice actually. With the second drop
down menu, we are done. Now it's time to
move on and take care of the third
drop down menu.
17. Creating the HTML Markup for the Third Dropdown: All right, in the
previous lecture we have finished styling the
second dropdown menu. I mean, the client's
dropdown menu. Now it's time to move on and to create the third
dropdown menu. Let's take a look at
the finished project. If we hover over
the product item, then we'll see here the
third dropdown menu, which I think looks pretty nice. We have here a couple of different icons and also some
details about the products. And down below you can sit. The first thing
that we have to do is to create the HTML markup, we need to find the third
navigation item which is products and
after link element, I mean the closing link tag, we have to insert new comments
for the drop down three. Then I'm going to open tag with the classes drop down
and drop down three. Next, I'm going to
open another dip tag, which will be products. It's going to be the
wrapper of the content. Next, I'm going to insert
here the product itself. This element will include phonosomicu and
two span elements. If we take a look at
the dropdown menu, you'll see here the phonosomicu and also the two span elements. Let's insert here I elements
with the classes solid, a wrench we need here. Then I'm going to open T. I'm going to insert
here two span elements. The first one is going to
be Theme and Page Builder. Then we need the
second span element in which I'm going to
insert the following text, the number one Theme and
Visual Page Builder. Let's sit about the
products overall, we will have five products, therefore I'm going to
duplicate this item four times. And then we have to make
here slight changes. I'm going to change the phonosomicons and also the content of
the span element. The second phonosomicon
will be a solid file, then the first span
element is going to be Page Builder plug in. As for the second span element, I'm going to insitu
themes and layouts. Then the third phonosomicon
is going to be a phase solid book open. As for the pan elements, I'm going to insert your
extra magazine theme. As for the second sanelement, let's insert the best
theme for blogger then. The 04:00 P.M. is going to be a solid envelope
as the panlements. The first one is going to be Mal Bloom E mail opt ins. As for the second, panelment's going to be the ultimate email opt plugins. For the last product item, the phone is going
to be a solid. As for the panelmentsI'm, insert your social sharing. As for the second phones, Micon is going to be
promotes social sharing. All right, and the
last thing that I have to do is to create the button we need
to inst down below. Let's open button. The type is going to be button. As for the content, I'm
going to insjoin to download Ok. That sits about
the third drop down menu. I mean the H t mark up. Let's check the results. If I hover over
the product item, you will see here
the drop down menu. It already has some styles, because we defined
some common styles in the last lecture
for dropdowns. Therefore, it already
has some styles. Now we have to make it look like the finished
version for that, Let's move on to
the next lecture.
18. Styling the Third Dropdown: In the last lecture,
we have created the HTML mark up for the
third drop down menu. As you can see, the drop down already has
some styles because we already have defined some common styles
for every drop down. Now we have to continue and finish the styling of the
third drop down menu. Let's go to the VS
code and insert new comments for the
drop down three. Let's go ahead and
select drop down three. I'm going to define
width and height. The width is going to be 40. As for the height,
I'm going to set it to 47 ran next, I define left position, it's going to be 50% Also, we need to censor the element
using transform translate x -50% The element has positioned
in the center perfectly. Finally, I'm adding, actually
the drop down has padding, but I'm going to overwrite
the default style. Let's use padding right now. By default, each
dropdown has pad two. And I'm going to
change the padding at the top side and I'm
going to make it one Ram. As for the rest of the sides, I'm going to leave it
as two M. All right, after that, I'm going to
customize the products. This element
actually, as I said, the products will be similar to the services in
the first drop down, the phone, atomics, and also those span elements
will be similar. If I take a look at
the finished version, you will see that they
are quite similar. I'm going to use these tiles from the
first drop down menu. Let's scroll up and find
they drop down services. Here we have them. I'm
going to add here products. Let's see what do
we have right now. As you can see, the icons and the panelments are placed
horizontally in a row. Let's go ahead and
add here products I. Now the phonosomicons are not visible because we have to define their colors separately. For that, I'm actually, let's get rid of those
spaces from here. I'm going to add here products child one. Then I if we check the result, you will see that the
first phonosomicon has its background color
and it looks pretty nice. We have to do the same thing
for the rest of the icons. I'm going to copy this
selector and edit here. Let's change the
anchit selector. We need here two, then do
the same for the third item, also for the fourth, and we need the same for
the fifth icon as well. Overall, we'll have
five products. Let's check, as you
can see the phone, awesome icons look pretty nice. We need the same hover
effect here as well. I mean, this hover effect, let's add the selector for
products here as well. We need hover, then elements. Now we have the
same hover effect. All right, next
thing that I have to do is to take care of
the spine elements. I'm going to add here product which is the wrapper
of the span elements. Now these spinelements
are aligned vertically. Next thing that I'm
going to do is to add here product and
then span element. It will change the phone
size of the span elements. As you can see, the
phone size is changed. Now we have to customize
each span element. I'm going to start
with the first one. Let's add here products, then then span element. With chart selector, we need
the first span element. If I check, then you will say that the first span
element is customized. Now we have to change the colors of
the first fan element. We need the proper colors. We have it in the
first dropdown menu. I'm going to a here new
selector for the products. We need product child one. Then we need development
followed by the span elements, again with child selector. Now we have to adhere one. Let's go ahead and check. As you can see, the first pan element
has different color. The same color that
we have for the icon. Let's do the same for the
rest of the span elements. I'm going to copy
this selector here. We need to change the
number of the product. It's going to be second. Then let's do the same
for the third product. Next we have product
number four, and then we need the same
for product number five. As you can see,
all span elements, the first span
elements have changed their colors and they
look pretty nice. Now we have to take care of
the second span elements. I'm going to add here selector for the
products we need here, the span with child selector, we need here the
second phanlementow. As you can see, the second
phenomment looks pretty nice. All right, next thing that
I'm going to do is to define the space
between the products. I'm go back to the
third drop down. Let's select products
and define margin. We need margin on top
and bottom, 1.7 Ram. As for the left and right side, it's going to be zero. Now we have to take
care of the bottom. Let's go ahead and style it. Select drop down three
followed by the bottom. I'm going to define width, it's going to be 100% then
the height will be four m. Let's change the
background color. It's going to be the purple
color we need here, 9544c. Next, I'm going to get
rid of the fault border. Also I'm going to make the button rounded
using border radius, it's going to be two Ram. After that, I'm going to
take care of the phone. Let's change the phone size. It's going to be 1.4 then I'm going to make
the phone bolts. Let's transform text to upper
case and change the color. We need color to be white. The button looks pretty nice. Next, I'm going to increase
space between the letters. Let's make it 0.1 Also
change the cursor pointer. Finally, I'm going to place
the button slightly down. Let's do that using transform. Translate y with the value
one r. Okay, so that's it. The third drop down
menu looks pretty nice. And now we have to move on and
take care of the next one.
19. Creating the HTML Markup for the Fourth Dropdown: All right, in the
previous lecture we finished styling the
third drop down menu, which I think looks pretty nice. And now we have to
move on and start to create the next
drop down menu. I mean the drop down
for contact link. Let's take a look at
the finished project. Here we have the
fourth drop down menu. It consists of phonons
and some links. And also we have here
down below the button. Okay, let's go ahead and start
to create the HTM markup. We have to find the fourth
no item which is contact. And I'm going to insert here
comments for drop down four. Next, I'm going
to open deep tag, which will have two
different classes. The first one is going to be
common class name drop down. As for the second
one, it's going to be an individual class
name drop down four. Then we need to open
another deep element and it's going to
be Contact options. Next, I'm going to
insert another tag. It will consist of ph
and span elements. I'm going to open a the
classes solid A envelope. Next I'm going to
institute panelment, which is going to be
getting touch overall. We'll have six
different developments. Let's duplicate it five times, then change pontoons and
also the panelements. The second icon is going
to be a solid commons. As for the span element, I'm going to interfere
chat with sales. Then the next phonosomicon
is going to be a solid, a user I'm interfere accounts and pills. Then the next phonosomicon is going to be a
solid. A wrench. As for the span elements, I'm interfere technical support, then we'll have here
a solid people group. Also, I'm going to change the
content of this panelment. It's going to be
as the community. Finally, we need to
change the last item. The phone is going to
be a solid file lines. As for the panelments, I'm going to in documentation. Okay, the last
thing that we have to do is to create the bottom. Let's insert here button
tag with type button. As for the content
of the button I'm going to share with us. Okay, that sits about the H tl markup of the
fourth dropdown menu. As you can see, we have
here the H Tl markup, which already has
some styles because we defined some common
styles for dropdowns. Therefore, those styles are applied to the fourth
dropdown as well. We need to continue
styling the dropdown menu. And for that, let's move
on to the next lecture.
20. Styling the Fourth Dropdown: In the previous lecture, we have prepared the HTML markup for our fourth
drop down menu. And now we have to style it. Let's go to the VS code
and insert new comments. Four. Drop down four, then I'm going to select Drop down menu with its
individual class name. Drop down four, we need
to define with height. The width is going to be 28 Ram. As for the height, I'm
going to set 233 Ram. As you can see, the size of
the drop down menu is bigger. Next I'm going to
change the position. I want to place
it in the center. For that we have to define
left position and make it 50% Then in order to center
the element perfectly, we need to use transform, translate x for the value
-50% Now as you can see, the drop down menu is
centered perfectly. Lastly, I'm going
to define padding. Let's set padding
to one Ram on top, then to Ram on the
rest of the sites. We need to m three times the padding is
applied to the element. Okay, next I'm going to
customize the development. I mean development which includes the phonemicon
and this pan element. Let's go ahead and
select Contact Options. Followed by a deep, I'm going to define margin, which is going to
be 1.4 m on top and bottom and zero on
left and right sides. Also, I'm going to
set to pointer. As you can see, the
margin is applied. We have some space
between the developments. Next, I'm going to take
of the phontosomicon. Let's go ahead and
select Contact options, followed by the element. I'm going to set width 24m. Then the font size of the phontosomicon
is going to be two. And also we need to
change the color. I'm going to use color 3293. Let's check the result. As you can see, the phone
osomicons look pretty nice. Next, we have to customize
the span elements. I'm going to select
Contact options, followed by the span element. The first thing that
I'm going to do is to change the phone size. It's going to be 1.6 Ram. Then I'm going to transform
text to upper case. Also change the color. I'm going to use the same color that we used for
the phonesomicon. Also, create some space
between the letters using letter spacing with
the value 0.1 Ram. Let's go to the browser. As you can see, the pane
elements look pretty nice. And the only thing that have to do is to style the butttom, which is placed down below. Let's go ahead and select
drop down four bottom. First of all I'm going to
define with in height. The width is going to be
100% As for the height, I'm going to set it to form. Also we need to change
the background color. Let's use here color 2371. Here we have the
button next we need to get to it off
the default order. Also, I'm going to make
the button rounded. Let's go ahead and
set border to non. As for the border radius, I'm going to make it run now. Our button is much nicer. Next we have to take
care of the font. First of all, let's
define font size. It's going to be 1.4 Ram. Then I'm going to make the phone bolder using
font weight bold. Also transform text to per
case and change the color. The color is going to be white. The font looks pretty nice. The only thing that I have to
do is to create some space between the letters using
the letter pacing, 0.1 ram. And also, I'm going to make
the cursor pointer again. That's it. The fourth drop
down menu looks pretty nice. We have finished working on it. Next we have to take care
of the next drop down menu, which is going to be the fifth drop down menu and the last one. Let's move on to
the next lecture.
21. Creating HTML Markup for the Fifth Dropdown: All right, in the
previous lecture, we have finished working on
our fourth dropdown menu. I made the drop down menu
of the contact link. I think it looks pretty nice. And now we have to
move on and take care of the last dropdown menu, which is going to be
for account link. Let's go ahead and take a
look at the finished project. Here we have our
last dropdown menu. As you can see, it consists of a couple of
different elements. We have two different inputs
for username and password. Then you can see here the check box which is
followed by the button. And down below, you
can see some links. If you forget your
username or password, those links will help you
to recover your account. That's about the
last drop down menu. As usual, I'm going
to create the HTML markup and then we will
style the mark up. Let's go ahead and find
the link for accounts and create new comments
for drop down five. Then I'm going to
open development, which will have two
different classes, drop down and drop down five. Then I'm going to open form tag. Let's get rid of action
attribute, we don't need it. I'm going to add
here class name, which is going to
be account form. Inside the form elements
I'm going to create, which is going to be
count input group, it will include
two input fields. I'm going to open input
tag with type text, and also we need here a placeholder attribute
as the value. I'm going to insert
here, user name. Let's duplicate
this line of code. The second input field
will be for password. I'm going to change the type. It's going to be password also. Let's change the
placeholder attribute we need here, password. Okay, let's see about
the input group. Next I'm going to create development which will
include input and label. I mean input for check box. Let's add a class name to the development and
it's going to be check. Then I'm going to
institute input elements. The type is going
to be check box. Also, we need your ID attribute
with the value check. Next, I'm going to open label
and in the four attribute I'm going to place
check also as the text, I'm going to insert your, remember me, we used your ID attribute and also four attribute
with the same values. Let's take a look
at the browser. If I click the label, then the check box
will be checked. That's why we used
those two attributes with the same values. All right, next I'm insert your buttoon with type button. I'm going to insert your
text member lock in. After that, I'm going
to create paragraph in which we will insert
the following text forgot. Then we need her span
elements, username. Next we need, and again, span elements with
the text pass. Finally, we need
here question mark. Okay, that sits about the HTML
markup for drop down five. Here we have the HTML markup. Next we have to style
those elements. And for that, let's move
on to the next lecture.
22. Styling the Fifth Dropdown: In the previous lecture,
we have prepared the HTM mark up for our
last drop down menu. I mean, the drop down
menu for link account. Now we have to customize it. Actually, we will finish the
navigation in this lecture. Let's take a look at
the finished project, the drop down menu. The last drop down
menu should look like. Let's go to the VS code and insert new comments
for dropdown five. Then I'm going to
drop down five, the rapper deep element and
define its within height. The width is going to be 30 ram. As for the height, I'm
going to make it 32 Ram. As you can see, the size has changed of the top down menu. Next I'm going to
censor the element. I'm going to do that using left position 50% And
also we need to transform translate x with the value -50% It allows us to censor
the element perfectly. As you can see, the
dropdown menu is centered. Next thing that I'm going
to do is to define padding. I'm going to make padding
2.5 Ram on all four sides. The padding is created, the space inside
the drop down menu. That's it about the
wrapper development. Next I'm going to
select Input Group. I'm going to align
inputs using flax box. We need display flex. Then we need to align
inputs vertically. And for that we have to
change the direction of flex box and we have
to make it column. Okay, that's it
about input group. Next we need to customize
the input itself. Let's go ahead and
select input group, followed by the input tag. First of all, I'm going
to define written height. The width is going to be
100% As for the height, I'm going to make it five. Also, let's change
the background color. In this case I'm going
to use RGBA color. The first value is
going to be 191, then the next one
is going to be 213. For the third value's
going to be 240. Then we need to
define the opacity, and I'm going to set
opacity 2.4 As you can see, the size of the
inputs are changed. And also we have here
different background color. Next thing that I'm
going to do is to create some space inside the inputs, and also we need some space
between the input fields. I'm going to set
padding 2.5 Ram on top and bottom and one Ram
on left and right sides. Then I'm going to separate
inputs using margin bottom. It's going to be three run. As you can see, the space
inside the inputs are created and also we have separated inputs
from each other. Next thing that I'm going
to do is to get rid of default border
using border none. I'm going to make the
inputs slightly rounded. We have to do that using border radius and the
value is going to be 0.5 Now the inputs
look much better. Next thing that
I'm going to do is to take care of default. I'm going to change
the font size. Let's set font size to 1.6 Ram. And also I'm going
to change the color. Let's use color 444, which is dark gray color. Now the font and the color is changed actually with the
input field, we are done. The next thing that
I'm going to do is to change the color of the
placeholder attribute. For that, we have to
select input group, then input, which
will be followed by the placeholder pseudo,
placeholder pseudo element. This one is pseudo element, we need here color. I'm going to use color 888, which is lighter gray color. Okay, so as you can see, the color of the placeholder
attribute is changed, actually, with the
inputs. We're done. Next thing that I'm going
to do is to take care of the check box and label. I'm going to select wrapper development which
has class name check. I'm going to move check box and the label slightly up for that. Let's use margin top with
the value minus two. As you can see, the
elements moved up. Next I'm going to take care
of the label, let's check, followed by label, I'm going
to set font size to 1.6 ram. Then we need pond. It's going to be 300, 300. Also I'm going to
change the color. Let's use color 777. Okay, The check box and
the label look nice. Now I'm going to take
care of the bottom. Let's go ahead and
select the account form. Followed by bottom
I'm going to set with 100% then the height is
going to be full Ram. I'm going to change
the back one color. Let's use here color two, D two DCF, the size of the bottom and also the back one color are changed. Next, I'm going to get
rid of default border. I'm going to make
the button rounded. We need here border none. Also, we need border radius
with the valued Ram. Now we should have
much better results. The button looks pretty nice. Now we have to take
care of the phone. Let's change the phone size. Let's set it to 1.4 Ram. Then we need font
weights to be bolder. Also, I'm going to
transform text into upper case and change
color, make it white. We have much more better result. Button looks nice,
but we have to add some Mos styles to this element. I'm going to increase
space between the letters. Let's make it a 0.1 Ram. Also change the cursor,
make it pointer. We need some space on top
and bottom of the bottom. I'm going to set margin
to three Ram at the top. Then we need zero
on the right side, 1.5 Ram at the bottom, and zero on the left side. Now we have much nicer results. We have some space on top
and bottom of the button. And actually that's
it about the button. Next we have to customize
the paragraph down below. Let's select Account Form. Let's set phone
size to 1.5 Fram. Then we need text, a line to be center. Also, I'm going to add
here phone weight 300. Here we have the paragraph. Remember we have here two links. I mean username and password, we have to customize
those two words. They are span elements. We have here two span elements. I'm going to select account
form and then span. Let's change the
color of the element. It's going to be 2371. Then we need cursor
to be pointer. Also, I'm going to
change for eight, let's say 2400, okay? So everything looks
pretty nice actually. With the drop down
menu, we are done. Also, we can say that with
the navigation, we are done. Next, we have to take care of the next section
of the landing page, which is this one. Its pretty nice. Let's move on to
the next lecture and start to build this section.
23. Creating the HTML Markup for Services Section: All right, in the
last lecture we have finished working
on the navigation. We have created all
the drop down menus. And now we have to move
on and start to create the next section of
our landing page. Let's take a look at
the finished project. The next section is going to be section about the services. The section will
consist of a heading, then we will have nine
different services. Each service will consist of ponsomicon heading
and some text. And besides that, we'll have here nice and cool backgrounds. Those different shapes which
I think look nice and cool. All right, as usual, we will start to
create this section by creating the HTML markup. Let's go back to the VS
code and after header, create new comments
for services. Then I'm going to open section tag with
the class services. Next I'm going to open tag which is going to be the
wrapper of the content and I'm going to assign to
its name services wrapper. Inside the wrapper,
I'm going to open H one heading tag and
I'm going to insert your content, what we offer. Then after heading,
I'm going to open dip tag and it's going
to be the services list. Let's add to this element
class name services list. Inside the list, I'm going
to create the services. Let's open tag with the
class name service. As I said, each
service will include phonosomicon heading and also paragraph with some dummy text. I'm going to institute I
elements with the class. A solid FA laptop. Then after phonomiconI'm going to open H three heading tag, it's going to be website
creation after heading element. I'm going to open tag, I'm going to insert you some dummy text with
let's say 20 words. Here it is. Okay, that's it. About
the first service, we're going to have
nine services overall. I'm going to duplicate
this element eight times. Then I'm going to change the
phonics and the headings. The second phonomicon
is going to be FA solid FA arrows to circles. For the heading elements, it's going to be
content management. Then the third icon
is going to be FA brands, the A logger. As for the heading element, I'm going to insider blogging. Then the next phonomicon is
going to be a solid, a globe. As for the heading element, it's going to be commerce. Then we will have here a brands, a search engine. Then we have to change
the heading element, it's going to be CEO. Then I'm going to change
the phonosomicon, it's going to be a solid. As for the heading element,
that's user management. The next phonomicon is going
to be a solid FA ticket. Let's change the H
three heading element, it's going to be multi
lingual support. Next we will have here a solid FA hashtags for the heading is going to
be social media integration. And the last icon in the
service is going to be parents FA, rocket chat. That's it, about the services. Let's take a look as the result. Here we have all services and all the icons are displayed. The only thing
that have to do is to create two backgrounds. Those two shapes, we need two deep elements right
above the closing section. We need here class name services G one and then services PG two. Okay. The HTML markup of the
services section is created. The last two elements, I mean, those backgrounds
are not visible yet because they are
just empty elements. Now it's time to
customize this section. And for that, let's move
on to the next lecture.
24. Styling Services Section: All right, so in the previous
lecture we have created the HTML markup for
our new section, I mean the services section. Now it's time to move on and
start to style this section. Let's go back to the VS code and insert new comments
after the header, We need here comments
for services. Then of services, I'm going to select
the section element. First of all, I'm going
to define within height. Width is going to be
100% As for the height, I'm going to make height
170, viewport height. It means that the
height will take up 170% of the view pot. If we check the browser, you will see that the
section will have height 170% of the view put. Okay, let's it about the
section element for now. Next I'm going to select
services wrapper. I'm going to define with as 60% Then I'm going to
change the background color. It's going to be white. Also, I'm going to
add here box shadow in order to make the
element visible. The box shadow will have
the following values, 02 Ram, then we'll have six Ram. As for the color, I'm
going to use RGBA value. I'm going to insert
here 130, then 162235. And then we need opacity, and it's going to be a
0.3 Now as you can see, the element has box shadow
and it's visible on the page. After that, I'm going
to take care of the position of the wrapper. Let's set position to absolute. I'm going to position services wrapper according
to its parent elements, which in this case is services. We need position relative
for the parent element. I'm going to set the position to 50% then the left
position is going to be 50% I'm trying to censor the element perfectly
on the page for that. As you already know,
we have to use transform with
translate function. And we have to add here
-50% and -50% We need here two -50% because we are trying to censor the element
vertically and horizontally. Now if I check the browser, you will find that
the element is centered perfectly
on both directions. I mean vertically
and horizontally. All right, after that, I'm going to create some
space using padding. Let's set padding on top
and bottom to six Ram. As for the left and right sides, I'm going to make padding zero. We have some space
on top and bottom. Next, I'm going to make
the element slightly rounded using border
radius with value one Ram. Also, I'm going
to align elements using flax box we need
here display flax. Then I'm going to place
the flex items vertically. We need to change the
direction of flex box. It's going to be column. Also, I'm going to align
items in the center. As you can see, the
items are placed vertically in the column and also the content is
placed in the center. All right, let's sit about
the services wrapper. Next I'm style of the
heading elements. Let's go ahead and select services wrapper with
H one heading element. I'm going to change
the phone family. In this case I'm going to use
phones called Mull cursive. Then I'm going to
increase the phone size, it's going to be three Ram. Also, let's transform
text to upper case. Then the phone is, the phone is going to be bold
and also change the caller. I'm going to use caller 39. 4353. It's dark gray color. Let's check the heading. As you can see, the
heading looks pretty nice. I'm going to increase space between the letters
using letter spacing. It's going to be 0.1 Ram. And also, I'm going to create
some space at the bottom of the element using marching
bottom with value eight Ram. Okay, that's it,
about the heading. Next I'm going to take care
of the services least. Let's go ahead and
select services list. I'm going to use
again, flex box. Let's set display to flex. Then in order to
wrap the flex items, in order to place the items in a couple of different rows, we have to use wrap
with the value p. Also, I'm justify content center in order to center the
flex items horizontally. Right now, nothing is
changed here because we need to assign with
height to the services, I mean the items themselves. Once we do that, then
the items will be placed in a couple of different roles like we have
it in the finished version. Okay, as a guest, we have to select the service itself and define with height. The width is going to be 28 Ram. As for the height, I'm
going to make it 35 Ram. Now as you can see, we have three different rows, and in each row you can
see the three items. All right, the layout is ready. Now we have to
customize the items. I'm going to create
space between the items on left
and right sides. I'm going to use margin. We need here zero on
top and bottom and 2.5 fram on left
and right sides. Now we have space
between the services. Next thing that I'm going to do is to use again, flex box. Let's set display to flex. Then I'm going to
change the direction because the elements inside the services need to
be placed vertically. For that, we have to set
flex direction to column. Then I'm going to center
the items using a line. Items center and justify content we need here
content center. As you can see, the elements inside the services are
placed in the center. Next thing that
I'm going to do is to take care of the phonoicons. Let's select
service, followed by the element I'm going
to set within height, both of them to ten. Then I'm going to change
the background color. It's going to be white. Also we need box shadow, it's going to be 01 Ram Ram. Then we need RGBA color. The values will be 75, then 1192 to one, and the opacity is going to be 0.15 Here we have
the phone icons. I'm going to make those boxes around it
using border radius, it's going to be 50% Now
we have the circles. Next thing that I'm
going to do is to place the icons in the center
of those circles. For that I'm going to
use again, Flex box. We need Display Flex and then a line items center
and Justify content center. Now the icons are placed in
the center of the circles. Let's make them bigger using, I'm going to set
font size to form. Also I'm going to create some space at the
bottom of the icons. Let's set margin bottom two M. Okay, here we have
the phone icons. Now as guest we have to change
the colors for each icon. I'm going to start
with the first icon, but before we do that, I'm going to look at the finished version. As you can see, each icon
has different color. But if you look at the colors, you will notice that we have
here linear gradient effect. I'm going to create this effect. First of all, I'm
going to select first service using
chat selector. Then we need element. In order to create
linear gradient effect with the text element, I'm going to use the
following technique. First of all, we need background with linear gradient function. I'm insert here. The first color is
going to be white. As for the second color, I'm going to insert one to 59. Also, I'm going to add
here 60% It means that color transition will start
after 60% of the elements. If we check the browser, then you will see
that the phonosomicon still has the black color, but the background of
the circle is changed. Actually, we don't need that. We have to change the
color of the icon itself. In order to do
that, I'm going to add here two
different properties. The first one is going to be
a web ket background clip. The value is going to be text. As for the second
property is going to be web ket text field color. I'm going to add here
transparent as the value. Now as you can see, we have here nice
and cool result, The ponme icon has
linear gradient effect. Let's do the same for
the rest of the icons. I'm going to duplicate
this code eight times, because overall we
will have nine icons. Let's change the numbers
of the selector. And also we need to
change the colors. The second color is
going to be FA 751c. The second icon
looks pretty nice. Let's go ahead and change all the icons when
you here three, the color is three to 93. Then we'll have here four. The color is going
to be 31 DCA one. Then we will have fifth icon. As for the color, I'm
going to add here 4400b. Then we'll have the sixth item. Let's add here f4800. Then we will have
the seventh icon. As for the color, I'm going
to insert here F26 AC. Then we need here
icon number eight. As for the caller,
let's use 0010. We need to change the last icon. It's going to be b6004. So as you can see, all the icons have different linear gradient
background colors. And they look pretty nice. Okay, now we have
to take care of the headings in the services. Let's go ahead and
select service three. I'm going to change
the phone family. It's going to be croson one, cursive, then the phone
size is going to be Tom. I'm going to change the color. Let's set color to 5728. We need here the pound sign. Finally I'm going
to add here margin. Let's set margin to
two Ram on top and bottom and zero on the
left and right sides. Can see the headings
look pretty nice. Now we have to take
care of the paragraphs. Let's go ahead and
select service. I'm going to set pound
size to 1.6 Ram, but then We need to align
text in the center. Finally, change the color. I'm going to use here, 889b9. All right. As you can see, the services look pretty nice. We're almost done
with the section. The only thing that I
have to do is to take care of the backgrounds. I mean those shapes here. Let's go ahead and do that. I'm going to start
with the circle. Let's select service PG one. I'm going to set width
and height to tram. Then I'm going to
change the background. We need to use linear gradients. The direction is going
to be two rights. Then we need transparent
as the first color. The second color is going
to be transparent as well as for the third color, I'm going to add here f437. Here we have the elements
in the background. As I said, it's
going to be circle, so I'm going to use boiler radius with the
value of 50% Also, I'm going to change the
position of the element. Let's set position to absolute. Then we need to
position to be zero. As for the right position, it's going to be 10% As you can see the
circle is position. Actually it covers the
services. We don't need that. In order to fix that, I'm
going to add z index property to services wrapper with
higher value than zero. Let's set it to one. As can see, the problem is fixed, okay? The only thing that
have to do with the circle is to
decrease the opacity. In order to make it
look much nicer, I'm going to set opacity
2.3 As you can see, now we have much better results. That's it, about the circle. Now I'm going to take care of the second background
which is rectangle. Actually, I'm going to
duplicate this code. Let's change the class name. It's going to be services G two. We need the same within
heights as for the background. I'm going to change the
color we need here, 74b5. Then I'm change
the border radius. In this case we need 15 Ram. Also, I'm going to change
top position to bottom. It's going to be 5% As
for the right position, we need to change it into left. Left position is going to be 12. 12% Let's check the
results we have here, the rectangle and I'm going
to rotate it slightly. Let's use transform rotate Z and the value is going
to be minus ten degrees. Actually, something's wrong here because in the finished version we have a different result. Let's check the code. It's weird because everything
seems to be correct. Oh yes, we need to
change the direction. In this case, the
direction should be to left and not to right. I think it fix the problem. The problem is fixed and
everything seems to be perfect. Okay, that's it
about this section, I think it looks pretty
nice and you like it. The next thing that
I have to do is to take care of the navigation, because once we scroll down, we have to make the navigation
sticky, fixed at the top. This effect here,
once we scroll, then the navigation
changes its background. It is fixed at the
top edge of the page. In order to create this effect, let's move on to
the next lecture.
25. Creating Sticky Navbar on Scroll: All right, in the
previous lecture we have finished styling
the services section. It looks pretty nice. As we said, we're going to
take care of the navigation. We have to make no sticky. Once we scroll down the page, let's take a look at
the finished project. Once we scroll down the page, then we have to change
a couple of things. We need to change the background
color of the navigation. Also, we need to
change the colors of logo and the
navigation items. We have to customize the bottom. And also we have to change the positions of the
drop down menus. Okay, so that's it, what we're going to
do in this lecture. Now it's time to use a
little bit of Javascript. Let's open script JS file. The first thing that
I'm going to do is to select the navigation. I'm going to create
new variable. I'm going to call it par. We need to select navigation, and for that I'm going to
use query select method. We have to specify
here the class name, which is going to be no part. Okay. The navigation
is selected. And now we need to check if the vertical scroll position of a web page is greater than zero. I'm going to use
a window object. Actually, window refers to the web browser window or the current tub that
you're viewing. We need to use
window object and we have to add to it
an event listener. The type of the event
is going to be scroll. Also, I'm going to place here a callback function which will be executed once we
scroll down the page. Now we need to check if
window is scrolled or not. For that, I'm going to use if statement as the condition
I'm going to insert here. Window scroll Y. Actually scroll Y is
a property that tells you how many pixels the page has been scrolled
vertically from the top. If it is greater than zero, then it means that you scroll down from the very
top of the page. We have to check if window
scroll y is greater than zero. If it is true, then I'm going to add
new class to the navbar. And then we will define new
styles in the CSS file. For that newly created class, I'm going to use navbar. Then I'm going to access
to the class list of the nap we have to add here new class and I'm
going to call it sticky. Again, if the page
is scrolled down, the naber will get
new class sticky. Next, we need statements. If the window scroll y property
is not greater than zero, then we have to remove back
class sticky from the napper. We need napper dot class list. Then we have to
use remove method. And we have to specify
here again, sticky. All right, that's it
about the Java script. Now I'm going to go
back to the CSS file. We have to select Napper
with a sticky class. I'm going to insert
Napper Sticky, And we have to
define new styles. I'm going to
decrease the height, it's going to be a Ram. And also I'm going to change
the background color. Let's set it to white. Now if we scroll down, then the new styles will
be applied to the napper. As you can see, the background
color is white and also the height of the
napper decreased. Okay, next thing
that I'm going to do is to make this
effect smoother. And for that we have to
use transition the values, all the duration is
going to be 0.3 second. Once we scroll, then the
effect will be smoother. All right, next I'm going to add little shadow effect
to the Of bar. Let's use here box shadow
with the values 01 Ram, ten Ram, and the color
is going to be RGB, A 130-16-2235, and the opacity is going
to be 0.6 once we scroll. You will see here nice
and cool shadow effect. All right, next thing that
I'm going to do is to change the color of the logo. Let's go ahead and
select span elements. Using again, sticky,
we need here sticky, then logo, followed
by the span element. I'm going to change the color. It's going to be 0926 to seven. Also, I'm going to get rid of
tech shadow from the logo. Let's say it none actually, the color is not changed. There is something wrong. We have to add this
code down below after the code where we style these panelementsow
this code should work. If we scroll down, it will see that the color
of the logo is changed. Okay, Now we need the same
thing for the no items. Let's find no link we need here sticky. Then no link, we have
to change the color. It's going to be the
same color, 092627. Also, we need to get rid of tech shadow. Let's
set it to none. As you can see, the color
of the O items are changed. Next we have to change the
position of the triangle, which is the after
element of the nav item. Also, I'm going to change the position of the
drop down menu. Let's add here Sticky, followed by the ad elements. Let's set to position two. We need here curly brackets. We need to position
to be six Ram. As for the drop down menu, let's use sticky
followed by dropdown. I'm going to set to
position to tram, and also I'm going to
change box shadow. Let's make it 0110 Ram. And the color is going to be
this one with lower opacity, 0.4 Now as you can see, the positions of the triangle and the top down
menus are changed. And also we have here
nice and cool box shadow. The only thing that have to do is to customize the button. Actually, we have
here little problem. We don't need this
triangle here. I'm going to fix that. Let's find the pseudo element, which is a triangle. We have to exclude
here the button. And we can do that in
the following way. You can see here
that we select item. And then after pseudo elements, in order to ex
element from here, we have to use one of the
pseudoclasses called. We have to specify here the bottom actually it
is the last up item, so we can infere pseudoclass
called the last child. It will exclude the
bottom from here. Now if we check, as you can see, we no longer
have here the triangle. The problem is fixed. All right, the last
thing I have to do is to customize the bottom
once we scroll down. So let's go ahead
and find button. It should be after drop downs. Here it is. Let's select
button with Sticky class. I'm going to change
the background. Let's use linear gradients. We need direction
to be two rights. As for the colors, the first
color is going to be F459. As for the second color, I'm going to insert here F3598. Then we have to get
through off box shadow, it's going to be none. Also, I'm going to change
the color of the button. It's going to be
white as you can see. Button looks pretty
nice actually. That's it about the
sticking out par, everything looks and
works perfectly. We can move on to
the next lecture and start to take care
of the next section.
26. Creating the HTML Markup for Projects: In the previous lecture, we
have created a sticky of bar. Once we scroll down the page, then you'll see
that we have here a fixed no bar at the top
edge of the web page. I think it looks
pretty nice and cool. Next thing that we
have to do is to create another section
which is called project. If we take a look at
the finished project, then we will see here
project section, which I think is very
impressive and cool. The section consists
of heading paragraph, then we have here
little navigation with different categories
of the websites. You can see here business,
food, health, travel. Other if I click any
of the categories, then we will get here the
proper website packs. The navigation works perfectly. We have here button view all, and if we click it, then all
the projects will display. I think this section will
be very interesting. We will use HTML CSS
and also Java script. Now it's time to start
to create the section. As usual, I'm going to
start with HTML markup. Let's insert new comments here. I'm going to open section
tag with the class projects. Then as I said, we will start
with heading and paragraph. I'm going to open H, one
heading element with the text 100 plus full websites. Then we will have
paragraph which will include some dummy
text as you already know. In order to create
some dummy text, we have to write a Lom and then we have to specify
the number of words. In our case, I'm going
to create 30 words. Here we have our dummy
paragraph after paragraph. We need to create navigation. Let's open tag with the
class filter of overall, we will have six
different links. Five of them will be
different categories. As for the sixth link, it's going to be
View All button. I'm going to open link with
the class filter link. Then as the text I'm going
to insert your business. Besides that, we need
you to insert attribute called data type in which we
have to specify the type, I mean the category
of the project. In this case, we need business. Let's duplicate the
link element five times, then change categories. The second one is
going to be food. We need to change
data type as well. Then the next one is
going to be health. Then we will have here travel. Then the next one is
going to be other. Finally, we need here view. All as for the data type, I'm going to insert here all. All right, so let's it about
the filter navigation. Next we have to
create the projects. I'm going to open deep
tag with the class name projects list in which I'm
going to create the project. Each project will consist
of three different images, like we have it here in
the finished project. As you can see, each project consists of three
different images. We need to insert here
three different images. But before that, we
have to add here data type attribute in order to specify the category
here as well. The first category is
going to be business. I'm going to insert
three different images. Let's open image. I'm going to specify here
the path of the image. First of all, we need to
as the current folder. Then select images
folder and find the first image which is going
to be web one, image one. Let's duplicate this code twice and change the names
of the images we need here. Web one image two, and then web one image
three. All right, that's it. About the first project,
as you can see, we have here the
heading paragraph, then we see here the navigation. And also three different
images which right now are too much bigger. But
we will fix that. Let's go ahead and duplicate
projects 11 times, because overall we'll have
12 different projects. Let's go ahead and
make some changes. The second data type
is going to be other. Also we need here to
change the name of the images we need
here, Web two. Then the third project
is going to be for food. We need here three. Then
the next project will be Health Web four. Next we will have other, let's change the names of the
images we need. Web five. Then the next date type
is going to be health. As for the images,
we need web six. Then we'll have your web seven. The next project will
be in travel category, it's going to be web eight. Then the next one
is foot web nine. Then we will have business. Let's leave the
value add here zero. We need web ten. Then we'll have foot web 11. And the last type is
going to be business. I'm not going to
change it as for the names of the images
we need here, Web 12. Okay. That's sits the HTML markup for the
project section is ready. Let's have a look
at the browser. As you can see, we have
here all 12 projects. Everything is ready.
And now it's time to start to style this
section for that. Let's move on to
the next lecture.
27. Styling Header of Projects and Filter Navigation: In the previous lecture,
we have prepared the HTML markup for our
project section. As you can see, all the
images are here for the web. It's time to style this section. In this lecture,
we're going to be styling the first
part of the section, I mean the heading paragraph
and the filter navigation. And then we'll move on and style the website packs as well. Okay, let's go to the
V code right after services section in set
new comments for projects. Then I'm going to select
projects section. First of all, I'm going to
define width and height. The width is going to be
100% As for the height, I'm going to make
it 100% as well. Next, I'm going to create
some space at the top and bottom of the section padding. I'm going to set
padding to 25 Ram, then 015 Ram, and zero. Also, I'm going to
align elements using flex book in the display Flex. Then in order to align
elements vertically, we have to change the direction. The flex direction is
going to be column. I'm going to align
items in the center. As you can see the content, the flex items are
placed in the center. Also, we have some space at the top and bottom
of the section. Next thing that
I'm going to do is to select H one heading element. We need here projects H one. I'm going to change
the phone family. It's going to be mull cursive. Also we need phone
size to be bigger. Let's set it to six Ram. Then I'm going to create some space at the bottom
using margin bottom. Let's set margin bottom to also I'm going to change
the color of the heading. The color is going to be f4800. Let's take a look
at the heading. So as you can see, the
heading looks pretty nice. Next I'm going to take
care of the paragraph. I'm going to select projects P. Let's set with to 90 Ram. Then I'm going to a line
text in the center. Next thing that I want to do is to increase the phone size. Let's set it to two Ram. Also, we need to
change the color. Let's set color to 57 to eight. Also, create some
space at the bottom. Let's set margin
bottom to four Ram. As you can see, the
paragraph looks pretty nice. Next I'm going to take
care of the navigation. Let's go ahead and
select Filter Off. The first thing
that I'm going to do is to define the width. It's going to be 80% then I'm going to set
height to ten Ram. Also change the
background color. It's going to be white. Then I'm going to
box shadow in order to make the navigation visible. I'm going to set box
shadow to 02 Ram. Eight Ram as the color. I'm going to use TBA. The values will
be 130, then 162. Let's select this values. I'm going to set
Opacity 2.2 Okay, here we have the
filter navigation. Next I'm going to make it slightly rounded,
using border radius. Let's set it to one Ram. Then I'm going to use flex box. Let's set display to flex. I'm going to align items
in the center vertically. As you can see, the items are placed vertically
in the center. Now I'm going to create a
space between the items using justify content space. On this value
allows us to create even space between
the flex items. Finally, we need some space between the navigation
and the images. I'm going to do
that using margin, bottom with the value six. Okay, now the navigation is
separated from the images. Next, I'm going to
customize the link. In the filter navigation, I'm going to select
filter nav link. Let's set width and height. The width is going to be 14 Ram. The I'm going to set
height to four Ram. Let's change the
background color. It's going to be F245. As you can see,
Width and height and also back one color are
applied to the link elements. Next, I'm going to make the elements around
using border radius. It's going to be four, so we need to place the
links in the center. For that, I'm going to
use again, CSS Flexbox. We need Display Flex, then Justify Content Center, and a line items center. As you can see, the links
are placed in the center. Let's go ahead and set font
size to one point form. Then we need font weight,
it's going to be bold. Also, we need to
transform text to upper case, then change color. It's going to be 919
AA. Let's take a look. The navigation
looks pretty nice. I'm going to create
a space between the letters using
letter spacing. Let's set it to 0.1 run. All right, now I'm going to create a
little hover effects. Once we hover over the links, they should change
their background color. And also I want to move
them a little bit up. Let's select filter
link with hover. I'm going to change
the background color. Is going to be a D F two. Also we need to move
element little bit up. We need to transform, translate Y and the value is going to be -0.1 The ho effect works fine, but we need smoother effect. Let's add transition
A 0.3 seconds. Now everything works fine. Actually, I think
that the height of the links are a
little bit smaller. Let's check the
finished version. Yeah, it's definitely smaller. Let's increase
height, make it five. Now we have better results. Next thing that I'm
going to do is to make the view button
active by default. As you can see, the
view all bottom has different background color and also the color of
the phone is white. In order to do that, I'm
going to add new class to the last link I view link. Let's add here Active. Then I'm going to select Active class and change
background color. It's going to be f401 And also we need color
of the text, white. We have to add to the classes and not to
the data type attribute. That was little mistake. Now the style should be applied. The only thing I
have to do is to change background color on. I'm going to select
active with hover. Let's change the
background color. It's going to be C611. Now, everything works fine. We have finished working on the first part of our section. Next we have to customize
those website packs. Right now we have
here bigger images. We have to take
care of it further. Let's move on to
the next lecture.
28. Styling Website Packs: All right, in the previous
lecture we have style, the first part of
the project section, I mean the heading paragraph
and the filter navigation. And now we have to take
care of the website packs. Overall, we have here
12 website packs. They are aligned in
different lines. We have four rows. In each row we have
three websites. Let's go to the VS code
and start to style. The second part of
the project section, we have to select projects and I'm going to
define width and height. The width is going to be 33 Ram. As for the height, I'm going to set height 233 Ram as well. Next I'm going to select
and style images. Right now they are to bigger, so we have to take care of
that and make them smaller. I'm going to select the
first image we need, project image, then
child selector. We need here first image. I'm going to set width to 22. Run as for the height, I'm going to make it 100% The
first image is smaller now, but actually it is stretched
and it doesn't look good. In order to fix that problem, I'm going to select image and use property called object
feet with the value cover. Now as you can see, the
images look really nice. Next, I'm going to
duplicate this code twice. Let's change the numbers here. We need nth child two
and nth child three. The second image is
going to be 20 Ram. As for the height, I'm going to set it to 30 Ram. Then we have image number three. The width is going to be
100% As for the height, I'm going to make
it 70% All right, next thing that
I'm going to do is to select projects list. I'm going to define
with and height. The width is going to be
70% As for the height, I'm going to make
it 100% Then I'm going to use Flex Box in
order to align the elements. We need Display Flex. Then we need Justify
Content Center to center the flex items horizontally. Then we need wrap with the value p in order to align website packs
in different rows. As you can see now we have images align
in different rows. Right now they don't
look quite good, but we'll fix that soon. Next thing that I'm
going to do is to set the position of the
image to absolute. Then we need position relative
for the parent element, which in this case is project. We need your position
relative because we are going to position the images according
to the parent element. Now all the images have
position absolute. Next thing that I'm
going to do is to set to position for every image to 50% Next we need positions
for the first image. I'm going to set
left position to 50% In order to place the
image in the center perfectly, we need to use transform
translate with the values -50% again -50% The first images are placed perfectly in
the center in the project. Next I'm going to add shadow
effect to the first image. Let's use box shadow. I'm going to add here
the following values. We need 01 Ram, and then full Ram, and RTB A. I'm going to use
black color with the opacity. 0.4 As you can see, the first images have
the shadow effect. They are not fully visible. In order to fix that, I'm going to use the index property. Let's set the index 22. Now, they should
be fully visible. Yes, they are visible. Next, I'm going to take
care of the second image. Let's set left
position to -5% Also, we need to translate, actually, not to
translate, to transform, and then we need to translate Y -50% The second images are positioned here. Again, z index property, because they are
not fully visible. Let's set z index to one. Now they are visible, but they are placed
behind the first images, and that's what we need. I'm going to add
here box shadow. The values will be
03 Ram, eight Ram. The color is going
to be RGBA, 130162. Let's select this value
and change the opacity. It's going to be 0.9 Now the second images have this nice and
cool shadow effect. Actually, I'm going to make the corners of
the images rounded. Let's use for the radius. Let's set it to one Ram. Now the images look much better. Next thing that
I'm going to do is to take care of the third image. I'm going to set
right position for the third image to -10% Again, we need to transform,
translate Y -50% the third images
are positioned. Let's add here box shadow. Actually we need
the same values. Let's copy them from here
and paste down below. Now the third images are
positioned and have box shadow. The only thing that
I have to do is to separate website packs
from each other. I add here margin five. Also, I'm going to make
cursor point, okay? So everything looks perfectly and where the
projects we are done, I'm in the website packs. Everything is styled
and looks pretty nice. Now we have to make
this navigation work. Once we click any
of the categories, then the proper images
should be displayed. In order to do that, I'm going to move on to the next lecture.
29. Making Filter Navigation Work: All right, in the
previous lecture we have finished styling
the project section. As you can see, everything
looks pretty nice. And now we have to make
the navigation work. I mean, once we click
any of the categories, then the proper website
packs should be displayed. Let's take a look at
the finished project. If I click any of the links, then the proper websites
will be displayed. If I click View All button, then all the websites
will be displayed. All right, that's what we're
going to do in this lecture. Let's go to the script JS file. Actually, the first thing
that I'm going to do here is to add comments for Napper, because I forgot it. We need here now of a. And then I'm going to insert new comments
for the project section. First of all, I'm going to select all the link elements and store them in the variable. Let's create new variable. I'm going to call
it filter links. Then we have to
select all the links using query selector all method. This method allows us to select multiple elements
with the same class name. In this case, we need here
class name filter, no link. This method returns a node
list which is a collection. It is an array like object. Now we have to look
through the node list. I mean filter links and add an event listener
to each link. We need filter links
followed by a forage method. Actually, for each method
is an array helper method. In Go script, it is used to look through the
elements of an array or node list and perform a specific action or
operation on each element. We have to insure a
callback function. This function will be executed for each element
in the node list. I'm going to insure an argument. It will be filter link. It represents the
current element being processed
in the node list. Now we can add an event
listener to the filter link. The type of the event is
going to be click also, I'm going to insure a callback function which will be executed once
we click the link. If we take a look at the browser and click
any of the links here, then we will navigate to
the top of the website. Actually, it is a default
behavior of the link element. And we have to prevent this default behavior for that we need to pass
here and even objects, then we can use method
called prevent default. Now if I click the links, we will no longer navigate
to the top of the page. All right, as you know, the last link, I mean view all button has a
default class active. Once we click any of the links, we should remove this class, I mean class active from the current element and we have to add it to
the clicked element. In order to do
that, I'm going to select elements using
query selector method. I'm going to specify
here the class name. We need filter link and we have to add
here class active. Once the active, the link
element is selected. Now we can remove class
active from this element. We need class list property. Then we need remove method. And we have to specify here
the class name active. Once we click the link elements, then the active class will be removed from the element and it will be added to
the clicked element. Now in order to add class
active to the clicked element, we need here filter link, class, list, add,
and we have to. Institute class act. All right, so let's check the browser. If we click any of the links, then you will see that the
background is changed. Actually, it works fine. All right, so now we have to
take care of the projects. Let's go ahead and select all
the projects using again, query selector, all method
we need to specify here, the class name, project. Now, I'm going to hide
all the projects. Once we click the filter link, we need to look
through the projects, which is a node, least a collection, and we
have to hide each project. In order to do that,
I'm going to select projects followed
by a forage method. I'm going to pass here
callback function. The argument is
going to be project. Now, in order to
hide the projects, I'm going to add new
class to the project. And then we will use
this class in CSS. In order to hide the element, we need project class list. And we have to specify
here the class name. In this case, I'm
going to call it hide. Now let's go to the CSS file and select project with class hide. In order to hide the element, I'm going to use display none. Now if we click
any of the links, then all the projects
will be heated. Okay, Now we need to hide and display projects according
to the categories. And for that we need to use
here a conditional statement. I mean if statement. Let's create if statement as the condition I'm going
to pass here the following. We need filter link
dot get attribute. I'm going to pass here
attribute called data type. As you remember, we added
data type attributes to the links and also to
the projects as well. If this expression is equal to project get attributes,
then data type. This condition if
the data type of the clicked filter link matches the data
type of the project. In other words, it's checking
if the filter link and the project belong to
the category or type. If this condition is true, then we have to keep the
matching projects displaying. But that's not all we have
to add here or statement, we have to check another
condition which is going to be filter link get attribute. We have to specify here
the data type attribute. If this is equal to all this part of the
condition checks if the data type of the clicked filter link is set to all. This condition is
used to indicate that all the projects
should be displayed regardless of their
type or the category. All right, the condition
of the statement is ready. If it is true, then we have
to display the project. Therefore, we have to remove class height from the project. We need project
class list, remove. We have to specify here
the class name height. All right, so I think that's it now the navigation
should work. Let's click, we have
here some problem. Let's inspect the page and
check the console tab. We have an error here which says that project
is not defined. We need 29th line. Actually we need to pass
if statements inside here. That's why the project
is not recognized. Now the problem should
be fixed. Let's check. If we click again, we
have some problem. Cannot read properties of
undefined reading remove. Let's check this
line of code here, Class list with the
capital L. Now if I check, then everything will
work perfectly. Finally, the
navigation works fine, actually with the project
section, we're done. Hopefully, it was interesting and you learn some new stuff. Let's move on to
the next lecture.
30. Creating the HTML Markup for Templates Section: All right, in the
previous lecture we have finished working
on the project section. It looks pretty nice
and also works fine. I mean this filter navigation. Now it's time to move on and start to build the next section. Let's take a look at
the finished project. The next section is going to
be section called templates. This section consists
of two different parts. The first part is what
you see here right now. As for the second part, it's going to be the video. Let's go ahead and
describe the section. The first part will include
left and right sides. On the left side, you can see the heading paragraph
and the bottom. As for the right side, you can see here three
different images. And also the bottom down below, you can see the part
effect of the images. We will start with
the first part and then we'll move on to the video. First of all, we need to
create the HTML markup. Let's go to the VS code
and insert new comments right after the projects we
need comments for templates. Then I'm going to open section elements with the
class name templates. As I said, the first part of our section will consist
of two different parts. I mean the left side
and the right side. I'm going to open p
tag which is going to be templates left. It will consist of heading
paragraph and the button. I'm going to open H
one heading elements which is going to be templates. Next we need paragraph. The paragraph will consist
of some dummy text. I'm going to insert here, Lorem, and then the number
of words is going to be 30. Here we have the dummy text. Then we need the type of
the bottom is going to be, but also we will have
here class name, where it's going to
be templates, PTN. As for the text I'm going
to insert about template, okay, That's it.
About the right side. That's all about the left
side, not the right side. Now we need to take
care of the right side. I'm going to open
deep tag which is going to be templates. Right? We will have here three different
images and a play butt. Let's insert image elements. I'm going to specify the
path of the image we need to exit the car folder,
then select images. I'm going to select
web eight, image one. Then web image two, we need web eight image three. All right, let's sit
about the images. Next we need play button. I'm going to open tag with
the class name button. We will create this
baton using phones on. I'm open a first button tag with the class name Play PTN. Then I'm going to insert your
elements with the classes FA solid FA play that sits the HTML markup is ready for the
template section. I'm in the first
part of the section. Here we have the elements. Now it's time to move on and
customize those elements. And for that, let's move
on to the next lecture.
31. Styling Templates Section: All right, so in the
previous lecture we have created the HTML markup
for the template section, and now we have to
style this section. Let's go to the VS code and insert new comments
in the CSS file. We need commons for templates. Then I'm going to select
template section. First of all, I'm going to
define with and height. The width is going to be
100% As for the height, I'm going to make it
100 viewport height. It will be 100% of the viewport. Next, I'm going to
change the background. Let's use linear
gradient function. The direction of the
color transition is going to be two left. Then I'm going to insert
your first caller. It's going to be 8430. Then we'll have
the second color. It's going to be 8430. It's actually the same color
as for the third caller. It's going to be 409. Let's have a look
at the browser. So as you can see, we have
here linear grading into fat. Next, I'm going to hide the
right side for a while. Let's select templates, right. Add here, display none. As you can see, the right part is hidden and we have
here only the left side. First of all, I'm going to
customize the left side and then we will take care of
the right side as well. Let's go ahead and
select templates left. I'm going to set width to 50% it will take up the
half of the section. Then I'm going to set
position to absolute. I'm going to position templates left according to
the parent elements. We need position relative
for the templates. Next I'm going to define
top and left properties. Both of them are
going to be zero. Also, let's create some space inside the element
using padding. I'm going to set padding
to 25 Ram at the top. Then we'll have ten
Ram on the right side, zero at the bottom, and ten Ram on the left side. Again, here we
have the elements, also the space inside
the left side. Next I'm going to take
care of the heading. Let's go ahead and
select templates. Left one heading elements. First of all, I'm going to
define the phone family. Let's set phone
to Molly Cursive. Next I'm going to
set the phone size, it's going to be seven Rams. Let's transform
text to opera case. Then we need some space
between the letters. Let's set it 2.5 Ram. So I'm going to
change the color. It's going to be white. As you can see, the
heading looks pretty nice. Let's add some
more styles to it. I'm going to create some
shadow effects using shadow. We need here, 0.5 Ram. Then two, the color
is going to be RGBA, black color with the
opacity 0.3 Lastly, I'm going to create some
space at the bottom of the heading using
margin bottom, the value is going
to be three Ram. Okay, so let's sit
about the heading next. I'm going to take care
of the paragraph. Let's go ahead and
select templates left. First of all, I'm
going to define the width of the paragraph. It's going to be 60 Ram. Then let's set font
size to 1.6 Rams. I'm going to set font
weight we need here. Weight, it's going to be 300 to create a space
between the letters. Let's set it 2.1 Ram
and change the color. The color is going to be 222. Here we have the paragraph. Next I'm going to use
again Tech shadow. Let's copy this line of
code and add it here. I'm going to decrease
the opacity. Let's make it 0.1 Ram. Actually, not Ram but
just 0.1 Finally, when you hear larger
bottom to create the space at the bottom,
let's add it to seven. Okay, let's see about
the paragraph next. We need to customize the bottom. Let's go ahead and
select templates. Actually, we don't need
here templates left. We need templates BTN it has
its individual class name. First of all, let's
set with 213 Ram. Then the height of the bottom
is going to be six Ram. Next we need background color. I'm going to set it to white. Let's take a look at the bottom. We need to get rid
of default border and also we need to make
the bottom rounded. We need here border none
and then border radius. It's going to be three Ram. Okay, after that we have
to take care of the fonts. The font size is
going to be 1.8 Ram. Then I'm going to
make the pont bold. Also, let's transform
text to upper case. Then we need letter spacing to create some space
between the letters. It's going to be a
0.1 Ram and also change the color of the phones. The color is going
to be A, A three EC. Let's take a look now. The button looks pretty nice. The only thing that we
have to do is to create some shadow effect
using box shadow. We need here, 01 Ram, three Ram, and the color is
going to be RGBA with the opacity 0.1 also. Besides that, we
need here to point. Okay, so that's it, about the left side, now we have to take
care of the right side. As you know right now the
right side is hidden. I'm going to get rid of
display none From here. I'm going to set width and
height of the right side. The width is going to be
50% Then we need height, I'm going to set it to 100% I'm going to set
position to absolute. Then the two position
is going to be zero. We have to define
right position, which is going to
be zero as well. As you can see, the
elements are placed on the right side
of the section. Next I'm going to take
you of the images. First of all, I'm going to select all the
images we need here, templates, right, followed
by the image tack. The images will have
two common styles. The first one is going
to be position absolute. Also, we will have here border radius and it's
going to be one Ram. Next, we need to customize
each image separately. Let's go ahead and start with
the first one we need here, template right image, followed
by the nth child selector. Select the first image, we have to define the width. It's going to be 40 Ram. Also, I'm going to define the position of the first image. The top position is going to be 50% Then we need right position, it's going to be 25% We need to center the image vertically. And for that I'm going to use
transform translate Y with the value of -50% here. Have the first image, this one. Let's make it visible using index property because it ended up behind
the other images. Let's set the index to one. Now you can see here that the first image
is fully visible. Next, I'm going to create some shadow effect
using Po shadow. The values will be 027 Ram, and the color will be RGBA
with the opacity 0.4 Also, I'm going to decrease slightly
the opacity of the image. Let's set it 2.8 Again, here we have the first image. It looks pretty nice. Let's move on and customize
the second image. Actually, I'm going to
duplicate this code, then change the
nth chat selector. It's going to be two, the
width is going to be 20 Ram. Then we need here to position 20% instead
of right position. I'm going to use
here left position. And the value will be 18% We
don't need here transform, translate. Let's get rid of it. The box shadow will
have different values. We need here 18 gram. As for the opacity, it's going to be 0.6. Also gets rid of
opacity from here. Then take a look at the browser. Here we have the second image. It looks pretty nice and
it's positioned correctly. Next we have to take
care of the third image. I'm going to
duplicate this code, change the nth chat selector.
It's going to be three. The width of the
image will be seven. Then to position is going to be 22% Next we need right position, it's 5% Also we have to change the opacity
of the box shadow, it's going to be 0.5
Then add here opacity, it's going to be 0.5 I'm going to get rid
of the index property because we don't need it here. I think that's it about the third image.
Let's take a look. As you can see, all three images are aligned and they
look pretty nice. Okay, now we have to take
care of the play button. Let's go ahead and select
Development Play Button. I'm going to set
position to absolute, Then to position is
going to be 57% left. Position is going to be
23% Let's take a look. The button is not visible. It ended up behind the images we need here,
the index property. Let's set the index to three. Now the button should
be visible here. Button. Next we have to select Play BTN and
define within height. It's going to be 20 Ram. I mean the both properties. Next I'm going to change
the background color. Let's set it to white. Also, I'm going to
make the element rounded using border
radius with the value of 50% Here play BTN I, the circle. Next we need to get rid of
default border of the bottom. Let's say border to none. Then we need box shadow. The values will be
01 Ram. Ten Ram. We need RGBA, black color
with the opacity 0.6 Finally, we need here cursor
to be pointed. The circle, the bottom
looks pretty nice. Next we have to create the
back side of the bottom. This part here, this
transparent circle. And I'm going to
create this element using four pseudo element. I'm going to select play BTN followed by the
four pseudo elements. Let's define content,
it's going to be empty. Next we need weight and height. Let's set both of
them to 26 Ram. Then I'm going to set
background color to RGBA. We need here white color, which is 25053 times, but we need lower opacity, 0.1 Right. Now the, before
the element is not visible because we have
to define its position. Let's set position to absolute. The top position is going to be 50% then the left position
is going to be 50% as well. I'm trying to center
the element for that. As you already
know, we need here transform translate
with the values -50% again -50% Now the
element should be visible. Here we have the elements. Let's make it rounded
using border radius. It's going to be 50% Also, we need box shadow. Actually, I'm going to
grab box shadow from here. I mean the values we just
need to change the opacity. It's going to be 0.3 Now we can see clearly
the circle next, we have to take
care of the phasic. It is too smaller right
Now let's select elements. We need Play BTN. The phone size is
going to be seven Ram. As for the color of the icon, I'm going to set it to 2025. To, as you can see the phone as icon became bigger and
looks pretty nice. Next we have to create
the hover effects. The effects. First of all, I'm going to take
care of the play BTN, let's select it with hover, I'm going to increase the
scale of the element. For that, we need
to transform scale. And it's going to be 1.2 We need her transition, all 0.3 second. Now as you can see, the scale increases once
we hover over the button. Now we have to make the four
element slightly smaller. On hover, we need
to select Play. Btn with hover followed
by the force elements. We need to decrease the
scale of the elements. Let's grab this code from here. And make the scale 0.9 we need here
transition all 0.3 second. Once we hover over the bottom, the scale of the
element will decrease. But as you can see,
element moves down. It happens because be
forced to the element by default has transform
translate here. We need to copy translate
and edit here as well. Let's copy translate
function and edit here. Now, the problem
should be fixed. As you can see, everything
works pretty nice. Now we have to create
the polar effect. I mean, we have to
create elements which will cover partially the
images with some blur effect. I'm going to create before
elements of the section. We need here templates
followed by the four elements. Let's define content,
it's going to be empty. Then we need within height, I'm going to set both
of them to tram. Then we need background. I'm going to use linear
gradient function. The direction of the
color transition is going to be two bottom. Then the first color
will be transparent. Then we need second color, and it's going to be
eight for 30, this one. As for the third color, we need to use the same 84430 A right now before the
element is not visible. Because it ended up
behind other elements, behind the section element. In order to make the
element visible, we need the index
with value four. The element is not visible. Actually, it happens because we have to define the position. I forgot it. We need
position absolute. Then bottom position
is going to be -5% As for the right position, I'm going to say it two, 10% Now the element
should be visible. Yes, it's visible. Next, we need to use
property called filter, which will allow us to
create a polar effect. I'm going to use filter with polar function and the value is
going to be seven. As you can see, we have here
pretty nice and cool effect. Now we have a little problem. The button and the up
behind the before element. In order to fix that,
we have to increase the value of the index property. Right now it is three. Let's make it five, which is higher than four. Now, the problem
should be fixed. Okay? Everything
looks pretty nice. And actually, with the styling of the first part of
template section, we are done next. We have to embed the
video to this section. For that, let's move on
to the next lecture.
32. Creating the HTML Markup for Video Player: In the previous lecture we have styled the
template section, I mean, the first
part of the section. Now it's time to move on and
take of the second part. I mean, we have to amble
the video to the section. Let's take a look at
the finished project. If I click the play button,
then the video will. If I click the play button, then it will start playing. Actually, all the
controls work fine. Here we have here speed options. Right now, the video is
playing in normal mode. If I click, let's say two X, then it will start playing fast. Next we have here picture. In picture mode, you can drag and drop
this little window. Also we have here
full screen mode. If I click it, then
the video will play in full screen mode. That's it, what
we're going to do, if I click the X button, then the video will close. Let's go ahead and start
to create the HTML markup. In the HTML markup, we will have lots of
different elements be focused and
follow the lecture. I'm going to insert new
comments right above the closing section
tag we need for video. Then open de element, it's going to be video container in which I'm going to insert another deep and
it's going to be video. I'm going to create
x closing pattern. That's open tag
with the class PTN. Then insert element with the
classes a solid FA x mark. After that I'm going
to open another and it's going to be
controls wrapper. Next we need another dip
tag and it's going to be video timeline in which
we'll have progress area. This element will include
span tag with zero. Also, we'll have
here another dip and it's going to
be progress part. This element will be empty. Next, we need to create video controls in which we
will have different options. I mean options on the
left side, in the center, and on the right side, we need deep elements with
the classes options left. I'm going to duplicate
this line of code twice. As I said, we need
options in the center, also on the right side. Let's take care of the options. Actually we need your
options and not option. Let's take care
of the options on the left side here button which is going
to be four volume. I'm going to insecure I
element with the classes a solid volume high. Next I'm going to
create input tag. The type is going to be range. Also, I'm going to add here a couple of different
attributes. The first one is going
to be a minimum. I'm going to set it to zero. Then we'll have maximum
and it's going to be one. And also we need another
attribute called step. The value is going
to be an All right, that's it about the range. Next I'm going to create another development and it's
going to be video timer. Inside. The video timer will have three
different span elements. The first one is going
to be current time. I'm going to ins zero. Let's duplicate
span element twice. The second one is
going to be separator. I'm going to insert. Forward. As for the
third span element, it's going to be video duration. Next, I'm going to take care of the options
in the center. We will have here three
different buttons. Let's create Button with
the class skip backward. I'm going to insert
your elements. It's going to be
FAS FA backward. Let's duplicate button twice. The second button element is
going to be for play pose. Let's change the class name. For the element, it's
going to be FASFA play. As for the third button
elements we need here, forward instead of backward. Let's sit about the
options in the center. Next we have options
on the right side. I'm going to insert
your Development. It's going to be
Play Back content. I'm going to insert your button, which is going to
be playback speed. Here I'm going to use Google Material symbol
instead of element. Let's go to the
browser and search for Google Material symbols. We need to visit the
Google Fonts website, where we have grabbed the
fonts from Select here. This style, it's
going to be rounded. Then I'm going to search
for slow motion video. That's the icon we need. Let's click this icon. And then I'm going to
copy this link from here. We need to paste the link
in the head element. Then we have to copy this
span element from here. Let's insert span element
inside the button. Then check if the
icon is displayed. As you can see, we have here
the icon, it is displayed. Next, we need to add
here speed options. Overall, we'll have five
different speed options we need. The first option is
going to be two x. Let's duplicate development four times and change the options. The second one is going to be 1.5 then we will
have here normal. The next one is going to be 0.75 As for the
last speed option, it's going to be
0.5 Besides that, we need to add also the
attributes to the developments. The attribute is going
to be data speed, and we need to insert here the similar values
we need here two. Then 1.5 as the normal, I'm going to use here one. Then we'll have here 0.75
and finally 0.5 That's it, about the speed options. Next we need to add
here icon for picture. In picture mode, we
need button with the class Pick in Peak. It means actually we
need here peak in peak. It means picture
in picture mode. Again, we need to grab
the icon from here. Let's search for
picture in picture. That's the icon.
I'm going to grab the span element and paste
it here inside the buttom. If we check the
browser, then you will see that the icon is displayed. All right, next we need another button for
full screen mode. Let's add here cluster screen. I'm going to use element
with the classes FA solid, FA, expand. Finally, we need to
embed the video. We have to insert here
the video itself. We need to open video tag
in the source attribute. We have to specify
the path of the file. First of all, we need to
exit the current folder. Then we need to select
folder called videos. And we have to select
this file here. All right, so I think that
sits about the HTML markup. I hope that everything
is correct here. We have all the
elements right now, everything is messed up. You can see here the
elements from the header. And it happens because the
video is about our project. It's the preview of our project. That's why you see here the
elements from the header. We will fix those issues, we will customize those elements in the coming lectures.
Let's move on.
33. Styling Video Player: In the previous lecture, we have prepared the HDML
markup for the video, I mean for the second
part of template section. Now it's time to
style those elements. Right now, everything
is messed up here, but we will fix that soon. The first thing then I'm going
to do before we start to style those elements is
to fix a tiny issue. As you can see, this icon
is not displayed here. If we check the HTML code, you will find that we're
missing here D. I mean, we need a face solid. Now, the problem
should be fixed. As you can see, the
icon is displayed. Okay, now let's go
to the CSS file and create new commons
for the video. I'm going to select
video container. First of all, I'm
going to define the position of the video. It's going to be fixed. Then I'm going to define
top and left properties. I'm going to set top to zero. Then left position
is going to be zero. I'm going to define
within height. Let's set both of them to 100% Then I'm going to
change the background color. Let's set background
color to a RGBA value. The values will be two to seven, then two for two, then we will have 253. As for the opacity, I'm going to set it 2.9 Here
we have the video container. But we have here the problem. It ended up behind
some elements. In order to fix that problem, we need to define
the index property. Let's set it to
some higher value. Let's say 100. Now
the problem is fixed. The video container is
created, it's styled Next, I'm going to select video
I, this element here. Let's select Video
and define its width. It's going to be 90 m. As for the height, I'm
going to set height to O. Besides that, we need to
select the video itself. I mean this element here, let's select it using
tag name and set with height to
100% In this case, it will take up 100% of the with height of
its parent element. Now here we have the video. The next thing that I'm
going to do is to place it in the center of the container. In order to do that, I'm
going to use flax books. We need Display Flex, then Justify Content center
and the line items center. Now as you can see, the video is placed in the
center of the page. Next, I'm going to add
little shadow to the video. Let's use box shadow. I'm going to insert here
the following values. We need zero, then one Ram. Ten Ram as the color. I'm going to use RGBA. The values will be 2052, then one to nine as
well, the opacity. I'm going to 32.7
As you can see, the video has nice and
cool shadow effect. After that, I'm going to take
of the controls wrapper. Let's set with 100% then I'm going to set
position to absolute. Next I'm going to
define left position, it's going to be zero. As for the bottom position, I'm going to set it two -5.5 m, the controls wrapper
and the dup down below. It happens because we need position relative
for the video. Now as you can see,
the controls wrapper is positioned correctly. In order to see better, I'm going to add here some
temporary background color. Let's say you read here, we have the controls wrapper. All right, let's get rid
of this background color. The next thing that
I'm going to do is to take care of the video timeline. Let's select this element. I'm going to set
position absolute. Then I'm going to set with
100% As for the height, it's going to be 0.7 Ram. Then I'm going to set
cursor to pointer. Also, in order to
display this element, I'm going to use again, some temporary background color. Let's set it to red. Here we have the video timeline. Next we have to take
of the progress area. I'm going to get rid of
this color from here. And then I'm going to
select progress area. We need height, it's
going to be 0.3 Ram. Then we need her
background color. I'm going to use RGBA color. It's going to be white color, but with lower opacity, 0.6 Here we have
the progress area. Next I'm going to take
care of the span elements. I mean this span element here, which is placed inside
the progress area, I'm going to select
progress area, followed by the T. Let's
set position to absolute. Then we need position relative
for the parent element, which is progress area. After that, I'm going to
define top left properties. Right now I'm going to a line span in the center
of the progress area. For that I'm going to set
to position to -2.5 frame. Then we need left position, it's going to be 50% In order to center the
element perfectly, we need to transform
translate x function with the value -50% Next I'm
going to change the color. It's going to be 333 and
also define font size. I'm going to set it to 1.3 Ram. Here we have the Pan element. Next, I'm going to take
care of the progress bar. Let's go ahead and
select Progress Bar. I'm going to define a width. Let's set it to 50% for a while. Then the height is going to be 100% I'm going to change
the background color. It's going to be 2289. It's blue color. Here we have the Progress bar. Next I'm going to of the
circle of the progress bar. I'm going to create this circle using before the element we
need here, progress bar, followed by the four, the element I'm going to
set content to empty. Next I'm going to
set within height, both of them to 1.3
m. Then we need border radius 50%
Because we're going to create the circle and also
change the background color, I'm going to use
same blue color. Next, we need position in
order to display the element. The position is going
to be absolute. We need position relative
for the power element. Then the two position
is going to be 50% Then we need right position. I'm going to set it to zero. Then in order to center
the element vertically, we need to transform
translate Y -50% Now the circle
should be visible. Here we have it. All right, Next I'm going to take care
of the video controls. Let's go ahead and
select video controls. We need controls
in the container. First of all, let's
define width. It's going to be 100% Then
I'm going to align elements. I mean flex items
using flex books. We need Display flex. Next, we need line items center in order to center the
flex items vertically. And also, I'm going to create space between the flex items. Using space between, I mean justify content space between. Let's check the result. As you can see, the
controls are aligned. Next, I'm going to create some space inside the
element using padding. The padding is going to be
one Ram at the top and bottom and two Ram on left
and right sides. Also, I'm going to change
the background color. It's going to be RGBA, black color with the
opacity 0.5 Okay, so here we have video controls. Next I'm going to take
care of the options here. We have three options, I mean options on the left side. Then we have options in the center and options
on the right side. I hope you remember them
from here. Options left. Then we have options
center and options right. Let's go ahead and
select Options. I'm going to set
display to flex. Then I'm going to define
width for each options. I'm going to divide
100% by three in order to assign each element
the even width. For that we then calc function, it allows us to make
some calculations. As I said, we need
100% divide by three. Then I'm going to align
items in the center, particularly using
align items center. All right, after that
I'm going to select second options element
and third options element because we need some individual alignment for those options, I'm going to select
options child two. We need here justify
content center. Then let's duplicate this code, change the child
selector. We need three. As for the value of the
justify content property, it's going to be flex. Now as you can see, the
options are aligned perfectly. Now we have to take
care of the buttons. Let's select button, I
mean Options button, I'm going to set
within height to, then we need to get rid of default border
from the bottom. Let's set border to none. Next I'm going to get rid of
default background color. I'm going to set background
color to transparent. And then change the
color of the text. It's going to be white. Finally, we need
cursor to be pointer. All right, now as you
can see the buttons, the icons look pretty nice. Next I'm going to
select elements. We need options. I'm going
to increase the phone size, let's say it to 1.9 m.
All right, let's it. But next I'm going to take
care of the input element, which is a range of the volume. I'm going to select
Options Input. I'm going to define height. It's going to be 0.4 Ram, then the width is
going to be 7.5 Also, we need some space on the right
side using margin, right? Let's say it to one Ram. I think that the input element, the range of the volume. Pretty nice. Next, we
have to take care of the video timer span elements. Let's go ahead and select Video Time Time line. We need span element. Let's set color to white. As you can see, the span
elements became white. We need to, of the
speed options, I'm going to speed options,
let's define width. It's going to be 9.5 Ram. Then we need position
to be absolute. Position relative for
the parent elements. In this case, parent
is a playback content, we need here position relative. Then we need to define bottom position for
the speed options. It's going to be as
for the left position, I'm going to set it
to minus four Ram. Then I'm going to change
the background color. It's going to be white here
we have the speed options. The next thing that
I'm going to do is to make it slightly rounded. Let's set border radius 2.4 run. All right, that's it. About the speed options,
the development next, we need to take care of those text elements,
I mean the deeps. I'm going to select
Speed Options, followed by the development. Let's set phone size to 1.4 Ram. Then I'm going to create some space
inside the development. Let's said pudding,
2.5 Ram on top. Then we need zero
on the right side, 0.5 at the bottom and 1.5
Ram on the left side. Then use again, closer 0.2 Okay, Now the speed options
look much better. Next we need to make one of
the speed options active. Actually, I'm going to make
this one active normal. The default speed option
I'm going to add to the third development which is normal is going to
be active option. Then I'm going to select
here active option. Let's change the
background color. It's going to be the blue
color that we used recently. Then we need color to be white. Okay, so as you can
see we have here nice and cool default speed
option, which is normal. All right, The last
thing that I'm going to do with controls is to place those icons
perfectly in the center. I mean the vertical
centering as you see, they are not perfectly centered. In order to do that, I'm going to select here Options and
then Options Spin. I'm going to set W and height 100% Then I'm going
to use line height. I'm going to set it to fold. Now as you can see,
the problem is fixed. All right, so the only thing
that I'm going to do in this video is to take care
of the X closing button. It should be placed here. Let's go ahead and select PTM. Actually, we need here element, I mean the icon. I'm going to set
position to absolute. Then we need to position to be -6% The right position
is going to be zero. Also, I'm going to
increase the size of the font at 3,022.2 Ram. And then make cursor point. All right, so that's it. We have finished
styling the video, it looks pretty nice. Next we have to make
it work for that. Let's move on to
the next lecture.
34. Making Play / Pause Button Work: In the previous lecture
we have finished styling the video player and now
we have to make it work. For that, I'm going
to use Javascript. Let's go to the VS code and
open script or JS file. I'm going to inserter new
comments for the video. Then I'm going to select a
couple of different elements. The first one is going
to be video container. I'm going to select this element using query selector method. We need to specify here the
class name, video container. Next, I'm going to
select the video itself. I mean the video file. Let's call variable main video. And select this element
using tag name. We have selected this
element here, Video also, I'm going to create another
variable and it's going to be play BTN. Let's select this element
we need here, class name, pose, and also we have to insider element because
it is a phone, also mic. Okay, we have selected
three different elements, the video container,
the video itself, and also play button. Now we have to add
an event listener to the play button
with click event. Once we click the play button, the video should play. Then on the next
click it should. I'm going to add event
listener to the play BTN. Let's specify here
the click event. Also, I'm going to institute
a callback function. This function will be executed
once we click the button. We need to check if the
video is post or not. If it is, it means the
video is not playing. If the video is post, it should start playing. We need if statement in which I'm going to insert
the following condition. We need main video post. It's a built in property
in Java script. If it is true, then we should play the video. For that, I'm going to use built in function
which is called clay. All right, Next we need L statement in which we
have to post the video. We need method called post. All right, let's go to
the browser and check. Click the button.
As you can see, the video is playing. Now, once I click the
button, then it will pause. All right, so
everything works fine. Next we need to change the icon. I mean, if the video is playing, then we should display
here the pose button. And once we post the video, then we should get back
here the play button. We need to replace the
buttons, I mean the icons. For that, I'm going to add even listener
to the main video. The event is going to be play. Also, I'm going to add
here callback function. It will be executed once
the video is played. If the video is playing, then we have to replace the
class of the phone icon. We need platen list, then we need to use
replace method. We need to replace the current
class which is a play. We need to replace
it with FA post. It will change the icon. We need the same thing for
the pose event we need here. Then I'm going to add here FAA play. All right, let's
check if it works. Once we click, then the video will play and also
the icon is changed. So as you can see,
everything works perfectly. All right, that's it for now. Let's move on to
the next lecture.
35. Updating Progress Bar: All right, in the
previous lecture, we have programmed
the play button. Once I click it, then the
video will start to play. Also the icon will change. Then if I click the Post button, then the video will pause. Everything works
perfectly so far. Next, we have to take
care of the progress bar. Right now it has default with
50% we have to change it, and we have to
update the width of the progress bar according
to the video progress. Let's go back to the Javas file. First of all, I'm going
to select progress bar. Let's create a new variable. It's going to be progress bar. I'm going to select
this element using, again, query selector method. I'm going to specify here the
class name, progress bar. Next, I'm going to change
the width of progress bar. As I said right now it has 50% and I'm going
to make it zero. As you can see, the width of
the progress part is zero. Actually, before the element ended up outside of
the video player, I'm going to change
the position. Right now it has
right position set to zero and I'm going to make it -1.3 m. Now the
problem is fixed. Next, I'm going to add an event listener
to the main video. And the event is going
to be time update. Time update event fires periodically as the videos
play back time progresses. I'm going to add event
listener to the main video. As I said, the event is
going to be time update. We need here callback function. It's going to be executed once the videos playback
time progresses. I'm going to use the structuring
and grab two properties, current time and duration
from the event object. We need here targets. And I'm going to place here
event object as the argument. This line of code
extracts two properties, current time and duration from
the thought target object. In this context, target
represents the video element, in this case main video. Current time represents
the current playback time of the video in seconds. And duration represents
the total duration of the video, also in seconds. I'm going to show those
two properties in console. Let's insert here current
time and duration. Then I'm going to go
to browser inspect the page, check console tab. Once I click the play button, then you will see here the
current time shown in seconds. And also we have here
the total duration, total time of the video. Okay, let's go back
to the Charles file. I'm going to get rid
of this line of code. The next thing that I'm
going to do is to define the percentage value
of the progress part. For that, we need to
create new variable. I'm going to call it person. It will be equal to current
time divided by duration. We have to multiply it by 100. This line calculates
the percentage of the video that
has been played. It divides the current time by the duration and multiplies the result by 100 to convert
it into a percentage value. This value represents how far into the video playback
has progressed. Now we have to add this value to the style
of the progress bar. For that, we have to
select Progress bar. Then we need style property
followed by the width. Then I'm going to open, then I'm going to open
template strings. We have to pass here percentage value that
we have just defined. We need calibraceisn followed
by the percentage sign. This line updates the width of a progress bar element to visually represent the
progress of the video. It sets the width property
of the progress bars CSS style to the
calculated person value, followed by the percentage sign. This will make the progress
bar grow or shrink. As the video plays, or six, everything
is ready to work. The progress bar. If I
click the Play button, then the progress bar
will update accordingly, so everything works fine. All right, let's it
about this video, let's move on to the next one.
36. Skipping Video Backward and Forward: In the previous lecture, we have programmed the progress bar. Once we start to play the video, then the progress
bar will update automatically as the
video progresses. The next thing that I'm
going to do is to program those skip forward
and backward buttons. If we take a look at
the finished project and click backward
and forward buttons, as you can see, they work. The video is rebinding. Let's go to the geos
file and select two elements, the phonomiconsan. The buttons skip forward
and skip backward. So I'm going to create
variable and I'm going to call it skip backward. I'm going to select the element using query selector method. We need here skip backward
followed by the elements. Let's duplicate this code and
change backward to forward. We need for, all right, now we have to add
an event listener to both buttons
with click event. And then we have to define skipping the video by adding and subtracting some
amount of time to the current time of the video. Let's add an event
listener backward. We need click event. Then we have to pass here a callback function
which will be executed once we
click the bottom. As I said, we have to subtract some amount of time to the current
time of the video. Therefore, we need her
main video, current time. We need her current
time then minus equals, I'm going to subtract 5 seconds. Now if I start to
play the video, then if I click backward button, it will skip the
video by 5 seconds. The skip backward
button works fine. Next we have to do the same
with skip forward button. I'm going to
duplicate this code. We need to change variable, it's going to be skip forward. We have to add here
5 seconds again. Here we subtract 5 seconds from the current playback
time of the video. It rewinds the video by 5 seconds when the skip
backward button is clicked. In the same way,
we add 5 seconds to recurrent playback
time of the video, and it fast forwards
the video by 5 seconds when this keep
forward button is clicked. If we check the results and
click the skip buttons, then you will see that
everything works perfectly okay. Let's see about the keep
backward and forward buttons. Let's move on to
the next lecture.
37. Working on Volume Button: In the previous lecture,
we have program the skip backward and
skip forward buttons. If we play the video and
then click those buttons, they will skip the video. They work fine. Next we have to take care
of the volume button. If we take a look at the finished project
and play the video, you will hear the
sound of the video. If I click the volume button, then it will mute the
sound of the video. And also you can see that
the icon is changed. We will program this
button in this lecture, and then we will take
care of the slider. All right, let's
go to the VS code. First of all, I'm
going to add here comments because the
code is getting bigger. And in order to avoid confusion, let's add the comments. I'm going to add
here progress bar, the end of progress bar. Then we have here
Play Pose button. Actually we need to
add this line here. And then we have Skip buttons. All right, so now it's time to take care
of the volume button. I'm going to select volume. Batson. Let's change the name. Then we have to change the
class name is going to be volume I the phone, so icon. Then I'm going to add
here new comments. I'm going to add an event
listener to the volume button. With click event, we need
volume BTN, add event listener. I'm going to insert
your click event. And also we need
callback function, which will be executed once
we click the volume button. Now we have to use
statement in which I'm going to check
the current state of the volume button. Inside the condition inside the statement and then
I will explain it. We need not operator followed
by volume PCN class list. Then I'm going to use
method called contains. I'm going to specify here
the class name which is a volume high. This condition checks whether the volume button does not
have the FA volume high. The class contains
method is used to determine if a class is
present on the element. If the button doesn't have
the FA volume high class, it means that the volume is currently not set to
the highest level. If this condition is true, then we have to set volume 2.5 It means that we set the volume property of the main video
element to 50% Next, we need to replace the icon. If this condition is true, then we have to
replace the phone. So icon we need volume
PTN class list replace. We have to pass here
FA volume x mark. This icon shows us that
the sound is muted. Now we need this class name. Let's copy it and paste it here. All right, after that, we have to use L statement in which we have to set the
volume of the video to zero. We have to mute the sound. We need main video volume. It should be equal to zero. Also, we need to replace
the icon we need here, FA volume high, then
a volume X mark. Let me explain once again. This line replaces the
class FA volume X mark, which represents a mute icon, with FA volume high, which represents a
high volume icon. This visually updates
the volume boson icon to indicate that the volume
is now at a higher level. As for this line here, it replaces the
class FA volume high with FA volume X mark. Visually updating the
volume button icon to indicate that the
volume is muted. Let's go to the browser and
check if it works fine. I'm going to play the
video, the sound. If I click the volar button, then it will mute the sound
and the icon will change. As you can see,
everything works fine. The volume button is programmed. Next, we have to take care of
this slider here for that. Let's move on to
the next lecture.
38. Working on Volume Slider: In the previous lecture, we have programmed
the volume button. Now as I said, we have to take
care of the volume slider, this input element here. Let's take a look
at the finished project and play the video. You can interact with the slider and change the
volume accordingly. If I drag this circle
to the left side, then it will mute the video and the icon will
change accordingly. That's what we're going
to do in this lecture. Let's go back to the VS code, select the input elements, but first of all, I'm going
to change the comments. Let's leave here volume because we're going to add the code
of the slider here as well. I'm going to leave
here just volume. Then I'm going to
select input elements. We need volume slider. I'm going to change
the class name. We need he left. It is the part of the
options on the left side. We need left and
then input right, the element is selected. Next we have to add
an event listener to the element we need
here volume slider, we have to add event listener. The event is going to be input. This event is triggered whenever the value of the input
element changes. In this case when the user interacts with the
volume slider. I'm going to pass your
input and then we need an error function which will be executed
once the event occurs. Now I'm going to define
the volume of the video. We need main video volume. We have to grab the value
from target object. We need here target value. We have to multiply it by one. And I will explain
it why we do that. This line sets the
volume property of the main video element to the current value of
the volume slider, which in this case
is to target to value the multiplying by one. This conversion
ensures that the value is treated as a number,
not the string. Next, we have to
use if statement. We need if statement with
the following condition. Main video is equal to zero. This condition checks whether the videos volume
is set to zero. In other words, if
it is muted or not. If the volume is muted, then we have to update
the volume button icon to indicate mute. If it's not muted, we need to update the icon to
indicate high volume. We need again, to
use those lines. We need here this line of code. And then in L statement, we need to replace x mark
with volume high icon. I'm going to pass this
line of code here. All right, finally
I'm going to add here volume slider value equal to main video volume. This line of code sets the
value of the volume slider to match the current
volume level of the main video element. This ensures that the position of the slider handle visually reflects the current
volume setting when the page loads or when the slider is first displayed. All right, let's go to the browser and check if
everything works fine. I'm going to play the video. Then let's track the slider. Actually, the slider
doesn't work. Let's check the
code. We might have a mistake somewhere here. We need main video volume. I forgot to write
this property here. Now I think that the code
should work. Let's check. Now, still we have some problem. Let's go back to the VS code. The problem is that we are
missing here event object. Now I think it should work. Yes. Now this slider works fine. And we can interact with it and change the
volume accordingly. All right, so that's
it about the volume. Let's move on to
the next lecture.
39. Controlling Speed Options: In the previous lecture we have managed
controlling the volume. I mean, we have programmed the volume button and
also the volume slider. And now it's time to move on and take care of the speed options. If we take a look at the finished project
and play the video, we can choose from
here, any of the speed. Let's play Two X. As you can see, the
video is playing faster. The same thing we have
with lower rate speed. The video is playing
in lower rate. Okay? That's it, what we're
going to do in this lecture. Let's go to the VS code. I'm going to select two
different elements. The first one is going
to be speed button. I'm going to select element
is inquiry electron method. Let's specify here
the class name. It's going to be playback speed. We need here span element because the Batson
is a spin element. Besides that, I'm going
to select speed options. We need here speed options. I mean, the wrapper
development this element here, we need to specify the class name and it's
going to be speed options. Okay? So the first thing
that I'm going to do is to manage displaying and
hiding the speed options. Once we click the speed button, right now, the speed options
are visible by default. Right now the speed options
are visible by default. We need to change
it. I'm going to add click Events to
the speed button. Actually, we need here new comments for
the speed options. Then I'm going to add
an event listener to the speed button
with click event. Also, we need here a
callback function which will be executed once you
click the speed button. I'm going to add to Speed options new class
with a togal method. I'm going to use this
class name in the CSS file and we will define new styles
for this new class name. I'm going to use speed options followed by
the class list property. Then as I said, we
need togal method, we need to specify
here the class name. I'm going to call it show. Next, we have to go to
the CSS file and select Speed Options with newly
created class show. First of all, we need to
hide the speed options. I'm going to set opacity to zero and visibility to hidden. Then we need those two properties
with different values. Opacity is going to be one, for the visibility is
going to be visible also. In order to make the effect smoother, let's just transition. We need here opacity. Then the duration is
going to be 0.15 seconds. Also, I'm going to
add here is okay. As you can see, the speed
options are hidden. Now, once I click the button, then they will be displayed. Okay, everything works fine. The next thing that I'm
going to do is to hide the speed options when we click anywhere on the page,
on the document. In order to do that, I'm going to add event listener
to the document. We need a event listener
with click events. Also, I'm going to insert
here a callback function. I'm going to use
statements at first. I'm going to insert
here the condition, and then I will explain it. We need target not
equals to span. Then we need the second
condition with or operator. It's going to be to
target class name. Not equals to the class
name of the span element. I mean this one, material
symbols rounded. Let me explain what
this condition means. This condition checks whether the clicked elements
target is not a span element or doesn't have the class name Material symbols
rounded, in other words. It checks if the
clicked element is something other than a
specific span element. With that class I mean class name,
material symbols round. If this condition is true, then we have to remove class
Show from the speed options. I'm going to grab this code and change togal
method into remove. Now if we go to the browser display the speed options and then click
anywhere on the page, something is wrong here. Let's check console tab. The error says that
is not defined as I guessed we forgot to insert here even object
as the parameter. Now the code should work. Let's display the
speed options and then click anywhere on the page. Now everything works fine. All right, next thing
that I'm going to do is to manage selecting
those options. We need to select developments which are placed inside the
speed options I wrapper, we need to select
those options here. For that, I'm going to
create new variable. Let's duplicate this code. I'm going to change the name. It's going to be speed options, items we need to add here de tu. Next I'm going to look through the speed options,
the developments. Let's use here newly created variable
speed options items. Then we need for
each method which allows us to iterate
through the collection. I'm going to add here callback function which
needs a parameter. It's going to be option, it is a current item
through the loop. I'm going to add
an even listener to the option with click event. Then we need here again
a callback function. This code iterates
through each of the selected development
using the forage method. For each development, which represents a playback
speed option, it sets up a click
event listener. Next, we have to define the
speed rate of the playback. According to the
clicked speed options. We need your main
video playback rate. It is a built in
property, in Java script. It should be equal to
Option Dataset Do Speed. We defined the playback rate which is equal to
Option Dataset speed. We are grabbing the values
from those attributes here. As you remember, we added
data speed attribute to each speed option with
the proper values, we are accessing
those values here. Again, this line says, the playback rate property
of the main video element to the value stored in the data speed attribute
of the clicked element. The dataset property
allows you to access custom data
attributes in HTML elements. This case, it is used to store the playback speed values
associated with each option. I'm talking about
those values here. Okay, next thing that I'm going to do is to change
the active option. As you know by default, the active option is normal. We add class to
the HTML element. This element here. You can
see here class active option. We need to change this class. We have to remove
this class from this element and add it
to the clicked element. In order to do that,
we need speed options. Then we have to select elements
with class active option. We need here active option. And we have to remove
from class property, the class name active option, and we have to add it
to the click option. We need class list. And The class is going
to be active option. All right, I think that's it
now the code should work. Let's select Option. Let's play the video. And then select Speed option. Something's wrong
here. Let's check the console tab speed
options, items. That forage is not a function. Let's check this line of code Speed options,
items, forage. Actually, here,
everything looks correct. Let's check the variables. Yes, we need here query
selector, All method, because we are selecting
five different elements. Now let's check the results. Let's play the video
Select Speed option. Still it doesn't work. Now I'm going to
check again the code. I think here everything
seems to be correct. The bad thing is that we
are not getting here. Any errors. I'm going to check if the click
event works properly. I'm going to run to the
console, this element here. I'm going to click
the speed option and then check Console. We are not getting
here the results. It means that the click
event doesn't work here. Maybe speed options are ending
up behind some elements, that's why the click
event doesn't work. I'm going to try here adding z index property with some
higher value. Let's say ten. Let's check if it works. That was the problem. Now
everything works fine. We can change the speed
options without any problem. All right, so that's
about the speed options. I'm sorry for the last
misunderstandings, but actually I think
that it's not bad. It's good for you,
for the students, because when you write the code, you will come across
such situations. A lot of times you should
know how to fix the problem, find the box, and so on. Okay, that's it. Let's move
on to the next lecture.
40. Picture in Picture and Fullscreen Modes: In the last lecture we have
programmed the speed options. Now we have to move on and take care of those two buttons. The first one is picture
in picture mode. As for the second one, it is a full screen mode. Let's take a look at
the finished project. Once we click the
picture in picture mode, then we will get here
this little window, you can track and
drop the window. That's the way how picture
in picture mode works. As for the full screen mode, if we click the cycle here, then the video will play. In full screen mode, you can minimize the
window from here, okay? So we will program those two
buttons in this lecture. Let's go to the VS code. First of all, I'm going
to create new variable. Let's call it picture
I pick pick PTN. We need to select it using
query selector method. Let's specify here
the class name. Pick in pick, followed by
the panelment we need here. Thoughts. Next, I'm going to
create here new comments. Actually, let's get rid of
this line of code from here. We need comments for
picture in picture mode, I'm going to add an
event listener to the picture in picture BTN the variable that we
have just created. Let's add here image
listener with click event. Also, we need here
a callback function in order to play the
video in picture. In picture mode, we have to use one of the built
in Javas functions. It is called request
picture in picture. We have to attach this
method to main video. As I said, we need request
picture in picture. All right, let's go to the browser and click
this icon here. As you can see, we have here
little window you can drag. And the window picture in
picture mode works perfectly. Okay. Now it's full screen mode. Turn, let's go to the VS code
and create new variable. I'm going to duplicate
this line of code. We need full screen BTN and I'm going to change
here the class name. We need full screen I element. Then I'm going to institute new comments for
full screen mode. Actually, I'm going
to grab this code. Let's paste it here and change the button we need
here, Full screen BTN. As for the method instead
of request method, we need request
full screen method. Now let's go to the browser
and click full Screen button. It doesn't work. We have here an error cannot
read properties of. Now let's check the code. Full screen, BTN, Let's check the variable we
have here a type. All we need here, double ls. Now it should work. Let's click the
full screen icon. And yes, we have here
full screen mode. It works fine. All right, that's it about the
picturing picture and full screen modes, Both of them work fine. Next we have to take care
of the video timeline. Let's move on to
the next lecture.
41. Working on Video Timeline: In the previous lecture,
we have programmed the picturing picture
and full screen buttons. Both modes work fine. Now we have to move on and take care of the video timeline. I mean, we have to make
the progress part dynamic. And also we have to display the current time of the video and also
the video duration. Let's take a look at
the finished project. As you can see, we have
here the video duration. If we start to play the video, then the current time will display as if I
click here anywhere. Then the progress bar, we'll update. Okay, that's it. What we're going to
do in this lecture. Let's go to the VS code. I'm going to select element
called video time line. Let's create variable and
call it video time line. I'm going to select this element using query selector method. We need to specify
here the class name. It's going to be video timeline. Next, I'm going to insert the comments
for video time line. Then I'm going to add
an event listener to the video time line
with a click event. I want to remind you where
this element we have in the HTML file here is
the video timeline. It wraps progress area. I'm going to add event listener
to the video timeline. Let's use that event
listener method and then specify here
the click event. Next we need callback function which will be executed once
you click the timeline. I'm going to define new variable which is
going to be timeline with. I'm going to make it equal to video time line client width. This line calculates
the width of the video time line element
and stores it in a variable. This width represents the
total width of the timeline, which is needed to
determine where the user clicked relative
to the timeline. In order to make it clear, I'm going to run to the console this variable time line width. Let's inspect the page. Actually, I'm going to attach this window
to the current top. If I click the video time line, then we will get
900, it is pixels. The entire width of the video
time line is 900 pixels. Again, the client width property calculates the width
of the element. All right, let's get rid
of this line of code Next, I'm going to define the
current time of the video. We need main video current time. It should be equal to the following expression
I'm going to use here, offset x. I'm going to explain
those things in a moment. We need her time line with the variable
that we defined here. Next we have to multiply
it to main video duration. Let me explain
what happens here. This line calculates and sets the current playback time of the main video element based on where the user clicked
on the time line. Here's how it works.
Do offset X represents the horizontal position of the click event within the
video timeline element. It indicates where the user
clicked along the timeline. I'm going to run to
the console dot. Offset X. Actually we need
to pass her parameter. If I click the video timeline, then we'll get the position where the user click
along the timeline. We're getting here, the
exact positions in pixels. All right, next we have here offset x
divided by time line. With this calculates the
relative position of the click within the time line as a fraction of the total
width of the time line. This fraction ranges 0-1 Next we have multiplication
by main video duration. It represents the total duration
of the video in seconds. The result of the calculation determines the exact playback
position in the video. It sets the current
time property of main video to that position, effectively allowing the user to seek to the click
point in the video. If I run to the console main
video, do current time, then if we go to the browser and click along the timeline, we will get current time
of the video in seconds. Okay. Next I'm going to
create new variable. I'm going to call it video time. Let's select element using
query selector method. I'm going to specify here the
class name, current time. I'm going to remind you
where this element is. We have here current time. It is a span element. By default we have zeros here. Now we have to display the current time of the
video in this element. We have to display the
current time here. For that, we need to
insert current video time, inner text equals
to current time. Let's go to the browser and
start to play the video. As you can see, we are
getting here seconds. But we have to format this
value. We don't need it. We need to display the current time in the format like we have it
here in the finished version. We need this format here. In order to do that, I'm going
to go back to the VS code. I'm going to create
new function. Actually I'm going to
insert this function here. Let's call the
function format time. It's going to be
an arrow function. I'm going to insert
here a parameter. It's going to be time. The first thing that
I'm going to do is to define seconds. We need new variable
called seconds. It's going to be equal to t floor and we have to
insert here time modulus 60. This line calculates
the remaining seconds by taking the modulus
of the time value. With 60, it ensures that
seconds contains a value 0-59 In the same way we
need to define the seconds, Let's duplicate this line
of code we need here. Minutes, we have to
divide time by 60, then we need modulus 60. This line calculates the
number of minutes by dividing the time value by 60 and
taking the floor value. The modulus operation is
used again to ensure that minutes is 0-59 Next, we have to define the hours. I'm going to duplicate
this line of code. We need hours, then math
for time divided by 3,600 We no longer need here. Module 60, this line calculates the number
of hours by dividing the time value by 3,630. 600 means that 60 seconds are
multiplied by 60 minutes. It gives the total number of
hours and the time value. Next, we need to ensure that single digit
seconds, minutes, and hours are formatted
with a leading zero for consistency
in the display. For example, if seconds
is less than ten, we should add a
leading zero to it. In order to do
that, I'm going to seconds equal 2 seconds, then the condition
is less than ten. We need her question mark. If this condition is true, then we need here
template strings zero followed by the seconds. If it is false, then
we need just seconds. We need the same thing for the
minutes and hours as well. Let's duplicate this
line of code twice here, minutes and then hours. All right, next thing
that I'm going to do is to use if statement, where we have to check if
hours is equal to zero. We need statement and
we have to check hours. We need hours equal to zero. If this condition is true, then we have to return the
following result we need here, minutes and seconds. Then we have to return. Let's grab this code from
here. Paste it here. And I'm going to add here
hours with column, okay? The following conditional
statement checks if the hours value
is equal to zero. If it is, it means that the
time is less than 1 hour. And the function
returns a string in the format minutes and seconds. If hours is greater than zero, it means there are hours
in the time value. And the function
returns a string in the format hours,
minutes, and seconds. Now once the function is ready, we can format the current time. I'm going to call the function here as the argument I'm going to insert
here, current time. So now the current time
should be visible. Let's play the video. Oops, we have here error. Ours is not defined. Let's check the statement. Yes, we have here a typo. We need hours without. I made this mistake
several times. Now, let's check. Yes, we have here
current time updating. Okay, let's sit about
the current time. Next we have to take care
of the video duration. Let's go back to the VS code. I'm going to create
new variable. Let's call it video duration. I'm going to select
this element using, again, query selector method. Let's specify here the
class name, video duration. We have this element
next to current time, and the separator here
is the video duration. I'm going to add an event
listener to the video duration. I'm sorry, to the main video. The event is going
to be loaded data. The loaded data
event is fired when the video has loaded enough
data to begin playback. Next, we need to interfere
a callback function. This function will
be executed once enough data is loaded
to begin the playback. Here we have to define the content of the
video duration we need. Here in our text property, it's going to be
main video duration. Okay, let's check the results. As you can see, we have
here the total seconds. We have to transform it to the same format that we
use for the current time. In order to do that,
we just need to call the function format time. And we have to pass main video
duration as the argument. If we check the results, then you will see that we
have here current time shown in the same format that we used for
the current time. Okay, that's it for now. Let's move on to
the next lecture.
42. Creating Draggable Progress Bar: In the previous lecture, we have worked on
the video time line. I mean, the current time of the video and also
the video duration. Both of them work
fine and they are updating once we play the video. Next we have to take care
of the Progress bar. We have to create the
draggable Progress bar. Also, we have to take
care of this time. Here, we have to update
the current time. Once we drag the Progress bar, let's look at the
finished projects. As you can see, I can drag the Progress bar and also the current time is
updating accordingly. We need to create this. In fact, in this video, let's go to the VS code. The first thing that
I'm going to do is to add an event listener
to the video timeline. The event is going
to be milestone. The milestone event is triggered the moment the mouse button is pressed down over an element. It is more specific to
the action of pressing the mouse button without requiring the button
to be released. This event is often used for detecting the start of
a user interaction, such as beginning
to drag an end. Also, this event occurs before the click event if the mouse is not moved
away from the end. The difference between
the click event and mousedown event
is the following. The click event is triggered after a complete click action, which involves pressing and then releasing the mouse
button over an element. It requires both
the mouse down and mouse up event to occur
on the same element. Also, the click event is generally used for actions
that should occur once a user has selected or activated an element like pressing the button to submit
form and so on. Now I'm going to pass
here a callback function. Then we need again video
timeline with event listener. In this case the event is
going to be mouse move. Now we're adding
an image listener for the mouse move event. Now we have to call the function which is
called Dale progress bar. Right now this function
is not created yet, but we will create
it in a moment. We are adding an event listener
for the mouse move event. When the user moves the mouse, the draggable progress
bar function is called. It will update the progress bar and video time as
the user drags. I'm going to create
this function. Let's create new variable
and then use this name here. We need here an event
object, then arrow function. The first thing that
I'm going to do is to grab those two
lines from here. As you remember, this line of code stores the width of the
video time line element. As for the second line of code, it calculates and updates
the current time of the video based on where the user clicks
on the time line. Besides those two lines of code, I'm going to pass here, progress bar style width equal to offset x. And we need here pixels. Now we find the width
of the progress bar. Offset x provides the
horizontal offset of the mouse pointer between the event and the putting
edge of the target node. Effectively setting
the progress bar to the point where the
user clicks or drags. Now if we go to the browser and the progress
bar, it will work. As you can see, we are able to drag the progress
bar right now. I'm pressing the
button of the mouse, but if I just hover over
the video timeline, then I will be able to
drag the progress bar. We don't need that. We don't need to drag the
progress bar on hover, we need to drag the Progress bar once we click the
video time line. In order to fix that issue, I'm going to
duplicate this code. We need to change video time
line into video container. This element wraps the
entire content of the video. Now I'm going to remove event listener
from the video timeline. Okay, now the problem
should be fixed. Actually, we need mouse
up and mouse down. Okay, now let's go to the
browser and check the results. Now, I'm pressing the
button of the mouse, but once I release
the button and just hover over the
video time line, then we won't be able to
track the progress bar. Okay, so the problem is fixed. Next, we have to update the
current time of the video. For that, I'm going to
use this line of code. Let's insert it here. We need to add here main video. Now if I track the progress bar, you'll see that the current
time is updating accordingly. It works fine. All right, next we have to take care
of the current time. Once we track the progress bar, I mean, we have to work
on this element here. As you remember, it is a span element Inside
the progress area, we have to take care
of this element. I'm going to add an event
listener to the video timeline. The event is going
to be mouse move. Then we need event objects followed by the
callback function. I'm going to select
this element. We need to create the variable, it's going to be progress time. We need here document select. Let's specify here the
element called progress area. Then we need span element. After that, I'm going to define
offset x of the element. Let's create offset x. And it should be
equal to offset X. We get here the horizontal
offset of the mouse pointer between the event and the pudding edge of
the target element, which is video time line. Next we have to define the left position
of progress time. We need here progress
time style left. It's going to be offset X, and we need pixels. Now we set the left CSS property of the progress in element
to the offset X value. Moving the time preview to align with the mouse
cursor on the time line. If I go to the browser and hover over the video time line, you can see that
the span element moves along the video time line. Next, we have to define the
width of the time line. I'm going to copy
this line of code. Now we have to define the current time of
the span element. Let's create a variable. It's going to be
progress bar time. I'm going to corrab
this value here. Now we calculate the time corresponding to the current mouse position of the timeline. It does this by
dividing the mouse of set x position by the total
width of the timeline, giving a fraction that represents where the
mouse is on the timeline. This fraction is then multiplied
by the total duration of the main video to get the corresponding
time in the video. Now we have to format
time and display it. I'm going to attach to progress
time inner text property. Then we need format time. I'm going to pass here
progress part time. All right, let's
go to the browser. As you can see, once I hover
over the video timeline, the time is updating. But we have here little issue. By default, we need to hide the time here and
also the circle. Then once we hover over the video time line,
they should appear. We need CSS. I'm going
to select both elements. Progress area, span. Also, we need progress bar
with before the element. I'm going to hide them
using displaying. Then on hover, video
time line hover. Then progress area span. Then we need here progress bar. Before now we need to display back the elements
using display block. As you can see right now, the circle and the span element, both of them are hidden. Once I hover over
the video timeline, then they will display back. All right, so
everything works fine. We have created the
Gable Progress bar. Let's move on to
the next lecture.
43. Hiding and Showing the Controls: All right, in the
previous lecture we have created a
trackable progress bar. And now we have to manage hiding and showing
the video controls. Also, we have to program the X closing button and the play button on
the landing page. Let's take a look at
the finished projects. If I play the video and
then stop the mouse, the video controls will
hide after 3 seconds. If I move the mouse, then they will appear back. As I said, we're going to manage this thing
in this video. And also we have to
program X closing button, which closes the video, and also will program
the play button. If I click it, the
video will appear. Okay, let's go to the VS code. The first thing
that I'm going to do is to find control wrapper and make them hidden using capacity zero visibility hidden. As you can see, the video
controls are hidden. Next we have to go to the
script JS file and creates, actually I'm going to and here, new comments for the controls. We need to create a function. I'm going to call
it de controls, that's going to be
an arrow function. Then I'm going to use
one of the built in Javascri methods
called set time. Motet time function
is a built in Java scot method
that sets a timer and executes a function or
specified piece of code. Once the timer expires, I'm going to pass here
a callback function. This is the first argument. Then we have to place
here the second argument, which is the amount of time, and it is expressed
in milliseconds. I'm going to place
here 3,000 again. The first argument of set time out is another error function. This inner function defines what will happen once
the timer is up. As for the second argument is the time delay in milliseconds. Here it's set to
3,000 milliseconds, which is equivalent
to 3 seconds. Okay, now as the block
of code I'm going to sue video container
class remove, I'm going to specify here
the name of the class. Let's call it show controls. The show controls class
will add styles in CSS that will make the video
player controls visible. By removing this class, the controls are
hidden from the view. Next, I'm going to
call this function. Now we have to go to the CSS file and use
class show controls. First of all, I'm going to
find the controls wrapper. Next, I'm going to
select video container, followed by the
class show controls. Then we have to select
controls wrapper. We have to make
visible the controls. First of all, I'm
going to define the position is
going to be zero, I mean the bottom position. Then we need capacity one
and visibility visible. Also, I'm going to use transition
for a smoother effect. We need here all, then
the duration is going to be 0.08 second. And we need here is. Then I'm going to add
show controls class to the video container
in HTM file. Let's insert here show controls, then go to the browser. If I wait for 3 seconds, then the controls
will disappear. Now we have to display them
once the mouse is moved. For that, I'm going to add here the video container
with event listener. The event is going to be moved. We need to place here
call the function. Now we have to add to the video container
class show controls. Now if I stop moving
mouse for 3 seconds, then the video
controls will hide and once I move the mouse,
then they will appear. Okay, we need to display the controls while
the video is posed. For that, I'm going to go
back to the child file and create statement here right above the set time out function. We need if statement, in
which we have to check if the main video is posed or not. Then we need return statement. Let me explain. What
am I doing here? This statement
checks a condition. And based on the results
of the condition, either continues executing
the rest of the function, or exceeds returns from
the function early. The post is a property that
returns a bullying value. True or false. The if statement, if the condition is true, if the video is post, then the condition inside the
if statement is satisfied. If the condition is satisfied, then the return
statement is executed. The return statement immediately exceeds the height
controlled function. Means that none of
the code following the return statement within the de control function
gets executed. In simple terms, if
the video is posed, the function does nothing and
stops running right there. If the condition is false, meaning that the
video is playing, the if statement
condition is not satisfied and the return
statement is not executed. The function then proceeds to execute the set time out block, which waits for 3
seconds and then executes the code within
its callback function, removing the show controls
class from video container. This results in
the video controls being hidden after the delay. Hopefully you understand
what this line of code does. Let's go to the browser. If I play the video
and then pause it, the controls won't disappear. The code works fine. The next thing that
I'm going to do is to stop executing the
set timeout function. Once we move the mouse for that, I'm going to create
a new variable. It's going to be timer. I'm going to decle the variable without
assigning to it any values. Next, I'm going to assign set timeout function to
that variable, the timer. After that, I'm going
to use one of the built in Java Sc methods
called clear time out. I'm going to pass here
the variable timer. It will stop executing the
set time out function. And also we need here to call
height controls function. All right, let's
go to the browser and check if
everything works fine. I'm going to play the video
and wait for 3 seconds. The controls are hidden. If I move the mouse, then they will display back. If I post the video, then the controls
will be visible. I think everything
works perfectly. And now we have to take care of the X closing button and also the play button in
the template section. Let's go back to the chavs
file and create new variables. I'm going to duplicate this
code we need Play Button. I'm going to select this
element with the class name. Play. Btn x PTN X pattern. Let's insert here. X PTN followed by the land. Okay, now we need to add click
events to both patterns. Let's insert here, Play
button, Add Event listener. And I'm going to specify
here the click event. Then we need to here
a callback function. I'm going to add to the video container new
class, which we will use. Then in the CSS file we need
video container class list. I'm going to insert
the class name. Let's call it show video. Then I'm going to duplicate
this code change button. It's going to be X baton. Then I'm going to change
method into remove. Also, I'm going to post
the video once we close the video container we
need here mainvideook. Everything is ready
in jovscript. Let's go to the CSS file. And first of all, I'm going to hide the video
container we need here, capacity zero and
visibility ten. Next, I'm going to select video container with
class show video. I'm going to display the video. We need opacity one and
visibility visible. And also, I'm going to use transition for
smoother effects. We need transition then opacity 0.3 seconds, okay? As you can see, by default, the video is hidden. If I click the play button, then the video
player will display. If I click X closing
button, it will hide. All right, I think
everything we ex, fine and actually with the
video player we are done. Hopefully it was interesting. We used a lot of Javascript and I think you learned
some new stuff. Okay, now it's time to move on to create the next
section of our project. For that, let's move on
to the next lecture.
44. Creating the HTML Markup for Subscribe Section: All right, in the
previous lecture we have finished working on
the template section. I mean, we have
finished working on the second part of
the template section, which was a video player. We have created the video player and made it work successfully. And now we have to move on and start to create the next
section of our project. Let's take a look at
the finished version. The next section is
a subscribe section. It is a nice and cool,
but little section. We have here a dark box in
the center of the page. It includes a couple
of different elements. We have here Google
Material icon, followed by the
heading paragraph, and also we have here an
input element with a button. The box has nice and
cool shadow effect. Okay, that's all about
the subscribe section. Let's go to the VS code. And first of all
I'm going to create the HTML markup right after
the template section, I'm going to insert
new comments. It's going to be subscribe, then we need end of subscribe. Next, I'm going to open section
tag with the subscribe. The first element that I'm
going to insert inside the section element is
going to be the wrapper. Let's open with the
subscribe wrapper then I'm going to create the icon we need development
with the class subscribe. It's going to be Google
Material symbol. I'm going to visit the website
Google Material Symbols. Let's click this link here. I'm going to search for
icon called Mark. Read. Here we have the icon. I'm going to corp
this panelment from here and paste it
in the development, I'm going to change
outline into rounded. Let's check the browser. As you can see, we have here
the Google Material icon. Next, I'm going to create the H one heading elements
with the text subscribe. Now next we have paragraph. The text is going to be enter your e mail to receive updates. After paragraph I'm open tag with the class
subscribe input group. Inside the development,
we will have input tag with the type email. Also, I'm going to add here placeholder attribute and
it's going to be your email. Next, we need bottom. The type is going to
be bottom as the text. I'm going to ins subscribe. Okay. The last element that I'm going to create
is going to be the shadow. I mean, we need tuck with the class name,
subscribe shadow. This is going to be
an empty element. That's it about the HD markup. Let's take a look at the browser We have
here all the elements. Now it's time to move on and start to style those
elements. Let's move on.
45. Styling Subscribe Section : In the last lecture,
we have created HTML markup for the
subscribe section. Now, as I said, we have
to style those elements. Let's take a look, once again
on the finished project. Here we have the
subscribe section. We have to style those elements, and also we have to create this nice and cool
shadow effect. Okay, let's go to the
VS code in CSS file. I'm going to insert
new comments right after the template section
we need here, subscribe. Then I'm going to select the section elements with
the class name Subscribe. The first thing that
I'm going to do is to define with height. I'm going to set with
100% As for the height, it's going to be 100
viewport height. I mean 100% of the viewport. Also, let's change
the background color. I'm going to use
linear gradient. The background color
will be similar to the template sections background I'm going to define the direction is going
to be two left. Then we need to pass
here three colors. First one is going to be 8430. I'm going to use this
color again, 8430. As for the third color, it's going to be 409, okay? The background color is
changed and also the width and height are applied to
the section element. Let's go back to the VS code and take care of the
alignment of the elements. I'm going to use CS's Flex box. We need Display Flex. Then I'm going to
place the content in the center of the section. For that we need to justify content center and then
a line items center. As you can see, the elements are placed in the center
of the section. Next I'm going to take gear
of the subscribe wrapper, which is this dark box. Let's go ahead and select
subscribe wrapper. Let's define within heights. The width is going to be
80, that's for the height. I'm going to make it 50. And then change
background color, it's going to be 231, D34. Here we have the wrapper. Next I'm going to make
the corners rounded. For that we have to
use for the radius. The value is going
to be one Ram. Also, I'm going to align the elements using
again, flex box. We need display flex. Then I'm going to change the
direction because we need to align flex items vertically. We need flex direction
to be column. Next, I'm going to create even space between
the flex items. For that, we need to justify content not center
but space evenly. Finally, I'm going to a line items in the
center horizontally. For that we need a
line items centers we need here center, okay. So as you can see, the elements are placed
vertically in the center. Next, I'm going to
take care of the icon. Let's select Subscribe icon, followed by the span element. I'm going to increase
the phone size. It's going to be ten gram. Also, I'm going to change
the color of the icon. The color is going to be 035. We have here nice and cool icon. Next I'm going to take
care of the heading. Let's go ahead and select
Subscribe wrapper, followed by the H
one heading element. I'm going to increase
the phone size, it's going to be four Ram. Then I'm going to
change the font weight. Let's make it lighter. Set font weight to 300. Next I'm going to
change the color. I'm going to use color AA. It is gray color. Then I'm going to move the element a little bit
up using margin top. We need negative value and it's going to be
minus five frame. Okay, the heading
looks pretty nice. Next, I'm going to take
here of the paragraph, actually let's
duplicate this code, then change the
selector we need here. The phone size is
going to be 1.8 Ram. Then we need the same
phone weight value. The color will be 999. It is slightly
darker gray color. As for the margin top, I'm going to leave here
minus five Ram. That's it. About the paragraph next, we have to take care of
the input and the bottom. First of all, I'm going
to select wrapper, I mean Subscribe input
group. Let's define width. It's going to be 50 Ram. Then I'm going to
change the height. Let's set it to 5.5 frame. Actually, in order to make
this element visible, I'm going to add here
temporary bacon color. Let's set it to red. Here we have the wrapper,
Subscribe input group. Next, I'm going to take
care of the input elements. So we need again,
subscribe input group, followed by the input elements. First of all, I'm going to
set position to absolute. Then we need position relative
for the parent element, which is input group. Next, I'm going to set with
height to 100% In this case, input element will take up with height of
its parent element. I mean 50 Ram and 5.5 Ram. Let's take a look
at the browser. Here we have the elements. Let's get rid of this
background color. We no longer need it. Okay. After that, I'm going to change
the background color. Let's set it to 1b16 to nine. Also, I'm going to get
rid of the fault border, then make the corners of the input round using border radius with the
value of five Ram, the input element
looks much nicer. Next, I'm going to create some space inside the
input using pudding. So the padding is going
to be one Ram at the top, then one Ram on the right side, one Ram at the bottom, and two Ram on the left side. Now we have some space
inside the input. Next we need to take
care of the phone. Let's set phone size to 1.6 Ram. Then the phone rate
is going to be 300. Also, I'm going to
change the color. Let's use a 05 FD. Okay, so everything
looks pretty nice. Next, I'm going to take care of the placeholder attribute. Let's go ahead and select
Subscribe Input group, followed by the input element. And then we need
placeholder pseudo element. I'm going to change
the phone size. It's going to be 1.6 Also, I'm going to change the color. Let's use the same color. Sellers can see the
placeholder is changed. Okay, let's sit about
the input elements. Next, we have to take
care of the bottom, which right now is placed
behind the input element. Let's go ahead and select, we need here subscribe
input group, followed by the bottom element. Let's define within height. The width is going to be 16 Ram. Then the height will be 100% It will take up the height of the parent element, 5.5 Ram. Actually, you can either
write here 100% or inherit. It will work in the same way, but I prefer 100%
I don't know why. Next I'm going to define
the background color. Let's set background to 644 EF. Next thing that I'm
going to do is to change the position of the button in
order to see how it looks. Let's set position to absolute. Then we need to
position to be zero. And also we need to set right
position to zero as well. Now the button is visible. Let's remove the fault border and also make the
button rounded. We need the border non, then border radius is
going to be five fram, the button looks much nicer. Next I'm going to take
you off the phones. The phone side is
going to be 1.5 fram, we need to pontights, it's going to be bold. Also, I'm going to transform
text to upper case, then change color,
make it white. Let's check the result. As you can see, button
looks pretty nice. The only thing that we
have to do is to create some space between the letters. And also I'm going to add to the button
little shadow effect. I'm going to set
letter spacing to 0.2 m. As for the box shadow, it's going to be 01, then five as the color. I'm going to use RGBA with the opacity 0.2 this
is the black color. Finally, let's set cursor point. Okay, that's it. The button is ready and actually all the
elements are styled. The only thing that
I have to do is to create shadow effect. I mean this effect here. As remember we created the elements called
Subscribe Shadow, the development which is empty. So I'm going to
select this element. First of all, defined
within heights, the width is going to be
80% That's for the height. I'm going to set it to 12 Ram. Then we need background color. I'm going to set
it to 116 to nine. Here we have the shadow. Let's change the position. I'm going to set
position to absolute. We need to position this element according to the
section elements. We need position relative for the section elements
that I'm going to set bottom position
to minus seven Ram. As for the left
position is going to be 50% We need to center the
element horizontally. For that we have to use transform with
translate function. In this case, we need to translate x and the
value is going to be -50% As you can see, the element is centered. Now I'm going to
rotate the elements by x axis vertically. For that, we need to
use rotate x function. And the value is going
to be siento degrees. Now the element is rotated next, I'm going to make it rounded. Using border radius,
it's going to be 30% the element is rounded. And now we have to make it blurred like we have it
in the finished project. In order to do that,
I'm going to use filter property
with the function called polar and the value
is going to be three Ram. Also, I'm going to set opacity 2.7 Now we have here
the shadow effect, but we have to transform it to three D effect like we have it in
the finished project. In order to create a
three D environment, I'm going to assign to the section element property
called perspective. It allows us to create
the three D environment, the value is going to be 50 Ram. Also, we need property
called transform style for the parent element
of the shadow, which is subscribe wrapper. We need here transform style
with the value preserved, three D. Now the three D effect will be applied.
Let's take a look. As you can see, we have here
nice and cool shadow effect. It is three D effect that's sits about the
subscribe section. I think it looks pretty
nice and modern. Let's move on to
the next lecture.
46. Creating HTML Markup for Footer: All right, in the
last lecture we have finished styling
the subscribe section. It looks pretty nice and modern. And now we have to
move on and create the last section of the
first page, the home page. It's going to be footer. Here we have the footer. It is simple one, but I think it
looks pretty nice. We have here different links, also the phones icons. Down below, you can see the
navigation items which work. If we click any of
the navigation items, then we will navigate
to the proper page. As you can see, all
the links work fine. Okay, let's go ahead
and, first of all, as usual, create
the HTML markup. I'm going to insert your new
comments for the footer. Then I'm going to
open H five foot. It will include two
different parts. We will have to me this part
here and footer bottom. The navigation
items we need here. Deep tug with the
class footer top. Also, I'm going to create
footer bottom as well. For top will include
social media icons. I'm going to open deta with
the class social media. It's we need here media. It's going to be an
individual class name. But besides that I'm going to
add here common class name. And it's going to
be footer item, I'm heading three, the text
is going to be follow us. Then we need here development
which will wrap the icons. I'm going to call it icons, I'm going to insert
your phone icons. The first one is going
to be a Brands A Phase. Overall, we will have seven
different icons, therefore, I'm going to duplicate this
line of code six times, then change the class names. The second one is going
to be FA Instagram. Then we will have here a linked. Then the next one
will be a Twitter. Right now, Twitter
has different name, but anyway, I'm going
to insert it here. Next we will have Pinterest. Then the next icon is
going to be a tribble. Finally, we'll have to, okay, so all phone also
icons are created. Let's check if all of them
are visible and displayed. Here we have seven
different icons and all of them are displayed. Okay, next I'm going
to take care of the next filter item and it's going to be some links. First I'm going to insert your
H three heading elements, it's going to be features. Then we need link elements. The first one is going to
be 1,000 plus layouts. I'm going to duplicate
this line of code five times because we're going to have six
different links. I mean, the second link element will be 100 plus elements. Then the next one will
be no code design. Then the next is going
to be E Commerce. Actually, links are
some tummy links you can insert here
anything you want. It is absolutely up to you. Then the next
element, be workflow. Finally, I'm insecure marketing. Okay, that's it. About the second footer item, actually, I'm going to
duplicate this element twice. Then I'm going to
change the heading. Let's change here
the first letter, it should be capital. The second heading is
going to be services. In this footer item,
we will have five. Link. So I'm going to delete one of them and then change the
content of the link elements. The first one is going
to be Marketplace. Then we will have Theme Builder. Next one is going to be Cloud. Then we will have here I finally I'm going
to Intro Themes. Okay, that's it about
the second Fem, actually it is third footer
item and the second, the last footer item
will be for company. We will have here four links. I'm going to insert
here about us. Then we will block, the next one will be carriers. The last link element
is going to be contact. All right, that's about
the footer items. Actually, that's it, about
the footer top part. I'm going to take ear
of the footer bottom. We'll have here six
different link elements and they will be
navigation items. I'm going to open link elements in the H reference attribute. I'm going to insert index HTML because this link element will
navigate us to home page. Then let's duplicate this
line of code five times, because overall we have six
different navigation items. The second one is going
to be for clients. Then we will have
products right now, those links, I mean those
pages are not created. We will create them in
the coming lectures. But anyway, I'm going to specify here the
names of the files. The next one is
going to be contact. Then we will have account. Finally, I'm going to, in pricing, I think that it's about
the extremal markup. All the elements are created. Let's check the browser. As you can see, we have here all the links and also
the phone asomicons. Now it's time to
style those elements. And for that, let's move
on to the next lecture.
47. Styling Footer: In the previous lecture, we have created the HDML
markup for the footer, and now it's time to
style those elements. Let's take a look once again
at the finished project. Here we have the footer, which is simple one, but I think it looks
pretty nice and modern. Let's go to VS code and
start to write CSS. Actually, before we do that, I'm going to add
here one element because I forgot to create
it in the last lecture. We need here footer content which will wrap the
content of the footer. Let's cut this closing, Deep talk, and paste
it down below. Okay, that's it. The H on markup is ready. I'm going to institute your
new comments for the footer. Next, I'm going to select
the footer element. First of all, I'm going to
define the width and height. The width is going to be
100% As for the height, I'm going to make it
60 view pot height. I mean 60% of the viewport. And also, let's create some space inside the
footer using padding. The pudding is going to
be ten ram at the top, then zero on the right side, three ram at the bottom end, zero on the left side. Okay? As you can see, the width, height, and also the pudding
is applied to the elements. Next, I'm going to take care
of the footer contents. Let's select these elements. First of all, define
width and height. The width is going to be
100% As for the height, I'm going to make
it 100% as well. Next, I'm going to align the
elements using CSS Flex box, we need to display flex. Then I'm going to
place the elements, I mean the flex items,
vertically in a column. We need to change
the direction of the flex and it's going
to be column. Then I'm going to
create space between the flex items using justify
a concrete space between. And also, let's align
items in the center. Again, as you can
see the elements, I mean the top and bottom
sides are aligned. Next, I'm going to take
care of the top side. Let's go ahead and
select foot to top. I'm going to set with
to 100% Then I'm going to align elements
horizontally in a row. And for that, let's
use again flex books. In order to create space
between the flex items, I'm going to use justify content with the value space evenly. Okay? The elements, the first part at the top side of the footer
are aligned nicely. Okay. Next I'm going to take
care of the social media. I'm going to select
footer social media. And I'm going to
define the width. It's going to be 30% As can see, the width of the
first footer item in the social media
icons is increased. It is 30% of the footer. Next I'm going to
select footer item. It is a common class name
for all four footer items, we need to use CSS, flex books. I'm going to align flex items
vertically in a column. As a guest, we have to change the direction and it's
going to be column. As you can see, the flex
items are placed in a column. Next, let's take care
of the headings. I'm going to select
footer item page three. We need the same styles
for all heading elements. I'm going to change
the phone family, it's going to be cursive, then the phone size is
going to be 2.5 Rams. I'm going to change the color, let's use color 007. Also, I'm going to create some space at the
bottom using margin. Bottom two Ram. As you can see, the headings look pretty nice. Next we have to take
care of the icons. Let's select icons,
followed by the element. I'm going to increase
the phone size, it's going to be 2.5 Ram. Then we need space on the
right side of each icon. I'm going to use marching
right with value two Ram. And also change the
Coursermate pointer. Okay, now we have bigger icons. As a guest, we have to change
the color for each item. Let's go ahead and start
with the first one. I'm going to select icons I, followed by the nth
child selector. We need first item
actually icon, the color is going to be 187. 72. Let's check the result. As you can see, the color of
the first item is changed. Let's do the same for
the rest of the icons. I'm going to duplicate this
code six times because overall we have seven icons. Actually we need seven
icons and eight. I'm going to change the numbers
of the chart selectors. We need numbers, we need
numbers from one through seven. Also, we need to
change the colors. The second color is
going to be C323. Then we will have a 662. The next one is going to be 112. Then we will have here D081. The sixth item is
the color 4c89. Also we need here red
color, which is F0000. Okay, so as you can see, the colors of the icons are changed and they
look pretty nice. Next we have to take
care of the links here, I'm going to select foot item. Let's change the phone size. It's going to be 1.8 Ram. Then we need space at the
bottom using margin bottom. And it's going to be 1.5 Ram. And also change the
color of the link. It's going to be 394353. It is dark gray color. Here we have the links. Actually I think that we have too much space
between them. Let's decrease margin. Potson, make it to 1.4 Ram. Let's make it 1.3 Ram. I think we have now
better results. Next, we had to take
care of the bottom side. Let's select footer Bottom. I'm going to set width to 100% Then we need to align
elements using Flexbox. We need to display Flex. Then I'm going to
create space between the flex items using
justify content space. Even also, I'm going to use align items center in order to center the flex
items horizontally. As you can see,
the link elements are placed horizontal row
nicely, they are aligned. Now I'm going to create
border at the top, the border that we have here. Let's use border top and values will be 0.2
Ram solid as the color. I'm going to use RGBA value, we need zero, then 122, then the next value
is going to be 170. As for the opacity, I'm going to make it 0.2 Also, we need some space
at the top here, at the top between the
navigation items and the border. Let's create that space Is
in padding, top one ram. All right, finally we have to customize
the link elements. I'm going to select foot bottom followed by the link element. We need font family. It's going to be
croissant one curs, then I'm going to set
font size two, Ram. And also change the color
of the link element. It's going to be 007 AA, Okay? As you can see, the link
elements look pretty nice. Actually, with the
footer we're done. We can say that we have finished working on the main
page, the home page. Everything looks pretty nice. Next we have to take
care of the pages, clients, products,
contact, account pricing. We have to create
five different pages. And also, we have to
make the entire project responsive to different
screen sizes and devices. Still, we have to
do a lot of things. Let's move on to
the next lecture.
48. Creating Custom Scrollbar: In the previous lecture, we have finished working on the footer. It looks pretty nice. As I said, we have to move on and start to create the pages because the home page is
already styled and customized. Before we move on and
start to create the pages, I want to do one more thing. If we take a look at
the finished project, you will find here that we
have here a custom scroll bar. It is different from the
default standard scrollbar. I mean from this one here. In this lecture I'm going
to change the scroll bar. Let's go to the VS
code and scroll up right after default styles, I'm going to insert new
commons for custom scroll bar. Then I'm going to select body elements followed by
one of the CD elements. It is called Webkit Scroll Bar. Now I'm going to define the
width of the scroll bar. Let's set it to 1.5 Ram. Next, we need to define
another pseudo element and it is called web kit, scroll bar, thumb, which
is this part here. Now I'm going to
define the background and let's use here
linear gradient. The first color is
going to be 830. For the second one,
I'm going to use B55. Now if we check, you will see that the
thumb is changed. We have here thumb with
different background color. Now we have to take
care of the track. Actually, right now it can
see the track is white. But anyway, I'm going to define it because you might need different track track
with different color. In future, you should
know how to change it. I'm going to select Body, then webkit, scroll, bar, track. Let's make background
color white. The track is white. If we change the
color and make it, let's say green, then the track will change
its background color. That's the way how
you can change the background color of
the scrollbar track. Let's get back here. White color again. That's it. We have changed the default scroll bar and
make it look modern and nice. Now it's time to move
on to the next lecture, in which we have to start
to create the pages.
49. Customizing Navbar: All right, so in the
previous lecture we have created a custom scroll bar which looks pretty nice
and it's different from the default and
standard scroll bars. Now as I said, we have to
start to create the pages. In this lecture,
I'm going to start to create the client's page. Let's go to the finished project and check once again
the client's page. Here we have the client's page
which consists of heading. Then we have here
some testimonials from different clients. And down below we
have the same footer which we have created
for the main page, I mean the home page also. We have here the navigation. It is similar to the
main navigation. The only thing that have to do with the navigation is to change the color of the logo and
also the navigation items. And also we have to
change the background, color, and color of the button. Okay, let's go ahead and start to work on
the client's page. The first thing that I'm
going to do is to create a new file here in
the HTML folder. The file is going to
be clients, do HTML. Let's open this file. I'm going to move it
here. The clients page. I mean, the HTML
file is created. Now, I'm going to grab
the entire contents. Let's copy the entire
code and paste it here. Then I'm going to delete all the sections
except the navigation. Let's delete everything except the navigation we have here. The entire navigation
from the home page. Also, all the links that we are using throughout
this project. Let's check the browser. Go to the client's page. Here we have the navigation, and the entire page is empty. As I said, we have to
change slightly navigation. I mean, we have to
change the colors of the logo and navigation items. I'm going to add
new class name to the nth bar and it's
going to be multipage. Then I'm going to
go to the CSS file and we need to find the
span element of the logo. Here we have it. I'm going to select that newly added class, multipage enough,
followed by the logo. Then we need span element. Let's change the
color of the text. It's going to be 0926 to seven. Also, I'm going to get rid of the shadow effect because when we have the
white background, then the shadow doesn't
look quite good. I'm going to set
text shadow to non. Let's check the browser. As you can see, the
color of the logo is changed and now it
looks much better. Let's take here of
the navigation items. I'm going to find link
elements here we have no link. And I'm going to here multipage
no followed by no link. Then I'm going to
change the color. The color is going
to be 0926 to seven. And also I'm going to
get rid of tech shadow. Let's set it to none.
As you can see, the color of the numb
items is changed. Okay, now we have to
take care of the butt. Let's find bottom which
is placed after drops. As I through up down five. Then we should find
here yes, PTN. I'm going to select
multi page up, followed by no items. Then we have to select, actually we need
here item and items. Next we need no PTN. I'm going to change
the background we need here. Linear gradients. The direction of the
color transition is going to be two, right? Then the first color
is going to be F459. As for the second color, I'm going to use F3598. So as you can see, the
ground color is changed. Next, I'm going to change the color of the text and
it's going to be white. Also, I'm going to get
rid of box shadow. Let's set it to none, okay? As you can see, the
navigation looks pretty nice. The only thing that have to
do regarding navigation, I'm going to change
the box shadow of the drop down menus. I'm going to change it slightly. Let's find drop down then. I'm going to add here, actually we need to
place the code here. I'm going to select
multipage no, followed by O items. Then we need to drop down. The box shadow is
going to be 0110. Then we need RGP color 130. Then the next one
is going to be 162. Then we need 235, and the opacity is
going to be 0.4 Okay. Now as you can see, we have here different shadow
effect and I think it's much better than the previous one for
the white background. All right, so with the
navigation we are done. Let's check if the Tiki
no bar works fine. For that, I'm going to increase the height of the
container for a while. I'm going to use
style attributes. Then we need heights. Let's set it to 150, put height. And now check the results. As you can see, the
sticking el bar works fine. We have here custom scroll
bar, but we will change it. We don't need the purple scroll
bar here. As I remember. We have here green scroll bar. We will change it a bit later. Okay, everything works fine. The navigation
looks pretty nice. Next, we have to add the
content to the client's page. For that, let's move on
to the next lecture.
50. Creating the HTML Markup for Testimonials Section: In the previous lecture, we have started working
on the client's page. We have customized the
navigation and now it's time to add the
content to the page. Let's take a look at
the finished project. The client's page will include the testimonials
from the clients. We're going to create the HTML markup for the
content of the client's page. Let's go to the VS code, and right after the navigation, let's insert new comments
for the testimonials. Then I'm going to open section with the class
name testimonials. The first element
that I'm going to insert here is
going to be header. We need developments with the class name testimonials header. Then I'm going to open
H one heading tag with the text what customers are saying about us. Then we need on because
we're going to add trust pilot After
the heading element, I'm going to open deep tag
with the class name stars. We're going to have stars here. I'm going to insert here
a Google Material symbol. Let's go to the browser and search for Google
material symbols. Then we need to find
icon called hotel class. This is the icon that we need. Actually, I'm going
to make it rounded, Then grab the span element
and paste it here. If we check the browser, then you will see here the
star is displayed on the page. Next, I'm going to add Tug with the class
name Trust Pilot. Then we need Span element, Put the text Trust Pilot. After that, I'm going
to add here five stars. Let's open deep tug. Then go to the browser and search for the
icon called star. We need this icon. Let's grab the span element and paste it inside
the development. Overall, we'll have five stars. Therefore, I'm going
to duplicate this line of code four times. Let's check the browser. As you can see, we
have here five stars. Okay, next thing that I'm going to do is to create
another development, and it's going to be
testimonials wrapper. Overall, we will have 12
different testimonials. Let's open deep tug with
the class name testimonial. We're going to create the
first one and then we'll duplicate the testimonial
and make some changes. The testimonial will include
two different elements. We will have testimonial
top and testimonial body. Let's open de tu with the
class name testimonial to it will include the image of the customer
and also the name. I'm going to insert image tag, then we need to specify
the path of the image. Before that, we have to
exit the current folder. Right now we are in
the Htiml folder. We have to exit the folder, we need dots and s. Then we have to enter
the images folder and select client one. Need name, I'm going
to open span tag. The name is going
to be John Smith. Here we have the image of the
customer and also the name. Okay, let's it about the
testimonial top element. Next we need testimonial body. The elements will include those stars heading and
the paragraph Actually, it's heading, it is
paragraph as well. Let's insert here stars. I'm going to grab these
elements with five stars, then let's paste it here. Next, we need paragraph
with dummy text. We need five words. I'm going to insert
your Lorin five, then insert another paragraph. Actually, if we take a look
at the finished project, you will find that we have
here different paragraphs. The length of the
paragraphs are different. Right now, I'm going to
leave this element empty, and then we'll take
care of it a bit later. Okay, so let's sit about the HTML markup for
the first testimonial. As I said, we'll have 12
different testimonials. I'm going to duplicate
this code 11 times, then I'm going to
make some changes. We need to change actually, first of all, I'm
going to insert here the number of words. I mean, we need Lauren 30. Then we have to take care of the second testimonial we
need here, client two. Then the name is going
to be Jack Brown. I'm using some domin names, you can use whatever you want. Next, I'm going to
inerre Lauren 40. Then we'll have
here client three. The name is going to be Smith. As for the paragraph, I'm going to
interfere Lauren 50. Then we have here client four, and the name is going
to be Nick Peters. As for the paragraph, we will have here 30 words. We need Lauren 30. Okay. Next we need client five with the name Philip Dough. As for the paragraph, it's going to be Laura 13. Actually, we need here 12 items. It's the first 112345. It is six item, so I'm going to
duplicate it six times. Now I hope that we
have 12 testimonials. It is fifth testimonial. Now we need here client six. Then the name is going
to be Jane Smith. As for the paragraph, it's
going to be Lauren 40. Then the next client
is client seven with the name Jessica Mendes, and the paragraph
will be Lauren 40. It was seventh testimonial. We need here client eight
with the name Steve Thompson. The paragraph will be Lauren 50. We need here nine and
it will be Maria Green. And the paragraph
will be, um, 60. Then we have here client ten. It is Alexis, Alexis Smith, and we need Lorem 40. Then client 11, Bob Brown, Lum 20. Finally we need client 12. It's going to be Rose Hanson. As for the paragraph, I'm going to insert
here, Laurum 40. Okay, So I think the H
time markup is ready, and I hope that everything
is correct here. Let's go to the
browser and check. Here we have images with
different names and paragraphs. I think that everything
we don't have here, the image for the 11th client. We might have a mistake. This is client 11. Now the problem is fixed. I think everything
seems to be correct. Now we have to
customize this section. Let's move on to
the next lecture.
51. Styling Testimonials Section: In the previous lecture,
we have created the HTML markup for
the client's page. We have created the
testimonial section. You can see here
all the elements. Now we have to start to
style those elements. But before we do that, I'm
going to do one thing. As you can see, we have here scrollbar which has the
purple background color. But if we take a look at
the finished project, you will see that the scrollbar has different green color. I'm going to take care of
that as the first thing. Let's go to the VS
code and first of all, create new file in
the CSS folder. It's going to be clients. Then I'm going to
move this file here. We need to link clients
CSS file to the HTML file. I mean, clients dot HTML. I'm going to
duplicate this code. And we need to change here the name of the file's
going to be clients. Okay, once the files
are connected. Next, I'm going to go
to the tile CSS file and grab this code. I mean, the code where we change the background color
of the scrollbar. Thump. Let's copy this code, then go to the
clients of CS file. First of all, I'm going to
insert your comments for custom scrollbar and then paste the code. Here we need to change
those two colors. The first color is
going to be 0067 A. As for the second color, I'm going to use 34 DC 87. As you can see, the color, I mean the background color
of the scroll bar is changed. And it looks pretty nice. All right, so let's see
about the scrollbar. Next we have to take you of
the testimonial section. I'm going to insert your new
comments for testimonials. Then we need to select the section element which
has class name testimonials. First of all, I'm going
to define the with hand height of the
section elements. I'm going to set both
of them to 100% Then I'm going to move the section
down using margin top. I'm going to set top, actually we are creating
the space between the top edge of the
page and the section. Next, I'm going to use CSS Flexbox in order to
align the flex items. I'm going to set
display to flex. Then I'm going to
change the direction because we are going to
align elements vertically. We need flex direction
to be column. And also we need to align
items in the center, as you can see, the contents
placed in the center. Actually, we need to
change the size of the images because right
now they are too bigger. I'm going to select testimonial top followed
by the image stack. Let's set within
height of the image, both of them to six Ram. Then I'm going to
set object feet to cover in order to avoid shrinking the images and
losing the quality of image. Then I'm going to make
the images rounded. For that, we need
for the radius with a value of 50% chem. As you can see, we
have here much better result because the
images became smaller. Next, I'm going to take
care of the header. I'm here, testimonial header. We need to align
text in the center. Next I'm going to take care
of the H one heading element. Let's go ahead and select testimonial header followed
by the H one heading element. First of all, let's
change the phone family. It's going to be Molly Cursive. Then I'm going to set
phone size to pi. Also, we need to change the
color that's used here, color 0926 to seven. Let's check the browser. We have here the heading. Now, I'm going to increase the
space between the letters. Let's set it to 0.2 Ram. Also, I'm going to decrease
the width of the heading. Let's set it to 70%
As you can see, the heading is placed on
the left side of the page. We have to place
it in the center, and for that I'm
going to use margin, although it allows us to place
the element in the center. If you want to
center the element, you need to use width
and margin together. Remember this. Now,
as you can see, the heading is placed
in the center. Next, I'm going to
change the line height. Let's set line height to eight. Okay, Next I'm going to
take care of the stars. Let's select the
wrapper development which has class names Stars. I'm going to use flex box
to align the elements. As you can see, the elements are placed horizontally in a row. Next, I'm going to take care of the position
of the element. Let's set position to absolute. We need to position elements according to
its parent element. We need position relative for the parent which is
testimonial header. Now I'm going to define
the two position, it's going to be 50% As
for the right position, I'm going to make it 15% Okay, let's check the results. The elements are placed
nicely and correctly. Next, I'm going to take
care of the trust pilot, but as I see, the
stars are outlined. If we take a look at
the finish project, you can see that the stars are not outlined,
they are filled. Let's go and visit the
Google Material symbols. Let's check the website. As you can see in
the filters section, we have here option called field and we have to turn it on. Now if I search for the icon, then you will see
that it is field. If I click the icon, then you can see that we have here the
exact same span element, the exact same class name, and the content star. The only difference that we have here is that in this case, when we are using
the field icons, the value of field
property is equal to one. But if we check the link
in our H Neal file, you will see that we have
here field property. It's appropriate value is zero. If I change zero to one
and check the browser, you will see that all
stars are filled. Okay? The problem is fixed. Let's move on and take
care of the next element, which is trust pilot. I'm going to select trust pilot and define
margin at the top, because we need some
space at the top, let's set margin
top to one m. Okay, the next thing that
I'm going to do is to take care of this
text element here. I mean trust pilot. Let's go to the VS
code and trust pilot followed by the panelements, if we take a look
at the HTML markup. You can see here
that this element, the trustpilot element, includes
different span elements. We have here the text
span trustpilot, and also we have here the
symbols with span elements. In our case, we need to select
only this span element. For that, I'm going
to use one of the CSS combinators,
This sign here. It allows us to select only the first child
span element here. If I add here styles
like font size 2.5 Ram, then color 0926 to seven. Also, I'm going to
use letter spacing. Let's say it, 2.3 Ram. Then if we check the browser, you will see that only this
span element is styled, these stars are not changed. If I get rid of please
sign from here and then change the color will
get different results. As you can see, now all these
pan elements are changed. But if we add here
the combinator, then on the panelement
will change. Okay, I hope that
it's clear for you, I'm going to get
back these tiles. Okay, next we have to
take care of the stars. I'm going to select Trust Pilot, followed by the development. And then we need Span. Let's change the color. It's going to be 00. Then we need font
size three, Ram. Also, I'm going to use margin. The margin will be zero at
the top and bottom -0.25 Ram. It's on the left
and right sides. Okay, the stars
look pretty nice. Next I'm going to take
care of this star here. I'm going to select stars
followed by the span element. Now we need to use
the same technique. We need the first child element. I'm going to use again,
the CSS combinator. Let's change font size. It's going to be five Ram. Then we need color. I'm going to set
color to 00b 67. And also we need marching
on the right side. Let's set it to one Ram. I think that we are
done with the header. Everything looks pretty nice. Next we have to take care
of the testimonials. I'm going to go to the VS
code and select testimonial. I'm going to define the width and height of the testimonial. The width is going to be 33 Ram. As for the height, I'm going
to set it to 100% Next, I'm going to place the
testimonials on different lines. For that, I'm going to
select testimonials wrapper, Let's set with 80% then
I'm going to use Flex box. We need Display Flex in order to place the flex items
on different lines. We have to use flex wrap wrap. Also, I'm going to justify
content and set it to center. Now as you can see, the
testimonials are aligned. Next, I'm going to
create some space inside the testimonials wrapper that
I'm going to use, padding. We need padding to be ten Ram at the top and bottom and zero on the left
and right sides. Okay. Everything
looks pretty nice. Next we have to go back
to the testimonial, and I'm going to add here a
couple of different styles. We need margin in order to create space between
the testimonials. Let's add it to two
Ram on all four sides. Then I'm going to set box
shadow to 01 Ram, ten Ram. The color is going to be a 113. Zero, then we need 162. Next one will be 235, and as the opacity
I'm going to use 0.4 Now the testimonials
look much better. Next I'm going to
make them rounded. For that we need border radius
with the value one Ram. Also, I'm going to
create some space inside the testimonial
using padding. Let's set it to two m on
all four sides. All right. Next I'm going to take care
of the testimonial top. I mean the image and the name. First of all, I'm going to select wrapper which
is testimonial top. Actually is testimonial top
and not testimonial top. Let's use Flex Books, going to display Flex. Then I'm going to align
items in the center. Also, let's create space
at bottom using margin. Bottom, 1.5 Ram. All right, after that I'm going to
select span elements, I mean the name of the client. Let's write this
code after image, I'm going to select
testimonial top, followed by the span element. I'm going to increase
the phone size. Let's say it to 1.8 Ram. The text is going
to be upper case. We need text
transform upper case. Then I'm going to set
margin left to two Ram. Next we need color, and it's going to be 588. Finally we need letter
spacing to be 0.1 run. Okay, so all the names
look pretty nice. Next we have to take care of the deep elements inside
the testimonial body. I mean the wrapper of the stars. Let's select testimonial body followed by the development. I'm going to set margin to one Ram at the top and bottom and zero on the
left and right sides. Now we have some space. Next I'm going to take
care of the stars. Let's select Testimonial Body, followed by the development.
And then we need span. I'm going to increase
the phone size, it's going to be three M.
Then change the color. I'm going to use here,
this green color. The stars look pretty nice. The only thing that
we have to do is to take care of those
paragraphs here. Let's start with the
first paragraph. I'm going to select
testimonial body, followed by the elements. And then we need
N child selector. We need child selector. You might think that
I write here one. But if we take a look
at the HT mail file, you will see that paragraph is the second member
of the development. Instead of one,
we need here two. Let's increase the phone size. It's going to be 1.8 Ram. Then we need phone family. I'm going to set it
to Molly cursive. Let's move this line up next. I'm going to set
phone weight to bold. And I'm going to
change the color. It's going to be 0926 to seven. Finally, I'm going to use here, margin, Bottom one, Ram. Okay, let's check the results. The first paragraph
looks pretty nice. Next we have to take here
of the second paragraph. Actually, I'm going to
duplicate this code, then change the chart selector. It's going to be
three. I'm going to get rid of phone family, then the phone size is
going to be 1.6 Ram. Then we need phone
weight to be 300, the color will be 466. Finally we need margin. Bottom one Ram. Okay, that's it. The testimonials are styled
and they look pretty nice. With the testimonial
section, we are done. But before we
finish the lecture, I'm going to do one more thing. If we take a look at
the finished project, you'll see that we have here the I in the foot that we
created for the home page. The only thing that I'm
going to do is just to copy the HTM markup of the
footer from the home page. Let's copy it and paste
it in the client's page. If I copy and paste here the footer and then
check the browser, you will see that we have here the exact same footer that
we had in the home page. Okay, that's it, The
client's page is ready. Next, we have to take care
of the products page. And for that, let's move
on to the next lecture.
52. Creating the HTML Markup for Products Page: In the previous section, we have created the client's page. It looks pretty nice and cool. Now it's time to move on and start to create our next page, which is going to be
the product page. Let's go to the
finished version of our project and go
to the product page. The products page consists of a couple of different parts. We will have here the header, which includes two headings. Then we have here
this part which includes two sides,
left and right. On the left side we have
some textual elements. And the button on
the right side, you can see nice and cool
images of the project. Then we have here a section which is something
like promo section. We have here nice and
cool horror effect. Down below, you
can see the footer which we have used in
the previous pages I, in the home page and
the clients page. That's all about.
The product page, I think it looks pretty nice
and cool and also modern. It's time to start
to build this page. I'm going to go to the VS code. I'm going to create new page, I mean HTML file and I'm going
to call it products HTML. Also, let's create the CSS
file and call it products SS. I'm going to close two
files then actually, we need clients. Let's open it. I'm going to copy the entire
content and paste it in. The products of the HTML file, we need to keep here those
default HTML elements. We just need to change
the name of the CS file. It's going to be products
we need here products. Next, I'm going to
leave here navigation. I'm going to delete
testimonial section. Let's delete
testimonial section. I think that's it. The HTML file is ready. Let's look at the products page. As you can see, we have here the navigation and the footer. I'm going to hide
footer for a while. In order to make our working
process more convenient. We have different ways
to hide the elements. In this case, I'm going
to use attribute called. As you can see, the
footer is hidden. Okay? So as I said, we're going to start to
create products page. And the first thing that
we have to do is to prepare the HTML markup as usual insecure new comments
for products section. Then I'm going to
open section elements with the class name products. Next, we need develements, which is going to be the
wrapper of the content. I'm going to call it
products wrapper. As I said, the product page will include three
different parts. The first one is going to
be the header we need here, Products header, it will
include two heading elements. The first one is going to
be H one heading elements. I'm going to insert here,
themes and plugins. Then we need H three
heading elements. The text is going to be billed the most popular themes and, and plug ins in the world. Okay, let's sit
about the header. Next we have to create
the second part. I'm going to call it
products content. Let's create developments with the class name,
Products content. I don't know if it
is a good name, but anyway I'm going to call it. Inside the products content. We will have two sides. I mean, the left side
and the right side. We need developments
which is going to be product content left. I'm going to create the
right side as well. We need products content right? Okay, let's take care
of the left side. In the left side we will have H one heading elements
with the text built. Then I'm going to insert here paragraph with some
loam ipsum dummy text. The number of words
is going to be 13. Also we need button. The type is going to be, we need here type attribute
and it's going to be button. I'm going to adhere class name. The class will be products, PTN. As the text of the button, I'm going to right here, learn about us that sits
about the left side. Now let's take care
of the right side. And the right side will
have five different images. We need your image tag. Then we have to specify
the path of the file. First of all, we have to
exit the current folder. Then we have to enter
the images folder. And I'm going to select
web two, image one. Let's duplicate this
line of code four times because we will
need five images. The second image is going
to be web two, image two. Then we'll have web
two, image three. Next one is going
to be web five, image one, and web
five, image two. That's all about
products contents. We have here are the
images right now, they are too much bigger, but we will take care of that. The next thing that
I'm going to do is to create the third
part of the section. The third part is going to be, as I said, products promo. We will have two parts. The first part is
going to be shapes. Those shapes here. We have here circle, two circles and the
rectangle I'm going to insert here Developments
and it's going to be products promo shapes. We will have here rectangle, then I'm going to create small circle and then
we need large circle. After that, I'm going to insert another development and it's going to be promo content. Inside the promo content, we need H one heading elements. The text is going to be 100,000
We need here 100,000 plus clients are already building awesome and modern websites with code and create. Then we need to join the
most empowered community. Okay, that's about
the heading element. Next we need here Batson. The type is going to be Patson. As for the text we need here, sign up today besides, but I'm going to interfere
paragraph with the text. We offer a 30 day
money back guarantee. Join us. Okay. And finally I'm going to
insert you development. It's going to be promo shadow. We will create this nice
and cool shadow effect. That's why we created
this development here. Okay, I think that's all the elements are created and the HTML
markup is ready. Now we have to style
those elements. And for that, let's move
on to the next lecture.
53. Styling Products Content Section: All right, in the
previous lecture, we have created the HTML
markup for the products page. Now it's time to
style those elements. Actually, before we start
to styling this section, I'm going to change
something in the HTML file. I have added here five
different images, but actually we need
only three of them. The first three images, it was my mistake, and I'm sorry for
that, I'm going to delete those two images
because we don't need them. Then I'm going to take
care of the CSS as, remember we have created new CSS file in the
previous lecture. It is called product CSS. I'm going to open it, let's move this file
on the right side. Then I'm going to close
clients CSS file. The first thing that
I'm going to do is to adhere comments for products. Then I'm going to select
the section element. It is products. First of all, I'm going to define
within height. The width is going to be
100% As for the height, I'm going to make
it 100% as well. And also I'm going to
create space at the top of the section using marching
top through to run. Okay, So width and height
are applied to the section. And also we have here the space between the navigation
and the section. Also the scroll
bar is displayed. If we take a look at
the finished project, you will see that we have
here scroll bar with a different background color.
I'm going to change it. Let's go back to the VS code. I'm going to open
style CSS file. We need to correct this entire
code and paste it here. Then I'm delete this
code. We don't need it. Also, we need to delete
scroll bar track. Next, let's change
the colors here. The first color is
going to be 14b3. That's for the second color
I'm going to use here, 538 FT sells. You can see the background color of the scroll bar is changed. And it looks pretty
nice and it is appropriate to the
colors of this page. Next I'm going to take care
of the products wrapper. Let's select this element,
the width and height. Both of them are going to be 100% Then I'm going to use Flex box to
align the elements. We need Display Flex. Then I'm going to
change the direction because we're going to align
the elements vertically. We need flex direction
to be column. And also I'm going
to align items in the center horizontally. As you can see, the content
is placed in the center. Next, I'm going to take
care of the header. Let's select products header. We need to align text in
the center using text. Align Center. The text of the heading
is placed in the center. Next, we have to take
care of the headings. I'm going to start with the first heading,
which is H one. We need the product header followed by the H
one heading element. First of all, I'm going to
define the phone family. It is going to be,
we don't need, we need phone family. It's going to be Molly cursive. Then I'm going to
change the font size. The font size is going
to be six round. As we need letter spacing in order to create
space between the letters, it's going to be 0.2 Ram. And finally, I'm going to change the color of the heading. The color will be 26353. Okay, the first heading
looks pretty nice. Next we have to take care
of the second heading, which is three. Let's select. Product header followed by
the H three heading elements. First of all, I'm going
to define font size. It's going to be three Ram. Then we need weight. I'm going to make it 300. Also change the color. The color will be 567599,
then create margin. I'm in the space, the margin is going to be two
Ram at the top, then zero on the right side, then 15 Ram at the bottom, zero on the left side. So here we have the header.
Both headings look pretty nice and now we have to take
care of the product content. I mean, this part
here, as I said, and as you see the
images are bigger. I'm going to change the size of the images and then we will style the rest of the elements. I'm going to select
products, content. Right then we need your image
with nth child selector. I'm going to select
the first image. We need to define the width. It's going to be 35 Ram. Then let's duplicate
this code twice, change the numbers of
nth child selectors. We need 2.3 The second image will have with equal to 20 Ram. As for the third image, it's going to be 30 Ram. Now the images become smaller and we can style the
rest of the elements. I'm going to select wrapper, which is product content. First of all, I'm going
to define within height. The width is going to be
80% As for the height, I'm going to make it 90 Ram. Then in order to make
this element visible, we need to add box shadow for
the value 01 Ram, ten Ram, and the color is going
to be RGBA value, The first value is
going to be 130, then we will have 162, then we need 235. And finally the
opacity is going to be 0.4 Now as you can see, the element, I mean
the products content, the wrapper element is visible. Next, I'm going to adhere padding in order to create
some space inside the element. The padding is going to be
five Ram on all four sides. Also, let's make the corners of the element rounded
using border radius. And the value is
going to be one Ram. We have here padding and
also the corners around it. Next, I'm going
to align elements inside the products content
using CSS, Flax box. I'm going to add
here display flag and also we need to align
items in the center. Actually, we have here
a little problem. This part should be placed outside of the products content. That might be the problem. By mistake, I have added prom content inside
the product content. Let's cut this code and add it outside
of the developments. Now the problem should be fixed. Well, we have here
the same problem. Let's find products content. This is the closing, the tag
of the products content. Therefore, as I said,
we have to grab the code of the chromo content and paste it outside of
the products content. Now, the problem should
be fixed for sure. And yes, as you can see, the content of the Romo content is placed outside of
the products content. Now once this problem is fixed, we have to customize the elements inside
the product content. We have to start with
products content left. Let's define the
width is going to be 40% of the products content. As for the height,
I'm going to make it 100% then I'm going
to create padding. I mean some space
inside the element. The padding will be 15 gram at the top and bottom and zero
on the left and right sides. Next, we have to align the
elements using flex box. I'm going to use Display Flex. Then we have to place the flex items
vertically in a column. Therefore, we have to change the direction it's
going to be column. And also I'm going to
create space between the flex items using justify
content space evenly. It will add even space
between the flex items. As you can see, the elements on the left side are aligned. Next, we have to customize
each of the elements. We have to start
with the heading. I'm going to select H
one heading element. We need products content left, followed by the H
one heading element. First of all, let's
change the phone family. It's going to be croissant one Co. Then we have to
change the phone size. It will be ten ram. Here
we have the heading. If I take a look at
the finished project and look at the heading, you will see that the heading
has linear gradient effect. We have here blue color. As you can see, the color
has linear gradient effect. Let's go to the VS code and set background to
linear gradient. We need to change the
direction of the color. Transition is going
to be two, right? Then the first color
will be 35730. That's for the second color, it's going to be two to 509. And also I'm going to adhere 80% in order to change
the color transition. Next we have to use the
following property. It is called Web kit
background clip, It should be set to text. Finally, we need
color transparent. Now the heading should have linear gradient
effect. We have here. I think it's different
from the finished project. Let's check the colors we need. 357.3 it should be
730 and then 22509. Okay, let's now we have here the exact same
background color. I mean, the linear grade infect that we have in
the finished project. Okay, let's sit
above the heading. Next we have to take
care of the paragraph, select products, content left, followed by the elements. First of all, let's
change the phone family. I'm going to use your
phone called Mull per, then the phone size
will be 1.6 Ram. Also, I'm going to change
the color of the text. The color will be 537983. Then I'm going to decrease space
between the heading and the paragraph
using margin top. In this case, we need a
negative value minus five Ram. As you can see, the
paragraph is tiled. Actually, I'm going to
change the line height, it's going to be 2.5 Ram. Now we have here a
bit better fact. Okay, that's it about
the paragraph Next, I'm going to take
care of the bottom. Let's go ahead and
select Products, Content left, followed
by the bottom elements. The width of the
bottom is going to be 50% of the left side. The height will be six ram. I'm going to change
the background and I'm going to use
linear gradient. The linear gradient will be the same that we used
for the heading. I'm going to copy the value. As you can see we have here the same linear gradient effect. Next we have to get rid of
default border of the bottom. Let's set border to none and also make the corners
round using border radius. The value is going
to be five Ram. Now the button
looks pretty nice, we have to take
care of the phone. Let's set the phone size. To 1.6 Ram. Then we have to transform
text into upper case. Let's set the color to whites, but then we need letter spacing. The space between the
letters will be 0.2 Ram. And finally, let's set closer
to 0.0 As you can see, the button looks pretty nice. Actually, with the
left side, we're done. Everything looks pretty nice. Next we have to take
care of the right side. I'm going to select
the right side. I mean elements with the
class name product content. Right, Let's define the width. It's going to be 60% of
the parent elements. Then I'm going to select Image. Let's use this selector here. We are going to add here
some common styles. The first one is
going to be position. I'm going to set
position to absolute. And then we need
position relative for the parent elements, I mean the products contents. Because we're going to align images according to the
products content elements. I'm going to add here
position relative. Then I'm going to make the corners of the images round it using border radius. It's going to be one Ram. Also, we need box shadow for all images with
the values 02 Ram, eight Ram, and the
color will be black. As for the opacity, I'm
going to make it 0.5 Okay, so here we have the
images with box shadow. Next we have to position
the images for that. Let's add some styles to
the individual images. I'm going to add here height, it's going to be 70. Then in order to maintain
the quality of the image, in order to avoid shrinking it, I'm going to use
object feet cover. We need here cover and contain. Okay, next we have to take
care of the positions. The two position is going to be 50% then we need right position. I'm going to set it to 15% Next, we need to center the vertically inside the
products content element. For that we have to use transform with translate
y function and the value is going to
be -50% As you can see, the first image is aligned and it is placed
in the center of the elements I vertically. Next, we have to take care of the second image. I'm
going to add here. Position is going to be 20%
for the right position, going 30 to 33% The second image is aligned and now we
have to take care of the third image, the position. Actually we don't
need to position, we need the bottom position. The bottom position is going
to be 20% then we need right position, 3% That's it. Images are aligned
and actually with the products content
element, we are done. Next, we have to take of
the content for that. Let's move on to
the next lecture.
54. Styling Products Promo Section: In the previous
lecture, we have styled the first part of
the product page. I mean products content. Now we have to take care
of the second part, which is products promo. All the elements are created and prepared and we have to
style them once again. Let's take look at
the finished project. We're going to customize
this section here. And we have to create this
nice and cool hover effect. Okay, let's go to the VS code
and select products promo. I'm going to define
width and height. The width is going to be
100% That's for the height. It's going to be 150
viewport height, I mean one 50% of the view. Let's check the browser. As you can see,
the height is not applied to the products
promo element. We might have some
mistake in the HTML file. Here we have products promo. Products promo should include the content of this section. Actually, let's
check closing tag. Okay, we have some
mistakes here. We have to cut this code from here because it is not a part
of the products content. Let's paste it here. Also, we have to include promo content in
the products promo. We have to include
this element here. Now I think, and I hope
that everything is correct and the code
should work here. We have the height which is equal to one 50%
of the viewport. Also the width is
applied 100% Okay. After that, I'm going to
take care of the shapes, those three shapes here. I'm going to start with
the Romo rectangle. Let's go ahead and
select these elements. First of all, we need to
define the width and height. Both of them will be 60 m. Then I'm going to change
the background color. Actually I'm going to
use linear gradient. I'm going to define
the direction of the color transition, and I'm going to set
it to 135 degrees. In this case, the direction
will be diagonally. The first color is
going to be 184b. As for the second color, I'm going to make it transparent. And also I'm going to define
the percentage value. It's going to be 8% Here we have the rectangle and the
linear gradient background. Next, I'm going to take care of the position of this element. The position is going
to be absolute. In order to position this element according
to the parent elements, which is products promo, I'm going to use
position relative. Next, let's define left
and top positions. I'm going to start
with the top position. It's going to be 25% Then
the left position will be 10% Let's check the browser. As you can see, the rectangle
is positioned next. I'm going to make it rounded because if we take a look
at the finished project, you will see that it is rounded. I'm going to use border
radius with the value ten Ram as you can see the corners of
the rectangle around it. Next, I'm going to
rotate this element. For that we need to
transform rotate Z function. We need to rotate the element by z direction at the value I'm
going to insert 45 degrees. As you can see, the
rectangle is rotated. And finally, I'm
going to decrease the opacity of the rectangle. Let's make it 0.2
Okay, That's it. About the promo rectangle. Next I'm going to take
you of the circle. I mean the small one. Let's go ahead and select small circle, define
within height. The width is going to be form. As for the height, I'm going
to make it form as well. Then we need background color, which is going to be A D00. Then we need to make the
elements rounded using border radius with
value of 50% Let's. Check the browser. Here we have the circle. After that, I'm going to
take care of the position. Let's set its
position to absolute. Then we need to position to be 20% As for the right position, I'm going to make it
40% As you can see, the circle is positioned. And the last thing that
I'm going to do is to decrease the
opacity slightly. Let's set opacity to 0.7 Okay, let's see, at the small circle. Next we have to take care
of the large circle. Let's go ahead and
actually I'm going to duplicate this code,
change the class name. We need here a large
circle with and heights will be 50 Ram. Then we have to change
the background color. I'm going to use
color 34 DC, then 87. It is a green color. Then we need border radius, 50% Also position absolute. Next we need to put some
position and it's going to be 25% As for the right position, I'm going to say it to 12%
Let's get rid of opacity. We don't need it in case
of the large circle. Okay, so here we have the large green circle and
all the shapes already. Next we have to take care
of the promo content. I mean this element here. Let's select promo content. I'm going to set width to 60% Then the height
will be 45 fram. Also, I'm going to change the background using
linear gradient. Let's use linear
gradient function. First of all, let's define the direction of the
color transition. In this case, I'm going
to use two, right? Then the first color
will be 184 PB. As for the second color, I'm going to use 13036. Here we have the promo content. I'm going to place it
here in the center. For that, we need to
change the position. I'm going to set
position to absolute. Then in order to center
the element perfectly, we need the same technique. We need to use top left
and transform properties. I'm going to set
top position to 50% then the left position
will be 50% Also, we need transform with translate function and
the values will be -50% and again -50%
Now in this case, the element is perfectly
center inside the section. Next, I'm going to make
the box slightly rounded. For that we need border radius
with the value 1.5 from. I'm going to create some
space inside the box, but we need space on the
left and right sides only. We need putting with
value 0.5 frame. Okay, after that, I'm
going to align the content of the promo content,
I mean this element. In order to align the elements, I'm going to use S Flex box. We need Display Flex. Then I'm going to change the direction
because we're going to place the flex
items vertically. Therefore, we have to change the direction and it's
going to be column. Then I'm going to center the
content in both directions. I'm horizontally and vertically. And for that we need to
justify content center and also a line items center. Let's check the browser. So as you can see, the content
is placed in the center. Next, I'm going to change the cursor record pointer
so everything is ready. Next, we have to customize the each element here
inside the promo content. I'm going to start
with the heading. Let's select promo Contents, followed by the H
one heading element. I'm going to set the phone
family to mull cursive. Then the phone size is
going to be four Ram. Also, I'm going to increase the space between the letters. Let's say 2.2 Ram. I'm going to
capitalize the text. Therefore, we have to use text transform with the
value of capitalize. Finally, change the
color, make it white. The heading is customized,
but as you can see, we have to align the
text in the center. For that, I'm going to
add here text center. Now the text is
placed in the center. All right, that's all
about the heading. Next we have to
take of the button. Let's go ahead and
select Promo Contents, followed by the button element. First of all, let's
define within heights. The width is going to be 25 Ram. Then we need heights which
is going to be six Ram. Let's change the
background color. I'm going to use 34 DC. I mean this color here, which we used in case
of the large circle. Okay, let's check the browser. So here we have the button, Actually we need some space
between those three elements. I'm going to create that
space using margin. Let's set margin to
seven Ram at the top, then zero on the right side. Five frame at the
bottom and zero on the left side. Now
we have space. Next we have to get rid of default border and
also we have to make the button rounded. We need border none, then border radius with
the value five Ram button. Looks nice, but we have
to take care of the font. Let's change the font size. It's going to be two Ram. Then we need font
weight to be bold. Also, I'm going to transform
text into upper case, then change the
color, make it white. Finally, we need some
space between the letters. Let's set it to 0.2 Ram. And also change the
cos, make it pointer. That's it, about the button,
it looks pretty nice. Finally, we have to take
care of the paragraph. So let's go ahead and
select promo content. Let's set the font
size to 2.5 Ram. Then the phone weight
is going to be 300. Also, we need color to be white. Then I'm going to
capitalize the text. We need text transform with
the value to capitalize. And finally create space between
the letters at 32.1 Ram. Okay, the paragraph looks
pretty nice as well, and actually all
three elements inside the promo content
are customized. Next we have to
create the shadow. I mean this shadow here. As you remember, we have created an empty element
called promo shadow. I'm going to select
this element. We need promo shadow. Let's have within hides, the width is going to be 90% then the hides will be ten ram. Let's change the
background color. I'm going to use color 0525c. Here we have the shadow. Next we have to take
care of its position. Let's set position absolute. Then we need bottom
position to be -20% the position of
the shadow is changed. Next we have to make it
rounded to the radius. Let's set it to ten Ram. But then I'm going to
rotate the elements using transform
rotate x function. And the value is going
to be 20 degrees. The element is slightly rotated. Next we have to create
the blur effect. For that, we need to filter with blar function and the value
is going to be three ram, the element is
blurred and now we have to decrease
slightly the opacity. Let's set opacity 2.7 Okay, the shadow is almost ready. Next we have to create
the three D environment. And the effect of the shadow
will be much more cooler. I'm going to go back
to the VS code. In order to create the
three D environment, we have to use property
called Perspective. And I'm going to add it to the wrapper which is product promo that set
Perspective to 50 Ram. Then in order to apply this
property to the shadow, we have to add another property to the parent of the
promo shadow element. In this case the parent is
promo content and we have to add here transform style. With the value preserved,
three D. Now as you can see, we have here much
better and cool result. Okay, now it's time to create
the hover effect. On hover. I'm going to move the
promo content to the user. This effect here, it
comes closer to the user. We have to do that using
transform property. First of all, I'm
going to add here, hover to the Romo contents. Then we need to transform. If I use here only
translate Z function, then we will overwrite
this code here. We need to grab this
function, add it here. And we have to add here translate Z function
with the value ten. Do the hoffect works
fine as a guest, we have to make this
effect smoother. For that, we need transition with the values a
and 0.5 second. Now we have nice
and cool who facts. Next we need to change the background of
the product promo. Also, we need to move
those shapes as well. In order to do that, I'm
going to use Java script. You may think that we
can do that using CSS. But once we select the elements, we need to change the style
of the parent element, which is product promo. We cannot do that using CSS. That's why going
to use Javascript. Actually, let's create
new Javascript file inside the JS folder. I'm going to call
it products JS. Then we need to link this
element to the HTML file. Let's duplicate this code here and change the
name of the file. It's going to be products S. I'm going to move
this file here. First of all, we need to
select two different elements. The first one is the wrapper. Let's create new variable
and call it products. I'm going to select this element using query selector method. Let's specify here
the class name it is. Let's duplicate this line. The second variable is
going to be promo content. Let's change the class name. We need here promo content. After that, I'm going to add event listener to
the promo content. We don't need dots, we
need promo content. Actually, we need here content. As I said, I'm going to
add to these elements at event listener and the event
is going to be mouse over. It is the same thing
as the hover effect. Next, we have to pass
here abc function, which will be executed once
we hover over the elements, I mean the promo content. I'm going to add new class to
the products promo element. Then we will use
this new class in the CSS file and we'll
define the new style. I'm going to add here, products promo class list
property and then add method. I'm going to call the
class name animate. We have to add to the
products promo on hover. But once we mouse out, then we have to remove
this class name from the products promo element. Therefore, I'm going to
duplicate this code here. On mouse out events we have to remove class animate from
products promo can sell. That's it about gov script. Next, we have to go
back to the CSS file and find products promo. I'm going to select this
element using class animate. We need animate followed by pro product promo. We have to change the
background color. I'm going to use RGBA value
and it's going to be ten. 59, then 156, and the
opacity will be 0.7. Also, use transition
for smoother effects, we need here all 0.3 second. If I hover over
the promo content, then the background
will be changed. Everything works fine. Next we have to take
care of the shapes. I'm going to select
Promo Rectangle. With animate class, we
need animates followed by the promo rectangle on hover. I'm going to increase the
opacity of the elements. Let's say it 2.8 Also, we need to increase the size of the rectangle
using scale function. But besides the scale function, we have to add here rotate
Z function as well. In order to avoid
overwriting the code, I'm going to grab
this code from here. Also add here scale function. I'm going to increase the
scale of the rectangle. Let's make it 1.4 Also
we need transition. It's going to be all 0.3 second. Okay, let's hover over
the Romo content. As you can see, the scale of the rectangle
increases on hover. And also the opacity of the
element increases as well. All right, let's move
on to the next shapes. I mean, we have to take
care of the small circle. Select it using class animate. In case of the small circle, I'm going to increase
the opacity to one. Also, I'm going to
increase the scale. Let's make it 1.4 as well. Let's add here transition
poll 0.3 second. As you can see, we have nice and cool effect with
the small circle as well. Next we have to take
of the third shape, which is this large circle here. Let's select large circle
with class animate. In case of the large circle, we just need to
increase the scale. Let's set it to 1.4 and also add transition call 0.3 second. All right, so everything
looks pretty nice. The only thing that we have to do is to take of the shadow. We have to change the
shadow on hover as well. Let's find the shadow
and then select it. With class animate on hover, I'm going to
increase the height. It's going to be 13 Ram. I'm going to change
the bottom position. Let's say it two -15%
then I'm going to change, also polar effect we
need here, 2.5 Ram. Finally, let's
change the opacity, make it 0.9 I'm going to add here transition p 0.3 second. If I hover over the content, then the shadow will change. Actually, we have here
nice and cool effect. Okay, with products promo
section, we are done. The only thing that we
have to do in case of the products page is to
add here the footer. I mean the foot
that we add it to the client's page as
remember in order to do that we just need to copy footer from here and paste it. Actually already
have here footer. We didn't need to
copy and paste, we just need to get rid of
this attribute from here. I just forgot that
we have here footer. Now, everything
should work fine. We can say that with the
product page we are done. Everything looks and works fine. Okay, let's sit about
the product page. Next, we have to take
care of the contact page. Let's move on to
the next lecture.
55. Creating the HTML Markup for Contact Page: In the previous lecture, we have finished working
on the product page. It looks pretty nice and cool. Now we have to move on and start to take care of the next page, which is contact page. Let's take a look at
the finished project. Here we have the contact page. It consists of a header where we have two
different headings. Also, you can see here
two different parts. On the left side, you can see a couple of
different input fields. We can contact the support team. As for the right side, you can see here a
technical support, We can chat with support. And also you can see here a
couple of different options. Also we have here
nice and cool circle behind the support team section. Okay, that sits about
the contact section. Let's go to the VS code and organize the working
files for a new page. I'm going to close those files. Then I'm going to create new
file in the HTML folder. It's going to be contact Html. Also, I'm going to
create contacts file. Next, I'm going to move this
file here on the left side. Then let's copy the
entire content in the product HTM file
and paste it here. Then I'm going to
close this file. We need to change the
name of the CSS file. It's going to be Contact CSS. Then we have to remove product section.
This section here. Let's get rid of it. Also, I'm going to
hide the footer for a while and get rid of
this link from here, so everything is ready. Let's go to the contact page. Here we have the empty page
with just the navigation. In this lecture,
I'm going to create the HTM Male Markup for
the contact section. Let's institute your
comments for contact. Then I'm going to open
section elements with the class name contact inside the section
element we need, which will be contact wrapper. It will wrap the entire
content of this section. Next, I'm going to insert
here empty Developments, which will be contact circle, I mean this circle here. After that, we need
to create the header. So I'm going to open p tag with the class name contact header in which I'm going to insert
two different headings. The first one will be
H one heading element with the text contact. As for the second heading, it's going to be H
three heading element. I'm going to insure. If you have any questions, please feel free
and getting touch. That's it about the header. Next we need to insure de tu, which will be contact
content side, that element. We will have two parts, I contact form wrapper and
contact support wrapper. Those two parts here
let's open deep tag, which is going to be
contact form wrapper. I'm going to insert
Google Material symbol. Let's go to the browser and search for Google
Material symbols. I'm going to search
for icon called group. Here we have it actually, I'm going to select rounded. Let's copy the span element
from here and paste it here. I'm going to check if
the icon is displayed. So as you can see,
we have here icon. Okay, next we need four heading elements and
it's going to be contact. The support team. After that, I'm going to inside your
paragraph with the text, if you have any questions, send us an E mail. After the paragraph, I'm
going to open form elements. Inside the form elements, we will have a couple
of different inputs. I'm going to open input
with the type text, and also we need here a
placeholder attribute. Put the text name. I'm going to duplicate this code twice. The next input
will be for email, we need to change the type and also the
placeholder attribute, it's going to be e mail address. As for the third input element, I'm going to leap
here, type text. As for the placeholder
attribute, I'm going to insert
your subject. Then after input elements, we need to text area, it will have
placeholder attribute, the text is going
to be your message. Then finally we need
here button with type button as the
text of the button. I'm going to insite
you submit message. Okay, that's it. About the contact form wrapper. Next I'm going to create the second part
which is going to be contact support wrapper. I'm going to insert here
again, Google Material symbol. Let's go to the website and search for icon
called construction. Well, we need to grab this icon. Let's copy this.
Panelmentlose, this tab. Let's insert here panelment, and then check the browser. Here we have the second
icon after span element. I'm going to insert your four heading with the text,
Technical support. Then we will have here
paragraph with the text. If you need help, you can chat directly
with our support team. After that, I'm going to insert your button with type button. I'm going to add
here class name. It's going to be chat BTN. As for the text, I'm going
to insert Chat with support. Next I'm going to insert p tag, which will be support list. I'm going to insert here a
couple of different patterns. Let's open button
tag with the types. Also I'm going to
add here class name. It's going to be
support least PTN. The first PTN. The first
pattern will before as the community we will have
four different patterns. So I'm going to duplicate
it three times. Then I'm going to change the
contents of each pattern. The second one is
Browse Documentation. Then we have here, join
the Facebook group. Finally, we need here, explore, explore the block. I think that's it about the nil markup of
our contact section. I hope that everything
is correct. We will see that when we
start to style this section, we have here all the elements. They are prepared and now we have to style this
section For that, let's move on to
the next lecture.
56. Styling Contact Section: In the previous lecture,
we have created the HTML markup for
the contact section. Now as I said, we have to
style this section once again. Let's take a look at
the finish project. That's the way how the
contact page looks. We have here header and
two different parts. We're going to customize
all the elements. Let's go to the VS code and insert new comments
in the CSS file. It's going to be contact. Then I'm going to select section element which
has class name contact. And I'm going to
define with in height, the width is going to be
100% As for the height, I'm going to make it
150 viewport height. I mean one 50% of the viewport. And also I'm going to create some space at the top
side using margin, top 30 m. As you can see, these tiles are applied. Actually we're going to
change the scroll bar. If we take a look at
the finished project, you will see that we have
here a blue scroll bar. I'm going to copy the
code from products file. We need this code. I'm going to grab it and
paste it here at the top. Now as you can see, the
scroll bar is changed. Okay, next I'm going to take
care of the content wrapper. I'm going to define
within heights, both of them will be 100% Also, I'm going to align the
content using flax box. We need display flax. We have to change the
direction because we're going to align flex
items vertically. We need direction to be column. Also, I'm going to align
items in the center. Okay, so as you can see, the content of the contact
section is aligned. Next, I'm going to take
care of the circle. I'm in this circle here. Let's go ahead and
select contact circle. I'm going to define
with heights. Let's set with 290 m. Then the height is going
to be 90 Ram as well. We're make this
element around it, so we need to border
radius with the value of 50% Next I'm going to
change the background. I'm going to use
linear gradient. First of all, as
defined, the direction, it's going to be two, right? As for the colors, the
first one will be 651f. As for the second color, I'm going to make it transparent. And also we need here the percentage value
transparent will be 30% Here we have the circle with a
linear gradient effect. I'm going to change the
position of the element. Let's set position to absolute. Then we need position relative, or the parent element,
which is contact wrapper. We're going to position
the element according to the parent element according
to the contact wrapper. So we need here
position relative. Next, I'm going to define
the bottom position, and it's going to be 12%
As for the left position, I'm going to set
it to 20% Finally, I'm going to decrease the
opacity of the circle. Let's make it 0.2 The circle
is positioned nicely. Next I'm going to take
care of the headings. Let's go ahead and
select contact header. I'm going to align text in the center using
text Align Center. As you can see,
the text is placed in the center of both headings. I'm going to start styling
the first heading. Let's go ahead and select
contact header H one. Let's change the phone family. It's going to be Lee cursive. Then I'm going to
define phone size. Let's set it to six Ram. Also, we need letter spacing. I'm going to make space between the letters 0.2 Ram and also change the
color of the heading, and it's going to be 26353. Okay, As you can see, the first heading
looks pretty nice. Next we have to take care
of the second heading. Let's select contact header followed by the H three
heading elements. Let's increase the phone size. It's going to be three round. Then I'm going to change
the phone weight. Let's set it to 300. I'm going to change the
color of the heading and it's going to be 567599. Then we need to create some space at the top side
and also at the bottom side. I'm going to use margin and it's going to be two
Ram at the top side. The zero on the right side, 15 Ram at the bottom side, and then zero on the left side. Okay, here we have
the second heading. Both of them look pretty nice. Next we have to take care
of the contact content. I mean, this part here. Let's go ahead and
select Contact Content. I'm going to place both parts of the contact content side
by side, horizontally. And for that I'm going
to use flex book. As you can see, the both sides
are placed horizontally. Next I'm going to
select the first part which is contact form wrap. Let's define within heights. The width is going to be 45 Ram. Then we need height, it's going to be 78 Ram. And then I'm going to change
the background color. It's going to be white. In order to make the
element clearly visible, Let's define the box shadow. We need 01 Ram, ten Ram, and the RGBA color. The values will be
130162, then 235, and the opacity is going to be 0.4 Here we have the first part, the left side of the
contact content. Actually need to place the
circle behind these elements. For that, I'm going to
use z index property. Let's set the index to ten
and then check the browser. Now as you can see, the circle ended up behind the element. Next, I'm going to
create some space inside the box using padding. The padding will be four at
the top and bottom sides, and then two Ram on the
left and right sides. All right, after
that I'm going to make the corners of
the box rounded. For that we need
border radius one Ram. Then I'm going to
create space on the left and right sides of
the element using margin. We need here 0.3 Ram. Also, I'm going to align text in the center that's sit
about the wrapper. Actually, as you can see, we have here a tiny problem. The navigation is ending
up behind this element. I'm going to fix that
problem. Let's open style. Let's file and find the navigation bar we have
here is the index property, and I'm going to
increase the value. Let's set it to 100. Now we have here
the same problem. Let's set the index
to 1,000 Well, now the problem is fixed. Okay, let's move on and continue styling the
context section. Right now, I'm going to
take care of the icon, which is a material
symbol of Google. Let's go ahead and select
Contact Form wrapper, followed by the Pan element. Then increase the phone size. It's going to be a gram. Also, I'm going to change
the color of the icon, and I'm going to say 2842. As can see, the icon
looks pretty nice. Next we have to take
care of the heading. Let's select Contact Form wrapper followed by the
four heading element. I'm going to set the phone
family to mull cursive, then I'm going to set the
phone size to 1.6 run. Then we need phone weight,
it's going to be 300. Then I'm going to transform
text into upper case. Next, let's change the
color of the text. I'm going to use the
same color here, let's grab it from here. And add here a pound sign. Then I'm going to increase
space between the letters. Let's set it 2.1 Ram. Finally, I'm going to create
some space using margin. We need margin, three
Ram at the top side. Then we have zero
on the right side, one Ram at the bottom side, and zero on the left side. Here we have the heading,
it looks pretty nice. Next we have to take care
of the paragraph here. I'm going to select
contact form wrapper. First of all, let's
define for size, it's going to be 1.8 Ram. Then I'm going to
change the color. Let's make it 5646.
Change the font weight. Let's move this line up then we need marching
at the bottom side. Let's set it to seven run cam saw that sits above
the paragraph. The top side of the
wrapper looks pretty nice. Next we have to take
care of the form, I mean those input fields. So let's go ahead and select form wrapper followed
by the form elements. I'm going to use Flex box in order to align the input fields, we need Display Flex. Then in order to place the input elements
vertically in a column, we have to change
the direction of the flex box and we have
to set it to column. As you can see, the input fields are placed in a
column vertically. Next, I'm going to
customize them. I'm going to set for
wrapper followed by the input t. Then we to
select the text area as well. First of all, let's
define a bit. It's going to be 100% Then
I'm going to change space I, then I'm going to create some
space between the inputs. Let's set margin to two Ram. And then zero, change the background color of the
inputs and set it to 024. Let's check the browser. Okay, next I'm going to increase the space
inside the inputs. For that, I'm going
to use pudding. It's going to be one Ram on all sides except the left side. It's going to be two Ram, I mean two Ram on the left side. As you can see, we have
space inside the inputs. Next, I'm going to get rid
of this default border. Let's set border to none. I'm going to make the corners
a little bit rounded using border radius with
the value 0.5 fram. Then let's set font size to 1.5 fram and also
change the font weight. I'm going to make it 300, okay? So as you can see, the input
fields look pretty nice. Next, we have to define the height separately for
inputs and for the text Aa, because we need different
heights for those elements. Let's select contact
form wrapper, then inputs, and
set height to five. Then I'm going to duplicate this code and change
input to text Aa. We need height to be ten Ram. Also, I'm going to add
here one more property. It is called Re size and
I'm going to make it none. We no longer can
resize the text area. Okay, so I think those input
fields look pretty nice. Next we have to take care of
the placeholder attributes. I'm going to change the color of the placeholder attribute for inputs and for the
text area as well. I'm going to grab this
selector from here. Then past, let's copy and paste. I'm going to add here
placeholder pseudo class, I mean pseudo element. Then I'm going to add
here color property. And the color, it's
going to be 0335. As you can see, the
placeholder attributes have changed their colors
and they look pretty nice. Next we have to take
care of the button. Let's go ahead and select
Contact Form Wrapper, followed by the Boson element. I'm going to change the height, it's going to be five Ram. Then I'm going to change the background using
linear gradient. The direction is going
to be two rights. Then we have to insert
here two different colors. The first one will be C40c. As for the second color, I'm going to make it 85, actually 852 A. The color has changed. I mean, the background color, it is now linear gradient. I'm going to get rid
of default border, Let's set it to non, and also make the button
rounded using border radius. It's going to be five Ram. Now we have here
much better results. I'm going to change the font. I'm going to customize
the font and not change, set the phone size to 1.4 Ram. Then the phone weight
is going to be bold. Next, I'm going to
transform text to per case. Also increase the
space between letters. Make it 0.1 Ram. Change the color, it's
going to be white. And finally, we need
cursor point that sits about the first part of contact content as we have to take here
of the second part. Let's go ahead and select
contact support wrapper. I'm going to define
width and height. The width is going
to swing it here with is going to be 45 Ram. Then we need height, I'm
going to make it 67 Ram. Then change the background
color, make it whites. Also, we need box shadow in order to make the
element visible. The box shadow will be
0110 Ram as the color. I'm going to insert
this color here. Here we have the
second part I'm going to add here for the radius, it's going to be one Ram. Then we need margin on
the left and right side, it's going to be three Ram. Also, it's a line
text in the center. Okay, after that, I'm going
to take here of the icon. Let's select contact
support wrapper, followed by this
panelement we need here, phone size, it's going
to be eight Ram. Then I'm going to
add here color. The color will be 6797 FF. Actually, we have here
some problem we need here. Contact support wrapper. Now the problem is fixed. Actually, I think that
we are missing here something because we
don't have space here. We need space and we had to make it using padding. Missing here. Padding with values four
Ram and then two Ram. Now, the problem
should be fixed. Yes, now we have here
the same result. I'm going to take
care of the heading. Let's go ahead and select contact support wrapper followed by the H four heading element. I'm going to set the phone
family to mull cursive. Then the phone size is
going to be 1.6 mm. Change the phone weights,
it's going to be 300. Then I'm going to transform
text to upper case. So let's change the color. I'm going to make it 6797f. Let's check the browser, the heading looks nice. Next, I'm going to increase the space between the letters. Let's make it 0.1 Ram. And also, we need
space using margin. The margin will be three
Ram at the top side, zero on the right side, one Ram at the bottom side, and then zero on the left side. Okay, the heading
looks pretty nice. Next, we have to take
here of the paragraph. Let's go ahead and select Contact support wrapper
followed by the element. The font size will be 1.8 Ram. Then we will have
here font weight. It's going to be 300. Let's turn at the color. I'm going to make it 56460. Then we need margin
at the bottom side. Let's set it to four Ram. That's about the paragraph. Next we have to take
care of the hut BTN. I mean this button here. Let's go ahead and
select hut BTN. I'm going to set the width to 100% then the height
will be five. I'm going to change
the background. Let's use again,
linear gradients. The direction will be two
rights for the colors. I'm going to use 651f. The second color, it's
going to be 48 FF. Let's check the bottom here. We have the bottom. I'm going to get rid of default border. Also we need here border
radius with value of five M. Let's check the bottom. It looks pretty nice. Let's take here of the PontsI'm, going to set the phone size to 1.4 M. Then it's
going to be bold. Also, I'm going to
make it per case, then I'm going to increase the
space between the letters. Let's set it 2.1 Ram. Change the color, make it white. So as you can see, the
bottom looks pretty nice. The only thing that
I have to do is to increase the
space at the bottom. And also we have to make
the cursor pointer. So let's set margin
bottom five Ram. And then cursor pointer. Oops. Okay. Actually, yes, cursor. Well, we have here a tiny issue. I think that we need the Z index property
for this part as well, because as I guess the circle
is overlapping this part. I'm going to add here, not here, but here. Index with the value
ten. Now let's check. As you can see, the
problem is fixed. All right, next we have to take care of
those patterns here, we're going to style
them this way. Let's go ahead and
select wrapper, which has class
name support list. I'm going to use Display Flex, because we're going to align
those buttons using Flexbox. I'm going to align them
vertically in the column. We need flex direction
to be column. All right, now we're
going to customize them. Let's go ahead and
select Support List, followed by the button element. Let's set the height, make it 4.5 Ram. Also, we need space
between those buttons. We need margin to be one Ram at the top and bottom side and zero on the left
and right sides. Also change the
background color. Use here, color F245. Let's look at the results next. I'm going to get rid
of default border. Let's set border to none. We need border radius to
make the corners rounded. The border radius
will be four Ram. Then I'm going to take
care of the phones. Let's set phone size to 1.4 Ram. I'm going to transform
text to upper case. Then the color will be four A, not a but eight A F. Then
we need let spacing, let's set it 2.1 Ram. And finally we need
courser pointer, okay? As you can see, everything
looks pretty nice. And actually with this page, we are almost done. The only thing
that we have to do is to add here the footer. For that, we just
need to get rid of the attributes that
we added here. I mean, the attribute
here, let's remove it. Here we have the footer actually with the contact
page. We are done. Next, we have to create the
next page of our project. It is account page. For that, let's move on
to the next lecture.
57. Creating the HTML Markup for Account Page: In the previous lecture, we have finished working
on the contact page. As you can see, it
looks pretty nice. And now we have to move on
to work on the next page, which is account page. Let's take a look at
the finished project. Here we have the Account page. As you can see, it
consists of header and we have here
the input fields. I mean the form with icon
and also with Submit button. Down below you can
see another bottom. We can see here the circle which is nice and cool
background of the form. Down below you can see
the standard footer. Okay, so that's it
about the account page. Let's go to the VS code and I'm going to organize
the working files. We need to create
new HTML file in the HTML folder, account HTML. Then I'm going to create new
CSS file in the CSS folder. Let's go to the
contact HTML file and copy the entire code. I'm going to paste it here. Let's close this file. I'm going to make
here some changes. We need to change the
name of the CSS file, it's going to be accounts. Also, I'm going to get rid
of the contact section, so we need to hide the footer. Let's make it hidden. Okay, I think I'm going to move this
file on the right side. Let's check the browser
goes to the account page. Here we have the account page, which right now is empty. We just have here
the navigation. I'm going to create
the HTML markup. Let's insert your new
comments for account. I'm going to open section tag
with a class name account. Next we need developments, which will be account wrapper. So the first thing that
I'm going to insert here is account circle. I'm in the background
of the form. Next I'm going to
insert your header. It will consist of
two heading elements. The first one will be H one heading with the
text member space. As for the second heading, I mean the H three
heading elements, we need here to
manage your account, download products
and chat with us. Also we need here 2047 came that sit about
the account header. Next, I'm going to open
another deep element with the class name
account form wrapper. The first thing that
I'm going to insert here will be span elements, I mean the Google
Material symbol. Let's go to the browser and
then visit the website. I'm going to search for
icon called person check. Actually, that's the icon. I'm going to select rounded. Then grab the span element
and paste it here. I'm going to check the browser. If the icon is displayed, we have here the icon. Next, I'm going to add here four elements in which we'll
have with the class name. Account inputs. I'm going to insert your input tag with the type text and with the
placeholder attribute, it's going to be username. Then we need another
input for password. I'm going to change the type, it's going to be password. And also we need to change
the placeholder attribute. I'm going to insert
your password. After that, I'm going to open another deep tag and it's
going to be account check. So I'm going to insert here input tag with the
type check box. Also, I'm going to add
here ID attribute. It's going to be account check. Next, we need a label
inside four attribute. I'm going to insert
the same value, I mean account check the value that we used for ID attribute. Let's insert here,
remember me here. The same values for ID and four attributes because
once we click the label, the input should be checked. That's why we used
here the same values. Next, I'm going to
interfere button with type button as the text. I'm going to interfere login. Then after button
I'm going to in paragraph with the
text forgot your. Then we need to
open span element, User name or again,
spin Passport. We wrapped those words with span elements because
they will be links. I'm going to add
here question mark. Okay, that's it about
the form elements. Next we have to add one more button after
that development. That's open button
with the types. Also, I'm going to
add here class name. Let's call it PTN out because it should be placed outside of
the form. The text. I'm going to introduce
not a member yet. Join today. Okay, so I think that's
it about the HTML markup. Everything is ready.
Let's check the browser. We have here all the elements
for the account page. Next, we have to customize
those elements for that. Let's move on to
the next lecture.
58. Styling Account Section: In the previous lecture, we have created the HTML
markup for account page. Now it's guessed we have
to style those elements. Once again, I'm
going to show you the finished version
of our project. Here we have the account page. It consists of header
and then we have form with this circle background and down below you
can see the footer. Let's go to the VS code and insert here new
comments for account. Then I'm going to select section element with
a class name account. First of all, as defined
with and height, the width is going to be
100% As for the height, I'm going to make it 120. Viewport height. Also we need space at the
top using margin. Top 30, okay? The width and height are
applied to the element. Actually, you can see
here the scroll bar. If we take a look at
the finished project, you'll see that we have here blue scrollbar. Let's change it. I'm going to go to the contact CSS file and grab this code from
here, the contact page. We have blue scroll bar. I'm going to copy this
code and paste it here. Okay? As you can see, the scroll bar has changed
its background color. Next I'm going to
select account wrapper. We need to define within height. Let's set both of them to 100% And also I'm going to use Flex box
to align the elements. We need display Flex. Then we have to change
the direction because we have two aline
elements vertically. So we need flex direction column and then a line item center. Okay, now I'm going to
take care of the circle. I mean this circle here. Let's go back to the VS code
and select a count circle. Let's define within heights. The width is going to be 70. As for the height, I'm going
to make it 70 m as well. Then let's change
the background. I'm going to use
linear gradient. The direction is
going to be two left. As for the colors, the
first color will be 651f. As for the second color, I'm going to make
it transparent. Here we have the element which
right now is not circle. We need to set border radius to 50% Now the element has
shape of the circle. Next, I'm going to take
care of its position. We need position absolute. Then I'm going to add
here position relative. Because we are going to position the element according
to its parent element. In our case, the parent
element is a count wrapper. The bottom position is going to be 20% As for the left position, I'm going to make
it 33% Finally, let's decrease the opacity, make it 0.2 Here we
have the circle. Next I'm going to take
care of the header. Actually, the header will be similar to the head
of the previous page, I mean the contact page. In order to avoid
writing the same code, I'm going to open contact CSS file and
grab the code of header. Let's paste it here. And change the class names. We need your account. Let's check the browser. As you can see, the
header looks pretty nice. I both headings, The only
thing that I'm going to do is to decrease the
margin at the bottom. Let's set it to 12 Ram. Okay, that's it,
about the header. Next I'm going to take
care of the form. Let's select wrapper. I mean a count form wrapper first of all, define its width. It's going to be 50 gram. Then we need height. I'm going to set it to 50 Ram as well. Then I'm going to set
background color to white in order to make this
Almon visible clearly. I'm going to set box
shadow to 01 Ram. Eight Ram. As for the
color I'm going to use, we need here zero, then one Ram. And RGBA value 130-16-2235 and the opacity 0.3 Here we
have the wrapper right now, it ended up behind the circle. I'm going to fix that
using Z index property. Let's set it to ten. Now
the problem is fixed. Next, I'm going to make the corners of the
wrapper rounded. Let's set border
radius to one Ram. I'm going to align elements inside the
wrapper using flex box. We need display flax. Then in order to align
elements vertically, I'm going to set flex
direction to column. Also, we need a
line item center. Okay, the elements are aligned. Next, I'm going to take care of the spin element I in the icon. So let's go ahead
and select Account from wrapper followed
by the pan elements. Actually, if we take a
look at the HTML code, you'll find that we have here a couple of
different span elements. We need to select this span
element here, only this one. Therefore, I'm going to use
one of the CSS combinators. In this case, we are selecting
only this span element. I'm going to set within
height to nine Ram. Then let's change the
background color. It's going to be Fc8f. Then I'm going to make the
elements rounded, the epod, the radius 50% After that, I'm going to place the icon
in the center of the circle. For that, I'm going
to use Flex box. We need display flax, justify content center,
and a line items center. As you can see, the icon is placed in the
center of the circle. Next, I'm going to
increase the phone size. Let's set 26. I'm going
to change the color. Let's set color to 3776. Now we need space at the bottom, but actually I think that
we missed year padding. I mean, in the wrapper because we don't have space
inside the wrapper, let's set padding
to three Ram at the top and bottom sides and two Ram on the left
and right sides. Okay, now we have space inside the wrapper and I'm
going to add here marching bottom in order to create space at the
bottom of the icon. Let's set it to three m. Okay, that's it about the icon. Next we have to take care
of the input elements. I'm going to select
wrapper con inputs. I'm going to use flex box. We need display flex
and then flex direction column Because we're going
to align inputs vertically. Let's set flex
direction to column. Now as you can see, the
inputs are placed vertically. Next, I'm going to
customize them. So let's go ahead and select account inputs followed
by the input element. I'm going to set
width to 40 Ram, then the height
will be five Ram. I'm going to change
the background color. Let's set background
color to F zero to four. Next we need some space
between the input, so I'm going to set margin to actually margin
bottom to three Ram. Then I'm going to get
rid of the fault border, let's say to none. And also make the
input rounded using border radius 0.5 Ram. Now the inputs look pretty nice. Next, we have to
create some space inside the inputs using padding. I'm going to set padding to 0.5 Ram at the top
and bottom sides and one Ram on the
left and right sides. Next, we need to change
the font size I'm. Set phone size to 1.6 Ram
and also change the color. It's going to be 444, which is a gray,
dark gray color. Okay, so that's
about the inputs. Next we have to take
here of the placeholder. I'm going to select
account inputs. Then we need input element, followed by the
placeholder pseudo class. I mean pseudo element. The color is going to be 888. Okay, After that, I'm going to take care
of the check box. Let's go ahead and
select a count check. It is a wrapper development. I'm going to define margin. I'm going to move the
element slightly up. I'm going to set margin at
the top side, minus two Ram. Then we need zero
on the right side, three Ram at the bottom, and zero on the left side. All right, after that, I'm going to change the
cursor to pointers. Select account check followed by the input element and
set courser to pointer. Now we have here a pointer. After that, I'm going to
take care of the label. Let's go ahead and
select account check, followed by the label. I'm going to increase
the phone size. Let's set it to 1.6 then the
phone weight will be 300. I'm going to change the color. Let's set it to 777. And also change the
courser pointer. Okay, that's it
about the checkbox. Next we have to take
care of the button. I'm going to select
account form wrapper, followed by the button element. I'm going to set the width to 100% then the height
will be five Ram. Next, I'm going to change
the background color. The color will be 3776. Then I'm going to get
rid of the fault border. Let's make it non change
the border radius. Let's make the button rounded. I'm going to set it to four. Here we have the button
which looks nice, but we have to take
care of the font. Let's go ahead and set
the font size to 1.5 Ram. Then we need font to be bold, as I'm going to transform
text to upper case. Then we need color,
it's going to be white. Next, I'm going to set
letter spacing to 0.1 Ram. And also, let's change the
cursor, make it pointer. All right, the button
looks pretty nice. The only thing that have to
do is to create some space. I'm going to set margin to
1.5 fram at the top side, and then need here 1.5 fram
at the top and bottom side. Actually, then I'm going to set zero on the left
and right sides. Alright, that's it
about the button. Let's move on and take
care of the paragraph. I'm going to select
Act form wrapper, followed by the element. I'm going to increase
the phone size. It's going to be 1.8 Ram. Then we will have here
text line center. We need to center the text. And also I'm going to
change the phone weight. Let's say it to 300. Okay. The paragraph looks nice. As you remember, we have two span elements
inside the paragraph. I'm in, the username
and the password. I'm going to customize. Then let's select
account foam wrapper followed by the elements. And then we need span. I'm
going to change the color. It's going to be 2371. Then we need foam
weight to be 400. And also I'm going to
set courser point, That's it about the paragraph. Everything looks pretty nice. The only thing that
we have to do is to customize this button here. I'm going to select button
with a class name, BT and out. Actually I'm going to
copy this code from here because we need
similar styles. The width is going
to be 35 fram, then we need the same height
as for the background. I'm going to use linear
gradients function. The direction is going to be
to right. We need colors. The first one will be f48f. As for the second color, I'm going to use F3393. Next, we need border
non border radius. For Am, all those tiles
will be the same. The only thing that I'm going
to change here is margin. We need margin top. The value is going to be
form the second button. Looks pretty nice. Actually, we are almost done with this page. The only thing that we have to do is to display
back the footer. For that, we just need to remove attribute called
hidden from here. Now everything looks pretty nice and we're done
with the account page. The next thing that we
have to do is to take care of the last page
which is a pricing page. For that, let's move on
to the next lecture.
59. Creating the HTML Markup for Pricing Page: In the previous lecture,
we have finished working on the account page. It looks pretty nice. Now we have to move
on and take care of the last page of our project, and it's going to be
the pricing page. Let's go to the
finished version of our project and look
at the pricing page. It consists of a header. We have here some
material symbols. Then you can see here two different options
of the pricing, the Yearly Access
and Lifetime access. Also, we have here a couple of different shapes as the
background of those options. Down below, you can see
the standard footer which we have used in
the previous pages. That's it about
the pricing page. In this lecture, I'm going
to create the HTML markup. Let's go to the VS code. Then I'm going to
create new files in the HTML and CSS folders we
need here, pricing HTML. Then I'm going to create
pricing CSS file. Let's move this file
on the right side. Then I'm going to go to
the account on HTM of file and copy the entire code. Let's paste it here. I'm
going to make some changes. We need to change the
name of the CSS file. It's going to be pricing CSS. I'm going to get rid of
the account section. Also, I'm going to
hide the footer. Let's check the browser. We have here the pricing page. It is empty right now. We have here just
the navigation. So let's go ahead and answer. To create the HDM markup, I'm going to insert your
comments for pricing. Then I'm going to open section tag with the
class name Pricing, the first element inside
the section element, I'm going to create pricing wrapper in which I'm going to insert
another deep element. And it's going to
be pricing shapes. We will have three
different shapes. The first one will be
pricing rectangle. Then I'm going to create
pricing small circle. Then we need large circle. I'm going to duplicate
this line of code and just change the class name. We need pricing large circle. Okay, After the shapes, I'm going to create pricing header in which we will have three
different headings. The first one will be H
one heading elements with the text Simple pricing. Then I'm going to open again H one heading elements
and it should be complete as
unlimited websites. And then after this
heading elements I'm going to open H three heading with the text Join. 100,000 plus customers get access to unlimited websites. Modern them. Actually we need here modern themes and plugins. And also we need the
ultimate website builder. Okay, Next I'm going
to open and it's going to be reviews we
need to in paragraph. With the text. Excellent.
Then I'm going to open p tag, it's going to be pricing stars. We need to go to the
Google Material Symbols website and search for star. We need field icons, and also I'm going
to select rounded. Let's copy the span elements. We need five different
sanelements. I'm going to duplicate this
line of code four times. Then let's go ahead and check the browser if the
icons are displayed. As you can see, we
have here five stars. After that, we need again paragraph with the
text reviews on. Then after paragraph, I'm
going to open tag with the class name,
Pricing, Trust, Pilot. Inside that element,
I'm going to insert again Google Symbol. Let's go ahead and search
for symbol called hotel. We need this symbol here. Let's copy this span
element and paste it here. Then check the browser. We have here the icon. After that, I'm
going to insert here another span element with
the text Trust Pilot. With that span element, we're done with the header. Next I in here, deep elements with the
class name pricing cards. We will have two
different cards. Let's create the first one. Actually, I'm going to add here another class name
pricing card left. This will be the
individual class name. As for the pricing card, I'm going to use it as
the common class name. Inside the card, we will have deep elements with the
class name pricing top, in which I'm going to insert H three heading element
with the text yearly Xs. Then we need H one heading
element for the price. The price will be 99.90 $9
Then after the heading, we need again stars. I'm going to open P tag with the class name pricing stars. Then let's copy this
panelment here. We need five stars. So I'm going to duplicate
this panelment four times. Let's check the browser. We have here the stars. Next, I'm going to open elements with the
class name list, in which we will have a couple
of different list items. Let's open LI elements. The first one will be
hundreds of website packs. Overall, we will
have six list items. Therefore, I'm going to
duplicate this item five times and then
change the content. The second one is going
to be product updates, then we premium support. Then the next one will be
unlimited website usage. Then the next one will
be risk free guarantee. Finally, I'm going to
interfere one time fee, okay? So here we have the list items. Next I'm going to open
button with the type button. Also, I'm going to add
here class name and it's going to be pricing card BTN as the text I'm going
to insert sign up today. Okay. Actually I think that's
it about the first card. All the elements are created. Next, I'm going to duplicate these elements because we
need second card as well. I'm duplicate it. We have to make some changes. Let's change the class name. We need pricing
card, right then I'm going to change the
content of the headings. In this case, we need time axis. As for the price, it's
going to be 249.90 $9 Then we need stars
as the card list. I'm going to make
slight changes. We need lifetime
product updates, the lifetime premium support. As for the rest of the items, I'm not going to change them. I think that
everything is ready. Hopefully, we don't have here any mistakes and
everything is correct. We will see that in
the next lecture, where we will style
those elements. Right now, let's
check the browser. All the elements are prepared. Let's go ahead and move
on to the next lecture, where we're going to
style the pricing page.
60. Styling Shapes: In the previous lecture, we have created the HTML markup
for the pricing section. All the elements are
created and prepared. Now we have to start to
style those elements. Let's go to the VS code
in the pricing Css file. I'm going to insert new comments
for the pricing section. Then I'm going to select
section elements, the class name pricing, actually we need here pricing. The first thing
that we have to do is to define the w and height. The width is going to be
100% As for the height, I'm going to make it
150 viewport height. I mean one 50% of the viewport. Then we need margin top 30 in order to create space
at the top of the section. Okay, with height are
applied to the elements. Next we have to change the background color
for the scroll bar. I'm going to go to the
account that file. Grab this code we have
here, blue scrollbar. I'm going to paste
this code here. As you can see, the
background color of the scroll bar is changed. Next, I'm going to
select pricing wrapper. I'm going to define
within heights. Let's set both properties to 100% Then I'm going to align
elements using flex box. We need display flax. Then I'm going to change the direction and make it column. Because we're going to align
flex items vertically, we need text direction
to be column. Also, I'm going to set
a line items to center. Okay, I can see the content
is placed in the center. Next, I'm going to take care of the shapes of this section. I mean those three shapes, the rectangle and
those two circles. Let's go ahead and start
with the rectangle. I'm going to select
pricing rectangle. First of all, let's
define written heights. I'm going to set both
of them to 50 m. Then I'm going to change
the background color. Actually I'm going to
use linear gradient. The direction of the
color transition is going to be 135 degrees. Then I'm going to
select the first color, it's going to be 184 BB. As for the second
color, it's going to be transparent with a
percentage value 8% Here we have the rectangle with
linear gradient effect. Next, I'm going to make it rounded using border radius ten. Then we have to
change the position. I'm going to set
position to absolute. Then in order to position element according to the parent, which is pricing wrapper, we need position relative
for the parent element. Then I'm going to set top property to 30% As
for the lab property, I'm going to set it to 15%
Let's check the browser. Here we have the rectangle
we need to rotate it. I'm going to use transfer
with rotate Z function, and the value is going
to be 45 degrees. As you can see, the
rectangle is rotated. The last thing regarding this shape is to
decrease the opacity. Let's set opacity 2.2 All right, let's sit about the first shape. I'm in, the rectangle. Next I'm going to take
care of the second shape, which is this
little circle here. I'm going to select
pricing small circle. First of all, as
defined within heights, I'm going to set both
of them to eight gram, but then I'm going to change
the background color. Let's use here color 34d, d87. It is a green color. Next, in order to make
the element rounded, we need border radius 50% Then I'm going to change the position
of the elements. Let's set it to absolute. Then defined top and
right properties. The top position is going to be 25% As for the right position, I'm going to set it to 15%
Here we have the small circle. Next we have to take
care of the third shape, I mean, this large circle here. Let's go to the VS code and
select pricing large circle. First of all, let's
define within height. I'm going to set both
of them to Fort to Ram. Then we need to change
the background. I'm going to use again
linear gradient. The direction of the
color transition is going to be two rights. Then we need first color, which will be transparent. As for the second color, it's going to be 71186. And also we need percentage
value 9% We have here mistake we need 71186. Now, everything
seems to be correct. Here we have the element, which right now is on circle. Let's take care of that. We need border radius 50% Now you can see here the circle with
linear grade interfects. Next, we have to take care of the position of this element. We need position absolute. Then I'm going to
define bottom position. It's going to be 15% Then I'm going to define
the right position. Let's study to 15% And finally, I'm going to change the opacity. Let's start 2.2 All three shapes are
customized and positioned. Next, we have to take care
of the header of the page. For that, let's move on
to the next lecture.
61. Styling Header: Okay, in the last lecture we have styled those shapes here. Now as I said, we
have to move on and customize the header
of the pricing page. Let's go to the VS code and
then select pricing header. I'm center the text, I mean we need text line center. Besides that, I'm
going to create space at the bottom
side using margin. Bottom 20 Ram. As you can see, the text is placed in the center and
also we have here the space. Next, I'm going to take care of the headings individually. I'm going to start with
the first heading. Actually, I'm going to customize both headings simultaneously
because we have here two H one heading elements. I'm going to select them. We need pricing header followed by the H
one heading element. First of all, I'm going to
change the phone family. It's going to be Mode Coursin'm, going to find the font size, it's going to be five Ram. Also, we need space
between the letters. Let's set letter spacing
2.2 Ram and find a lichen. The color let's use
here, color 26353. Okay? As can see, the first two headings
are customized, they look pretty nice. Next we have to take care of
the H three heading element. I'm going to actually, let's duplicate this code, change the selector we
need here, H three. Then I'm going to get
rid of phone family. Also, I'm going to set
phone size to two Ram. Then we need to get
rid of letter spacing. The color of the
heading will be 567599. Besides that, I'm going to
add here phone weight 300. Let's check the browser. I'm going to decrease the
width of the heading. Let's set a two Ram. And then the browser, the width is decreased. But as you can see, we have to place the heading
in the center. Therefore, I'm going
to use marching. We need marching, it's going to be two Ram
at the top side. Then we need auto on the
right side, then two Ram. Actually, let's get rid of two because we need the
same values for the bottom side and
also for the left side. So we can leave here just two
Ram and auto. Let's check. As you can see the heading
is placed in the center and also we have some space
at the top and bottom sides. Okay, let's sit about
the headings Next. I'm going to take care
of this part here. I'm going to select paragraph. Let's set the font
size to two Ram. Then we need font weight. It's going to be 300. Also, I'm going to create some space on the right
side using margin, right? The value will be one Ram. Okay, so the paragraphs
are customized. Next I'm going to take
care of the stars. Let's select the wrapper
development which is reviews. I'm going to use Flex box
to align the elements. Let's set display to flex. Then we need to justify
content Center. As you can see, the elements are placed
horizontally in a row. Next, I'm going to
select Pricing stars, which is the wrapper
of the icons. Let's select Pricing stars and create space on the right side using
marching right, one Ram. Okay, now we have to
customize the stars. I'm going to select
span element. I mean those span
elements here we need pricing stars followed
by the span elements, let's set the phone
size to 2.5 Ram. And also I'm going to change
the color of the stars. The color will be 03b 57. It is a green color. As you can see, the
stars look pretty nice. Next, I'm going to take
care of this part here. Let's select Pricing
Trust Pilot. I'm going to use Flex box. Let's set display to flags. Then we need to align
items in the center. Also, we need to move the
elements slightly up using margin top with a
negative value -0.5 Ram. Okay, now it looks pretty nice. Next we have to customize
those two elements here. Let's go ahead and start with the first span element,
which is an icon. I'm going to select
pricing trust pilot, followed by the span
element with selector. As I said, we need to take care of the
first span element, which is an icon
we need here one, I'm going to set the phone
size to 3.5 As for the color, I'm going to use the same color. Let's grab it and paste here. Okay, so as you can see, the icon looks pretty nice. The last thing that
we have to do is to take care of this element here. I'm going to
duplicate this code. We need span element to
the second span element. Let's get rid of
color and change the phone size we need to run. All right, that's the header. Looks pretty nice. Next we have to take care of the cards. And for that, let's move
on to the next lecture.
62. Styling Pricing Cards: All right, so after
styling the header, next we have to take
care of the cards. We have to style both of them. So let's go back to the VS code and start
styling the cards. I'm going to select the
wrapper development which is pricing cards. And I'm going to use flex book in order to place the cards horizontally in a row. I mean side by side. So we need to display Flex. If we take a look
at the project, then you'll see that the cards
are placed side by side. Next, I'm going to
customize the cards. As you remember, each card has a common class pricing card and also an individual class
name pricing card left. First of all, I'm going to add to both cards some
common styles. Therefore I'm going
to select them using common class
name pricing card. I'm going to define
the widen heights. The width is going to be 45 Ram. As for the height, I'm
going to make it 70 Ram. Then I'm going to change
the background color. It's going to be white. And also in order to
see clearly cards, I'm going to define the box
shadow with the values. 01 Ram, ten Ram, and the color will be RGB, A 130-16-2235, and the opacity
will be 0.4 Okay. As you can see, we
have here two cards. Actually the shapes, I mean, those elements are
overlapped on the cards. I'm going to place
them behind the cards, and for that we can define
the index property. Let's set it to ten, okay? Now, as you can see,
the problem is fixed. Okay? After that, I'm going to create some space
between the cards. Let's do that using margin. Margin will be zero at
the top and bottom sides. As for the left and right sides, I'm going to set margin to 1.5 m. Now we have space
between the cards. Next, I'm going to create
space inside the card as well. For that we need padding. The padding will be four Ram at the top and bottom sides and then six ramp on the left
and right sides. All right. After that, I'm going to make the corners of the
cards rounded. Also, we have to align items inside the card
using flax books. Let's set border radius to, actually we need
here border radius. The border radius
will be one Ram. Then as I said, we
need flex books. I'm going to set
display to flex. Then I'm going to change the direction because
we're going to align items inside
the card vertically. So I'm going to set flex
direction to column, let's place it down. Next, I'm going to set
items in the center. We need align items center. And also we need to sensor
the text using text. Align Center. Okay, that's it. About the common
styles of the cards. Next, I'm going to customize
the H elements separately. We're going to start
with the headings, I mean H three heading elements. Let's go ahead and
select pricing car, followed by, actually we
need your pricing card top. And then H three
heading element. First of all, I'm going to
define the phone family. It's going to be mull cursive. Then we need phone size, I'm going to set phone
size to 1.8 Ram. Then we need to transform
text to upper case. I'm going to create space
between the letters. Let's set it 2.2 Ram. Finally, I'm going to
create some space at the bottom using margin bottom, the value will be two run, okay? So as you can see, the
headings are customized. But if we take a look at
the finished project, you will see that the headings
have different colors. And also we see here the
linear gradient effect. I'm going to define
the color separately. Let's go ahead and select
pricing card left, then I'm going to grab
the selector here. I'm going to use. Linear gradient, The direction of the color transition
will be two rights. Then we have to
define the colors. The first color will be 441d. As for the second color, I'm going to use 0b38. Also, I'm going to
adhere 90% Next we need property called Webkit background clip,
it's going to be text. Also, we have to set
color to transparent. Okay, so as you can see, the heading of the first
card looks pretty nice. We have here a linear
gradient effect. Let's do the same for the
second heading as well. I'm going to
duplicate this code. Then we have to change
the class name. We need here pricing
card, right? And also we have to
change the colors. The first color is going
to be C, A six EFF. For the second color, I'm
going to set it to 71186. Okay, let's check the results. As you can see,
the second heading looks pretty nice as well. Next we have to take
care of the prices. I'm going to select
pricing top H one. I'm going to set the
phone family to Molly. Actually, let's
grab this code from here and then make some changes. The phone size will be six Ram. Then we need, actually we
don't need here upper case. I think actually that's it. Let's check the browser, the headings, the
prices look good. We need to change the colors, and we have to do the
same what we have done for the previous headings. We can simply add here select. Let's duplicate the selector. Get rid of the Calibra
then we need here. And also H one heading elements. Let's check the browser price has the same color
with gradient effect. Let's do the same for
the second card as well. Actually, let's copy
this selector from here. And then just change the class
name we need here, right? All right, that's it. The headings look
pretty nice and next we have to take
care of the stars. Let's go back to the VS code. I'm going to select wrapper with a class name pricing card stars. I'm going to create
some space at the bottom using
margin bottom for Ram. Then we have to select the
panelement we need, again, pricing card stars followed
by this panelement. I'm going to change
the color of the star. Let's use here 0357. So as you can see, the
stars look pretty nice. Next we have to take
care of those lists. Here I'm going to select UL elements with the
class name pricing list. The first thing that
I'm going to do is to get rid of default bullets. We need list style none. Also I'm going to
create some space at the bottom side using
margin bottom for. Okay. As you can see, the bullets are removed and also we have some
space at the bottom. Next, we have to take
care of the list items. I'm going to select
pricing list, followed by the LI elements. Actually we need here. Pricing card least and left. Then it should be followed
by the LI element. I'm going to increase
the phone size, it's going to be two Ram. Then we need phone
weight, let's say, to 300 as I'm going
to change the color. Let's set it to 567599. Then we need margin, 1.5 Ram at the top
and bottom side, and then zero on the
left and right sides. As you can see, the least
items look pretty nice. Next we have to
change the color of the fifth least
item in the least. I mean, we have to make
this least item green. For that, I'm going to
select LI elements, followed by the nth
child selector. We have to select fifth item. The color is going to be 0357. As you can see, the fifth item now has the different color. Now we have to take
care of the last item. We need the last item
to be overlined. A fact here, Let's go ahead and select the list item
of the first card. We need pricing card left, followed by the pricing list. And then we need a
li element followed by the last child selector. We need your last child. I'm going to use property called text decoration with
the value line through. Then we need opacity 0.5 Okay. That's it's about the least. Next we have to take
care of the buttons. I'm going to select
pricing card BTN. I'm going to set width to 100% then the height is
going to be six Rams. I'm going to change the border. I mean, we have to get
rid of default border, let's set it to none, then we need border
radius to be five Ram. Then let's set the
font size to 1.6 Rams. I'm going to transform
text to upper case, change the color, it's
going to be white. Then we need to create some
space between the letters. Let's set it 2.2 Ram. Finally, I'm going to
set cursor to pointer. Right now the buttons don't
look quite good because we have to change the background
colors for each buttons. We need linear gradients
for both patterns, they have different colors. I'm going to select
pricing card left, followed by the pricing PTN. Then I'm going to
change the background. Let's use linear gradients. Actually, we need
the similar values that we used for the heading. So I'm going to grab
this code from here. Let's check the browser. The first pattern
looks pretty nice. Let's do the same for
the second one as well. I'm going to
duplicate this code, then change left to right, and also grab the
values from here. Let's paste the value here. As you can see, the both
buttons look pretty nice. Actually, with the cards,
we are almost done. I have to do one more thing. If we take a look at
the finish project, you will see that the
card on the right side looks a bit larger
than the left card. Actually, you may think that we're going to increase
the within height, but that's not what
we're going to do. I'm going to create through the environment and
then I'm going to move this card
close to the user. In order to create
through the environment, we have to use property
called Perspective. We have to add it
to pricing cards. The value will be 50 Ram. And then I'm going to
select pricing card, right? I'm going to use transform, then translate z function
with the value five Ram. Now as you can see,
the second card, I mean the card
on the right side moved closer to the user. I think it looks pretty nice. Okay, with the pricing
page, we are almost down. The only thing that we have to do is to display the footer. I'm going to get rid of
attribute called and that's it. Okay. The pricing page looks pretty nice
and modern actually, with the pages we're done. The next thing that we have
to do is to make the project responsive to different
screen sizes and devices. Let's move on to
the next lecture.
63. Making Project Responsive for Larger Screens: Hi and welcome to our new
section in which we're going to make our project responsive to different screen
sizes and devices. In the last section, we have finished
working on the project. I mean, we have created
and styled all the pages. Everything looks pretty
nice and modern, but now we have to make
the project responsive. I want to talk a little about importance of the responsive web design in web development. Actually, it is super important in web
development because it makes sure that
the websites work well on all kinds of
devices and screen sizes. With so many different gadgets like smartphones and tablets, responsive web design helps websites look good and
easy to use everywhere. It also saves time and
effort by avoiding the need for separate
designs for each device. Plus, search engines like Google prefer websites
that are mobile friendly. Responsive web design can boost a site's visibility as well. In simple terms,
responsive web design is a must have in web
development to make sure that the websites stay user friendly and effective
on the wide range of devices people use
today in my web project, I've made it a priority to make the website look awesome
on various devices. We're talking big
desktop screens like 1920 pixels and
also 1,600 pixels. As well as slightly smaller
ones like 14 40 pixels, 1960, 6.12 80 pixels. Four tablets. I've got 820
pixels and 768 pixels. Of course, for those who love
browsing on their phones, I've optimized for
43,393.3 75 pixels. By doing this, I'm ensuring that no matter how someone
accesses the site, whether it's on a
computer, tablet, or mobile phone, the experience is smooth and looks great. This approach is essential today because people use
all sorts of devices, and I want everyone to have a positive and user friendly
time on my website. Responsive web design is
not just a fancy term. It's about making things easy
and enjoyable for everyone, no matter what gadget
they are using. Okay? As you know, we have built our project on this extra large screen size, and now we have to make it responsive on those
break points. The first breakpoint
will be this one here. I'm going to make
project responsive with all its pages and then we will move on to
another breakpoint. Okay, let's inspect the page, switch to the responsive mode. So as you can see, we have
here those dimensions. I mean, 1920 pixels of width
and 1080 pixels of height. As I said, the first
break point will be 1,600 pixels and 900 pixels. I'm going to insert
here those dimensions. Then I'm going to
go to the VS code. Let's close this file here. Then I'm going to insert here
new commons for responsive. Then I'm going to use CSS media query to define
the max width of the screen. We need a sign
followed by the media. Then we need to specify
max width of the screen. It's going to be 1,600 pixels. Now we can insert here
these tiles that we need. The first thing that
I'm going to do is to change the font size
of the HTML element. As you remember, we have
set the font size of the HTML to 62.5% in order to use Ram,
the measurement unit. And I'm going to decrease the size of the font
of the H mal element. It will decrease the size of all the elements of
the entire project. I'm going to make the font
size of the H mal element 60% Now all the elements in
the project became smaller. Next, I'm going to take
care of the nav bar. I'm going to decrease
the padding on the. Left and right sides. I'm going to select no and set putting to 0.10 Run next I'm going to change the
width of the no items. I, the wrapper deep element. I'm going to select
no items and set its width to 55% As you can see, the width of the
navigation items, the wrapper element
is increased. Next, I'm going to
take of the drop down. As you can see, we
have here little gap between the drop down
menu and the triangle. I'm going to fix that problem. Let's select drop down menu. Change it took position, I'm going to set it to 4.5 Ram. Now as you can see, we no longer have here the gap between the triangle
and the drop down menu. Next, I'm going to take care
of the services section. Let's select services
wrapper and set the width to 70% Okay, now we have a better result. Next, I'm going to take
care of the projects list. Let's go ahead and
select projects list. I'm going to set
with to 80% Okay, so this section
looks good as well. Next I'm of the
template section. I'm going to
customize the images. Let's template right
followed by the image. Then we need child select. Let's select the first image. I'm going to change
the two position, it's going to be 45% Then
let's set the width to 35 Ram. I'm going to duplicate
this code we need here. Third image, then I'm going to get rid of top
position and change the width. Let's make it 55 Ram. Okay, now everything looks good. Next we have to take care
of this little gap here. Actually, I think that it's a browsers fault
that we see here. This little gap. Anyway, I'm
going to fix that problem. Let's select subscribe section. I'm going to set marching
top to minus one M. Now we don't have any gap and everything
looks pretty nice. Okay. So I think that's
about the home page. Next we have to take care
of the remaining page. Let's go to the client's page. We need to increase the width of the testimonials,
I mean the wrapper. Let's go back to the VS code and open clients of CSS file. I'm going to insert your
comments for responsive. Then we need CSS
media query max width is going to be 1,600 pixels. I'm going to select
testimonials wrapper. Let's set its width to 90% Okay, now the section
looks pretty nice. I think that we don't need to change anything here
on that break point. Let's move on to the next page, which is product page. I'm going to make
here slide changes. Let's go ahead and
open products page. Then we need her
comments for responsive. I'm going to define media
X with 1,600 pixels. We need year 1,600 pixels. I'm going to select product content change
width is going to be 90% Next I'm going to take
care of the promo content. I'm the heading element. Let's go ahead and
select promo content, followed by the H
one heading element. I'm going to change
the phone size. Let's set it to 3.5 m. Okay, now the promo
content looks good. Actually, with product
page we are done. Let's move on and check
the content page. I think everything looks good. Next, let's check
the account page. We don't need here any changes. As for the pricing page, I'm going to make
your slide changes. Let's go back to the VS code
and open pricing SS file. Let's insert comments. I'm going to create
Caesars Media query with Xw of 1,600 pixels. Let's go ahead and
select small circle. And change its right position
is going to be 10% Also, I'm going to take
care of the position of the large circle. Let's duplicate this code then. I'm going to change
the class name. It's going to be large. I'm going to set
right position to 10% And also I'm going to
change the boxim position. It's going to be 12% okay. Everything looks pretty nice. And actually on that breakpoint, I mean 1,600 pixels of width
and 900 pixels of height. We are done. So we can
check this breakpoint next, we have to take care of
this breakpoint here. For that, let's move on
to the next lecture.
64. Making Project Responsive for Smaller Screens - Part 1: In the previous lecture, we have made the
project responsive. On the breakpoint, I mean 1,600 pixels of width and
900 pixels of height. Now it's time to
move on and make the project responsive on
different screen size. The next breakpoint is
going to be this one. I mean, 14, 40 pixels
and 900 pixels height. Let's go back to the browser and change the dimensions in
the responsive mode. We need here 14, 40 pixels and then 900 pixels. Then go back to the VS code, open style CSS file and
create new CSS media query. The max width is going
to be 14, 40 pixels. The first thing that
I'm going to do is to change the font size of
the H Timel element. I'm going to decrease it again. The font size is going
to be 48 pixels. I mean, percent, not the pixels. Now the elements
became again, smaller. Next, I'm going to take care of the items, the
wrapper development. Let's select no items. Again, increase the width. I'm going to set it to 60% Okay, I think we don't need any
changes with the header. Next we have to take care
of the services section. I'm going to select
services wrapper. Define the width.
The width is going to be 75% Okay, the services section looks good. Next I'm going to take care
of the project section. I'm going to increase the
width of the navigation. I mean this navigation here. And also I'm going to increase
the width of project at, let's go ahead and select
Filter and set its width to 85% Then I'm going to
select Project List here. Project list, and I'm going
to set with to 85% as well. Okay? So the project
section looks pretty nice. Next I'm going to take care
of the template section. The only thing that I'm
going to do is to make this paragraph I'm in the width of this paragraph
slightly smaller. Let's go ahead and
select templates left, followed by the elements
I'm going to set with 250. All right, so I think that's
sit about the home page. Everything looks pretty nice. Next we have to take care
of the client's page. Let's go ahead and open
clients CSS file and create new CSS media query with
max width of 40.40 pixels. I'm going to increase the width of the
testimonial wrapper, I mean this wrapper element. Let's go ahead and select testimonial wrapper
and set its width to 95% Then I'm going to change the width of
the testimonial itself. Let's select testimonial
and set its width to 32. Again, the testimonial section
looks good with this page. We're done. Next, let's take
a look at the product page. We have to make your
slight changes. I'm going to open
products of CSS file and then we have to
create new CSS media. Query max. Width is going to
be 14, 40 pixels. Then I'm going to select promo content and
set the width to 70% Then I'm going to take care of the shapes. Let's select promo rectangle. I'm going to set
left position to 8% Also I'm going to change
it to position as well. Let's set it to 25% Next, I'm going to take care
of the large circle. I'm going to change
its position as well. Let's select the large circle. Set bottom position to 25% Also, I'm going to change the
right position is going to be 8% That's it. The promo section looks good. Actually, with this
page, we're done. Let's check the contact page. It looks good. Also, the account
page looks good as well. Let's check the pricing section. So I'm going to change the position of
the circle slightly. I'm going to open
pricing the file. And then let's create news media query with the
max width of 14, 40 pixels. I'm going to select
pricing small circle. I'm going to change
its right position. Let's make it 7% okay? That's everything looks pretty
nice on the breakpoints. And I'm going to check
this breakpoint here. Next, we have to make the project responsive
on that breakpoint. And for that, let's move
on to the next lecture.
65. Making Project Responsive for Smaller Screens - Part 2: In the previous
lecture, we have made project responsive
on that breakpoint. Here I'm in the screen size with the following dimensions. 14, 40 pixels of width
and 900 pixels of height. Next, we have to take care
of the next breakpoint. I'm in this one here. Let's go back to the browser and change the dimensions
we need here, 13, 66, and then 768. I'm going to go back
to the VS code. Let's go to the style CSS file and create new CSS media query. The max width is going
to be 13, 66 pixels. The first thing that
I'm going to do is to change the phone size
of the HTML element. I'm going to set
the phone size to 56% it will decrease the
size of the elements. Next, I'm going to take care of the projects because the
first two sections look good. Let's take care of the projects. I'm going to select Project. I'm going to change the width, it's going to be the two Ram. Also, we need to change
the size of the images. I'm going to select
the first image with nth child
selector insider one. The width of the first image
is going to be 19 Ram. Then I'm going to duplicate
this code twice because we need to customize the
remaining two images as well. The second image, the width of the second
image is going to be 17 Ram. Then I'm going to define left position and I'm
going to set it to zero. As for the third image, let's set it with 90% And also I'm going to set
right position to zero, okay? As you can see, the width of the images is changed and
they look pretty nice. Okay, next we have to take
care of the template section. I'm going to take of the images. Let's go to the VS code
and select template, right, followed by
the image elements. Again, select, we
need the first image. I'm going to define, let's make it 30 Ram. Also, I'm going to change the
two position is going to be 45% Next I'm going to duplicate this code,
change the selector. We need your second image. I'm define width of
the second image. It's going to be 17 Ram. Okay, let's check the browser. I think everything
looks pretty nice. Next we have to take
care of the shadow. I mean, this blur effect here, as you remember it, is a four elements of
the template section. I'm going to select templates followed by the four element. I'm going to change
the within height. Let's set with 270 m. As for the height is
going to be 70 m as well. Also I'm going to change the position of the
element we need. Bottom position is
going to be zero. And also we need right position, which is going to be 8% Now we have better results
actually with the home page. We are done. All these sections look good. Let's check the
rest of the pages. I think the client's
page look good as well. Let's check the products page. I'm going to make
here some changes. Let's go to the VS code and
open products of CSS file. I'm going to create
new C mediary. Specify the max with it's
going to be 13, 66 pixels. First of all, I'm going to
take care of the images. Let's select products content. Right then we need image
with child selector. I'm going to select
the first image. Let's change the within heights. I'm going to set
width to 30 Ram. Then the height will be 60 Ram. Also I'm going to change
the position of the image. Let's set top position
to 45% As for the right, position is going to be 13% The first image is customized. Next we have to take care
of the second image. I'm going to duplicate
this code here. Then I'm going to
change the selector, we need her second image. The width is going to be 17 Ram. Then I'm going to
get rid of height, change to position,
it's going to be 20% As for the right position, I'm going to make it 29% Okay, the second image looks good. Next we have to take
care of the third image. Let's go ahead and duplicate
again this code we need. Third image, I'm going
to set with 226 Ram. Then we need here
bottom position, it's going to be 28%
Then I'm going to set right position to 3%
The images look good. Actually, with this
part here we are, done. Let's move on and take
care of the promo content. I select promo content, let's change within height. The width is going to be
60% As for the height, I'm going to make it 40 Ram. Then I'm going to
customize large circle. Once we hover over
the promo content, I select large circle
with the class animate. I'm going to change the scale. It's going to be 1.3 Now we have better results. Actually, I think that we
need to customize the heading because I think it's
bigger than we need here. I'm going to select promo content with H
one heading elements. Let's set size to three now. It looks pretty nice. Next I take care of the shadow. Let's go ahead and
select Promo Shadow. I'm going to change
the bottom position. It's going to be -14% Then I'm going to
change the shadow, I mean the bottom
position of the shadow. Once we hover over
the promo content, I'm going to
duplicate this code. Then we need to add
here class animate. I'm going to set bottom
position to 17% Okay, now everything looks good. And actually with this
section, we're done. Let's check other pages. The contact page looks good. I think that the account
page looks good as well. Next we have here
pricing section. It looks good as well. I think that's it.
About the breakpoints, the project looks good. I'm going to check
this breakpoint. The next breakpoint
is this one here, the screen size with
the dimensions 12, 80 pixels of width and
780 pixels of height. On the breakpoint, we need to change the font size
of the H mel element. That's all about
this breakpoint. I'm not going to dedicate a new video lecture
about this breakpoint. I'm going to customize the
project on the breakpoint. In this lecture, let's go to the VS code and open
styled Css file. Let's create new Css media query with max width of 12, 80 pixels. Then select Htimil element
and change the phone size. It's going to be 52% Then I'm going to change
here the dimensions. So let's check the project. As you can see,
everything looks good. We don't need to change
anything on that breakpoint. Actually, I forgot one
thing on the home page. I have not checked
the video player yet. That's my mistake. But as
you can see, it looks good. We don't need to change
here anything Okay, that sits about
those breakpoints. I'm going to check
this one as well. Next, we have to take care
of this breakpoint here. For that, let's move on
to the next lecture.
66. Making Project Responsive for Smaller Screens - Part 3: In the previous lecture, we have made project responsive on those
two breakpoints here. Now we have to move on and take care of the
next breakpoint, which is going to be 1024 pixels of width and 768
pixels of height. Let's go back to the browser
and change the dimensions. Here we need 1,024.7 68. Let's go back to the VS code and create new CS media query. In styles file, I'm
going to define max width as 1024 pixels. The first thing
that I'm going to do is to take care
of the navigation. Let's go ahead and select
no part and change padding. I'm going to set
padding to 0.5 frame. Then I'm going to take care of the wrapper of the Nova items. I'm going to select Nova items, I'm going to set the width
to 65% As you can see, the navigation items look good. Next I'm going to take
care of the logo. I'm going to select Logo
followed by the Panlements. But in this case
I'm going to select the first pan element
we need here, child selection
with the value one. I'm going to set font 2.5 Ram. Then I'm going to
duplicate this code. I'm going to add
here span elements. Let's set font size to 1.5 Ram. Then I'm going to select
second span element. I'm going to copy
this code here. Let's change the
nth child selector. We need here two. As
for the phone size, I'm going to make it 1.2 run. That's it, about the logo. Next I'm going to take
care of the banner. I'm going to select banner. I'm going to change the
position of the banner. Let's set the position to 16%
As for the left position, I'm going to make it 18%. Next, I'm going to take
care of the headings. Let's select Banner with
H, one heading element. I'm going to set the
font size to nine Ram. As for the second heading, I'm going to duplicate this code we need
here, banner three. As for the font size,
it's going to be two. Okay, the banner looks good. Next I'm going to take
care of the backgrounds. We need to make slight changes. I'm going to select
VG one and I'm going to set right position
to -5% Actually, before that we need to take
care of the main background. I'm going to select G main. Let's set left position to -25% As for the
third background, I'm going to select
background two. Let's set with 60% Okay, I think the backgrounds
look good And actually with the
header, we are done. Next, we have to take care
of the services section. I'm select Services. I'm going to set the height of the services to 190 view height. Then let's change the margin. I'm going to set margin to 15 Ram at the top
and bottom sides. As for the left and right sides, I'm going to set
margin to zero again. Next I'm going to
take care of shapes, the backgrounds, the
circle, and this rectangle. I'm going to select
services G one. I'm going to change
the position. The top position is going to be -15% Then I'm going to set the right position to 3% Also I'm going to set ten
height to 60 Ram. I'm going to make
the elements motor. Let's set height
to 60 Ram as well. Okay, here we have the circle, and I think we have
much better results. Let's take care
of the rectangle. Actually, let's
duplicate this code. Change the class
name we need here. As for the positions, I'm
going to set bottom position. To -12% then I'm going to use a left position
and the value will be 5% As for
the when height, I'm going to leave those
two lines of code here. Let's go to the browser. As you can see, we have
here rectangle and actually this
section looks good. We just need to make
your one slight change. We need to increase the
space between those items. I'm going to select
services list right now. Services list has justify
content property with the value center in our
case on that screen size. I'm going to change the value of the justify content property and I'm going to set
it to space evenly. Now the space is much bigger and I think it
looks much better. Okay, so with the services
section, we are done. Next, we have to take care of the template section because the project section looks good. Let's take care of
the template section. I'm going to take
off the left side. Let's templates left. I'm going to change the padding. Let's say padding to 25
fram at the top side, then ten Ram on the right side, zero at the bottom side, and five fram on the left side. Next I'm going to take
you off the heading. Let's go ahead and
select templates left H, one heading elements. I'm going to change
the phone size, it's going to be five Ram. Then I'm going to duplicate
this code we need here. Paragraph, I'm going to change the width
of the paragraph. It's going to be 45 Ram. As for the phone size, I'm
going to set it to 1.5 Ram. The heading and the
paragraph look good. Next we have to take
care of the bottom. I'm going to select
ten plates, PTN. First of all, I'm going
to decrease the width. Let's set it to 27 Ram. Then we need to
change the height. It's going to be 5.5 Ram. And then change the phone size. I'm going to set to 1.6 Ram. All right, that sits
about the left side. Let's take care of
the right side. I'm going to
customize the images. Let's select templates right, followed by the image. In this case, we need
the first image. Let's use chart selector
and select first image. I'm going to change
the top position, is going to be 45% Also,
let's change the width. I'm going to make it 25 frame. Then let's duplicate this code. We need her second image. The top position
is going to be 25% Then we need left position is going to be 20%
As for the width, I'm going to say 214 Ram. Finally, we need to take
care of the third image. Let's duplicate this code, change the value of the chart selector
we need here three. In case of the third image, we need two position to
be 27% Then I'm going to get rid of left position
and let's set with 240 Ram. Okay, the images
look pretty nice. Next I'm going to take
care of the button, I mean the play button. Let's go ahead and
select play button. I'm going to set within height, both of them, to 17 Ram. Besides that, I'm going to customize the before sit
elements of the play button. Let's add here before
and set within heights, both of them to 23 Ram. Okay, so the button
is customized. And finally I'm going to take care of the blar effect here. We need to select templates
with four pseudo elements. I'm going to set within heights, both of them to 60 Ram, and then change the
bottom position is going to be 10% Okay. I think that sits about the home page on the breakpoint.
Everything looks good. Let's check the video player, it looks good as well. Let's move on and
check other pages. The clients page looks good. As for the products page, I'm going to make
here some changes. Let's go to the VS code
and open product CSS file. I'm going to create
new CSS media query with the mux width
of 1024 pieces. First of all, I'm going to take care of the heading in the paragraph on the left side of the
first section. Here. I'm going to select
products contents. We need products contents, then then we need H
one heading elements. I'm going to change
the font size. It's going to be Ram. Let's duplicate this code
and select paragraph. The font size in case of the paragraph is going
to be 1.5 round. That's it, about the left side. Next I'm going to take care of the images on the right side. Let's go ahead and select
Products Content Right, followed by the image elements. And then we need chart selected. Because we have to
select the first image, I'm going to set 228 Ram. As for the height, it's
going to be 55 Ram. Then I'm going to duplicate this code twice because we have to take care of the remaining
two images as well. We need here image two. Let's get rid of height
and change the width. It's going to be 15 Ram. As for the third image, I'm going to set with 224 Ram. Need image three. Okay, I think the first
section looks nice. Next we have to take care
of the promo content. So let's go ahead and
select this element. Let's set with 70% then I'm going to take
care of the heading. Let's select promo content, followed by the H
one heading element. I'm going to set phone
size to 2.5 Ram. Now the heading looks good. Next we have to take
care of the shapes, I mean the rectangle
and those circles. Let's go ahead and start
with the promo rectangle. I'm going to set
within height to 50 m. I mean both properties, then I'm going to select
the small circle. Let's change the
position of the circle. I'm going to set top position to 25% As for the right
position is going to be 40% Next, I'm going to take care
of the large circles. Select large circle, then I'm going to grab the
within height from here. Let's set within height, both of them to 40 gram. Okay, the Romo
content looks nice. I'm going to change here the position of
the large circle. Once we hover over the element, I'm going to select
large circle. With the class animate, I'm going to set wide
position to -2% okay? So now I think we have much better results
actually with this page. We are done. Let's check content page. It looks good. The account page looks good. As well as for the pricing page. I'm going to make
here some changes. Let's open pricing is file and Create new CSS media query. Let's specify here
the max width. It's going to be 1024 pixels. I'm going to select pricing car. I'm going to set width 24 to. Then I'm going to take
you of the rectangle. Let's select rectangle. I'm going to change
the position. Top position is going to be 28% then the left position
will be 5% Also, I'm going to change with height. Let's set both of
them to 40 gram. Let's check the browser. Here we have the rectangle. Next, let's take care
of the large circle. I'm going to
duplicate this code. Let's change the class name. We need large circle instead
of top and let properties. We need bottom and
right positions. The bottom position
is going to be 10% Then I'm going to
change left to right, and the right position will be 5% As for the within height, I'm going to set both
of them to 30 Ram. Actually, the code is not
applied to the elements because we need here pricing large circle and
not just large circle. Now let's check the browser,
the code is applied. Large circle is good. Let's take you of
the small circle. Let's duplicate this code. I'm use, your top
position is going to be 30% then we need right position is going to be 5% It's probably within height. I'm going to set both of them to six rap we need
here. Small circle. Okay, actually I think we can move the circle up slightly. So let's decrease top position. Let's set it to 28% I'm going
to change again the value. Let's say 25% Let's make top position 26% Okay, I think that's about
these break points. All the pages look good. Next, we have to make our
project responsive on tablets. Let's check this break point here and move on to
the next lecture, where we'll start to make the project responsive
on tablets.
67. Creating Hamburger Menu - Part 1: All right, in the
previous lecture we have finished working
on the breakpoint. As I said, we have
to move on answer to making the project
responsive on tablets. I mean, on those
breakpoints here, let's go to the browser and change the dimensions
of the screen. We need here 820 pixels
and then 11 80 pixels. This is the screen
size of the tablet. Let's go to the VS code
and open style CSS file. I'm going to create
new CS media query. Let's specify the max width. It's going to be
820 pixels. Okay. So before we start
to write the code, I'm going to check the finished version of our
project on that break point. As you can see, we no longer have here the navigation items. You can see here the menu icon. If I click it, then we will
get here the hamburger menu. We have here navigation items. Down below, you can see the
bottom for the pricing. If I click any of the
navigation items, then we will get here
the drop down menus. We have to change
the navigation. I mean, we have to transform the navigation in order
to make it look this way. Let's go to the VS code. First thing that I'm
going to do is to hide the navigation items. I'm going to select Nova items. Then I'm going to add here
display N. As can see, navigation items are hidden. Next, I'm going to
create the menu icon. For that, I'm going to go to the index of the HTM of
file right after the logo. I'm going to insert new
comments for the menu icon. Then I'm going to open Deep tug, it's going to be menu icon. The menu icon will
consist of two lines. I'm going to open deep tug
with the classes line. And then we need line one. The first one is the
common class name. As for the second one, it is
an individual class name. I'm going to duplicate this code because we need two lines. Let's change the class name. It's going to be line two. All right, the menu
icon is created. Next, I'm going to
customize this element. I'm going to select menu icon. Let's set, we can hide
both of them to four Ram. I'm going to add here some
temporary backund color in order to display the icon. Let's go to the browser. As you can see, we have
here the menu icon. Okay, let's define the
position of the menu icon. I'm going to set it to absolute
amino position five ram. Right? Position is going
to be five Ram as well. All right, after that, I'm going to display the lines. Right now, they are just
empty developments. That's why we cannot see
the lines on the page. I'm going to select the line, let's set with to 100% then
the height will be 0.4 Ram. As for the background color, I'm going to set it to white. Now I'm going to get rid of the temporary red
background color. We have here two lines. Now as you can see, we need
to separate those lines, and for that we
can use flex box. I'm going to add flex
box to the menu icon. When it display flex, then we have to change the
direction because the lines should be placed
vertically in a column. Flex direction is
going to be column. Then we need space
between the lines. And for that I'm going to
justify content space between. We don't need such space here. Actually, the height of the menu icon should
be two m and not four m. Now the menu icon looks good. Next, I'm going to transform navigation and
make it look this way. We need to change the background
color of the navigation, and also we have to
change the color of the text and the icon. Let's go to the VS code. I'm going to select Nuer. Let's change the
background color. It's going to be white. Then I'm going to change
the color of the logo. Let's go ahead and select
Nuer followed by the logo. And then we need Span element. I'm going to set color to F40. Then I'm going to
catch you text shadow, let's say to None. As you can see the
color of the text, I mean the color of the logo is changed and it looks good. Next I'm going to
customize the menu icon. I'm going to change
the background color. Let's use here the same color
that we used a minute ago. We need here 40. As you can see, the lines have different background color. Next I'm going to transform
icon into X closing button. For that, I'm going
to select line one. I'm going to use transform
property With rotate function, the value will be 45 degrees. Also, I'm going to move slightly line using
translated y function. The value will be
1.2 Let's duplicate this code and customize the
second line we need here, rotate with negative 45 degrees. As for the translated
y function, we need here negative 1.2
Let's check the browser. As you can see, we have here x. Now we have to take care
of the navigation items. Right now they are hidden. I'm going to get rid of display none Instead
of display none, I'm going to add
here display flex. We need to place the navigation items
vertically in a column. Therefore, we need flex
direction to be column. Next, I'm going to flex
items using justify content. Flex, Start and align items. Flex start properties
and values. Let's check the browser. We have here navigation items. We need to change the
position of the element. Let's set it to absolute. Then I'm going to set
two position to 12 Ram, because the height of
the upper is 12 Ram. As for the left position, I'm going to set it to zero. Then I'm going to
define with height, the width of the
navigation items will be 100% As for the height, I'm going to make here
little calculation we need cut function height will be 100, viewpot height -12 gram, which is the height of the Nper. If I add here akron
color with value 245, then we'll get this result here. All right, now we have to
customize the navigation items. I'm going to select nav item but I need to exclude
the last item. I mean the bottom we need
here not pseudo class, we have to add here
the last child. Now the code I mean the
tiles will be applied for all Nov items except
the last child. The bottom, I'm going
to set width to 100% then the height
will be 12 gram. Also, I'm going to use flex box. We need to align
items in the center. Then I'm going to create some space on the left
side using padding. Left three Ram. The navigation items
are aligned nicely. Now we have to
customize the links. I'm going to select
no item we need here. No item followed by
the link elements. Again, we have to
exclude the bottom. I'm going to insert
here. No BTN. Let's change the
color of the link. The color will be 0926 to seven. And also let's get
rid of shadow. Let's set tech shadow to non. As you can see, the
links look good. After that, I'm going to
create those plus signs here. And I'm going to do that
using four elements. Let's go ahead and
select No item, followed by the four elements as the content I'm going
to insert here, plus sine. Then we need font size. It's going to be form Also, I'm going to change the color. Let's use here color F4a0. Here we have the plus sines. Actually we don't need
plus sine with the button, I'm going to exclude
button here. For that we need to use again. Then we have to add
here last child. Now as you can see, we no longer have here
the plus sign. All right. Now we need to take care of the position of the plus sign. For that, I'm going to
set position to absolute. Then we need to position to be 50% As for the right position
is going to be zero. Then we need to center
the element vertically. For that, I'm going
to transform, translate Y -50% As you can see, we have here the plus sine. Next I'm going to define
width and height. The width is going to be ten. As for the height, I'm
going to say six ran. We need to center the elements. For that, I'm going to
use Display Flex with justify content center
and a line item center. Okay, that's it,
about the plus sign. Next we have to take care of
the last navigation item, which is this button here. I mean the pricing bottom. I'm going to select Novem
followed by the last. See the class, let's
set position absolute. Then we need bottom
position to be zero. Also we need left position, it's going to be zero as well. Then we have to define
width and height. The width is going to be
100% As for the height, I'm going to make it 12 Ram. Then I'm going to define
the background color. It's going to be white. Let's check the browser
we have here the bottom. Let's use flex box to
align the element. Let's set display to flex. Then we need justify content center and
align items center in order to center the bottom. As you can see, the
bottom is centered. Let's add here shadow
using box shadow. The values will be 01 Ram, ten Ram as the color, I'm going to use R GPA. The values will be 130-16-2235, and the Opacity 0.2 That's it
about the parent elements. Now we have to customize
the button itself. Let's go ahead and select PTN. I'm going to set with 290, 5% then the height
will be six Ram. Let's any background color, I'm going to use 40. Then we need color to be white. Finally, I'm going to set
point size to 2.2 m. Okay? So as you can see, the
bottom looks pretty nice. Actually, we have
here the same result that we needed next. We have to make the
hamburger menu work, and also we have to take care
of the dropdowns for that. Let's move on to
the next lecture.
68. Creating Hamburger Menu - Part 2: So in the previous lecture, we have started making project
responsive for tablets. You can see here the
dimensions for tablets. We're creating the
hamburger menu. Now in this lecture,
I'm going to customize the dropdown menus because they don't look
quite good right now. I'm going to style
all five dropdowns. Let's go back to the DS code. The first thing that
I'm going to do is to hide those triangles here, because we no longer need them. I mean, we don't need
them for tablets. Let's select novem followed by the after element we need here. In order to hide
the after element, I'm going to use display none. As you can see, the
triangles are hidden. Next, I'm going to select
the first dropdown. I'm going to define with, it's going to be 100% Then we need to change
the top position. It's going to be 12 gram. As for the leg position, I'm going to set it to zero. Let's check the browser. As you can see, the
position is changed. Actually, we see
here the nava items. It means that the drop down menu ended up behind the nav items. In order to fix that problem, I'm going to use
the index property. Let's set it to 100. Now the problem is fixed. Next, I'm going to get rid of
the border ideas from here. I'm going to set the
border radius to zero as I'm going to
get rid of box shadow, let's set it to none. Then I'm going to change
the direction of the flex. I mean I'm going to
place features and services on top of
each other vertically. And therefore I'm going to
set flex direction to column, then get rid of pudding. I'm going to set it to zero that's sit about
the top down one, I mean the wrapper next, I'm going to take care of the left and right sides
because right now, top down menu looks awful. I'm going to select
Top Down, one left. Let's set with 100% then the height is
going to be 50% Next, I'm going to create space at the bottom
using marching bottom. Let's set it to five Ram. Finally, we need padding. Let's set it to two Ram. All right, after that, I'm going to select
features list. Let's select features list. I'm going to set
within heights to 100% then I'm going to use Flex box. Let's set display to flex. Then we need to
change the direction. Let's set flex
direction to column. And finally, we have to
wrap the flex items. I mean, we have to place the flex items on a couple
of different lines. We need flex wrap to be wrap the left side of
the drop down menu. Looks good. Next I'm going to take care
of the right side. Let's go ahead and select
drop down one right. I'm going to set width to 100% Then the height
is going to be 75 Ram. Actually not Ram but percent. Then I'm going to set padding
to zero on the top side, then two Ram on the right side, 13 Ram at the bottom side, and two Ram on the left side. Okay, next I'm going to
select drop down services. Let's set width to 100%
then the height is going to be 100% Then we need
her Display Flex. Also, I'm going to change the direction it's
going to be column. And like the features list actually I'm using
here the same values. Let's just add here class name. And get rid of this
code from here. As you can see, the
right side looks good. I'm going to change
the background color. Let's add here
background color, white. Okay, I think the first
drop down menu looks good. Next we have to take care of
the second drop down menu. I'm going to select
drop down two. First of all, let's
define within height. The width is going to be
100% As for the height, I'm going to set it to 75 Ram. Then I'm going to
change the position. Top position is
going to be 12 Ram. As for the left position, let's set it to zero and
then check the browser. Here we have the
second drop down. Like the first one,
we have to use the index property because it ended up behind
the nub items. I'm going to set
the index to 100. Now the problem is fixed. Next, as you guess
we have to change the direction of the flex box. I'm going to change, I'm going to set
flex direction to column we need here, column. Okay. Next I'm get rid
of for the radius, let's set it to zero. Also we don't need box shadow,
it's going to be none. And then I'm going
to set padding to two Ram at the top side, to Ram on the right side,
zero at the bottom, and two Ram on the left side. Next, I'm going to create
some space between the items. I'm going to select drop
down two with development, let's set margin to
zero at the top side, 0.5 Ram on the right side, two Ram at the bottom side, and 0.5 Ram on the left side. We have here some space. Next I'm going to select the elements and
decrease its size. Let's go ahead and
select Drop Down to, then we need developments. And then let's set
font size to five Ram. Well now we have here the problem with the
height of the drop down. I have here, height 75 Ram. Let's get rid of this value from here and just
set height to auto. Let's check the results. Okay, the drop down looks
pretty nice actually, with the second dropdown
menu, we are done. Let's move on and take care
of the rest of the dropdowns. Actually, we're going to
use some similar values and properties in order to writing the same code
over and over again. I'm going to select all the
dropdowns simultaneously. Let's start with the first one, then I'm going to
duplicate it five times, change the numbers we need. Drop down two, then
drop down three. Next we have drop down four, and finally drop down five. I'm going to grab from here some properties like these
two properties here. Let's cut them. Also, we need box shadow and border
radius and the index property. Let's add them here. I'm going to delete those properties from the second drop down menu. Okay, now I think all five drop down
menu should look nice. Let's check, products look good. Next we have Contact.
It looks good as well. And the drop down for
account looks good as well. Okay, all five drop down
menus are customized. Next, we have to make the
hamburger menu work for that. Let's move on to
the next lecture.
69. Making Hamburger Menu Work: In the previous lecture, we have customized the drop down menus for all
navigation items. Now in this lecture,
I'm going to make the hamburger menu work. Let's go ahead and take a
look at the finished project. By default, we have here the menu icon and the
navigation items are hidden. If I click the icon, then the navigation will appear. Navigation items with
the drop down menus. I'm going to take care of
those things in this lecture. Let's go to the VS code. The first thing that
I'm going to do before we start to making
the navigation work, I have a little mistake
from the previous lecture. If we take a look at
the drop down two, you will see that
we are missing here flex direction with
the value column. We have removed it.
Instead of this line, we need to remove
box shed on none. That was my mistake. Okay, now we're ready to start to making the
hamburger menu work. The first thing that I'm
going to do is to go to the Javascript file
and select menu icon. I'm going to create
new variable, let's call it menu icon, And then select it using
query selector method. I'm going to specify here
the class name, menu icon. The menu icon is
selected and now we have to add an event listener to
the icon with click event. I'm going to add event
listener to menu icon. As I said, we need here click event followed by
the Calbeck function which will be executed once we click the menu icon inside
the Calbeck function. I'm going to add new class name to the
knapper using togal method. Once we click the menu icon, we have to add new
class to the knapp. And once we click again, then we have to remove this
class name from the nap. For that we have to
use to method we need here upper class list, followed by the togal method. I'm going to add here new class, let's call it hamburger. Let's go to the CSS file. I'm going to hide Nov items using display none. Then we have to add newly
created class hamburger to the following elements. The first one is Nov items, we need to add here
hamburger Next, I'm going to add class
hamburger to the navbar. Also we need to add
hamburger here. Then I'm going to add
hamburger to the Novem. Then we need Novem for
the link elements. Finally, I'm going to add
hamburger to the lines. I mean line one and line
two as a here C hamburger. Okay, let's go to the VS
code, then check the result. Once I click the menu icon, then the navigation
items will appear. Then when we click
the closing X button, the navigation will height okay. Everything works fine. Next we have to
change the color of the menu icon because
it should be white. I'm going to find line and change the color
is going to be white as I'm going to adhere transition for smoother effect
we need here transform. Then the duration is
going to be a 0.3 second. Also I'm going to use transition
timing function called. Now as you can see, we
have here white lines. If I click the menu icon, then the lines will transform
with smoother effect. But once we display
the navigation, then we no longer see the menu icon because
the lines are white. We have to take care of that. I'm going to select Line with the hamburger class
we have to change, we need here class name line. We need to change
the background color and it's going to be f40. Okay, now everything
works fine. All right. Next thing that
I'm going to do is to fix some little
problems here. I mean, once we display the navigation and
then scroll down, you see that the
nap became sticky. And actually we don't need that. We have to prevent this action. Let's go back to the Vs file and find
window with scroll event. Now we have to use statement
where we have to if the window width is less
than or equal to 820 pixels, if the of bar has
the class hamburger, we need to check those two
conditions simultaneously. I'm going to use if statement
and the condition will be window inner width is less than or equal
to 820 pixels. We need to check if of bar class list contains
class hamburger. If this condition is true, we need to remove the class
sticky from the upper. We need here no
class list remove. We have to specify here
class name sticky. Besides that, we need
to use L statement. If the condition is false, then we have to toggle the class sticky based
on the scroll position. If the scroll position, I mean window scroll Y
is greater than zero, then we have to
add class sticky. Otherwise, we have to remove it. We need to pass here
class list Togo. We have to specify
here two things. We need class names sticky, then we need window scroll. Y is greater than zero. All right, so I think that's it. Now the code should work. Let's check the results. I'm going to display
the navigation. Then if we scroll down, we will have here
the same result. Something's wrong here. Let's check the code. The condition is correct. We have to remove class
ticky from the no part. And then we have to add
it using class togal. Yes, we no longer need
this if statement here. We need to remove it because we are adding class sticky to the now part
using togal method. We no longer need the
previous if statement. Now the code should work. Let's display the navigation,
then scroll down. And yes, we no longer have
here the sticky no part. Okay. If I close the navigation
and then scroll down, you will see that the icon
is no longer visible. I mean, the lines are white and also the position is different. We don't need this position for the icon. Let's
take care of that. I'm going to go back
to the aves file. We have to create if statement
inside the scroll event. We need to check if window scroll Y property
is greater than zero. If this condition is true, then I'm going to add new
class to the menu icon, which then will be
used in the CSS file. To create new styles, we need
you menu icon, class list. I'm going to call the
new class position because we are changing the
position of the menu icon. Otherwise, if the
condition is false, then we need L statement where
we have to remove class. Position from the menu. Besides that, we need another if statement where
we have to check if the nap contains class
hamburger or not. We need if statement with
the following condition. We need class contains. We have to specify here
the class name hamburger. If this condition is true, then we have to remove class
position from the menu. We need the same statement. Next, we have to use class position and
define new styles. I'm going to find menu
icon. Here we have it. Let's use class position
followed by the menu. I'm going to set to position
to four m. Then we need transform translate Y -50% Let's add here transition
for smoother effect, we need here a 0.3 second. Besides that, we need to
change the color of the lines. I'm going to add here no
sticky followed by the line. We need to change the color of the line when we have
the sticking alper, that's why I use
nob sticky color. The background color is
going to be 0926 to seven. Okay, let's check. If I scroll down, then the position of the
icon will be changed. And also we have
here dark lines. Okay, everything works fine. Next we have to take care
of the dropdown menus. Once we click the
navigation item, then the proper dropdown
menu should appear. Then once we click back to the navigation
item, it should hide. Right now, you may think that we already have here click
event, but that's not right. It is a hover effect. When you have
smaller screen size, then the hover effect
works like click event again, that's
not click event. We have to create it. We need to display the drop
down menu and click. And also we have to
transform this sign here. We need minus sign
instead of plus sign. Let's go ahead and do those. I'm going to create
new variable and it's going to be no items. We need to select all Nov items. Let's select them using
query select or all method. I'm going to specify
here the class name. It's going to be nav item. Next, I'm going to look
through the nov items. Let's use for each method we
need here parameter n item, we need to add click
event to each nav item. We need here no item followed by the add
event listener method. We need to specify
here the click event. Also, I'm going to ins
here a callback function. Now we have to check if the clicked navigation
item has a new class, which then will be used in the CSS file to
create new styles. I mean the same technique that we've been using
throughout this project. Again, we have to check if the clicked navigation
item has the new class. I'm going to use if statements where we have to pass
the following condition. Novem class list contains and we have to specify
here the class name. I'm going to call it show. If this condition is true, then we have to remove it. I mean we have to
toggle visibility off. I'm going to add here nav
item, class list remove. We have to specify here
the class name show. Then we need L statement
if the condition is false. If the nav item doesn't
have the class show, then we have to iterate
through all navigation items. We have to remove class
show from all items. After that, we have to add the class show to the
clicked navigation item. It means that we have
to total visibility on. Again, I'm going to
adhere nov items forage. We need to look
through the ov items. Let's adhere parameter item. I'm going to remove
class show from the item item class
list dot remove. I'm going to pass
here class show. And then we need to add
class show to the nob item. We need here nob
item class list. Do add, we have to specify
here class name, show. Again, when a navigation
item is clicked, then the callback
function is executed. If the clicked navigation item already has the show class, it means that the item
is currently visible. In this case, the code
removes the show class from the clicked item,
effectively hiding it. Then if the clicked
navigation item doesn't have the show class, it means that the item
is currently hidden. In this case, the code first removes the show class
from all navigation items. And then it adds the show class only to the clicked
navigation item, making it visible while
hiding all others. Okay, hopefully you
understand those things. Next, we have to go to the
CSS file and find Drop Down. I'm going to select Drop down. I mean the common class
name we need here, Opacity zero and
visibility hidden. Then I'm going to select
nav item with hover fact. Then we have to use,
again, drop down. We need the same code here. I mean the same
properties and values. Then I'm going to select
novem followed by the class. So then we need again drop down. I'm going to set opacity to
one and visibility visible. Again, I think
everything is correct. Let's go to the browser
and check the result. If I click the navigation item, then the drop down
menu will appear. Once I click back to the navigation item,
then it will be heated. As you can see,
everything works fine. Next we have to transform
plus sign into minus. Let's go to the VS code and find nov item with four
element. Here we have it. Let's go ahead and select
no item with class show, followed by the four.
See the element. We have to change the content and we have to make it minus. Okay, Let's check the browser. Click the navigation item. So as you can see,
now we have here minus sign instead
of plus, okay? Everything or expine. But we have to do
one more thing. If I close the navigation, then scroll down and
click the menu icon. The navigation
will be displayed. But as you can see, the
now part is still sticky. And also the background
color of the lines are dark. We have to fix those problems. I'm going to go back to
the Java script file. I'm going to add here where we have the
click event with menu icon. We need to remove class
sticky from the now part. I'm going to add here no
per class list toggle. We have to specify here
the class name, hamburger. Then we need to check whether
the hamburger class is not present and also whether
the window is scrolled. I'm going to add here if statement where we have to
pass the following condition. We need not operator, then class list contains
class hamburger. Then we need here and operator. And we have to check
if the window scroll y is not equal to zero. If this condition is true, if both conditions are true, it means that the
hamburger class is not present and the
window is scrawled. In this case, the sticky
class will be added to the Napper here list. We need here sticky.
Also, we need to add class position to
the menu icon here. Let's grab this code pas here. Next we need L statement, where we have to remove
class position from the menu icon we remove. Okay, I think that's it. Finally we're done with
the hamburger menu. Let's check the browser
and click the menu icon. Well, it doesn't work. It means that we have a mistake. Let's check the code. The condition inside the
statement is correct. Then we have to add sticky to, now we need to class
position for the menu icon. And then we have to remove class position from
the menu icon. Well, we have here a mistake. I don't know why I
added here this line. Actually, we need here now. Part class list,
remove class sticky. It's my mistake now. I think it should
work. Let's click. And yes, everything works fine. Let's scroll and then click. So as you can see,
everything works perfectly. All right, let's sit
about the hamburger menu. Next we have to customize the rest of the sections
of the home page. And also we have to customize
the other pages as well. For that, let's move on
to the next lecture.
70. Making Project Responsive for Tablets: In the previous lecture
we have finished working on the hamburger menu. It works fine. And now we have to
move on and customize the rest of the sections
of the home page. And also we have to customize
the remaining pages. Let's go to the VS code
and select header. I'm going to change the
height of the header. It's going to be 70 view height. Next, I'm going to take care of those backgrounds here I'm
in those three elements. Let's go ahead and
select PG Main. I'm going to increase the width, it's going to be to 50% And also I'm going to change
the position of the element. The top position is going to be -105% As for the left position, I'm going to set
to -50% That's it, about the first background. Next we have to take care of
those two backgrounds Here, I'm going to select G one. Let's change the right position. It's going to be
-10% Let's duplicate this code and customize
the second back round, we need to change
the class name. Going to be G two in case of the second background I'm going to get
rid of minus sign. Let's leave here just 10% Okay, let's sit about the header,
everything looks good. Next we have to take care
of the services section. Let's go ahead and
select Services. I'm going to change the height. It's going to be 120 put height. Then I'm going to take
care of the background. I'm in those shapes here. Let's go ahead and
select services G one. Let's change the position. Two position is going to be -20% As for the right position, I'm going to set it
to -5% Then let's duplicate this code and
change the class name. We need here services g two. In case of the second element, I'm going to get
to right position. Then we need here left position. I'm going to set it to zero. Okay, that's it about
the services section. Next we have to take care
of the project section. I'm going to customize
the navigation. Let's go ahead and
select Filter of. I'm going to change the width. It's going to be
90% Then I'm going to select link element
we need here fill, let's set width to 12. As for the height, I'm
going to make it 4.5 Ram. As you can see, the
navigation looks good. Next we have to take care
of the project list. I'm going to select
Project list, and I'm going to
set with 90% Next, I'm going to take care of the template section because I think we are done with
the project section. Let's go ahead and select section element with the
class name templates. I'm going to set
height to 90 Ram. Actually not M, but put height, then I'm going to set margin
bottom to minus one Ram. Then I'm going to take
care of the left side. Let's select templates left. I'm going to set left
position to 5% Also, I'm going to change the padding. The padding will be
12 at the top side, then ten Ram on the right side, zero at the bottom side, and then ten Ram
on the left side. Okay, after that, I'm going to take care of the images
on the right side. Let's go ahead and
select templates. Right then we need image
with nth child selector. I'm going to select
the first image. Let's change the width.
It's going to be 30 run. Then I'm change to position, I'm going to set to
70% Let's duplicate this code twice
because we have to customize the remaining
two images as well. Let's change the child selector, we need here 2.3 in case
of the second image. Going to set width to 18 Ram. Then top position is going
to be 2% Besides that, we need left position, let's set it to -15% Okay, Next we have here the third
image width to be 48 Ram. As for the top position, I'm going to make to
position 57% Okay, we have changed the
positions of the images. Next we have to take
here of this element. Here, I mean the blur
effect, the four element. So I'm going to select templates followed by
the four su element. Let's set with and
height to 60 Ram. Next I'm going to set
bottom position to -5% Then the right position
is going to be 5% Also I'm going to
change the background. I mean linear gradient, I'm going to change
the direction, it's going to be two bottom. Then the first color
will be transparent. For the second caller, it's going to be 8430. We will have here the third
caller and it's going to be 863c0, okay? So that's it about
the blur effect. Next we have to take
care of the bottom. I'm going to select play bottom. I'm going to set two position to 60% As for the left position, it's going to be -8% Okay, so that sits about
the template section. The video player looks good. Next I'm going to take
care of the footer. Let's go ahead and
select the footer. Change height, It's going
to be 40 viewport height. Then we need to
change the padding. I'm going to 3026
at the top side. The zero on the right side, three Ram at the bottom side, and zero on the left side. All right, I'm going to take
care of the social media. Let's select social
media and I'm going to set width to 35% Okay. I think that sits
about the home page. Everything looks pretty good. Let's go ahead and
check the clients page. We have to customize this page. The first thing that
I'm going to do is to display the menu icon. I'm going to open
clients HTM file, then I'm going to grab menu icon from the
indexed old H tim file. Let's copy this element and paste it right after the logo. Let's check the browser. As you can see, the
menu icon is white. Until we scroll down. We have to change
it. Actually, I'm going to add here
common class name. Let's call it I, I'm going to call it on pages, maybe you have some better name. Next, I'm going to
find menu icon here, and I'm going to
select icon pages. Let's change the
background color. Actually, we need her line. Let's change background color
and make it 0926 to seven. Okay, let's check the browser. Now we have here the menu
icon with dark lines. And we don't need to
scroll down to display it. Okay, so I'm going to take care of the head of
the client's page. Let's open clients page and
create new CSS media query. It's going to be 820 pixels. I'm going to select
testimonial header followed by the H
heading element. Let's set with 80% As for the
font size of the heading, I'm going to set it to 4.7 Okay, next I'm going to
take of the stars. Let's select Stars And set right position
to 12% All right, so everything looks good. We can move on and
check the next page, which is product page. We need to do the
same with menu icon. And also we have to
make here some changes. Let's go ahead and
open products HTML. Then I'm going to grab
this code from here. Let's paste menu
icon after logo. Now you can see here the
menu icon with dark lines. Next, I'm going to create new CSS media query the
products of CSS file. We need CSS media
followed by the maxwidth, which is going to be
eight turn pixels. I'm going to select
products contents. I'm going to change height, it's going to be 115 Ram. Then I'm going to change the
direction of the flex box. We have to place the
flex items vertically. Therefore, we need here
flex direction column. Also, I'm going to align items in the center and
then change padding. The padding will be five
Ram at the top side, zero on the right side, five Ram at the bottom side, and then ten Ram
on the left side. Okay, here we have
the products content. Let's go ahead and
customize the left side. I'm going to select
products Content left. Let's set with to 60%
then I'm going to set height to auto.
Also we need padding. It's going to be five fram at the top and bottom side and then zero on the
right and left side. All right, after that, I'm going to select paragraph. Let's go ahead and
select products. Content left, followed
by the P element. I'm going to set margin to
three Ram at the top side, then zero on the right side. Next, we need five Ram at the bottom side and
zero on the left side. Okay, I think we are
done with the left side. Next we have to take
care of the images. I'm going to select products, Content right, Followed
by the image elements. And we have to select the first image using
N chat selector. I'm going to change the
size of the first image. We need to define width, It's going to be 22 Ram. Then I'm going to set
height to 44 Ram. Then I'm going to change
the position of the image. The top position is going to be 65% As for the right position, I'm going to set it to
24% As you can see, the position and the size is
changed for the first image. Next, we have to take care
of the rest of the images. I'm going to duplicate this code twice we need here Second image, I'm going to set
width to 12 Ram. Then I'm going to get to height. The top position is going to be 50% As for the right position, I'm going to set
it to 43 Ram Ram. Next we have here
the third image I'm going to set with 220 gram. Then we need bottom position, it's going to be 21% As
for the right position, I'm going to set it to 11% Okay, I think that's it
about the images. As you can see, they look good with this
section, we are done. Next we have to take care
of the promo content. I'm going to select
products promo. Let's set height to 120. Viewport height. Next I'm going to take care
of the shapes. I'm going to select
Promo Rectangle. Let's set within heights, both of them to 42. Next I'm going to change the
position of the element. The top position is going to be 32% As for the left position, I'm going to set it to 6% Okay, Next we need to
take of the small circle. Here I'm going to
select small circle. Let's set the position of the
small circle to 30% As for the right position is
going to be 40% Okay. After that, I'm going to
take of the large circle. Let's select large circle. I'm going to set both position to 30% As for the right position is going to be 5% All right, finally I'm going
to take care of the heading of the
promo content. So let's go ahead and
select Promo Content, followed by the H
one heading element. I'm going to change
the font size. It's going to be to run. Okay. I think that sits
about this section. Everything looks good. Next we have to take care
of the contact section. As you can see, we have
to make some changes. Let's open contact HTML file. First of all, I'm going to
take care of the menu icon. Let's find logo and
paste here menu icon. You can see here the menu icon. After that, I'm going to
create new CSS media query in the contacts file. First, I'm going to interfere
comments for responsive. Then I'm going to
create CSS media query with maxwidth 820 pixels. Next, I'm going to select
the section element. I'm going to change the height. It's going to be 110
view, put height. Next I'm going to select
three heading element. We need here contact header followed by the H
three heading element. Let's set width to 70% Then
we need to change margin. I'm going to set margin to
two Ram at the top side. Then we need Auto
on the right side, 15 Ram at the bottom side, and Auto on the left side. It allows us to
center the elements. Okay, next I'm going to take care of the circle,
this background here. Let's select contact circle. I'm going to change
with and heights. Let's set both of
them to 70 Ram. Then we need to change the
position of the circle. Let's set bottom position to 25% As for the left position, I'm going to make it 2%
Let's check the browser. The circle is placed here, it's not quite visible. But if I change the Bacon
color and set it to red, then you will find the
position of the circle. We're going to change the
size of those two elements. I'm going to select
contact form wrapper, let's set with 235 Ram. As for the height, I'm
going to set it to 78 Ram. Next, I'm going to
duplicate this code and change the class name. We need your support. The height will be 67, okay. That sits about
the contact page. You can see here the circle. I think everything
looks pretty nice. Next we have to take
care of the next page, which is a count page. So let's go back to the VS
code and open account HTML. I'm going to grab the
menu icon from here, and let's paste it in. The account HTML file, the icon is visible. I'm open account CS file, then I'm going to insite
comments for responsive. Next we need to create CSS media query for the
max width of 820 pixels. I'm going to select
the section elements. Let's set its height
to 100 foot height. Then I'm going to change
the size of the circle. And also we have to change
the position of the circle. Let's set with and height
both of them to 65 m. For the position, the bottom position
is going to be 39% As for the left position, I'm going to set it to 23% Okay. I think that's it. About the account page,
everything looks good. Next we have to take care of the last page on the breakpoint, and it's going to
be pricing page. Let's open here
pricing HTML file. Then I'm going to grab menu. Let's paste it after logo and check if the
icon is displayed. As you can see, the
icon is displayed. I'm going to go to the
pricing of CS file and create new CSS media query with the
max width of 820 pixels. The first thing that
I'm going to do is to select pricing section. I'm going to change the hide. It's going to be
120 vehicle hide. Next I'm going to take
care of the shapes. Let's select pricing rectangle. I'm going to change left
position is going to be -3% Then we need to take
care of the small circle, which right now is not visible. I'm going to select
small circle. Actually we need pricing. Let's change with, in height, it's going to be six Ram. Next we need to position. I'm going to set it to 25% As for the right position
is going to be 1% actually I'm going to
move the circle up top position to 20% I think
it's better actually. I think that we need to move
the rectangle up as well, because I don't quite
like this result here. Let's set to, let's say 25% We can move the
rectangle up slightly. Let's set to position to 20% Now the rectangle
looks better, but I think 20% is too much. Let's set to position
to 22% Okay, Now I think it's much better. All right, next we have to
take care of the large circle. I'm going to select
a large circle. Let's grab those four
lines from here. I'm going to set within
height to 40 Ram. Then we need here.
Bottom position, It's going to be 25% As
for the right position, I'm going to set to -5% Okay, I think it looks nice. Next I'm going to take
care of the header. Let's select pricing header. Let's set with 28m. Then I'm going to take
care of the cards. We no longer need the
three D effect here. I'm going to select pricing cards and then I'm going to set
perspective to none. Okay, finally I'm going to take care of the
card on the right side. As you remember, we used translate Z function
for the right card, therefore I'm going to
select pricing card, right? Then we need to transform with translate Z function and I'm
going to set it to zero. Okay, that sits. Now once we remove
the three D space, I think we have to change the position for
the small circle, for the rectangle as well. Let's place small
circle, little bit down. Let's set to position
to 25% Okay, it's good. I'm going to increase
the value of the top position for
the rectangle as well. Let's set it to 25% All right. I think that sits
about the pricing page and I think that with this
breakpoint we're done. I mean the breakpoint for table, let's check this
breakpoint next. We have to make the website
responsive on the breakpoint. And for that, let's move
on to the next lecture.
71. Making Project Responsive for Mobile Phones: All right, in the
previous lecture, we have made project responsive
on that breakpoint here. I mean the breakpoint
for tablet. Next we have to take care
of this breakpoint here. This is the second
breakpoint for the tablet. Let's go back to the browser and change the
dimensions we need here. 768, then 1024. If we check the home page, you will see that
everything looks good. I'm going to check the pages. Let's check clients page. I think that we don't
need to change here. Let's next page, it is products. The products page
look good as well. Next we have contact page. It looks good. But then
we have account page. I think we have to change
the position of the circle. Let's go to the VS code
and open account CSS file. I'm going to create
new CSS media query. Maxwth is going
to be 768 pixels. Then I'm going to
select account circle. I'm going to define
bottom position. It's going to be 30% now,
everything looks good. Next I'm going to check
the pricing page. I'm going to
customize this page. I'm in the shapes
backgrounds of the cards. Let's go to the VS code and
open pricing the CSS file. I'm going to create
new CSS media query. Let's specify the max width. We need 768 pixels. I'm going to select
pricing rectangle. Let's change top position is going to be 30% As for
the left position, I'm going to set
it to -6% Then I'm going to select
pricing large circle. Let's set bottom position to 12% All right. I
think that's it. Everything looks good
on the breakpoint. And we can say that for tablets
the website looks good. I'm going to check
this breakpoint here. Now as you can see, we have
to move on and start to make project responsive
for mobile phones. The first breakpoint is 430 pixels of width and
32 pixels of height. I'm going to set the
dimensions to 43932. As you can see, everything
is messed up here. Let's go ahead and
customize the project. I'm going to open
style the CSS file. Let's create new CC media query. The max Wi is going
to be 430 pixels. The first thing that
I'm going to do is to select HTML elements. We have to decrease
the font size. Let's set font size to 45% It will decrease the sizes
of all the elements. Next, I'm going to take care
of the services section, and then we'll go
back to the header. I'm going to select services. Let's increase the
height of the section. I'm going to set it
to 40 pot height. So now we have better result, but we have to take care of the shapes I'm in
the background. Let's go ahead and
select services G one. I'm going to change
the position. The top position is going to be -10% As for the right position, I'm going to set it
to -10% as well. Let's check the browser. The first shape looks good. Let's take care
of the rectangle. I'm going to
duplicate this code. Let's change the class
name we need here. G two, I'm. Define bottom position
and it's going to be -8% Okay. That's it about the
services section. Next I'm going to take
care of the banner. Let's go ahead and
select banner. I'm going to define
left position, it's going to be 8% Next, I'm going to take care
of the backgrounds. I'm going to start with
the main background. Let's select G main. I'm going to define positions. The top position is going to be -75% As for the left position, I'm going to set
it to minus one, 20% Then I'm going to change the background,
the linear gradient. Let's define linear
gradient function. The transition of the colors, I mean the direction of the transition is
going to be to left. Then we need first color, it's going to be 44005. As for the second color, I'm going to use 4400b again. Next we have to take care
of the second background. I mean we need to select G two. I'm going to set
left position to 20% Okay, I think that's it. About the header,
everything looks good. Next we have to take care
of the project section. I'm going to start
with the headings. Let's go ahead and select projects H one
heading elements. I'm going to set one
size to four Ram. Next, I'm going to take
care of the paragraph. Actually I said that
it was heading, so that's my mistake. It is a paragraph. I'm going to select projects. I'm going to set width 250. Okay. The next thing that I'm going to do is to
take care of the navigation. I'm going to place the
links on two lines. We need to select filter up, I'm going to define height. It's going to be 15 Ram. Then in order to place
the links on two lines, we have to use Flex
with the value p. Okay, now the links are
placed on two lines, but we need here the same
number of links on each line. I'm increase the space
between navigation links. Let's select filter link
and set margin to one run. Now the problem is fixed and with this
section we are done. Everything looks good. Next we have to take care
of the template section. I'm going to take care
of the left side. Let's go ahead and
select template left. I'm going to set let
position to zero. Next, we need width
to be 100% Also, I'm going to change the padding. Let's set padding to 12
Ram at the top side, then five Ram on the right side, zero at the bottom side, and five Ram on the left side. After that, I'm going to place the flex items in the
center of the section. For that, I'm going
to use flex box. Let's set this plate to flex. Then we have to change the direction because
we are going to place the flex items
vertically in a column. We need flex direction
to be column, then we need justify
conference center and also a line items center. Okay. So that's sits
about the left side. Actually I'm going to a line the text of the
paragraph in the center. I'm going to select
templates left, and I'm going to use
text line center. Okay, now everything looks good. Next we have to take of the
images and also the bottom. Let's start with the images. I'm going to select
template, right. Followed by the image
elements and I'm going to select the first image
using nth child selector. I'm going to change width, it's going to be 23 Ram. Then I'm going to
change positions. The top position is going to be 65% As for the right position, I'm going to set it to 40%
Then I'm going to duplicate this code twice because we have to take care of the rest
of the images we need here, image two and then image three. The width of the second
image is going to be 14 Ram. Then the position will be 51% as the left
position we need here. Left position is going to be -55% Next we have to take
care of the third image. Let's set with 38 Ram. Then the two position
is going to be 55% As for the right position, I'm going to set it
to 10% All right, so let's sit about
the images next. I'm going to take care
of this shadow here. I mean, we have to select
templates with free elements. Let's define the right position. It's going to be -7% but then
we need bottom position, it's going to be -10% Also, I'm going to change
the background. Let's use a linear gradient. The direction is
going to be two left. As for the colors, the first
one will be transparent. Then I'm going to use
the second caller, 8430. As for the third caller, it's going to be 409b. Okay? Everything looks good. We have to take care
of the play button. Let's select wrapper. Define left position
is going to be -25% Then I'm going
to select Play BTN, I'm going to decrease
the size of the element. Let's set width and height, both of them to 15 Ram. Also, I'm going to change the
size of before the element. Let's duplicate
this code and add here before the with height for before element is going to be 19.5% Not percent but Ram. All right. I think
everything looks good. The only thing that
we have to do is to change the size of the Phm icon. I'm going to play BTN, followed by the element. I'm going to set font
size to five Ram. All right, that's it. About the play button, I'm going to check
the video player. So as you can see,
it's time to take care of the video player because it doesn't
look quite good. I'm going to go ahead
and select Video. I mean, the wrapper,
let's set width to 50. That's for the height.
It's going to be auto. Now we have to take
care of the controls. Let's select video controls. We need here controls. I'm going to change the padding. It's going to be one ramp at the top and bottom sides and zero on the left
and right sides. Next we need to take care of the options
on the left side. I'm going to select Options
with the class left. Let's set with 40% Now
everything looks good. I'm going to change the position
of the x Closing button. Let's select X PTN, followed by the element. I'm going to set to
position to -8% Ken, the video player.
Looks pretty nice. Let's close it and move
on to the next section. It is a subscribe section. We have to customize
this section as well. I'm subscribe wrapper,
let's set width to 50. Then I'm going to take
care of the input. And the bottom I'm going
to subscribe input, we need you subscribe
input group, let's set with 240 Ram. Next I'm going to of the inputs, let's use the selector we have to add here
input I'm going to set with in
height to 100% Okay, That's it about the
subscribed section. Next we have to take care of the footer because the elements, especially the social media
icons, are messed up. I'm going to select footer. Let's set height
245, put height. I'm going to change the position of the
social media icons. I'm going to place them here. Down select social media. Let's set position to absolute. Then we need position relative for the parent element,
which is footer. Next we need bottom position. It's going to be six Ram. Also, let's set with to 100% Then I'm going to place the elements
horizontally in a role. Therefore, we have to
change the direction of the flex box and in this
case it's going to be role. Finally, we need to
justify content center. Okay, as you can see, the heading and the
social media icons are placed here nicely. We need some space between
the heading and the icons. So I'm going to select foot social media followed by the H three heading elements. And I'm going to set margin
on the right side to five m. Okay, now everything looks good. Next I'm going to take
care of those links here. I'm going to change
the font size. Let's go ahead and
select foot bottom, followed by the
elements. I'm the link. The phone size is
going to be 1.8 Ram. All right, so I think that's
it about the home page. Next we have to take
care of the navigation. I'm going to check
the drop downs. As you can see, we have to
make here some changes. I'm going to hide those panelementsIoecond
panelments here. Let's go to the VS code and
select drop down service. Then we need developments
followed by the span. And we have to select
second panelement using child selector. Let's set display to none. As you can see, these
panelements are hidden. Next, I'm going to change the size of the right side
of the first drop down. Let's select drop down one right and set width to
100% As for the height, I'm going to set
to 75% Actually, all other dropdowns look good. Therefore, we can say that with the home page and with the
navigation. We're done. Next, I'm going to
check other pages. Let's check clients page. We have two,
customize this page. Let's go ahead and open clients CSS file and create
new CSS media query. Then specify xw, it's
going to be 430 pixels. I'm going to select testimonial header followed
by the H one heading element. I'm going to define phone size. It's going to be form also. I'm going to hide the stars. Let's select stars
and use Display Non. Okay, now everything looks good and with the client's
page, we're done. Next, I'm going to
select Products page. As you can see, we have
to customize this page. Let's open products of CCS file and create new Ss media query. I'm going to specify
Mawi is going to be. 430 pixels. Then I'm going to select products header followed by
the H one heading element. Let's set phone
size to four Ram. Okay, next I'm going to take
care of the second heading. Let's go ahead and
duplicate this code. I'm going to change
the selector. We need H three, then
the phone size is going to be 2.5 Also, I change the width, let's say to 80% Then we have to center
the heading for that. I'm going to define margin, it's going to be two
run at the top side. Then on the right side, 15 Ram at the bottom side
and O on the left side. As you can see the heading
is placed in the center. All right, that's
cable, the header. Next we have to take care of
the product content section. I'm going to select
Wrapper Product Content. Let's define padding. It's going to be five Ram at the top and bottom sides and zero on the left
and right sides. Next, I'm going to take
care of this part here. Select Products Content Left. I'm going to set with to 100% but then let's
use Flex box. We need Display Flex. Also, we have to change
the direction because the flex items should be placed
vertically in the column. Therefore, we need flex
direction to be column. Also, I'm going to set, align items to center. Okay, Next I'm going to change the alignment
of the paragraph. I mean the text
of the paragraph. Let's go ahead and
select products. Content left, followed
by the elements. First of all, I'm going
to change the width. It's going to be 8% Then let's place text in
the center using text. A line center. Actually, we have here some problem because this content should be placed in the center
of the section. Let's go back to the VS code. And actually we need here products content
and not mo content. As you can see, the
problem is fixed. All right, after that, I'm going to take care
of those images here. Let's select products Content right followed by
the image elements. And we need first image
using chart selector. I'm going to define
with and height. The width is going to be 18 Ram. Then we need height,
it's going to be 36 Ram. Also, I'm going to change
the position of the image. The top position is going to be 75% As for the right position, I'm going to say to 30% Let's duplicate this code twice and
change the chart selectors. We need image number two
and image number three. Then I'm going to set width of the second image to ten Ram. I'm going to get rid of height as for the top
position is going to be 63% Then we need
right position, which is going to be 57%
As for the third image, I'm going to set
width to 18 Ram. Let's leave this value here. We don't need height. As for the positions we
need here, bottom position. I'm going to set it to 13% For the right position is
going to be 7% Okay, I think that cable the images. Let's check the results now. I think everything looks
good with this section. We're done. Let's
move on and take care of the second section. I, the promo content. I'm going to select products
promo and set height to 100 H. Next I'm going to select
promo content and define widths going to be 8% Now we have to customize
the promo content on hover. Let's go to the VS code and select promo
content with Hover. Hover, I'm going to change
transform property. Let's use here translate. The values will be
-50% again -50% Then we need to change the value of the translate Z function.
It's going to be six. Okay, now everything looks good. Next we have to take care of the shapes behind
the promo content. I'm going to start
with the rectangle. Let's select promo rectangle. I'm going to set within height, both of them, to 35 Ram. Next, I'm going to
change the position of the rectangle we need here. Top position is going to be
28% As for the left position, I'm going to set it to -3% Okay. After that, I'm going to take
care of the large circle. Let's select large circle. Actually, I'm going to
grab this code from here. We need with in height, with the same values as the position is going
to be bottom and the value will be 27% As
for the left position, I'm going to change it with right position and
the value is going to be -8% All right, finally we have to
customize the small circle. Select small circle and
change the position. Top position is going to be 26% As for the right position, I'm going to say to 30% Okay, that's it about the shapes. Next we have to take care of the heading and the paragraph
inside the promo content. I'm going to select Content
one heading element. I'm going to change
the phone size. It's going to be 1.8 Then I'm going to take
care of the paragraph. We need promo content
followed by the P element. And the phone size is going
to be 1.8 Ram as well. All right, I think that's it about the products page,
everything looks good. Next we have to take care of the next page and it's
going to be Contact page. As you can see, we have
to customize this page. Let's go ahead and open
contact CSS file and create new CSS media curry we need
to specify the x with. First of all I'm going to select the section elements with the class name contact and
I'm going to set height to 180 viewpoint height. Then I'm going to take
care of the header. Let's select contact header followed by the H
one heading element. I'm going to change
the font size, it's going to be four Ram. Next, I'm going to duplicate
this code and take care of the second
heading which is H three, I'm going to set font
size to 2.5 Ram. Then I'm going to add here
with it is going to be 80% And then we need
to sensor the heading. I'm going to use
margin with the values two Ram Alto 15 and
then auto as well. So that's sit about the header. Next I'm going to take care
of those two parts here. I'm going to select
contact contents. We have to change the direction of the flex box because
we are going to place those two elements on
top of each other vertically. I'm going to set flex
direction to column. Then we need a line item center. Now as you can see, they
are placed vertically. We have to create a space
between those elements. I'm going to select contact form wrapper and then
I'm going to define margin. It's going to be zero
at the top side, three Ram on the right side, ten Ram at the bottom side, and three Ram on the left side. Now we have here some space. Next I'm going to take care of the position
of the circle. Let's go ahead and
select contact circle. We need to change bottom
position is going to be 30% As for the left position, I'm going to set it to 5% Okay, I think everything looks good and we have to move
on to the next page. It's going to be account page. I'm going to go to the BS code and open
account of CSS file. Let's create new
CSS media query. We need here, mawi, 430 pixels. I'm going to select
account circle. Let's change the
size of the circle. I'm going to set with 260 run. Also, we need heights
with the same value. Then I'm going to change
the position of the circle. Let's add bottom position to 34% As for the left position, it's going to be 10% Okay, next I'm going to take
care of the header. Let's add header here. We need H one heading elements. I'm going to change
the phone size, It's going to be form, then I'm going to
duplicate this code. Select H three heading elements. So we need font
size to be 2.5 Ram. Then we need width,
it's going to be 80% Then we have to center
the element using margin. We need to 15 run and again. Or Ok, that sits about
the account page. Next I'm going to take
you of the pricing page. Let's go to the VS code and
open pricing to CSS file. I'm going to add here
new CSS media query with the max width, 430 pixels. I'm going to change the
height of the section. Let's select pricing and set
height to 18 view height. Next I'm going to
take of the header. Let's select pricing header, followed by the tron
heading elements. I'm going to set font
size to four Ram. Then we need to change
the width of the header. It's going to be 50 Ram. Then we need to center the
element using margin overall. Okay, after that, I'm going to take of the second heading. I'm going to duplicate this
code, change the selector. We need H three, I'm going to
set phone size to two Ram. Then we need the same
with, as for the margin. It's going to be two
M, then two Ram. Again, actually we can leave
here just two M and O. It will be the exact same thing. Okay, that's it about the
H, three heading elements. Next I'm going to take
care of the cards. We have to place
them vertically. And for that we need to
select pricing cards. To change the direction
of the flex box, it's going to be column, Now they are placed
vertically in a column. I'm going to create
space between the cards. I'm going to select
pricing card, I'm going to set margin to zero, then 1.5, then ten run, and again 1.5 r. Now we have
the space between the cards, and next thing that
I'm going to do is to take care of the shapes. Let's go ahead and start
with the promo rectangle. I'm going to add here
the code for rectangle. We need pricing rectangle
and not promo rectangle. I'm going to change the two
position is going to be 20% Here we have the rectangle. Next I'm going to take
care of the small circle. Let's go ahead and
select small circle. We need pricing small circle. I'm going to set position to 17% As for the right position
is going to be 5% Finally, I'm going to take care
of the large circle. We need to change the position. We need pricing large circle and the bottom position is going to be 8% Okay, I think that's Everton looks
good on the breakpoint. We can say that with the first breakpoints of
the mobile phones is done. We can check this breakpoint here and we can take care
of the next breakpoint. I'm going to check the
website on the breakpoint. Let's go ahead and change
the dimensions we need here, 393 and 893 pixels. Let's check the projects. If everything looks good, the home page looks good, let's check other pages. The clients page looks good. Next we have products page, it looks good as well. Then I'm going to
check Contact page. Next we have account page,
finally pricing page. As you can see,
everything looks good. We don't need to change
anything on that breakpoint. Now, I'm going to check this break point here
and take you off the last breakpoint
for mobile phones, it's going to be 375
pixels of width and 667 pixels of height. So let's go ahead and change the dimensions we
need here, 375.6 67. So as you can see,
everything is messed up. Again on that breakpoint, let's go ahead and
open style the CS file and create
new CSS media query. It's going to be 375 pixels. I'm going to take care of
the services section first, let's select services
and increase the height. It's going to be 350
viewport height. Okay. Next I'm going to take care of the services G one. Let's set top position to -7% Then I'm going to take care of the background
to here on the header. Let's go ahead and
select BG two. I'm going to set left
position to 30% Okay, next I'm going to
check the navigation We need to make
here some changes. I'm going to decrease the
height of the navigation item. Let's go ahead and select no item but we need to exclude again the novem which is bottom. I'm going to add here
last child to the class. Besides that, we need here
to add class Hamblger, we need to decrease the height.
It's going to be eight. Then I'm going to change
padding on the left side, let's say it to
three m. As can see, the height of the navigation
items is changed. Next I'm going to change the
positions of the dropdowns. We need to select drop down and then set to
opposition to eight run. All right, the next thing
that I'm going to do is to add scroll bar to the
first drop down menu. Let's go ahead and
select Drop down one. And then use Overflow Y
property we need here Scroll Now as you can see, we are able to scroll
down the drop down menu. Let's take care of
the second drop down. I'm going to select
drop down two. Let's set height to 32.5 Ram. Besides that, I'm going to
select drop down two with the developments and I'm going
to set height to a next. I'm going to hide the icons
and also the paragraphs. Let's drop down two followed
by the developments, and then let's set
display to none. We need the same thing for
the paragraph as well. Let's change to, all right, so that's it about the
second drop down menu. Let's move on to the third one. I'm going to customize
the third drop down. Let's select drop
down three to change the height of the third drop
down. It's going to be 45. Then I'm going to hide the second spin elements
inside the dropdown menu. Let's select drop down three, followed by the development. Then we need span with selector. We need to select
second span elements. Let's add here display none. Okay, that's it about
the third drop down. The fourth drop down looks good. As for the fifth drop down, I'm going to customize it. Let's go ahead and
select drop down five. I'm going to change the height. It's going to be 30. Then I'm going to set putting to 1.5 Next I'm going to
take care of the button, I mean the pricing button. Let's go ahead and select
Item with Last child. So class, I'm going to
set height to ten Ram. Then I'm going to
change the height of the button as well. Let's duplicate this
code we need here. O BTN I'm going to set
height to five Ram. All right, let's
check the browser. Everything looks good, actually, with the navigation. We're done. Let's go ahead and
check other sections. Everything looks
good. As you can see, the footer needs
some adjustments. Let's go ahead and
take care of that. I'm going to select footer, and I'm going to
increase the height. Let's say 255 foot height. Now the footer looks good. Okay. That sits
about the home page. Next I'm going to
check other pages. The client's page looks good. Next we have products page. Inside the products page, we need to take care
of the promo content. Let's open products of CSS
file and create new CSS media. Query Maxwit is going
to be 375 pixels. I'm going to select
Promo rectangle. Let's set within height, both of them to 30. Then I'm going to set top
position to 23% Next, I'm going to take care
of the large circle. I'm going to set with height. Actually, let's grab
this code from here. The width and height will be 30. As for the positions we
need here, bottom position. It's going to be
20% right position and go 30 -11% Let's
check the result. Everything looks good. Next, the position of the small circle. Let's select small
circle and set its top position to 20% Okay, I'm going to change
the position of the small circle on hover. Let's go back to the VS code
and duplicate this code. I'm going to add
here class animate. The top position is going to be 13% Now I think everything looks good
with the product section. I mean the products
page, we're done. Let's check contact page. I'm going to
customize this page. Let's open contact CSS file and create new CSS media query. We need max with 375 pixels. Let's select contact section and set height 220 viewpoint height. Okay, now the problem is fixed. Let's go ahead and
check account page. We have to customize
this page as well. I'm going to open
account of CSS file. Actually, let's grab
this code from here. We need account section. The height is going
to be 130 put height. Then I'm going to
decrease the width of the account for wrapper. Let's select account for
wrapper set with 245 Ram. Okay, now everything looks
good with the account page. We are done. Let's
check pricing page. Well, we have to increase the
height of the pricing page. Let's paste here media query, select pricing and set
height to 250 pot height. Okay, that's it. All the pages, including the home page, look good on this breakpoint. I mean, the breakpoint
for mobile phones, actually we can say that
our project is responsive for all those actually
popular breakpoints. We can check the last
break point as well. It's been the longest
video in the course. But finally, we're
done with the project. The only thing that we have to do is to deploy the website. I mean, we have to host it
and make it online for that. Let's move on to
the next lecture.
72. Deploying Website: All right, in our
previous lecture, we successfully made our project responsive to various
screen sizes and devices. Now it's time to move
on to the final step, deploying our website online. There are numerous ways
to host your website, but in this course, I
prefer using Netlify. Netlify is a cloud platform that provides a range of services for modern web
development and hosting. It offers a platform as
a service solution that simplifies the process
of deploying and managing websites and
web applications. Let's go and visit Netlify Com. The first thing that you
have to do is to sign up. It is a quite simple process. I'm not going to go through it. I have already registered, so I'm just going to login. Here, we have a
dashboard of the user. In order to deploy the website, you can either import your existing Git
repository or you can just drag and drop your
working project folder. I prefer the second way. I mean, I'm going to drag
and drop the project folder. But before I do that, I'm
going to note one thing as remember we had three
different folders for HTML, CSS, and Charles files. If I kept those folders, then Atlifi won't deploy
the website correctly. We must keep our files
together like so. Let's open the
projects in VS code. Once I removed the folders and placed all working
files together, then I should have changed the
paths of the linked files. If I check the path of
the file style CSS file, you'll see that we
no longer have here two dots with slash and
then the folder name, CSS. I did the same thing
for the images as well. As you can see we
have here images folder without any
dots and slashes. Okay? Make sure that you changed the paths of the
files and images as well. Like otherwise, when
you deploy the website, you won't see the
tiles or images. All right, I think we are
ready to drop the folder here. I'm going to exit this path, and then I'm going to
drop the folder here. It will take some time. As you can see, deploy success. I'm going to click Get
Started, then click here. I'm going to click
the link here. As you can see, now
our website is online. We can see that
everything looks good and everything works fine. We can navigate to
different pages, everything works
and looks great. We can say that our
website is online. I want to do one more thing. As you can see the Netlify has generated some
tummy domain name. And I want to change it. Let's click here.
Site configuration. I'm going to change site name. You use any names you
want. It's up to you. I'm going to delete
those characters. And I'm going to
call the website. I don't know, Let's say
call them Create website. It's not the perfect name, but I couldn't think
of any other names. I'm going to save the name, then if I click the link, you will see here
domain name con and create website,
Netlify dot app. Okay, Now you know how to
host your website on Netlify. Again, there are tons of
ways to host the websites. You can buy the domain
names and so on. All right, congratulations. Fantastic job on
finishing this course. You're now equipped with the skills to create
awesome websites. I would like to say a huge thank you for being a part
of this course. Keep learning, stay curious, and enjoy the journey. As a web developer, I wish you the best of luck with all your future projects. Happy coding, and may your
websites always impress. Good luck. Bye, bye.
 Giorgi Lomidze, UI / UX Designer