Transcripts
1. Introduction: Hello everyone. My
name is Dichelle. I'm a commercial artist and
illustrator specializing in realistic botanical and
food illustrations for clients and editorial packaging
and branding industry. Painting realistic
botanicals has been one of my all-time obsessions. I started painting with
watercolors in 2017, and since then I never stopped. I just fell in love
with the diversity that watercolors can
bring to your art. From loose florals to
realistic botanicals. My journey has been
full of learning, anxiety, frustration,
and many celebrations. Welcome to Botanical
Illustration with advanced techniques, where we're going to explore an advanced level of botanical illustration
using watercolors. In this class, we're
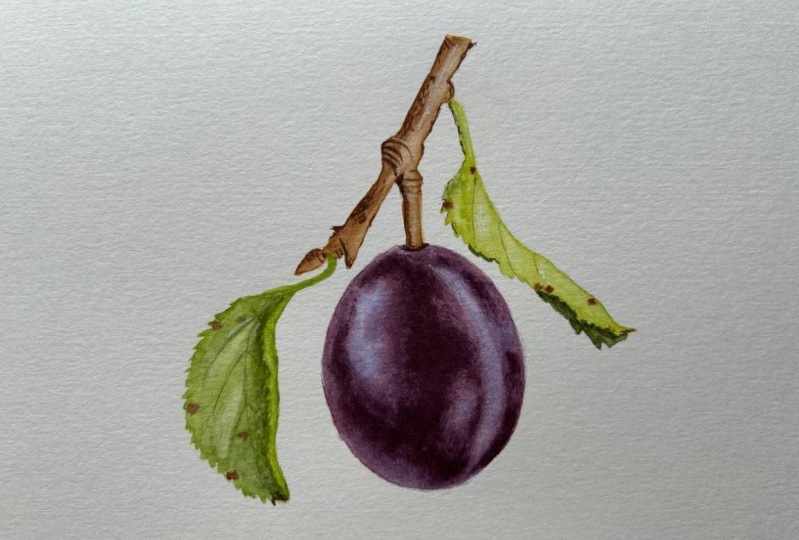
going to paint this delicious
Italian blue plum, which has all these gradients, textures, and blooms, which can be a little
intimidating for beginners, but we can always make it
easier using simple techniques. In the class, I will
be teaching you the techniques that you
will use to paint the plum, like dry brushing, detailing, wet on wet, and lifting. I will also show you how to make those color variations on the plum and those
blooms and textures. For the project of the class, I will be using this image as the primary reference
with some tweaks in it. Like I added a cleft in the plum using this
image as the reference. I will also show you how
to paint the leaves and stem and get that realistic
look in your painting. You can find the
reference images and line drawing in the PDF in the Resources tab below and if you want to use
your own reference, I'll encourage you to do so. This class is perfect
for anyone who has a basic understanding
of using watercolors, but if you're a total
beginner in watercolors, I will encourage you to take my Basic Watercolor Techniques
class in which I have covered all the
foundational techniques and basic concepts of
using watercolors. If you're just starting out
with Botanical Illustration, I'll recommend my
second class which is Botanical Illustration
for beginners, which is a great starting point for anyone who's familiar with the medium but want to get started with
watercolor botanicals. As you proceed with the lessons, I'll encourage you to
share your progress, as well as the final project
in the project gallery. Just create one project in the project gallery
and keep sharing your in-progress shots as well as your final piece as you
progress through the lessons. In the next lesson, I'm going to talk
about the materials that we'll use for this class, so are you ready
to get started and level up your botanical
art skills? Let's do it.
2. Materials: In this lesson, I'm
going to go over the supplies that we'll
need for this class. Let's start with the paints. I'm going to use professional-grade
paints from Sennelier and Winsor and Newton. The colors that I'm
going to use are dioxazine purple, cobalt blue, helios purple, burnt umber, lemon yellow, and bright red, Winsor blue, and sap green. You don't have to use
the exact same colors, but just try to use the similar shapes that
you may have at hand. I also have provided a list of all the materials
that I've used for the class and some
more recommendations in the PDF in the
resources tab below. Another thing that I want
to mention is try to use professional-grade
paints instead of using student-grade paints because
student-grade paints will fade away
with time and they will not give you
the right results. After paints we'll
need some scrap pieces of old watercolor paper
just to test your swatches. Then we'll need some palettes. I use these ceramic plates
for my color mixing. I use these small pallets
for different colors. If you don't have any
ceramic palettes you can use any spare plates if you have
in your kitchen or if not, you can also use the
plastic palettes that come in the market. Then you will need some brushes. The brushes that
I'm going to use are from King Art supplies. This is their finished series and they are maximum brushes. I really love these brushes
for their longer hair and nice point and they're affordable as compared
to other quality brands. Another thing that I
love about these brushes are their point is really nice. I've been using these brushes
for like three years or so. For mixing my paints
in the pallet, I'll be using this
acrylic brush, I guess. I'm not sure, but it's a very hard brush and
it's a very short one. The name is Christen Filbert, but you can use any old brush
for mixing your colors, you don't need to buy a
separate brush for that. Then you'll need a jar of water. I prefer using just one jar because I have a
tendency of tripping everything around me so I just keep changing
water whenever I need. But you can keep
two jars one for cool colors and one for warm colors if that
works for you. Then we'll need a pencil I
use edge or 2 edge pencil for sketching on paper
and a kneadable eraser. If you don't have a
kneadable eraser, you can use any
regular eraser just make sure that you don't
use the eraser a lot on your watercolor paper
because it's going to change the texture of the paper and
the quality of the paper. You'll also need
some paper towels or if you have any cotton rag
that works pretty well. The paper that I'm going
to use for this class is Fabriano hot press paper. This one is 300 GSM and you
can see it's a little thin. But the paper that I'm going to use for the project of
this class is this one. This is the same Fabriano
artistical hot press, but the weight of the paper
is 640 GSM or 300 pounds. One thing that I love
about this paper is that it doesn't
buckle at all. After three or four
wet-on-wet washes even you won't see any buckling. Another thing is, I
don't need to stretch this paper because
it doesn't buckle. The problem with this paper is that it only comes
in large sheets, so you will have
to tear them down yourself and another
problem is the cost. This paper is really
expensive as compared to the 300 GSM paper and
honestly speaking, 300 GSM paper works
perfectly well. Just make sure that you stretch your paper before
starting to paint on it. The last thing
that you will need is the painter's
tape to tape down your paper if you use a 300
GSM or lesser-weight paper. That's all about the supplies. We'll see you in
the next lesson.
3. Techniques: [MUSIC] In this lesson, we
are going to practice some of the techniques that we need
to complete our project. I've drawn these six
circles as a template, but you can use any shape,
that doesn't matter. The first technique we will work on is the
wet-on-wet technique. I'll just write it down here. This technique is
used to lay down the base colors in any subject. I'll just take some
water in my brush and apply an even layer of
water on the circle. Basically, wet on wet means
that the surface is wet, and then we apply
wet paint on it, just trying to cover
the whole circle carefully and trying not to
go outside the boundaries. Just make sure not to
apply too much water. You must be able to see a
nice even sheen on the paper. You can use any brush for this exercise that you
are comfortable with. Let's give it a few moments so that the water gets soaked in a little bit in
the paper and then we can come back and
add paint on it. In the meanwhile, I'll show you the second technique
which is wet-on-dry, which means that our
surface is dry and we will use the wet
paint to paint on it. I'll take some paint
in my brush and start applying paint
in the circle. This is the most simple
and basic technique as we use this with
almost every medium. By the time we're done
with this circle, both circle will be
ready for us to work on. [MUSIC] This was the
wet-on-dry technique. Now let's get back to our first circle and
using some paint, I'll just drop it in the
wet circle like this. [MUSIC] Now you can
see how the paint starts to spread on the surface. I will add more purple randomly. [MUSIC] Now we can
also try adding a different color to make
it more interesting. This is what we are going to
use in our project a lot. Now, main thing we need to take care of with this
technique is that the paper should be wet but should not have a
puddle of water. Rather it should have a
very even layer of water. If you're not very comfortable
with wet-on-wet technique, I'll suggest you to practice
this technique a couple of times before you get
started with the project. If you want to make the
gradient smoother and softer, just clean your brush and
slowly try to use the brush and sweep on the edges of the colors which was
more than those blooms. Now the next technique we
will use is dry brushing. Now for dry brushing, you will need some wet paint, of course, because you need to activate the
paint with water. But this time we don't
need very dilute and your brush should not have
too much water in it. When you dip your brush
in water to activate it, just take a paper towel and dab the brush on it to take out
the excess amount of water. Then taking the
paint and the brush. [MUSIC] Now just try to
make these marks like this. [MUSIC] We get those textures and dry brush marks like this using dryer paint
and dryer brush. I'll just write down the name of the technique, dry brushing. [MUSIC] The next
technique we will use in our project is the
dry variegation. Now I think there
is not such a term called dry variegation,
I just made it. The idea behind this
technique is basically we are going to transition between
two colors in the plum. We will use wet on dry and dry
brushing at the same time. Let me show you what I mean. I'll take some
purple in my brush and the paper is
dry, it's not wet. Now I'll apply some purple just like we did in
wet on dry technique. [MUSIC] Now while the purple is still wet, I'll quickly wash the brush and take some blue shade in it. I will start painting
with the blue right where we ended with
the purple and try to merge these two
colors by wiggling the brush and irritating
the paint to merge them. This way we can get the
smoother transition in colors while retaining
the dry look of the plum. [MUSIC] That's why I just
named it dry variegation. [MUSIC] After dry variegation, the next technique is detailing. For detailing, I will
use the tip of my brush. But if you have, just to
try to use a smaller brush. The point of the brush needs to be very fine in this technique. Taking some paint in my brush, I'll make some very
thin lines like this. Try to make these lines in different directions and angles. [MUSIC] We will use this technique later
to get these lines and textures like you can see on
this painting right here. [MUSIC] We may also be using
the stippling technique, which is simply making small, tiny dots and marks with
the tip of the brush. This technique comes in
handy if you need to make very small dotted patterns on any subject or making
very tiny details. [MUSIC] The last technique
is called lifting. This technique is
basically used to get some highlights
in our painting. Or if you add too
much water or paint, then we can use
this technique to lift off the extra
paint from the paper. Let's say I have some
paint over here. One way to lift the paint
is by drying your brush, by dabbing it on paper towel, and then rolling it over
the surface, like so. Now sometimes lifting in this way can leave
very hard edges. Another way is by
using a corner of the paper towel and slightly
dabbing it on that area. That way it will leave
the highlight with very soft edges as
compared to the brush. [MUSIC] You can see that we got the softer
highlight here. These are the techniques
we will be using to finish our project
in this class. Let's move on to our next lesson and get started with
the first wash.
4. Layer 1 - Wet on Wet: [MUSIC] I have the drawing ready on the watercolor paper, if you want to learn
how to transfer your sketch to the
watercolor paper, I've explained it in detail in my other class, watercolor
botanical painting. I've also shown the process
of how you can transfer the sketch from an iPad
to the watercolor paper. You can just have a look at Lesson Number 4 of that
class to follow the steps. Now, to get started, I will start with a plan first. I'll just clean up some of the dark pencil marks
using my kneaded eraser. For the very first layer, I'll lay down the
blooms which are very light blue
washes, and for that, I'll just take my
palette and mix some cobalt blue in
the palette using a lot of water and
making it very dilute because we don't need
it to be very saturated. [MUSIC] Maybe add a little bit more purple on this, and let's test it out. [MUSIC] It looks pretty good. I'll keep the plate aside
and bring my paper back. The first step is to lay down an even layer of water
on the whole plan. For this wash, I'm going
to use the bigger brush, which is size 8 brush, and cover the entire area
of the plan with water. Now, make sure you don't use
a lot of water in this step, but it has to have a nice
even sheen on the surface, and just try to avoid going
out of the boundaries. [MUSIC] Once you are done, you can pick up your paper
and check if the water is evenly spread on the
whole plan like this. I think I need to add
a little more water on the top portion. [MUSIC] It looks good now. I'll wait for a few seconds
so that the water gets sipped in into the
paper a little bit, and then I'll switch
my brush to size 6, and again mix the blue
well on the palette. Sometimes the color starts separating from each
other on the palette, so it's a good idea
to mix them well before you put them
down on the paper. Taking some paint in the brush, I'll start dropping
this blue in some of the areas where I think
the blooms should be. You can see the paint starts to spread and create some
soft blooms like this. We'll come back and
make them even later. I'll also add some blue
near the cleft of the plan, where you can see in this image, the cleft is quite bluish as compared to the
other parts of the plan. Now, I think it's
looking perfect. I'll wash the brush and
dab it on the paper towel. Then just using the
tip of the brush, I'm just going to soften
those edges of the blooms. [MUSIC] Now I'm going to add a little more color where
I think can be added. Now, let's wait for some time until it
is completely dry. Once it is completely dry, we'll come back and
start working on the second layer with
the dark purple shade.
5. Layer 2 - Dark Tones: The first layer is
completely dry. Let's start with
our second layer. For the second layer, we'll go with the wet on wet technique again and lay down a layer of clean water on top
of this layer. But before doing that, I'll make a nice mix of my purple in the
palette so that we are ready to start
painting right after we have applied
the layer of water. For mixing, as I
showed you earlier, I'll be mixing the red
and blue and a little bit of purple if needed. When you're doing this mixing, as these colors are
a little staining, especially the blue paint, try to keep your painting
aside just to avoid any splashes or stains
of paints on the paper. I think it must be a good
starting point for us. Let's just add a
touch of red again, and I'll just test
it on the paper. I always recommend making
enough mix on the palette beforehand so that
you don't have to mix the colors
again and again. That may change the shades of the paint every
time you mix them. Always try to make enough mix so that you don't have
to do that again. I feel like I need to
add a little more blue. This step is really
crucial to get the right colors and don't shy away in spending a little
time on this part. This way you won't regret
mixing the wrong shades later. I think it looks perfect now. On the side, I'll make
a smaller bundle of more bluish purple
just in case if we'd need to add some variation
of color on the plum. What we're going to do
is we're going to use the bigger bundle as
the primary color. If needed, we are going to use the smaller bundle if we
want to add some variations. I'll take my brush
and apply a layer of water just like we did
in the previous lesson. Just spreading the water
gently and evenly. Just be careful
around the edges. [MUSIC] If you feel like you can move
around the paper like this. This is one thing I
love about working on a thicker paper that I can easily move the
paper as I need. I'm a little lazy person when it comes to stretching my paper. I like using this
paper for client work or if I want to make realistic botanical
illustrations like this one. But 300 GSM is perfectly fine to work with if you stretch it
properly before painting. [MUSIC] I'm just checking the sheen and it looks
like we have got an evenly throughout so
let's start painting now. I just waited a few second. Taking my smaller brush, size 4 and taking the
purple mix we just made. I'm going to drop it
in the white areas. I'm just going to
avoid the blue areas. [MUSIC] While painting around the edges, try not to touch the edges because we will be
spreading the paint later using the clean brush and that way we wouldn't get any
hard lines on the edges. [MUSIC] This part
is a little dry, so I'll add a little water and make it wet and start
adding paint again. If you live in a dry climate, then you may need to
work a little faster and maybe use a little
more water than usual. [MUSIC] At the cleft part, I'm just trying to
keep it bluish as you can see in one of
the references here. [MUSIC] You can see that the paper in this
area was not very wet and we are
getting hard edges, but we can fix that by
using a damp brush later. I'm going to wash the brush
and dab it on the paper. Then I'll start
softening the edges by gently sweeping the
brush on the edges. [MUSIC] At the cleft, I'm going to use a clean
damp brush again and sweep through this line to make it a little more prominent
and lighter. [MUSIC] We are done
with the second layer and we'll let it dry completely. Then we'll advance further with the next steps in
the next lesson.
6. Layer 3- Textures and Details: So now after the second layer, I will mark down some of the
darker and smaller details. If you look at this
painting here, you can see at this part here where the stock is
connected to the fruit, there's a small dip
which needs to be a little bit darker
than the whole plum. So for this, I'm going
to use the Size 6 brush, which has a very nice point, but you can use a
small detail brush if you have one for the step. I'm not going to load the
whole brush with the paint, but just going to use the tip of the brush to work
on the details. So I'll take some dark paint
on the tip of this brush. You can see I'm just
touching the tip here and using a thicker
consistency of the paint. Basically, I'm just going
to use it like a pencil. I will recommend you going with a smaller brush if
you don't feel very comfortable in using
a bigger brush for this step and for
making it even simpler, I'm going to turn
around the paper and simply and slowly
mark down those areas. [MUSIC] Like so. You can see I'm using the thinnest point and
I'm using it very slowly. Just be careful while
doing this step. All right, that looks good
and not overdoing it, just need to mark
down that joint where the stem and the plums are
connected with each other. Now after this, I will mark down some of the
texture lines using the dry brush technique like we see on the surface
of the plums. But before painting right
on the final piece, I will practice a few
strokes on a scrap piece of paper using a dry brush. I'm using Size 4 brush, but please use a
smaller brush if you're not comfortable
with the large brush. Again, I'm not going
to use a lot of water as explained in
the techniques lesson. But to activate the brush, I just need to dip it in water once and then dab it
on the paper to take out all the excess water and then take the dry paint
in the tip of the brush. So we'll practice these marks
and check how they look. [MUSIC] Just trying to make these random lines
with a dry brush. They are looking perfect. Just got a little
extra paint here. We'll dub again on paper
and see how it looks now. So the basic idea is just to
get the thinnest brush and try to use thicker consistency of paint rather than
the dilute paint. [MUSIC] Now let's get back to our painting and
make these marks. [MUSIC] You don't have to do it all vertically. Just try to make the marks
in different directions and angles just to make
it look more organic. Going on some random areas and we don't have to
cover the whole plum. [MUSIC] As always, it's very important
to know when to stop. I'll just stop right here. Although it's not very wet, but we'll give it
a few minutes so that the paint gets
completely dry. In the next lesson, we'll
start with a new layer.
7. Layer 4 - Wet on Wet: Okay, so now it's time to
add more color on our plum. I'm going to use wet on
wet technique again. Now I'll make a nice mix of
dark purple in my palette. This time we're going to make
it even darker than before. [MUSIC] I'm just trying to mix these colors and
testing on a rough sheet. I'm just trying to make
enough mix so that I don't have to mix the
colors again and again. It looks pretty good. Now I'll make some
bluish tone as well for adding some
variation on the plum. Now we have enough paint ready, so let's glaze the
plum again with water and then start
adding paint to it. This time, I'm going
to go by sections. I'll start working
on the left part first and then we'll paint
the right part later. This way I won't have to rush
before it starts drying. Taking some water in my brush and glaze the left
part of the plum. [MUSIC] Then adding the paint. [MUSIC] Remember we
are using darker tone of paint than our first layer. Just trying to do it faster and cover most of it
while the paper is wet. [MUSIC] Now once we have applied the paint, I'll use a clean damp brush and sweep through the
edges like we did before. [MUSIC] The left side is dry. Now we'll move on to
the right-hand side of the cleft and follow the same
steps as the other side. I'll just speed up the
video and let you watch. [MUSIC] I'll add a little bit of
blue near the cleft and make a little bit more color
adjustments if needed. [MUSIC] Now, let's take a break for some time and let
it dry completely. Then we'll come back
and add the last layer of color using wet
on dry technique.
8. Layer 5 Wet on dry: [MUSIC] Now is the time
to advance further and apply our final layer
of purple on the plum. This time I will use wet on dry technique using even
darker tone of purple. First, I'll mix a good amount of dark purple in the palette. [MUSIC] Let's mix a tiny bit of yellow to get that
muddy purple shade. [MUSIC] Only this much, I guess. [MUSIC] Let's test it out. I think a little bit more blue and some red and a
touch of yellow. I think a little more yellow. Perfect. This looks good. Now I'll take a generous
amount of paint in my brush and start applying on the dark
areas of the plant. Just make sure that the paint
consistency is thicker this time and we're just going to
use wet on dry technique. [MUSIC] Now washing
the brush and taking the damp clean brush, I'm going to gently soften
these edges like we did before just like this. For this side, I will use some lighter
bluish-purplish shade just to add some variation, and soften the edges with
the damp brush again. I will just keep on adding the colors wherever
I feel as needed. Adding some blue tones
in the lighter areas. [MUSIC] At the left I'm just going
to add a touch of blue and then sweeping through to
soften the edges again. I just flip it over and we'll fix this tiny
part right here. All done, so we will
leave it here for now and we'll start working on the
leaves in the next lesson.
9. Leaves - Part 1: [MUSIC] We're going to
start with the leaves and then we'll go to the stem. For the leaves we're going
to take some sap green. I'm using [inaudible] sap green, and I'll also add a little
bit of lemon yellow in that. If required, if we want a
little bluish tone somewhere, so I'll also use that too. To mix my paints, I'm just going to
use this brush. Taking the paint here, [MUSIC] and adding a
little bit of yellow. Not much, just a
touch of yellow. [MUSIC] I'm making
another puddle, but just a little bit bluer
for some cooler tones. I'm going to start with
this leaf right here. Now, looking at the
reference image, if you look at the right leaf, we see the underside
of this leaf and has direct sunlight
falling on it, so we will use lemony
green for this leaf. If I zoom in, you can
see that there are some dark and reddish
spots on the leaves, so we're going to
cover those parts as well using reds and browns. Now, first of all I'll clean
some of the pencil marks, and taking my Size 4 brush. I will start with this stem, which is joining the
main stem and the leaf, and apply an even
glaze of water. [MUSIC] But I'll flip my paper again to make it easier for my hand and just apply
the water evenly. [MUSIC] Now I'll take the lighter green shade and start dropping
it on the leaf. [MUSIC] As the veins are not very visible on
the backside of the leaf, so I'm not going to worry much
about them at this moment. Adding a little bit
of bluish green here, just try to notice the colors on the reference image while
you're painting the leaves, and keep adding
different variations of your mix as you see them. [MUSIC] Now I have covered the whole leaf, I will mix a little bit of
red and green quickly on the side and then drop that in some of the
places to make those spots, as I see on the leaf. I'm simply loading the
brush a little bit with the brownish tone and adding these tiny dots while the
green color is delivered, and that way it
will merge in the green and give
that organic look. [MUSIC] Also I'll just lift some of the paint
on the top right here, since it's too bright
because of the sunlight. Let's keep it lighter [MUSIC]. I'm just using a damp
brush to lift some of the paint like this to give an impression of the veins here. [MUSIC] Now I leave it to dry and start
working on the next leaf. For this leaf, I'm going to
work on the left side first, and when it is dry, then I'll come back and start
with the right-hand side. [MUSIC] Applying water, [MUSIC] and then dropping the green. Just like before [MUSIC]. With this leaf, I'm
just trying to leave some of the white areas
near the veins [MUSIC] Just notice the leaves have
serrations at the edges, so just be careful while you're putting the
paint on the edges. We will be working on
them in our next layer, but just be sure to find
them while you're painting. [MUSIC] Now, dropping some reddish
brown to make those spots. [MUSIC] Now I will just clean the brush and soften these areas by sweeping
the brush like this. [MUSIC] Now let's give it some time, and when it is dry, we will come back and start working on the rest of the
portions of the leaves.
10. Leaves - Part2: So these arts are dried. What I'm going to do is I'm
going to add some color here. You can use wet on
wet if you want to. But I think this area
is not that large so we can just go with
the wet on dry as is. For this one I'm going to
take the darker tone of green because this is behind and no light is falling on it. Just considering
that, I'm just going to use the tip of my brush. Remember you can
also do wet on wet if you're interested in that. I'll just add a
little bit of blue. Just moving around the paper,
as I told you earlier, I really find it easy to move around the
paper and new combo, [MUSIC] using my brush-like pen. It looks good so far. If you want, you can add
a touch of darker tone. What I'm going to do
is I'm going to make a light mix here, add some green, light, and just add some dark tone just next to the overlap here. That's it. Wash
the brush and use the damp brush to even
out that hard edge. That's all and let it dry. Now, let's come to
the second leaf and we'll do the same thing
on the left-hand side. If we look closely, this has some saturation because of the
fall of that leaf. Need to be a little
careful here. But even if you paint
on top of that, that is not the
end of the world. We can always fix that. And then we'll take some
green and start [MUSIC]. Since it's quick to dry today, you can see that my paper is
becoming very dry easily. Just make sure, just
rubbing off that and taking the damp
brush and again, just pulling some of the
paint just to make sure that we are showing that
we need thick. We can also add some red, one or two spots, not much. It looks good. Let's wait for
some time and let it dry. Then we'll come back
and add more color and details on the leaves and then we'll start
working on this stem.
11. Leaves - Part 3: [MUSIC] Now our leaves
are pretty much dry. Now it's time to get into the
second layer of the leaf. This is the stage where
we are going to add some details and
mark down the wings. We don't need to be very specific on the
backside of the leaf, but we need to make
[inaudible] on some of these. I'll take some water
and start with an even glaze of water and
then add some paint, [MUSIC] and make sure that you
don't go on the other side. Again, I'm going to flip
over my paper [MUSIC]. We don't need to
add too much water here using some green. Starting from the edges, we want the edges to be
very specified here. I feel that the backside of the leaves are usually
little cooler. So we're going to do that. I'm leaving some of
the area like this. Just to walk down the veins [MUSIC]. That's too much paint. Now just dumping the brush
and softening all the colors. While it is still wet, just add a new bit of the darker brown wherever
you think is needed. [MUSIC] Now one thing I wanted to do was just
to define the edges properly because if you look
at the edges right now, they are not properly defined. For that, either you can
use the tip of the brush or you can use the detail
brush if you have it, I will do it later, once we are done with this
leaf and then we'll come back. What I'm going to do is
I'm going to lay down the second layer on the
left-hand side and after that, I will come back to the backside of the leaf
and cover this one. Let's just do this one first so that while we are working
on this, it could dry up. For this part, this
particular portion, I'm not using wet on wet
because it's too small area, so I'm just using very pale
wash or yellow color [MUSIC]. You can see that I'm just
using a touch of green right here. That's it. Stop. Now, let's
come to this part, add water on the
left-hand side [MUSIC]. Again, start adding
green on this leaf. Just trying to have a
deceleration as much as you can. But if you find it difficult, we can always come back and
do it with the detail brush. Then leaving a little
bit of white area. Then starting again, leaving
some gaps for the veins. [MUSIC] And now taking the damp brush and
softening all those edges and making those
impressions of the weeds. Now this part is pretty much dry because we do not use
too much water here. We can actually go back
with our smaller brush and start with another layer. Now, what I'm going
to do is the portion which is away on the
right-hand side, I'm going to make
it a little darker. Just making a line,
washing the brush. And now I'm going to
swatch that line using the damp brush towards
the other end. Now, I hope you can
see that it has already started to
look like a fold. We'll come back
to the left side, but just wait for sometime. In the meanwhile,
let's go back to the other leaf and
start working on it. Making a darker tone of green. I'm just going to add some
green near this edge. Then washing the brush
and using the damp brush, I will just pull that paint towards the other
end of the leaf. I'll go back to the other leaf and start working on
the right side of it, applying the water
glaze and then adding green paint just like we did on the
left-hand side. I think I forgot to add the brown color in the spots
on the left-hand side, but we can do it later. Now, taking some reddish tone or brownish tone and marked
in that area like this. [MUSIC] Even if that
portion is dry, you can still make those marks. This is the stippling technique that we practiced earlier. Put the marks using
the tip of your brush. If you feel like you
need to spread them, just dry up your brush and
just squiggle it like this. We will add more details once
everything is nice and dry. We'll let it dry and we'll
use the other brush. Now let's just cover this area. For this, either you can go with wet on wet or wet on dry. I'm going to use the wet
on dry technique here. Using again, a lighter shade
of green, not much darker. And I am going to paint in this manner, in
this direction. Again, covering that darker
area if you can see, and then covering this darker, too much water like this. Now taking the clean brush
and just pulling that paint. I think this is too dark
for the backup leaves. I'm going to just lift off
some of the paint here. Make it softer[MUSIC]. So I'll stop right here and we'll move on to the next
lesson where I'll show you how to paint the stem and which colors we need
to mix for this step.
12. Stem - Layer 1: [MUSIC] Now we'll mix up
some colors for the stem. For this stem, what I'm going
to do is I'm going to take some burnt umber in my palette. We don't need a lot of paint
here and just test it out, taking very slight paint and more water and we'll
see how it looks. This should work
as our underlayer. As we start building
up the darker tones, you can either add a
greater one or you can add blue and maybe purple mix
that we already have. I'm going to take some of
the paint from this palette. I'm going to take
some Helios purple on the side because I don't want to mess up anything here right now and
a little bit of red and a touch of blue. You can see that I'm just
barely using any colors. This is how you test
your colors without wasting a lot of paints. Let's just take some brown here, which is burnt umber, and add those Helios
purple with the red. I will take all of that, actually and this one too. We'll see what that
does to our paint. It's more likely similar
to what we have. Now adding blue will
definitely work better as compared to red
and Helios purple. What I'm going to do
is I'm going to take more blue here and add it to our burnt umber. This looks pretty dark. What I'm going to do is I'm
going to add more red again. That's too much red. Again, we'll add some blue. We actually need a grayish tone, which is this one. Basically, I just
mixed burnt umber, a little bit of red, and some blue to make
this grayish-brown shade. But we're going to start
with pure umber first, and then we'll carry on
with our darker tones. I'm going to flip
over my paper again. I'm going to start
with this area. We can actually start
with both of them. I'm going to cover the whole
stem with simple water. This demo is supposed
to be lighter, which means it's
going to be green. We'll take care of that later. [MUSIC] Let's just wait for a few seconds so that
it gets soaked in. In the meanwhile, I'll just make a nice watery
mix of this shade. You can also add a little bit of yellow if you are interested, but I'm happy with
how it looks for now. We'll start from the top. [MUSIC] I have more water than I need here. I'm just wiping down
some of the water here. Let's just leave it to dry and let's go back to the
leaves in the next lesson. I'll show you how to add details and structure
to the leaves.
13. Leaves - Final Touches: [MUSIC] While we are waiting
for the stem to dry, I will start working
on the leaves to add more details and darker
tones wherever we need them. What I'm going to do is
I'll just keep it aside. I'll take my green palette here, and either we can use
very fine point brush, or I'm just going to go
with this one for now and taking generous amount
of green on my brush. But I need to be sure that
I'm using the very fine tip, so I'll just test
it out if it is working well because
this brush looks like I've used it too much. But let's just go with it. Not taking dripping paint, we just need a batch
of it and I'm going to just lay down this
line, the middle vein. As you come to the
top of the leaf, just try to make
it even thinner. You can do it by just
lifting your brush a little. Just making it soft. We don't need a hard line here. We need a soft line and we need it very subtle
when it comes to the top. Just using the dry
brush to soften. That's it, stop. Now I will take some
more green paint and start working on the edges
and serrations of the leaves. For this part, I'm going to use the smaller brush
which is Size 2, and I load enough
paint in the brush, just dabbing it on the paper to get rid of the extra paint. Then I will gradually apply
the paint on the edges. Defining them just
as you would do with a pen or pencil like so. [MUSIC] Now after I've
covered some area, I will clean the brush, and using the damp brush, I'll pull the paint
towards the center, making a nice gradient
of the green tone. I'll do the same thing
for the rest of the leaf. [MUSIC] I'm also going to define the veins a
little bit just making these thin lines and
taking the damp brush softening those, like this. We'll keep on adding some of the dark tones wherever
I think is needed. [MUSIC] Now, I'll just add some paint to the
adjoining stem, just connecting the main
stem with the leaf. [MUSIC] Now going back to the leaf, I get the right-hand side
we need to show that fold. For that, I'm going to use
a darker tone of green. I'm going to paint on the
right-hand side just to show that there is some
shadow due to that fold. Just testing this paint here. I think that looks good. Just using the tip again, I'm going to mark down those areas where this
fold is very visible. Once I've painted
this up to the end, I'll just use the damp
brush to soften that paint. [MUSIC] Just defining those
serrations very carefully. This is how we can actually show that the leaf has
folded a little bit. If you want, you can also use a white gel pen
just to mark down those edges and just define the veins on the
right side as well. I think I need to
darken this one too, adding a little
bit brown where I think I can make them darker. Using the damp brush just
softening those spots. That's too much, I guess, so I'll just lift off
some of the paint. I'm going to go over to
the second leaf and do the same thing to define
the edges and the veins, just like we did with this leaf. [MUSIC] The leaves are done, and in the next videos, I will show you how to add the final touches to
the plum and the stem.
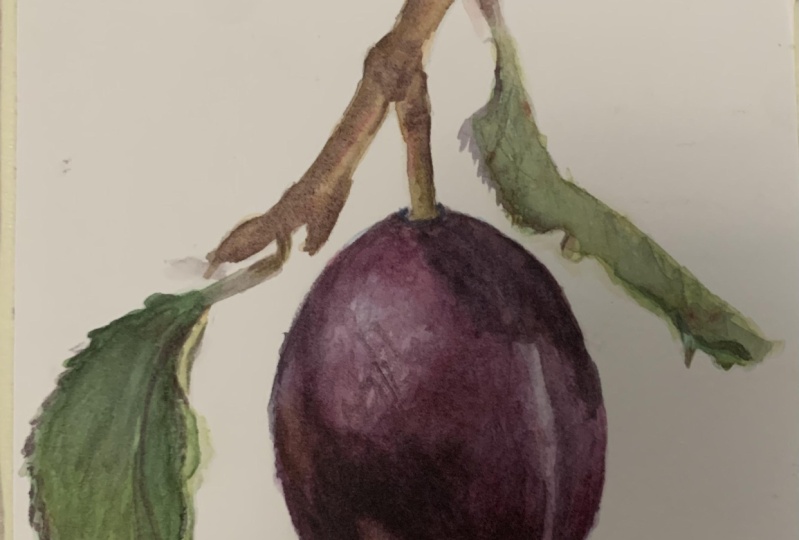
14. Plum Final Details: [MUSIC] In this lesson,
we are going to get back to the plum and
add the final touches, like adding more color
wherever is needed, textures, and details. I have my old palette with
me with the purple mix. I'll just wake up
the paints by adding some water and mixing it nicely. [MUSIC] I'll just test it out, and this time we need a
little dark shade of purple. [MUSIC] I think that looks good. I'll also mix a blue shade
using the cobalt blue and adding a little bit
of Helios purple to it. [MUSIC] That's perfect. [MUSIC] Now I'll
take my size 4 brush and take some paint in it. I'm just going to start adding some dark paint on some
of the areas which are supposed to look even darker
using wet on dry technique. [MUSIC] As we did before, using a clean damp brush, I'll just wipe off the
edges to make them softer. Like this. [MUSIC] You can see I'm adding different variations of
purple on different areas so that we can get that
nice-variegated look that we see on the plum surface. [MUSIC] Similarly, I'll take some blue color
and add in the bloom areas. [MUSIC] Keep on making
some more adjustments to the colors as I go. [MUSIC] We need to make
this bottom part even darker than the other
parts of the plum. [MUSIC] Now the next step is to add those lines again
since the older ones we made earlier are not quite
visible at this point. I'm going to take
some concentrated mix of dark purple for this step. By using just the
tip of the brush, I'll start making those lines. Some random lines
like this, some more. [MUSIC] Just remember not to overdo this part
because we don't want to fill up the whole fruit with those textures and lines. We just want a few of them to add more
interest to the plum. [MUSIC] I'll flip the paper and fine-tune this
part carefully. [MUSIC] That's all I guess. Let's move on to our next
lesson where we will work on the stem and add more details and final
touches to the stem.
15. Stem & Final details: [MUSIC] Now, in
this final lesson, we are going to
work on the stem, add more shades and details
to get the final touches. To get started, I'm going to take the darkest
tone of the brown. For that, I'll mix burnt umber, blue and all these colors that are already on my palette, and will keep
mixing them until I get a very dark grayish
tone of the brown. [MUSIC] There we go. Now, I'm going to use the
fine brush and first of all, I'll mark down the darkest
lines in the stem. [MUSIC] Now, I'm going to
go back to the dark brown. I think I'll just
add a little bit of yellow to the burnt umber, and start adding the brown
on the right hand side. Then using the damp brush, sweeping the colors to make the gradient even
more subtle and soft. Remember, the light is falling from the right side of the plum, so we're keeping the right
side of the stem a little lighter as compared to
the left hand side. [MUSIC] Let's give it a minute to dry, until then I'll take my
green palette and paint on this stem because I feel like it looks very
light at this moment. I'll just mix my green and paint on it with
the smaller brush. [MUSIC] That's it. Now, I'll go back to
the brown palette. I'm going to mix another
shade of brown by adding some red in
the burnt umber, and then test it. Looks good. I'll start painting again on the right
hand side like we did before. [MUSIC] Then I'll use a damp brush to soften the edges by sweeping
it like this. We'll add details as I
feel are still needed. [MUSIC] Let's again give it a minute or two
to let it dry. [MUSIC] Flipping the paper back, I'll just use some of the
dark brown again and add some more color just to
give it more dimension. [MUSIC] Now, taking a look at the
peace from a distance, I still feel we need to add some brown and dark lines
to make it look more 3D. I'll just speed up the video and work on it a little more. [MUSIC] It's almost done. One thing I feel is that
the stem should have been a little lighter as the light
is coming from the right, so the right part needs to be a little lighter
than the left part. I'll try to lift
some of the paint by using a rough flat brush, just scrubbing it like this. I can see that I can still
add some highlight here, so what I'm going to do is I'll use my white gel pen for this. You can use white
gouache if you have, and white gel pen works
perfect in such cases. I'll just mark down some of
the dots and lines like this. [MUSIC] If you want, you can scrub these marks with your finger just to make
them a little softer or use a brush because we don't need the
white to be very prominent, the idea behind using gel
pen was just to lighten the brown in that
area and that's it. This is our final painting. I hope you enjoyed
the process and learn some new techniques
from the class. I completely
understand the fear of starting with realistic
botanical art, especially with watercolors, and I hope this class
helped you in some way. I would love to
see your projects. Please don't forget
to share them in the class and on
social media. [MUSIC]
16. Outro: Thank you for taking this class. I hope this class helped
you in some way and you are more confident in tackling such subjects with watercolors. I would love to see
what you create, and please share
your project and in-progress shots in
the project gallery, as well as if you can
on Instagram and tag me @markdisha. See
you next time.