Transcripts
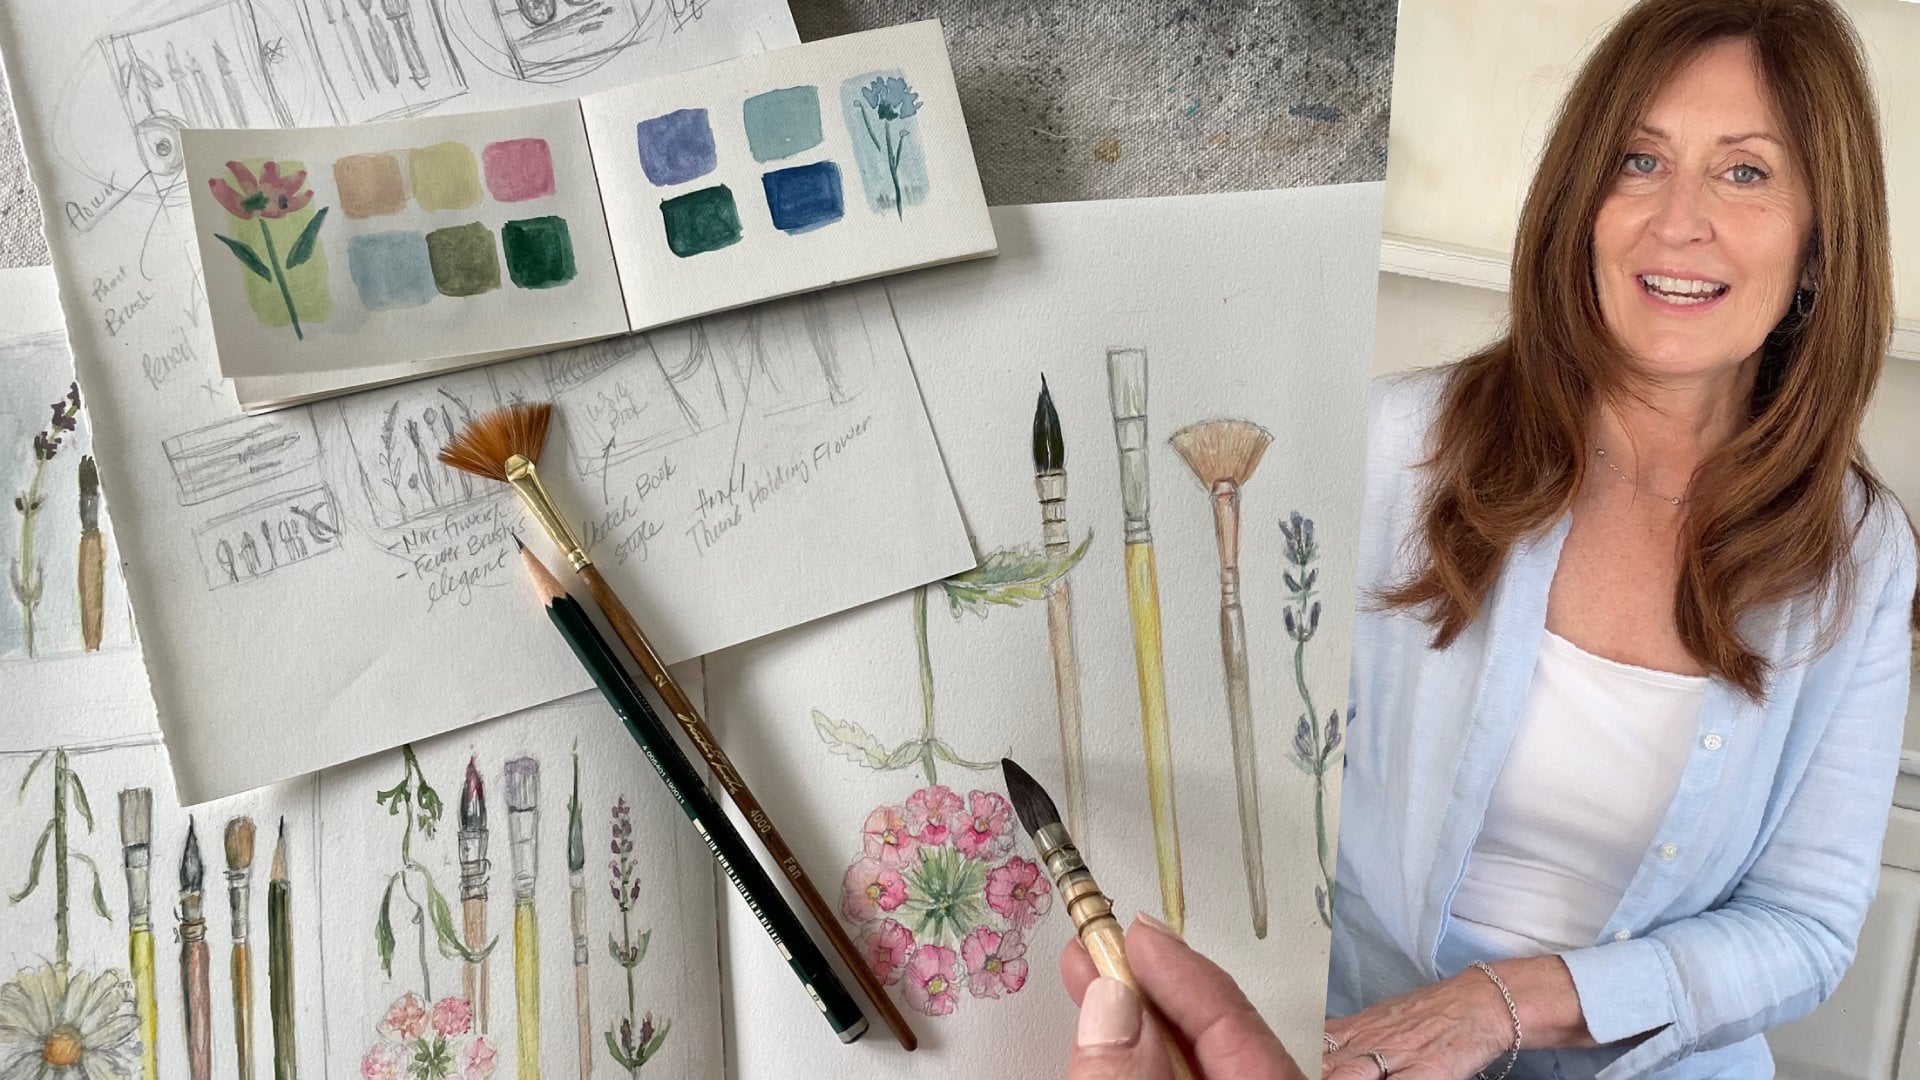
1. Introduction: Botanical Dye from Flower Petals: And welcome to this class. Growing, making and
painting, botanical dies. I'm Janice Steph Go, I'm a graphic designer, illustrator and botanical
fine art painter. You may have seen
some of my work on publications, packaging, branding, billboards, and even point-of-purchase
displays. I develop this class because I wanted to a more sustainable, health conscious and
earth friendly way of creating my illustrations
and my artwork. As much as I love working
with all of my clients, my true passion is gardening. And through this process, I can incorporate my gardens, my love of painting, and my love for my client into one healthy and
sustainable practice. It's a great technique that can be used not only on paper, but also in fabrics. It does have its origins
in the textile industry. So these dyes will work
on not only paper, but on fibers, reds, and fabric as well. So if you are a
quilter or a crafter, or someone who's just curious about botanical
dies, or a gardener. And also anybody wanting to learn about landscape painting. Because as an added bonus
at the end of this class, I will be showing you a
few quick techniques. And we're going
to create a quick technical dye color palette using three different
types of flowers. There's a downloadable
list for supplies. And if you're not
already a gardener or a painter, don't worry, I will guide you through
all of those steps is simple flower pot on
your window sill, your porch, your patio, or even on your kitchen counter, will do just fine. You don't need a lot
of flowers either. You can gather a few at your local farmers
market or garden center. And a few petals for each of the three different primary
colors will do just fine and preview
the whole class. I think it's helpful to know
what you're going to be doing and then watch it
again at a slower pace. After all, at Skillshare, you can watch these classes
as many times as you want. This is, after all, your art practice, your skills that you're
learning and adding to. And I'm so glad that you're here and we'll see
you in the class.
2. Welcome to Class!: Before we gather
up anymore petals, I'm going to take
you into my studio where I'm going to show
you how many petals you need and all the
other supplies that you're going to need to make your botanical dive patients. Most of the teeth
a little bit about the history of botanical dying. And then we'll get
started on that project, making our color palettes. Come on into my studio with
me. Let's get started. Welcome into my studio. This is the area of my studio where I do most of
my creative work. I have my computer
here that I do a lot of graphic design and
digital illustrations on. And it's also where
I do a lot of my fine art painting and some of my painted
illustration work. It's also where I create my paints made out of
my botanical dies. I do over in my kitchen
area of this studio. I have a spot where
we will go and we will be making our
actual dye and dye bath over there and extracting and also where we will be clipping our swatches to let those dry when we get to that
portion of the class. And we're going to talk
a little bit about the supplies that you are
going to need after that. In the next lesson,
after the supplies, we're going to go
over some foraging, gathering and
gardening techniques. And I'll let you know which
types of flowers that you really could focus on gathering so that you'll
get optimal dies. And I'm going to tell you
the characteristics of those dyes with all of the commercially available
paints and pigments available. Why have I chosen to do this? Well, it's very simple. I believe it's great
for the Earth.
3. Supplies You Will Need: Here are the supplies
that you will need. Is just some plain sea salt available at any grocery store. A couple of strangers, really one we'll do
just a fine mesh. If you faint pink brushes, actually one would do just fine. Something to measure with. You're going to need
three glass jars. I only have one here, but you will need three
with lids, preferably. Maybe three more, or
even just some glass jars to strain your dye into. Once you haven't made, you'll need a few flower petals. Not a whole lot. About a third of a couple of probably do, and they can be fresh or dried. You'll need some paper, watercolor paper or cloth. Ribbon will do, but makes sure both your paper
and your fabric, or 100% cotton, it works best. Nothing synthetic. Just plain old sea salt. You don't want
anything with iodine, table salt would do but seesaw, I find works best. Some shares for
trimming your flowers, something to mark things with. And then a couple
of little clips for hanging up your
swatches to dry. Really nothing too complicated. And things that you
probably already have some additional
supplies that you may find useful is a little
pan pallets such as this, or even just a little
porcelain dish plate or even another additional
small jar will do. For our swatches. We're going to want to cut our ribbon or
fabric into strips. I have about three inches
by about 1.5 inches. You can use smaller
or larger depending upon the size of Girard
that you have picked, you want to be able
to dip that in there. I also, for my paper swatches, I have a little bit smaller. You can really use whatever size that you are comfortable with. So we'll go ahead and
we will just cut one, measure one, and then
use the second one. Use your first one
as a guide for yourself for subsequent ones. And you'll notice I
do have written on the back what I used for that. It's nice to just keep a
record of what you're doing. And you can go ahead and cut as many strips as you think
that you're going to want. Now if you have fabric
rather than the ribbon, you obviously want, you'll have more cuts to make.
And that's okay. Then you'll want to
do the same thing for your watercolor paper. And if you have, if you want to be really
particular and precise, you can grid it all out
and use an exacto knife. I'm just going to rough it in. But notice how I'm
trying to be very expedient with my
paper so that I might have to make a
whole lot of cuts. That's why I chose that size. Because this is a I
convenient size of paper. It comes in a pad.
It is a Strathmore and you can get several
swatches out of one sheet.
4. Foraging, Gathering & Gardening: Welcome to my porch and to
my porch flower garden, where I am growing a wealth of color for us to gather from. Our petunia actually
have a wealth of color. They are an edible flower and they are full
of anthocyanins. I have been using a
combination really. It's a purply color and also this magenta pink you
can even use for that. It's pretty amazing because no matter what the
outside pigment, they do seem to really produce quite a bit of that bluish anthocyanin
color and the dye pot. They are flavonoids. And
you can do rubbings. It's quite fascinating to
get some of the pigment. There are techniques,
shrubby and hand pounding of the flowers
that are fascinating. I'm a painter though, so I
really wanted to learn how to extract these pigments
to use in my painting. And here's where the
chlorophylls are. But I have found the chlorophyll
is a very difficult, for some reason, a very
difficult pigment to extract from actionable
leaves if you can't do it. But I've really focused on
the parts of the plant. The pedal parts that
have the anthocyanins, particularly in
our Petunia does. And if there are
any parts that are brown are starting to decay, decompose, just go ahead
and clip those out. I like to just keep some
containers available, clean ones you can use your
glass jars if you would like. But just to start really kind of gathering the different colors that we're going to want. And those are for our
blue, believe it or not, because we're going to isolate
those anthocyanins and create more of the blue tones. And then here we are
going, as you can see, we've got some more of the red and purple tones
that are in there. And I'm going to just go ahead. I want to clip out all
of those good petals. And if there are any
that are brown or decayed, don't include those. We need to separate those out. You can see this one is already starting starting to
weld a little bit. I think this one yesterday. And it is a little bit
wilted, which is okay. We're going to actually
with our warm water, we're going to
warm it up anyway. And I did have this one on
my counter for a few days. After all the joy of gardening is to be able to pick them, to bring them into our
homes and to enjoy them. And then as they start to wilt, you bring new life to them. You create, you create
pigment that you can die. Your clothing, some OT towels, your kids clothes with
that maybe you've gotten some stains
and tablecloths, lots of things you aprons, things that you can
just really revitalize. And you can also paint
a painting with them. It is just beautiful
to be able to really get in and enjoy your
flowers in a whole new way. Ours that we grow in our gardens and even some of
the weeds that we think are weeds are actually there
cleaning up that water before it hits those lakes and
ponds and streams because they serve a
very important purpose. And not only are they cleaning
up our water systems, but they're also
helping pollinators. We're growing food sources for our birds or bees
and butterflies, and also protection for them. So growing a rain garden or a bios whale is one way
to really help to get the contaminants out of the runoff before it hits our
ponds or lakes and streams. Some flowers around
your vegetable patch. And they will actually
help each other. And while you're at it, you can harvest
some color as well. So just to recap, we are sorting our petals here. We have gathered
them for our garden. Unless you have access to a safe space where
you can go forage. You know what can
make goals and how the plants in that area
may have been treated. They may have pesticides or insecticides or
fertilizers on them. Or you may be in an area where those flowers
are not yours to take. So be careful how you go about going into other people's
spaces and places in gardens, even public gardens to forage. It's really best if you stick with your own garden
or a friend's garden, or really ask
permission ahead of time if you can go
in and dead head or take fresh petals and remember to wash them thoroughly
when you bring them in. And after we've made
our three colors, our yellow or red and blue, then we will do some mixing
in fresh clean jars. We'll mix some of our
secondary colors, and we'll also be mixing
some on our paint palettes. So whether you're here for
just strictly learning how to do this as a dying
medium for fabric or ribbon. That's great. And if you want
to continue to do more exploration
with the painting, then stick around
for those lessons.
5. Making Botanical Dye from Flower Petals: In a minute, we'll go over into the kitchen area
where we will make our dye bath out of all of our flower petals and
will want some warm. Fairly warm doesn't need to
be boiling and could even just be really hot
tap water will do. So. You want to make sure
that you have that available when we begin
to make our diabetes. So now that we have all
of our petals sorted, not you could do one
color at a time. But I'm gonna do
all three of them because we're here and
it's more time effective. I like to match my work. So like you saw, I like to gather usually in the mornings from most flowers. Some flowers are better off in the evening like lilies and things that are
mourning bloomers and then die off in the evening. I tend to go gather those then, but these flowers really pretty much anytime
during the day, but it was morning
when I gathered these, it's starting to get towards noon and it's getting
a little toasty at the flowers are okay being
a little bit hot and humid, actually the warmth kind of kinda helps to
release their color, which is why we're
going to use them hot wire in a minute here. But first, another thing that
helps to release the color is something that we've all used and it's a
very common element. And it's the same as cooking, something that
releases the color and releases the flavor
in your food. It's just salt. Table salt will do. I like to use sea salt
and not a whole lot. This is an
old-fashioned teaspoon. This is a quarter teaspoon. And I haven't even had
this all the way filled. In fact, about an
eighth or a smudge or a pinch will do is
probably a four ounce jar. We're not going to fill it
all the way up with water. There again, I'm going to use about two
tablespoons probably. Like I said, I use hot
water, not boiling. I just like to cover the petals. We don't need a whole lot. And in fact, I'd rather
go make fresh and keep it going fresh as I go
then to make a whole lot. So you can see, I'm just sort of
swirling around. And if you were expecting it
to immediately look yellow, I'm sorry to disappoint you. It doesn't really
work that fast. We're going to let that
sit for a little bit. I will cap it in a minute. Some of these will
release the color really quickly and some of them walk. So we're gonna go
ahead and do our red. Notice I am putting I am
putting the Salton and then I'm putting the water in and i'm I'm not going to
bother to measure this. Like I said, I usually
just cover the petals. Give it a little bit
of a swirl in there. You can see we're not
getting quite yet. Set this out to the side because I am prone
to spilling things. So now I'm going
to add these hot. And if you want to label, you can write right on the top of the Sharpie or make
yourself a little tag. Whatever you like
to do. I do tags. Forget what I use, but I'm pretty consistent
about the flowers that I use. Now after trying a lot
of them, just right, you are bypassing lot of lot of trial and error
here by watching this class. And I've got more tips and
tricks in other classes. This one is already
starting to release some of that color, which is nice. That should set up pretty well. This May 1 take a
little bit longer. Although it's turning pink. Can you see against the white? You can see that. Notice I'm not shaking
these real, real hard. You don't want to really a
macerate the, the petals. You don't want to get
all of that pedal part in there because we are going
to drain that off later. On the supply was she made notice that you need a strainer and we will be using this is just a typical
kitchen strainer. You could find it
most grocery stores. Or if you have a tea strainer or a cocktail
strainer, that will do. But again, try to keep
it if you're gonna do this more than,
more than once, or even just font, try not to
use something that you use with your own food or your
own cocktails or, or things. Unless we're using edible
flowers and you know, no one in your family
has a reaction to them, but be on the safe side and just designate designate your items. Let's talk a little bit about
why we are using caligula, rose petals and
petunia petals rather than using weld
matter and indigo. If you came into this class with a little bit of
knowledge of botanical dying for the textile industry
on fabric, yarn threads. You may have been expecting
that we were going to be talking about those
three substances. And here we are not
talking about those. We're talking about
flower petals. And the main reason
that I have opted out of those is for
simplicity sake, it's a very quick process. We're not boiling
the petals in a vat. We're not letting them ferment. We're not letting them sit
up for weeks at a time. We're not drawing
them into cakes. We are simply releasing
and look at that, look at that beautiful color. I hope you can see it already setting up a
hold it down here. But already in it's only been a couple of hours that
this has been sitting. So that's already releasing
some phenomenal color. And where does this
color come from? Well, if you heard me say earlier that none of
these petals are toxic, they're actually, they're
full of flavonoids, but that's what we
are releasing here, that's the pigment then. That is the dye. Pigment and water dye bath
creates the pigmented water. What us don't drink it, but it's better for
the environment. It's better for our pollinators. It's better for us because at some point this is going to
be discarded and disposed. At some point, I'm going to
have to get rid of these. And they're simply salt
and flower petals.
6. Mordants & Modifiers: We had talked about isolating those anthocyanins that are in these flower petals
and the red petals, as well as these purple
and pink petals. They all have the same
anthocyanins in them, which we have to isolate. And now we want to try to shift
these with a modifier to, to shift that pH levels
so that we get a blue, more of a true blue
rather than the pink or the purple shapes
that were naturally getting out of these
petunia pedals. And blue is a very
difficult color to adhere from
botanical substances, which is why indigo and woad really rose
to the forefront. But I promised you a
more simplistic process here and not one that
is so complicated is working with indigo and woad. And so we're going to use and very readily available
substance which you, if you do any canning
or any pickling you may already have in your
kitchen and that is alum. And we're just going
to add about, again, about a little less than
a quarter of a teaspoon, somewhere between an eight
and a quarter of a teaspoon. Again, this is, this is more
like cooking, not baking. You can be a little less exact, but I've got about
three tablespoons of flour pebbles in here, probably about a
quarter cup of water and about an eighth of a cup of, I'm sorry, not cup an eighth
of a teaspoon of the moment, about a quarter of a
teaspoon of our sea salt. I'm gonna go ahead
and let those sit up. It is going to take
this one longer than, than our red and yellow. To get our pigment released, it is probably going
to take overnight. So be patient. And I just noticed I've got a little bit of a
green bit in there. A little bit of the leaf,
which is not a big deal. And something that is just scoop it on
out like you would an eggshell out of
your scrambled eggs. I have a little bit of I have a pair of
tweezers here that I like to keep on
hand to do that with. But you could even just use
a spoon or something else. An edge of the
knife or something that you may have available. Again, just keep these things
isolated for using with your dice and not for something that you will
be cooking or eating with. Just unimportant little
tip there to keep these things, your
utensils separated. And you'll notice I
have labeled on here, what we are using, these are petunia petals. And now I'm going to add that we put our sea salt in there. And also our alum. I don't bother really
using ratios anymore, although when you start out,
you might want to do that, but I know I'm pretty
consistent with these now. I've been doing this for awhile. I do try to keep
my materials and my quantities and what I'm
using fairly consistent. Now I want you to notice the differences on different
types of materials. This is actually a cotton
ribbon and same flower petals. This is on the Strathmore
watercolor paper, and then this is on a
different type of water paper. It's a hot press rather
than a cold press. And then same thing here. We've got on the fabric, and then we've got on
the watercolor paper, same flower, same petals, but they do come out very different on
different substrates. And also the water
that you have, it has different
chemicals in it, so it has Different pH
level than mine might. And really what we're after
here is a neutral pH. So if you really
want to control it, consider using
distilled water or even bottled water and be consistent with
what you're using? I just use my tap water. I know what I'm going to get. I do sometimes tested for PH, but I don't get that
exact him with it. If you want to have a truly
controlled experience, then you might want to consider
getting distilled water. So here we have, and I will take away our pretty little props
here and just show you the beautiful color
that we have here from our calendar lists
and our rose petals. Very common flowers
in your garden. And if you are not able to
come up with some Caligula's, Coriolis will do, as
well as pot marigold. And actually pot marigold and Caligula are usually
the same thing. And if you're again,
if you're having trouble finding those sources, check with your local garden
center to grow some of these beautiful
botanical flowers and even maybe start your own
dye garden at some point. So there you have
our extracts that we've isolated these pigments and we've extracted them
into our solutions here. Next we will drain and
strain off our flower petals so that they don't
know or get bacteria. And then we went
to keep them very, very clean and pure. Because then after that, after we've strain them, we will be using them to adhere to our
paper and our fabric. And one of the things
that's going to help them to adhere
we've already used. And I will be telling you about that in the lesson when we
start to make our swatches.
7. Straining & Draining Botanical Flower Dye: Extracted our pigment from our flower petals by
using our fixative. And then we modified our petunia paddles so that we would actually get
a more true blue. We use are fixative, which was the sea salt
to release that color. And then the fixative
is also then going to fix it to our fabric
and our paper. And we will be doing that in the next lesson
after this one, where we will actually make our color swatches that then we'll make into our color wheel. But first we have to drain
off our botanical extract. That's the liquid, It's
the water that now has those anthocyanins and those
carotenoids in the water, we've made a solution, a pigment of solution, which we now need to strain off our petals because these petals, they will begin to mold. And we also don't want those in our fabric or in our paint. That will be on our paper. We want to get rid of
those and just have our pure color on
your supply list. You probably noticed that
there were strangers. So I said a fine mesh strainer. You're a little T ball or will do even a cocktail strainer, they do have a finer mesh. Even a little gravy strainer or a kitchen strainer will
do just fine as well. Although you may have a little bit more of the
bits left in here. So if you have larger petals, such as the petunia petals
or even the rose petals. This will be
appropriate for those, for the calendar which
has very fine petals. I'm going to stick with
probably the T baller. So we'll go ahead and use that. And again, I'm not going to
use this for t after this. I use this just really
for using this process. And you could even
just really use this like tea and fill this with your flower petals
and then submerge it. Sometimes they don't fit row
roll into the jars though. So I I do make them
sometimes with this, but we're just going to
strain this off here. And you can see how beautiful
that color really is. It's a beautiful,
just a nice really. What I think is a rich yellow. It's not too green. It's not too orange. It's just a beautiful,
beautiful color. So I'm going to let that
the little extra bits I do keep in my sink. I do keep a little container
that I actually will then put these petals into and take them back
out into my garden, into my garden and
use them as compost. They are that same. So next up we'll do the, read the red roses here. I'm gonna go ahead and set this over here on my piece of paper. Rather than I normally would just take
it over to the sink, but I'm going to keep
moving with this so that we can get
onto the next lessons. So now we have this probably could set up
a little bit longer, but we're gonna go ahead
and strain that off. It's just a beautiful color. But there are still some of the petals that you can see in here that do still have some of that pinkish
pigment on them. They have not completely
released yet. So it will get even richer and darker if we continued
to leave this. So I'll let this sit here. Again. I'm going to go ahead and
take this over to my sink. I don't mean to turn
my back to you, but I don't want
to get that spread around on my little
table top here. I'm going to let those go
into my composting area. You can see some of that
pigment already on the paper. Quite pretty. Sitting there on that paper. We'll let that sit over here
and in dry up a little bit. It'll it'll absorb into that paper to be fixed to that paper because our
fixative, our seesaw. So there you have the lesson, a quick little lesson. I'm straining and draining to really isolate our
botanical extracts. So now up next, we will be creating
our color swatches.
8. Making Primary Color Swatches: Now it's time to eat. Been part of this whole process. Getting to see what our colors look like on
our little desk swatches. We're going to start making
our papers swatches. And it's a very simple process. This won't take long at all. We're just simply going
to dip these in for now. I like to see the same color as a quick dip and
then as a long soak. So as you can see,
I'm sort of leaving, I'm leaving the jar
over a little bit, not, not allowing it to run out, but just doing a quick dip where I'm holding the paper in. So that when I set
it upright and look at that already, it's
absolutely beautiful. This is the quick dip of color. Hold a plain piece of paper up in front of that so you
can see a little bit better. But that's the plane dip. And then we're going to
just let it sit right there in in there and I'll even let that sit probably
overnight so that it will really intensify and
you'll get the rich color. And again, I'm doing the same
thing that I did before. I'm doing a quick dip. And you can see that
beautiful color. And then I'm going to
just let that sit in there a little bit longer. That's why I like to
use these small jars. You can, and this is one of
the reasons I have the clips. You can go ahead and just click that right there to
the side of the jar. And let that stay. If you're worried about it, kinda falling in, but
it's really not going to, if you've measured out your strips similar to the width of the width and height
of your jar, jar. So that is why it is nice to gather all of your
supplies ahead of time so that you don't have the unfortunate episode of your strips not fitting into your jar or being too
little or too short. So we'll do this
again with our blue, Our beautiful petunia pedal blue that we did use
our modifier with. Hello again, bullet that. Click that on there. And just let those sit. And then we'll come back again. We'll pull these out. I have a little bit
of a line ready and waiting that will click
these two and let them dry. And while they're drying, we will do our fabric swatches. If you have a nice little
place to go ahead and hangers. Really, this is just a
piece of twine hung up, as you can see between
my little bookcase ends. You could hang them between
knobs on your cabinets. I don't have knobs
on my cabinet doors, but you could even do
something like that or if you have a closed line
in your laundry room. And now here for our
petunia pedal blue. And I've only been
letting these, and these have only been soaking
for about an hour or so. So you may have
more intense color. So now while we let our primary colors dry
there for a little while, we're going to
proceed to our cloth. And this is a 100%
cotton ribbon. And I'm just going
to cut this into strips using a pair of scissors. Nothing too complicated. Let's just say in
our same sequence, I'm going to do the
same thing here. I'm gonna do a quick dip just to show you
the initial color. And I'm going to
let that go up a little bit further
up into the fabric. So that when, when
we let it sit down inside and let it just
soak in there for awhile, we'll get the more
intense color. But already again, an
absolutely beautiful yellow. An absolutely beautiful yellow
from our calendar, Lula. And then I'm going
to let that soak in there a little bit more. And with the cloth, I do I do use these clips
more frequently just because the cloth might be a little on the fluffy side
and just kinda cascade down into that dye bath. And I don't want that. I want to be able to see the variation from white
to the light first pool, and then on down
to a longer soak. And bear in mind that your
clock is going to absorb that color up in probably a little bit
more so than your paper. Although watercolor paper
is fairly absorbent. And you might also
want to have something like a spoon, something
stainless steel. Again, not something
that you use on food to kind of push that
around down in there. Now, if you do want to cover the entire piece of
fabric or cloth, go ahead and push it
all the way down in. Put your lid back
on and let it soak. And there is some fun
in doing solar dying, where you're actually
just letting it sit in your window sill or outside
and letting the heat of the day help to release
that color and to fix it will help the salt
fix it into the fibers. Again, another economical and
environmentally friendly way of doing this process
is the solar dying. It works best on the cloth, not so well on the
paper I found. But you could do different.
You might find different. You might find
different results. So we'll let my clip is
not going to cooperate, so I'll just let that sit there. It's not quite big enough. You need a bigger
quick like this one. I have used it over there. I'll have to snag
it in a minute. But we'll do the let that sit there and now we'll go on to our pedal petunia or pedal
petunia, pedal blue. Tongue twice, tongue-tied here. Oh my goodness. Our first pool is
really beautiful. I keep saying
beautiful, but my gosh, they just start there gorgeous. And I have to say,
every time I do this, I just loved the results. So that's a
beautiful, beautiful, really more of the indigo. I do have tricks to
get the cyan blue. The anthocyanins were isolating and I do have
tricks to get that. But for these, for this class, we're just going to stick with these as our primary colors. Now that our fabric swatches have had time to sit
up for a little bit. We're going to pull them out of their dye bath solutions as well and hang them up on
with our papers swatches. So I think for this process, a pair of tweezers is
a very handy thing. I have these kitchen tongs. Again, I'm only using them
for my fabric dyeing. But it's nice to just use those two kind of fish
these out of your solution. Especially if you have
not clipped them on. But we'll let our cloth ones
join our papers swatches. I'm going to pull
this out. Also. It's good idea to have
a little paper towel or cloths sitting
around and you can see some of the color
already on that. Pull these out and just
kinda keep these colors pure as you do the
process each time. I have some more little clips. You could use
little clothesline. Little clothesline clips. I think these paperclips
work pretty well. You could even use the
traditional paperclip. Whatever you have around. You don't need to
buy anything new. I don't I doubt unless you don't have anything like this
around your house. And if you did put
that onto your jar, you might not need to use
the tweezers or the toms. Although I'm going to just to stretch this out
again to kind of keep it on curled so it
dries nice and flat. It's a little bit easier to make our color wheel when
they're nice and flat. Sorry to have my back to you. Sorry to have my back to you. But here we go. Our three primary colors on our two different
substrates are 100% cotton, watercolor paper and
are 100% cotton cloth. This is cotton ribbon. So next up, we're going to use the same extractions to
make our secondary colors.
9. Making Secondary Color Swatches: Using the same dye bath
extraction solutions to make our colors orange,
green, and purple. We will then make similar
swatches as we have drawn here, which we will then use
to make our color wheel. If you know very much about color processes
and color wheels, you can already anticipate what we're probably going to get. I'm going to add just
kind of equal amounts of both of those. Although you might want to start with your lighter
color and then add your darker color in as you go to get the shade
that you're after. I put about equal
amounts of both m. And now we're going to start
with our paper just to keep in the same sequence
that we have been using. We'll do a quick dip first and foremost and see what happens. Now. Alternatively, I think
you're gonna like what's happening here is a very
beautiful soft orange. Now, alternatively,
you could just layer on your lighter
color first on your paper. We'll talk about that when
we do to our painting. And then overlay that
with your darker color. Sometimes it's
really nice to just start out with the
fresh pigment though. And again, I did a quick dip at the top to see
what would happen. And then I'm going to let
that just soak in there. And we'll move on to doing
our other two colors. So now we have our
yellow and our blue. We need another clean
jar, clean and dry. You don't want any kind of soap residue or
anything left in there. So I've gone ahead and clean clean them
and drive them out. We'll get a, another
fresh piece of paper. And this time I'm going to add, as I had suggested
before of little bit, I need to make sure that
I leave some of this for for using just
the plain pigment. I don't want to use that
off because this is Oliver. This is all of our yellow dye. Certainly we can make more. Okay. But that's all we have for now. Actually had a little
bit back in there. And then I'm going to add just
a tinge of this because I don't want to overpower
this lighter hue. So I'm going to be very careful. I'm going to add just
a little bit in there. Let it swirl around. We'll add a little bit more. Now, this is what I
wanted you to see. It goes a little bit sad, looking a little bit brown, looking in, in our initial poll. And I'm going to show
you a quick tip here. It's surprising what
comes out on paper. Don't always be fooled by
what you see in the jar. Now as that dries, it is going to shift. And remember we can also
use the shift that we used to modify the color here. We use that alum to
modify the color. And we can also do that. Again. As we go into creating
our secondary colors. I'm gonna go ahead
and let that dry up. And you can see it's vastly different than what we
had here on the paper. More similar to what
we had on the clock. But again, these dry up into
some surprising colors. So I'll go ahead and
add that up here. And one thing that we
have not talked about yet is keeping really good
records on your swatches. As these dry up. I'm going to want to
write on the back of them what we have used for
each one of these colors. Because it's easy,
as you can see to start to get a
little bit confused. Which one was the pure yellow? Which one was the quick dip? Which one was the
overnight soak? I like to keep pretty
strict records on the backs of
each one of these. But we're gonna go ahead and proceed to making our purple to make a color that is noticeably different and more
purple than our red, but not as deep as our blue. But we're going to
make one to make sure that we do keep enough of our blue pigment to use for our painting in
our bonus lesson. So now we'll test that
on our paper swatch. Again as I've done
in the others, I'm going to do a quick poll. And then we'll let it
soak for a little bit. You can see we're getting a
very pretty purple color. Then let that soak for a little bit longer
because I really do like what's happening
with this longer soak. We can intensify these
if we leave them in the dye bath solution
a little bit longer, or even over dye them. But I wanted you to see how the quick poll
looks on the cloth. I think it's absolutely lovely. The softer colors
that we that we got from our blend of
our primary colors. Which we will then use
to make our color wheel, which is a wonderful
tool for using in your garden landscape
painting or even as a wonderful reference
for using to select your dye garden flowers
with a very useful tool. A reference for dying cloth
and over dying things such as an old used tea
towel or a tablecloth, or even some of your children's
T-shirts and clothing. It will bring new
life to them to be able to add such
beautiful vibrant color.
10. Making the Swatch Color Wheel : Once your color swatches
are nice and dry, both you're the ones created on your cloth and on your paper. Will do them separately though. We'll start with, let's
start with the paper ones. And you can see you
really have a lot of choices when it comes to how to actually
make your color wheel. We're going to punch these. I've started with
a couple of holes. I have labeled on the back
what each of these dyes are, just so that we know as a
reference later on what we've, what we've created as one
of the purposes of it. Then you can either
use a hole punch, you could really
just kinda go in. And I like these little
enamel pins got a few around. And you can even
just gathered them up and put them
doing it backwards. I'm sorry. So sorry. You can gather them
up and put them through the back of
your enamel pin. Or and then just don't forget
to put the back on it. And then they'll just
really kinda spin around on there and
look very pretty. That's one way of doing it. You can also put them
on a little clip, a little ring on there, or you can even just really
take the easy way out, don't even you really
want them to be versatile and mobile for you. Just simply click them with
a little close to them. Or one of the clips
like we used to hang them with that
we'll do just fine and then you can
take them out and just sort them out
when you're creating your color palettes
and using them for even purchasing your
flowers in the garden. And like I've said,
I'll have classes on both of those later
on in Skillshare. And for the fabric,
you can pretty much do the same thing. You can punch these if
your fabric is stout enough or you can just
simply click them together. This is another reason why
I really like these little, these little enamel pins. You can just simply poke it
through and clip the back. Put several of them together. Then they're easy to just
take off and move about. Create different
color combinations for your whimsy
for your projects. If you're into patterns, surface pattern design or
painting or decorating, home decor were just dying. Fabrics for your family. There's lots of different
things that you can use this process for. Even over Dying old tea
towels, tablecloths. It's a great, it's a great way to really recycle up cycle and reuse things that maybe you thought were ready
to be discarded. But you can give new life to
them by simply adding a few, a few days to them,
painting over them. Creating something new
and fun to give as a gift or to keep
in your own home. So it's a very simple and very functional and very usable way of creating a color wheel. So have fun with yours. Continued to make yours
in any way that you feel that it was best for your art and fiber art practice.
11. Painting with Dye : So what we'll do
next is we're going to pour them right here directly onto this
porcelain plate. I like to use white because
it shows the colors better. I also like to use this particular type of a
palate because it gives a little bit of a
well and notice I'm not filling that all of the way. I am leaving some space. It's going to dry
up a little bit. We somewhat tacky before
we start to use it. You couldn't use it
directly this way, but it's not going to
be as highly pigmented. Some of the water is going
to actually evaporate out of it so that we're left with
more of the pigment itself. And then we can use this
palette for mixing our colors. Because if you know very
much about the color wheel, we can make an orange color out of the yellow and the red. And we can make a
purple color out of the red and the blue. And then we can also then make a green out of the
yellow and the blue. So we'll do some of that
mixing on our palate, but most of it we
will be doing on our paper as we paint
our gardenscape.
12. Bonus: Paint a Garden Landscape-1: Let's talk a bit about brushes. Since this is a
watercolor medium, we will, we will be using
watercolor brushes. And I do have a lovely
collection of them because they'd been painting
in this medium for awhile. This is a round, round, whereas this
is a round long. I'm holding up a piece of paper so that you can
see the difference. Then this is also
a round, round, but it is a more
expensive brush with a longer barrel on it. This is where the water, the liquid pigment, would
be mostly contained. And it's what differentiates
a watercolor brush from, say, an acrylic brush. This is a landscape
that we're going to do for our class project. I haven't oriented and a tall
vertical that I've laid in this little triangular space here that we're going
to start out with. And I'm going to have
my warm and my cool. I like to keep two different
waters because they do get they do tend
to absorb some of the paint in the water
as you clean your brush. Going to begin with a
wet on wet technique. So with that, you actually
do wet the paper. And what that does is it gives a path when we put
the pigment on, you'll see in a minute a
path on the paper to follow. And you can see I've got a few little spots on
here that I want to leave white because in watercolor we don't
actually have white. Will leave the
paper as our white. Because watercolor
is a transparent, not an opaque paint
painting mediums, so it doesn't have a pigment
for actually, for white. You could use gouache or
acrylic to add on top. And there are some
companies that do make a white watercolor. It has pigment. It's basically, it's
essentially gouache. As you recall, I put
that water on the paper. Now this is going to track in. I'm gonna just kinda
guide it through. I'm going to grab a little bit
more pigment out of there. And I'm going to just guide and see the more pigment
the deeper it is. So I tend to like to
leave it a little washy. Can always add, but it's not
impossible to take it out. And I'll show you a trick
on how you can take it out. But you can see as it
kinda tracks around, I'm leaving, I'm leaving
those little spaces. We're going to add some
other colors and I don't want the green in behind that. I don't want the next
color that I put into B2 muddied up by the green. And some of them I
will leave white. I left my pencil marks a little stronger than
I normally would, just so that you guys can
that you can see them. Know where I'm going normally, I would just really put in
there very, very lightly. But you can see it even
if I tilted this up, it would start to roll around a little bit
more down there. I have a fairly flat so
you guys can see it. But you might want to elevate your board or your canvas
a little bit to get that, to get that working around, I tend to just a
little trick I learned decades ago to kind
of go in and you're, I darken the corners
a little bit. Tend to bring your eye more towards the center
of your piece. And remember, we are
doing landscape, so things, things grow. So i'm, I'm coming in and I'm giving it that sort
of elongated brush. Notice I'm just sort of doing really quick sweeping motions, giving that elongated
brushstroke of a stem or a leaf, leaving a more
pigmented area here. And I'm going to, while
I have that same color. And I'm gonna kinda do
that in this next corner. Just a little bit. I don't want to I don't want it to
be completely mirrored, but I want them to
relate and I'm sorry, it looks like I have an
old tissue in my hand, but what I do is it's actually a paper towel,
cotton paper towel. And sometimes if
I feel like I've put too much pigment
in another pro tip, you can just dab, don't rub, just dab and you can lift
some of that pigment out. If you feel like you
put too much in. What I'm trying to do is to
give a sense of space here. A little bit darker
here is going to fade out as it goes up. And then you're gonna get a little bit of edge
and we'll go in and put some more and we
can even layer up as we go. But that's a starting
point for our project.
13. Bonus: Paint a Garden Landscape-2: Now we're really getting the
true effect of a wet on wet. See how that just
starts to find, find the course that I laid in. And just really, you can see
that moving right through. I think that's always
just so interesting. It will start to just
really move in where I laid down that water before we, before the pigment and
it will just flow. This is the relaxing, fun part about watercolor. And it's really unique
to this medium. And sometimes it does
the work for you. I think it's more relaxing than any of the other mediums truly. That's kinda pretty, I like how that's how that's reading. How that's where I'm
gonna I'm gonna put UCI carried a little bit of
that paint through here. I'm going to carry a
little bit of it in here. I want the eye to move through my painting and to see some of these colors
happening throughout. Start to layer in a
little bit more detail. Repetitive patterns. It's always nice. I like to see some
repetitive patterns throughout these pieces. This is a landscape. We're going to see
some of the land going up into the sky. You can see it starts
to take shape. And like I said, I did go in, I made myself some
guidelines just so I knew where I
wanted to head. You wouldn't have to. You could just play
and really let the, let the colors kinda
create your own landscape. You would not have to
put the guidelines and it all just something
that I like to do, especially as I'm teaching. You see now this has o is
holding a lot of water in here. I'm gonna go ahead and
lay that in again. And we'll do some fun stuff. It's still got a little bit
of that green paint in it. Going around my little
my little spots. You. Okay, and let's
shift colors again. Let's see as we go up, we're going a
little less intense as graying out a
little bit more, washing out a little bit more. See what else we've
got to work with here. This is one of my
favorite colors. And it's a secret,
but it's made out of not going to
tell you that yet. But it's one of my
favorite things. Favorite Things were
really kind of getting in a painting to read as
if it's in the distance. Kind of gradually
getting up into those those ranges where it turns from land to sky and sometimes you're
not sure which has width. One of the joys. It's a little bit of a
meditative process for me. This is a small piece of
paper, actually, it's, it's a grid it off to
pretty much nine by seven. It's on this is Strathmore. Strathmore. Know what kind of let that move around the
page for a minute here. This is Strathmore watercolor. It's cold press, and it is a
400 series, nine by £1240. So it's got a good weight to it, a good thickness to it. It will hold up on its own. You can see here some
of my strokes here. Someone when I
practice strokes and I usually warm up before I
start in on a painting. It's, I think it's
a really good idea to just go in and just give you, I'm not gonna do it
here because I don't want that to retract on the back here or
even to get on here. But just to do some
warm-up strokes, I think it takes
the intimidation of working on a piece of paper out because you really can just
feel like you're ready to go. You've practiced a little bit. You've got yourself in
the mood to do this. If you aren't in the mood at the strokes aren't
common, walk away. Go do something else. Go work on your, a little, little drawing. Go work on sketches, go make some paint to
go do something else. Because if it's if it's not happening and it's not,
you're not in the mood. Walk away for a few
minutes, come back to it. You don't have to walk away. I mean, you don't
have to walk away forever, Rockaway all day, but just kinda know no one
to let it sit for a minute. But at two Fe, to use no cooking
term plus let it simmer. Be thinking about it. They doing something else. Clean your brushes, clean your studio, and
come back to it. Warm-up again, come back to it. You can see I have
these pigments stashed in all kinds of places. That is a lot stronger of
a pigment than I planned. And that's okay.
It's up in here. Again, it's going to help
define my corners here. And I'm going to really
wash it out and drag it down a little bit more
gray than I had wanted. So I'm going to find something with a little bit more of a blue pigment in there. If I can't find that,
that's okay too, because I'll do my trusty
little paper towel trick. And just notice again,
I am not rubbing. I am blotting. I'm blotting this out. And I kinda like what's
happening there. Now some people are really rigid about keeping the paper in the same spot and
never moving it. I totally disagree with that. If you need to move it, move it. Otherwise, move yourself. Get up, stand. I'm sitting on a
high high chair, but it's a desk chair that I
have up to the hi As Type. I like to be over my work a
little bit more than that. Maybe most people do
like to be able to get in and really see and see. I've changed my
brushstroke here now I'm, I'm I'm doing a real, I'm doing a side, side hold and I'm
flicking, flick, flick, flick, flick that
color out of there. Notice I'm leaving the
eye into the center. Other pro trip tip. Okay. Alright. Doing more of what
I wanted it to. But I mean, you could
stop right there with your framework and just
leave it like Pat. You could leave it open. Really, it's your painting, your painting
practice, your style. You don't have to
do what I'm doing. Painting should be
a joyful practice.
14. Final Thoughts: Thank you so much for joining me here in this class and
taking this journey with me into grocery making and painting botanical
die from flower petals. I've so enjoyed having you
here in my studio out in my flower dye garden and sharing with you about that,
This wonderful process. I'd love to see what
you have come up with. I'd like to see
your botanical die. I'd love to see your swatches, how you make your color wheels, and also your final paintings, or even just some
process along the way. So go ahead and share and upload some pictures
that you take, even just with your phone will do into the project gallery, bloated my project there, my final painting
you've had noticed, I didn't finish it
during our class demo, but I have finished
it and I have uploaded it to the
project gallery. So you can check out the
final painting there and please add your final projects or even projects that
aren't finished. Show us your process
and your brand photos. And I'm sure the rest
of the students in the class would really enjoy seeing your
projects as well. And maybe you'll get
some valuable feedback. So enjoy teaching you
everything that I know. Well, not everything. I still got other classes to share on growing,
making and painting. Botanical die from
flower petals. You would like to learn
more about botanical die. Please follow me
here on Skillshare. And again, thank you so much for being here and taking
this class with me. And I really hope that you
will take more classes. So that's your
journey into growing, making and painting
with botanical die from flower petals can
continue to grow.
 Janice Stefko, @thepaintgardener