Transcripts
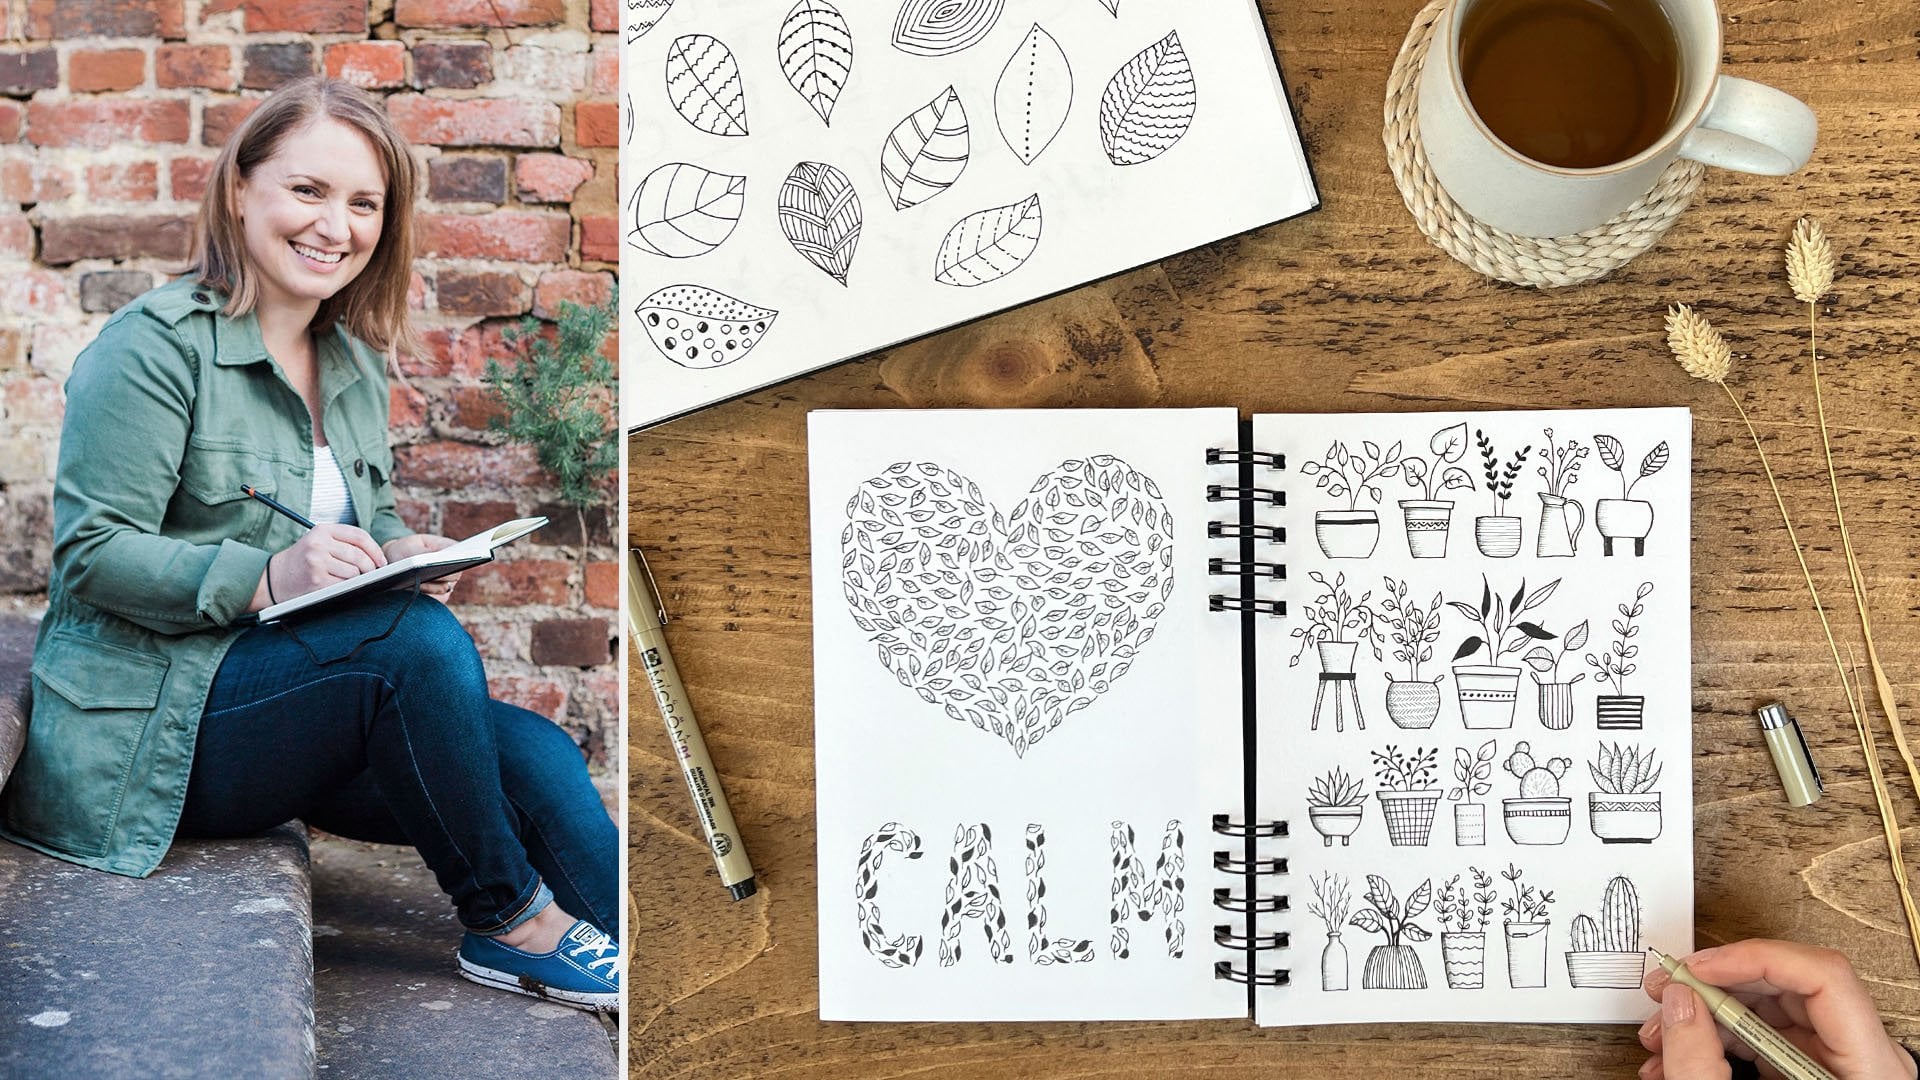
1. Introduction: Hi, I'm Sharon Stevens and
I am an artist and author specializing in
watercolor illustration and modern calligraphy. In this class, we are
going to focus on drawing fun and unique leaves
in a simple way. I'll be taking you
through my approach for simplifying a subject
so that you can turn your leaves into either quick doodles or more
delicate detailed drawings. I'll start by giving you some tips for finding
both inspiration for your drawings and
also for finding references so you can get
to know your subjects. We will then focus
on drawing some of the most popular leaves and some of my favorites including Eucalyptus ginko and
big tropical leaves like Monstera and banana leaves. We'll start from the
simplest of leaves and work our way up to leaves that are
a little more complicated. I will show you how to transform your basic doodles
into something a bit more delicate
and detailed, so that you have the freedom
and flexibility to establish your own preferred style or to adapt your drawings to whatever
you want to use them for. We will then look at fun ways to use them in our
everyday life, Perhaps using them to
decorate our journals or to make simple gift tags
for friends and family. This class is aimed at anyone
who wants to learn how to draw leaves in
a simple, fun way. You do not need to
have any experience at drawing or doodling. The only things you need
to take this class are a pen or pencil and
a piece of paper. The whole class is in real time, so you can draw
right along with me. I believe in the
incredible benefit of using art for
joy and relaxation. My aim is to show you how
creativity can be a simple, relaxing, and joyful part
of your life as well. One of my biggest inspirations
for art is nature and botanical classes have been my most requested over
the last few years. I hope this class will give
you the inspiration and tools you need to create simple and beautiful
drawings regularly. You may have seen my first
botanical doodling class where we covered
simple basic leaves. This class is an extension to that using more
specific subjects. Okay, I'm ready to draw
some leaves. Are you? I hope so. Grab your pen and
paper and let's get started.
2. Supplies: As I mentioned in the
introduction for your supplies, you really only need
a pen or pencil and some paper to be able to follow along with this class, you can still easily get started with whatever you
already have at home. In this video, I'll go through some of my favorite supplies. And in the resource
section of the class, you will be able to
find a recommended supplies list with
links for paper. You can use any
paper that you have. Some printing paper will
be absolutely fine. I like to use sketchbooks
for doodling and drawing. These don't need to be fancy. You can get really
cheap sketchbooks from your local arts and crafts
stores or even from the supermarket sketchbook
that I'll be mostly using in this class is this Square
White of Brighton Sketchbook. Nothing Fancy. It's an
affordable sketchbook from my local art shop. I like it because of the
size that it's a square. The paper is 150 GSM
cartridge paper. It's a decent thickness
for using pen width. Most normal sketchbooks
will probably be anywhere 80-200 GSM in weight. I like to choose ones that
are on the thicker side so the pen doesn't show through on the other side of
the paper too much. So that I can use both sides
of the paper if I want to. I also like to use sketchbooks that have a
little bit of texture. This mini pocket sketchbook is a watercolor moleskin
sketchbook and it's 200 GSM, slightly thicker than
my a white sketchbook. With this, I have
the option of adding a little bit of water
color to it if I want to. It's a great size to carry around with you
for some doodling. When you're out and about, you can just pop it in your bag. I'll also draw and doodle in my bullet journal and I'll be showing you an example of some
projects later on in this. My bullet journal is
by Scribble and Dot. There are so many different
journal companies these days. Some are easier to find than others depending on
where you're based. I like this one because
the pages have grid dots, which can help give
you some guidance for drawing and planning your
compositions and layouts. The paper is also thicker
than some other journals, and it's 160 GSM. If you're looking for
a bullet journal, keep an eye out for that
thickness when buying, especially if you
want to use pens for drawing and not have them
show through the other side. Don't worry about brands
or having anything fancy. Start with whatever
paper you have and then if you want
to buy a sketchbook, just keep an eye on the
weight of the paper within it so it's suitable for what
you'll be using it with. As for pens and pencils, my preference is to
use fine liner pens like the Unable and
Pigma Micron pens, which have a nice flow
and vary in thickness. However, if I only have a
pencil or a biro nearby, then I will doodle with those. Sometimes I'll start my drawings off with a pencil sketch. And I like to use a
mechanical pencil with HB lead as they keep my
pencil lines nice and fine. In this class, I'll be using a row ring tick
mechanical pencil. And you can get these in
three different sizes. And the size that I'm using is a 0.7 millimeter which
is the thickest. Hopefully you'll be able to
see the sketches that I'll be doing on camera
in this class. I'll mainly be using three pens. The first is a unable
fine liner pen, and this is a unable pen
and it's a micro pen. You can get this
in a fine version which is slightly thicker. I like to use this for slightly bolder doodles or drawings in each
leaf drawing video. In this class we are going to
be drawing two versions and I'll be using this
for the simpler doodle, it's slightly bolder. I'll also be using a couple
of Pigma micron pens for the more detailed
versions of the leaves come in a range of sizes and
you can buy them in a set. I use these all of the time, and if you enjoy
drawing with pens, then I recommend getting
a pack of these. In this class, I'll
be using the size two and the size 005. I'll use the two
for the outlines or any areas that I
want to be slightly bolder as it's a thicker pen, I'll use the size 005 for any details and any finer areas that I want to be really fine. I like to use two pens because it gives an extra bit
of contrast to my drawings, which makes them
look a little more interesting and allows me
to emphasize certain areas. You may notice during
the class that these pens look a little bit different when
I'm using them. That's just because the
first pens I started using were these pig and micron
pens in this color. But they actually ran out and slowly started
using a new set. Which are these black ones? They're exactly the same. This is just a special addition, which is why the casing
is a different color. All of these pens are
waterproof, which is great. If you love water
color like I do, you can add and paint
your drawings as well. These are the pens
that I recommend. But like I said, if you
only have a pencil, then there is no reason why you can't just use that instead, especially if you're quite need to drawing and just want to practice in the
project ideas video. Later on in the class,
I'll be showing you some examples of fun
projects with these leaves. In these, I've used a few
more supplies in some of them for some of my
projects and drawings, especially in my
sketchbook and journal, I've added some shading
using a gray pen. I've used my tomb
jewel brush pen, and I've also used
my tombos pen, which are both in gray and grep for adding a
bit of shading. I'll also show you some examples
of gift tags I've made. For these, I tend to use mixed media card or
watercolor paper, which are both
fairly thick paper for punching the holes
in the gift tag. I like to use these
hole punches. This one is a rapes
single holt punch, which makes a hole of
six millimeter diameter. It's good for larger tags or if you've got a larger
ribbon to put through it. I also use this
fiscal hole punch, which make smaller
holes of 3 millimeters, which works well for
the smaller gift tags. And if you're using
twine instead of ribbon, I've added links for both of those if you want
to check them out in the supplies document for
the rectangular gift tags, again, that I'll be
showing you later on. I draw them out and cut them
out myself using scissors or a metal ruler and a craft
knife for the cards. I've used pre cut templates which I've ordered
from a paper shop. Okay, so that's all
now for supplies. In the next video, I'll give you a quick overview of the
project for this class.
3. Your Project: Your project in this
class is to draw some leaves by following the steps I use to
approach my subjects. I hope your confidence will build as we progress
through the class and practice the seven
different types of leaves that I show
you how to draw. We'll be practicing
two different versions of each leaf so that
you can experiment with different styles and
learn how to create simple quick doodles plus more detailed versions
of the same subject. Hopefully this will give you
some confidence in going away and thinking more about your preferred style of drawing. Once we have practiced
these leaves, you can then apply them to a variety of different
projects of your choice. Later in the class, I'm
going to be giving you some examples of ideas
for how you can use them. With lots of tips
from layouts in your sketchbook to
journal layouts and gift tags and cards. In this section,
we'll be covering a little bit about
composition and layout. And I hope you'll be inspired to trance and different
designs of your own. Whether you stick to drawing
the individual leaves, which is fun and
relaxing in itself, or you wish to experiment with different designs and projects. I would love to see your
work and hear about how you found the class and which type of style
you preferred, The very simple doodles or the more detailed versions
of the leaves. To share your work, just head to the Projects and Resources tab and click Create a Project. You can upload
your image and add a project title and description. This is a great place
to add any comments you have about your drawings
or the class in general, as other students will
be able to see this and I'll be able to feedback
on these projects as well. In the next video, we'll
cover a few drawing tips before we move on to drawing each of the individual leaves.
4. Drawing Tips: In this video, I wanted to cover some basic drawing tips that may help you when you are
approaching your leaves. But the principles also apply to any subject that you
want to doodle or draw. We'll start right
at the beginning. Say we have something specific in mind of what we want to draw. We need to know
what it looks like, we need something to refer to. You may need to use
multiple references if you're working from photos, so that you can see the subject from different angles and get to know its characteristics
and how it bends or moves. Especially if you want to draw
it from different angles. The more detailed or
realistic you want to be, the more references
you may need. I like to work from multiple
sources because it means I have more freedom to choose which details I
include or leave out. And it also means I can
create something more unique. Ideally, when I can, I'll use
references from real life. So I like to go for
lots of walks or visit garden centers
or florists. For both inspiration
and for references. You can do some research
to find out what places near you have the plants
that you're looking for. For example, if you
wanted tropical plants, you can then either take a sketchbook and
pencil and do lots of quick sketches whilst you're there or take some photos. When you're taking photos, it's a great idea
to take photos from different angles and
maybe a video as well, so that you'll be able to
perceive the plant better when you're back home with
just the two D images. Paying attention to how
they move and twist. Try and take a good
head on shot so that you can clearly
see the shape as well. You can also make some notes about the details
and textures that they have or that
you would want to try and recreate
when you're at home. You can save all these photos to an inspiration album
on your phone to refer back to so they don't get lost amongst your
other daily photos. There are also lots of
great books out there, gardening books or reference
books that have images in. I love to find out
interesting facts about whatever I'm
drawing or painting. Obviously, you have
to be mindful of copyright issues
when you're using other people's photos or
artwork as references. Though, do keep that in mind. Of course, the Internet is a brilliant source
of information. You can create a board on Pinterest and collect
images that inspire you. Or you can look at
sites like Unsplash. Again, look at multiple photos. You can understand
the colors and textures and structure
of the subject. You can also use the Internet
to search for information about your subject so that
you can understand it better. Once you've got to
know your subject, you may not need to
use a reference, especially when doodling and when the subject
is pretty simple. The first feature of our
subject that we want to identify is the oval shape
or mass of the subject. This forms the basis
of your drawing, giving you a guide for
where to work on your page. Leaves are a great
starting point for observational drawing because they're pretty simple compared to a lot
of other subjects. Here are some examples of different leaves and
they're oval shape. The oval shape of the ca, palm leaf is an oval shape, whereas the oval shape of
the realia leaf is a circle. When you're first
looking at these leaves, you might not think that's
a circle, that's an oval. But drawing these
out first in pencil really helps to give you a
good guide for where to draw. We'll be using these
later on in the class. So you'll see drawing these guides first
in pencil does make it quite a lot easier
to draw the rest of the leaf when you're
using a pencil. It allows you to
refine your shape or outlines to get them just
to how you want them to be. There's no rush. You can take
as much time as you need. If it doesn't feel quite right, just keep going back
to your references and that oval shape as guidance. Once we have our guideline
for our subject, we can start looking
at our references for the distinguishing features. These are the main features
that make it recognizable. Knowing these main
distinguishing features of your subject is really helpful for whatever level
of drawing you're doing. Whether it's a simple outline or doodle or something
more realistic, it's going to help make whatever it is look
much more recognizable. Here are a few examples of
references of a monstera leaf. The bottom left is a photo I took myself and
saved on my phone. The bottom right is from a nature reference book I have which is great for
finding inspiration from. The other three are
images I found on the Internet from unsplash
or Pexels website. Having these multiple
references just allows us to see a variety images
of this leaf. If I only had my own
reference photo, that one at the bottom left, then I'd be working
from a more mature leaf with lots of those
slits and holes. But I can see easy from some of the others that it's
not always like that. And we can simplify
it much more if we want to. With this Monstera. As an example, let's look at
the distinguishing features. The overall shape of the
Monstera leaf is a heart shape. That's the first thing
we need to include. That will be the starting point, which we'll sketch
out in pencil. The next distinguishing
features we can see is that it has a
fairly thick vein running through the center. Then it has slits and small holes that are
randomly dotted about. We can see that the slits
are all angled towards the dip of the heart shape
where the leaf joins the stem, and the holes are generally
next to the center vein. For a simple doodle, that may be as much information as we need
to keep it really minimal, but this will
definitely still be enough to make it recognizable. When we're drawing, we have
the freedom to choose what we include and what we leave out and what style we draw in. There are so many ways that
we can draw the same thing. So I hope this
class will start to give you some ideas
for how you can make subtle tweaks and changes to your drawing to make it
look quite different. Here you can see the
simple doodle or the monstera on the left
that we just looked at, a slightly more detailed, realistic version on the right. A lot of the features are the same for both of these leaves, but I made some simple changes
to the one on the right, like using a finer
pen to give it a more delicate look
and adding shading. Little things like using
organic curves with wobbly lines instead of simple curves can make
a big difference. And change a simplistic
doodle shape to a more realistic one. Paying attention to
how you do the points of the leaves can also
make a difference. So you can see the one on
the right is much pointier. We'll be looking at
this more within the class as we do two
versions of each leaf, a really simple version and a slightly more
detailed version. With these added details
like the shading, I hope these tips
have been helpful. We're now going to
apply them as we work through drawing the
leaves in the class. The first leaf in the next video that we're going to draw
is the banana leaf.
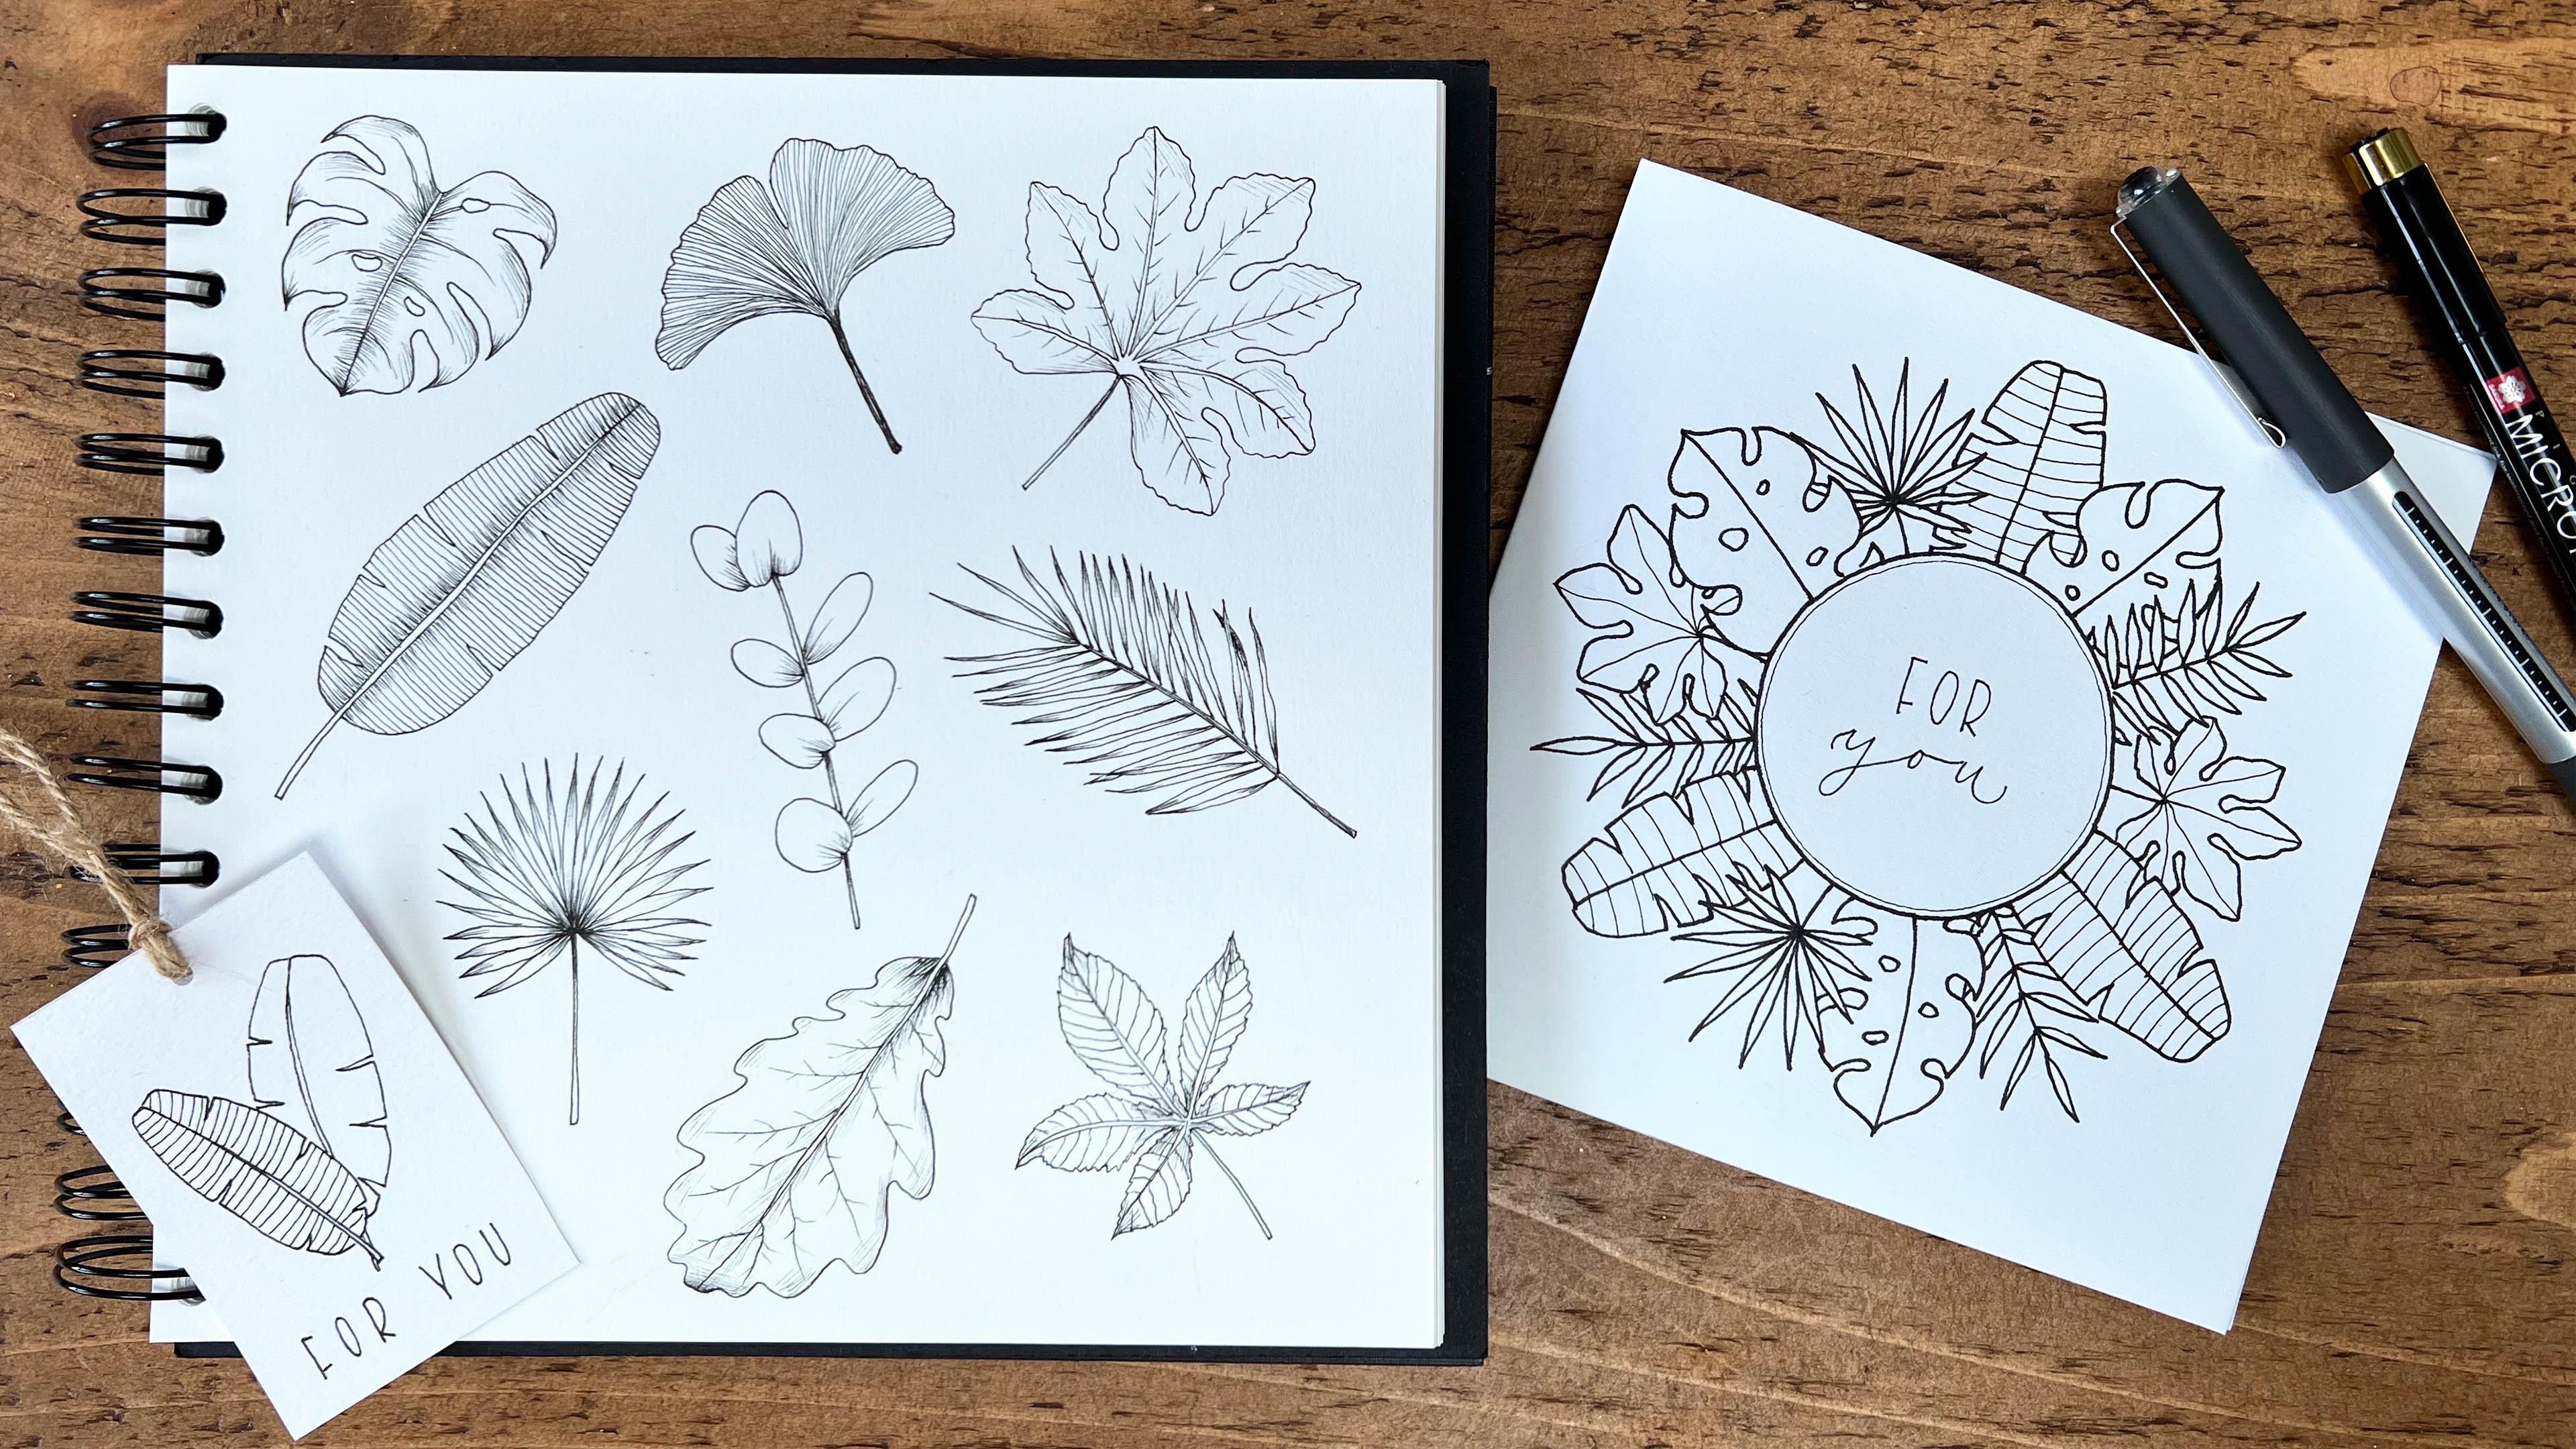
5. Banana Leaves: The banana leaf is one of my
favorite leaves to doodle. It's so simple yet so unique
in its shape as well. I'm starting with this one, as I think it is one of
the simplest to draw. This is a tropical leaf, so they grow really large
with this long paddle shape. They have a prominent center
vein down the middle, and then they can
also split as well. They also have lots of
finer veins on the leaves. We have the choice to add
those in if we want to. Here are two examples of
simple drawings for these. A very basic outline on
the left with no splits. Then on the right, I
added in the split using simple V shapes and
also all the veins as well. Before we start, I just
wanted to show you a couple more examples from my sketch books and my journal for how I've used
these banana leaves as decorations or just when I'm doodling to give you a
bit more inspiration because I really do enjoy
drawing these ones. Starting with my pencil, I'm going to start by sketching
out that rough outline. I'll start with
that center bone. This is going to
be a curved line. Then I usually start
my banana leaves at the top with a flat top that starts being
a bit rounded and then bring it down and then in, and then do the same on the other side,
it's quite rounded. There aren't any sharp edges. Sharp corners, But it's got
this flat bit to the top. It tapers in, and it's almost got a little bit of
a flat bit here as well. That's enough with my
pen, so I'm going to move on to my Uniball pen. Now, straight into
the pen for this, I'm going to start
with that center Vin, I'll just follow that line down. Then starting from the top, I'm going to curve round. Then I'm going to
add in a V shape for the first split
to carry on down. You can add these in
wherever you like, however many you like, or
just a smaller one here. Then I'm going to do one more then just do the
same on the other side. Those splits don't have
to mirror each other. It's really as simple as that for the basic
banana leaf doodle. Now let's do another one, slightly more
detailed this time. Again, start with
that curve line. I'm going to curve it off
to the right this time. Then again, draw this out line, this long paddle shape. You can alternate the
shape a little bit so you can see this has
come out a little bit more. And then you can make
it a little bit wavier. You can have a play around
with these for this, because I want it to be
a bit more delicate. Going to my size to micron pen, I'm going to start with the vein again and draw the first
line all the way down. Starting from about an inch
or shorter than an inch down, I'm going to start
widening this center vein. Then I'm not making it too wide. I'm going to just take that all the way
down to the bottom. And then I'm going
to do the same with these splits as I did
on the other one. And you can make some bigger V, some shorter. Can never play around and do the same on
the other side. Don't worry about sticking
to that pencil outline. It's just there as a
rough guide for you. Then you can just concentrate on what you're doing
in the detail rather than worrying about
getting the shape right. Okay, now I'm going to my 005 micron pen to draw the veins on
either side of this leaf. These are going
to be really fine lines quite close together. And this is the
really relaxing part of these doodles, the
repetitive lines. So just take your time. There's no need to rush whenever there's a
split, I'll just start from the edge of that
split and then bring it in so you can just concentrate on your breath
whilst you're doing this. Making sure you're
nice and relaxed. Your shoulders are loose,
they're not tense. And then we can just do the
same on the other side. What I like about
these banana leaves is that you don't have
to include these veins. It's really recognizable
on its own, the split, by the shape of it. As you've seen in some of my sketchbook doodles that
I showed you earlier, it's quite nice to
alternate them, have some with the veins, and keep some P
that just provides a really nice contrast
in your layout. If you wanted to add even
more detail to this one, you could add some
shading down the vein. If you start on one side
of the center vein, you could just do
some frick lines. This would just add
a bit more depth to the side of that vein. I'm doing these at slightly
different lengths, so it doesn't look too
uniform, but they are fine. I'm still using my finest pen. They're quite subtle,
but they'll just add a nice subtle
shading effect. But again, this is just
one option that you can include or not include. Okay, so now we can just
erase those pencil lines and we have our banana leaves. In the next video, we'll move on to drawing the ginko leaf.
6. Ginkgo Leaves: The ginko leaf is another favorite leaf of
mine to draw as again, it's so simple, yet
unique in its shape. These leaves are semicircle
with a fan shape. Top edge of the leaf has this lovely, organic,
undulating edge. They usually have a
dip in the center creating two lobes
within the leaf. They have a fine stalk, then delicate veins
along the leaf, which we can choose
to include or not. Here are two examples, a very simple doodle of just
the outline on the left capturing those first
three main features, it's really recognizable. Then a slightly more detailed, delicate drawing on the right
which includes the veins. These lines can be
really relaxing to draw as they
are so repetitive. Just like with the banana leaf, I always enjoy adding them in. Okay, as a way, starting with the pencil again, we're going to start
by sketching out a semicircle for the main leaf. This is just going to be
a rough guide for us, then this can curve round
and then come up slightly. I'll do the same on the
other side to bring in quite close to each other because this stalk
is really quite fine. This is going to curve
round ever so slightly. Okay, that's just
our rough guide. If you need to just
use your rubber and your pencil to just tweak it
until you're happy with it. Then I'm going to go
to my Uniball pen. I'm going to start
at the top center, just going straight
above this stalk. And I'm going to
do this dip first, start with a slight curve, dip down, quite narrow, and then bring it back up. It's so U shape with
curves either side. Then I'm going to follow
this guide round. I'm going to make this
edge nice and wavy and then curve it round
and then bring it up, curve it round to the stalk. I'll just do the same
on the other side. Again, you can see with
this undulating edge, it's not completely uniform. These waves, like the
dips, are not the same. Constantly along, you've got some larger bits and
some smaller bits. Then this bottom edge
is a lot smoother. Then just bring this down to
the stalk is nice and thin. That's it for our basic
doodle of the ginko leaf. We'll just keep it really
simple with just the outline, but it's still really
recognizable and interesting. Now we can do
another ginko leaf. This one will be a
little more detailed. I'm going to start with
the pencil as before, but this time we'll be adding in those veins and some shading. Again, using my pencil, I'm going to curve this
one slightly off to the right and start with
that semicircle shape. I'm making sure these corners are slightly curved and
then it comes upwards a little and then
adding in that stalk. Okay, I'm going to switch to
my zero to pigma micron pen. Now for the outline, I'm going to start with this dip at the top first in the middle. Then I'm going to work
on these edges here. I'm going to make them a little
more organic than these, a little less regular. I'm just going to go up and down some bigger
waves than others. Curve that round, This
bottom edge is still smooth, bringing it up,
curving this down. And then bringing it
down to the stalk. Now I'm going to do
the other side again. Those nice organic,
undulating edges. Some bigger, some smaller. And then curving it
round at this corner, making this nice and smooth. And then bringing
it to the stalk. Even by dropping down the pen
from the ible to this 02, it's already given the leaf a bit more of a delicate look. You don't need to worry about these leaves being
completely symmetrical. Remember they are leaves
and organic shapes. If they happen to
be a bit lop sided, it will just make them
look more natural. You can see this bit here
is not exactly symmetrical. This comes up more, but
I'm not worried about that for the veins I'm going
to switch to my 005 pen. For these veins I
like to start in the center and then
divide the leaf up. I find this makes easier
to keep yourself on track, as if you started from one side and just work
your way to the other. You might find that
the lines have started to go in a certain direction. These points, these
markings will just make areas smaller
and easier to manage. Starting in the center,
I'm just going to draw a line down to the stalk. Then I'm going to go to this middle point and do another
line and curve it round, finishing in the same place. I'll do the same on this side, halfway through
curving this round. Then I'm going to break
up each of these as well. Center here, curving it
round in the middle, here, in the middle
here, and here as well. Now that we have
these initial lines, these guiding points, we can fill in the
rest of the veins. I'm just going to
start on this left. I'm just following
that outside edge. The goal is to slowly make this parallel to
the next one over here. And as these lines get
closer to the center, they will merge
together, which is fine. I'm going to turn my page
around now to make it easier. Like the veins of
the banana leaf, this part can be
really relaxing. If you don't try and rush it, it's a great time to check in with your posture
and your breath. Make sure your
shoulders aren't tense, so just loosen them up and take a few slower,
deeper breaths. And enjoy the calming process
of repeating these lines, Okay, So now we have
our veins going to roughly color this stalk in. I'm not going to
make it a block, just doing short lines, It's a scratchy finish. Then I'm just going to
add some flicky lines up from this center point. Okay, so I'm happy
with that shading now. Once you're happy
you can finish. So now we've finished
both of these, and we're confident that our
pen is dry, so it won't. We can raise our pencil lines. I hope you've enjoyed
drawing this ginko leaf. It's such a unique leaf that can look beautiful within
different projects. Which I'll be showing
you some examples of later in the class when we
move on to project ideas. But for now we're going to
move on to the next leaf, which is the Monstera.
7. Monstera part 1: The Monstera leaf
is probably one of the most recognizable
tropical leaves. It has large, glossy, dark green heart shaped leaves. The young baby leaves are
smaller and unbroken. But as the leaf gets
older and a lot bigger, it develops these splits and holes which make it
so recognizable. These apparently help the leaves withstand heavy wind and rain. The three main distinguishing features that we want to
capture in our drawings, whatever style we use are
going to be its heart shape, its center vein, and the splits and holes
within the leaf. As I showed you earlier
in the tips video, here are two examples of simple drawings
for this monstera. One very basic doodle on the left and another a bit
more detailed on the right. In this video, we'll be drawing both of these so that you can practice the different styles
and levels of details. Starting with my pencil, I'm going to sketch
out the outline, which as we know
is a heart shape. The dip is going
to be at the top. And you can do this either
way round for the Monstera, but we'll start it at the top on this one we're
going to come out, curve it round, and then bring
it back in from the top. Bring it out curved,
bring it back in again. I'm now going to switch
to my unibalens. You can clearly see
what I'm doing, but you may wish to
stick with the pencil at this point and then go
over in pen shortly. I'm going to start with this
dip at the curve round. I'm going to add in three
splits on each side, starting at the top. I'm not going to make this
dip come into a point. I'm just going to soften it
slightly so I'm going to come up and then go up and
then bring this round. When I get to it back
here, I'm going to stop. This is going to be
the first split. I'm going to bring this in curve round and as it goes back towards this guideline
is going to be a curve. I'm going to bring that down. This, this section
comes to a point. It curves round, and
this top bit is a curve. We'll do another split here. Again, this is going to be a
point, going to bring it in, curve it round, bring it
back up so it's a little bit closer then bring it back down. Can do this one more time. I'm going to make this
one a little bit smaller. Going inwards, curving it round, curving it upwards again, back to that guideline, and then bringing it down to that bottom point
of the heart shape. Now we can do this
on the other side. Just remember that that point
here is a bit softened. I'm just bringing it round. It's not a sharp corner. I'm going to curve this round and then stop about
here at the top. Curve this up, bring this up closer to this top
area and then curve round. It meets the edge of that heart guide line
and then bring it down. This is going to
be a point again. I'm going up curving it
and then curving it, background as it meets that outer guideline that's
two more splits on this side. We'll do another
small one like this. Again, part is going to be
a point just like these. I'm going to go up
curved and back out curving to meet
that bottom point. Now we can add in
a central vein, and that's going to start at the top and it's going to come all the
way down to the bottom. You'll see I haven't
done mine in a completely straight line. It's got a slight wave
to it which just adds a little bit of natural
ness to the leaf. Finally, for this
simpler doodle, we can just add in
a few little holes. I'm going to do this
as oval shapes. You can do these
different sizes. Slightly bigger one here, and then I'm going to do
a small one over here. Okay, so that's the
simplest one finished. If you've done yours in pencil, you can pause the
video now and just go over these parts in pen.
8. Monstera part 2: For the second Monstera leaf, we're going to start in
exactly the same way by sketching out that
heart shape as a guide, then we're going to use
our finer pens and make these lines slightly more
natural and organic, and then just add
some more details in to make it look a bit
more delicate and realistic. I'm going to have this one coming slightly
off to the right, whereas this is
slanted to the left. This vein will go to the right. We're going to start
of the dip and then sketch this round
into that heart shape. It's making this a
little bit narrower. Okay, so that's just my outline, that's very rough, but it
just gives me a guide. So I'm going to
switch to my 02 now. Again, feel free to continue in pencil at this point if you feel
more comfortable. We're going to do three splits
on each side as before, but as I said, these lines are going to be slightly
more organic. We're going to start
this top dip again, flattening this a little bit. Going to come up. Whereas
this line is a smooth curve, we can flatten it off
and then curve it round. It's not as smooth. These points, I'm going to make even point yet I'm going
to come straight up. They're a bit more finer,
bit more delicate. And then I'm going to
bring this in again. It's not going to be as
fluid a curve as this, it's going to be
a little bit more natural. I'm bringing it round. Then going back to
the outer edge, you can see it's not
as curved again. For the second split,
I'm going to go up to keep this nice and fine, curve it round,
bring it back up, and then bring this down. You can see that these lines are a little bit more organic, a little bit more wonky. You can be a bit freer with
the pen with this one. For the final split, again,
we'll make this bit smaller. I'm going to go up, curve this, then bring it back in,
and then bring this down to the point you can see I've rounded this off a
little bit rather than go in. Okay, that's our left side. Let's do the same
with the other side. I'm going to go a bit
sharper, bring it round, flatten it off a bit, then
come up with this point, and then bring it
in and then go, rather than go up like
these, bring this downwards. Now we're at the second split. I'm going to get
up and in again, making these a bit more organic. Bringing it down to the top of the next split, curving this up, I'm going to make this
a little bit bigger, a bit more circular, and then bring this
down to that point. You can see this one isn't
as symmetrical as this one. Bit more natural, the
lines aren't as smooth. Now we can do this
center vein again. I'm going to start from the
top and I'm going to bring this all the way down with
a slight curve to it. I'm going to draw another
line very close to it, all the way down to about
here where it will join. This is just going to add
some thickness to this vein. I'm joining it in there. Okay, now we can
add in the holes. I'm going to add in
a larger one here, another fairly large one here, and a smaller one up here. Now we can add in some veins
for each of these segments. These are going to follow
the curve of that area. Starting from the middle. I'm going to bring that
up and then flick it off. It doesn't go all
the way to the end, but it's got a tapered edge. It's just using the pen and lifting it and
dragging it quickly. For this, I don't want to go straight across
for any of these. I'm starting
slightly lower down, bringing up, and then
curving it round. This is just going to show
the shape of the leaf again, finishing off with
a little flick at the end, doing the same here. And then finally a
small one there. I'm going to do the
same on the other side. These don't have to start at the same point as the
one on the other side. This is going to
start a bit higher. If you find that you're going
into one of these holes, just stop and then continue
on the other side. This will be the case here. I'm going to just draw this in and then I'm going
to follow it over. I'm not touching the
pen, but just so I know where the line needs to go and then flick
out the other side. Okay, now that we
have our main shape, I'm going to switch to my final
005 and add some shading. I'm going to start at the edges, particularly at these points, and I'm just going to add flicky lines upwards
to make them darker. Not too many, just
a few on each one. I'm also going to do the same
at this tip on either side, and the corners on the
other side as well. Okay, Now from the center
vein on either side, I'm going to do the same
shading all the way down, leaving the gap in between
these lines white. This shading is just going
to give the leaf some depth. For these flicky lines, they're all going to be
slightly different lengths, it doesn't look too uniform, so occasionally I'm doing a slightly longer
one and then a few small ones and just varying it. Okay. I'm going to do that
on the other side now. So I'm just going to turn
my page to make it easier. Always do these shading marks
in the angle or the leaf. If you think about that
center vein and each side of the leaf coming up
and out these lines. I'm doing slightly at a
slant, going upwards. That's going to help give
the leaf more of a shape. On the page without
these, it's pretty flat. This one looks a lot flatter, but all the shading
that you add, all the lines that you add that go in the flow of the leaf, are just going to
give it more shape and make it pop out of the page. The more you practice drawing
and looking at leaves, you'll just get to
know these lines, which way they should be going. And it will just come
much more naturally to you if it's something
that you're struggling with. Okay, we've done some
shading in the center. And on those tips now, I'm just going to add
shading around the edges, particularly where
they curve around. I'm just going to do a few
lines coming off the edge. These are quite subtle, but they're just going
to add some depth. Just have a look. And
if there's anywhere particularly along
these top bits, I think it works well here. Again, I'm following
the curve down. Then you can just see if there's any more shading that
you want to add. I'm actually going to make some of these areas
a little bit darker. I feel like this center point could do with a bit
more shading and making these veins a bit darker, especially towards the center. I'm just going to
add a few more in. Going over and then
over this vein, the more you go over it,
the darker it will become, the more depth you'll give up. It's nice to do this
gradually because then you can just keep going until you decide that
it's what you want. Rather than jump too far in too quick and not
be happy with it, just do the same
on the other side, making these veins a
little bit darker. And then just adding a
little bit more depth, particularly next to
that center vein. And adding in some
longer strokes of shading around the edges once you're happy.
And the penis. Right. We can remove
our pencil lines. Okay, now we have our two
versions of the mensa leaf. I hope you've enjoyed
making both of these. I hope you're starting to
understand how easy it is to transform your drawing
from a simple doodle to something much more delicate and detailed just by making
a few simple tweaks. We've got the same
structure here. We start with the same outline, we've got three splits
on either side, we've got three holes. But it's just the
simple things like adding a bit of depth
to the center vein, adding the shading,
adding more of these organic lines rather
than the solid curves, and it can transform
it quite a bit. I love both of these and I
would use both of these, and it just depends
on what I'm drawing. It's nice to have that in
your toolbox, so to speak, to pick and choose
what style you want to use for
whatever you are doing. In the next video, we're
going to be moving on to the Cap Palm.
9. Areca Palm: The Aca palm is different to
the leaves we've drawn so far because it has lots of individual leaves
coming off of the stem, and these are long and thin. If you wanted to draw
a guideline for this, it would start with
an oval shape, which would help you decide how long to make each
of those leaves. Here are two examples of simple drawings
for this Aca palm, which will be drawing
in this video. One very basic doodle on the left and another a
bit more detailed and delicate on the right using a finer pen and some
subtle shading. So we're going to start
with the basic version. Starting with my pencil, I'm going to sketch
out an oval guide. So this is slightly
santed towards the left, because I'll be doing this, curved up slightly to the left. And then the second version
slightly towards the right, just like the other
drawings we've done so far. We have an oval now
take your time and you can use you an eraser just to
get that rough guide right, but don't worry
too much about it. Then we can draw a aligned and center slightly curved and that's going to come out of this oval, and this is the center stem. At this point, you can
continue using your pencil if you feel more comfortable
or switch to your pen now, which is what I'm
going to do and I'm switching to my uniform pen. Each of these leaves
are going to come up diagonally in a V
shape from the center, and we're going to
have one at the top. We want the one at the top to be probably just a little bit shorter than the
ones at the side. We're going to start
with this one. I'm starting from this line, it's going to be fairly narrow. I'm going to come up to a point and then bring it back down. We can draw this
stem in as well. It's just going to be a single
line curved very slightly. Next we're going to do the leaf underneath that's going to come up and it's going
to come up roughly to this outer edge of the oval. I'm going to leave a little gap. Bring this up and down. We'll do the same
on the other side. Bring it up to that
edge and then down. The next one is going to be a slightly less at an
angle again leaving a small gap from that top leaf above it and
then coming out to that edge. And the same on the other side. Now we can continue working down using this oval as our guide. Just making these leaves almost parallel to this one here, again leaving a gap,
going to the edge. I'm going to do all the
ones on the left first, and then we'll move
over to the right side, 0. Kay? So now I'm going to do the same on the right side, making them Sbt Coal. So starting roughly
at the same point and then just going up to
the edge of that oval. Okay, so that's all we're going to do for the very
simple version. It's simple, especially
once you have the guide, it makes it much more easier to make it balanced and
pleasing to the eye, which is why I like
using these guides. We're going to go back
to the pencil now. Draw this oval guide
again on the right side. And then we'll draw
our second version. This is going to veer
slightly off to the right. I'm just going to roughly sketch in that
pencil line as well, that stem with the pencil
slightly curved to the right. Again, at this point,
if you want to carry on using your pencil
and then go over it and pen later,
that's absolutely fine. I'm going to switch to my pen because that's what
I normally do, but also because
it will help make it easier for you to see what
I'm doing on the camera. The differences we're
going to make in this version are we're going to add a few more of these leaves in to make them
a little bit more delicate. We're going to add some thin width to the stem to make it
look more realistic. We'll add some shading into
each of the leaves as well. We're going to do
a couple that are overlapping each other just to make it look more natural rather than uniform like this one is. We'll start with the top one, again, coming to a point, keeping it nice and thin, and then bringing
it back to a point. Then we'll do this central stem, starting with one line, bringing it all the way down, Then adding thickness,
not very much, keeping it fairly
thin and delicate, bringing it all the way down parallel and then
joining that up. Now we'll start with the
leaves on either side, just a short way down, bringing this up to that
outer edge of the oval. And then another,
then continue down. You can see these are
slightly thinner, slightly more
delicate than these. Where is the mostly point in pretty much the
same direction, you can have slightly
more natural. For example, this one is
a bit closer at the top. And there's more of a gap here. This one That way
a little bit more, just adding that
gives it movement, makes it look more natural, like there's a breeze
flowing through the leaves. We just keep working our way down using that pencil line as our guide for this next one. I'm drawing in this leaf, and then the next one below it, I want to go
underneath this one. I'm going to curve this around. The tip is going to
go above this one. I'm following my pen just
over the vapor so I can see where it will and then
bring it back down. So this top one now is
overlapping that one underneath. And then we can continue. Okay, so now let's do the
same on the other side. I'm going to turn my page
slightly now to make it easier. The next one I'm going to do, coming down a little bit more
then the one underneath, I'm going to make it come up. So it's falling underneath
that one above. They're crossing over. This one has become quite straight and I want to keep that diagonal. I'm going to move down a bit further and bring
it up quite close. You can see with
this one I'm going, I'm not starting from a point exactly symmetrical to
the ones on the left. Pretty similar, but
I'm not being as exact just so it looks less uniform and
a bit more natural. Do one more overlapping with
this one at the very bottom. This one is going to
come up and underneath. Okay, if you did
yours in pencil, you can pause the video now and go over all of
your leaves in pen. I'm going to switch to my
05 now for the shading. For the shading, I'm
just going to do some of those short flicky lines at the bottom and the
top of each leaf. This is just going to
give it some depth. These are the repetitive
details that I love because I find that they're the most
relaxing part of it. Once you've done your outline, you can relax a bit more. You don't need to think as much. It's just about filling
in these areas. As I always say, it's
a good time to check in with your posture,
your breathing. Make sure you're nice and relax. Where the leaves
come underneath. I didn't do it with this one,
but we can go back to that. Just going to add an
extra bit of shading where it sits underneath here. And that's just going
to emphasize that it is separate and distinguish
it from the leaf above. So again, I'm
adding that shading in just where it sits
underneath that leaf. I'll go back and do
the same on this one. Okay. The final bit of
shading I want to do is just to the stem just
to make it stand out. Just adding in some lines. I'm not making it so I don't
want it to be too bold. I'm just lightly coloring
it in lots of small lines. Okay. Once you're finished
and you're happy, we can remove our pencil lines again. I hope this shows
you how just making those subtle
differences can really transform your leaf from
something really quite simple and bolder to something
more delicate and natural. I hope at this point you're
getting to know what you like and starting to think
about your own style, but also for ways that you
can use each of these. In the next video,
we're going to be moving on to the leaf.
10. Aralia: I love the realia
leaf because it always looks so
healthy and vibrant. It's different to
the other leaves we've drawn so far
because it has these deep lobes and as a whole it forms
a circular shape. It usually has
seven to nine lobes with veins running
through each one. With leaves like this, I like to come up with a
method to approach it. Otherwise, I feel like it can easily be harder
than it needs to be. In this video, we'll start
with a simple version focusing on that distinctive
shape and those deep lobes, and then we'll add
in the veins and shading in the more
detailed version. For the simplest version, let's start by
sketching out circle, which as to be seen is the oval shape that
the leaf sits inside. Okay, once you have
your larger circle, about two thirds
of the way down, we can sketch a smaller circle. We can put a.in the
center of this one. This is going to
be where the stalk reaches the base of the leaf. At this point, we can just draw a slightly curved line
coming out of those circles. We're going to draw
seven leaf sections, which means there will be six of these lobes that come inwards. First, let's draw the veins in which sit in the center
of each leaf section. We'll have one that comes all the way to the top
of that outer circle. We'll do the two
bottom ones next. And these are going to
be slightly shorter. They're not going
to come all the way to this outer circle. About there, about halfway between the smaller circle
and the bigger one. We'll do that on the
other side as well. That gives us three leaves. If each of these veins
represents a leaf, we want two more on either side. Try and do these. Even one going up and
then one in the middle, and these ones will
reach the outer circle. We'll do this on the
other side as well. One going up there and
then one in the middle. Okay, I'm going to switch
to my pen at this point, my Uniball, so you can
clearly see what I'm doing. But do feel free to continue
with your pencil and then go over it with your
pen when you're ready. In between each of these veins, I'm going to draw a C curve. This is going to be
the innermost part of each of those lobes. It's like a marker point for us. You can see these are all
resting on that smaller circle. You should have six of these, each within those lines, those veins with
each of the leaves, they are going to be
smooth towards the center. And then they're going to
have a undulating edge coming to a soft point when it reaches the
top of the vein. We'll start from the base
for this bottom leaf, it's going to come
down that's smooth, then as it goes in
towards this top bit, it's going to be undulating. Then it's going to
curve round and meet the top of this curve. Starting at the
bottom of this curve. Now this is the bottom
of this section. We'll bring this up going
outwards a little bit. Then as we go in, we're
going to undulate this. Coming up to that top
point of the vein, undulating again as we
come bring it round. And then join it up with
this one starting from here. This is going to come all
the way round to the top of that vein, bringing it round, meeting here, starting
with a slight curve, then that undulating
edge as you bring it meeting to the
top of that vein, undulating edge all the way
around, bringing it back in, becoming smoother,
meeting that curve, extending this one
undulating edge, bringing it up, undulating edge, bringing it round,
smoother, and joining up. Now we've got four leaves, four leaf sections rather. Okay, bring this up, undulating, curving it round, draining
the top of that vein, bringing it back round, bringing it back in
slightly smoother, so undulating, reaching the, undulating as it comes
round and then smooth. Then for this bottom one, remember these two
are slightly shorter. I'm starting from the base, bringing this undulating
and coming round. Okay, I'm going to
bring the stalk down. Now, because of the way
this bottom one is sitting. I'm going to adjust
where the stalk is. I'm not going to follow
that pencil line. I've moved it slightly
over to the right. And then I'm just going
to draw in these veins. Okay, so now we can move on to the second version where we
are going to add more detail, some more veins and make it look much more
realistic and delicate. We'll start again
with this circle, then again with the
smaller circle, about two thirds of the way down with a.in the center
for where that base will be. Let's sketch in those veins coming up from that center
point up to the top. Then the lower ones which don't quite meet
this outer circle. And then adding
two more in here, and adding in two more in
on the other side as well. And then just sketching
out where that stem is going to come
down to that stalk. Okay, I'm going to
switch to my size 02, but again, you can
continue with your pencil. We'll start with those curves in between each of the veins, then we're going to
do the outline in a very similar way
as we did before. Starting just a bit lower than the center
point for the base, bringing it down
nice and smooth. Then those undulating
lines up to the tip, bringing it round to
meet that first curve, bringing this out, and then
those undulating edges. So we'll do this
all the way around for this bottom one. Start from the center again,
bringing it down, and then in, and then
meeting that curve, we've got our outline. Now we'll be drawing
in the veins again, but this time we're
going to be giving them a little more width. I'm just going to draw a
small circle at the base. And all of the veins
are going to meet that. We'll start with a line
from this bottom one. Bring it in that small
circle, just to the edge. Then we're going to add
some width to this vean, again, that's going to be
touching that small circle. From where this one finished, we're going to bring the
line up to this vein here. Then bring this down again,
touching that circle. And from where this finished, we'll start this vein. And then drawing
another one next to it, coming back down to that circle, starting from where
this one finished, we'll bring it up to this
next vein and adding another line next to it again, starting where
this one finished, bring it up, then
adding another line, keeping it nice and narrow. And then joining
this to this vein. Then this final
vein at the bottom. Then we can just connect these two low veins to
the bottom of that base. We've got a small
circle in the center. Now we can draw in the
stem following this line, roughly down unless
you want to adjust it, and then adding
another one next to it to give it a
little bit of width. I'm going to go along each of these
veins and add some smaller veins now just
with flicky curved lines. And then do the same on the
other side of the main vein. We can do that for each of them. Okay, once you've
done your veins, you can switch to
your smaller 005. Start by adding some
shading in now, particularly to the top of the stem coloring that in a little bit that's
going to really push it back, give
it some depth. And then I'm just going
to bring it down, coloring it in a
bit more lighter. Then I'm going to add
some shading in the vs, in between these veins,
just flicking up. And then if we want to add
a little bit more shading, we can do so with some smaller flicky
lines along the veins, along the tops of
each of these leaves. So these are just lots of small flicky fine lines
next to each other. The more you have, the
darker it will be. Just always try and keep them in the flow of the shape of the leaf to help
give it that shape. These are always parallel with
those veins at a diagonal, so just do this leaf and then the final
one at the bottom. Okay, Once you're happy with your shading and your pens dry, then we can erase all our pencil lines again, starting from the same point, the same shape,
and same outline. We can create two quite
different end results just by tweaking some of the processes and adding a few more details. I hope you've enjoyed
drawing these two. In the next video, we'll
be drawing the fan Palm.
11. Fan Palm: The fan palm, just
like the ca palm, has numerous, long, thin leaves, but these leaves fan out
from a center point. The oval shape is circular. Here are two examples of
simple drawings for this palm, which will be drawing
in this video. One quite simple drawing on
the left and another a bit more detailed and delicate on the right using a finer pen, some subtle shading, and you'll see that it actually has
more leaves as well. The one on the left, which has less leaves is a lot
more simplistic. I find that this fan palm is a bit trickier than it looks. I'll show you how I sketch some extra guides to make the leaves even all
the way around. As always, we're going to start
with the simplest version and I'm going to
start by sketching out a circle guide
with my pencil, I'm going to sketch another
circle, quite a bit smaller, about two thirds of the way
down with a.in the center. This is where all the
leaves will meet the stalk. We can draw a line
for that stalk in. Now for this simpler version, we're going to be
drawing 12 leaves. We're first going to
use our pencil to mark where they're
each going to start. The leaves don't go all
the way around the circle. They start from about
here. Either side. We can just draw a
line as a marker. Now we've got those two lines. We can draw a line up
the center as well, that can reach the edge
of that smaller circle. Now you should have three lines if you're ignoring this stem. We're now going to add a line halfway in between
each of these. One on the left and
one on the right. Then we're going to add two
more lines in each gap. Again, ignoring this bottom area where there are no leaves, we're going to add one line
there and one line there. And then dividing
this one up as well, adding two in here, one
here, and one there. Adding two in here, 12.2. In here, 12, okay? Now, ignoring again this stem, you should have 13 lines. 12345678, 910-11-1213, That's going to give us 12 leaves because there will
be touching at this point. Each of these lines
represents an edge of a leaf. And these are going to
guide us to the width of each leaf and the
direction of each leaf. Each gap is a leaf. If that makes sense, it
will become clearer. Again, you can continue using
your pencil now to draw each leaf if you feel more comfortable or you can
switch to your pen, and I'm going to be
using my Uniball. Start with the
first leaf. All of these are going to come out to that center circle,
starting from the center. Using this first line, I'm going to draw the outer
edge of the first leaf. I'm going to bring it back in, shall start from the center, following this next
line and connecting it. The next leaf is going to
share this part of the line, which is inside the
smaller circle. We can start from that edge
of the smaller circle, bring it up, then
using the next line, I'm going to go over that. Then I'm going to bring it up to a point and connect it
at that outer edge. Again, this next leaf
is sharing this line. I'm going to bring it up,
then bring it back down. That falls into this line. The next leaf is
going to start back here and then coming
back to that line. Doing this all the way around
within this small circle, the leaves are
touching each other. Don't worry if it's not precise. You can see this
has a bit of a dip. It comes in further,
it doesn't matter if Not perfect. We're
not after perfection. But hopefully these
guides will just help you and make it a lot easier to get a
nice balanced leaf. I'm just going to
rotate my page now, the final one, okay? So now you should
have 12 leaves. 123, 456-789-1011 12, okay? I'm just going to draw a
simple line for this stalk. And we're going to keep it as simple as that for
this first one. So for the next version, we're going to do 24
leaves This time, make it a bit more
delicate and detailed, but we're going to
use the same method. So we'll start by sketching
out our circle guide. Drawing that smaller circle, about two thirds of the
way down with the.in, the middle where the base of where all the leaves are
going to meet the stalk. Okay, now we can sketch out our lines for where the
leaves are going to sit. As I said, we're going to
have 24 leaves this time. Start off by adding
in the bottom two lines where those lower
leaves will finish. Then we're going to
add another line straight up, just like before. We'll add one in
between each of these. Now we've got five lines, and then we're
going to add one in between each of these as well. Okay, So now you should
have nine lines. Okay, In each of these gaps, we're now going to add in two more lines trying to
keep them fairly even. I find just spending this little bit of extra
time at the minute just means that the leaves look so much more even and
balanced as you go around, especially when it
comes to the center. Okay, now we have our guide. We can draw in our leaves. I'm just going to do
exactly as I did before, starting from the center and going all the way to the edge using these lines as a guide. As I'm moving it around, I'm just going to go back
from the start and just check that I look on track. Just make sure this pencil
line is where I want it to be. It looks okay to
me at the moment. I find that using
these guides takes out so much guesswork
and frustration. Because now I just need
to follow my guides. And I can just relax and enjoy the process without
thinking too much. Okay, so once you
finish your leave, we can draw in that stalk. I'm just going to
draw a line down. And then another
one quite close, keeping it narrow and
joining it together. Then finally we can just add
a little bit of shading. We can add a little bit
of shading down the talk. Then at the tips and the bottom
of each of these leaves, we can just work our way around. You can add in some longer flicking lines of
shading as well, if they're looking too
white in the center. Okay, once you've finished your shading and
your pens Right. We can just remove
our pencil lines. Okay, So I hope you've
enjoyed drawing these two fan palms and you found my method of
approaching it useful. I just find using the pencil to divide it up in this
way really helps. You don't have to worry
about the number, like trying to get
a specific number of leaves or worrying. If you're breaking
it up correctly, just start drawing some
lines and then divide them up and then add some more
lines and then go from there. In the next video, we'll
be drawing our final leaf, which is the eucalyptus.
12. Eucalyptus: In this video, we're going to draw a branch of Eucalyptus. The most recognizable is
probably the baby blue, which is usually seen in decorations and
bouquets as foliage. The leaves are stemless, they connect directly
to the branch, and they are rounded. I've left this one to last
because it's a bit of a different leaf to the others, that it has lots of leaves. Instead of just one
along the branch, you usually have two leaves
that sit next to each other. As you're usually looking at these leaves from a side view. This means that we'll usually
end up drawing the leaves in more of an oval shape
due to the perspective. If you looked at them flat on, they would be much rounder. As we go through and draw
different leaves on the branch, we'll be varying how round they are or how oval just show that they're sitting at different angles on the branch. For our simplest version, we'll start by drawing in
a slightly curved line. In pencil, this is the main branch. And we're not going to draw
a pencil guide for this one. We're just going
to dive straight in just using that
branch as our base. I'm moving to my uniform pen so you can clearly
see what I'm doing. But please do feel free to carry on in pencil if
you're more comfortable. We're going to start with
the leaves at the very top. There's usually two
leaves that sit together at the very
top of each branch. They dip in slightly
at the base. We'll do the first one
which is closer to us. I'm going to start the dip, so it's going to come down
slightly and then be rounded. It's almost like a heart, an upside down heart shape, but it doesn't have that point. This is the one
that's closer to us. And there'll be another leaf that is connected to this one. Remember they connect
to this branch. At the same point, what we
can do here is use our pen, go over the paper, wherever we think it will sit, and then put the pen down. Once we're outside of that leaf, because it's going to
sit behind this leaf, we can make this any circular or oval shape that's similar
in size to this one. I'm going to go round and then bring that round like that. Moving down a little way, we can do our next one. This one I'm going to come
off to the side more, that's a slight dip, and
then I'm going to bring that up off to the side. Then the other one is going
to sit on the left side. It's going to be
slightly flatter because it's going to
be more of an angle. We'll move about the
same distance down. We'll do a similar one to
this one's sitting in front, dipping it out but coming off
to the left side this time. Then having the right side
which is sitting behind it, coming up from the bottom,
following it round, and then meeting there. It's quite fun just
playing around with these different
angles because you don't need to look
at Eucalyptus. You can just follow
the principles of they sit next to each other. They're a similar shape, they're a version of a circle. Whether they're a bit
more flattened or not, and they're coming off
at different angles. It's quite fun just to
play around with it. We'll do one more. This one
will come off to the right, then this one is going to be, I think, a bit more
flatter behind. So I'm going to bring this round and curve it around like that, as this is our simplest one. We're just going to do a
single line for the branch. I'm going to bring
this down to here. This stem, this branch is going to sit in
front of this leaf. So I'm going to draw over there. We'll bring it down again. It's going to sit in
front of this one. But this leaf is in front
of the branch here. We'll leave and bring it down through this one
because it's sitting in front. Then this leaf is in front. That branch will go underneath
and we'll bring it down. Then from the center of
each of these leaves, we can just do a
short flicky line as a vein in the direction
that the leaf is going. Keeping it really simple, for this one it might just be a thinking
about where the branch sits, usually just trying to have
one leaf that sits in front, like this one covering
up that branch, and then one leaf that
sits behind here. This sits behind the branch
the branch runs through. This leaf is sitting in front. When we do the next one, because we want to add
some width to this branch, we'll have to draw that
out in pencil first. Because if it's a single
line, that's fine. It doesn't matter that
it crosses through here. Okay, let's do the
second one now. Again, use your pencil
to draw in this branch. Then I'm going to sketch
these ones out in pencil. First these leaves, because then we can figure out where
the branch is going to sit, whether it's going to sit in
front or behind the leaves. Let's just start by sketching out the leaves in a
rounded heart shape. You can just play around with the angles
that these are at, which is really quite fun. You can have some which
are coming off in really horizontal
directions as well. Okay, so we've got our
four pairs of leaves. Now we can see and
potentially use our rubber to see this leaf sits in front. That branch will go over there, this leaf sits in front. We won't see any of this
branch running through here. Then again, this leaf sits
in front of the branch. Once we know where those are, I would go to my 02 pen and
draw in that branch first, because then we can draw
the leaves around it again, two lines, adding that width,
following the line down. Okay, now we have our branch, and we know which leaves sit in front and which sit behind. Then we can draw in
each of the leaves. So when you go
through the branch, make sure you leave the gap
of where that branch is, Okay, so I'll stop, leave the branch and
then carry on through. So I'm going to add in that vein again with the flicky line. Then finally we can just add
a little bit of shading. Switching to my 005, now I'm going to start
with some shading from the base next
to these veins, just the flicky lines coming
up for the leaves behind. You can do some shading all
the way along if you like. Just to give it a bit of shadow, it emphasizes that
it's sitting behind. This one is behind. I'm
adding in a bit more shadow. Again, this one here is behind, adding in a bit more shadow
then for the branch, particularly where
it joins the leaves. I'm just going to
add a little bit of shading just underneath to
give it a bit of depth. Okay? And then just take a step back and see if there's any more shading you want
to add for this one. Otherwise, when the
penis is right, we can remove our pencil lines. Okay, so that's our
Eucalyptus finished and those are all seven of
our leaves finished as well. In the next video, we're
going to be moving on to looking at
some project ideas. Well, I'll give you
some inspiration and tips for how to use these leaves in your journal as gift tags, cards and more.
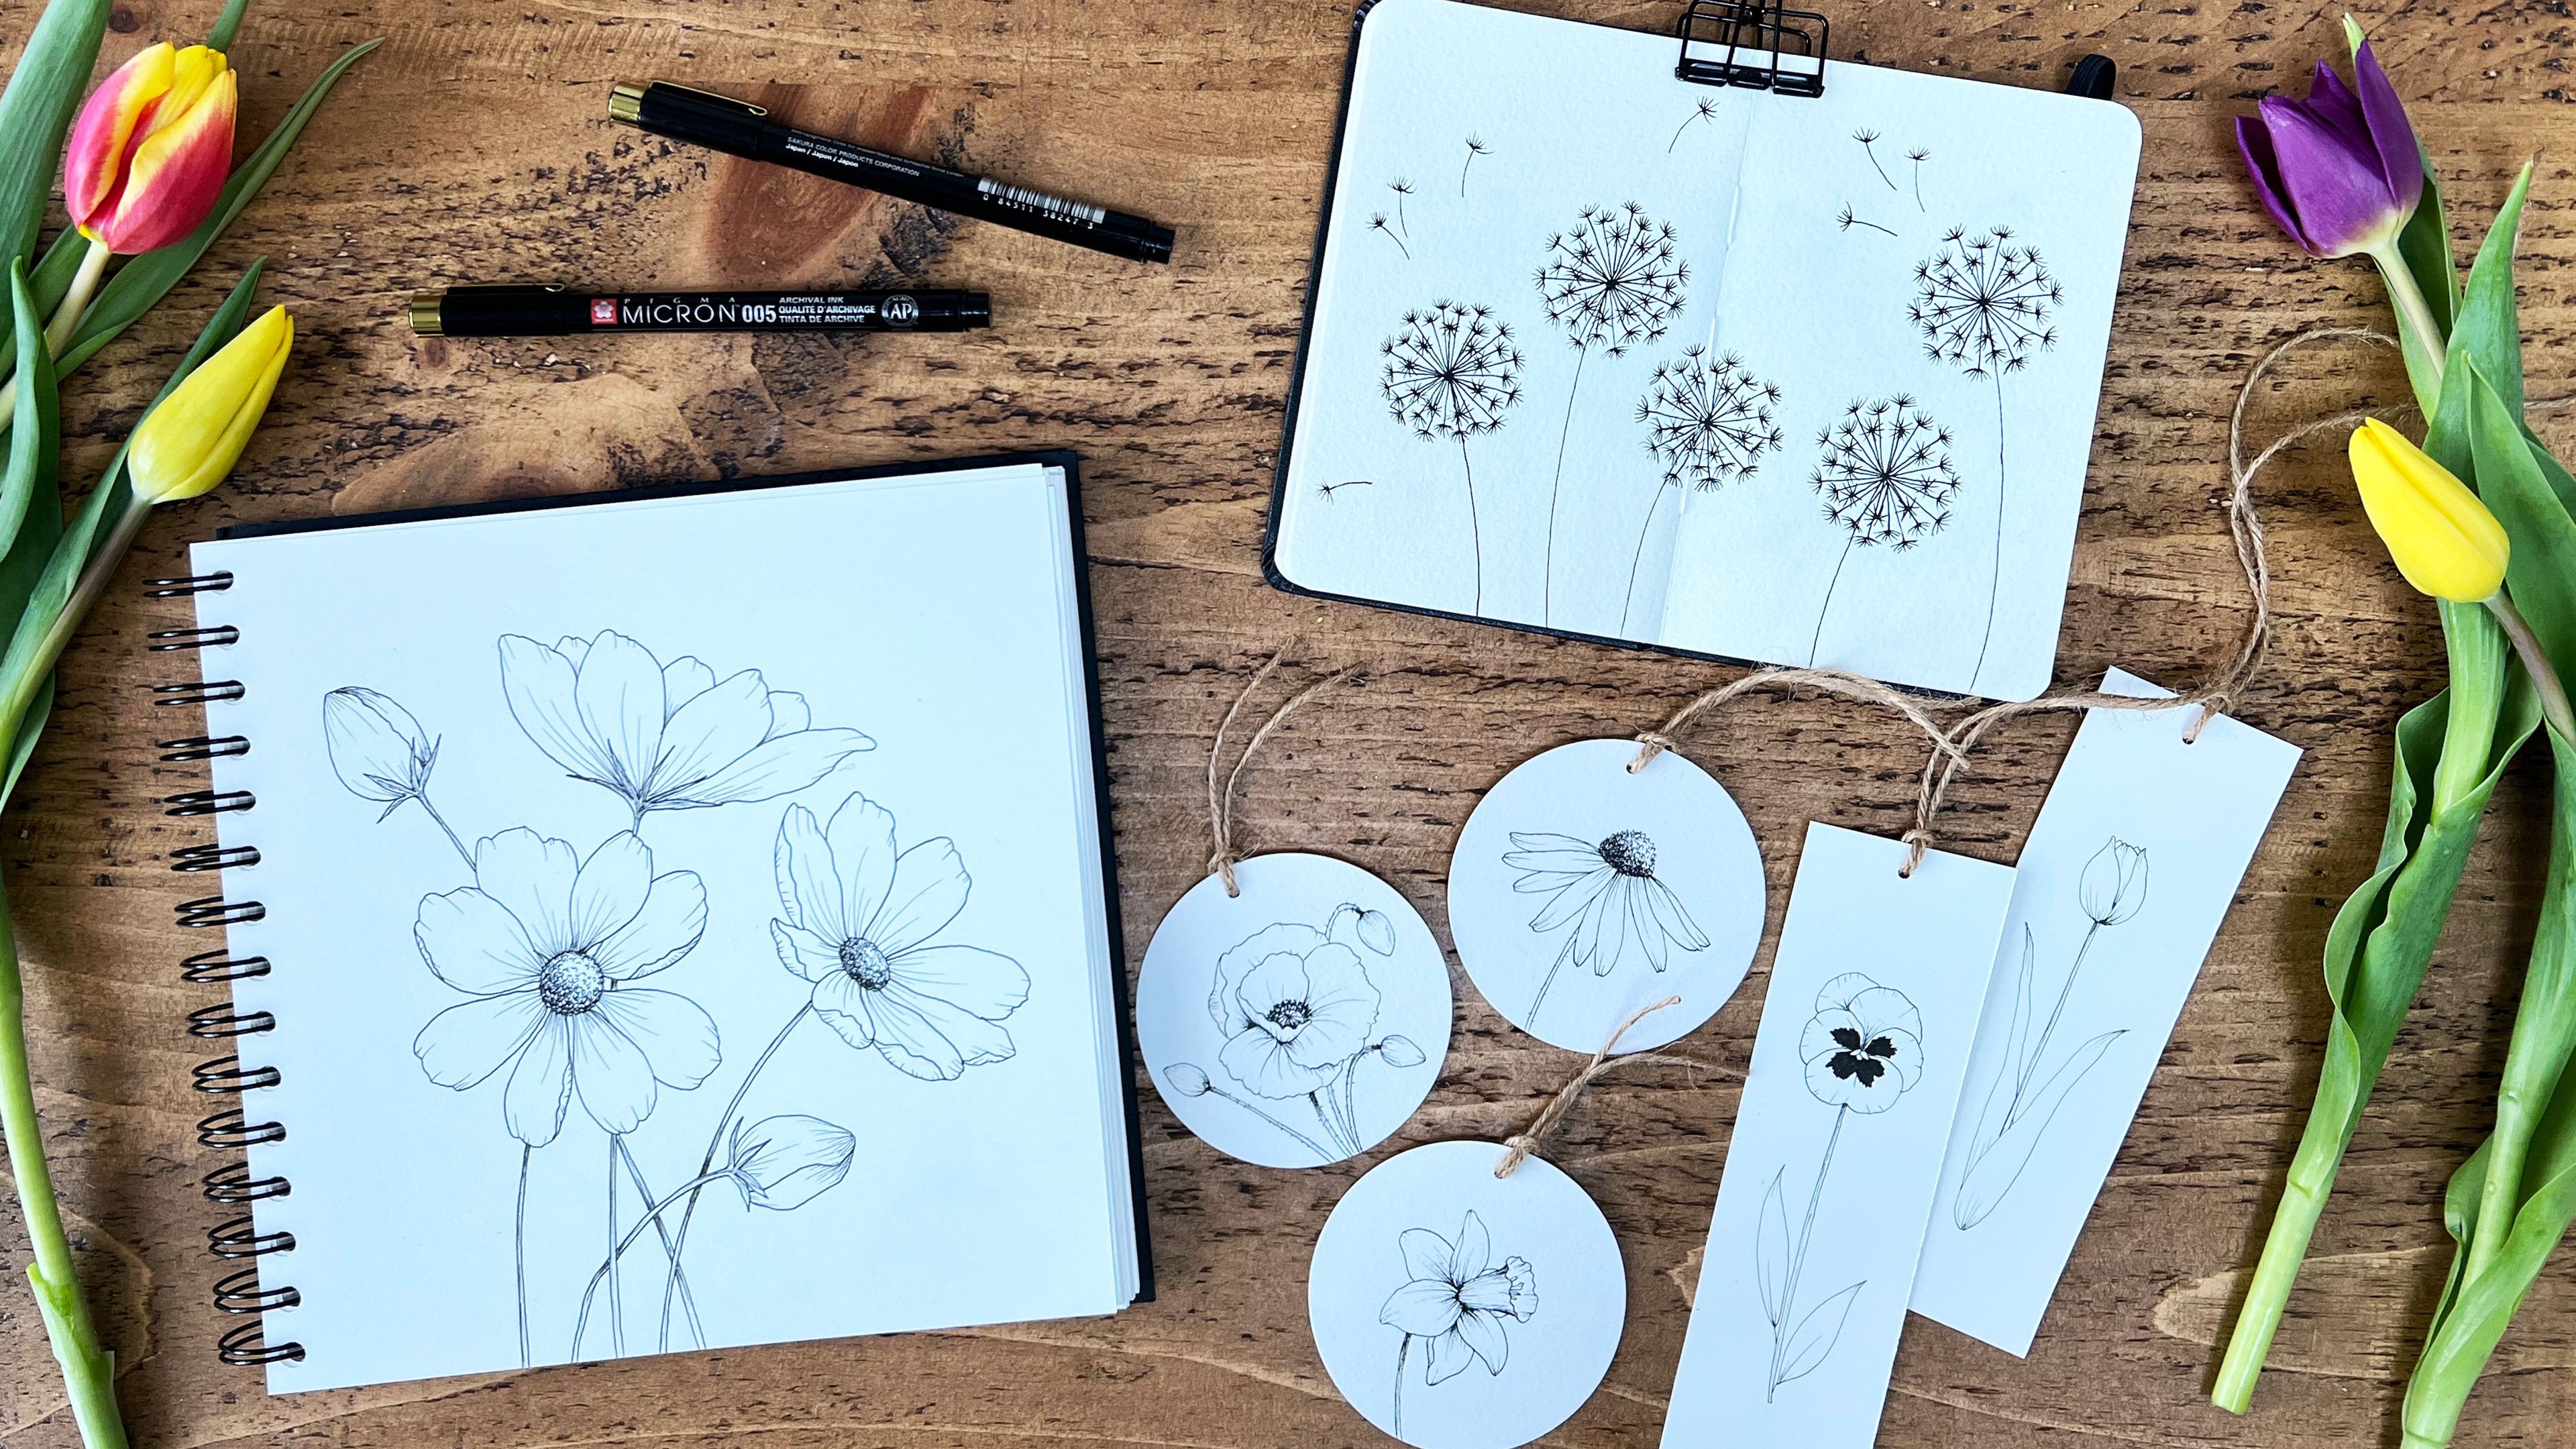
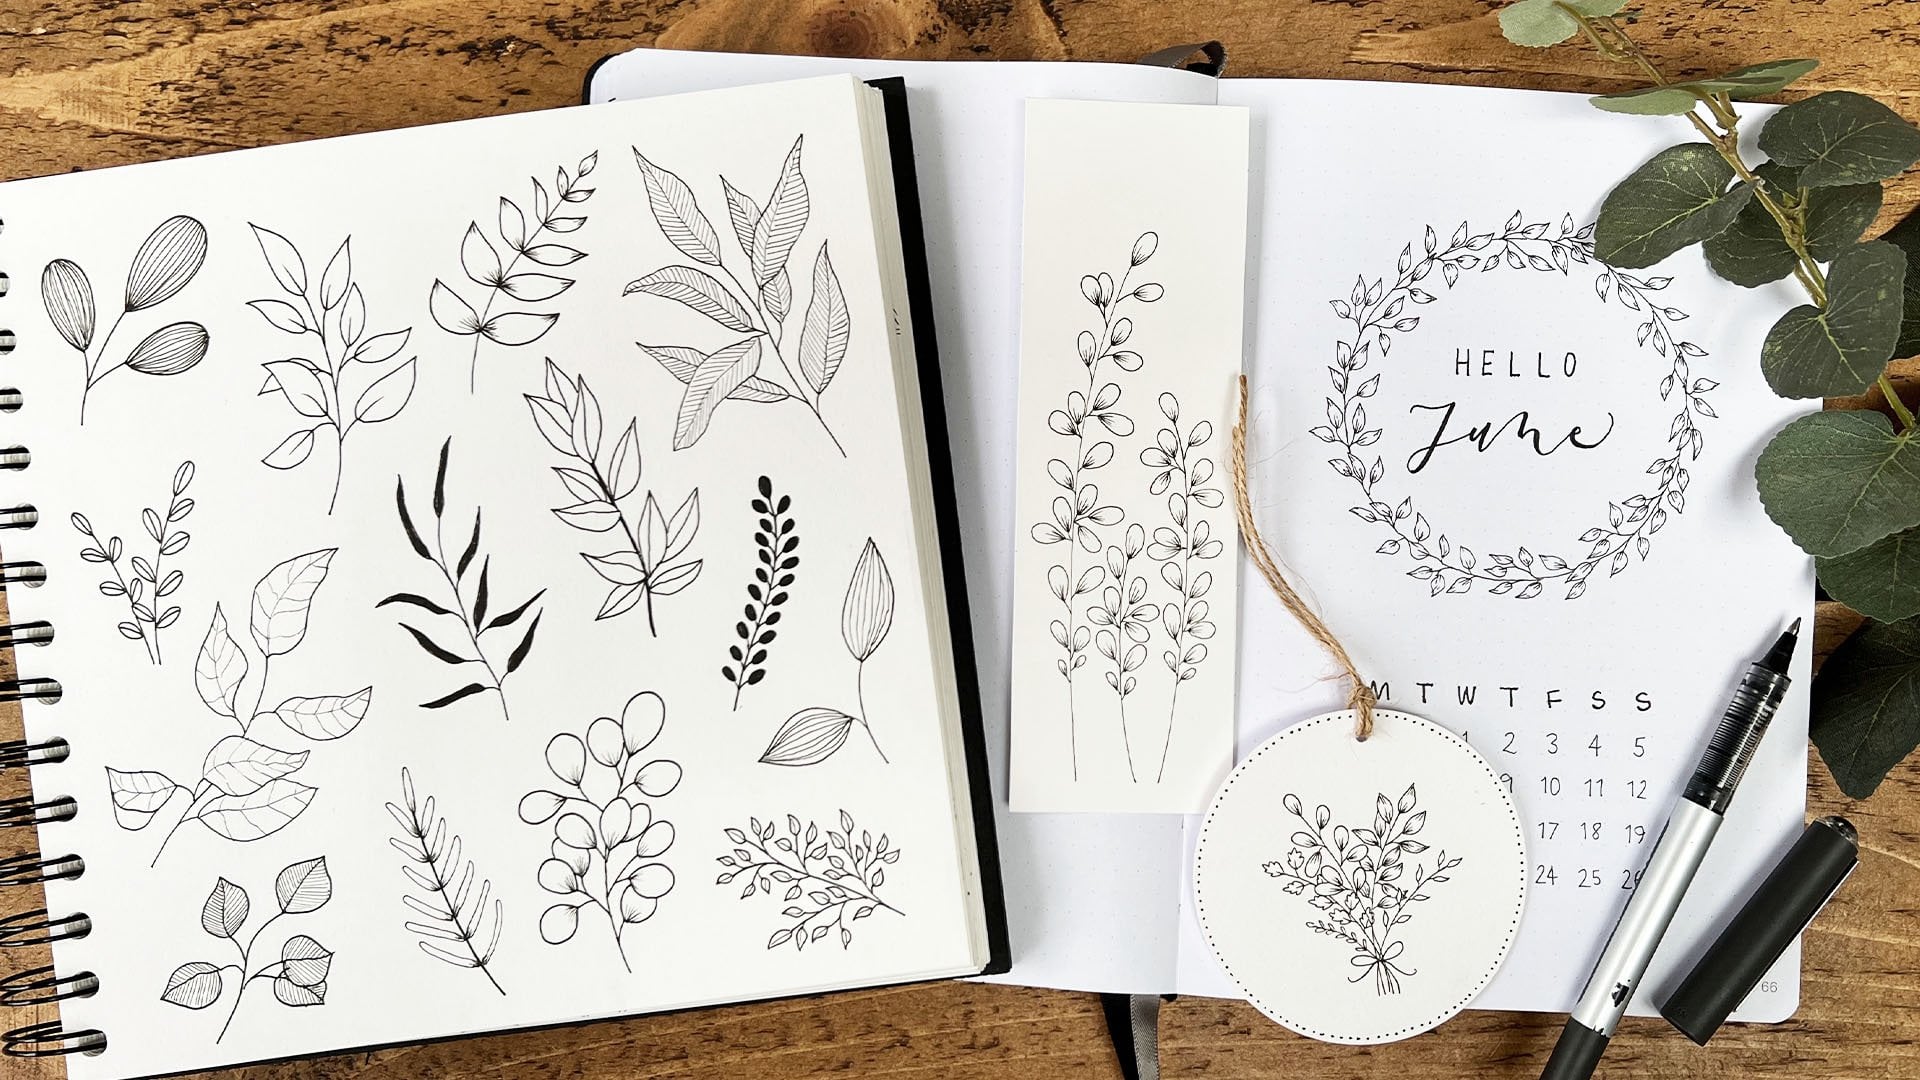
13. Project Ideas Part 1: In this video, we're
going to cover some project ideas and tips for how you can
use these leaves. There are so many fun projects that you can use them with, Similar to how I've shown
you in my other classes, when we're drawing
flowers and leaf doodles, we can make simple,
yet lovely gift tags to add a nice homo
touch to presents. We can make greeting
cards or bookmarks, and we can decorate our
journals with them as well. We can, of course, doodle
and draw them solely for fun and relaxation
in our sketch books, practicing different designs
and compositions without any particular
purpose other than to enjoy the process
of creating. First, let's talk
about Sketchbooks. It can be fun to come up
with different designs and compositions within
your pen Sketchbooks. These can be really relaxing without any pressure
and can also help you practice and give
you opportunities to experiment with
different ideas. You can then come back to
these for inspiration. When you want to
create something, you can just have a
flick through and see what inspires
you at that point. I always like to have some
sketchbooks handy for some doodling these mini
pocket mole skin. Sketchbooks are great for small designs when you don't
want to spend too long on something or if you
want to pop it in your bag to do some drawing
when you're out and about, perhaps waiting
for an appointment or on the train on
your commute to work. I'll just talk you
through a few of my pages in my sketchbooks. This one is a spread of some floating gingkos all
in different directions. It was really relaxing to draw. I mapped this out in pencil first before starting
with my pen. And you can see some of
these have quite a lot of veins and some have less. I really like the contrast
that this gave the piece. Overall, this is a spread of Eucalyptus all reaching
different heights. I added a little bit of
shading to the leaves, so you can see at the
base of each one I colored in the stalk to make
it stand out a bit more. These didn't take very long, and it's still quite simplistic, but with those added little
details at the shading, it gives it a nice
bit of contrast. Here I've done some
overlapping monstera leaves. They tend to face downwards. The stalk sits behind them, and then the leaf comes down. I quite like this one
because I've left quite a lot of white
space at the top. It's quite nice just to have that negative space
on the page as well. Again, these are quite simple.
Without too much detail. They didn't take very long here. I fancied adding in a quote. I saw this one on line I think, and I thought it
was really nice. The Earth has music
for those who listen. I first started by mapping out the lettering
where I wanted it to go, and then decided where
the leaves would sit. I knew I wanted them to come up sides and act as a
border to the lettering. I use five different leaves. The ca, the monstera, the fan palm, the banana leaf. Then I added in this royal fern, which is another
simple tropical leaf. But it's a great filler for
compositions like this. It's quite similar to the
Ca, in terms of structure. It has shorter rounder leaves which have a bit more
of an organic edge. You can see it's not smooth, they're a bit wobbler
lines than the Ca, which is a bit straighter. Again, I wanted to give this
piece a bit of contrast. I kept some of the
leaves really simple, like the monstera
and the banana leaf, which I didn't really
add any detail to. Then I added in some
shading to the other ones. Next we have some simple
banana leaves overlapping. For that contrast, I
colored in the background. And I think I used
my Tombow brush pen for this just to get
that good coverage. Here I've done a
vase of eucalyptus. Here are some floating
fan palms with some small individual
leaves to fill in the gaps. And then I just added
some dots in as well. It's a little more fussy
than what I'd usually like, but it was quite
fun experimenting with a different kind of design. Here are some more
banana leaves, again, overlapping each other. You can tell this is one
of my favorites because it appears quite a lot
in my sketch books. Unlike the other layout where they've all reached
the same height, I wanted to play around with the negative space in this one. Have this little bit of
a dip come down here. And I quite like how
this turned out. I think it's good practice not filling in every
space on the page, but instead leaving an area
blank to add to the effect. As you can see, I drew
some lines in some of these and then left some of these blank
for that contrast. In my bigger sketchbook, I have some larger examples
of eucalyptus leaves. I've made these stalks really bold to give
it some contrast. Again, adding in that a
bit more delicate shading to the base of each leaf. Then for these ones, I started
playing around with adding some gray using my
Tombow brush pen. I went over some
of the leaves at the back just to make
them a bit darker, to give them a more shaded look, added in a little
bit of white using my white gel pen for
some highlights. These are fun pages
to create when you're getting to know a new
leaf or a new subject. This is for the Eucalyptus. I added in some facts and drew an example of
both the young leaves, which are rounder and
these adult leaves which are longer. Then I also included the
flower that's in the plant. Then using those leaves
and this little flower, I created this
Eucalyptus wreath. Another page similar
to the Eucalyptus, one is this Monstera
page where again, I've added in some facts here. We've got these
baby leaves which are smaller and are unbroken, and then the adult leaves which have more of these
slips and holes. Here, I've just
experimented a little with addings in different
shading to the leaves. Here are some more
banana leaves. I started playing around with the shapes and perspectives
of these a bit more. Instead of keeping
that paddle shape, I made some of
these a little bit thinner at the top and made the outer edges a
little bit more wavy just to give it a
bit more perspective. Here I added a side view. I started with a curve
over to the right, and that's the middle vane. Then both sides of the
leaf fall inwards. I drew the first side
and then just added in a little bit of the other
side showing behind. Here's another page
of banana leaves. This one I looked at lots
of different images on line of leaves of
different angles, some twisted like this one. Some bending over,
I kept the backs of some of these leaves white and added the
veins to the front. You'll see that here and there. Here are a couple
of banana plants with leaves at different angles. Again using lots of different references to figure out how they would look and keeping
the base really simple. Here we've got a
couple of the ca, palms with these ones. I colored in the leaves using my gray pen and just
overlapped a couple of them. Just like in the class, how
we practice doing that. Added a bit more gray to the leaves beneath to make
them look a bit darker. Here I've got a couple
of realia leaves. I wanted to try
this one out again, overlapping, trying out a slightly different
level of detail. So we've got the
veins in this one. I've left this one
plain just to have a look and see
what that contrast would look like together. Got another page of
floating gingko here. Then I've also got lots of
other leaves in my book, like the elephant's ear. This is the heart's tongue fan. This is a horse chestnut leaf. These are oak leaves. Those are just a few different
pages of my sketchbook. Obviously, not all of the leaves were
included in this class. But hopefully they can give you some inspiration for
ways that you can just doodle and create different designs in
your own sketchbooks.
14. Project Ideas Part 2: These leaves are great
for using on gift tags. It can take just a few
minutes to make them, and it's a really fun
and easy way to add a handmade touch to a present
you're giving to someone. I've made a few
different examples here. You can keep it really simple
by just using one leaf, like here with this Rica palm. You can add simple lettering
to it, like on these ones. Or you can add multiple
leaves on this one. I've added two banana leaves overlapping one has
the veins, one doesn't. So it's got some contrast. This one has the
Monstera leaf in the front with this
Ca palm at the back. Again, this Monstera
leaf is quite bold, with very little shading. The ca has more shading
in the background. Again, it stands out, you can add a splash
of water color, either as a background for this one or inside the
leaf, like these two. For these tags, I used either water color paper
or mixed media paper. They could easily withstand
a little bit of water, but you can also use pens
or pencils to add color, which would also
look really lovely. Here I added
multiple monstera in that floating style like I showed you earlier
with the ginko leaves. So there are lots of
different yet simple ways you can play around with these. And you can also
use craft card or different colored card
for all of these. I mapped them out in pencil. First, making sure that there
was a bit of border and making sure the lettering
didn't end up looking squashed. So I usually start with
the lettering and then plan out where I want the
leaves to go afterwards. Then go over in pen, and then I just use
my whole punches and some twine to
finish them off. These leaves are
great if you want to draw your own greeting
cards as well. I like these small cards and these are pre cut cards I
ordered from a paper shop, but you could easily
make your own using card and cutting them down
to whatever size you wish. I use some very similar designs for these that are
used on the gift tags. Either individual leaves like this Ginko or overlapping leaves like these banana leaves and
this Monstera and the Rica. Just like that gift tag
that I showed you here, I've drawn three eucalyptus stems all at different heights. As with the gift tags, I mapped out the lettering
first in pencil, making sure there was a bit of space underneath so it
wasn't too squashed. And then sketched out where
I wanted the leaves to go, making sure there was
a bit of a border. And then it drew in the leaves before going over it in pen, this one is a
slightly bigger card and is a square instead
of a rectangle. So it's great for a
wreath designs like this. And again, this is a pre
cut card that I ordered. This composition takes
a little bit more time. So I wanted to walk you
through my steps for this. I started by finding something circular to draw around
for the central circle, I like to use these
metal circles I have from my cup machine, but there are so
many circular things around the house you'll
be able to use as well, just ever hunt for
the right size. I then drew a bigger circle. I just use a bowl for this. To give myself a guide for where the leaves
would come out to. In this wreath, I used
five different leaves. The banana leaf, the Monstera, the aka the Lia, and the fan palm. I started by sketching out the guide shapes for each
leaf overlapping each other. The paddle shape for
the banana leaf, a heart shape for the Monstera, an oval for the Aca, a circle for both the
Lia and fan palm. As the Ca and found palm
are both quite spiky. I tried not to have these
two next to each other. I then went around
again and started drawing in the leaves in pencil. At this point, I just drew in the whole leaf and
wasn't worried about which parts would be showing or not when
they overlapped. Once you get to this point, you may find that you want to change the positioning
of some leaves or the order like I did here. Just grab your eraser and make
any changes at this point. This is why it's great
to do this in pencil. Once I was happy
with where each of the leaves were sitting,
I grabbed my pen. I started by choosing a
leaf that I wanted to sit at the forefront so
I could draw it all in. I then went around the
circle and chose a few more that would be
sitting at the front as well. Next I drew in the leaves
that would be partially hidden sitting
behind another leaf that I'd already drawn in. Finally, I drew in the rest of the leaves that was
sitting further back, hiding behind the other leaves. I then carefully
drew in the circle. I usually add lettering in
first as this is quick to do, If you make a mistake
you can start over. It's less risky doing it first. But I didn't here, I just wanted to say that I
would recommend doing that. I grabbed my pencil again, mapped out where the halfway
point was in the circle and then sketched out my lettering before going over it in pen. You can also use a
light box and trace over lettering to get the
placement right if you want to. For a finishing touch,
I decided to add in a fine line around
the inner circle. And then added in some veins
to some of the leaves, like the banana leaf
and the aurelia. This is another wreath,
very similar design, but with a finer pen
and a bit more detail. You also use a gold pen for
the circle inside the wreath. And then added some gold
dots around the card just to give it a bit of sparkle
as it's a birthday card. You can also experiment
with different shapes. Here is an example of a square. This one is a bit fuller, the leaves are
overlapping a bit more, they're all a bit
closer together. For this one, I also
included the royal fern, which is this one here, a simple birch leaf, and also this side view
of the banana leaf. Again, here is another
circular example which is a bit fuller than the card examples I showed you. This one again is using
those additional leaves like the royal fern,
the birch leaf. Yet there's a side view of the lana leaf in there as well. It also includes a bolder
frame for the circle. We can also use our leaves
to decorate our journals. And there are lots of
ways that you can do this from big designs
on your cover pages, using wreaths like we've
just looked at in the cards. Or by using borders around
the edge within a layout. Or just using them as
quick little additions to decorate the page. Here's an example of a weekly page layout using tropical leaves to
decorate the bottom edge. To do this, I first mapped
out what I wanted to use the page for and figured out
how much space I needed. I wanted the leaf border to
be quite a big presence, but not taking over. I didn't want it to come
higher than say 23. Using these small dots as grids, I worked out how many
lines I needed for the title and for these boxes, and then I knew how much space I had to play with
for the leaves. I used my pencil to
sketch a guide for the top of where I wanted
to the leaves to go, and I wanted them to come
round in a nice arch. I drew that in first as a guide. I then sketched in those
guides for each leaf, just using that initial
shape that we started with. The circle for the area, the heart for the Monstera, the oval for the
Erica, and so on. In these ones I've added
some gray shading as well, using my Tombobn into some
of the background leaves. Here is a very simple design
with leaves coming in from the outer edge with a
very simplistic style just using lines and no shading. Then one more example of a spread using banana
leaves at the edges. Again, really simple with just the outline so that
they're not too distracting or overpowering for the
page using these are a really nice way to add
a bit of decoration. Literally only takes
a couple of minutes, but it still looks really nice. You can of course,
add some color or more detail to
these if you want to. Okay, I hope that was
helpful and inspiring and gave you some ideas for
how you can use your leaves. There are lots of
other ways as well, from bookmarks to decorating your own wrapping paper
or even envelopes. And I would love
to see your ideas. The next and final video is a short conclusion.
Keep watching.
15. Conclusion: I really hope you've enjoyed
learning how to draw these leaves with me and feel inspired to create
some projects. I would really love
to see your work, whether you decide to stick to drawing the
individual leaves, which is fun and
relaxing in itself, or you wish to experiment with different
designs and projects. I would love to see what you
create to share your work. Just head to the
Projects and Resources tab and click Create a Project. You can upload
your image and add a project title and description and any comments you have about your drawings
or the class. Your feedback always
means so much to me. Please do leave me a review. These are so encouraging for
me to see and to read and also really helpful
for other students who may be thinking
about taking the class. If you're on Instagram, you can tag me in any work you share at Sharon Stevens Design if you'd like to see more of my
classes and more of my work. I have lots more classes
here on Skillshare. You can check out my other
doodling and drawing classes or take a look at
my many watercolor classes. I have a popular
class on drawing flowers where we draw
ten different flowers. Another botanical
drawing class on basic leaves for relaxation. I also have an introduction to doodling class if you
haven't seen that yet, which is great for beginners
if you love watercolor. I also have lots of
watercolor classes. You can find all of these
classes on my profile page. I also have a watercolor book that is great for
beginners and for learning how to use watercolor to watercolor for the soul. And this has 20
fun and relaxing, step by step projects. Okay, once again, thank you so much for watching
and happy drawing.
 Sharone Stevens, Watercolour, Illustration & Lettering