Transcripts
1. Welcome: Do you have a love of
handmade books like me? Are you interested in exploring new and different ways of
making unique journals? Welcome to the piano
hinge journal class. This is a class where you'll
learn how to make a nifty. No. So yes, that's right. I said no expandable
journal with a piano He. This class is aimed at
beginner level of it, suitable for anybody
who'd like to know how to make a
piano hinge journal. Hi, I'm Michelle. I'm an artist who works
in mixed media textiles. I have a love for handmade
books and journals, which started back in the 1980s. I was after a journal that had paper which I could
watercolor on, maybe use alcohol markers, drawer with graphite
or charcoal, even do collage in. You would think that
wouldn't be a hard thing. I just could not find
anything that was suitable. I decided that if I couldn't
find what I wanted, I was going to make it. And I'm still making them today. I'm so excited to be
presenting this class to you. It's one of my
favorite journals. And once you understand how it's structured and how
it can be used, you'll fall in love with it. Just like me, the
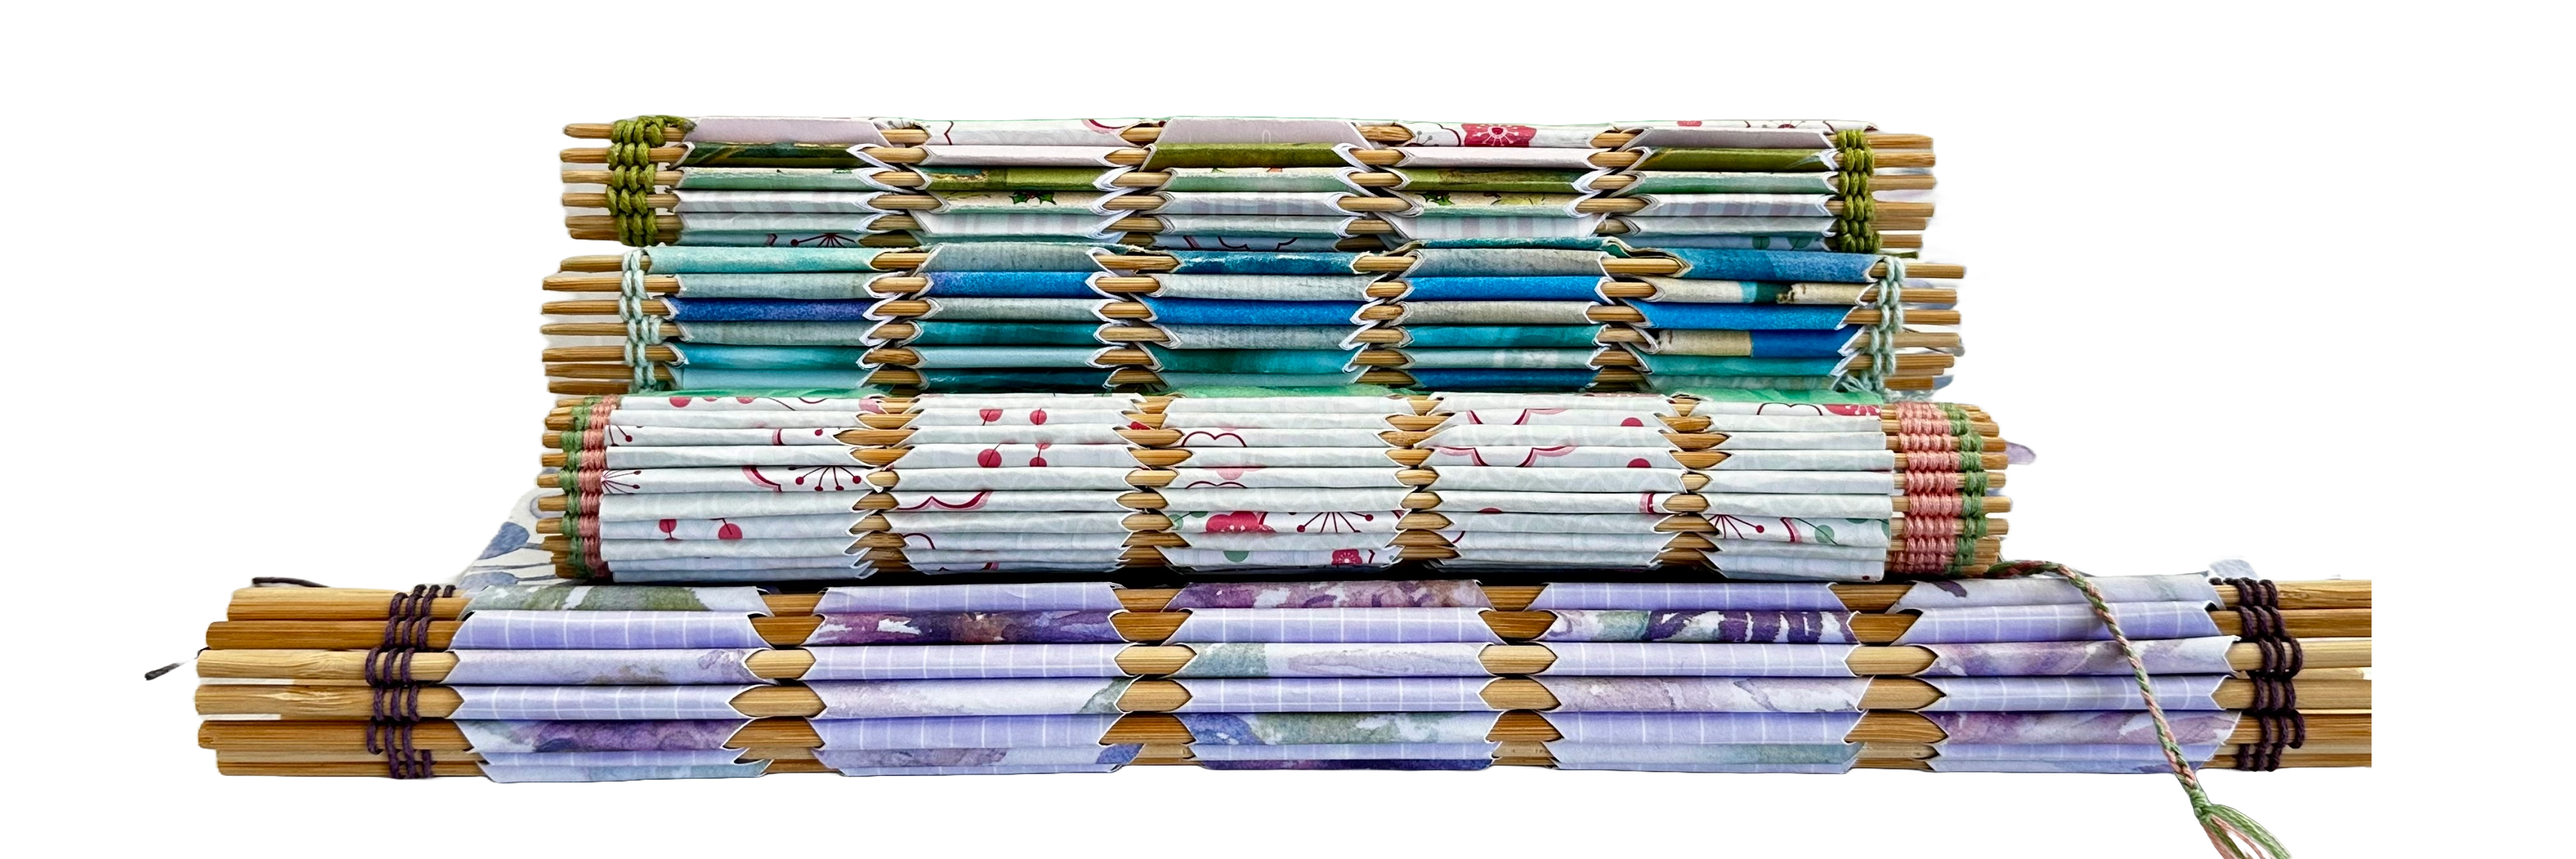
journal is called a piano hinge
journal because it's constructed reminiscent of
the hinges in a piano lid. The beauty of this journal
is that it's expandable, which means that you can curate the pages that you
have in your journal. You can unbind it,
shift pages around, or even add in new pages and expand the size
of your journal. The journals can be made
in different sizes. Five, one for travel journaling, landscape size in
a portrait size. And of course, there's
nothing stopping you from making it in any
size that you would like. I've also made you a PDF book, which is under the Projects
and Resources tab. Head on over there. Download it and let's get started
making journals.
2. The Project: The project for the
class is pretty simple. All you need to do is follow
along with the step by step videos and create the
journal of your choice. I will be demonstrating the
A five soft cover journal, the portrait size journal. And I'll also explain how you can make the landscape
style journal, if that's your preference. We're going to work
through the steps of choosing the type
of journal you want, the style of paper, and whether you want
a decorative spine, or whether you just want
a plain paper spine. Then we're going to work
step by step through making the folios or signatures
for your journal. Depending on which one you
make, creating the coverboard, hinging and binding, it'd be fabulous if you could upload
your projects to the class. Just have a look at the tabs underneath the video section. Click on Projects
and Resources and follow these steps for uploading a picture of your journal. I'm excited to see
what you create.
3. Supplies: The supplies you're
going to need to make the journal
are pretty basic. A cutting mat, some
glue bone folder, something to score your
papers is very helpful. A paper trimmer, a
pair of scissors, or a craft blade for
cutting a pencil eraser, and a rule left for
measuring and marking out. You're going to
need some cardboard to make the covers
of your journal. I always try to use
up recycled bits. Just needs to be sturdy enough so that it protects
your pages inside. You can use cardboard box
or anything that you have. That's a little bit
on the sturdy side. We're going to need paper. There are many different
papers you can choose from depending on how you plan
to use your journal. For example, I've made journals
with watercolor paper. I've used grid paper
and graph paper before drawing cartridge paper
or even lined paper. This paper is by Hewlett
Packard in its 100 GSMs. It's copy paper, but it's
a little bit stiffer. I'll be using this paper for the journals that I
create during this class. There are two methods
for making the journal. One has a decorative spine on it and one is just with
the plain paper. I'll give you
directions for both. If you're going to make the
one with a decorated spine, you'll need some
colored paper for that. You'll also need paper for covering your front
and back cover. And inside the front
and back cover, just the kind for
scrapbooking is fine. Or you can recycle
wrapping paper, craft paper, anything
that you have. You're going to need some
kind of bamboo skewers, dolls or sticks to slip through the hinge
part of your journal, which holds the pages together. Then you're going to
need something to bind either end of your journal to hold the sticks nice and firmly.
4. Construction Overview: The journal will look
something like this. With skewer and hinge spine and a hard cover if
you choose to make a hard cover back and front, this one is a
landscape orientation, you might do a
landscape orientation, you might do a
portrait orientation. You might choose to make a
smaller journal half the size. I have here some sheets of
ordinary printer paper. There are standard size four, which is what we
use in Australia. If you're in a
different country, your paper might be
a different size. For example, in the US, you might be using letter size. This is an example of a
signature for a smaller journal. A signature, if you're only using lightweight printer paper, it could consist of
three to four sheets folded inside each other, and the hinge will be
made along this edge. That will make you a
nice plain journal. If you would like
a decorative edge on a journal like this. That can be achieved by instead of having
all plain papers, using a printed patterned paper for the outside layer
of your signature. If you're making a
smaller journal, you'll be using the landscape
oriented hinge template. If you're making a
landscape journal, your page will go this
way and you will be using the landscape template
to create your hinges. I'll be doing a
portrait journal. Just so you get an idea
of how this journal is constructed with a decorative
spine like this one. Your pages are singly
joined together with a strip of colored
paper on either side. Then on the spine, we use our template to indicate where
we're going to make the cutouts for our hinges. If you're going to make one
that's plain paper with plain paper binding
holding it together, this bit would be just plain paper strips holding
it together. Then you just simply follow along with the way we're
going to do it with colored paper only
you would just be using your plain white paper.
5. Make A Hinge Template: Making the templates for the journal Hinge tabs is
fairly straightforward. First of all, you need to know the measurement of the
length of your paper. The side where you're going to add your hinge, for example, landscape or portrait, you take the measurement of the length of your paper on the side where
the hinge is going to go. Then you divide it by five, which gives you 12345
tabs for hinging. Sometimes it works
out better if you use millimeters than
if you use inches. For example, the
landscape template that I made came out in
measurement quite odd. I think it was like 11 16th or something of an inch when
I was trying to work it out. Whereas in centimeters
or millimeters, it was 42 millimeters, or 4.2 centimeters, which is
much easier to measure out. The measurement you get when
you divide your paper length by five gives you the centers for where
you need to cut out. You just need a
piece of paper the same size as the length
you want to make it. Because I was using
printer paper. I just have a sheet
of printer paper. I just cut a four inch strip, so the width of the
template is 4 ". And I did this same for
portrait one, it is 4 ". It doesn't need
to be bigger than that because that
just gives you enough to hold onto it while you're
marking in your hinge. I have my measurement of 4 "
by the length of my paper. I've cut my four inch strip. Then what I do is
fold it in half and I make a line at a
quarter of an inch. Realistically, your hinge area
might be bigger than that. Mine is mines three
quarters of an inch, but I like to cut a little bit smaller than that
because you can always cut a bit more out, but you can't add any in. If you cut the hinges
too big hinge tab, the skewers just fall
out all the time. I start off with that
measurement and if I need to, I can snip a bit more out. When I'm making my journal, we've got our four inch strip. We've folded in half, and I've ruled a
quarter of an inch. I've calculated my measurement, and I've gone along and
made these marks up to the line at every 42 mill. You then make your
little triangles. The easiest way to do that
is to use a clear ruler. Just a little clear ruler and I like to position it along
the line I've drawn. Keeping it. If you've got a
grid ruler, that's great. This one's a little grid. Just try and keep it
at a right angle. And then I just draw a little
line either side of it. Once you have that, then
it's just a matter of using your scissors to cut out. Now the ends are just a
little half of a triangle. Then I just cut along my lines up to the
quarter inch line. These templates will
save you a lot of time because you won't have
to measure for every page. You will just hold the template
up and make your marks. If you don't want to
have the diamond cut out on your spine to
show the skewers, you can actually
just make a snip at the line on each one when
you're marking your journal. You'll just where the snip is, you'll just cut a straight line. By doing that, you get a spine
that doesn't show skewers. There's my little
template all made. That is how easy it is
to make your template.
6. Small Journal Creating Signatures: For those of you making
the small journal, which is your
standard paper size, your standard
printer paper size, folded in half with or without a decorative
paper on the outside. You might choose just to have four sheets of plain paper
without the decorative paper, or you might choose to add a decorative paper
around a signature. In either case, you'll have
four pages that are folded. Well, we're not exactly going to fold them because we want a rounded edge so that our skewers will
feed through easily. What we do is we line
the skewer up in there, bring the edges together, and make sure you've
got everything even with your skewer in there. Work your way up to the skewer. It's probably easier
if you do it this way rather than put a
sharp crease in there. We want to roll the
paper over that skewer and make a crease either side of the skewer
on both sides of the paper. Still trying to keep everything
even looks pretty good. You can use the handle of
scissors to help you with this. A bone folder or just your
finger and fingernail. Whichever method you're going
to use to make this crease, you just need to be
careful that you don't make holes in your paper. We just go up as close as
we can there and create a crease right up
next to skewer. Then you turn it over and
do that on the other side, which creates a little bit of a rounded space for your
skewer to thread through. You just do that with however many signatures
you are going to have. Once you've done that to
all of your signatures, then you're going to be using the template that
we made earlier. You go in and mark. We want to make these
little triangle cuts. Just go to the center of the arrow shape like that. I never worry about
marking the ends. I just make a hamper
cut when I get to them, then I use scissors for this. But you can use a craft
knife if you prefer. You cut your samp off from
the corner like that, Just cut it to that case. Then along here
going to your case, make your little triangle cuts. Go carefully so that
you don't go too far. Eye eyeballs, you can draw them on if you want
to be more precise. At the end of the
day, it doesn't really matter because you
don't see that much of it. You just see the edge part and the skewers will
cover those little holes. You can actually do this
without taking triangles. You can just do slits
if you want to. But if you do that,
you don't get to see the skewers
through the gaps. I like to see the skewers
sitting in there. You just keep going along, making sure you cutting up to that crease line,
don't go beyond it. And then taking that little
shamphor off the corner, which basically more or
less a half a triangle. Just go ahead for those
of you that are making the small folded journal and make up your
signatures of four pages, either with or without
a decorative paper on the outside your hinges, using the landscape template, cut your little
triangle bits out.
7. Large Journal Calculating Hinge Strips: Once you've decided what
size journal you're going to make and you've
collected your papers, if you're making the one
with the decorative binding, then what you need to do is audition your
skewer to work out how much space you will need to leave in the spine
to fit your skewer. The way to do that is to
just using a piece of paper, put your skewer inside
it, wrap it around, and then using either a
fingernail or a bone folder, rub up against the
skewer like that, do it by sides like that, and then lay it out
and measure it. I'm going to be using these really big skewers and
they're reasonably thick. My measurement came out to
be five eighth of an inch, but I know that I'm
going to be using two thicknesses of
paper in the spine, and it's going to
be a little less flexible to one sheet of paper. I have decided to allow
just a little bit more and I'm going to make my
spine allowance three, four of an inch. In the past when I have been using narrow skewers like this, I've allowed a half an
inch for the spine. This measurement will largely
depend on the size of twig, skewer, stick, whatever
you're using in your hinges. Go ahead and audition your
skewer with some paper. Then work out how much
you need to allow for your hinge measurement to
comfortably fit your skewer in. Now that you have
auditioned your skewer in your scrap piece of paper and worked out what you
need to allow for the hinge part for your
skewer to comfortably fit in. We are then going to cut our decorative papers,
your decorative papers. When you come to do them, you need to work out. First of all, which side you're going to be putting
your hinges on. For a landscape side, you will be cutting your
paper the exact width of your landscape book with your hinge part
on the short edge. For a portrait, one like this, you'll be cutting your papers to the long side of your paper. This is the way that
we attach the papers. What we'll be doing is
attaching our strips, one on one side and
one on the other. Now to facilitate that, the measurement you
took for your spine or your hinge part will
be in the center. Then you need to allow a
quarter of an inch either side to attach your papers. I like to draw the
line so I know where to put the glue and I have something to
line my pages up next to line it up like that, once it has the glue on it and smooth it out and then add
the one on the other side. I allow some time for
drying and then I go back and put the piece over the
top on the other side. The number of strips
that you require will depend on how many folios you're going to make
two pages together. Like this is called a folio Because of the thickness
of the hinge part, it's best to only have a folio rather than
a stack of papers. Each skewer will
attach two pages. I'm going to have 22
pages in my journal, so I know that I need 22 strips of paper because I'm adding a
strip either side. To work out your measurement, you take your allowance for your hinge and add a
quarter of an inch either side. That made my one and a 4 " wide. You need to work out exactly what measurements
you would like. Go ahead and work out
your measurements for your strips and cut
your strips to size. Oh.
8. Large Journal Constructing Pages: Now we're going to attach our
papers to the first part of our hinge using something underneath to protect
your table tops. Just apply your glue. I like to use a glue stick. It's less messy, I
feel, than liquid glue. Just make sure you
put enough on there. Then attach your first
paper on one side, it's lining it up, and get ready to do your next
paper on the other side. Go ahead and attach all of your papers to one hinge strip. Once you've done all of your papers with the
first hinge strip, come back and position the
next hinge strip over the top. Now that the paper
has been joined together with the
strips on both sides, we have to prepare
the roll section in the center of
our hinging strips, where our skewers
are going to sit prior to making the cuts
for our hinge tabs. The way to do this
is to lay a skewer in the center of
that joining strip. You have to encourage your paper to curl
around the skewer. I do this by laying the
skewer there and rolling the paper up because it
will be a little stiff. Once I've got it curled a bit, then I concentrate on making
sure my edges are together, pushing the skewer up
into the rolled piece of paper and rubbing along
just a little bit. Either end with my finger nail to begin to put the crease in. Just make sure your
edges are lining up. Okay. Then I just use the Baron folder to go
up against it and put that crease in there
and then turn it over and do the same
on the other side, just rubbing into the
crease on the inside. You'll see that we now
have this channel. Our skewer will slip
in there nicely. And then we can cut our
hinge tabs along the edge. So go ahead and do
that with all of your pages in preparation
for the next step, which will be cutting
out the hinge tabs.
9. All Journals Folding Hinge Tabs: Whichever journal
you're going to make. The next step is the
same for each one. What we're going to
do is take our pages, we're going to fold these
little tabs along here, which are our hinging. You fold all of the odd ones one way and all of the even
ones the other way. Exactly the same on every sheet. I'm going to fold
the odd towards me along that crease
line that you made. And then the even to the back that you just continue to
do that with everyone? Exactly the same I did. The odd ones towards me along that case and the even
ones away from me, odd away towards you. Just line them all up
together. Ready for the next? I want you to go
ahead and do that. Whichever journal you're making, the portrait and
the landscape, one, you'll do exactly the same
odd towards, towards you. And go ahead and do them all and we'll meet back
here for the next step.
10. All Journals Hingeing Pages: The number of
skewers you need for this part is one less than the number of folios or
signatures you have here. I have 11 folios, which creates 22 pages for
me in my portrait journal. And I have ten of
these skewers here, ready for this little journal. I have six signatures here, so I have five skewers
waiting to hinge that one. The way to hinge
this journal is to pick up your first page
and pick up a skewer. Pass it through the first
odd hinge on the first page. Pick up your second
page and pass it through the even or second
hinge on your second page. Go back to the odd one
on the first page, and through the next
even on the second page, and back to the odd
hinge on the first page. Now we've joined two
folios together, so we just continue
in that manner. Pick up your skewer, go through the first hinge
on the page that's attached. Pick up your next page and go through the even hinge
on the next page. Go through the odd hinge
on the previous page, and the even hinge
on the next page, and the odd hinge on
the previous page. And now we've got three pages joined together or three folios. We just continue like that, pick up, read through the first
one on the previous page, the second on the new page
that you're attaching back, the odd one on the previous through the even
one on the new page, and back through the odd
one on the previous page. Go ahead and thread up your
prepared pages through the one on the first through
the even one on the one you're attaching through the odd through the even
through the odd. When we come back, we'll go on to the next part
of constructing our journal, which will be making covers.
11. Cutting Hard Cover Boards: The cover boards for
the hard cover journal are made from a
sturdy cardboard. I like to use recycled
cardboard most often I use the backs of art pads. Once I've used all
the paper in the pad, I just save the
backs because it's a nice size and it's not that hard to cut
through working out. The size of your board depends
on the size of your paper. What you want to do is just allow an eighth of an inch on
three sides of your paper. You don't need to add
it on the hinging side. The hinging side, your board will sit right along
the edge of your paper. Then you just cut two
exactly the same size. The method I use for cutting my cardboard is usually
with a metal ruler. Although you can use a sturdy
ruler of any description, you need to be very careful, cause the craft knife can
actually cut into the rule. And if you slip, you
might cut your fingers. I approach any
cutting with caution. I like the metal because my craft blade
doesn't cut into it. I gently go down the side of my ruler and just keep going several times until
you get right through. If you have any rough edges, it's best to get rid of them. I use just an ordinary
nail file emery board, or you could use a little
bit of sandpaper and just rub off the rough edges. It helps when you come to
attach your paper covers over your cover boards if
you don't have a edge.
12. Small Journal Covers: I'm just going to show
you what the journal looks like with pockets. I like these little
pockets to carry little bits of ephemera
in sticker sheets. Sometimes I put these
envelope type arrangements where I can slip in some little bits of
paper or something. I carry a bookmark sometimes as well I have the same
on the back cover and another little
fold out place for keeping bits of ephemera that I might want to
attach inside by journal. The other way you can approach
your covers is to not have any pockets to finish
off on the inside. To cover up your cardboard
with paper like this, you would cut your paper
and just show a little edge of your front cover paper
on the inside pocket cover. For this small journal, I have provided you
with templates. Just bear in mind that
my templates were created for the paper
size here in Australia, the standard size being a four. One is for the cardboard covers or bookboards as
they're commonly called. One is for the patent paper, or the paper that you chose to cover your
cardboard bookboards. I have allowed an extra
eighth of an inch around the edges so that
if I turn it upside down, you'll be able to see my
hinge sits against there. And I have allowed at least an eighth of an inch all the way around to protect my
pages inside the covers. The three, four of an inch, I have allowed to to create these hinge
parts for our covers. So I'll set that aside
now. I'll just show you. This is the template I've
created for the paper covering. I've allowed enough for a pocket on the inside
of the journal. If you don't wish to have
a pocket on your journal, simply cut off your paper
along the dotted line here. The important thing
to remember when you're creating
covers is that you need one going one way and
one going the reverse. Particularly if you've
got a design that you want at the bottom or
at the top of your journal, otherwise you can just flip it. But if you don't get it right, it's going to be a problem
when you come to attach it. I've written that
on here for you. Cut one and one reverse
from patented paper. These are my cover boards. I've chosen to use
recycled manila folder. It's not very stiff but I think that will be fine for my purposes for using
a small journal. This will be a soft cover, it'll be a little bit stiffer
once the paper goes on. If you would like to make a small journal
with a hard cover, then just follow along with the instructions for the
large journal cover. Just remember to adjust the cover size to
fit your journal. This is my paper cover. I have cut it off. A recycled painting, it's
a little bit bubbly, but I'm hoping I can smooth
it down when I glue it on. If not, I'm not too worried
about that, the size. As I said, it's a four. So this has been cut
from this template. My page was a little bit short. I've allowed the short
bit to be on the pocket. I won't really miss that little sliver of about
an eighth of an inch. You can see here, I have
marked them with the three, four an inch which
allows us to have a roll over for our hinge. Now I'm going to go ahead
and cover my boards. What you do is line your
board up inside your paper. I'd like to make a
couple of marks there so that when I've finished
applying the glue, I can come back in
and know where I'm lining up to it. Just makes it a
little bit easier. Apply the glue to my board because my paper is already a little bit crinkly. And I'll do the paper with
a little bit of glue. Last try and get a good
covering of glue on, I use a glue stick I put on paying attention to
the edges in the corners, make sure I've got some tachy
on the inside part as well. If you get any lumps of glue, try and remove them because you might be able to get them out when
you try and smooth down. Now I might just add a little bit on the
paper, not too much. That's a small amount to
help with the bonding. Now, I'll line up
my bottom corner, my bottom edge, and then making sure my
top edge looks okay. And then over to this side. Just moving it a little bit. Sometimes you need to
reposition when you're happy, Give it a good rub over. I like to use my
large bone folder to try to help smooth out
any bubbles or wrinkles. I may end up with a few
in this because I'm using the recycled painting
which was a water color and it did have
buckling in the page. That's all right. It will just add a uniqueness to my journal. This process of rubbing
out to make good contact, you can use a
expired credit card. You can use the edge of a ruler. But if you're going
to use the ruler, make sure your ruler
edge is clean. You don't want to go dragging dirty marks across
your cover paper. I'm pretty happy with the way that's come out. It
looks pretty good. Now I'm going to go around
and fold these edges up. Just put the creases in, ready for the next step. Not going to rub here, because this one we're going
to roll to create our hinge, where I'm going to create
this little pocket, it has a little flat here. I'm just going to crease
that so that it is in line with the edge
of the cover board. And put a crease in there
because when we glue that over, we'll be gluing that under
there and over like that. I just want to wait a little bit until that one dries some more. So I'll go on and do
this one double checking again that I have got one going one way
and one the other. The other thing I'm
just going to show you here is that because I was
using a recycled painting, it wasn't quite wide
enough on the edge there. I've added a strip of paper that I have actually used
here in the journal. It's an off cut and
I've just glued it on.
13. Small Journal Covers 2: My book boards are dry enough. Now that I can
continue covering, gluing with the paper, the first thing I'm
going to do is fold up my little pocket where I
folded that tab on the edge. I'm just going to apply some
glue to that, glue that up. Just rub it into place with whatever you're using
to smooth your papers with. Then this one is going
to come around over the top of it, just here again. We're going to go along
here with the glue, making sure I've
got plenty on there and now I can fold
that in like that, smooth it down,
give it a good rub. Just pick up any bits
of glue that pop out. Then this one's going
to go down here. And lastly, we'll make
the hinge on the side. Lastly, we're going to make our hinge and we need
a skewer for that. What we need to do is just
encourage a curl in it. If you're making a smaller
journal with a harder cover, follow the directions for the landscape or
portrait journal covers. I line my skewer up
against that line because that's where my
signatures are going to end. I curve around it, just encouraging my paper
to curl over the hinge. It's the same process that we used for our papers
when we created that crease along the
edge here and we made the rounded channel for
our skewers to go down. We need to do the
same thing here, Just checking that you
are in the right place. And I am, I can
see my line there. I haven't gone too far. The other thing you
need to check is that your edges are
lining up here, not out of place. And then you can
start to rub into it the same as we
did with our papers. And then I check the other end before I do the middle
that that looks right. That my hinges and
from up in there and that my edges
aren't hanging over. I'll go for my small
bone folder for this. If you're doing this
when there's wet glue, be super careful because if there's wet glue
you'll poke a hole. I also like to have a nice
crisp edge on this side, on the outside of the cover. Just run along there as well. We've created that
little channel in there. And double check again that
covers are sitting nicely, then you can go ahead
and glue it down. This bit is not glued
because that's my pocket. And you can see that
my recycled painting was watercolor crayon and it's
rubbing off on my fingers. I may have to seal this
with some spray sealant. When I'm finished in here, we're going to put some glue. We don't want glue in
this channel area here, that's where our
skewer will sit. A little bit more glue on here. You can come right
up to that cre stitch, but don't go over it. If you've got any
lumps, get them out. I like to leave my skewing
because it keeps the channel nice and rounded
and roll back over. Checking your edges
are not going to be sitting overlapped that they actually
meet properly. Press it down. Pick up your bone folder, go back, put your
crease back in and rub. Make sure your paper is
making good contact in there, that you've got enough glue
to hold it all in place. Pink it together if it's
not adhering very well. Double check that you happy, then you just put it
aside and let it dry. Once it's dry, you can use your template to mark
your hinge positions. Just be aware that
when you allow a little bit of extra on your cover to
protect your pages, your template won't
fit exactly anymore. What I do is eyeball the position and get
it pretty right. I'm happy with that. I think we're about maybe just a little bit more that way. You just position out so
that you think you've got even either end mark in your hinges like we've
been doing, ready to cut. So go ahead and make your covers either with or without a pocket. Next we're going to attach
our covers to our journal.
14. Small Journal Covers 3: Now we're up to attaching a
cover to our small journal. I have my back cover
and my front cover, I just need to make sure that I have my journal
going the right way. I've got a design on my
paper that goes one way. I just check for that, then have a look and see, I need to push my odd
tabs on this one away. This is my front color. I need to decide what I'm going
to do with the even tabs. I could push them to the
inside and they would just sit on the inside
in there out of the way, Or I can try and make them
disappear by forcing them back inside the gutter that we've created for our
skewer to go through. That's my preferred method. The easiest method is just to roll them in and leave them loose
sitting in the inside, But I like to try and
make them disappear. The way I go about that is I
just put my skewer in there, then I push down on the hinge part to
flatten it a little bit, Holding it pinched
in your fingers, and pushed down on it
until it squeezes out. And it looks like that the next step is to
encourage it to go inside. You can use your fingers for
that as much as you can, just rolling it up inside. I particularly like to use
the edge of my metal ruler. I just tuck it in there
as much as I can, encourage it out of the way. And then using the barn folder, I just smooth it
down a little bit. Now, it's far enough
down that when he he my skewer will sit
just on top of it like that. And it has created a little gusher in there
for the skewer to go into. If you're making a
hardcover journal, then I use an
alternative method. Watch the videos for the larger journals and
see how I do it for those. This one needs opening a little bit so I can
get it a bit flatter. It's better just pushing down
on it, squashing it down. Then using my fingers, my fingernails to roll it inwards a bit and
encourage it down. I get it to about that stage. And then I like to use
the edge of my ruler to see if I can get
it to going further. Then pinch it up, then you can test it out to you. Use your skewer and
just make sure you've created that little
gutter for it to sit in. It sits in there like that. But that's the front cover. This is the back cover again. You have a look and
see on this one, we're going to have to
do it with the odd ones. Okay? So that's our back cover, ready to go now. We're going to attach them now this one is
through the odd one through the even one
through the odd one through even one
through the old one. So that's our front cover
on this one goes on here. This one needs
opening a little bit, it's got a little bit flat. The last ones are always
the hardest to get on. Sometimes you need to use a
skewer or a finger nail or something to help thread, just to lift your threading
skewer into position. Because the hinges
you have together, the harder it is to manipulate, sometimes you just need to use something to
lift it into place, opening the hinge
that it's going into, and trying to scoop under to
get it to go in like that. That's our back cover. That way all in place, hinges looking quite neat. All that remains to
do now is to bind the edges of the skewers with
some string or some twine. And to snip off the pointy edges so that we don't hurt
ourselves on them. Our pages will open nicely for the rest
of the small journal. Follow along with the making
of the large journal, because the finishing
off is exactly the same.
15. Cover Mistake Alert!: Let me show you these
cover boards that I was working on and
not concentrating. I've ended up with them
both going the same way. But when I come to use them, I'm going to have
a funny journal at the front with the
strip at the top. And then when you turn it over, the back will have the
strip at the bottom. Unless you want a journal like
that to make a statement, you just need to pay attention.
16. Landscape Covers : For the Landscape Journal, if you're using scrapbook paper, you're going to need
to join two sheets together for both the
back and the front cover. I have joined my
papers like this. You can use the same patterned
paper if you have it or something that
goes together nicely, like I have in this one. To cover the journal cover, you need to allow some paper around the edge and
work out where you want the join to sit on your
cover, on the outside. On this one, I thought I'd just have it off to the side a bit. I positioned on the
paper according to that. Then you need to
allow enough for the hinge and also to come back in and create this little bit of covering here in front of me. I have two scrapbook sheets
of paper that I have joined together using the
information strip as the adjoining place. I've already marked in where all of the lines will go and
I'll talk you through those. The first thing I do
is put my paper in the correct
orientation and bring my board out and lay
it on the paper. From experience, I know that
I need an inch and a half to have enough paper to roll it onto the board
and glue it down. So with that in mind,
the first place I make my measurements
on the opening edge. This is the opening edge. I'm currently working on a
paper for my back cover, which means that my hinge side will be on the left
using my roller. I'm measuring in an
inch and a half from the edge of the paper and make some marks at the end of the paper so that I
can rule in that line. Make your marks with a pencil. I make mine with a darker marking pen so that
you can see them clearly. If you don't have a
clear grid ruler, just do it the old
fashioned way. Measure in your inch and a half and just mark either
end of your paper, lining up your markings and
rolling straight through. Once you have that line,
choosing one of the long sides, marking the next 1.5 inch with the same method and
roll that line through. Only this time we're going to extend it to the
end of the paper. So line number one and
line number two goes all the way across one
long edge at a one, a two inch margin. At this stage, I bring my
board in and I lay it on the paper where the two lines intersect. So right on that. And then I make sure it
lines up with that line across there and that
line along there. And then just draw a line
along the edge of my board. And while I'm at it, I draw a line across the
bottom of my board. That gives me the position where my board is going to
sit on the paper. Now you'll notice that I didn't measure this edge of the paper. There's probably going to be a little bit more than an inch and a half on this side using
the scrapbooking paper. It doesn't really matter
because we're going to put a piece of paper over
the top of the rough edges. Anyway, to finish off the
inside of our coverboard, what I need to do is extend this line right down the
length of the paper. At this stage, you
have this line, you'll have this line, you will have this line, and you will have this line. Now we need to mark
in a couple of angles because we're going to cut along those lines to make the tabs
to cover our board width. This one becomes a cutting
line from this point out, and so does this one. That particular tab
folds in first, and I always leave that
as straight lines. It seems to give a
better corner coverage. To get these angled lines, I lay my ruler across. And it doesn't
matter whether you have a clear ruler
or an ordinary rule, you just eyeball it. It's about a 45 degree. You draw in that line. You do the same here
from the point and the same from this point to the edge of the
paper on an angle. From this point to the edge
of the paper on an angle. I've put little
scissors on mine, so you can see that they
will be cutting lines. And the same on these ones. Now you need to cut your excess paper away along
the lines that we marked in, starting with the opening
edge of your journal cover, take out the corner pieces, then following the lines
marked on the hinge side, take out the excess paper there using the glue
of your choice. Now, attach your board to your paper inside the
lines that you've marked. I use glue stick for this, but you can use
PVA if you prefer. Just put down a good
coating of glue. I always put a little
extra glue onto the paper. If you're using PVA glue thou, I'd be careful because it's
easy to put too much on. Line up your board
with your corners. Smooth it down on the outside, working from the center, smooth out any bubbles. Now that the glue has dried and your board is attached
to your cover paper, we address the hinge side. The way I do that is to use
that whole piece of paper, bring it across, and fold it in half on the
outer edge there. I apply some glue in
here and glue this down. This gives us a double
thickness for our H, which makes the hinge
much more sturdy and eliminates the need for
any more cutting of paper. Now I'm going to
work on the tab. You're going to need
your bone folder or whatever you're using
to rub your papers with. The first thing I
do is run some glue along the edge of the
cardboard for good contact. Then with your fingers, push up against that edge
where you want the fold, making sure you've got good contact with the
edge of the cardboard. Then I simply roll
the paper down from the center to the edges. Smooth it down. If you get little bubbles in
which sometimes happens, just keep smoothing from the center to the
outside edges as best. It helps prevent
stretching of the paper.
17. Portrait Covers: For those of you who are making a portrait journal
using scrapbook papers, they're not quite big enough. You do have to join them. And what I've done is left that little strip that
you normally cut off, the bit that has all the
information on it like that, I've left that as a
joining strip and butted my papers one over the top of the
other and lined it up. And then I've put a
decorative piece of paper strip over it because the pattern didn't
match exactly. Now we need to cover our board. The directions are
pretty simple and you can adjust them to
any size cover. I have a piece of paper here that's two sheets
joined together. I want to cover this board. I want the join to be down towards the bottom of the cover. This will be my back cover. To make it my back cover, I need to have the hinge
on the left hand side. When you make these covers, you need to have one going one way and one going the other way. So that means that you'll have a hinge on the left and
a hinge on the right. And if you lay
them side by side, the hinges would be
next to each other. I have a set of measurements
that I've calculated based on the size of scrapbook
paper that I'm using. I'm pretty sure it's
all standard size, but you might need to
check yours just to make sure I have my coverboard and I put it on the page and
have a little bit of a look to see how much
space I've got around it. I know I need extra on the side that I want
to put the hinge on, because it has to come
around and form a hinge. We don't have enough paper
there to create hinge. So we have to cut off
the bottom section and attach it on the side there. When I put my board on, I had a bit of a
look and thought, I need a little bit
more on this side, a little less on this side. What I did was measure it
to see what was there, and I think it works
out to about 2 ". And I took a measurement
from this side, which was one a 2 ". So I decided I'd make one a 2 ", the size for wrapping the ends over the,
measured across here, 1.5 ", down in from the edge 1.5 " and through the
cover board here, added one a half inches
to the bottom of that. Then I came back and put
my board on the paper, lining up my corners, and made some dots just so that I could get it back
into the same position. So I dotted each corner. Then I went around the
board and marked it. And then you can
see where the board will be positioned on the paper. Then we have to make
some cuts to allow for our paper to be
glued onto the side. We're going to hinge. Is this the first cut you're going
to make across here? And then this piece of paper
is going to turn sideways, either for the left or
the right hand side, whichever side you're making the hinge on the first
cut across here. Now that you have that, you bring it over here and
it will be glued down. I'll just point out to
you that it doesn't quite meet the edges
of your board. That doesn't really
matter because this all gets cut when
we do our piano hinging. When you glue it down, just eyeball it and try and, you know, allow about
the same either end. I just use glue stick for this. To make the turnings
for the board, we have to cut out
little pieces. Either end, it's very simple. The line through here is a cutting line and it's
the same on the bottom. Then we need to cut at an angle here to meet
the inside edge. I just try and make a bit
of a 45 degree angle there. And the same over this site. You meet at the point which
is the corner of your board. Your cover board. It's the same down the
bottom here and the same On this section here. And the same on the other end where you've got a
little bit extra paper. You leave that
extra paper there. You follow the line
of your measurement, cut along that line, and then you cut that piece out. It's exactly the same. On the other end, you
just follow that line, cut it out, cut into the point. The next thing I'm
going to do is glue my board down to my paper. I'm going to leave this
excess paper on here. I'm curious to see
how far it goes and whether I'm going
to need to cut it off or I'm going to put some glue on the board
and attach it on here. I do just use a glue
stick for this. It seems to work fine. It's just an acid
free glue stick. And I just put a bit of glue on there to make sure it's
going to hold to the paper. I'm just putting my board down matching up the corner is
making sure everything is okay. Then I turn it over. I like to use my
largest bone folder and give it a smooth down, which helps create that contact. Now I'm just going to go along and make sure my fold is good along this edge because this is the next edge I'm
going to fold in. Grab my glue again. I try to get some glue along the
edge of the cardboard. Now I push it up and I use a straight edge along there
to help with the contact. Then I just move it across, make sure it's all
made good contact. Give it a good run and a
good rub along the edge.
18. Cover Hinge Tabs Portrait & Landscape: Once the glue is dry, we mark in our hinge allounce out from the edge of the board, minus three, four an inch. As I'm using these
sturdy skewers, yours will be determined by whatever size of hinging
stick you're going to use. I just measure out from
the edge of my board, and if you're using a
conventional ruler, just make your mark either end and then rule
a line between it. If you have a clear
grid ruler like this, you can just line it up and
make your mark through. This line comes up to
the edges of board here. And this piece in the middle
doesn't have any glue on it. Once we glue it, the next
thing we're going to do is mark in our hinge cuts. This next part you're going
to need your template, the one you previously prepared. Next is marking for
our hinge cutouts. The way I do it is to find the halfway mark between
your hinge allowance, once you found your
center in the line, so that you can see it when you place your template
down over the top, then taking your template, center it between
the hinge allowance, remembering that your coverboard is slightly bigger
than your pages. Again, there'll be a little bit where it doesn't
quite match you. Eyeball that and try and get
your margins reasonably even where your template has
been folded and cut line. The points of your cuts against the line so that you get them in the right spot. Use a pencil. I'm using a dark
marker so that you can see what I'm doing carefully. Use your craft knife
to cut out the shapes. If you don't have a craft knife, then you're going to have
to do it with scissors. Pay attention to
the points there. The hardest part,
that's where your paper will stick when you
try to remove it. Once you've made your cutouts, then you're ready to roll your hinge and glue
down the excess paper. I do that with my skewer
and I put my skewer in between the outer edge of the hinge allowance
and the middle line. And lift up the paper and
begin the process of rolling the paper around whatever you're using as
your hinging stick. When it's thick like this, it takes a little bit
of encouragement, but you just keep working on it. Just keep rolling. Rolling
it around the stick, trying not to get too
sharp a crease in it. Then using the bone folder, you make your crease in there
up against your skewer. Then turn it over and do
the same on the other side. You end up with that nice rounded spot to
your skewer to slide in.
19. Finishing Portrait & Landscape Covers: There's something
you need to think about before we
finish our covers. We're going to hide the hinges that we're
not going to use. Instead of having
them just sticking up as an extra flap like this, we're going to actually
tuck those inside and glue them so that
they're not sticking up. The way it ends up is that
on one side of your journal, you're going to be hinging the covers with
the two even tabs. And on the other side
of your journal, you're going to be hinging
with your odd tabs. For example, I have
my front cover board ready and I've left two even
tabs out to attach with. I have my decorative strip at
the bottom where I want it, which means that this one
is now my back cover, so that when I put it this way, it will be the back part with
my strip where I want it. I'm going to leave out my odd tabs on this one so that I can
attach it to the back. Odd, odd, even, and odd. What we're going to do is push in the tabs that we're not
going to be using on this one. For me, I'm pushing
in the even ones. When I made my front cover, I pushed in the odd ones. What that means is in here, we're going to click them inside and glue them
inside the cover. You can, of course, just
leave them if you want to. They can just sit on the
outside of your journal like this or you can simply just fold them once you've covered your journal board
to the inside. And then they'll sit on
the inside like this. Just fold it in. When you
open your first page, they'll just be sitting there. If you don't want to
go to the trouble of gluing the folding
them and gluing them in, then by all means
just leave them. I need to leave out the odd
tabs to thread through. I'm going to make creases
in these ones here, the even tabs on the outside. You need to just ease
it in just by pushing. What we're trying
to do is create this little pocket where we're just going to tuck
it into the inside. The next bit is just to add a little bit of glue
here to keep these in. What I can do now is go ahead and glue the whole of
this to this board. Then we're going to bring
those final tabs up. It's important not
to get glue in your gut up where your
skew is going to go. Start at the hinge
edge and make sure you have the tabs that you've pushed to the inside
stuck down first. And then you can go on and
stick down the other part. Smooth your paper down. Any little bumps, any little
bubbles, just work on them. They generally come out easily. And then the final
pieces are on the edge. Here I use the bone
folder just to make sure that I got a nice
gauge on my paper. I like to get a little bit
of glue up along the edge of the cardboard to help keep
everything nice and tight. Using the bone folder, I push it up against the
cardboard and roll it over with your phone folding. Rub along the edge first
and then fold it over making sure that it's nice and hard up there
against the edge. So we'll just set these
two boards aside for now. Once the glue has dried, you're ready to put in your covering piece to cover
up all of these raw edges. And the cardboard,
I have my piece. All I did was measure to see
where I wanted it to sit. And my measurements were 10.5 ", or about 26 centimeters
by seven 4 ", or roughly 18 centimeters. I put a little strip across the join here
on the two papers. I blew down a piece of ribbon on there and brought it around
onto the inside of my board. That's an alternative to putting a joining strip on at the start. Carefully position your paper
when you're happy with it, then start to push it
down from the middle out. Well, not quite perfect. I've got a little lump of glue there that I didn't notice. And that's why it's
important to check before you glue down your
paper if it bothers me. One thing I can do is
attach a little pocket onto the inside of the
board for carrying little bits of paper that
I might use for collage. Now that you've got
one board made, go ahead and make the second one following
the same instructions, but reversing your paper so that you have a left
and a right cover.
20. Attaching Hard Covers: My boards are dry now and
ready to attach to my journal. I'm going to attach
my back cover first. And to do that I'm
just lining it up with the signatures that are
already joined together. Then I'm going to start thing. You can do it from the
right or the left, but I'll just keep
going so that all of points are at one end. You go through the
one you're attaching, and then you go through
the one that's already attached through the
one you're attaching, and then through the one
that's already attached, and then through the
one you're attaching. If you're having
trouble threading them, I often find it's easier to
have them sitting right up in where you want them
to go and make sure that you have opened up
the gutters a little bit. That's my back cover. Now I'll add my front cover. I might have a little bit
of trouble with this. I've pulled my hinges down
a little bit too far. When I've attached my paper
was not paying attention. That's a word to the wise. Just watch that the skewers
are pretty tight in mind, so I might have to fiddle
a little bit to get it in. Just line them up so that
all the hinges line up, and it makes it a
little bit easier to poke your skewers through. Let's see how we go with this. On a wing and a prayer because I know these are
going to be tight. But let's hope, let's
hope I can get them in, Particularly this
hinge is tight. The last one here, it's
just a little bit of manipulation to get
your skewers where they need to be to go
through the papers. I'm just going to roll that
one back out a little bit. I've gone too far past the join. If I can line this up,
go through easier. What I'm doing is
pushing my cover board up and my signature down to try and make the two meet there. It's in. I won't have any trouble with
that skewer sliding out, that's for sure because
that hinge is really tight. Now, I like to try and get them, even if I can, the sticks. All right, and then you
have your covers on, opens quite easily, pages.
21. All Journals Binding: Now what we have to do to stop it being as wobbly as it is, is to bind the ends. I'm using some pieces of
this recycled purple cord. I don't even know what
it's actually made out of, but it feels nice and dirty. How much you put
on is up to you. Just make sure
you've got enough to put at least maybe
three, four rows on. I usually start with
a knot on one end, just an ordinary
overhand double knot. Then it's simply weaving. I'll go round that
one to keep the knot. There you go over and under and over as you do
with any kind of weaving over that one, under that one, over that
one, under that one. You just keep repeating that
until you get to the end and then you have to
come back the other way. Now, because I'm
using short pieces of I'm going to have to
join mine at some point. If you've got a long
strand of thread, you won't have to do that. You come back the other way. You go around the last one, and then you come back
weaving over and under. And you end up with the opposite where you
went under that one. You now go over it, tightens everything up,
just work your way along. Now I have to tie this one off to this one and cut it off. Now I need to tie in a new pix. You won't need to
do this if you're working with a
single long strand, but the ultimate and
recycler of objects. Normally I would tie that round. But what I'm going to
do, I went over there, I'm going to go
under here and I'm just going to tie
it to this end. I'm just leaving all
these ends at the end. I'll just tie them all together. Just keep working under o and around. Keep them all nice
and tight together at the end and work
your way back again. This weaving can be done with
more than one color thread. I don't tend to put
beads on because I find they get in my way when I'm trying to use the journal. But some people
like that effect, if that's what you like,
on these end pieces, you can actually thread on
some beads and off the end, just as a decoration,
I think that'll do me. You don't have to put a huge
amount of binding on them. Sometimes if you want it as more of a decorative
element, you can go further. But for my purposes, these four rows that
I've done are fine. I will tie off now all of these pieces together,
nice and secure. One thing you need to give some consideration to when
you're binding is where the end will end and how much of a tail
you want to leave on it. For example, on this one
I've cut it really short, but I've dabbed some
glue on the end of it to stop it from
coming unraveled. The same with this one. I did the same thing here. I have a tendency not to like the really long
tails, but again, it's personal preference With this one I've got a couple
of different lengths here. I'm thinking I could make each of them a
different length. I'm going to do
that. I'm just going to trim it down a
little bit more. And trim it down a
little bit more again. Then I've an
interesting tail piece. I usually dab a bit of
glue on the knot once I'm finished to stop it
coming unraveled. Now the beauty of these
journals is that you can actually undo this
and add in pages. If I've made a journal
of a size that I think is perfect for my needs, I'll actually dabs and glue on the binding as
well to keep it in place. The other thing to
give consideration to is where the knot ends up. Mine is at the back. You might like yours
to sit at the front. Now, I'm going to do
the same at this end, so you can go ahead
and do yours. When we meet back,
we'll work on trimming off the sharp points
and working out how much of an overhang you
want to have for sewers.
22. All Journals Finishing Steps: For these little skewers, any pair of scissors that
you're not too precious about, you can actually
cut off the points. Now I try and do them
one at a time if I can. It's not always practical to
get your scissors in there, but I just nip off the
tips to start with. If you have any little
splinters at the end, a nail file or sandpaper, emery board,
something like that, you can sand the ends. Now, I'm just going to even
these up and make sure I'm happy with the link by
just nipping off the tips. I've allowed myself a little wriggle room there if
I want to adjust it at all. I tap it onto a flat surface and see where everything sits. That looks pretty good.
And then while it's like that you can actually
even it up a bit more. I'm happy with the length
I've left on that. Now there will be some variation
in where the hinges sit. Like this one. I might just push that up a little and that one up a little, but I think that's
allowing us a little bit of wriggle room
there for binding. This one hasn't been bound yet because these skews
are so heavy duty. I think I'm going to need
these wire cutters now. These are just a tiny
pair that I have, Jew, hoping they'll be enough. They do the job quite easily, the same as I did with
the small journal. I'm just going to
cut off the tips for the minute because the tips
are a little dangerous. And then I might try
cutting down a bit further. Now I need to make a
mark where I want to, a pencil and a straight
edge so that I get my marks reasonable where I want them. If you end up with rough edges, again, a little bit of
sand with a nail file, if you have one, or a
little bit of sandpaper, whatever you have handy, because these things tend to splinter a bit
when you cut them. As you are cutting your skewers, the end pieces have a
tendency to fly off. I should mention that you
need to watch your eyes. I wear glasses, but if you
don't wear glasses like I do, maybe put on a pair
of sunglasses or a pair of protective
goggles if you have them. The kind that you would use
when you're doing yard work. I think I'm happy with
the length of those. Hang down just a little bit. If I decide later
on I want to put some more binding
thread on there, I've got room to do it. There's enough that
they're not going to slide out when you don't want them
to and unbind your journal. The last little bit
for me will be just to smooth out these
splint try bits. I'm going to add some
glue to mine now. I'm happy that I've got smooth ends and that my book is working
the way I want it to. I'm just going to put a tiny
bit of glue at the end, on the inside here, just in this space here to stop my binding
from sliding off. The easiest way to do
that is to lay it flat, hold it down with your fingers. For this, I do use PVA glue and my trusty
PVA glue skewer, trying not to get
too much on the end. I just run along and dab it, gluing it in place. Once I've got the glue on, I run my finger over it as well. I don't end up with big blobs. Just to tidy it up a little. Just that little bit
of glue is enough to hold the binding
where you want it. I turn it over and show you, I just some glue around
the knot on the end. If you want to glue your
knots or your binding, just go ahead and do it. Small amounts of PVA
glue are the best. Something that dries
clear and just dab it so that it's not
too messy when it dries. And it's a good idea to pull on your strings into a position that you want them to dry in. I'm just going to
leave that now to dry.
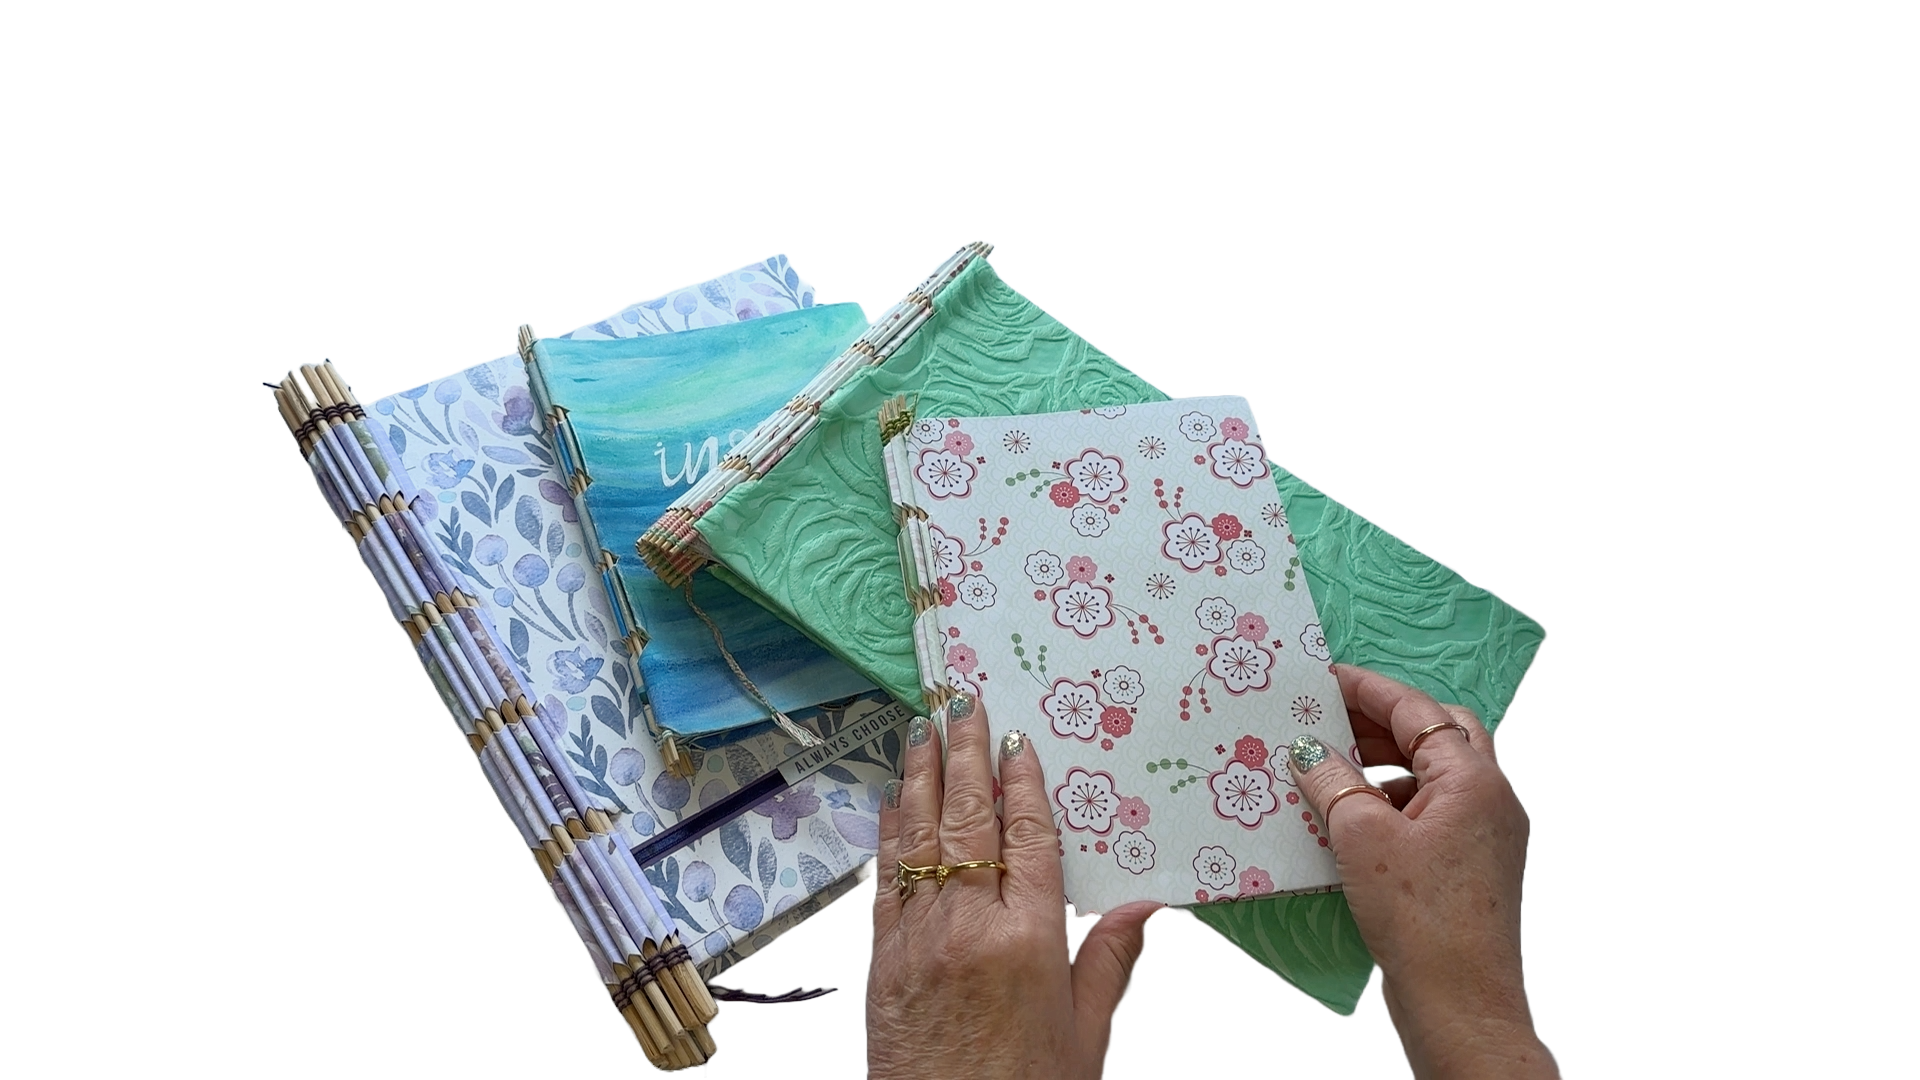
23. Finished Journals & Final Thoughts: This is the one I made
before the course. It's the landscape one. During the filming
of this class, I made two small ones
with little pockets in the front and colored pages
wrapped around my signatures. This one also has a little envelope in it
as well as a pocket. And this one I made
during glass as well. This is my word for
this year, inspire. So I put it on the front, at the back of this journal. I'm going to use for inspirational photos
from magazines, Postcards or pictures. I used some thread that I had collected at some
stage off some packaging. And hanging on it was
this little ring. And it had such a nice
saying on it that I kept it. It says being
different is one of the most beautiful
things on earth. I've attached it as Kapok mark, and the way I did that was underneath where the
binding thread is. I poked it through and
tied it off on the inside. And this was the
portrait journal with my little
bits of paper that I saved off the front of
the scrapbooking paper. You could add pockets
to this if you want to, Similar to the small
journal. Well done. You've made it
through the class. You now know how to work out sizing for your journal
papers, for your journal. And how to construct your journal from
the coverboards through to the signatures, the hinges, and how to
put it all together. I really hope that you upload
photos of your journals. I'm excited to see what
you've made and I'm sure other members of the class would love to see them as well. I'd like to thank you
for taking the time to spend with me and learn
about piano Hinge journals, which are so versatile
for artists. For those of you who are interested in more
bookmaking adventures, I have a class on
pattern making. At the end of that class, you'll find a bonus class on making a reverse
piano hinge journal. Once again, thank you
for taking the time to create a piano hinge
journal with me, and I would love
to see you again in one of my other classes.
 Michelle Watson, Brunybear Art - Mixed Media & Textile