Transcripts
1. Introduction: Okay, I am goofing
around a little bit, but I should emphasize
the importance of stretching in the meantime
so you don't get cramped up. Anyhow, welcome back and continue watching my
introduction video. Hi there and welcome back. In this Skillshare class, we will be looking further into the bobbin lace techniques. For this particular one
we will be looking into. I actually had to Google it, the four leaf clover, which brings luck and so on. So also, I think in my opinion, is the perfect place
to start doing. A bit more than just the
simple braid and patterns. In this one, you will
learn how to begin, how to start how to manipulate
with four pairs of Batman. How to join the sides, how to do sharp edges,
and how to finish. So it's a great
place, as I said, to start and to get the basics. So let's dive in.
2. Lesson 1: Beginning and First Few Pins: Hi there and welcome
to the first class. As always, we will
start with the basics. You will need four pairs. I added the red one just
to remind you that you can use a colorful one for the
leading pair just to practice. But otherwise, I do not recommend you doing that
in reality because it doesn't look good on the final product and I won't
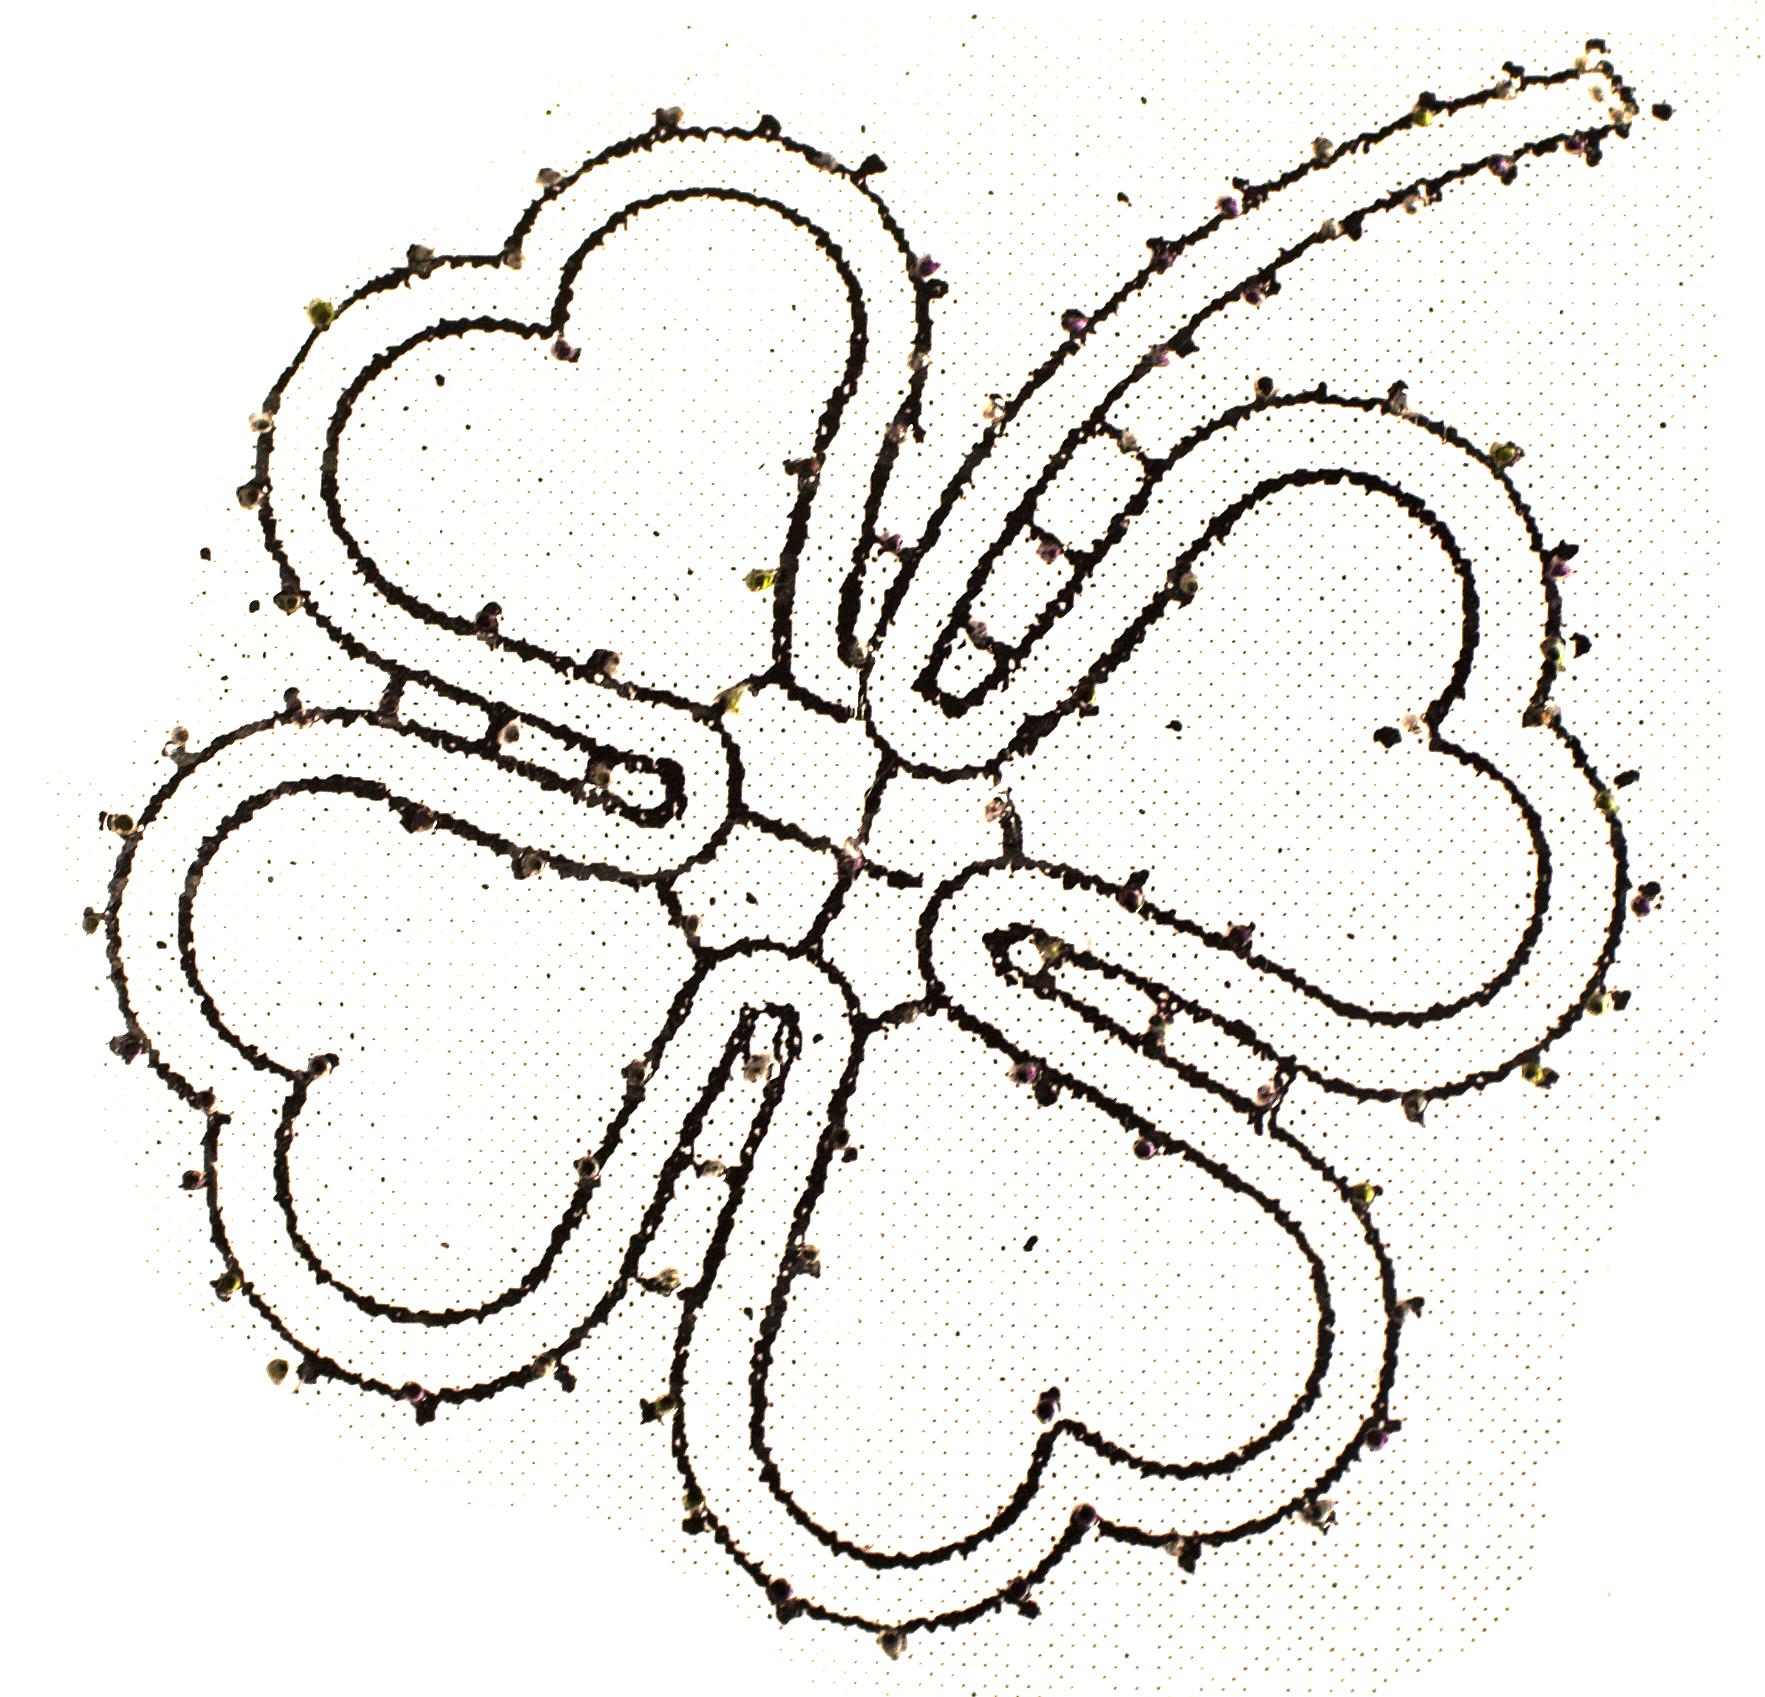
be using it in this video. This is the pattern
that we will be working on as you saw
in the beginning. You can turn it
however you like. Don't forget to tape
it and pin it down. And because it is
a curvy pattern, you should consider turning
your pillow over and over so that it suits you best and that the pattern is
continuing downwards. Okay, so let's begin. Basically you just
take each pair and then hang it on one
of the bobbin pins. The fourth pair that
stays behind is just laid over on all of them
as you will see shortly. But I should remind
you that this is a very simple beginning
and only appropriate in this case because
it stays solo and it's not planned to
be joined in any way. The difference is
basically that you don't put the fourth
pair over all of them. You join it with one of the
others on one bobbin pin, which basically becomes
the leading pair. In this case, you have to
look at the pattern and see at which side the
first dot is drawn. And that place is where you
will put your first pin. Hours is on the right side, which means we will be
starting on the left by taking the first four and continuing with
the leading pair. These first few steps sort of resemble what we
have already learned. You can rest your bobbin pairs at the side like this so
they don't bother you. But with the exception
of this last pair, what you basically
do is you place a pin beneath the
leading pair, like this. And then you have to
turn it to the left, always to the left, no
matter which side you are. Two times as true literal, four times as too much. So I guess three times
is perfect in this case, just so that the loops
at the sides are not too big or too small. Now let's do the same
thing to the left, starting with the leading pair. Adjusting the length
of the baboons. If they are too
short or too long, It's okay, it's
normal, don't worry. Happens all the time. And then when you
reach the end, again, you take the pin and you place it beneath the leading pair. You twist it three times
to the left, again, 123. And then you continue
as we have before. Okay? And now we just repeat
these steps to the point where you don't know what to do next and just check
the next video. See you there.
3. Lesson 2: Preparing to join Ends: Hi there. I'm glad you made it
through the first video. If you followed
the drawn pattern, you probably placed your
last pin on the left side. So let's just continue
to the right, just as we have
been doing so far. And here, as we reach the end, here comes the new part. You can see that
instead of a doubt, we have a line, which means we are
going to be joining two sides to strengthen
the pattern. And basically first time
around, we're just preparing. And what you do is simply
place the pin right in the middle of the line and then twist the leading pair
as much as needed, which means for the length
of the line like this. And then you check if it's
too long, it's not good. If it's too short,
again, it's not good. Then also with the
pair that you start, you just twist it once
or twice and then you continue doing as you
have been doing so far. Now let's quickly go back and forth so I
can explain again. Everything is still
normal and nothing new. We're here again. As before, we place the bobbin pin underneath
the leading pair, then twist it as much as needed. And as I said before, it's very important
to twist enough, which you can test by checking if it comes to
the other side like this. And then also twist
the neighbor pair, which is very important. You don't want to have
a hole and then just continue doing what
you know best. As you can see also here
on the left side we have a line and we basically
do the same thing. The only difference
is that it's a bit shorter than the other two. Again, you just adjust it
accordingly by twisting it a bit less than you did
with the previous ones. And the rest is
basically the same. You always turn to the left side as I have
emphasized before. And that's it. I should add that there's
an additional thing you can do to be
even more precise. And if you want to know, you can check the
tips and tricks video that I have
prepared for you. It's an additional thing,
it's not obligatory. We are beginners. And take a look. This is all for less
than to keep practicing. And see you in the next video.
4. Lesson 3: Sharp Turn: Welcome back, and
let's see you here. For a beginner, this is already a long journey, so congrats. I hope you are taking breaks in between and doing something fun. And now returning again
to being creative, Let's just start
where we left off. We finished on the right side
by doing the line and now we just simply go through the left side as
we already know. And as you can see, if you follow the pattern, we are just at the place
where it is supposed to end. And we need to prepare basically two holes to
finish our four pairs. So we place one pen
and the first corner. And then when we come back, we'll place another one and we will have our finished ready. And if you don't do this step, which is very important, you will probably not be
able to finish the pattern. So please, please
do not forget about these things because you
cannot properly finish. You cannot insert anywhere, as you will see in the end, how to finish a pattern. And now we just simply
continue onto the other side. And this is the part where
we learn another thing. And that is turning around
without placing a pen. As you can see, it's a
very sharp turn and there is practically no
space for Bob and pens because it will turn
out to be too bulky. So the thing that we do is
basically turn both pairs to the left and then you cross the inner ones, left over right? And that's it. Now you just rest
the outer pair and the inner pair now
becomes the leading pair. As you may have noticed, it kind of switched
because it's not the usual leftover, right. Both to the left
and left or right. And try not to squeeze too much, which is actually pretty common. But with practice, everything
will eventually be perfect. And now we just
simply continue on to the left side and
placing the pen, preparing for the finish, which I sadly didn't do here. So keep that in mind and please do not
make the same mistake. I mean, it was okay in the end because
I had at least one, but two are required. So I apologize for my
mistake. Don't do the same. Now, if we put that
aside and continue, you can see that we are preparing for the biggest
junction in this pattern. And again, the same as we
did with the lines before. You just twist it as
many times as needed. For the full length of the line. Maybe it's best
visible in this case. Because when you go back, you simply just folded into
and that's that's perfect. Which you can see over here. So it's not too
long, not too short. Now we proceed back to the right side where we
go both to the left, leftover, right, and then again, the whole thing
over and over until the first dot or line where you place your bobbin pin
or join the sides, as you will see in
the next video. And this is it for this one. I hope I explained that well, but in case you
have any questions, you can always write to me. If not, see you in the next one. Bye.
5. Lesson 4: Joining Sides: Welcome back. If
I'm not mistaken, here is where we left off by
finishing on the right side. So what we have
in front of us is a line that needs
to be connected. So before we start, I should remind you that in this video we will be
needing a crochet hook. So get ready. I would say that this is one of the most difficult
lessons in this class. So pay attention and don't worry if you don't get
it right the first time. That's why we practice. So let's begin. The first thing
you do is twisting the leading pair for the half
of the length of the line, just so that you go Come to the bobbin pin and
then you take it out. Spread. Both bothers of the pairs so that the other
doesn't distract you. And then technically it doesn't matter which one you take
into the loop left to right. I like to take the one
that's more convenient. In this case, the inner bobbin. And then you just squeeze the crochet hook
through the loop. And then I just pull the
thread through it like this. Don't forget to prolong the, the bulb and if needed, just, just to make the loop big enough for the
other to go through. And then you just put
the bobbin through the loop tail first, like this. And now you just pull
apart and make an art. You should watch out so that you don't catch other
structures, other pins. And this is basically at, you will probably
want to shorten the first Barb entity used
so that you can work on. Now again with the twisting and returning to the
initial pattern. Let me explain once again, close-up when we come back, We're back again. So we start by turning
our leading pair, taking out the bobbin pin. Using our crochet hook to go through the tiny loop
that we made previously. So that we can make an
even bigger one for the other bobbin of the
pair to go through. Tail first. Make sure to carefully
pull them apart, not catching anything else. Shortening the thread so that it's comfortable
to work with. And now twisting back. In this case, maybe three times, four times just to go back. And now continue as you
have been doing before. This is it for this one? Check the next lesson. Sharp edge, and have a nice one. Thank you for being here.
6. Lesson 5: Sharp Corner: Hi there. I suggest we just
continue where we left off. Lastly, we did the right line. And now there's some sort
of a U-turn that we are approaching and we do
just the same thing as we did before with
the sharp turn. You just go both to
the left and leftover, right, and then continue. But the thing that we will
learn in this lesson is how to do the sharp edge. I will just jump to it. But you guys, I need to
practice this curve not to put too much pressure to it so that it doesn't
squeeze together. So let's go. Okay, So you've come this far. Now. You replace the
bobbin pin simply in the right corner and proceed
normally to the other side. Till about this point, when you're leading
pair comes to an end, you put above and pin
into the sharp edge. Turn two times or
three times less is better because you don't want
your loop to be too big. You want a nice sharp edge. And the trick for it to look good is actually how you position your bobbin
that's beneath it. If you're baboons are going
to be all on the right side. They're going to pull away from the corner and
it's not going to be filled with thread and
the grid is going to expose, which doesn't look good. So I'd recommend
you leaving half of the buttons on
the left side and the right ones on
the right side so that they kind of evenly put pressure on your,
on your pattern. It's okay if it doesn't
look good the first time, it comes with practice. And the most important thing that you'll learn is
how much to Paul, and that is it. Now you just do the uterine again and
proceed to the next lesson.
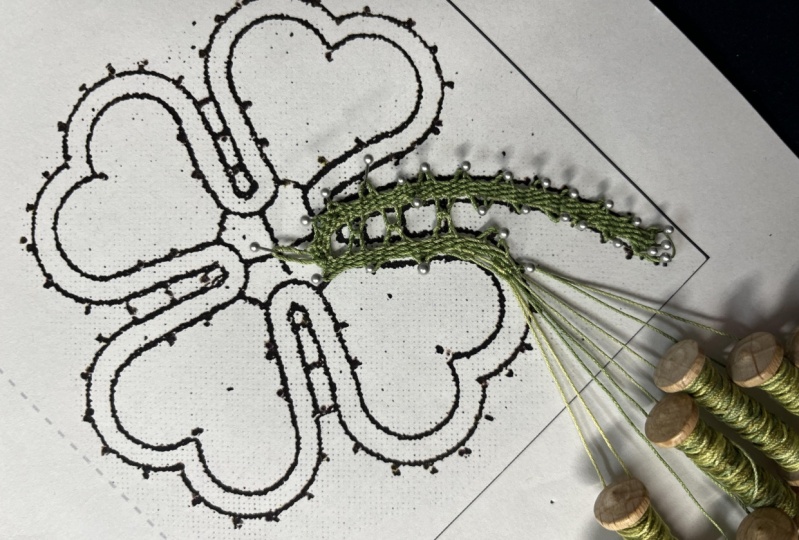
7. Lesson 5: Joining Many Sides (4): Hi there. Welcome back. Now, as we have been piling
up in our middle section, we have come close to
the end where we have to join the prepared three sides and now our final fourth side. The basis is actually the same. You take the leading pair, you twist it, and you
take out the bobbin pin. And now the difference
is that you have to pick up all the three
sides from above in the order as they
were placed and tried to pull through
one of the threads, make the loop big enough and put in the other
bobbin tail first. And this, as you can see it as a tricky part because you
have to turn it around a bit. You can do it slowly. Do not try to rush things. And this is how it should look. Again, you shorten
your bobbin if needed and turn it four or five times in this case to
come to the other side. Now you just continue
doing what you do best and see you at
the finish line.
8. Lesson 6: Finishing : So here we are in
our last lesson. If you follow the
pattern correctly, the last thing you did was
joined with the left side. As you can see here. And now simply what you do is just traveled to the right side is usually and I will
show you how to finish. I did the first one
myself just to try if the one home mistake
is going to be okay. And the principles are
yet again the same. Without twisting the pairs, you just take a crochet hook, go through the loop,
make another bigger loop to put the other bobbin through
it and then pull apart. You do the same thing
for other pairs as well until you have
covered them all. So again, you take
a crochet hook, you prolong the first bulb and
if you need a bigger loop, and then you put the others
toward and pull apart. This is how you make a knot. And now showing once again
with the last pair, like this. But because this is the end, let me pause the video here. There will be some extra naughts needed so that the pattern
doesn't fall apart. You take each pair individually. You place your left bulb
and over your right, turning upside down
and then taking with your right hand from
underneath through the loop, as you can see here. So you do it twice
for each pair. So now that you
have all the nuts, you just take a pair of
scissors and simply cut. Let's say half a centimeter away from where you're finished. If it's too long, it's best if you cut it
afterwards when it's off the pillow so that it doesn't fall apart when you
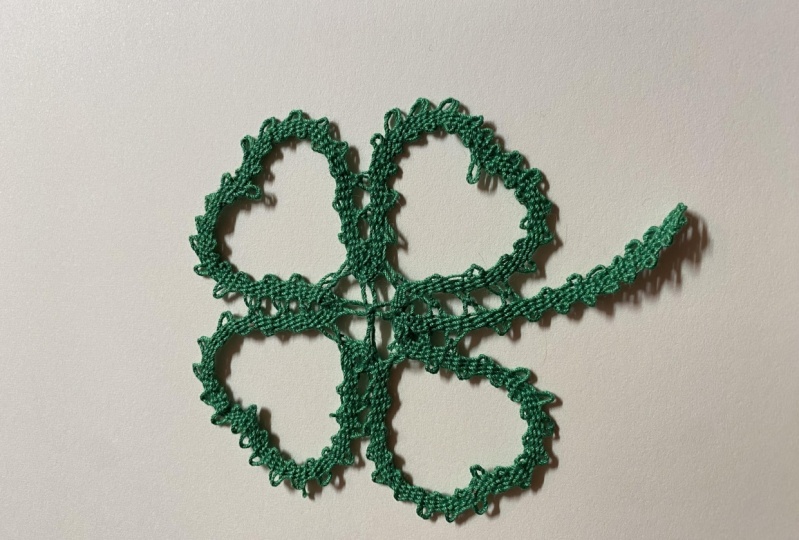
take depends out, which is what we will do now. You finally completed the
pattern and well-deserved. To just take them all out. You can do it randomly. It doesn't really matter. Just be gentle and try to push down a bit so that you
don't distort the shape. So this is the final
product of the class. If yours is close or same
or even better looking. Either way congrats. If you want to share a photo of your progress or
the final product, feel free to do so and see
you in the next class.
 Ana Radulovic