Blooming Letters: A Fun Introduction to Flower-Filled Designs | Jamie Smith | Skillshare
Search

Playback Speed


1.0x


  • 0.5x
  • 0.75x
  • 1x (Normal)
  • 1.25x
  • 1.5x
  • 1.75x
  • 2x

Blooming Letters: A Fun Introduction to Flower-Filled Designs

teacher avatar Jamie Smith, Artist, Teacher & Community Builder

Watch this class and thousands more

Get unlimited access to every class
Taught by industry leaders & working professionals
Topics include illustration, design, photography, and more

Watch this class and thousands more

Get unlimited access to every class
Taught by industry leaders & working professionals
Topics include illustration, design, photography, and more

Lessons in This Class

    • 1.

      Welcome

      1:39

    • 2.

      Let's Bloom

      5:34

    • 3.

      Next Steps

      1:54

    • 4.

      BONUS! Canva Letting Making

      1:33

  • --
  • Beginner level
  • Intermediate level
  • Advanced level
  • All levels

Community Generated

The level is determined by a majority opinion of students who have reviewed this class. The teacher's recommendation is shown until at least 5 student responses are collected.

8

Students

2

Projects

About This Class

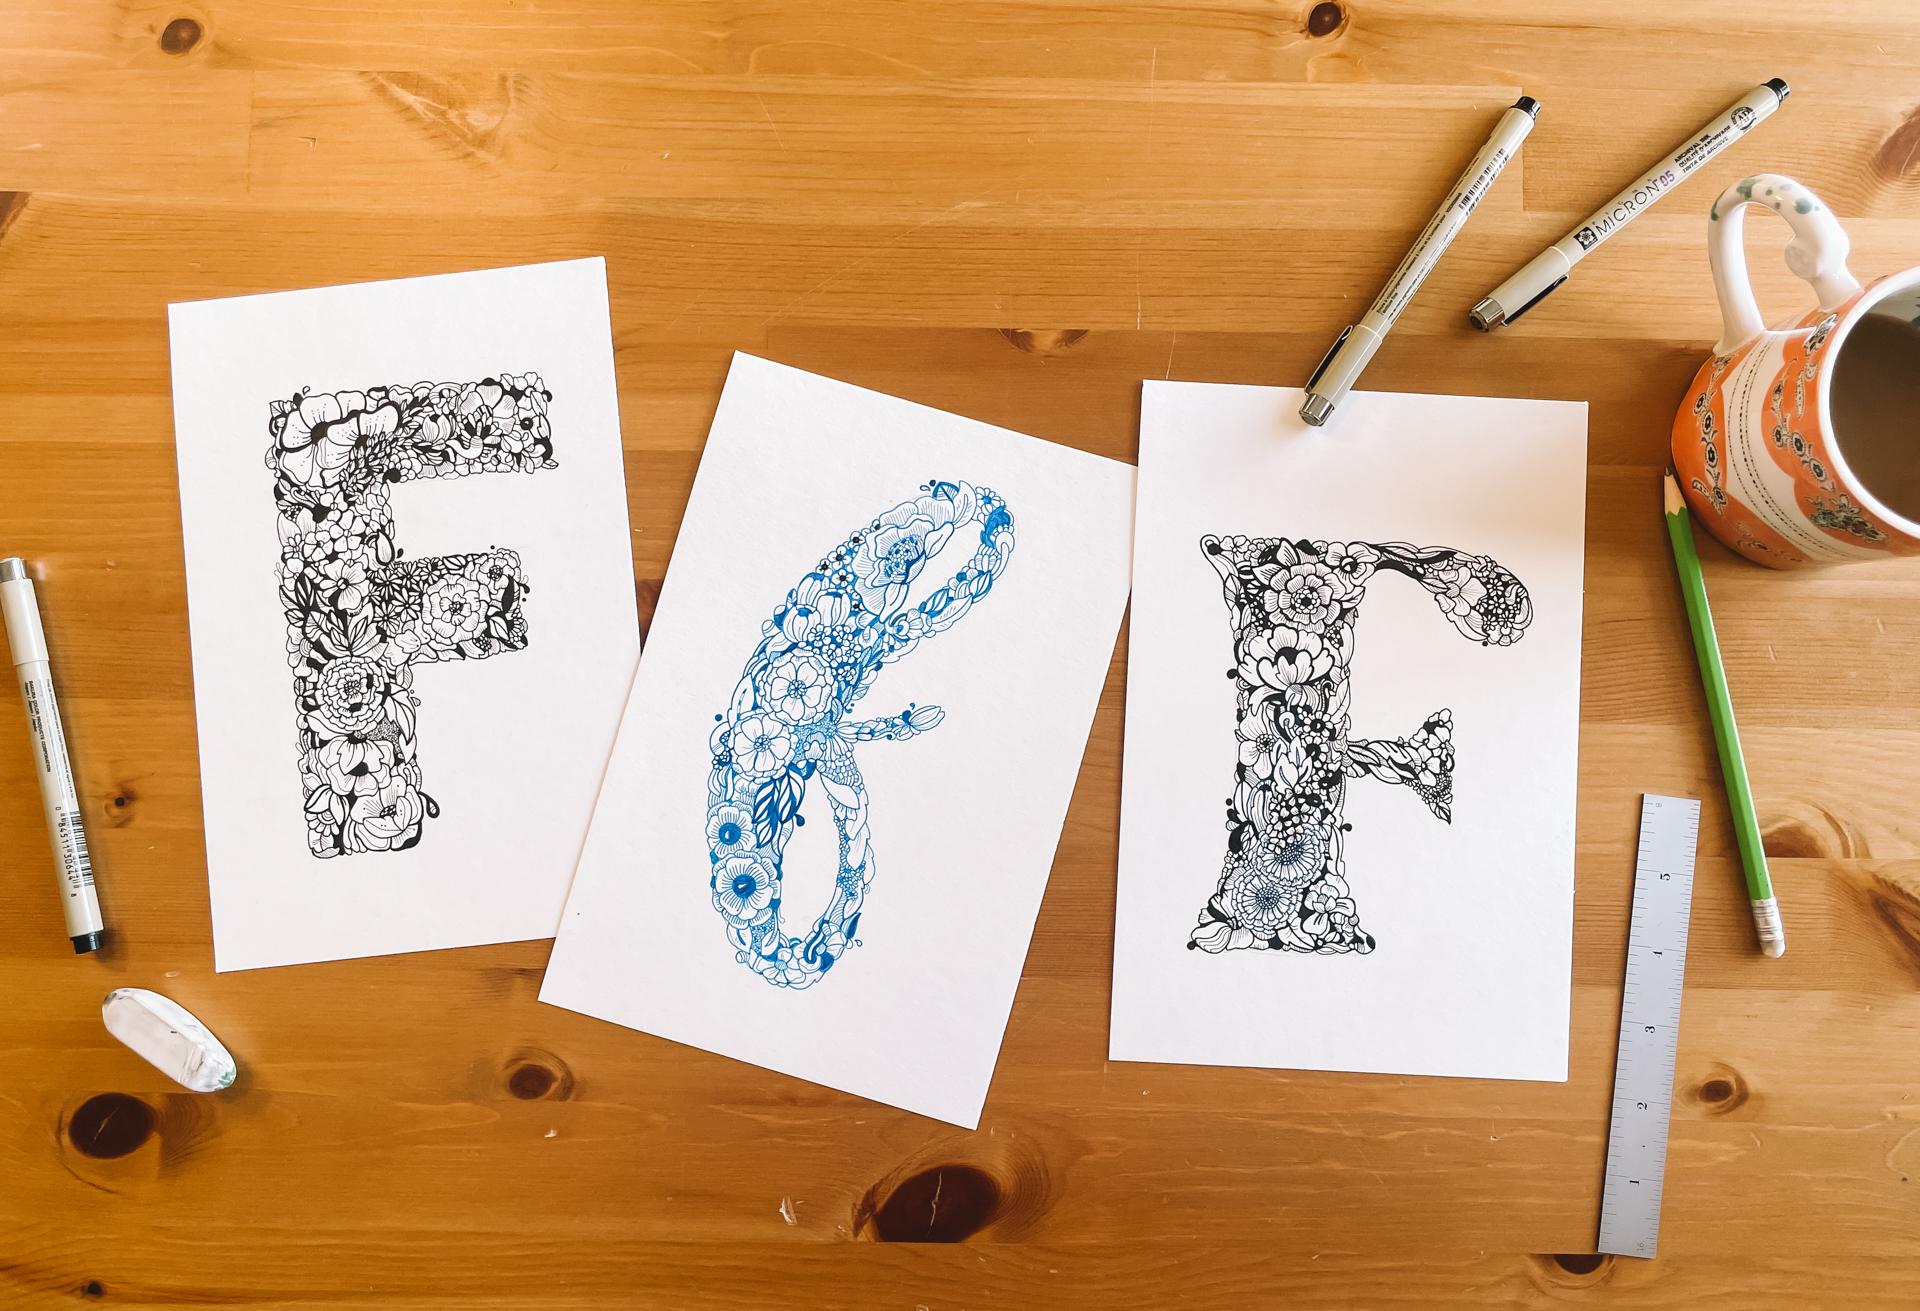
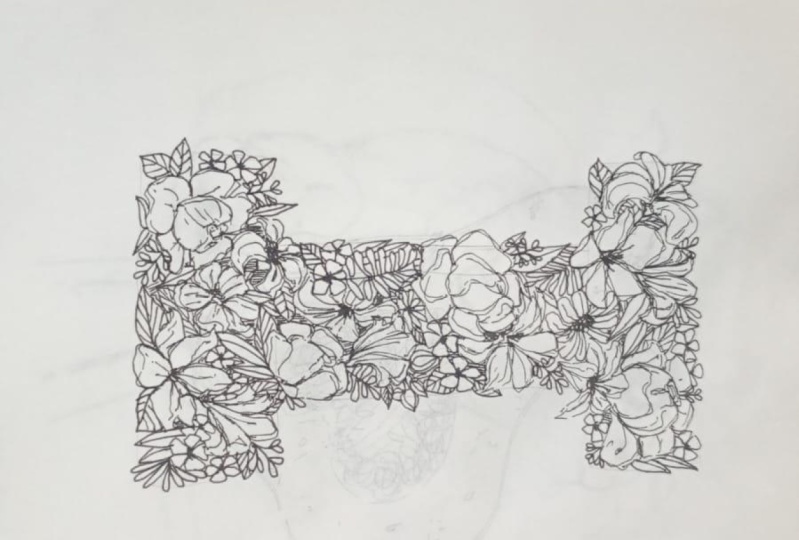
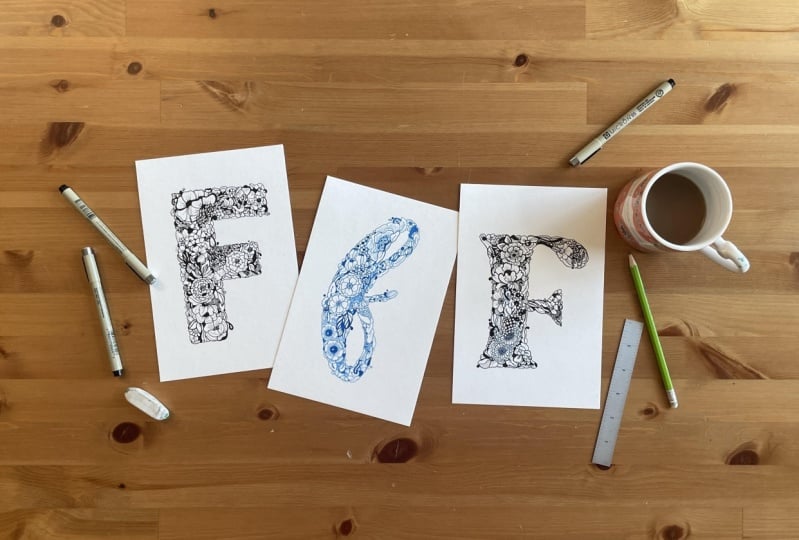
What if a single letter could bloom into a masterpiece?

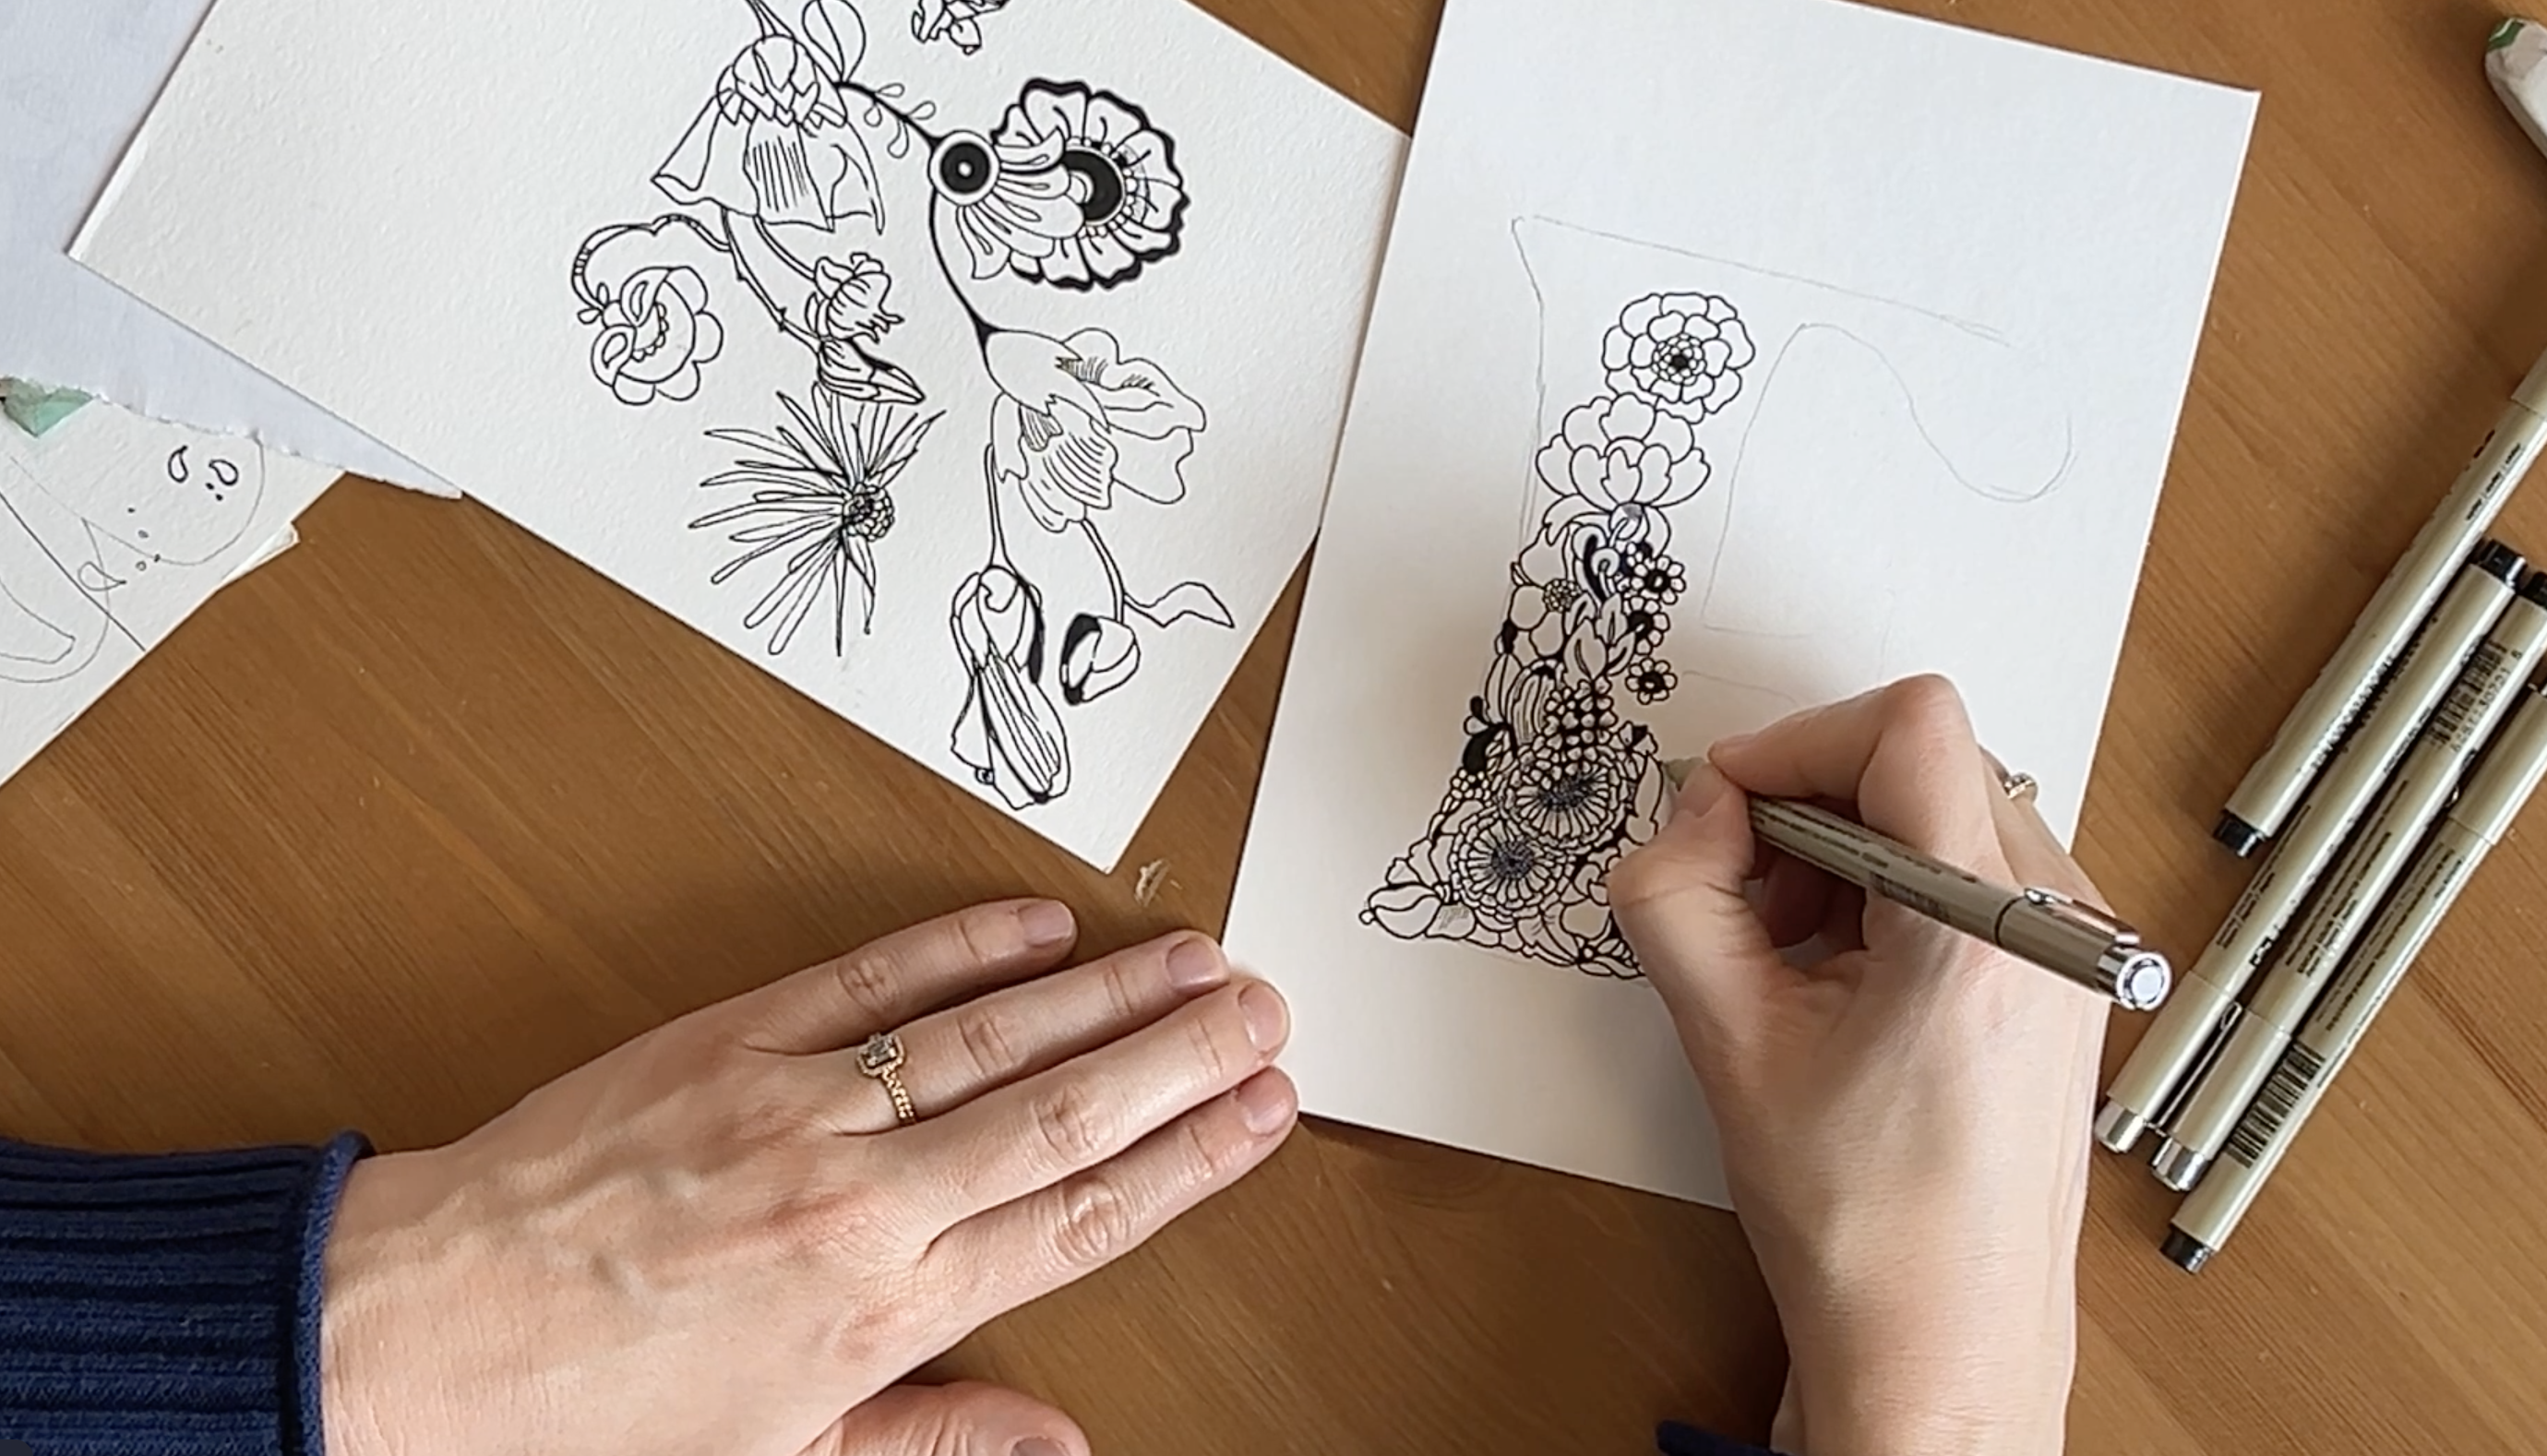
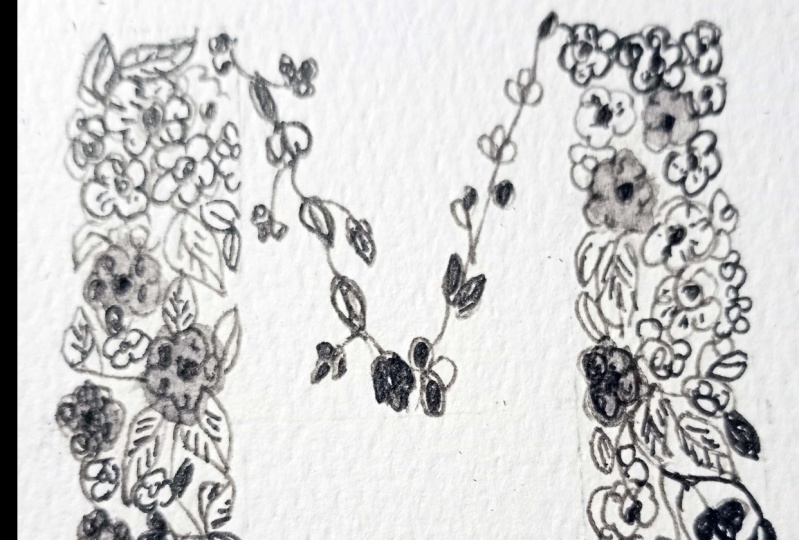
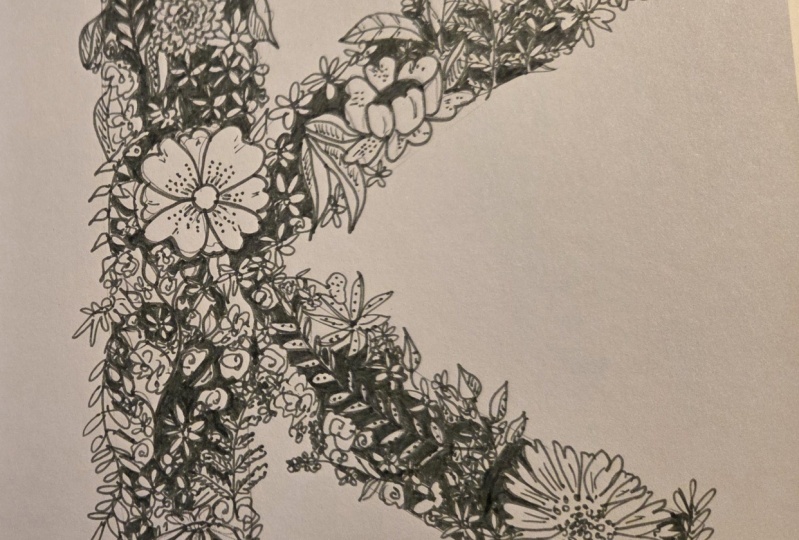
In this mini-class, Blooming Letters: A Fun Introduction to Flower-Filled Designs, we’re combining the elegance of florals with the art of typography to create personalized, eye-catching designs. This is a creative and relaxing project that allows you to explore textures, details, and artistic techniques while having fun with simple art materials.

Together, we’ll walk step-by-step through the process:

  • Choose and design a letter.
  • Learn techniques to layer florals and add variety to your design.
  • Create a finished art piece that is perfect for framing, gifting, or displaying in your home.

This class is quick, creative, and packed with helpful tips to make your art stand out.

Who is this class for?
This class is for anyone who wants to explore their creative side. Whether you’re a beginner just starting your artistic journey or an experienced artist looking for a fresh and fun project, this class offers something for everyone. All you need is paper, pens, and a bit of imagination!

Who am I?
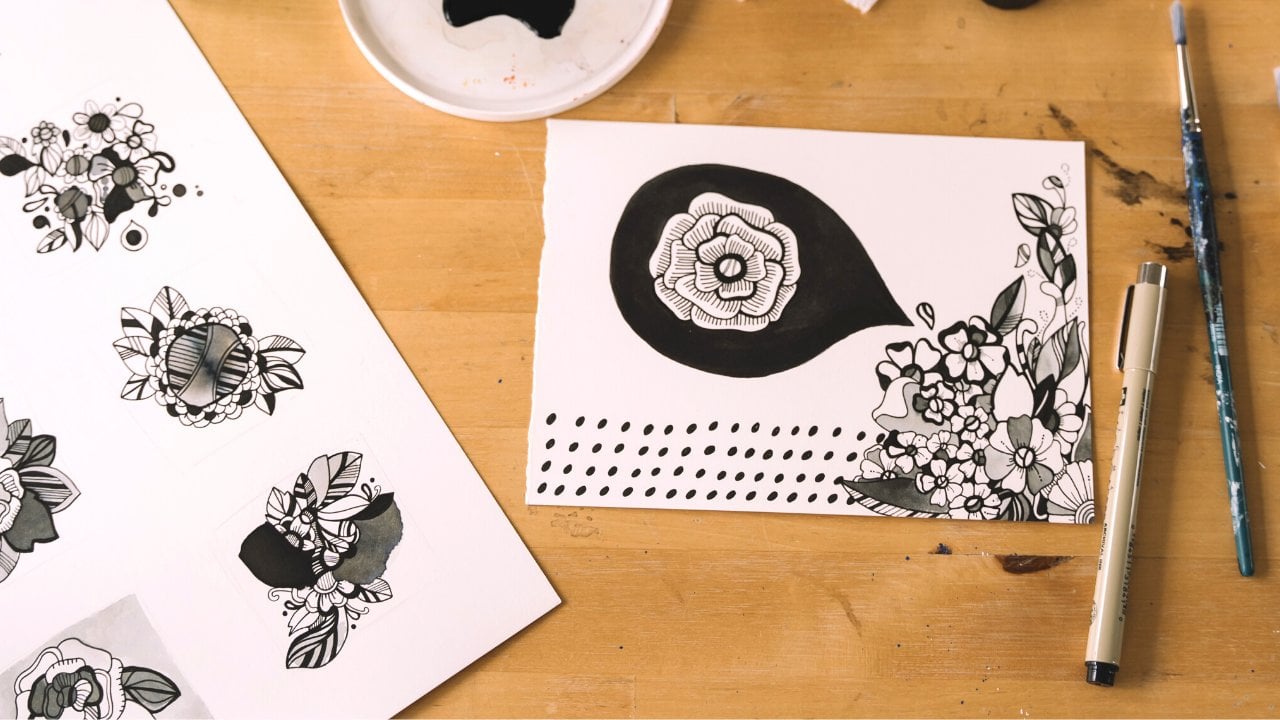
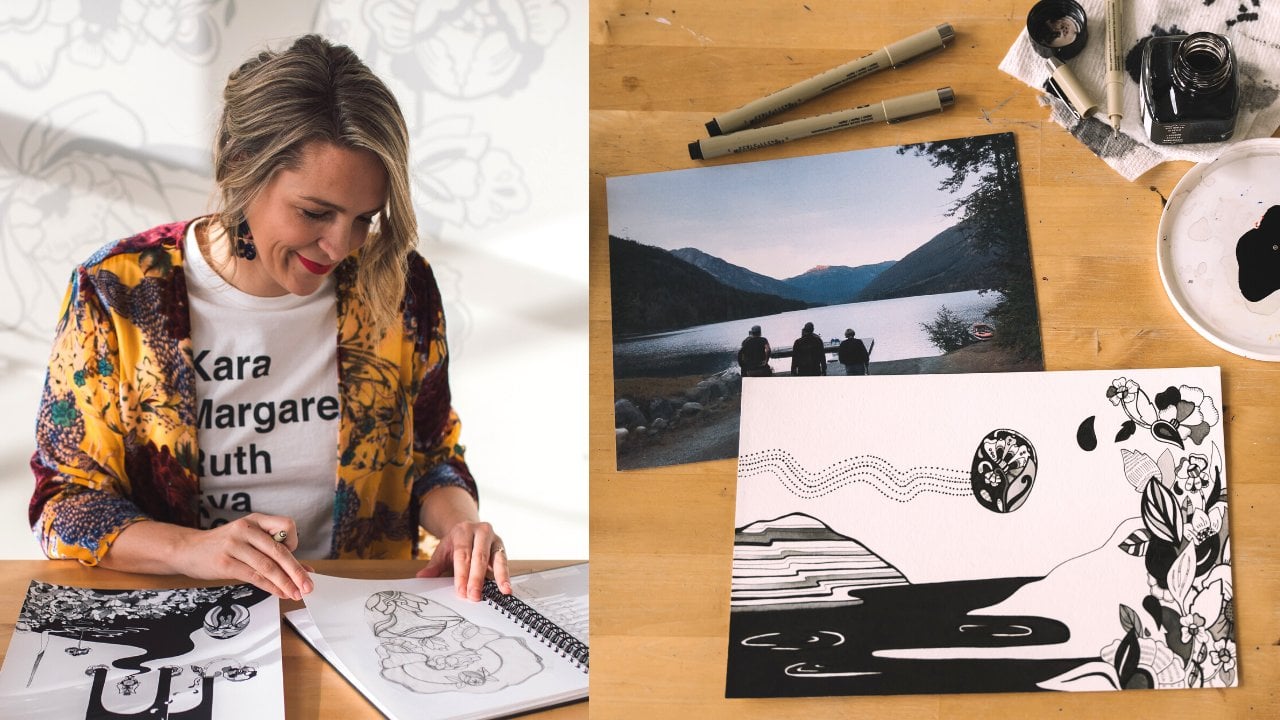
Hi, I’m Jamie Smith—an artist, teacher, and creative entrepreneur. I’ve taught hundreds of students how to infuse their unique voice into their art, and I’m passionate about making creativity accessible and enjoyable for everyone. My personal artwork often incorporates pen and ink techniques, and I love sharing my knowledge to inspire others.

You can see my artwork here and explore my other pen and ink classes on Skillshare:

Let’s design something beautiful together. Grab your supplies, and I’ll see you in class!

Meet Your Teacher

Teacher Profile Image

Jamie Smith

Artist, Teacher & Community Builder

Top Teacher

My name is Jamie Smith and I am an artist, teacher and community builder living and working in beautiful British Columbia, Canada.

A long time ago I went to art school and left without a clue about how to make a living from my work. Over the past ten years I have been learning how to make a living as a creative. I believe the world needs more creatives embracing entrepreneurship and making their dreams a reality.

Here on Skillshare, I have created my classes to cover business skills, self-care and art making (all the things I care about most). So thank you for being here!


Let's stay connected...

INSTAGRAM- Follow along on my art and business journey here. Follow me at @jamiesmithstudio

NEWSLETTER- I send out art studio updates, new artwork and u... See full profile

Level: All Levels

Class Ratings

Expectations Met?
    Exceeded!
  • 0%
  • Yes
  • 0%
  • Somewhat
  • 0%
  • Not really
  • 0%

Why Join Skillshare?

Take award-winning Skillshare Original Classes

Each class has short lessons, hands-on projects

Your membership supports Skillshare teachers

Learn From Anywhere

Take classes on the go with the Skillshare app. Stream or download to watch on the plane, the subway, or wherever you learn best.

Transcripts

1. Welcome: A single letter could bloom with life and creativity. Have you ever imagined turning simple typography into a floral masterpiece? Well, together, we're going to do just that. I'm Jamie Smith. I'm an artist and I'm an educator and welcome to my mini skill share class, Blooming Letters, a fun introduction to flower filled designs. In this class, we're diving into the magical world of combining florals and typography to create a beautiful, personalized design for you. Whether you're creating this piece of art for your home, a handmade gift or just exploring a new creative outlet, this project is all about having fun, using your art supplies, and expressing your creativity. We're going to work step by step together. We're going to choose and create a letter design. We're going to explore different ways to create flower filled designs with texture and variety, and finally complete a one of a kind art piece that you can be proud of. This class is perfect for beginners and seasoned artists alike. You're all welcome here. All you need are some simple art supplies. Paper, pens, and your imagination. Yes, it is that easy. I'm going to guide you through each step, sharing tips for layering, adding details, and creating dynamic compositions that truly pop. If you enjoy experimenting with pen and ink or if you're just looking for a quick, easy project to unwind, this is a class for you. So grab your supplies, and let's get started designing your blooming letters. See you in the next lesson. 2. Let's Bloom : I am so excited to guide you through this project, and I hope you will love pen and ink as much as I do by the end of it. So let's dive right in together. Step one, draw your letter. So first, you have to pick your letter. I am going to do the letter F for my daughter, Florence, for her room, a nice little gift for her. Next, you're going to grab a scrap piece of paper, and we are going to create studies. So studies are a great way to practice ideas before you start on your actual, nice, fancy art paper. This is such an important step in the creation process. This is a place where you can try out techniques and do any creative meandering that you need before you go to the nice paper. So next, we want to think about what do we want our letter to look like? You could do a capital letter or you could do something more cursive. There are lots of different designs here. So use a pencil, and I suggest just drawing, handwriting your letter. Then using that as a guide to do this larger outline because you want to make sure that your letter is thick enough that you have room to fill it with flowers. Another technique is to print a letter online. So pick a style that you like, and then that printout, you're going to hold it up to a window using the natural light to trace out your letter on the paper. If you want to try this, I found a really quick and easy way to do this on Cava, and I create a little bonus video for you to check out. Our next step is to pick your paper. This is a time if you have a thicker watercolor paper or cardstock, you want to get this out and we're going to use it for our final drawing. You can also use a regular piece of paper, that's no problem, whatever you have. I would measure to find the middle of the paper to make sure that your letter sits in the center. You also want to make sure that you leave white space around the letter, especially if you are thinking you might frame the piece. If you're planning to frame, I highly suggest using a standard paper size that works for a standard frame. It's so much cheaper to buy a standard frame. My favorite size of paper is nine by six. I would recommend going a bit smaller than bigger, especially if you're trying this project for the first time. Filling the flour does take a while to complete, and you don't want to lose steam and then never finish it. Done is better than perfect, or in this case, done is better than bigger. So step three, fill your letter. Start in the middle of the letter and work outwards. That is the best technique to do. You want to really layer in your flowers. One should lead into the other. Pieces should peek out from underneath the other. It's filling it up. The more the better. A key thing is that you want to make sure the edges of the letter look very natural. So you want leaves and petals growing up in a natural way from different angles to create that edging. I have some other important flour tips to share. So you want to make sure that you are creating different textures in your piece. And the way you're going to do that is by repeating organic elements over and over inside the flower. This could be a bushel of leaves, the inside of a flower bulb. This creates movement and adds a lot to your final piece. Another flower tip is to create full and open areas. So making things that are full of lots of different elements, but then open bigger areas with leaves and petals. Open and big creates that movement that our eye is looking for when we're looking at the piece. It makes it more dynamic. On the same note, we want bigger and smaller to create that movement, bigger flowers, bigger leaves, and then smaller ones as well. This makes the work more interesting and also more realistic as nature is all different sizes. And to follow this along, we also want dark and light areas. So using a thicker pen to really fill in some areas to create contrast is going to add a real pop to your project. Then leaving some areas of blank white space like petals and leaves are going to add a lot. Lastly, we want details. So using different sizes of pens really makes a difference. It may feel like there's so many flowers here. Who cares? But these details matter. Little veins in your leaves, little dots in your flowers. All of that adds up to make it really interesting. Step four is draw, draw, draw a eras. This is the last step, the fun part. We're going to settle in and get drawing. I like to turn on some Harry Potter, pour myself a cup of tea, and draw away. There is truly nothing better in my opinion. Once you have finished all of the flowers in your letter, and it's completely full, well done, give the work at least 30 minutes to fully dry. Make sure that ink is dry. Then with a soft white eraser, remove the pencil line that you drew to outline your letter on the paper. And that's it. Fun and quick and a way to make this personal and gorgeous piece of art. Enjoy the process. I can't wait to see your letter and all the flowers you have created within it. Make sure you post your project in the project section below, and join me in the next class, I'm going to share some next steps for you. 3. Next Steps : You did it. You made it to the end of this mini class, and I couldn't be more proud of you. You've created a beautiful floral filled letter design, but along the way, you've learned techniques that you can take onwards into your creative practice, and hopefully you're pen and ink to the next level. This is just the beginning. If you enjoyed this class and really want to continue exploring this medium, which, of course, is one of my favorites, I have designed two more classes for you. The first is called Flower Power postcard, Basics of drawing and Pen and ink. In this class, we will dive deeper into the foundations of pen ink, the techniques and also create a stunning floral postcard. In this class, you'll learn patterns, variety, and using bold shapes to bring your drawings to life. It's a great class. The next one I created is drawing your personal landscape, next level of drawing and pen and ink. This one is a bit more of a challenge, I must say. In this class, we build on everything you've learned, and we really do take it to the next level. You'll be exploring how to create larger and more personal works of art. We create meaningful personal symbols and thoughtful compositions together. These classes were designed to complement each other along with this mini class. And together, they're going to help you develop confidence in penaning and find a voice as an artist. So whether you're a beginner or a seasoned creative, there's something for everyone in these classes. Thank you so much for joining me in this class. I can't wait to see your beautiful design. Please make sure to upload and share your project. And remember, your art matters. The more you create, the more your unique style will bloom. Now, let's keep those pens moving and creativity flowing, and I will see you in the next class. 4. BONUS! Canva Letting Making : How to make quick and easy letters in canvas. So you're going to create your design. And this is your paper size you want to put in. So I always use six by 9 " paper. That's what I like to draw on right now. So I'm just going to open up that project. You can use any size that your paper is going to be. So this is what my white piece of paper is going to look like sitting there in front of me, and now I want to play around with letters. So I am going to put some text on here. My letter is M, and I can use this as a great way to see how is this letter going to look? So we want to find letters, fonts that are thicker, right, because we're going to fill them with the flowers. So this one's kind of neat because it's thicker and then thinner. So I'm going to say this is a maybe, and I want to play around some more, but keep the ones that I find. Oh, I'd love, like, a script. That would look kind of neat. So I'm going to play around with this. But when I'm done and I have a few options, I don't want to print this much ink. So I'm going to go into effet. I'm going to go to hollow, and then I can change the thickness. So now I'm going to have a nice outline. I'm going to print that and then use it to trace that letter through a window using some light or light box onto my paper to start my drawing. I'm just going to download that into a PDF and I am ready to print and get going. I hope this was useful and thanks so much for taking this class.