Transcripts
1. Welcome!: welcome to buttercream blooms. Elegant cake design. I made me Kimmel and I want to share my speed obsession with you in this class. I'm gonna take you through step by step, how to construct and finish a beautiful wedding cake has a new class. We're going to be starting out with how Teoh deal with the client coming to you of an idea and turning that into an actual drawing that will move into scheduling. When are we going to start the process of making this cake? What days do we need to plan everything? And how long is the whole process going to take us? I'm gonna give you a quick run through of pipes, buttercream flowers for the design of our cake. Then I'll show you how to build the cake from cutting it, Teoh stacking it and adding the buttercream and putting a crumb coat on that Kate is also gonna teach you a really cool technique called buttercream watercolor, which we're going to do on the bombed here of our cake. That's really exciting. After that will move into the process of stacking the tears of cake and getting it onto our finished board. That's going to go to our event. And finally, after all of our hard work piping the buttercream flowers, we'll put them onto the cake. There are a lot of resource is available as Firas Recipes supply list. If you have any questions along the way, please don't hesitate to ask. I really hope you enjoy this class and I'll see you in the first lesson.
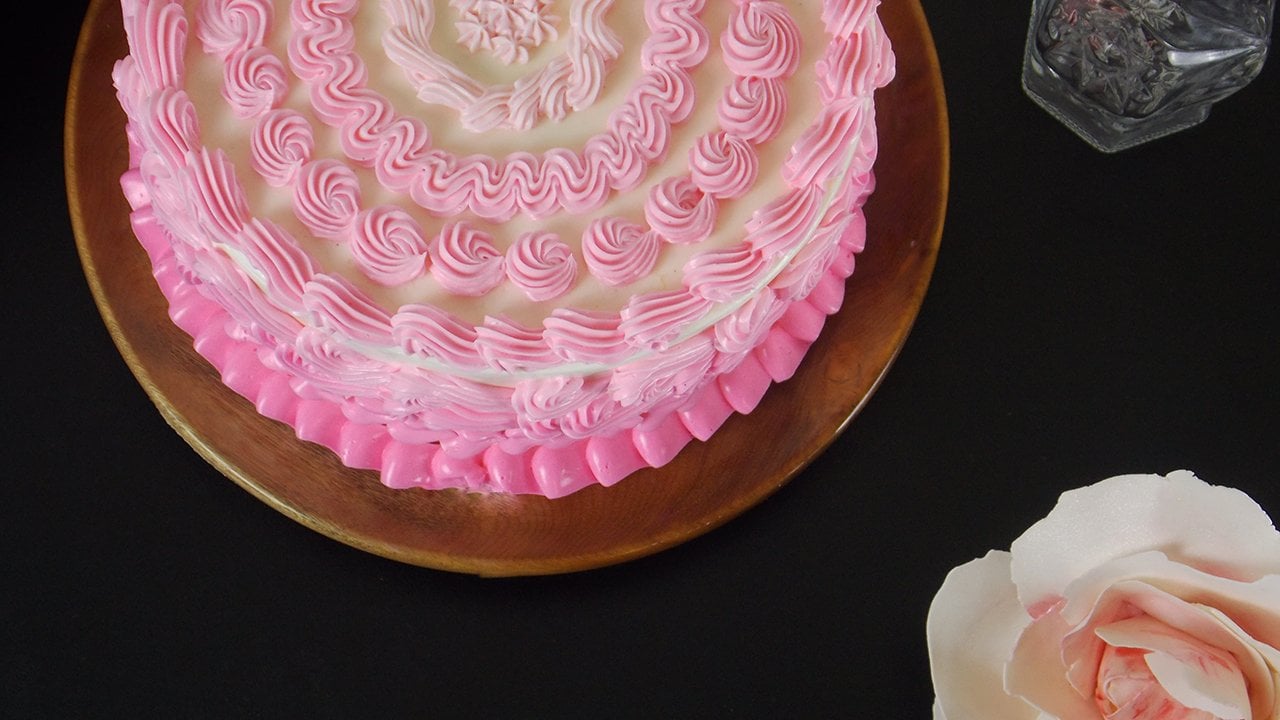
2. Cake Design: clan came to you or a friend or family? Never. And they were having a wedding. They gave you a picture of a piece of inspiration from the theme of their events and they want to do to create a two tier cake. Would you know what to do with that? If not, that's OK, because we're going to go over that in this lesson. We're gonna briefly touch on how to take inspiration and turn it into an actual design. This isn't super in depth, and obviously it's definitely something that takes practice, and you're gonna have to find your own style and your own voice over time. But this is a really great place to start. I'm gonna walk you through my process of how I would design a cake if somebody came to me and said that. So let's get started. So here's a scenario Friend comes to you and says, Hey, me, I know you're really awesome and cakes, and my wedding is in six months. I really want you to do a cake for me. It's a small gathering, and I would like two tiered. I don't have a photo of a cake that I already want. And I trust that you can really come up with something beautiful. Here's a picture, though, of a bouquet I found online that I really, absolutely love the colors off, and I'm gonna build the colors of my wedding off of this. Do you think you can help me? I'm gonna say, Yeah, absolutely. I would love to. Because me, I love to design cakes. That's kind of what I specialize in. I don't have a lot of people. That's kind of what I specialize in. I never had a lot of people coming to me with pictures of exactly what they wanted. They would bring the inspiration or tell me colors or a theme, and I would just do my thing. So first things first. What? I'm gonna dio Obviously not right in front of them, cause this is a very rough sketch. I'm gonna come home. I'm gonna take the picture whether it's the email, that to me or printed out, whatever. I'm gonna look at that and I'm gonna sit and I'm gonna daydream. Yeah, I said daydream, because that's what I dio. I sit and I try to come up with an idea of what I think would be really beautiful. And then I start to sketch. So I have my reference photo, and I noticed that a lot of it is white, really white, elegant. And then you have these very subtle greens that really save you green and almost looks like kind of makes me think like I see or wintry. Um, And when I think of winter, I think it just kind of white, stark, but little bits of greenery popping through. So right there, I know that I'm gonna wanna have a lot of white as a background on my cake with little pops of color. Now, obviously these of the flowers they're gonna go with So I'm gonna want to use those flowers as well. So I'm gonna start. And they wanted a two tier cake. So I was going to start by just really basic here. Nothing fancy. This is for you. This is kind of ah guide of where you're going to go And how you gonna finalize things now for me? I like I like height So my bottom tears kind of tall My top tears gonna be even taller. Reason being is because I want the top of this cake to kind of come up like like there's a bouquet on top of the cake. So this is a very rough sketch, and this is why I do cake art and not art on paper, because I am not that great of it. So I know I'm putting roses on my cake, and I know that there's kind of other types of flowers and these obviously you'll put on later and whatever pattern you want. So there's really you don't have to specifically place the flowers, but I know I want a taller cake because I want a lot of white space, and I think it's really dramatic to kind of have these flowers spilling down over a little bit so I might have some flowers coming down here with my leaves. And I want a lot of roses because they really are a beautiful wedding flower. They put a lot of bulk in there, so I know that I'm gonna have these leaves coming down a little bit, but not a whole lot. I don't I don't want them coming all the way down. Like I said, I want a lot of negative space here. So that's kind of my bouquet idea there. And, you know, I I like to label my drones. Even though they're my own drawings. You never know. Especially if maybe you're doing a lot of cakes. And you just wanna always make notes on your drawing as well. So I'm gonna put that this is white. Now, this is really beautiful. I mean, this would just be a beautiful cake white without on top. But the tall cake. I know what the tall cake. So I want negative space, but I don't want all of the attention to be right at the top. I want to balance it out. So I'm gonna bring a design down here on the bottom. Right. So for me, I'm just gonna That tells me that there's some type of design down here, right? And then have to decide what what is in my arsenal. What do I want to do? What do I think? It's gonna look really nice. You know, I could do borders. I could paint something What I really want to do. And then this is also the point where you say, Well, you know how much with their budget How much time do I want to put into this cake? You know how? What can I dio Do they want fondant, or do they want all buttercream? So I know that say they want all buttercream. So I'm gonna figure out our design down here. That's gonna be buttercream, you know, found in I could do cut outs. I could do ruffles. I could do all kinds of things with that, but I want to use buttercream. So what do I know with buttercream? And I love watercolor. It's just a really nice buttercream technique adding different colors. I've got a couple of subtle greens up here, so why don't I just take my greens up here, pull them down here and do a watercolor effect? So I have just a basic sketch of my cake, and I visualized what I wanted. I drew it, and then I rationalize, basically, you know, Will it work? Well, something else work better. What's the budget? Like I said, it's just it all depends. And, you know, cake design is really going to take all things into account and you go, you'll get better at it and more experienced, and you'll understand more of what you can and cannot do. Basically. Ah, but for this they don't have a very large budget. They have kind of, ah, winter themed wedding. It's really going to focus on the flowers, and it's got to be all buttercream. So here I've come up with a design that I think is gonna be really beautiful. Pretty simple. And I'm sure they love it. Once you get to this point, you have to look at it and figure out how am I gonna timeline this whole cake? It's really important to know exactly where to start and where you're gonna finish and how early you need to start before the event. So we're gonna go over that in the next lesson.
3. Cake Planning: Now that we have a rough sketch of what our cake is going to look like when it's finished, you have to take the time, Teoh. Figure out how you're going to make the cake. When are you gonna bake the cakes? When are you gonna frost the cakes When you're gonna make all the different components? What time doesn't need to be at the venue? What am I making it out of? Because if you're making it out of buttercream, well, you can't let the cakes in. The refrigerator is long. So you really have to know your materials and understand that sitting down, Andi even just writing it on a piece of notebook paper, which is when I'm going to show you and figuring out exactly what you're gonna dio is gonna make such a difference, especially if you're doing multiple cakes in the same week or weekend. You really have to plan. It's so important. I can't stress that enough. So let's get into making a list and making a timeline for our cake. I always do this part just on a piece of notebook paper to get it started. Obviously, if you're going to send that customer a quote or finalized sketch. You would type this up on the computer, but I'm just going to show you the breakdown of how I figure out my timeline for a cake. I had my photo here. Now I have Teoh first make a list of all the pieces that I need in the cake. Obviously, your client should have told you how many servings who needs you would have determined. You know, what size does the bottom tier need to be? What sizes top here need to be? I know that this bottom two years a seven inch and this top tier is a five inch. So based on whatever flavors, let's just make a list of what we need. So depending on how you do your cakes, I always do. I cut cakes in half, and then I'll have four layers of cake, three layers of butter cream inside the cake, so I know that I need to seven inch cakes and Teoh five inch cakes. And then how much butter cream do I need again? This is something that's going Teoh. Take time and practice, but I know looking at this cake I'm gonna need about 2.5 batches of buttercream. I'm also going to need buttercream flowers. So I got my checklist of what I need to do. As far as the timeline goes, this is a pretty simple cake as faras wedding cakes go. Really, Once I have this list, I can just look at it and say, Oh, wow. Okay. I need four things for this cake. When do I want to do these things? So say the wedding is on Saturday. I'm gonna put that farther down on my piece of paper because I want space up here to kind of plan backwards. So Saturday at I need to have the cake there at 11 a.m. All right, so right away. I know that I don't really want to have to be decorating this cake any time in the morning on Saturday. I'm already gonna be scrambling and nervous. So Friday, Friday I need Teoh. We're backtracking, so the cake needs to be put together, so we'll just put cake put together. So then I go like this. Well, if I need to put the cake together on Friday, how long is it going to take me to stack the cakes and Teoh put the buttercream flowers on it. Something like that would take me 30 minutes, tops. So I'm gonna put here 30 minutes. Okay, So do I have time then, to do the other components of the cake on Friday? I can frost my cakes on Friday as well. Frost cakes and crumb coat. All in all, this process is going to take me to crime. Coach the cakes, chill them final frost them at my watercolor technique. We're looking at about two hours, So 2.5 hours, And, you know, if you already have 40 hour a week job, this isn't me something you're going to do in the evening. So this takes up my Friday evening, right? And this cake will be put together in the refrigerator, and I can take it on Saturday morning. Okay, So I'm gonna put I'm in a second, Okay? You can put my buttercream flowers on it, but I'm also going Teoh Frost, The cakes and crumb coat them the same day. So obviously I have not made my buttercream. I haven't baked my cakes yet, and I haven't made my buttercream flowers, so looks like we're going Thursday for that. I can make my buttercream. I'm making 2.5 batches would probably take two trips in the mixer, which is gonna take me about, let's say, 1.5 hours just because Swiss meringue buttercream is a little bit more time intensive. So we've got that, and then I'm gonna pipe my buttercream flowers and piping my flowers All in all is probably gonna take me about another 1.5 hours, and then my flowers can go in the freezer. I've got almost everything on my list so far, Except I haven't baked my cakes. Well, I know that my cakes need time. Chill. So what better time that overnight? So I'm gonna bake my cakes on Wednesday, and you might be looking at this and going Wow, you're making your cakes on Wednesday. It's not gonna be eat until Saturday. That seems a little bit weird. Well, number one once you get the butter cream on the cake, it's gonna lock in the moisture and the freshness, and they're really not going to deteriorate after that. Same thing is, if you would put funded on a cake, it's not gonna deteriorate too much. It lasts a little bit longer because all that freshness is kind of sealed into the cake, so to speak. If it makes you feel more comfortable, you can bake your cakes. Wednesday, let them cool overnight and Thursday morning, pop them into the freezer. And then Friday, right when you get home from work or some time a couple hours before you're ready to use them and frost them, just pop them into the refrigerator. That seems a little weird to be freezing them for just a day. But if it makes you feel better, you can, although for me personally, I know that if I bake my cakes on Wednesday and I let them cool overnight if I wrapped them Thursday morning and I put them into the refrigerator that by Friday, when I go to cut those cakes and soak them with simple syrup, they're still gonna be moist. They're still going to be delicious, and then I'm gonna cover them with my butter cream into the fridge. They're gonna be still be great for Saturday. If people won't even know that they were baked on Wednesday. I promise you big cakes that might take me an hour. If you're doing multiple cakes in a weekend while you can fit these time slots in around other things, this really gives you a good idea of how much time you're gonna need and obviously when to start. Because if you hadn't done this and you thought well, get started on Friday, that should be plenty of time. I don't need until Saturday morning. Well, you would be really kicking yourself for waiting to the last minute because for a Saturday cake that's considered simple and you need to start Wednesday, you can see why this process is so extremely important. I can't stress that enough. And I still do this even though I have been making cakes for professionally over 10 years, and I've probably done over 1000 cakes in my career. I still do this with every special event cake, no matter what, it is so important we have our list, and in the next lesson, we are going to look at how to start building our cake
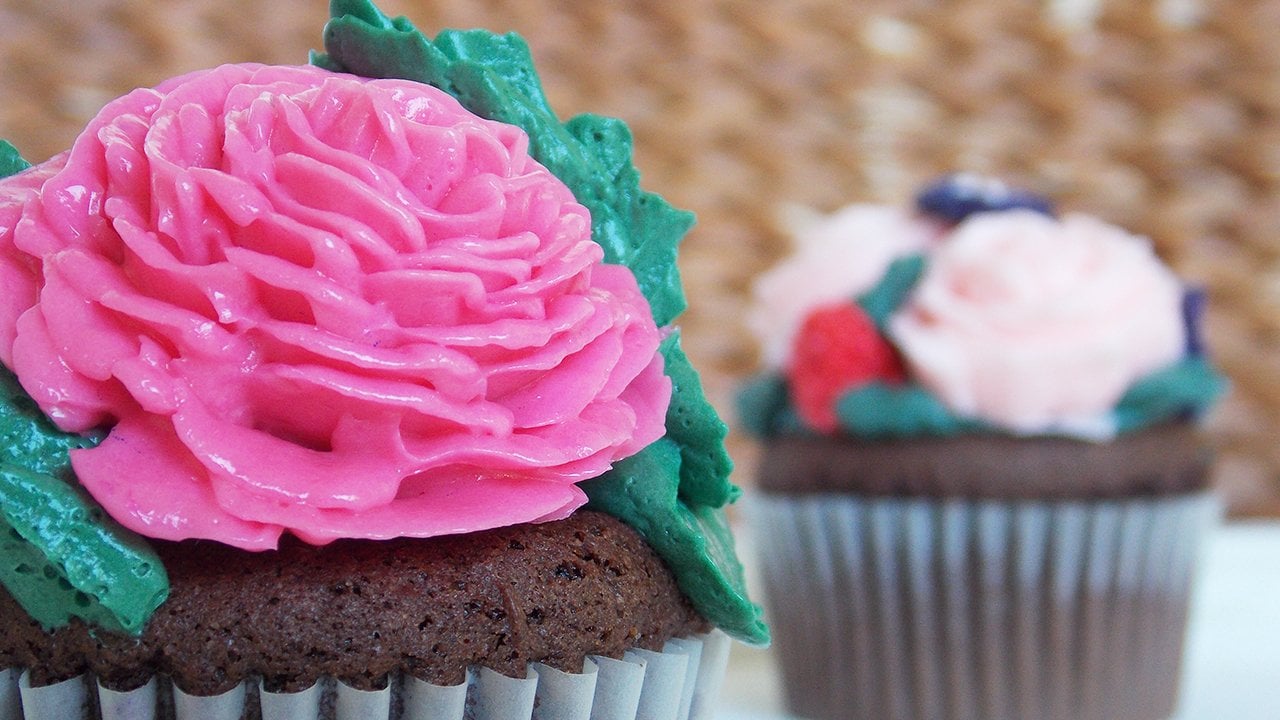
4. Piping Flowers: for this. Listen, I wanted to give you a quick run through of the flowers that we're gonna be using on the cake, how to pipe them and store them for this process. I usually like to start before I'm going to actually start working on the cake. So sometimes I'll do my flowers a day. I had a time or even a week ahead of time and pop them in the freezer, which makes them so much easier to handle and apply to the cake later on for this first flower. Misha, you the rose. I have my piping bag fitted with tip 1 52 at the Wilton Tip. And I have my flower now, and I have all my tools here, ready to go. The majority of my flowers are piped in white buttercream. So I just have a couple bags for this because then I can just switch out tips really quick and pipe all of my white buttercream flowers at once, which is really nice and easy. So for this, we're going to start by putting a little bit of butter cream on our Neil to attach the parchment. I start out by piping my center. And then I'm gonna pipe right around to get the senator my rose and the center. But part I'm continuing to pipe leaves a little bit further down my bass each time while I'm rotating my nail until I have a nice finished rose. And then that's Congar. Oh, right onto the cookie sheet. Now I'm such to a large star tip still using the white buttercream, and I touched my tip to the surface. Apply pressure, Stop pressure, pull away. Obviously, there's a big hole in the center of that, so we're gonna fill that in. So the way I achieved the look of those flowers was Teoh. Take just this little Fondital and smushed down those chips and drag inwards like that off on my toe. I let me being a little bit of a perfectionist. I just like to clean up that center a little bit when I take one of my black Drudge's Drop that rain to the center pipe. Few of these and they go right on my cookie sheet, ready to go in the freezer. What's covered my bag? Teoh one fitted with a couple of system so that I can just switch out these smaller tips easier. The previous bag had just a tip in the bag because those large chips don't fit on these couplers. So for this I just have Ah, Wilton Tip 12 and it's around tip, and there's kind of like little round buds in that bouquet, so I want to mimic them by using my round tip. Applying pressure was tryingto high pressure in a way that gives it kind of around uniform shape. And then I like to take my spatula and clean up this bottom so that it's just more rounded . The same for this. I can just drop a little drowsy right into the center. I kind of give you a little round bud when we can switch our tip right over to tip 17. Again, this is just another started, its much smaller This is going to give us our what looks like a hydrangea. I just like to look at the photo of the flower and kind of see exactly how I can replicate it, so they're kind of misshapen. It was piping little stars to look like little believes when it kind of just gives you this nice women's ago looking flower. Those could go right on talk. He sheet as well. E went ahead and mixed up some of that Seiji Green that we saw in the picture. And I used the blue and the yellow just a little bit at a time until I got the color. I wanted there, not even using a new bag. This is actually the white piping bag that we already had for the other flowers. And I just put my sage green buttercream and they're fitted it with a chip 104 wilderness and whatever white is left in there, you can just squeeze out into your bowl until you get to the green. And then we don't have to dirty any extra bags, which I'm a huge fan off that can reuse tools. I will, the less you have to clean it, the end the better. So for the leaves were just going. Teoh get our nail ready to go and I am laying my chip down with the narrow end at the top where the tip of my life is gonna be the wide end facing towards me, and I'm actually going to start piping and then I want to turn and pull away, and then that gives me half of my leaf. I'm actually going to flip my bag over to do the other side. So there again the narrow and now is pointing towards me the wide and pointing away from me start and pull away. It was really great Leaf, and I like to make it even more realistic and kind of clean up this front edge here and make sure that it's a nice point. There's the leaf, really simple. Just pipe a bunch of these because we're going to use them as fillers around our flowers and with all of flowers, I say pipe at least ton of each. Um, and it's always great to have extra for any project. If you think that you're going to, I need a lot been always, always do more than you think you're gonna need, because the worst thing is to run out and then you have to mix more colored buttercream and try to get that exact shade. Just try toe be as prepared as possible. And this for this particular cake, we're not going to use all of the buttercream that we made the full batch that we made. So save the buttercream. Just put it in an airtight container, throw it in the fridge, and then before you are ready to build the cake, just pull it out about an hour ahead of time, two hours ahead of time. Make sure it comes up to room temperature and whip up that buttercream before you use it again. I think it's totally optional, but I actually mixed up another color darker green that goes with the colors in the photo of our cake. And you can mix these up and this is just gonna be for filler leaves at the end when we're really trying to get more of a fool, look to our bouquet and I have them in the same bowl because they are going to be saved. Make sure you save your last little bits. Whatever you have left over of these colors, I disturbing the same bowl, which is fine because we're actually going to use it for the watercolor effect on our bottom seven inch cake. That's it for this lesson. I'll see you in the next
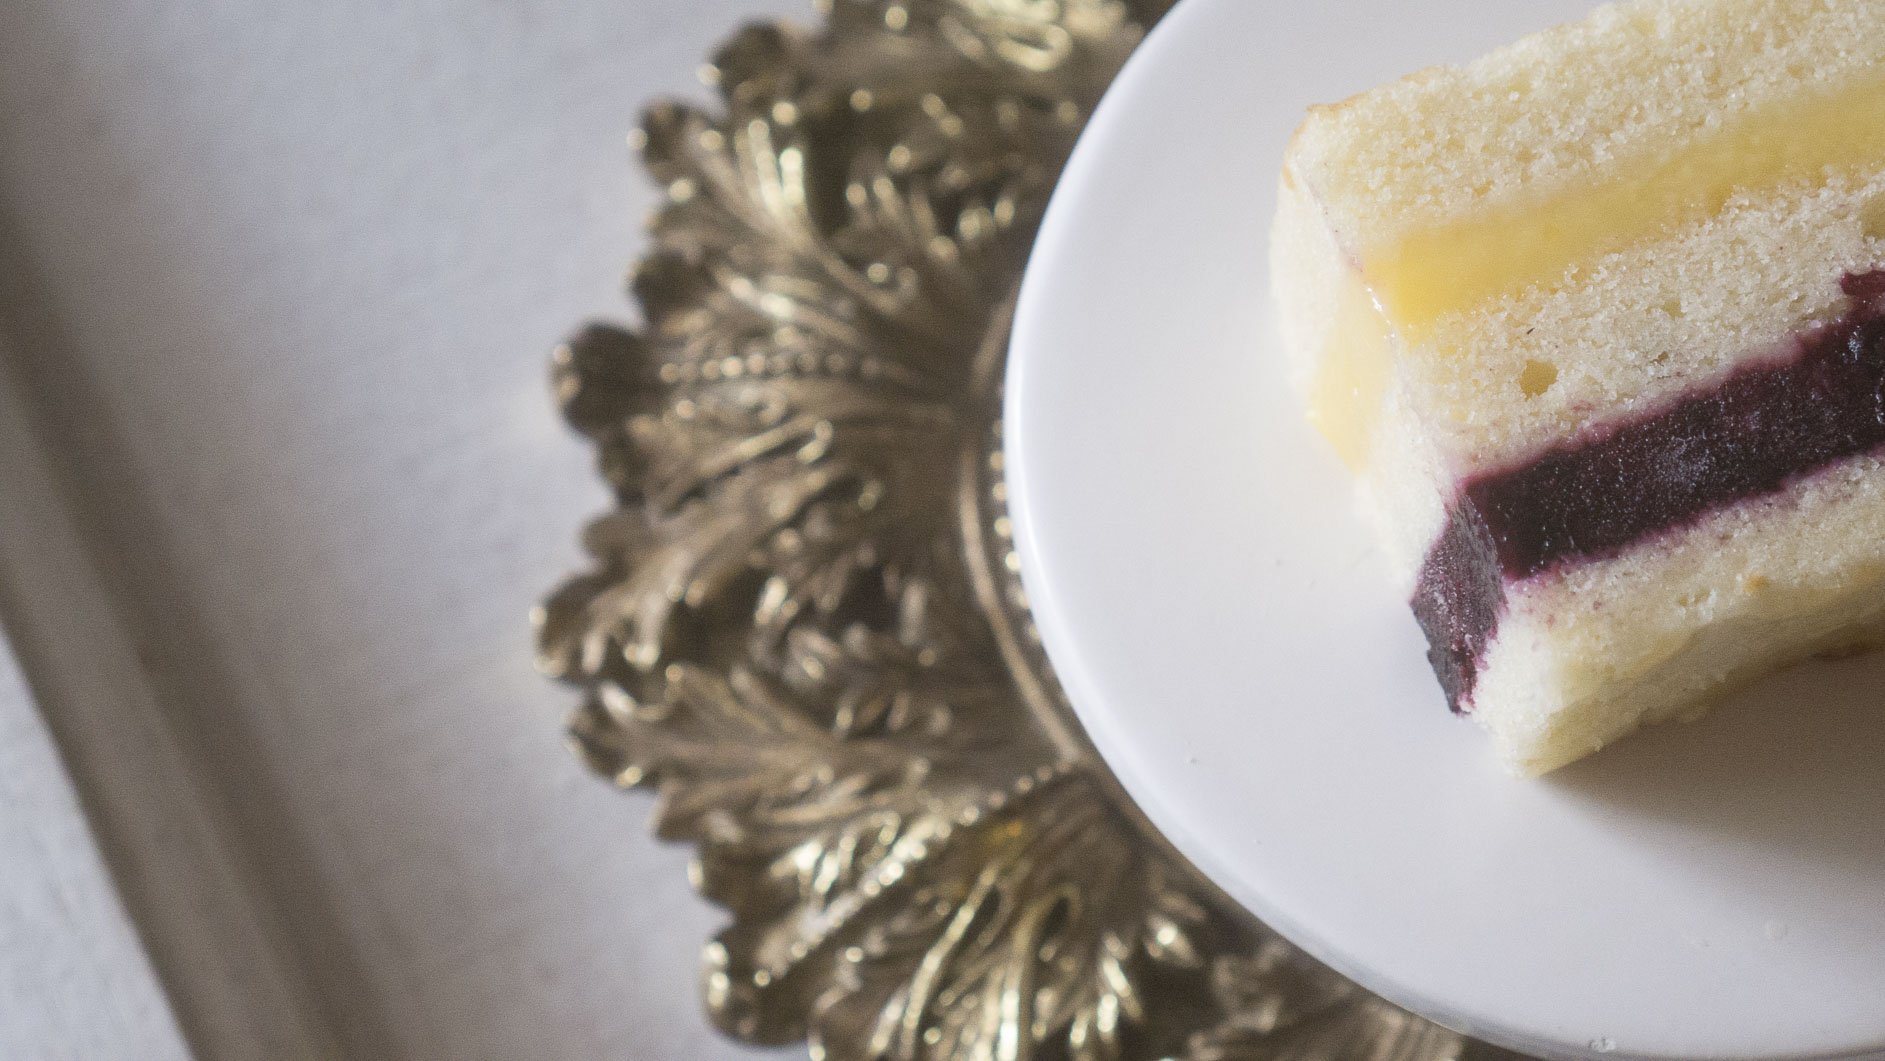
5. Cake Building: building your cakes, I think, is the easiest part of the whole process, which is really great because that's where you start. And then you kind of work up the more difficult task as you move through the process of building a tiered cake. The recipe that I supplied for the vanilla will give you 35 inch cakes, and for the chocolate you'll get to perfect seven in chocolate cakes. Now we're also going to need simple syrup really easy, equal parts water, sugar. Mine's a little off white because I like to add vanilla extract to mine. And what's really great about simple syrup is you can kind of add whatever you can come up with. So maybe if you have a chocolate cake and you wanted to put like lavender or something really different in your simple syrup, that would compliment all the flavors that you're working with. You can do that so you can kind of add flavor to every component. You'll also need the Swiss meringue buttercream. I have a full batch here, and I also have my serrated knife, and I just have a small spatula. That's how you always want to keep a towel handy, especially for this part because you get a lot of crumbs and kind of get pretty messy. So keep a child hand. Do you try to keep a clean work space? And I have my cake on the five inch board thing was actually a six inch board, which I cut to be five inch. It could be kind of difficult to find a five inch cake board, so I always have six inch board playing around and I just cut them around. You can use the bottom of your five inch pan to make a template on six and four and cut around. That works out really well, and I have my seven inch cake on a seven inch board. It's really important that the board is the same size as the cake, and you'll see why in a little bit to get started, we're going to start with the smaller cake, the vanilla, and I just like to start. If I'm doing in two different flavors, start with the vanilla and the new chocolate, because if you use any of your tools on chocolate, then you're gonna chocolate crumbs and then you're gonna put those on to a vanilla cake and you'll be able to see where, as you get vanilla crumbs on chocolate cake you don't really notice. So always start with your lightest colored cake, moving to your darkest if you're using the same tools, I like to take all the caramelization off the outside that you don't have to do this. This is definitely, ah, personal preference. And if I'm just making it for my family, I don't typically do that. I'm gonna show you how to do it, though, because it's really important, especially if you want to start taking orders. You really want your case to look professional inside as well as out our cakes. We're gonna look beautiful on the outside. When somebody cuts into that, I think it's really important to have really nice to find layers and that caramelization. While it would be very difficult to see if you have, say, a white cake with white buttercream on the inside, you're going to see that caramelization, and I think it just looks a little bit messier. So I just really like to clean it up and keep it looking really professional and something that people you know, feel like they got their money's worth. So we're gonna start by. I always take the top off. The top of your cake is called the Crown. It's this little bit of domain that comes up on the top, which is perfectly normal. Some cake recipes will have larger domes somewhere more flat. This Miller cake recipe usually comes out pretty flat and actually has a little bit of a dip in the center, too. So I'm gonna be paying more attention to that dip in the center and making sure that I get it level to that depth so they don't have a really nice flat top and then just still kind of like a little in Dent in the middle. We're going to start with we top part, and you can see there the indentation that I was talking about, so I just wanna make sure that make sure that this is gonna be really level in the top, So always start by putting the edge of your blade in right exactly where you want that level surface to me, and it's just gonna go in just a little bit. And I'm kind of putting it down a little bit because I can see that. That's where my dip goes to down the bottom. So I want to make sure that I get all this caramelization off the top. So I'm actually gonna put my hand on top and I'm gonna turn the cake as I'm cutting right now, you can see I'm not really pushing the blade into the cake. I'm just making a mark on this mark, making sure that you're holding the blade really level and like you can see here that it looks like there's more being taken off. That's because I'm keeping my blade level. My cake was obviously a little bit higher on one side, and I'm just taking it around and then I'm gonna come back. Teoh, where I started right here. My knife has met up and then I'm gonna start pushing in a little bit further. Don't ever just cut the top off or just caught straight through, because then you tend to get really uneven cuts. This is just a really good method to make sure that your getting a really nice level cut and they're a couple we dio just throw your top off. The sides can keep a plate for your cake scraps if you want. And I like to keep them wrapped up in plastic wrap in my freezer so that I can use them later on. So I'm just brushing off my crumbs here, and then I'm gonna take my cake on. I'm actually going to flip it over at this point, and then that part can just become our bottom. And we're gonna take off this caramelization on the bottom. Same process just turning as you cut. And you could see I barely took any off. This is super thin. You don't want to take a whole bunch off. You really want to keep the height of your cakes? It's important. Not gonna cut it in half. It's the same thing. Just, you know, I've all where you're half Markis. Mine looks good right about there. And I'm going to just to the same process for the half market. My cake. There we are. My knife out. Just make sure my two layers are lined up because I'm actually going to cut the caramelization off the sides now. So I just take the very end of my blade here and very gradually carved off the caramelization on the edges. You definitely don't. I want to take a huge chunk out of your cake. You want to keep as much? Is that beautiful interior cake in there? That's really nice, because then when you're eating the cake, all you're getting is just really the best part. I big of the cake, that really nice, moist part. And there's my vanilla cake cut, ready to go, Just cake. So I'm gonna go ahead and do this with the chocolate cake. - Once you finish cutting all the caramelization off your cakes, we get Teoh. Stack them. So I already went ahead and cleaned up all of my white cakes and my chocolate cakes. We'll just push one off to the side. We'll start with a vanilla, and we'll build this one first, and you can see the Manila's a little bit taller than the chocolate. I did that on purpose. Like I said, the recipe The Vanilla recipe makes three perfect five inch cakes specifically for the cake that we're doing in this class because I want this to be, I actually want my five inch to be taller than my seven inch cake, so it wasn't a mistake that was intentional. So we're gonna do is we're going to start with the cake that is on your board closest to you. Just lay your layers out and then in this part, you're just going to give these a really nice soak with your simple syrup. Once you've got that done, starting with the cake that is on the board, we're gonna add a little bit of buttercream. We're going to just Phil r K Cup. You really wanted to be specific about this? You could measure out your buttercream between each layer in a measuring cup. So then you have perfectly stacked layers than you have, you know, exact ratios of cake to buttercream. If you really wanted to do that. And if I was doing wedding cake, I would totally do that for this. I'm showing you you can eyeball it, and I'm just showing the process. It's OK if it comes out around the edges a little bit. That's fine, because we're gonna clean it up when we do the crumb coat, and then we're just gonna take our next layer and put it right on top and looked down over your cake and make sure that you've got it nice and even. And you just repeat that process until all of your cakes are stucked. Wait, you got the vanilla cake Done. Move turntable over. Pop the kick down on that, and this is what we're gonna put our crumb coat on. So just put a blob of butter cream on top of their The crumb coat is just that. It's just gonna take all the crumbs and just kind of adhere them into this first layer buttercream so that they're not going to get into out earlier buttercream and make it really messy. So this does not have to be super clean. And by no means should it be thick. And if you need to stand up for this, go right ahead. You want to bring your brother cream down the sides and it's messy, Which is fine, because we're gonna put another layer of buttercream over this to finish it. And whenever you're doing this and you're taking any of the buttercream that's filled with crumbs off of this cake, don't put them back into your clean bowl. Scrape it off on the edge of another goal or just the edge of this bowl. Just make sure it doesn't fall down in, but you do not want to get those crumbs into your nice, clean buttercream. This is what's so beautiful about the turntable as you can just spin your turntable. Well, your icing this with the crumb coat. Time to smooth off the top. Here, just go from the outside edge and drag inwards, and I don't give you nice, smooth top edge and there's the vanilla cake. I'm going to go ahead and repeat this process with the chocolate cake. At this point, you want to put it into the refrigerator and let it sit in the refrigerator, for I like to go at least an hour so that this crumb coat and the butter in the buttercream can really set up and get hard and that when we put on our outer layer of buttercream, this won't be soft and getting into that layer. So one hour in the fridge and I'm gonna do the chocolate with the butter cream that I still have left on my boat thing. - You're not the chocolate crumb coat in the fridge for an hour. Let this set up before we start working with it. If you're following along right now, your cakes are chilling in the refrigerator. And if you have any questions about this lesson or any steps along the way, please don't hesitate to ask. I'm always checking the platform on. I love answering questions I really love connecting and getting to know my students and knowing where you're coming from and where you know you might be having difficulties. Or maybe I'm not teaching it in a way that makes sense. I guess so. I really wanna make this class the best at all future classes. So if there's something that could be better or more descriptive, please let me know otherwise I will see you in the next lesson.
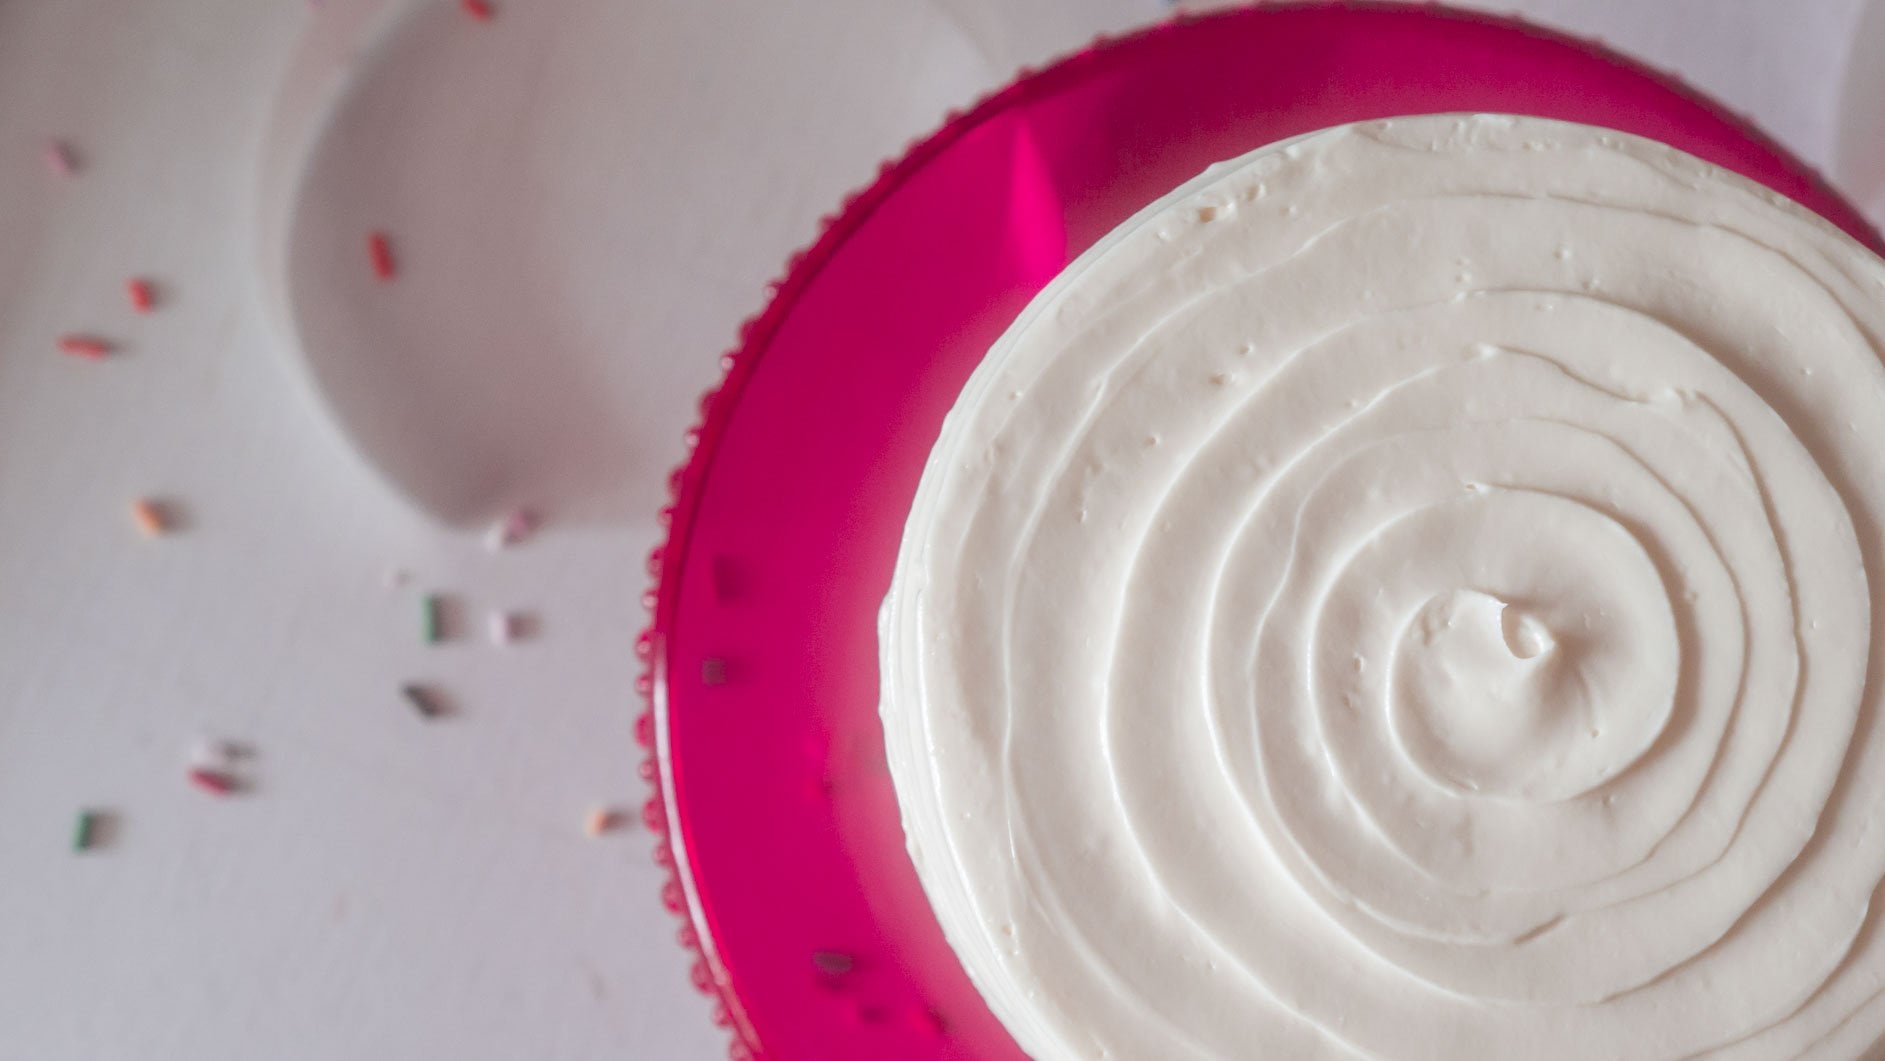
6. Buttercream Watercolor Technique: Hey, students, At this point, I have my cakes with the crumb coat chilling in the refrigerator, and I have my buttercream flowers in the freezer setting up. So the ready for the final cake in this? Listen, I'm gonna show you how to do a really cool buttercream watercolor effect for our seven inch base cake We're gonna be using the greens that we had left over from piping are flowers and leaves. I'm really excited to show you this technique. It's absolutely stunning. You're gonna really love learning it, So I'll few there. It's so at this point, your corn coat should be really nice and firm. You can test this by just touching your buttercream, and as long as it doesn't stick to your fingers, you're good to go. If it does, then it hasn't been chilled long enough and you're gonna want to put it back in the refrigerator for at least 1/2 on hour. If you're in a crunched for time and you just speed up this process, go ahead and pop it in the freezer and it'll firm up really nice and quick. It's so important that you have this crumb coat on there because especially when you're doing darker cakes like chocolate cake or even red velvet, you do not want those crumbs to get into your final coat. People will really see that. And we just want a really nice finish. We're going to start with our final coat by putting just a good amount of buttercream on the top of our cake that we're gonna use our spatula and just step back and forth motion, spreading it out to the edges. It's OK if it goes over the sides a little bit, we're gonna be adding butter cream to the size of our cake. So that's fine. We can smooth it out later, finally, to just give it kind of a preliminary smoothing on the top of the cake. Now I'm gonna start adding it to the sides of my cake, and you want to get a nice, thick layer on their Don't worry, we're gonna be taking a lot of this off as we smooth it at the end and finish it up. If there's a gap between the bottom of your cake and the board like there's a space of board that's visible, that's about how thick you want your buttercream to be because we want to close that gap and make sure that the board is covered. It also helps if you stand up and look down over the cake. I like look down over the cake and frost the side that's farthest away. For me, that seems to be what always works. Well for me. Just make sure you get everything really good from the top all the way to the bottom. Make sure that your getting that bottom inch, I feel like is the toughest part to cover with buttercream. So just make sure that you're getting a nice, thick layer on there. Once you have all your sides covered, I like to sit back down because it gives me a really good viewpoint. I'm gonna hold this straight edge whatever street as you're using and you want it snugged up against the cake, pay attention to the angle of it. Obviously you want your sides to be straight up and down, so you're holding the straight edge in one hand and then turning the turntable with your other. Just keeping an eye on that's straight edge, making sure that it's perfectly up and down and sometimes I will take what builds up on my street it and just patch in. You'll see little spots where it's not smoother. There's there could be more, buttercream added, So just add butter cream there. And if that doesn't work, or you run out of buttercream, even just ADM. Or with your spatula, and this could take a little bit of time, and it's OK if it does. I like to get this really nice and smooth and professional looking, and the added bonus is is the buttercream underneath is really cold and solid, so the butter cream on top isn't going to get melty and, you know, just heard into a puddle on you, and you can kind of work with it for a little while. I know it can seem tedious, but just keep going, making sure you have nice straight professional looking edges. And I wanted to get this part really nice and smooth. Once you add that colored buttercream, you really only want to run your straight edge over once, maybe twice, so make sure your foundation is really great. You know, it's it's like building a house. You gotta have a good foundation or else your house isn't going to be well built. So just make sure you're starting off on a good foot. Wasn't really happy with my size. I'm gonna take my spatula, and then I'm gonna take those bids off the top that are sticking up and I wanna start furthest away for me and just very lightly. Don't apply a bunch of pressure because then you're gonna push out on the buttercream and create a lip, and we don't want that, so just very lightly Take off that top edge. Always make sure that you're scraping your spatula in between each swipe. Because if you don't, you're gonna be leaving little bits of buttercream behind in places that you don't want them to be. And if there's any little patches on top, just fill them with a little bit of butter creating too. You could see there's a lip, so I'm just kind of smoothing it out a little bit, too. I like to get my top really, really smooth. So then, once you have this nice and smooth, this is where we're gonna take that left over buttercream that we had and I was gonna take . I'm gonna start with my lighter color, and I really want to keep it kind of on the bottom half because I want to set up established like a really nice chunk of white through the center of my cake. So I'm just adding bits of this around the side of the cake. And it's really important that you had it nice and smooth because you don't wanna have to do any extra smoothing once you put the colors on because then you're going to get him all really blended. And we don't want that. We wanted to just kind of have just to really nice drag of colors without it being over blended. So there I have my light. Now I'm gonna take my dark and ads and patches of that and you're not covering up the whole thing. Obviously, we're covering up all the white buttercream. We don't want to do that, so that looks pretty good. It's really important to have your straight edge really straight up and down and flushed to the cake at this point because you really don't want to do more than one or two turns. So I start with my hand on the back here holding my straight edge, flushed the cake and I'm gonna turn. Try to get a full turn Scrape off your straight edge. Gonna go over this one more time just to get it really nice and smooth There we are you so you can see if you had to really get it more smooth after this, it would really blend it a lot. And I don't want that. I like the real randomness of it, but it's not. It's still you can still definitely see the separate colors. So I'm happy with that. Someone's gonna take my towel and clean off my spatula. Make sure there's no color left on it and just clean up the's top edges again. And that is our watercolor effect. And don't worry too much about this part being super smooth because don't forget, we're gonna put that five inch cake on top of here. Now that I have a beautifully smooth finish on my five inch cake, this is ready to go into the fridge, and then I let it set up for about 1/2 an hour, and then we can stack the cakes so I see in the next lesson
7. Cake Construction: Hey, students, Thanks for joining me in this lesson. Now we're at the really fun part and we get to put it all together. All of our hard work. It's ready to go. We've got a seven inch with the watercolor technique, the five inches in the fridge, the buttercream flowers or in the freezer there, just waiting to be put together. So I'm gonna show you how to dow the bottom layer so that we can stack another layer on top of it. It's really strong and sturdy. And then how to put onto our finished plate. I'm so excited to see you in the lesson. I have my seven inch cake in front of me ready to go, and this is the plate I'm going to be using. You can use a really nice wrapped cake board. You could even make your own cake board by taking a couple of the rounds. You want to make sure that it's at least a nine inch round so that you have a nice space around the bottom base of your seven inch cake. You could take a couple of the carp around, stack them together and then wrap them in really pretty food. Safe oil. You can buy the colored foil at your local craft store, such as Michael's. You could even get a specialty cake decorating supply store. Sometimes I like to order things online, too, and you can also find things like nicer plates. Or I have a great collection of cake plates that I always like to break out if I'm making a cake for somebody in the family and it's going to stay at home. So for this I'm just using this really nice wouldn't cake plate. And it's the perfect size for this cake, and it's nice and sturdy to always make sure that whatever you're putting your cake on is heavy duty enoughto hold the weight of the cake. Horrible thing would be to lift the cake up, and the board just bows in the middle of from all the weight or something. So we make sure it's a good, solid base for your cake, and then to move this cake, I'm actually just going to take my spatula and slide it right under the edge of the board. Here. I'm gonna slide my hand underneath, and then that gives me a way to get up under there, just slowly lift up sliding your hand under. But I've got it on one hand there. Move this over and I really want this cake plate to be on my turntable so that it's easier in the finishing process. Best part is to stand up and look down over the cake when you're doing this to make sure that you're getting it centered. And there it is on my plate, and sometimes I just I twisted a little bit to kind of, but it's settled down on there. Now that I have the seven inch on the plate, I actually want to start putting my lollypop sticks into the cake for support. I chose these because they're easy enough to cut with the Paris scissors. They're tall enough always gonna make sure that whatever you're using is tall enough or taller than your bottom cake or whatever interior putting these into for support. You can use wooden dowels for those. You'll obviously need something more heavy duty than kitchen scissors to cut those I like. I'll use pruning shears. Those work really well for wooden dowels. I've seen people used the bobo straws, but I'm not a big fan of those because you can actually cut through those The knife, Andi people might get straw in their cake. So you really want to have something that's sturdy that people are gonna notice? And then whoever is taking apart the cake will see these and be able to easily pull them out of the cake. So I actually have, uh, my five inch cake pan. And I'm just using this to kind of sit over the top to give me a guide of where I want my dowels to go in. That you really want to make sure that you put enough in there, So I'm just putting a five inch cake on top of this. But I'm still gonna have five Popsicles, five lollypop sticks in here because I really don't want that cake toe Wiggle the top. Take toe, wiggle it all on here. So I want to make sure that I have one in the middle, and then we have four in the shape of a square for just really good support. Teoh, stabilize it and make sure doesn't sink it all. So must start by putting the 1st 1 right in the center and my cake is pretty firm because it's been chilling for a while, So you're just gonna have to give it a little bit of love once it's all the way down and you can feel it at the bottom, it's time to market with a pencil, and you want a market flush to the top of the buttercream on this cake. Make sure you can see the mark and then you just pull it out and we're gonna use this as our reference to cut our other doubts. So I have my 1st 1 marked right there, and I'm just going Teoh, line up all my dolls and once they're all lined up, I'm just going Teoh, use the first one as a referent and draw a line across all of them. And then I just cut my dials with the scissors and be aware that the ends of those dollars are going to go shooting off somewhere. So I recommend not having any small Children next to your table. Here we go, so there's two, and you can also just hold him up next one another. Make sure that's the same height. It's really important that these air the same high it even if your cake isn't completely level, you do not want to put these into a cake that is unlevel. And these are different sizes, even though that's where the top of the buttercream hits. Because then your top tier or whatever tears next is going to be crooked on your cakes and make sure that these are really what's the same length. Okay, so I have those cuts and they're all really close, some of them just slightly taller. So I want to make sure that those termed perfectly so all of my six now are the same size, and I'm gonna put these into my cake. So these are going to go into a cake. Now I'm gonna put the middle one back in. I just use the tip of your finger to make sure it's down in there. And then when I kind of look at the bottom of the inside of my cake pan and there's a single one in there in the center, I kind of gauge you don't want these to be too far out, and then your cake isn't sitting on them and you can see them from the top. So when I look at this, I'm safe in about an inch and 1/2 from my CenterPoint. So I'm gonna put these in here and you'll know when they hit the bottom. I'm happy cause they're coming, like, right, Right to the top. Sometimes if your cake is really cold, you have toe. Really? Give it some love can take another one to, and that will help you push it down in Here we go, keeping it in a square. Perfect. That is my support structure for the tear that is gonna go on top of this. I went ahead and grabbed my five inch cake out of the refrigerator and we're going Teoh, place this on top. Now, I have a spatula ready here because this is where it's a little bit tricky. You want to really have the spatula, help you and stand up for this to get, Make sure you're centering it incorrect. So if it's not completely centered when you're looking down on the cake, you can use your spatula and do this part quickly to center itch. Mrs. What helps having that buttercream really solid from being in the refrigerator, because then you're not gonna dent it as much. When you're placing that cake on there and just want to take your time, be really careful with it and make sure that it is centered. It's always exciting to me to get to this point because I feel like all of the most difficult things have already happened. The cake has successfully stacked, nothing is destroyed, and now we're just ready to add the finishing touches. I'll see you in the next lesson.
8. Finishing Touches: All right, students, you've made it this far. And I honestly sincerely hope you've enjoyed watching the whole process up until now. And this is the finale we get Teoh, add the borders and the beautiful buttercream flowers that we already piped. So I want to start my finishing touches by applying a border cause we could see that there's just some gaps here that are noticeable on each of the bottoms of my cakes. And I don't want that to be visible, So I'm going to add a B border. And I was have white buttercream in a piping bag fitted with the Wilton size 12 tip. I like be borders because I feel like they're really simple. They kind of just go with anything and they're timeless. So to do this, I'm gonna start Here are my top tier, and you always want to spin your cake and figure out which side is going to be the back of your cake based on you know, where do you have any marks in the buttercream that you don't that you will want to be on the backside or is your take on even on any side or anything like that. So I'm just going to spin my cake and I can determine that this right here is my worst side . So this is where I'm going to start with my beat border, and I just start just one little bead just applying pressure, flooding it speed up and then stopping pressure and pulling away to give it a little tail. And then you start the next bead at the end of the previous two. - For the last one, just try toe ended as best as possible. So there's our first feed border that at the back of them to come down to my bottom here and start my be border on my seven inch here. - Here we are. And that's already pulled the cake together so much it looks beautiful, even just like this to add a flowers. I really wanted to go for kind of like a make it look like the bouquet was on top of the cake, so I don't want to just lay my flowers on here flat. I kind of wanna stock them up against one another a little bit just to kind of give it some height. And I know that this is the back of my cakes. I'm actually gonna turn Teoh front of my cake. This is why it's so beneficial. Toe. Have these really frozen solid because we can just pull them right off, plop him on her cake. And I was going to use some of that dark green buttercream. I had kind of help these flowers stand up a little bit. Keep your towel handy because you're really gonna need that for cleaning the buttercream off your hands. I was gonna make a cluster of Rose is up here and I want to bring the flowers down too much . I really wanted a lot of just white space here. A lot of distance between colors because I feel like it gives it a much more dramatic effect. Not one of me we're gonna have coming down just a little bit off the corner there, Which I think it's really nice undramatic have these really pretty little hi drank just so put that there. Like the effect it has of these looking like they're spilling off the side a little bit, so I'm gonna stick with that. It seems tree working for me doing to together just put whole three right there. So pretty. Okay, we need to get some buds in here. And if you're buttercream is really softening up and you're finding it hard to handle, then just pop it back in the freezer for a few minutes and you can pull it out. Obviously, he would be doing this for an order or for a lot of people, you know, wear gloves for this part. Actually, wearing gloves would really help because it's gonna protect the buttercream from the heat in your hands a little bit more. I have a big gap, right? They're gonna put this triple bud. Okay? Never have my little star flowers, although I think I'm gonna add some. So I actually want to put some of these leaves up in here to really give it to mention, make it look more realistic. Kerry of a smaller leave, which I'm going to have coming down the side of the cake like that. Then I think I want to put another leaf right next to it. They become that's fun to just adding some veins to these to make him look just a little bit more realistic. I like the way that looks gonna have the star flowers over here and we can put those on. That's my green. Just fill in. Just put a little cluster of those fill in back up. I want to have an added a few more leaves and flowers. I really like the look of it. And then I want to add these darker greens fillers. I just want them. You really dainty leaves, nothing huge, just kind of really natural looking, especially around these buds here, just like that.
9. Thank You!: Congratulations. You finished the course. Thank you so much for joining me. I sincerely hope that you really got a lot of value out of this class because I really love teaching or just feel that if you know something and you're not willing to share it with other people, then what's the point of knowing it? Right. I want you to benefit from this class. So if there was anything that you saw along the way, that could be better or changed, Please let me know. I love feedback, and I'm always working harder and learning more to make these courses better for you. If you have any questions about anything that I went over in class, don't hesitate to ask poster questions the platform of always checking it and I'll be happy to get back to you as soon as I can. If you found a lot of value in this course, please give it a thumbs up. That really helps other students know that it's a good course to take, and it's worth their time. Don't forget that there are plenty of resource is available for the class all on the project page. You can go there and download or print all the materials and follow along with class again . Thank you so much for taking this class. I hope to see you in another one. Goodbye.
 Amy Kimmel, Baking and Pastry Arts Instructor