Transcripts
1. A Warm Welcome And Class Navigation: If you've always been in all of the natural
colors around you, and you want to bring it home with you through natural dyes. This class is for you. Welcome to this class. You can call me Joy, and I'm here to help
you turn the colors from your garden
into natural dyes. For this class, this is the
overview and navigation. First we start with the
introduction to dies. Then I'm going to take you on a walk where you see some of my favorite spots to get
natural ingredients. Now in this class, I'm going to take you through two
different processes, how you can extract color. The first one uses heat
and the other one, no heat is required. You can see what
works well for you. Now I'm also going to be
talking about something called additives and modifiers. And these additives and modifiers actually
help you to shift your color so that you can get a wider range of colors
from the same material. Since we have created our
Es, we're going to use it. One project that I'm going to go through with you is making a decor edge Escott
with natural dies. Most of the videos are
going to concentrate on the process of
creating our dies. And if you need handouts
to help you follow along, I've provided them under the
Projects and Resources tab. Before we get started,
come along with me, I'm going to take you on some of my favorite spots where I collect some of my
natural materials.
2. Natural Inks - Foraging for Dyes: 0 a.
3. Natural Inks Introduction to Natural Dyes: Before we start, it'll
be useful for us to have a good grounding and foundation
about making natural. Yes. But first, why do
we want to make natural? Yes, I really think that
it's very beautiful to have a process that offers a connection
with your surroundings. For example, if you always
pass by this Hibiscus bush, you may get inspired
by it and that's the E that's going to emerge
from that inspiration. The beautiful thing
about natural yes, is that unlike
synthetic dyes that have a very flat
color natural dyes, they actually made up of different color
carrying particles, so there's a lot of depth to it. The colors for natural dyes also tend to be very subtle and soft, and they match very
well with each other. It's also flexible because if you want the color
to be brighter, of greater intensity, we
can always use moderns. I'm going to be sharing also
about cleaning and safety, common tools and
equipment that you need. And also the process of creating
your natural dyes first. Because you're working
with natural ingredients. And natural ingredients
are just so delicious, the bacteria and microbes that it's important
for you to sterilize, disinfect, or sanitize
your tools and equipment. Next, you can go to town getting all the kinds of tools and
equipment that you need. But to be honest, please feel free to
improvise and if you have another tool
that can accomplish the same thing
yeah, just use it. Here are some basic tools
and equipment that you'll need for processing
your coloring agents. You'll need a coffee filter, a mesh sieve, and a funnel. These will help you
to separate out your natural materials
from your De. If your coloring
agent is too big, you probably will need a motor pestle to break
down into smaller units. Alternatively, you can also
use an old coffee grinder, but make sure that it's
not used for food. If you're working with berries, it's also helpful to have potato masher so you can break down the
fruit even further. Again, make sure that the containers that
you use for making your yes are solely
used for dye making. You may need containers
such as a pot, a large bowl, or glass
container for storage. You will also need
some mixing tools like a spoon or stir stick, or even glass rods. Now, natural colors can stain. Ensure that you put plastic on top of your working surface. Protect your hands with gloves
and also have a rag handy. Other things that you will
need to measure the amounts of your die component
will also be beakers, droppers, measuring
cups and spoons. You'll also need paper because you want to
test out your die and also because
you want to create beautiful works of
art with the die. Again, I talked about shifting
the colors of the die, and you want to see what
is the H. And for that, you'll need a litmus paper. Now, more about keeping things simple in the process of
creating your natural dies. Just remember the process
of BCD and what are they? A you really have to think about what is your
coloring agent? Do you want to use flowers? Do you want to use leaves?
And it's all up to you. Next is the bath
stage where you're bathing your natural
ingredients in water. This is the hot bath de, method, but if you don't
want to use heat, that is also a pulping method. I share with you two
different strategies. And you may need
to take a look at your plant to see what
is more suitable. Of course, when
you're creating, yes, you may want to
add some additives and that's totally optional. Then once your dyes are made, you get to be created with it. Now, when you're working with
your natural ingredients, it's so important to be able to dance with your
natural colors. For example, if you're
buying a Windsor and Newton Watercolor
set in one store, and then you buy the same
set in another store, you are likely to
get the same colors. However, if let's
say you're getting a red french pan
flower from one plant, and you get a red
french pani flower from another plant
in another season, it might give you slightly
different colors. So just be open
to the experience that the natural ingredients
have to bring to you. It's also about the spirit
of experimentation. So in this particular class, I'm using plants and natural materials from
my own surroundings. You probably have your
own native plants, so experiment and
see how it works. If you're gathering natural
materials for your. Yes, remember, don't uproot any wild plant for
flowers sometimes. Later on in this video, you'll see how I pick up
flowers from the ground. You can either do that, but
if you're picking flowers, make sure that they're
enough flowers to generate seeds for
the next crop bar. Some plants are harmed. When you peel off the bark, make sure that you take the bark from either fal***
or removed branches. And don't pick so many leaves that you leave any
branches bare. Alright, So now
let's get to work making our Yes, but
first cleaning.
4. Cleaning Your Tools and Equipment: I have a more in depth video in an early class on
cleaning tools and what happens if you store
natural inks and dies out for too long
without a preservative. But let me emphasize
three actions you can take to sterilize or
disinfect your tools. One, clean your surfaces by rubbing it with
rubbing alcohol. Two, for glass and metal tools, you can submerge them in boiling water for
about 20 minutes. Three, if you have plastic, wash them with water
and detergent, At the very least you can spray rubbing
alcohol on plastic. I tend to avoid it because
I found that at times it turns the plastic and especially acrylic
materials cloudy. It's really important
that you do clean your tools because we are working with natural
ingredients. If you choose not to
add preservatives, make only the amount of dye that you need
for your project. That there is no need to
store the excess ink. Otherwise, you might have unwanted gas like
mold in your ink. I know it's gross. We're just going to
cut the visual now. This has been a public
service announcement. My friends clean your tools. If you're storing your
inks for a long time, use preservatives such as whole clothes or
wintergreen oil. Now let's get down to de making.
5. Preparing Your Flowers: We have three different
kinds of flowers which are going to yield three
different colors of dye. I know you think that these two actually have
a similar color, but once it's dyed with paper, you can see that the colors
are actually quite different. This is the Hibiscus in Malay, it's called bunge
or celebration. Flower is a national
flower of Malaysia. This is the butterfly flow. This is French red French Penny. The white version is actually the national
flower of flowers. What we're going to
do is we're going to put the flowers in the beaker, and we're going to top
up the beakers with water that's going to
form our dye bath. As you can see, hey,
I'm wearing gloves. I think it's a good idea to wear gloves because you
don't know if some of the flowers that you found
are poisonous better be safe than you may be
able to find Hibiscus tea. In that case, you can
go ahead and use that. But I didn't want to pluck
flowers of the shrub, I just took those that
fell on the ground. What we're going to do
is we're going to of the flower because if we were to put the whole
flower in the beaker, there's not going to
be enough space here. I have 100 ML beaker. I didn't want to make too much because I don't know if
I'll be using that much. This is for me to show
you how it's done. You may want to scale
up the recipe and I'll give you the
recipe in a while. Okay? What you're going to
do is you are going to take all the petals and you're going
to drop it in the beaker. This is just so that there's enough space when we
put water later on. I'm just going to come
back later on when I have peeled all the petals off
and put it in the beaker, I'll be doing the
same for the red fan. Penny, the smell divine. I've always loved the
smell of French Penny. I think you would love it too. You can't smell it
through the camera but there's almost narcotic. Sweet smell. Not nauseating, sweet
but very intoxicating. Okay. I'll do this for the rest as well and I'll try to fill up
the beaker as much as I can. For the butterfly blue, I don't need so much. It's a dehydrated. I will need maybe about 20 butts and I'll
put it inside here. Okay. All the petals have now been broken off and
placed into the bucker. I'm now going to
place about 60 M L of water inside each beaker. One thing I would like
to share with you about inks is it's not so much the volume that you get at the end that
really matters the most. What's more important is you get the intensity or shade of
the ink that you want. If you feel that the
ink is too pale, then you might need to
reduce it a bit more. You need to reduce
the water a bit more, or you need to put in a little bit more of the coloring agent. If I feel that, for example, ten is not enough, then I'll probably put a little bit more just so that the
color is more intense. Yeah, now I'm going to
put them in a water bath.
6. Bathe Stage: Extracting Colour Through Heated Water Immersion: The water bath is
now being prepared. I've already turned on
the flame on my stove. We're now putting the beakers of coloring agents into
the water bath. Now if you're careful about the heat or
quite wary about it, you can always use tongs. You can already see the blue color coming
out of the butterfly, blue pea flower ink. In the meantime, let's wait for the water in our water
bath, the simmer. Now you might be wondering why I'm putting my flower petals into the beaker instead of putting them
directly into a pot. The reason is because I don't need a large quantity of ink. A beaker is small
enough to contain a small quantity of
ink that I need. Also, as you can see, it's a much more efficient
process because I can do three different kinds of dies at the same time
in one water bath. Ever so often you are going
to take a ceramic spoon. Your chopsticks or glass stir to push your power petals into the water before putting your spoon into
the next speaker. Wash it first so that
the colors are not contaminated from one
beaker to another. You will be checking in
on your yes periodically. For the butterfly blue ink, the dye is already
quite concentrated. For the Hibiscus, the dye
solution is also quite dark. It seems to be going quite well. However, if I look at my
red friendship Penny, the dye solution is
still quite pale. But the flower petals are
already quite translucent. Which means that the
petals have already seeded as much color
as they possibly can. What happens if you feel that your E is not
concentrated enough? You do something
called a recharge. You can put more fresh petals inside into the
same dye solution. What I'm going to do is I'm going to take
out these petals. It's time to put
their peers inside. You'll keep adding as much
as you think you need until the concentration of the E is at an intensity
that you want. Just the note, you need to know your natural
ingredients well. For different
botanical ingredients, the degree of heat
and the ***gth of time the heat is supplied
will change its color. For example, this is
true of dragon fruit. If you heat it at too
high a temperature and for too long, the color turns from a
bright pink to a dull one. You need to experiment
to see what works best for the botanical ingredients
that you have on hand. It's not a problem for these flowers that
we're working with. Now. You can continue
extracting the colors for about 40 minutes or so to extract more colors
from these botanicals. It's been 40 minutes. Now, let's check if all our flower petals have
given out as much de, as they possibly can. Now, this is the
red French penny. You can see that the
petals are really pale. We can stop here.
Rinse your chopsticks, so that it does not
contaminate the other beakers. Now I'm checking the hibiscus. The petals are very soft and compared to the original
red of the fresh petals, we can tell that a
lot of the color has already been
seeded to the water. The same goes for our
butterfly blue pea ink. Now to check if you are happy with the color dye intensity, it is helpful to have
a white ceramic spoon. Because against the
white background of the ceramic spoon, it allows me to check
if the concentration of the dye is an
intensity that I like. For the butterfly
blue pea flower dye, you can barely see the
white of the ceramic spoon, which means the color
intensity is high. The same goes for the Hibiscus. Lastly, our red fringe penny. Once you're pleased with the
outcome, turn off the stove. Next step, we remove the
botanical matter by filtering or straining the contents of the beaker so that we
can get a clear de.
7. Bathe Stage: Extracting Colour Through Pulping Without Heat: Before you see the results of the dye solution we've created
from flowers we have made, I wanted to show you
one other method of color extraction that
is through popping. I'm going to show
you an example of the popping method through
using panda leaves. I've already cut my panda
leaves and they're all washed. What I'm going to do next is to cut them into smaller strips. If you're working
with pandan leaves, pick older leaves because they contain more of the green pigment than the younger leaves. Also be careful with the
ends of the pandan leaves. The ends of the
pandan leaves contain some jagged edges that can cut. You do be careful
when you're handling them and you can cut them
away if you wish to. Pandan is a very useful plant
in the Asian household. You can use it to
make dessert too. My aunt makes this
dessert cap salad, which is made up of glutinous
rice with Pandan custard. My mom in law makes Pandan
Shivon cake with it. Besides its food applications, many people also use it to ward off if you can
believe it, cockroaches. What I'm doing here is just
cutting down the leaves into smaller pieces so
that it'll be much easier to pop it in
my grinder or meal. The fantastic thing
about working with dies like Panda
is that you don't need separate equipment for your art and your
normal kitchen use. Because we Panda is food and we're not adding
any additional ingredients. So yeah, as I'm cutting down the Pandan
leaves into strips. The side benefit is that the juices of the
pandan is released. You can smell the aroma
of a deep vanilla like fragrance that pandan is after all known as the
vanilla of the East. Here you can see the pandan that has already been
cut into strips. Now place your pandan
leave strips into your food processor or
in my case, a meal. I'm adding a small
amount of water to help lubricate my mill and make it easier to extract
the panda juice. Now we pulp the leaves. Once the leaves
have been pulped, you can see the
green goodness of the pandan juices as it
flows out into a bowl. You can do this
repeatedly until you get the amount of pandan juice that you need for your project. I've now separated out the pulped leaves of the
pandan from its juices. Now you can place the juice into another container
to make it easier for you to use for
your projects.
8. Filtering the Red Hibiscus Dye: We have three flowers
that we worked with, but I'll show you an
example of the filtering and straining process using
our red French penny. Here I have the beaker of red French penny that
I took off the stove. And I have here a
coffee filter filter and a glass container. So what I'm going to
do is I am going to pour this to filter
out any impurities. And you can see I've already
taken out the petals, so I'm just going
to pour it over. Okay, And we'll just wait to see the
eventual solution.
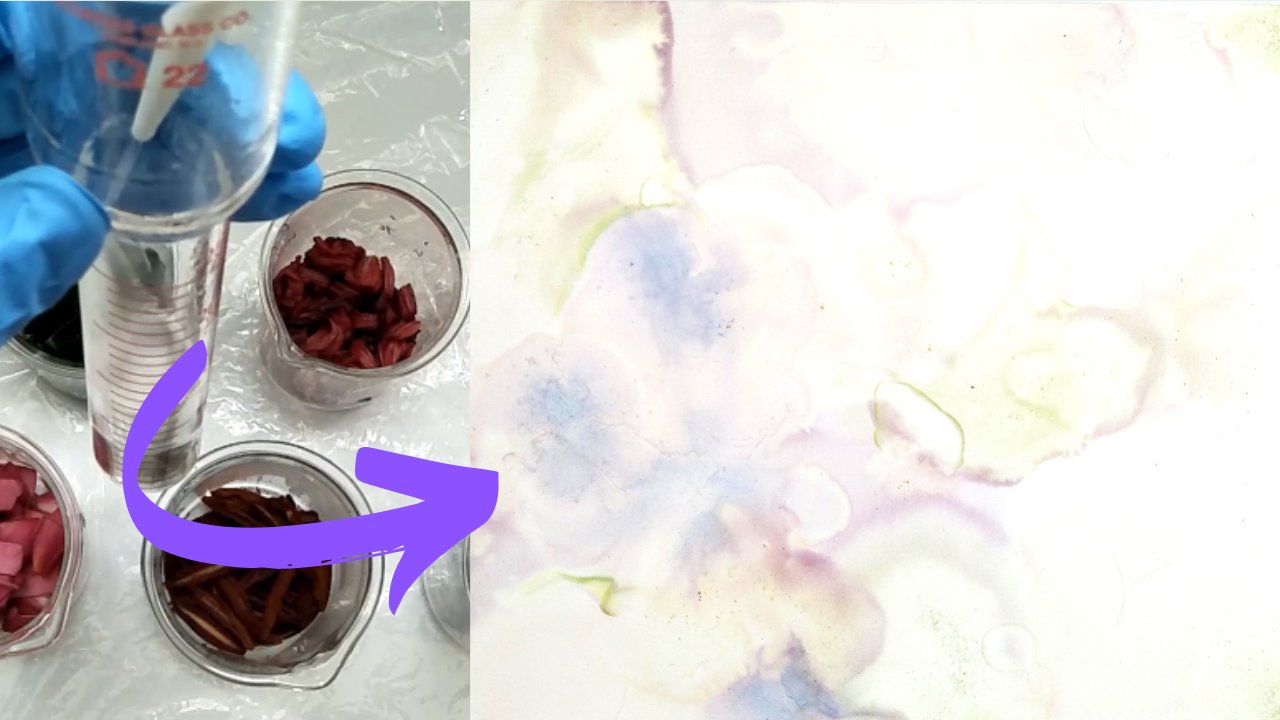
9. Extending Colours With Additives: You've seen how color is
extracted using water, and now we are trying to extend the color range by combining the dye with other additives. On my left, I have
a solution that's 80% vinegar and 20% water. This means that for 100
milliliter solution, there is 18 milliliters of vinegar and 20
milliliters of water. What we're trying to see whether the acetic acid in vinegar will cause changes in
the color of the dye. On my right is soy milk. The solution contains 13
soy milk with 23 water. To help us see the effect of vinegar and soy milk on our yes, I have prepared strips of paper. I've labeled them vinegar and soy milk so that we can
distinguish the effects. We're going to dip the ends
of the strips of paper into their respective solutions
for about 30 seconds, not too long, so that the water color paper itself
is not degraded by the acid. We will then dry them before using them with
our natural dyes. What's the reason behind
using vinegar and soy milk? I have here indicator papers so that you can see
what is the p H of each solution from
the visual scale. Here you will see a color
attached to a number 1-14 When we dip the indicator paper into
the respective solutions, we're trying to see what is the color change of
this indicator paper because that will tell us how basic acetic each solution is. We start on the left with our acetic acid in
vinegar solution. Quite quickly you can see that the indicator paper
is turning red. The color responds most closely to the scale
of two or three, which indicates that
our solution is acetic. This means that when we combine this vinegar solution
with our dies, it will act as a modifier that will change
the ph of the dies. This will cause a color
change in our dies, which you will see
in a separate video. Next, why use soy milk? Because if you dip the
indicator paper itself, there is not going to
be a color change. However, the reason why we can
use soy milk is that it is a known binder that
helps the color from the Des adhere more
strongly to the material. In our case, our material
is watercolor paper. It's not so much about
creating a color change like we have for the
acetic acid in vinegar. Now, don't save the strips of paper in the solutions beyond a minute or they will start
to disintegrate the paper. In my home, I have
a drying rack, so this is just my set up to
air dry the strips of paper, dry them away from the sun, and make sure that you have
air that's circulating.
10. Effects Of Additives On Dye Colours: Okay, so all our Es
have now been filtered. This is our red French penny, this is our butterfly, blue pea. And lastly, this
is the Hibiscus. Here I have my papers
that are already dry. This was soaked in
the vinegar solution. This bunch of paper
was soaked in soy milk solution and
nothing has been done to it. This is just watercolor paper. Now we're going to
see the effect of the dies on the paper. Let's take our vinegar, okay, in the. Leave them in for
about 30 seconds or so just to see what
the color looks like. You don't want to leave
them in for too long because the paper fibers
might disintegrate. Okay. I'm going to use my book. I'm just going to
place it inside. I going to do the same, but a butterfly blue. Make sure you tap
out any excesses. Remember to keep a
rat candy or else sometimes the dice might
stain your surface. Okay. And then we have our last one, this is from the Hibiscus. Tape out any excess. Again, of course you can
use crocodile clips. You can use any other clips. But I just decided I
have a book with me. So I'm just going
to put this here. Okay. So these are from
my vinegar solution. I'm going to leave this
to dry somewhere else. Just I'm leaving it on
this book because there's a certain thickness to the book so it wouldn't
touch the floor. Now let's repeat the same with our soy milk solution paper again. We'll leave it in for
about 30 seconds. Long enough so that the
paper does not disintegrate, but there's enough time for
the paper to absorb the E. Let's do the same. Take
out your paper strip, make sure you tap
out the excess, and then insert it
into your book. Okay? So, I'm just going to compare
this two because these two are my red French penny. Now I'm going to tap out the excess for
the strip of paper. This is for the butterfly.
Pea. Butterfly, pea flower. Okay. I think you're
already starting to see the subtle changes in color. Okay. Next. Lastly,
this is my hibiscus. Tape out the excess and put
it inside your book. Yeah. I'm going to leave
this to dry and we'll repeat the same for
these strips of paper. It's not treated, so
there is no soy milk, there's no vinegar, and it hasn't been treated
with anything. And we'll compare to the. Let's leave this in for
about 30 seconds or so. Okay? Same thing. Take out the piece of paper, tap it out, and you'll insert
it into the book. I'll come back again and
show you what the effect is when all these strips
of paper are dry. Just look at the range
of colors that we have. Now I want to compare our red french penny with
our Hibiscus. All right? They almost look quite similar. The color seems pinkish
red in the light. But do check out the color that emerges from the dye
for the red frangipani. You would think it will turn out a little bit more
like pink or red. But the original color is a little bit of
a purplish gray. Isn't it cool like how
different the color turns out? It's the same thing
also with Hibiscus. If we compare our Hibiscus
and our red frangipani, I don't know if you
can see it clearly, but put this aside. Okay. If you compare this, our Hibiscus is a little bit more gray and our red franchi, penny has a little
bit of red in it. But still, they turn
out to be like, so different from
the color the de, right on watercolor paper. Okay? And then we have
our butterfly, blue pea. Butterfly, blue pea is
a lot more predictable. The color you can
see here is blue, and the color that emerges on the watercolor
paper is also blue. Okay, and what about the
effect of soya milk? When I looked at the
eventual outcome, I didn't think that soy milk
had a very big difference. But what had a big difference
is our H modifier, which is our vinegar. So if you take a look at
our red French Penny Yeah. Here before, I just want to put this aside so that you can
see more clearly. Okay, this is the
piece with vinegar, and you can see it has
a greenish tinge to it. Whereas the original,
without putting in vinegar or any
other additives, is actually reddish gray. You can see that vinegar helps you to extend the color
range of your natural dyes. Another dramatic
change from blue to green vinegar actually changes the color from blue to green. For our butterfly, blue pea, also the same for our hibiscus. It changes color
from gray to green. It's quite a
dramatic difference. I'm just going to put this down a little
bit so you can see it. Oh yeah. I hope that you're excited to see
what additives can do. You can use other
additives like alum, copper, and so on. If you want to change
the H to make it more alkaline or more acidic, you can use baking soda, sodium hydroxide, and so on. Feel free to experiment and see what additives can do to
your range of colors. We've just created together
only a few of what you can actually use natural
died in the real world. But just look at what range
of colors you can already get with just a sampling of
using natural materials. If you were to look
at this, we're going to do a project together. We're going to make escort
cards or place names. Think about what color
you want to use. Do you want to use the blue? Butterfly? Blue. Have a
think about what kind of colors would suit your event or what kind of colors
you'd like to try. Then we're going to work
on our project together.
11. How To Create A Deckled Edged Effect On Paper: Let's start with making the
deco edge for our paper. Prepare a painting brush, water, and a ruler. Let's start on the short
side of the paper. Align the paper with your ruler. I'm using a metal ruler as
well as the plastic ruler. I'm actually more partial
to using a plastic ruler. For the metal ruler, it is a little bit too sharp, although it's a
lot more precise. The principle of making
deckle edge on paper is that the water is going to make the paper soft when you tear it. Then there is a
imprecise tearing and that creates a
pseudo decal effect. Here's how we start
making our deckle edge. Take your pain brush,
dip it in water, and then dab the pain brush on the paper on the
side of your ruler. You can also smooth out any excess water if you see
any pulling on the paper. Now let's tear the paper. There are two ways to do this. The first way, you
are going to pull the paper towards you upwards, that will give you a
much cleaner edge. Two, you can pull it away
from you to the side, and then that will give
you a much blunter edging. I'm going to be
alternating between both for the same
side as I shared. You can pull it towards you and then away
from you to the side. You can vary the
effects a little bit, some towards, some away. Let me bring the paper closer
to you so that you can see how the pseudo decal
edging paper looks like. Now I show you the reverse. This is the decal edging
that we're talking about. If you want to make the deck edging a little
bit more straight, you can always tear
off a little bit of the pieces that were
jutting out too much. I'm also now going
to create the deco edging for the
other three sides. Also, we're going to make four escort cards from
this one piece of paper. We'll come back
when that's done.
12. Design: Create An Escort Card With Natural Dyes: This is one of the
four pieces of escort cards which you
saw in a previous video. I will be doing a wash with the brush lettering in
the middle of the paper. In order for me to be able to have my brush
lettering stand out. I'm going to put
a painters tape. I'm cutting off two strips just to form the blank area where I can do my
brush lettering on. On the sides of my table, you can see several
containers of natural dyes. On my left, you'll see the butterfly blue
pea flower dye which we created together
in a previous video. I'll start to prepare
my paintbrush by just dipping it in water. First, I'll start first with
the lighter color, yellow, and that comes from onion skin, to make sure that all
the different colors are well distributed. And I'm going to paint
them on random areas of the escort card that is not
covered by the paper tape. Now for a light purple
courtesy of grape skin fruit in between colors,
I'm going to dip my paint brush just to b***d
out the previous color. My pink color, brought to you by the lack insect.
This is carmine. We're also gonna put
red from our beet root. Now comes the time for us to use the star of today's project, which is the butterfly, blue pea flower which we created earlier. If you want your wash to be more concentrated
and precise, you can use a dropper
instead of your paint brush. I'm just going to do it at the
side just for that impact. Now we're going to
set the escort cart aside for the dies to dry. Now that our dies are dry, I'm going to take off the
painter state carefully. You can make an
aesthetic choice. Do you prefer the
larger area to be the top or do you prefer
it to be at the bottom? Here? I'm using my tumble
brush pen and it seems to be the right size for this area
to do my brush lettering. I'm doing a brush lettering of the name has H, F, A, H. Now that the brush lettering is done, you know I love
me, some glitter. What's going to happen is I'm going to decorate my deckle, edging with some gold. I will be using a gold pen to create that effect
on my deckle edge. And here I have a pen for Marta. If you prefer a thin gold edge, you can start doing
the gold by holding up your paper vertically and then doing the gold
edging at the top. If you're going to do
the thicker goal border, I would really recommend having a plastic paper in between
your card and the table. This is because you're
trying to make sure that the gold pen really
goes to the edge of the paper and
there's going to be some marking on your
table If you don't have a protective sheet as you see here, I'm using the gold
pen to just go over the edges of my paper following the contours
of the decor. Edging. If you want
a super thin gold, then you can just
brush the tip of your gold pen on its
side of the edging. I will be doing the gold edge on all the other three
sides and I'll show you how it looks
like in the end. I'm also going to do the same for all the other three sides. And we're just going to speed
up the video a little bit. You can do a little bit
of a touch up trying to make sure that you don't see whites of the paper
on the edging. If you're thinking that is still too thin for a gold
edging that I like, you can always do
another contour just below your original line. Feel free to be experimental. Early on creating my deck edge. I use water, but you can
always use the natural De, because it also contains
water in it that will already give some kind of color
to your edging here. I love that the goal just
gives a hint of F to complement the rest of the quite subtle botanical
dies that we created. Here's how the final
piece looks like.
13. Design: Brush Calligraphy With Butterfly Blue Pea Flower Ink: With the butterfly
blue pea flower ink that we created together. Let's now make a
happy birthday card using the brush
calligraphy technique. I'm using watercolor paper here, which is great for
more watery inks. When you're doing
brush calligraphy, you want to get the contrast
of thick and thin strokes. Remember that when you're
doing down strokes, like the stem of
the letter B here, you increase pressure on the brush tip so that you
can get a thicker line. As you're doing
the embellishments on the left side of the stem, you are going to decrease the pressure so that you
get a thinner stroke. I'm linking the bar of T to the stem of
H with a ligature. I'm not completing
the H yet because I'll be combining it with
a swash towards the end. Instead, I continue
with the letter D for the letter Y.
I'm also stopping the descender loop at the
stem and will continue later. Now that I have the word
birthday completed, I know how long the
word is and that will help me to gauge
the size of my swash. Now I'll complete the H and
extend the swash to emphasize the word for the word happy. I'll be starting my brush
calligraphy in the middle of the word so that I can estimate the composition
of the phrase much better. The stem of in the word birthday will double up as a stem of in the word happy. I'll start with creating the
counter for joining it up with the next, then Y. Now as I complete
the swash of Y, I'm going to join it up
with the Y in birthday, because I want to have
an integrated phrase. All right, let's now create
the missing letters H and E to complete the
phrase. Happy birthday. Here you go. From the
humble butterfly, blue pea flower to a beautiful
natural botanical ink. I hope this sparks
more ideas on what you can do with your
botanical inks.
14. Thank You! And Your Class Project: I had a great time creating
the cards for you and I hope that gives you more ideas about how you can make
your own natural. Yes, and that's what we're going to do for our
class project one. Select a coloring
agent that you like, maybe you found
something on your walks. Then use the ABCD
process that we have gone through together in the class videos to
create a die with it. And snap a picture of your die. And post it to our
class project section. The plants and material
that I use for this class could be very different from what you have
in your own surrounding. I cannot wait to see
what you guys have. If you'd like to get
in touch with me or have questions that
I can help you with, you can go to the
discussion section and post a new discussion. Or you can find me on
Instagram at Join Hands, and also my website at
Join Hands.com I also have other classes on creating natural dyes from things
that we find in our kitchen, and also creating our own calligraphy inks
from natural sources. I hope to see you
in another class.
 Joy Tay, Maker