Transcripts
1. Promo: Blender Photographic
Designers is my new course here
on skill share. I will teach you everything
you want to know for designing products
for commercial use. I'm Ken Tommy. I am
three D modular. Have experience
over six years in the field of three D
industry. I'm the co founder to.org you can check
my portfolio there. Product design is my passion. I like discovering new tools which may be helpful
in our work. Free will take advantage
of the new tools and adds and applying
materials and textures. And we will also focus on the design and the
modeling part. In my free time, I
photograph products, whether they are mobile phones, tablets or accessories, then
I draw them in blender. If you do so, you will develop your drawing and modeling
skills in blender using a blender and fob can model and render any
type of product. A blender for the
three D stage and for the two D work where
we design label, sticker or adding logo. In this course we'll
explain shoe modeling, cosmetics and jewelry rendering. This course we'll explain shoemdeling cosmetics
and jewelry rendering. If you are still
beginner, you can still follow along
my lessons where we will start from easy
tasks to complex, advanced, highly detailed model. You can reach me on Instagram
or Twitter at Camel Atami, or you can reach me directly
via myop site of token. Let's talk about the
tools and adds that we will use in our
training workshop.
2. Tools & free softwares: So before we get started, we have some ads and software that we will
use in this course. Basically, you should use
a three software such as gender and that we will
use in ordering workshop. And you should use
a two D program, which you will use for signing stickers,
labels and so on. Here is some free software. Firstly, we have the game. This software is a free, it's an alternative for foo you can load from here
for Linux, Mac or Windows. After that, we also the enscape software for Zylingulogs or
making illustrations free. Also, you can download for any platform or any system
such as Meclinux or Windows. After that, we have the
blender market where you versus adds tools and so on. Also we have the blender free. You can download
from here and use, you can get a lot of
free materials free. Over to 20,000 K, the result of assets
for free materials, shared, DRI, Three
models, and so on. Just download from here and after that you can
install the ad, as I will show you later. Here we have the
Blender.org site, The main software that we
will use in this course. As you can see, it's a vobular
software's open source. You can download for any system, also Malinux or Windows. Here is the blender for
which is the latest version. It has a lot of features such
as light linking new brains will SDF and better
color management, so on. If you have some cash, you can use the job. It's the industrial standard. The latest version has the feature you can throw
for one month after it. It costs around 20
or $19.04 months. All of that are softwares. If you don't have the
cash versus adoob, you can use Gamescape and
both will do the job. That's it for this
lesson lesson, we will see how we can
set up our blender.
3. Setup blender: Before we dive into the lessons, I will show you how you
can set up a blender. Here are the layouts you
can choose from moding, UV, kitchen binding,
shading, and so on. The layout you can drag
here and add a new window. You can manage the
windows such as this. It's very flexible as you
can see or you can collapse windows into the right
or into the left. Here is the blender, It where you can search for any model. After that click maybe you
want to get this cabinet. After that, you
will see it will be loading and you will get
into your scene for free. You can search for models, materials, eyes, or rushes. There is some atoms
that we will use. Of course, here you
can install the ad. Just click on the install. Look onto your drive, and click onto the pole, which is around the 2 megabytes. There's some atoms that we
will use, which is three. We will use two, we will use Le tools, we will use edge flow. We will use node
Angular in the shed. Or if you want to use bolts, you can use the bolt factory. Also, you can use
curves or meshes. Both are helpful
if you want to get more objects or helpful objects
such as spiral and so on. Personally, I am
using graph tablet. Immediate button
is very helpful. If you want to use
a graphic table, you can use the At using,
let me explain that. Using the Alt and so on, you can rotate, so here the Alt and middle, you can rotate or using the bin. Using the Alt, you can
rotate using the Alt shift, you can be using the
Alt under control. You can zoom in or out the
emulate butt is very helpful. If you have a laptop
and you don't have the embed into the right. You can emulate numbed to
use number above the letter. Can bed Y numbered is useful. You can use one for front view, three for right view, saving for the top view. Also in the system you
can enable optics and enable urographic
cart In the system, you can make undo steps
to the rest number. If you type any
number such as this, it will be the rest 2056. In the interface you can scale or large scale such as this, you have large scale, it may be helpful. That's for this lesson in the net video will
start our first lesson. Also just refresh, you can get here
in the themes and change the same as you'd like. You can use minimal dark, this is for mode, this is for Maya and so on. This in the aid
will explain how we can model some piece of
cosmetics inside blender.
4. Lip stick modeling: Hello, here is the first video
in our training workshop. In this tutorial, we're going to make this product
from a scratch. We will model and material, then render it in
an awesome look. And see how we can add or make the white background
so you can bod to Amazon or ecommerce store. Here we are in the blender. And firstly, I will call
it this is the camera B, C and add reference the shift. All right, that's fine. After that, I will breath
shift and add image and background and add
this background that pin. We say this has the
height of 15 centimeters. If you want to draw
the model based on real reference
or real dimensions, you can add 1 billion
and rotate around x. This billion now is
1 meter by 1 meter. We can scale scale 0.15 We first have scale
0.5 we have 1 meter, and after that we
scale 0.15 Then we can select the MBT
and scale down. Scale down, such as
this scale scale, Maybe this value, that's fine. You can look this one
and go to the Blaine, We don't need it anymore. So I will delete selected
difference again and move to the site. We go to the design, and as you can see, we start from circle, but the cursor here
and add circle. Circle, say it will be 24 radius 0.2 This one we have
here and curve. So we can extrude and
add one loop cut, another loop cut will
extrude and fill. Let's exude this one here. Cero the scale 0.85
etceter scale again and extrude scale bound five
and another time ex scale. We can make another knife. Here we have cut
through this one. We cut this is knife and add some sickness
using Ce scale. Then we can scale that Z, move in this direction. I think we are now
done for this part. I will add some loop cuts here, some loop cut here, another loop cut here, another loop cut here. Feel free to add
Subduent surface. You can go to the Fire
Sublient surface, are fine. We did a good job here.
We can scale that. That's fine. If you
want to add out here, it will be fine just a lot here. That's fine. We are now
done for this metal part, which is the main part. In the next video, we'll
make the other parts, which is Discover the tick.
5. Modeling the cover: All right, so let's continue to have lived in
the previous part. Today, we will make
the labs stick and we will make the cover and
we will render our scene. We will not restrict
this design, but we will make our own style. We can call it the
bottom or both. How we can achieve that? It's a very simple, just here. Control shift is selected everything I based
on the keyboard. It will be shown here.
And increase the size, maybe size 18. That's fine. After that, we can make regular circle,
very simple circle. I will make it maybe 16 or 18. The scale down
scale 0.1 and scale 0.5 Let's see if
we can increase, decrease T 0.2 is fine scale
until I reach this value, move in the direction. After that I will move or make an
extrusion in the axis by breathing on and debreath
z and move like this. Then I will add loop
cut after that. If you see this clipping issue, you can go to the view
and decrease that. You can breathe, scale and fill. There is a lot of ways for
making this inclined blind. One of them is using
the shear tool and say how you
can she on X or Y, let's say it will be on X again, three to search and try the Y we are now
sharing on the O. Let me move in this direction. After that, I will move
in the Z like this. That's fine. We have made this, we can move this edge to here. There is gap, so you can select all and scale shift
little bit such as this. What about the cover? The cover is very simple. Again, I will select
this edge or this edge, any of these edges, one of them and shift on the Z and separate
boy selection. After that, I will move in this direction,
scale little bit. Let's make an extrusion
in the Z like this. A extrude the scale, point it and extrude in the Z. And extrude. Extrude the scale and the fill that Nic. I think we are done
for our scene. This is the cover. This may be the stick or the
limit, the actual product. We are done. What Next we will make a visual and let's
build our background. Will make a bledcaledill move in the direction and select
this edge extrude in the Z. Then we can add the modifier. Let's apply the
modifier and maybe ten and increase and
add smooth shading. That's fine. I will
make a duplicate, this collection, but before
that, let's deletarchy. I will apply material. We have this gold. And Okay, so this one is gold. If you search it for
the gold hex value, you will find that
the gold hex value has there is a values and a ingredient. And I will type 700 like this, we will make it metallic
and roughness may be 0.2 Start from 0.2 and anisdroic 0.5 Some clear coat may be 0.2 This is the gold. This one also has
the gold, the top, but it's, let's see, it will be metal, maybe something like this. This is metallic roughness 0.2 and the clear 0.2 All right, like this, the top will be gold control blasts
and select this one. And choose the gold and assign. Let's see, this one is the gold. After that we have the lipstick. This one may be the
color and roughness. Four maybe such as this. Declare Cot all the
way and bicular 0.6 maybe 1.3 That's it. After that I will duplicate this collection and
the collection. All right, so we have the
bill and I will move to the camera collection and
delete this building. After that, I will select this collection or select
objects and move in the X. We can move that in this
direction, that's fine. I'll move that here in the X. Here we will make a U Vsphere
rotate around x 90 degrees. After that we can
delete this vertex, the scale ex, thru the
scale and the fill. Let's add smooth shading that we can scale
on x such as this. And the scale on y less, you'll scale that and move here, set or into geometry and
make it live in this color. After that, we can
change the hue. Maybe choose this
value, maybe this red. Enable the camera and see. I will add the camera
debris control at zero. This is the camera we
want square dimensions. Aspect ratio is one is the Instagram profile
dimensions in 1080 and deletill fix is the bill. Continue that in
the Nvidoeextial.
6. lighting & Rendering: All right, so let's continue. In this video, we'll see how
we can render this lipstick. Basically, we will
add some area light. I will add the first
area light here. Size may be pointy
three or pointy four. Bower may be 100. I'll move to the
camera collection. In the camera collection, I organize all my lights and all the background and all
other stuff other than Sn and geometry that help me to take this collection and drag and drop in
any other new file. Instead of creating
this from scratch and see how we can
achieve the study light. Firstly, I will rotate that in the x direction by 90 degrees and move to value. After that we can make it
angled to this direction. I will make a rectangle and the y may decrease such as this. Let's see what this, let's see the effect. It's too, as you can
see, it's too bright. This one may be bow of tin. A bow of tin is good. I will make it a such as this. Make another
duplication area light. And this one will also red. This one will be yih, I will move it again here. This one also will
be in the area. Let's add here or
the effect first. This is amazing. After that, we will make an area or
Blaine subdivide on time. This is the pill which our scene fill
shadows scale again, I will call it fill
light strength. Let's see quadratic and one. This may be six and
this one will be. If we hide this one
and hide this one. Let's see the effect
only of the fill. This is the fill, amazing blue. Let's see, the red,
green, blue, white. If we can make it
come back again, I think the area is
too, maybe five. This is too much because
our scene is too small. It's in centimeter
in what is too. Too much for the background. It may be white if you
want to upload it. But I don't like the bank, so I will delete semetllic. It looks fine now it looks fine. Now I will try 0.3 or 0.25 for this one. Let's see, for this one we will make roughness of
point, maybe one. Okay. For the background,
we will not show in, this is the background,
we will not show in the rendering about
the render setting. Maybe 500 performance or the
tiling 256, that's fine. Let's see how we can, if you
want to render, just render, but I want to make it clear background background so I will make the film transparent. And now you can render and
hit the render button. You will read like this. After this is the file, I will say it render,
save SB energy. After that we can go
and open that in up. After opening that in chop, you will see that
you have this one, just this one white. This is the render. You can upload image
or this file or this product to Amazon and
it's a clear oil background. If you want to add shadows, it's very symbol, just select the background
again. And select it. And call this. And go to the
visibility and say it's shadow cat such as this. Make sure you have it here. The background to shadow
cat, we have your shadow. You can enhance your scene by
going into the environment. Add an HDR, I maybe Stree 0.1 that's fine.
I think the gold. I don't like the gold. How we can maybe roughness of 0.25 increase tropic. Of course we can add bump
scratches and roughness map, but we will make it
in another tutorial. Here is the Di without HDy. This is the value after adding the HD. Here is the result. 0.1 is enough for our case that depends on the
HD map that you are using. Here is the render. As you can see, we
have made it easily using some symbol techniques
in the next tutorial, in the next chapter, we'll see how we can
model shoes from scratch.
7. modeling sandals: Hello, welcome. Here
is the second chapter in our training
workshop and they are going to make and model
this shoes or this heel. We will make two variations. May be black and brown. It's all the same but
different colors. It has been a long time since
I So there is free tutor in my tube chain about making
shoes from scratch from start and how you can
model it from scratch. Let's see how we can
first model this. We have started a
new brand scene and I will activate the
screen casts so you can see what I'm erasing on
my keyboard about units. It doesn't matter because
we will not model from a reference such
as the first person. This may be advanced, but I will stick
for the centimeter. Firstly, I'm here on
the front of you. Or choose this Grease bencil's. Such as the profile,
such as this. Here is a profile, maybe it's called the base here. Some cover can achieve that. As usual, we start from Able. I will, I think it's
much taller than this. I will start from Able on Y, maybe because it's man shoes, it's skinny in that direction. I will add a loop cut
here and a loop cut here, and add loop cut here so we can extrude. Extrude here is the profile, but it's not such as in the real world because we don't
have that view from here. It's skinny. Maybe we can choose the broch and the scale on such as this. Here we
have the profile, something such as this,
it's such as this. We can add loop
cut in the middle. Maybe I will disable
the proportion I think. And move this one to be here. This one here. This one to be here.
This will be here. This one will be here, and
this one will be here. And I think we can now move in the oil, but I will skill that skill and move in the X. That's fine. I can hide the grisbenslre, I can hide the grismencil now. And this will be moved
to the zone collection, and I will duplicate and move again to maybe temp collection. After that, we have the chance to make an
extrusion. We have the chance. Let's see. First I will
scale that in the Z. All right. I think we have to
move it to be here. Here we have the temp. All right, so we have to move it here and
we have to move here. I will select all and make an ex slightly too harsh. I will move it in
this way and select A and and after that, duplicate and separate by selection and exit
rude in the Z. That's fine. I will add the subdual surface here. We will add the subd
surface of three here. Also the same subd
surface of three, but this one we
will loop cut here. Another loop cut in the top. She smooth. I think we are now about the local,
about the top. We can add here loop cut, another loop cut here. We can move in this
direction such as this. That's because we are not
working with reference. It seems maybe a
little bit hard. But I will move this one in the select this one also. They maybe such as this, it's fine scale. Or move that scale on X, select this is lower, lower, maybe. Let's continue we have here.
So it's a very simple. We can select any
edge of this one, duplicate and severed
by selection, select this one and
the scale, 0.6. After that we can extrude, we can extrude,
extrude and rotate. And may be extrude in z, move in z direction. And that in the direction also, it seems, such as this. Let's add another one
with color of bin it, such as this one. Let's move it in the X, move that in the X, and move that in the X. We can select this one and
move in the Z, that's fine. Move in the Z, choose the
sphere, such as this. Just extrude that in the Z
and move in the y direction, I think it's in this way. And also that will be. In this way. Move
that in the way. Let's see, I will dissolve
that and obo or add here, and old is, all right, we have to make it after that. I think we have two.
Select this one. And the move here, and select this one. And the move here, move that here so I can sel this one under it and Z such as this or
move in the oil, let's snap and move in this direction can result is all right, that's fine. It's not smooth so
let's move that here. All right, that's fine for
now. Let's add the slidy. Um, to fire the scale of
1 centimeter may be fine. That's it. I will
add loop cut here or add one and vel select this
one and add the stitching. Select this one. Let's call it, select this one and shift
D separate by selection. In this one we will call it all. We will call it curve CV. I will convert to curve. Let's make our stitching.
It's a very symbol. Let's add thus, and thus
may be here and here 12. That's fine. The scale deletes the lower half it smooth and rotate around
the x 90 degrees. After that I will add
array maybe slightly 1.1 maybe 1.1 or
1.2 that's fine. And array maybe 40, that's fine. And scalp transformed and scale and set
origin to geometry. Don't forget that
we have the curve. Let's say the origin
will be here, that the scale move to the point here by shift
selection to cursor. If you want to
rotate around the Z, no problem. Apply the rotation. Apply the rotation. And 1.17 here, all is fine and you are now
ready to add the curve. Let's save file
and select the CV. Another orientation may be
Y. I think the O is fine, but we can scale down such as and rotate oil height and rotate such as this. And you can move
in the, in the O. After that we have
made one stitch. So we can make the second, we can start from scratch, but we can select
both the curve and the array shift D on the X. Let's select this edge again. I think we can snap perfect. But let's select this edge
and sever it by selection. We don't need the solidify, but we will apply
the son surface. And I will convert to select any point here and
set the origin to there. After that we have 22b. I select here the CV two. What happens? We don't need make sure
selection to cursor. After that we can switch from X. Z acyl is perfect, but we will rotate around the
Y -180 and move in the X, move in the such as this. It's fine. That's it. We have made
the stitching and I think the stitching is too high or it must be in the edge
or to the edge. You can move in the
Z such as this. We have made the stitching
and you have made, in the net video, we'll continue
meding of our shoes.
8. modeling base of shoes: Let's continue our
second chapter, and today we're going
to make the base. It's a very simple, we
will put the cursor here and we will add the circle, may be 16, it doesn't matter. This may be 30 or
40 scale scale. On the Y scale. Let's delete these edges and fill that here. And point and move to be here. We can add and this edge
one and you have 123. Let's add three, fill, let's add three and fill. After that we select this one. Let's see, Now we can select all. Let's it such as this
extrude in scale, you have second diversion, duplicate and saved
by selection. This time let's extrude in z. All right, we are now I
will add loop cut here, and I will add loop cut here, another loop cut cut here. If you want to add the solgent
surface, doesn't matter. Let's see how we can solve that. We can solve that by
adding globe cuts here or slide here. Or maybe three edges like this. Slide, edges like this. Fine, this one. We can add devil like this. That's fine, this one. And select this one. Again, select maybe this edge. All these faces duplicate
separate by selection. And after that,
oil extrude in the K. Don't forget to add loop
and other loop cut here. And we should have
here loop cut. Let's see in the faces. We can select all the faces. Select all the faces. And just the scale. Let's select all. I want it to be sharp
because it's the connection. So Exter scale, it looks fine. Tibor, we can do the same here. I select slightly such as this Itter. Let's see here,
doesn't matter a lot, it will not be shown. But let's see, we
have 40,000 fine. But I think we can do something. We need it to be
curved such as this. So we can scale on the
Y and scale on the X. And this skill on the oil, what happens here, it's fine, but I think we can skill on the oil
and the skill on the X. All right, that's fine For now. In the next to this detail, we will make other detail here. I think after that
we are now done.
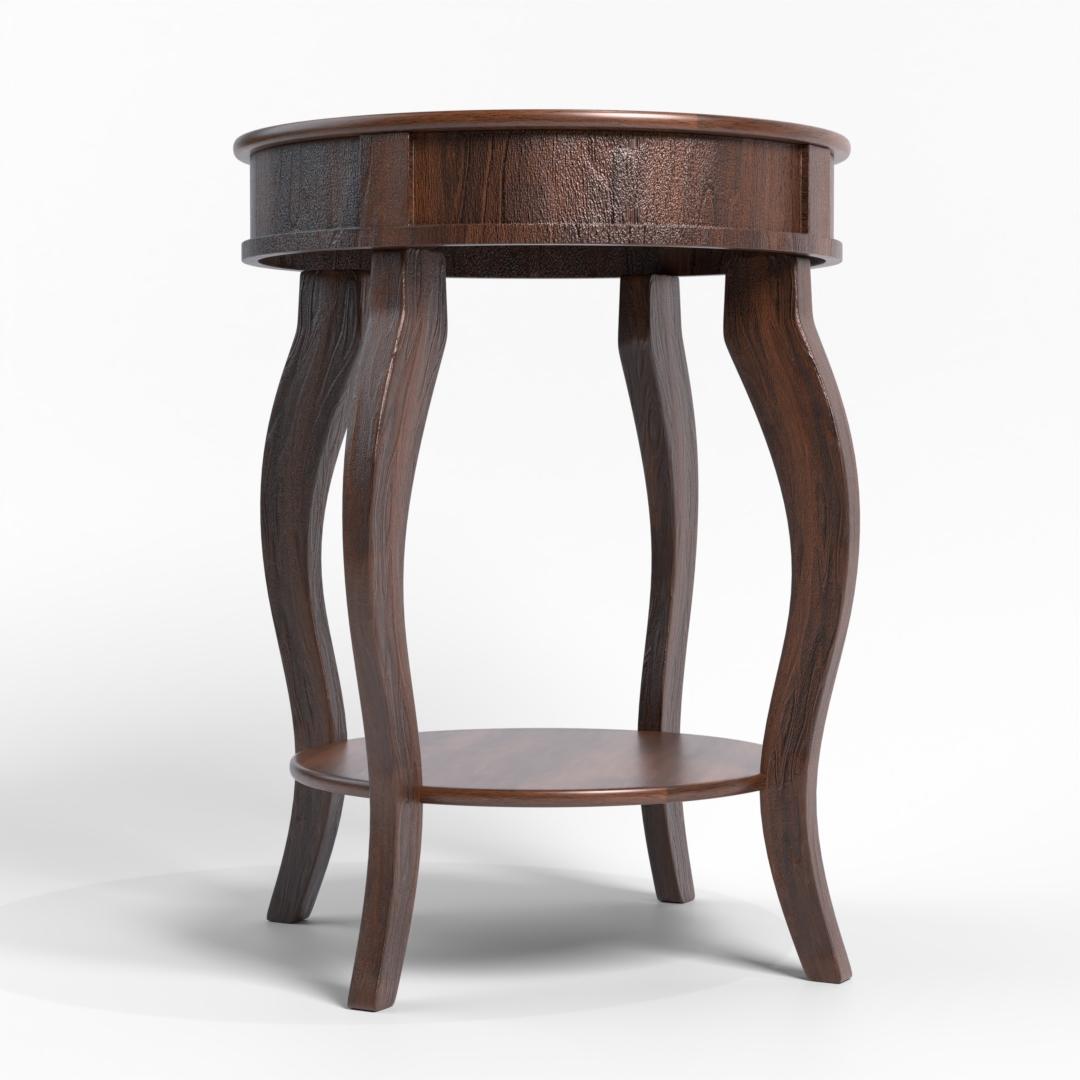
9. Modeling the table: Hello everyone.
Welcome. Let's continue our lessons and today we're going to make this
shelf table from scratch. The reason why I'm choosing this website because
it's commercial. And we can see that the
background is white. And this all the time
when you are making products to be published
commercially on any store, it should have this white
background so it can extend easily with the white
background of the website. This obligatory for
something like the website you use background
for your product. As you can see here, all are white background. What about the texture? We
have this wooden texture, it's easy dimension here. In this time we will
work with dimension that's of course height
24 ", top diameter 18. The sickness here is
three and higher 15. And let's start as
usual, new fresh scene. After that, I will leave
the link for the product in the source files
so you can check and start working on
this model easily. We have the diameter of 18. We can start circle,
it's all inches. So we can go to the
units here and start from metric switch and
convert it to emberial. After that, the lens feet, but inches as you can see. Let's add a new circle. The top circle has
diameter of 18, the radius is half of diameter. You can type 18/2 and that's it. Or you can type nine directly. Let's stick with 32. And I will click on the bird. So you can zoom extents here. I will move the circle, I will move the circle. Here we have the height
that the height is 2024. That's why I will
select the circle and move by click on 24. That's fine. After that
we can exude the scale. Slightly extrude the
scale and just fill, I say stick four
thickness may be 5 ". Extrude in the Z 0.5 edge here. And the scale slightly
such as this, you can risk control two to
make it so here to here. Three later we will, that don't worry
about the Tegatureb. We have finished the tube. After that we have another
one similar to it, but 15, we can duplicate that. All right, how we can make
that will click here. Shifts selected. After that, I will
add a new circle. This time we can also go for 32. Anything you must apply by four, we can say four multiplied by seven or multiplied by nine. I will scale that 0.95 sickness is 33. Only I will extrude minus
three such as this. After that, I will
make here an edge. Just scale slightly. The trick here, the trick
to choose only four. You can go for
select chedilectly, select one and deselect mayen doesn't work, Let's seven. Okay, that's that work. Let's try by rotating all. Select this one,
select the other, go here, select this one, and select and select the other. We have here four and select
this one, that's fine. But before that I will select all and extrude
scale shift to add some sickness here,
slightly sickness. And again select the group again, let's do that one here and here. And one phase. We
switch from back to front by click control
three or three, we will extrude that. We have two methods.
First you can breathe, shift z, you scale like that or you have to
extrude along normal. So that's it. Let's scale shift like this, That's fine. Let's make here an edge. And we are now done. Later we will add materials. Let's try to add
some loops here. Also, what happens here. So problem, we can
add devil edge here. Angle, the same angle
segment may be three and amount may point to 1 ". And Ellen is Angel, all right? I don't want an angle here so I will
increase the angle maybe 91. Let's decrease that. I'll say 89. B select all and this
angle has been dismissed. So let's, that's fine. Profile here to smooth. Okay, let's fix that later. Symbol here we have
another small disk. We have to disk in the tube. And one here, so we
can duplicate this one by the distance here is 15. From here, here to
here, 15.3 We have 18 shift 18 -18 that's fine. Of course, it will
be scaled down. It has diameter of 15. You can come here and say it
will be 15.15 That's fine. Let's make our legs. The type of legs will be the same type of And curve such as this. Let's go here. And we have slightly curve
here as you can see. Let's, that's fine. I will put the
cursor here and we can select any edge here. May be this edge
just to doublicate. And severed by selection. We have this edge and extrude
in this direction in the X. After that we can
extrude in the Z. Then just click, extrude that every scale a control, click, control, Tic,
click and control, right click and scale. Zero skill on the X, X we have fill, let's see, we have to
scale this one skill on X, move that to be here. This one also will be skilled on the X and this one will be moved here. And I skill that and I think we are now done. We can delete the Vl, let's un it's symbol, we can select this
edge and there is control marksm Select this
one and this one marksmen. After that, if we
select all and unbold, get this one symbol. I will add level two
of subder surface and we want here loop cut. Maybe 0.97 Same thing, 0.97 we need at the
top one to be here. And another one here.
Another one here. Let's see, it shouldn't close. And of course we need one here. It's symbol after that
to duplicate that by using the mirror on X and
choosing to be the base. Let's see or selecting this one on the X and
oblizer rotation here. Oblizer rotation, let's make
the origin to geometry. Okay, I'll mirror on
the X and after that, duplicate and rotate
around the Z. I changed bone to be
here and rotate around the Z 90 degrees, then make it on the Oi. That's fine. We have
modeled the shelf. That's it for this lesson. In the next tutoral, we'll
see how we can apply materials and render our shelf.
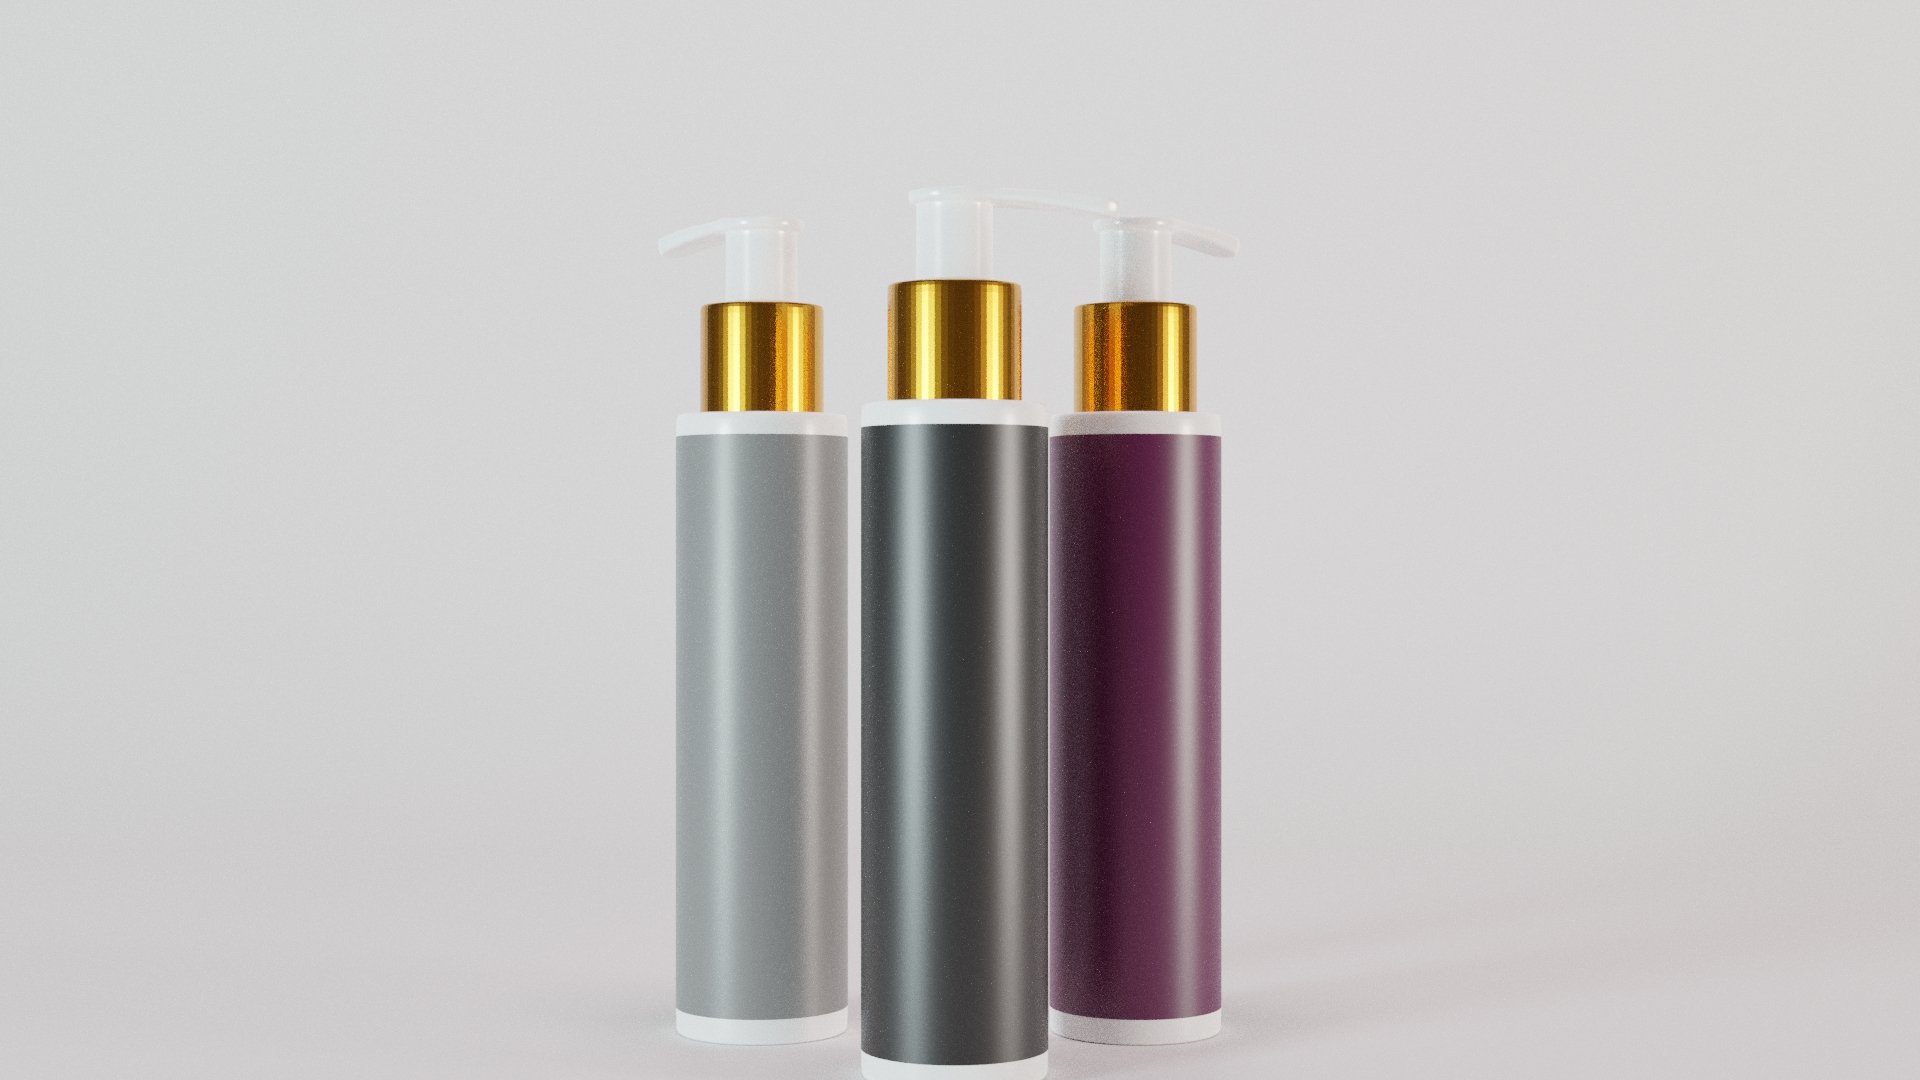
10. Rednering the table: Hello, here is the second and today to see how we
can render this table. The geometry has been done. We also are wooden. It's only one material
for all pieces. We can start from
here to add wood. Now I'm going to use the
blender to grab some textures. I will maybe wood. Let's see, I will
grab both sole. Let's grab some wood. And see, this may work
but we don't need that. Let's try another on basically that may be work,
but it's Symblasticyk. We need something different
sink that may be work. I'll se it has been downloaded. We have over 1,000 one and this one Old wood. This one also. Okay. That's it. We have old wood. Okay,
Let's try the old wood and the C, the pattern. Let's try the procedural. By the way, if we go
to the ambient CG, so we can see that this
is the word that we want. I will download at one
K so we can use in our project free to use
any version of that. He is eight K, four ke,
the suitable quality. After we don't load that, we will see how we can
board to our blender file. All right, if you
want to use any of the blender kit version or any material here
fell to use it, but I will disable that and choose some image Tturelet's
delete all of that. Say it will be new. Fine, let's make this is the three D view
board and here is our shared and after that you have a quick
method control shift T, make sure you have the
node rangular here, make sure you have
the node Angular enabled and debris control shift T. If you go to the texture and click all except the D
x two version of normal, we will Opengl, use roughness, displacement and color and
just principle texture nodangular will set up
for us all these maps. Fortunately we have this one, but I want it to be flipped. Let's see, I will
increase the scale B two. After that, let's
make a three normal, may be 0.7 I will keep
the displacement as it. Let's try to make the scale 0.1 0.2 mid level, 0.05 That's fine. We are here, we'll choose the setting, Bump
and displacement. If you don't need
displacement block this one, but we need displacement. After that, I will
go to the UV and select all and
rotate 90 degrees. We have it flipped correctly, such as here we are. Let's see, Displacement may be 0.1 that we can scale that also. Maybe four, maybe three point. Let's see. See, okay, we are not done for
material control materials and control UV Maps here we can Smart UV project. Let's see what at
the scaring test by also material,
let's for that. But we will
Materials, materials. What happens here? Here we
have large displacement. We can go for the
shared and say the normal may be bond two scale. Maybe bond five
here may be bond, just the displacement until you are satisfied
with the result. To be honest, I am not
satisfied with the UV. But we can come back later. He also, we should have
the same material. The same material, but because
it doesn't have any UVs, it's not apply corrected. So we can select all. And Smart V project, you have this one, That's it. And Smart V project, we have now done, but I'm not satisfied
here with the result. May decrease, the scale, may be 2.5 displacement. I will block the
displacement. That's it. I like that maybe subnormal here, also the same material. That's fine. Fine. I'll set all and move to
the design collection. And after that, we will make another camera collection which will have some light for us. Let's set up our studio light. I will make a plane and
move to be in the center. After that, select this
edge and move here. Then we can add
bevel. That's fine. And segment may be in. I will make it white, no problem, but I will not
show it in the reader. I will shadow cater. After that, the view
board will be black. If you add an camera and move it to the
camera collection, we have here the background and you have Armin camera
here is the camera. I will risk control at
zero here and we can see that we have this one, honestly. We can make it square, such as this for the camera. I don't want it to
be 50, but maybe 90. This view board to
be a close up shot. Just move such as this. Maybe slightly lower angle, Lower angle again
just to move in the Z, just that's fine. If you go to the render, you will not see anything. It's completely, that's because
we didn't add any light. We can start from
point lamp here. I will move to the Z. Let's move here, point
lamb, maybe 500. Is this yellow? So let's see the effect. We will fix the displacement, but let's try to add some area. It will be 100 for now. And also yellow as
may be 50 or 40. Another one here. This is the K. This is the fell
fell may be 80, fell will be some bluish angle will be here. That will be here
for this material. We will come back and check bump displacement
in the setting. If we go here, we can
see that for now, here we are, that's fine. But the area is too. We can make it 51, Let's make it 100. And after that, we will go
to the film and make it transparent. This is a shadow. The area is too much. All right, for the
point, it's too high. Let's say five only
will stick, maybe 2025. And this area, it's removed, this area is too much. So let's say it will be
25 here and only 70 here. Okay, right further
under setting, I will GB sampling the same, but in the performance to 56 on the tiling and
the car management, I will stick to standard because I want a white background. That's fine. So you
can render now. All right, we are now
done for this example. I will show you how after the render we will
go to the composter. Here's the result of the render. Just click backdrop
and use node after it. Using over the second is the render layer and the top which is the white background of you can use any background, may be black in
the background and just refresh it, should
complete render. But anyway, here's the doses. That's it for this lesson. We will try to explain the compositor in
more details later. But that's it for this lesson. See you in another example and another product of our
training workshop.
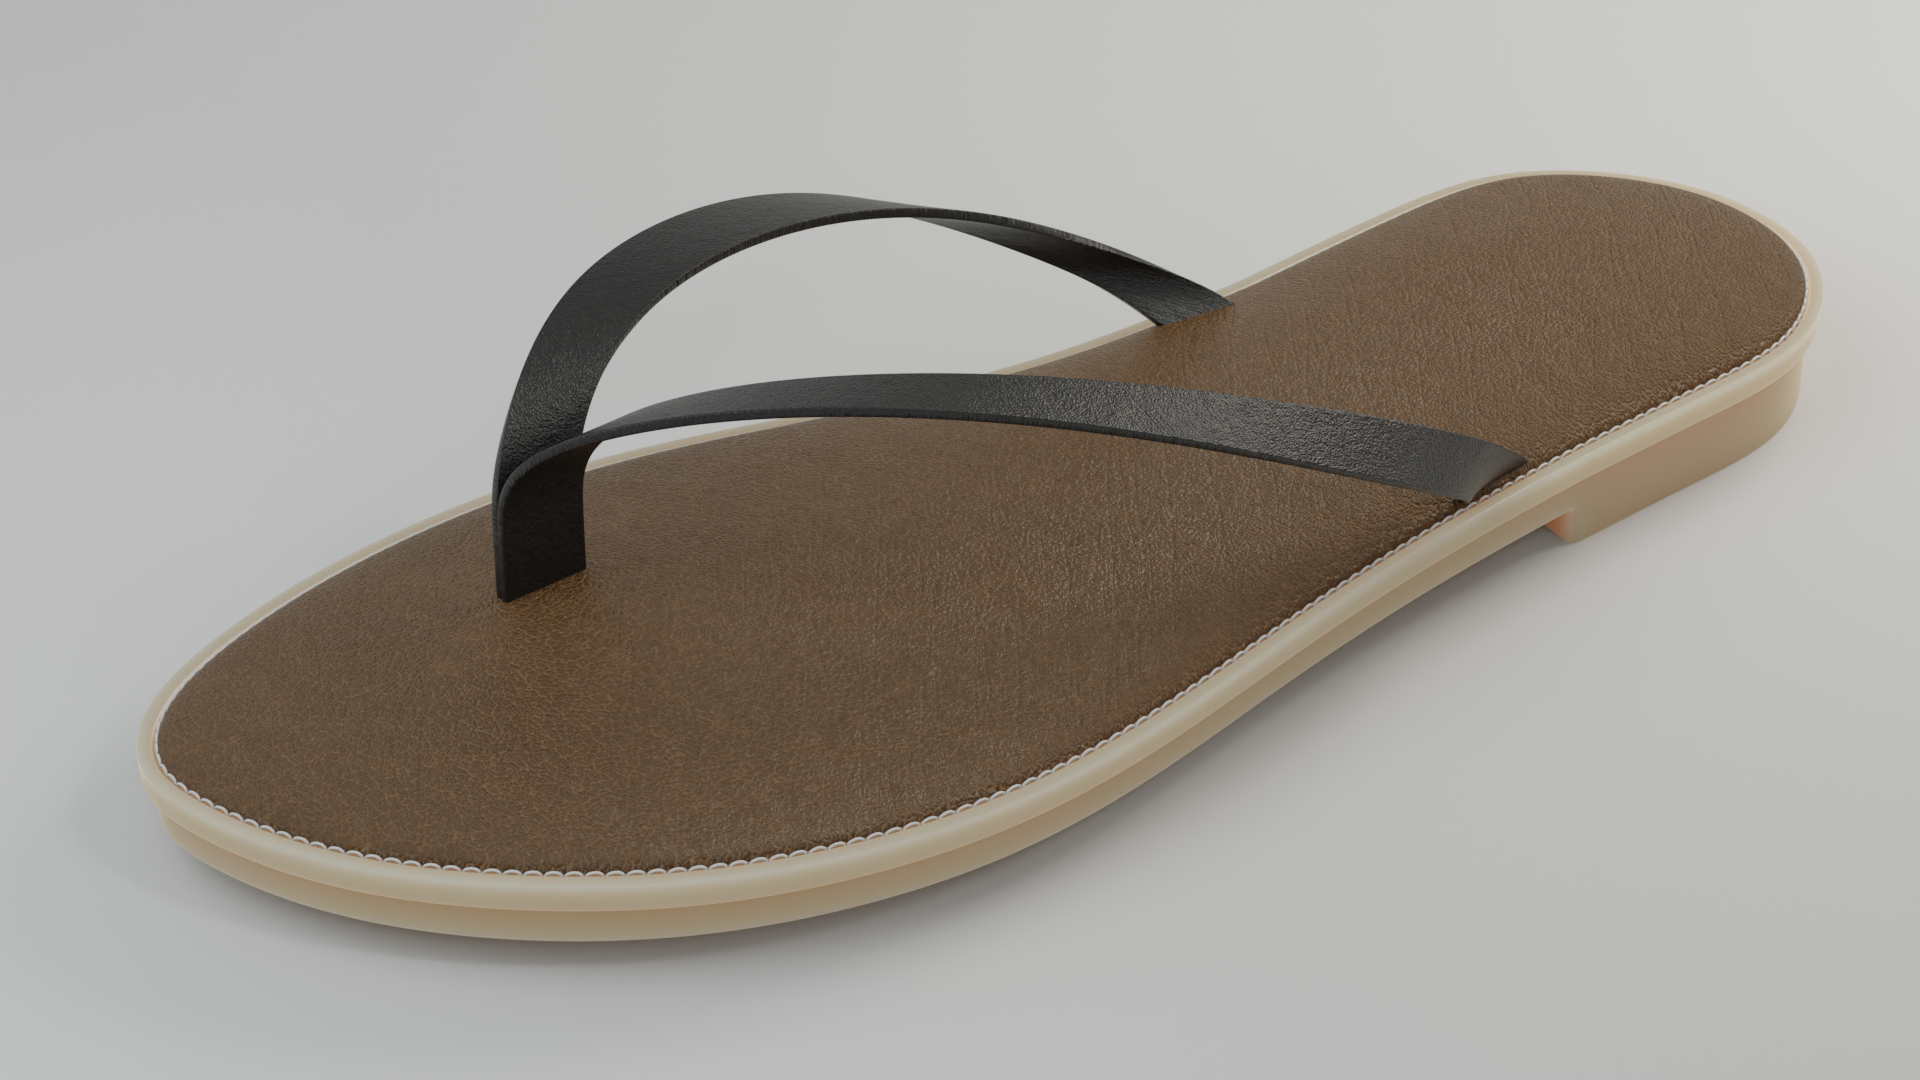
11. Modeling sandals: Hello everyone.
Welcome. We are now here in chapter number
four and today we are going to make this
piece of shoes. I have chosen it because
it has more variations, so we can exhibit our options in the render
the same thing here. I'm curious to make this model
because I did it before. I make some shoes, but
this type I didn't. I am curious to make it
perfect as it's shown here, of course, for man shoes. And we will make it
based on this image, on the perspective we
have the perspective, we have some front here, but we will on this one
and this perspective. Let's start everything
on the keyboard. It will be shown here,
because we have here, of course, the
screening test case. We will start by
emverting our reference. Let's go here. We
don't need that. We will go to add
collection and I will name it reference in the
bottom view control. I will add an image
background to this reference which is here. I want it to be in this side. I want it to be like this will rotate -180 every
shoes here the base is. You can start adding Able. But let's see we have here,
right? Let's continue. Control seven, Control seven, I will add abline. We can merge it at the
center and remove it to be here, Control Control. And just to trace this
base just like I want, some vert should be
here, vert here, here. We want 1231 here and one
in the middle and one here, and in the final curve here, and another one here,
selectable and fill. Then maybe three vert here, one here and another one
type here, and one here. That's fine. Of course, I will move it to
the design for now. You can select the reference and mix may be lower such as this, maybe 2.3 Of course you can open and remove this
background but no problem. We will only that don't use fill because we need
this to be even topology, this vertex at the
same line fill, that will be fill here. We have 123 that let's
check our doubles, we don't need, let's
fill that first and come back and we have 123. Let's add three loop cut here. I will fill that
space. That's fine. We have now even to
boog, That's perfect. I will select all and just scale a little bit such as this. Because after adding
the sub surface, let's see if you add
the sub surface, you will see that we
add some thickness. Let's scale on y, that's fine. Of course, we will
slide that to be here, slide that to be here. And the slide that to be here. And the slide that to be here. And just slide fine. After finishing the design, I will show you, it
will not be notable, but I will show you how
you can add the logo here, this size number if
you want to make. Like this. Of course, I will show you how you
can make these lines by using some piece of sheet. By using the normal
map or bump map. That's fine. Okay. Okay. You will
make a sickness. I don't know the
sickness exactly but will extrude to be
here to this line. Let's disable some
surface for now and exclude the other time
why we are making this because we have some line here. Let's extrude along normal outside a little
bit. Such as this. Fine, fine, okay. And after that, after that we have the
leather of course, Okay? Okay. So let's see sorrow for that. I will select all I'll
select all the top faces here using all faces here. And I will make some
little bit in such as this right after that extrude, let's scale a little
bit extruded, that slide, bblemIiscale shift, Z, o, and scale on the way. I want that to be bumpy. As I mentioned, I want
it to be slightly bomb, we can select some part. Here is the middle vertex, it's the bombie, the middle
vertex move in the Z. Maybe selecting the
lower one and enable this bubertiat using the
sphere and move such. This is what we need for now. Maybe selecting here one here, amazing one here,
another one here. All right, just stick for that. Of course we will add another
loop cut here, cut here. That's it. If you want, you can add another
loop cut here. That's fine and itching. Of course we have made the leather after that. Here, this is called
maybe the flip. Let's see here we need here on base, another base here we
need another base. It's a symbol, adjust plane, we can add, able to be here. Scale down and dirted
around x 90 degrees. After that, we will
move to be here. Again, adjust, rude. If you go here, you can
such as this move here. Routed slights and extrude here. We want that to be like this. Of course. We will fix that. We will fix the bbtions, want that to be like that and here moved like this. And that will be set flow. Let's see. Let's see. Okay, we will move
that to be perfect and that will be
outside such as this and extrude. That's fine. Let's stick for two for now. Let's make the
other one the same. We can select all and
duplicate around the control. And here we will make some adjustments
for our model. So it will be here, the one here will be, such as this. Don't worry about that. Let's move to be here, let's around the z to
be here a reference, Move to be here, around and rotate around the x. Let's make it if you want
to get these two functions. Let's see, first it's flow. Just search online for flow, you will see that. Let's check that, right, I
will leave the link for that. Of course, here you have this. It's called D Flow from Being
Game Solar Work on 2.8 I don't know if it works
on the old versions but it works on version 2.8 and later it make it set flu as the function which set linear. But we want as usual the set flu options helpful works 2.7 as
you can see here, the branch is here
but we want branch, it's y helpful for check the documentation
but that's fine for now. Let's continue. Of course, if you
can go to the edge, you can sit and shortcut or add to
favorites as you'd like. If you want to add
to no problem, but let's see what we have here in the reference. It Sound the same here, but this one is. Try to fix that. I will select this one. Let's try set flow. This one set flow also, but it comes from the outside. This one comes from here. We can sell on the
zero and move that. I will scale at zero. And after that set below
the same thing here. And that also will
be such as this. And that also will be here. And, and, and, and I think this one should be, let's try. It should be like this. Oh, I think it should be like this. And this one will be moved here, this one will be floor. Let's see. We can now add the
sickness we will add here. Let's add, I will add another edge here are making
that when we add solidify, what does that happen? Because we have, we need all to be such as this. Let's see again, we
have 0.03 I think. 0.025 work. And let's add final
sold surface. This is fine for now. Fine, fine, fine. All fine. What happens here? I will make the basement
to be straight. Let's see. That's fine. Of in the basement. We have we have some I
will select all the Tics, extrude some time to this edge, maybe a slight such as you can. Let's see, just another edge
here and another edge here. We have made one final thing, that we, we should
add some stitching. How we can add the stitching? I will one edge
here. Any edge here. Let's select this edge. Shift severed by selection. Select edge and maybe two. What about that? Maybe
three. This one also. I will, I will convert
it to curve after, let's say the curve
will start from here. So sit into the
geometry that fine. Let's make our stitching
start from circle. Circle may be 12 scale, 0.1 scale, 0.2 rotate. All right, we can
add another edge here and extrude on calero, another edge here, scaly zero. We have made some stitching just and move that
in this direction. And move that in this
direction, and that's fine. Let's see, we have one assembly. Add some array in this direction and a
slightly large space. I want to make it
also smaller. I will. What happens here? What happens here?
As I have mentioned, I will move the
cursor here and set into the three decursornI, Set into geometry and
selection cursor. After that symbol, I will add curve and
choose this plane. So change the fine it has
been here, but it's flipped. This one is fine. Just root
it around y 90 degrees and increase this array
as you would like. This one is fine. Scale scale, point it and you are now do we have now done the stitching,
make it a smooth. And for the stitching
I will move to the stitching collection. Maybe need some adjustment
so it's easy to find. Here's the stitching, what we have some clear idea to make. Now I want to, let's see, I want to add here in here for the stitching that I say, let's want to move the stitching to be
already on the curve here. So that's why I say we can move in the Z direction such as this. Okay, once we have made
the material for this one, let's see, we need another
be cut here, that's fine. Let's see, of course, we need another rope cut
here and another cut here. In the next session, we'll see
how we can apply materials for this kind of shoes.
12. rendering the sandals: And come. So now we're
going to see how we can add materials
for this product. And I assume that all
modeling is fine. Just here. I think we
need some adjustment. And let's see, we just, we just need to select
this one and move. That's fine. I assume
that everything is correct. Let's see. Basically you have
three materials. This one maybe 0.3 subserve roughness, maybe 0.3 We will come back
for this optimization, but we have a lesar, we can make the S. Let's go
back here and add Brown. No problem. Select all and
verdict from view. Seles controls, come back to face another. Control control. Few times. The assign this one, come Alors control shift
T and go to ticketing. Let's have zip that. We have some thicketures. Now let's choose the ticketurele
color Disbicementres. Course we need the
open GL normal. Let's up our leather I will
start from maybe four better. Maybe normal of 0.7
disbilacement scale, Maybe 0.5 here and the mid
level 0.1 that's fine. Let's come back here to
the three viewboard. Don't forget to assign and of course you
can in the viewboard make it an brown or so that's a. Let's check our viewboard. This is the material which
is the brain and I like it. Let's scale. It's fine. It's fine. Fine. As I mentioned, I will change the change
the material letter of the base, but no problem. Let's continue for
this one also. We can choose. I will rename it black leather. Check the UV check. It's, I see that. I can unwrap this one. This one maybe un, select
all and select a follow. Active adseeine. Fine. Fine. Let's rotate that scale. Let's see what we have here. We can unwrap that. Control follow active quads. Let's see. Let's see. Let's see, scale here, it should be Troy. Again, control shift. Go back to the les. I have a black
lessen from normal. Only open G L here, maybe this 1.5, this 1.12, Little bit of displacement to Too much. I will not
choose displacement. I will check displacement. But some normal,
this is too high. Maybe five, maybe five, one. Let's go back to displacement. Let's say point here, 0.1 here, midlevel 0.05 okay? This is fine. The skill is also too
much that maybe here 3.8 I like it. I like it, amazing, amazing. But here's the color. I'll
choose one such as this one. Let's make Tito, I will not make the beer now because we have to add some ticket here,
but no problem. As usual. As usual, of course, the stitching
we have for the stitching. A stitching may be a fabric. I will make it stick to it and
a little bit of roughness. Okay. We can add fabric for that letter, but let's render this time. I may choose HDRI. I have here some a browser. Let's say the HDRI, Maybe D, This one looks fine. Do okay. This looks fine. Okay. All right. So let me choose
the first one here. I want warm color. Some warm colors such
as this or maybe this. That's fine. All right. I'll stick for that. And after that, let's, let's add the Bleen. This one will be the background, so let's add vile. After that, let's
add the camera. I will add camera of
course control at zero. This is our camera. Luckily, this model
has a lot of, we will make other variations and it will look fine and you can add that for your birth. This is what we
have here is too, is you can change the rotation, you can change the strings. May be minus one
boys a way is fine, but we need some lights here. I will add here one light. This is a light fell but I mean the direct
light or the light, it will be here no problem. Let's another one here. This is the fill. Of course, Stan may be
two and slightly here. Let's see here we have to add
some area and large area, light stick to to see effect, I will make a Doom largest
sphere, largest sphere. To isolate some color, I'll select random faces
and delete these faces. Let's check. Fine. Let's see.
For the background, it can be anything. I'd like to make
it white for now. If you want to make it black, stand with us. Let's see. We make it like this, like this variation, let's see. Okay, and choose plane here
and move away such as this. Let's render now this
sample, after a few minutes, it has finished rendering
as a background what we can make or we can move this part to be here
because it's strange. Maybe of course we will
lower the subserve here. The rim has this color. We can choose another color
for the black leather. If you want to know how you can add more
details for the base, you can check Minton. See you in another tutorial.
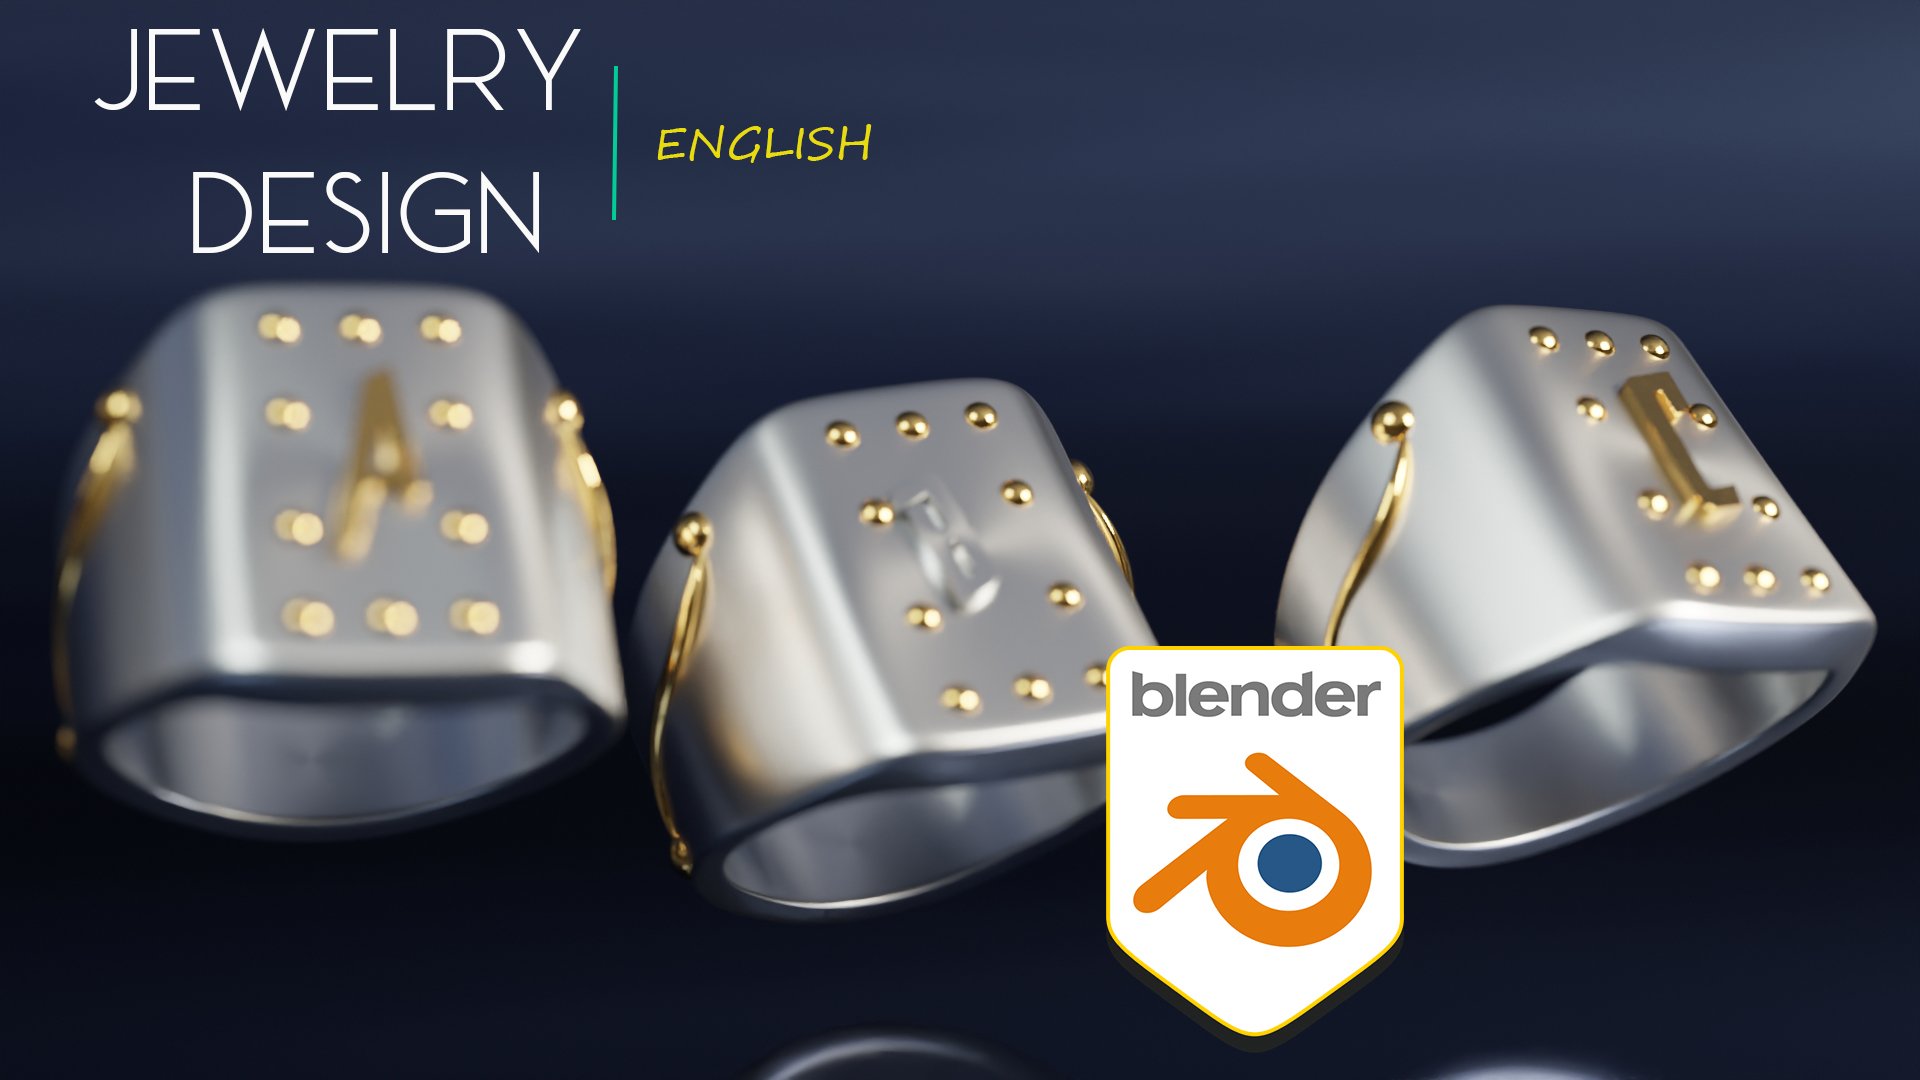
13. design knot forever: Hello everyone and welcome. Today we're going to
start a new chapter which is about jewelry design. And we'll start to
the jewelry section. The first example
is very symbol, which is this bracelet,
it's called forever. Firstly, we will
make this part and we will attach these
spheres easily. I will go to the design
in that collection, we will, we can start circle, circle maybe has
vertex of sistine. After that the
radius may be one. Let's go here and mode
and delete this one. Maybe delete this
also and select one. After that, this is the
top and this is the front. I will rotate around the x
axis 90 degrees in the top. We can enable connected and move like this and that here. Then we can eccerude. Eccrude. And also Eccerude, excerude, etcetera. We have made the shape
I will after that, a subdue surface, we
position it correctly. So in this one we
can say that here. This one. Let's add here another subdurfacetrolD
control which is subdivide. I have a shortcut, can add any short cut using
click and change shortcut. This is the base
and I like it here. We can put the cursor here. This circle may be
24 or 26, 26 here. And the radius of
0.05 it's too large. 0.03 maybe let's decrease
0.025 fine for now. And the scale, so I will tate that in the
axis and move here. I will move that, it will be like this. I will late and move to maybe or any
backup collection. Then I will scale that here. Let me select this part and
scale on the Z a little bit, scale on the X, that's fine. I will convert that to curve. After that we can go here, maybe here in the geometry will add here and L, it's too large. We can say we have one, it's fine, fine. And we can now move that here, and move to be here. And move that to be here. And move that to be here. So we have Many options we can add,
circle and connect. Let's see how we can
implement that Also, I will duplicate that and
move to the tembe and then convert that to mesh. Or here you convert to mesh. Click and control, you
can extrude. Extrude. Extrude multiple times like this and simply do the same here. We can extrude again and make sure you have the s here so we can add
maybe a bin scale. That scale, maybe add the blane here and
I will add a blane. Rotate 90 degrees scale, 0.1 and move to be here. And this will be our options. And also to be here. Okay. Fine, fine. Maybe we add subdivision
surface and sink. We can go back to be here. Let's remove that. If
you want to make it, just select bird
and click or edge. Edge flow, we go here. And the flow, of course, we need the lobe. If may be, make sure
you see references. Clicks, filomzingd clicks, fellow click flow. Click set flow, Kl flu, right? Lit flow. I think we can move
that to be here. So a next let's define this
sport to have 16 vertex, so we need a sphere with
sistine vertex both here. Sctinedius may be bone on the scale, scale. Scale rotate around x 90
degrees and move to be here. Move to be here. All
right, let's remove that. What about we don't need that will both the cursor here and selection occurs like this. If you see the cleving, you can go to the view and make the start to
be large number then we can abridges
bridge here. We will do the same
on the other side. Control and shift X
rotate around the Z. Amazing. After that, let's
connect these two parts. This is what we have
now let's make it A. So we have made the design and let's
make it flow here. All right, we have
made the design, we can move that to the tips. Happens here. So a gold, if you want to fast results, you can go to the bling darket Search in the material for gold, you can find a lot of materials. Let's choose this one. I will have this also. All right, so I will
duplicate that few time. And another material, maybe this one, maybe this one. It's choose the best version. And let's choose on all we have here, added spark, metallic gold. Let's hide. And now we will
add the backdrop. This can be changed. All right, this is
the background, so this may be black or something. We will add the camera. I will move to the
camera collection. The camera collection
will include a light because it is
too small and microsot. I will leave the focus
to 150, control to zero. When you have shot such
as this and you are ready if you want to make
it such as no problem. We shot one is a clean
white background and one which has this black. If you go to the render view, because we are in cycles, you will not see anything
because there is no light here. You have it black.
Let's gradually add here in the top view, I will add a light's large, maybe 0.2 is enough. Move the heart or effect Noise will make it here. What next I will
duplicate or add here. Maybe Blaine scale 0.1 rotate, subdivide and add
emission shader stancy will make it quadratic
to make some follow. Stancy may be five
and also something. The same thing here. Rotate, but scale
maybe four times. Then it will be the flight. This one will be something white such as this here. Let's surrender.
Let's see effect, make it to ben. As you can see, you have
some shadows here, maybe 12. For now it's too. All right, we can also
add here point lamp. I will increase it
too high to see the see as you can see here. Right, the light is
here so we can move. Okay, I will make it 15, but maybe something
such as the background, I will make it completely black
and roughness to be zero, roughness to be zero, something like X gloss. Doesn't matter a lot. Okay, I will render
this for now. Here we have made
render for our jewelry. I see the reflection
is too smooth. We can also of save that, maybe five, save as. Let's make the second version of the render in 0.1 may be. And that's it. We can slick
the camera and adds field, this focus, we can
add dips to the focus and maybe 2.8 or maybe four, something better. Maybe maybe six is the best version. Here is the version
with deep field. As you can see,
it's much better. That's it for this.
Listen in the next video are going to see
how you can make the product so as white back.
14. render commercial shot white background: Here we are. So let's continue. I will save another version. Let's say it be
white back ground. That's fine. For now, we only
need one version. All right. I will make it
completely white, no problem. But in the visibility will make a shadow catcher
here in the film, we'll make it transiberent. We only need one, so I will move to
design, to collection. And for the shadow
catch for this one, we will make it such as this. We don't need, of course, dips field, this is sparky gold. Let's see, What about the scale? Maybe the scale maybe here, 600. That's fine, right? We have the gold, we have gold. All right. Solid surrender. And here we have a GD. And now we are going to
increase some bills. They may be such as this
and it will decrease. Let's see the performance. That's fine. Let's surrender. All right, so we have
finished surrender. Of course, you can
hide the shadow. Don't use the shadow cat. You can save it and
open background. But I think we can do that in the compositor
backdrop control shift and V V to them out. A, Alpha, alpha over. That will be in the top. And here we are. We have here clear
white background. But if you go in the color management
and choose standard, you will get completely
white background. As you can see,
this is the film, but with the standard, you can get complete
white background. Personally, I don't
like the shadow. Maybe we can move the ground lower so you
can decrease the shadow. The shadow is too intense. We can also use
color management, color balance, color correction,
and maybe brightness. That's it for this list.
This is how you can render the file
with white ground. And you can upload that to any commercial website
or to any online store. That's it for this tutorial. See you in the next example in which we will design an earring.
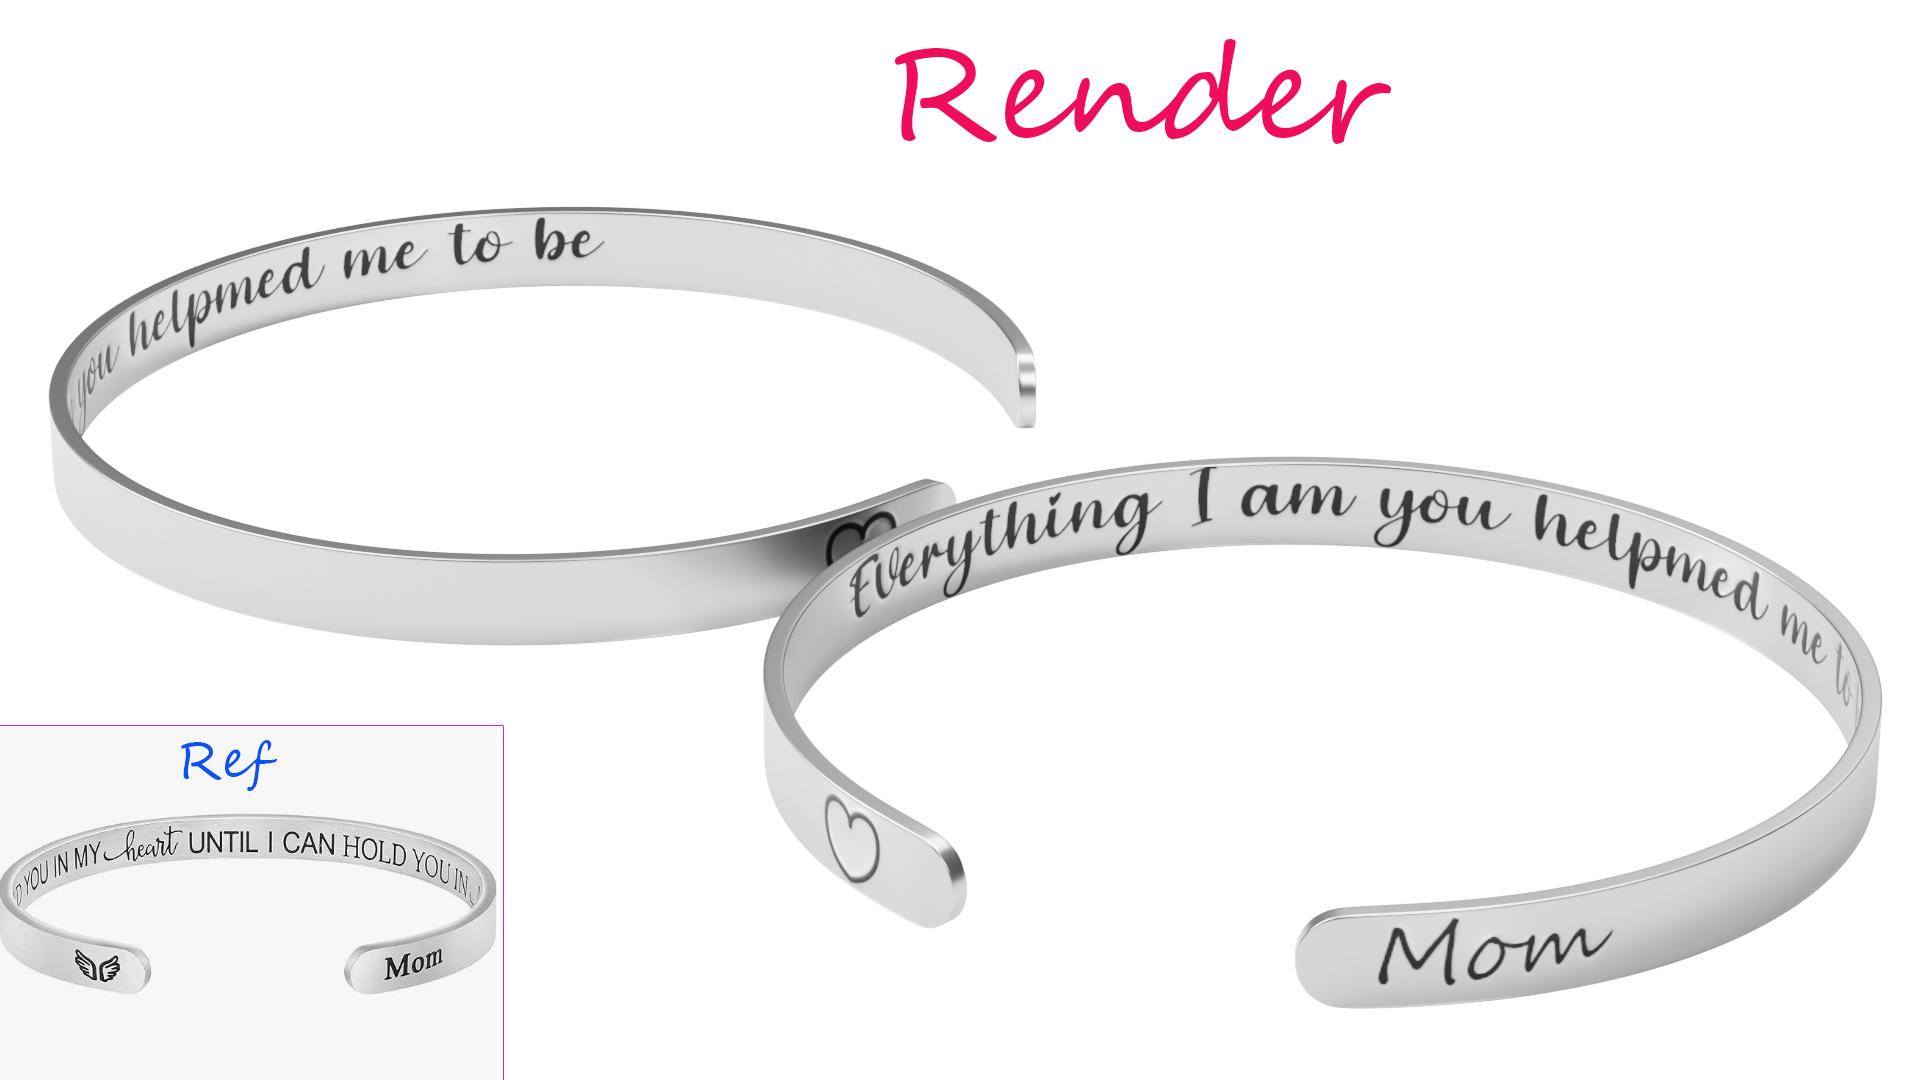
15. Bracelet modeling: All right, in this
lesson we're going to make this memorial gift. It's a very sample we can do and modulate in various
ways non destructive. Maybe we will see how
we can this word. There's a lot of
ways but we will type and add the graves. I'm here in the design
collection as usual. And we have the radius radius is 1.3 I will go to the and start from im burial
because it's an inch. I will add circle, maybe radius 1.3 exactly 1.3 That's fine. The cursor here
maybe, let's see. I will start from circle
this time a circle will be, may be 14 or 16. Radius may be 0.2 and around the x 90 degrees, that's fine. We will see we can fill and add a few loop cut and
fill, that's fine. And we can select
all and scale maybe 0.8 What happens here? We can rotate around the Z -20 I put the cursor here, select this edge and
lind the cursor spin 180 minus steps, may be 16. Let's see, that's fine. I think we can increase
the size scale point. Do the rest again. Make sure you are in
the top orthographic. If you are in the perspective
it will not work. Make sure you are in
the top orthographic and -180.16 That's fine. For now, I will add the mirror. The mirror will be. Let's add an MBT that I will call it
EM at the center. We can Baran later. Let's select EM at the center. Let's move that. The X enable cleving can add circle and
delete some parts. And we want the reason what I am using this because
I want the edge here to be curved and
circular such as. That's why start four half
of circle and then spine. Now I'm going to
start with so surface maybe two smooth and add, certify that 0.1 maybe that will be zero. Let's increase by two amazing. And you can of course add
southern surface like this. All right. So if you want to
add the writing, of course, let's say a name that. And duplicate. Move to back up. And after that, let's see. Let's see. You will, you will that. So let's see if we can. The net is to all of these arts mark. That's fine here, Control, markem, and maybe
here also the cleaving issue. Okay, let's see if we can. Of course there is
multiple ways to unrap. I'll first try to this
method. Let's see. It's fine. It's fine for now, but let's go here and
rotate 90 degrees. Let's see if this is the
inner or outer and move here. We don't need that. I'll leave as it, let's add here to be
the three D view board. And let's see,
this is the outer, this is the outer. This is the inner. Okay, that's fine. I'll select all and exit here. Let's let V maybe two here, four. Maybe export and
export UV layout. Then you must go
to Do after that. We will open that in Ad.
16. Bracelet render: All right, so this is
the second part in our bracelets and today
we're going to see how we can add the materials for
the bracelet and how we can render that to be realistic. And how we can make
the red suitable for commercial usage on any
website or any online store. That's that's what we
will make in this lesson. We have here and we have the themes and
you have unwrapped it correctly as you can
see here the top part, this is, this is the outer. As you can see, if you
brisk control L, this is, this is the outer UV and export v define the size. Maybe two, maybe two, uzbee, three like and such
as G. Then go to imagetre will type a few words and that's what we will
make in this lesson. Here we are in here UPNG. First name it V to be organized. And here is the background
for this lesson, we will type some words. This is the original image
that we are going to simulate. Let's say the outer here, we can here and it will be black. Of course, I define
the color here. The color may be
black, such as this. After that, we have here
put a ship type sentence. Here is a gift. Well maybe. All right, type some orders. And here you can find any icons for free in
iconfinder.com That's it. This is the Mtor. We will not use this
order anymore. That's it. Let's save this file. We will export first BCD. I will gift CD first because we
can use this file later and change the word. Change the synthesis
as you would like. You will export another
file. We will export. We can export BG gifts. We will make some
adhere white background and group that and duplicate
this group control. In this group we will
make a bomb map. We will convert to smart object. We will steroid layer after the filter bloor goes and
pler to be maybe one. We will go here in three D, generate normal map, you can either generate
bomb map or normal map. Feel free to use the one for
you and we like this value. Will click here, this will be. Let's come back and the filter three D generate normal map
and you will invert that. See, we can invert as
you can see here and the brisk is what we want and will save as maybe, let's make it G. Also left. Map and save that. Let's come back
to the file here. Let's say it will
be silver here. We can say that we have maybe such as this metallic
roughness may be Boeing 15 some clear and add another principle using the danger control
shift and control shift and click shader. This is handy
shortcut after that, using the image as mask, I will, but the image here in the V, we will embort this one. Alpha will be here. But the color will be here. Black. It with silver. Yes, but for the roughness, let's say you have some
roughness is fine. All right. We can
decrease the roughness. Maybe pointy three using normal. Map here a image. Take a chart. Here is the normal as you
can see. Here is the normal. And plug it here. And after that it
will be on carded. It's too high, too high. So we can see it will be 0.2 maybe 0.1 0.2
something like that. May be 0.15 that's amazing. Of course you can increase. But a 0.1 0.15 is fine. So we have done this. Okay, so I can duplicate that here
and rotate like this. And maybe here. Let's build scene at
camera collection. In this camera collection, we will add a bin. It can be here a
camera control at zero in the view camera to view in the camera may
be 1.5 millimeter, because this is microshot. Will add light now, we can now add some light. I will add, this may
be right light and the scale may be born three
and that will be maybe here. All right? And I will be will be node which will be this node. This node is a
realistic light node. Will add material if we
go here in the group, we'll see this group, we have single Mb, double X if we go here after apply the scale and B. Here we have, we
have some values. This is the intensity, maybe 15, this is the falloff location. And this is the Z, this
is the first light. I want it to be y. I will say it will be, maybe here we have
another one to double x, but we will duplicate this, right to be here and
scale all the way. Maybe like this. Let's see. After saving, of course, I will leave the
node for this one. Using this node, this will
make a lot of realistic light. We can make it here, we can a peculiar roughness and okay, let's see. I think this one may be fine
and, and some roughness. I move the slight to
be here and the plane. Now you can render the
file using full GD. You can using samples, maybe 1,000 But let's see how we can add
the dips of field. All right, here is, let's see how we can
add the dips of field. I can add here the cursor and add any BT maybe MBT sphere. And this one will be EM Focus. If we go to the
camera will enable this field and
choose the EM focus. If you increase this to low, say it will be maybe five. That depends on the dimension. I will say maybe seven. For our case, I think it needs
to be. Okay, that's fine. And we can render here after
using the dips of field. As you can see, it's nice. But I must mention that this image isn't suitable
for commercial use. If you want to use this
product render for commercial use it
white background and what we will make now go here and say it will
be shadow cat of we will remove field as you can see. Have some reflection
for the Blaine, let's say it will not
receive a glossy. Maybe. Yes it will. Diffuse. May be glossy, it may work. But we can change the
light here to be white when you're under that G. But let's say in the film
it will be transiberent. That's it. We have
the surrender. I will save a very slit. I will open file in any image
editor you can open in, you can open in game, you can open in any software, this file as just here. You can add white background. So this image is suitable
for commercial use. If you find this is
not bright enough, so you can add who to may be, this is fine, this
is before and after. As you can see,
this is the way for making and design jewelry
for commercial usage.
17. Class project: As usual, there is
a close verdict. Here is the image
that you should use. You can download this
image from the resources, and after that, you can follow
along and start to model. And this piece of jewelry, it's very attractive and
it's very amazing that you can have a real product
after watching this. If you have any questions, don't to contact me
here on the question. As you can follow
along and start to model and design some
piece of product. When you upload your render
in the verdict section, you must type and you must type and meta data for
the time that you used in completing your task. I can measure that and I can give feedback for you a talking, let's talk about what next
after watching this plus.
18. What next ??: After watching this class. You can watch, of course
in my skill share. You can watch the
jewelry design emptor. You can watch Advanced modeling. And you can watch the
secrets of modeling. You can watch the product
mission emulator. All of these workshops you can find in my
skill share bid. That's it for this course. You can reach Instagram or
Twitter at Camel Altami. Thanks a lot for
enrolling in this class. See you in another
advanced workshops.
 Kamel Altohamy, Designer & Youtuber , basically Engineer